
Diversity and Equality is something that currently is being pushed forward to reduce discrimination against particular groups and I like the fact that Graham makes us acknowledge that fact that in designing we should try to incorporate these values into our design. For the past weeks we have been talking about integrating the emotions of the user and making the design have an aesthetic feel or look to it, I am not surprised to see this concept once more.
Category: F2023 – Aya
Reading Response – Week 10
I share Bret Victor’s perspective on the significance of hands and their tactile capabilities when interacting with tools and the world around us. However, I believe that the challenges he identified with the “Picture Under Glass” concept may not be as relevant today with the advancements in augmented reality, virtual reality, and haptic technologies. Researchers are actively developing virtual environments that strive for realism, and personally, I’ve encountered promising experiences in our AIMLab on campus. For instance, I felt a virtual spider crawling up my arm and interacted with a software loop, sensing its weight and texture through a haptic device. In my view, while Victor’s concerns were valid at the time, technological progress has since addressed many of these issues.
Budget Rave
Inspiration
Speakers at the Convenience Store are too expensive (the good ones that is). This presents a problem for me, because for reasons unknown to me, my room has been established as the instinctively occasional hangout spot by my friends (maybe it’s because I have the biggest fridge and a microwave and a kettle for chai AND a roommate who’s hardly ever in my room). Anyways, for this assignment, I thought I’d make up for the absence of a speaker in my room by using the free speaker given to me by the university for my IM course.
Concept
I’m using an ultrasonic sensor to gauge how far an object is from the breadboard and playing different notes based on this distance. Keep in mind I don’t know the first thing about music theory so I used random notes for each distance so the music itself might not make sense. Or maybe it does and I’ve created a new wave of post-music music. Anyways, here’s a pic and the code.
Code
const int trigPin = 9;
const int echoPin = 10;
float duration, distance;
#include "pitches.h"

int melody[] = {
  NOTE_A1, NOTE_B2, NOTE_C3, NOTE_D4, NOTE_E5, NOTE_F3, NOTE_C4
};

void setup() {
  pinMode(trigPin, OUTPUT);
  pinMode(echoPin, INPUT);
  Serial.begin(9600);
}

void loop() {
  digitalWrite(trigPin, LOW);
  delayMicroseconds(2);
  digitalWrite(trigPin, HIGH);
  delayMicroseconds(10);
  digitalWrite(trigPin, LOW);

  duration = pulseIn(echoPin, HIGH);
  distance = (duration * 0.0343) / 2;
  delay(100);

  int melodyIndex = map((int)distance, 0, 50, 0, 7);  // Adjust the range (0-50) so the notes change over a noticeable distance
  melodyIndex = constrain(melodyIndex, 0, 7);  // Ensure the index is within the valid range
  tone(8, melody[melodyIndex]);
  Serial.print("Distance: ");
  Serial.println(melodyIndex);
}
See for yourself
Here’s links to a video showing the functionality of my instrument and a bonus video of my friend discovering my instrument and easing up to the idea of raving to the melodious notes. Easter egg alert: we used the same lamp as a strobe light as the one in my previous assignment. Maybe the 100 campus dirhams weren’t a bad investment after all…
https://drive.google.com/drive/folders/1wF5HzdHqWylkz1_lZ35EAcVphwg50Nb9?usp=sharing
Assignment 10: Travelling music. (w/ Minjae Kim)
Concept:
Our Arduino project combines an ultrasonic distance measurement sensor, a switch button, and a buzzer to create an interactive music instrument. The ultrasonic sensor, consisting of a trig pin (connected to pin 10) and an echo pin (connected to pin 11), is utilized to measure the distance between the sensor and an object. The setup initializes the pins and sets up serial communication. In the loop function, the sensor is triggered to emit ultrasonic waves, and the duration of the wave’s round trip is measured. The distance is then calculated in centimeters based on the speed of sound. Additionally, a switch button connected to analog pin A0 turns on the music when I press the switch button.
Code:
int trig = 10;
int echo = 11;
long duration;
long distance;
int force;

void setup() {
  pinMode(echo, INPUT);

  pinMode(trig, OUTPUT);

  Serial.begin(9600);
}

void loop() {
  digitalWrite(trig, LOW); //triggers on/off and then reads data
  delayMicroseconds(2);
  digitalWrite(trig, HIGH);
  delayMicroseconds(10);
  digitalWrite(trig, LOW);
  duration = pulseIn(echo, HIGH);
  distance = (duration / 2) * .0344;    //344 m/s = speed of sound. We're converting into cm


  int notes[7] = {261, 294, 329, 349, 392, 440, 494}; //Putting several notes in an array
  //          mid C  D   E   F   G   A   B

  force = analogRead(A0); //defining force as FSR data


  if (distance < 0 || distance > 50 || force < 100) { //if not presed and not in front

    noTone(12); //dont play music

  }

  else if ((force > 100)) {  //if pressed

    int sound = map(distance, 0, 50, 0, 6);  //map distance to the array of notes
    tone(12, notes[sound]);  //call a certain note depending on distance

  }


}
Circuit:
We used this video to properly correct out codes and build the circuit:
Watch how we did it here: MusicInsturment
Lecture Reflection
Professor Neil’s lecture titled “Alien Intelligence” was a thought-provoking experience. From his beliefs about the terror of AI attributed to the fast-developing nature of technology to his reasoning that behind the success of AI is the triumph of human beings, I found myself engrossed in a period of reflection and understanding of what the future holds. With the debate surrounding AI overtaking humans, I particularly liked Professor’s emphasis on the term “Alien Intelligence” and how human beings may no longer be at the center but their capacity to think remains unmatched. Listening to impact of AI on our lives seems to instill a sense of helplessness and a sincere hope that we are able to grapple with the self-created dangers as AI continues to grow in the hands of human beings.
Week 10 – Reading Reflection
A Brief Rant on the Future of Interaction Design
Bret Victor prompts us to question whether the future of interaction design in the form of screens is visionary. Through his unique take on the topic, with a focus on human capabilities to understand the ideal nature of design, the author emphasizes the need to incorporate the use of hands in design. This would not only lead to a true sense of interaction but also prevent the mighty capabilities of our hands from being reduced to tapping a screen. Throughout the reading, I was able to resonate with the argument as I reflected on my reading experience. While a Kindle does offer a sustainable solution, in my opinion, it can never replace the experience of reading a physical book. When I read a book, I enjoy engaging my sense of touch with the pages. Feeling the thickness of the divided pages between my fingers provides a sense of the passage of time in the reading, along with an anticipation of what lies ahead. All these involuntary thoughts seem to vanish as I slide to turn page after page on a Kindle and find myself distanced from the story.
What I inferred from the reading and the responses to it was that the author does not deny the development of technology in the form of screens for it has certainly simplified our lives. However, he is against the idea of limiting ourselves to this model for future innovations and urges redefining visionary in terms of making the best use of human capabilities in addition to technology.
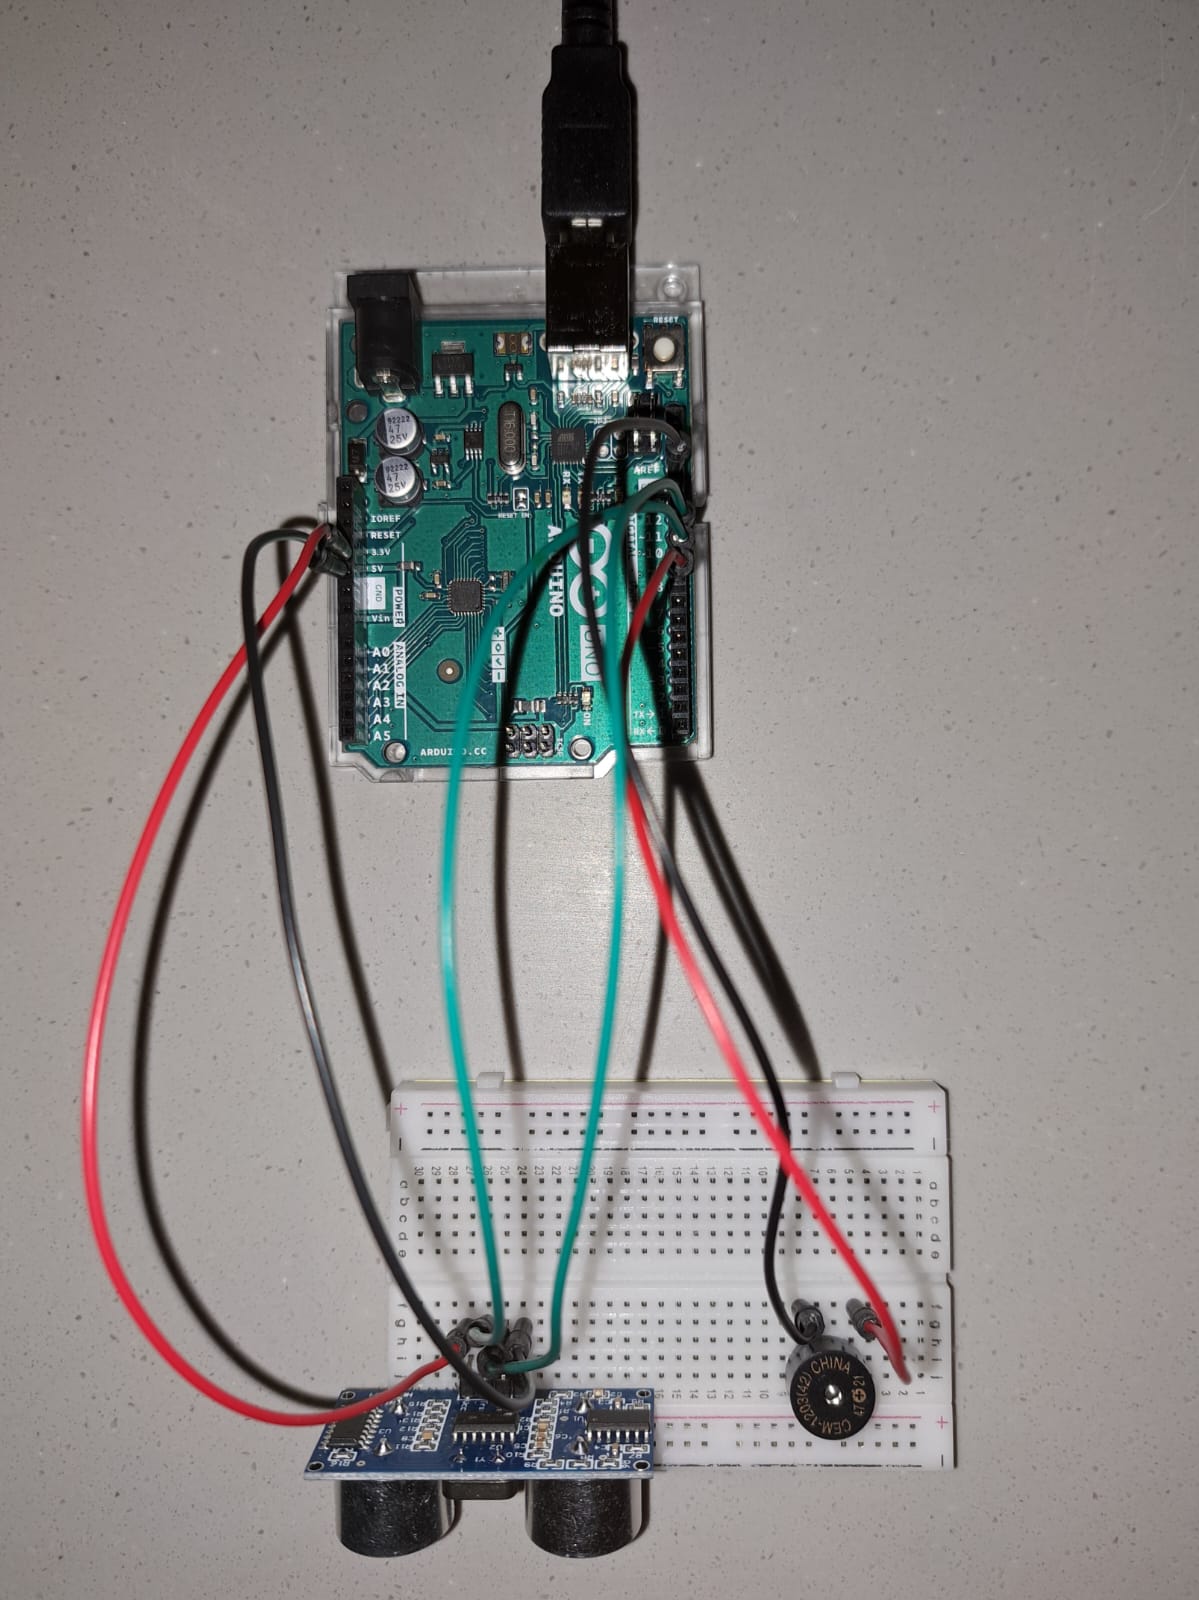
Week 10 – Assignment – Music Box
For the assignment we were required to use an analog sensor and a digital sensor to create a musical instrument. We came up with the idea of using an ultrasonic sensor as our analog input and also incorporated the servo motor to add a physical dimension to the instrument. The overall concept of our project is inspired from a music box that is wound to play the music.
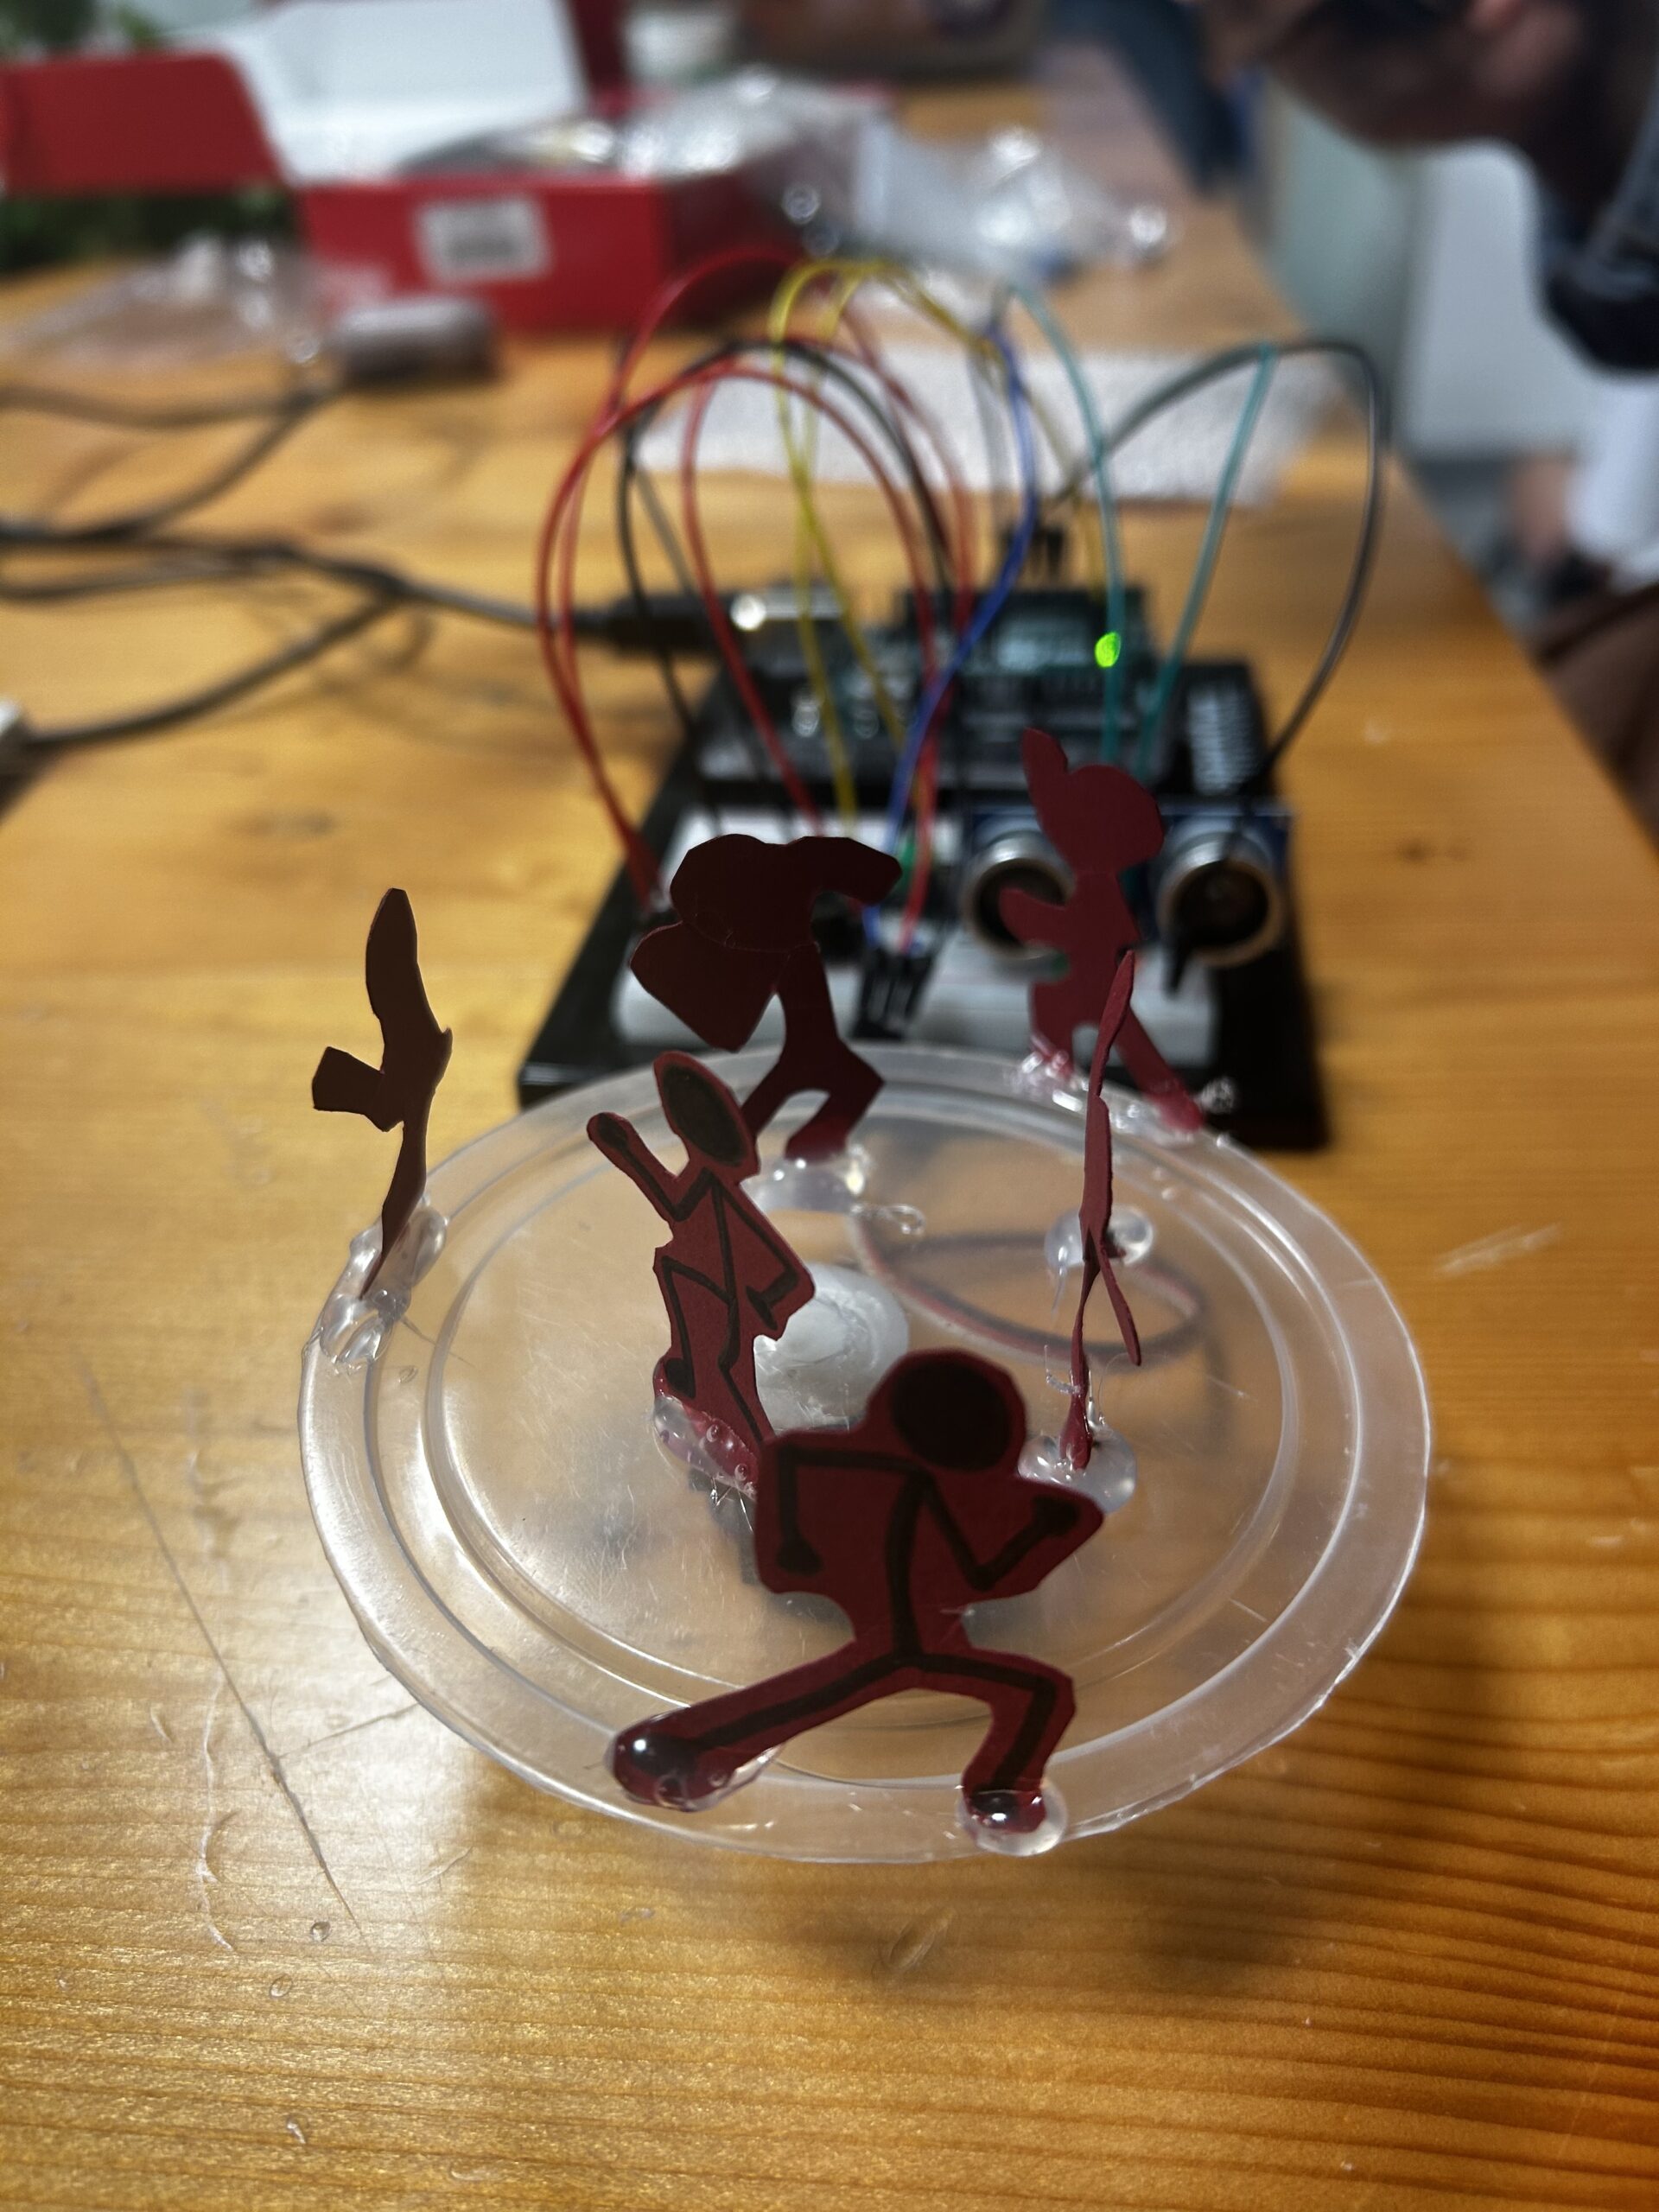 We created a disc with small stick figures placed around at different distances and attached it to the servo motors. As the servo motor rotates the different positions of the figures serve as an input to the sensor to change the delay between the notes of the tune being played through the piezo speaker. Additionally, we have used a button as the digital sensor to restart the rotation of the disc from its initial position.
#include <Servo.h>

#define TRIG_PIN 7
#define ECHO_PIN 6
#define SPEAKER_PIN 8
#define BUTTON_PIN 2

Servo myservo;
bool soundProduced = false;
int servoSpeed = 3; // Initial servo speed
unsigned long debounceDelay = 50;
unsigned long lastButtonPress = 0;
bool buttonState;
bool lastButtonState = LOW;

void setup() {
  Serial.begin(9600);
  pinMode(TRIG_PIN, OUTPUT);
  pinMode(ECHO_PIN, INPUT);
  pinMode(SPEAKER_PIN, OUTPUT);
  pinMode(BUTTON_PIN, INPUT_PULLUP);
  myservo.attach(9);
}

void loop() {
  // Read the button state
  buttonState = digitalRead(BUTTON_PIN);

  // Check for button press
  if (buttonState == HIGH && lastButtonState == LOW && millis() - lastButtonPress > debounceDelay) {
    // Change servo speed
    servoSpeed += 1; // Increase servo speed by 1 degree
    lastButtonPress = millis();
  }

  lastButtonState = buttonState;

  // Rotate the servo in a carousel motion with adjustable speed
  for (int pos = 0; pos <= 360; pos += servoSpeed) {
    myservo.write(pos % 180); // Limit the position within the 0-180 degrees range
    delay(5);
    checkDistanceAndSound();
  }
}

void checkDistanceAndSound() {
  int duration, distance;

  digitalWrite(TRIG_PIN, LOW);
  delayMicroseconds(2);
  digitalWrite(TRIG_PIN, HIGH);
  delayMicroseconds(10);
  digitalWrite(TRIG_PIN, LOW);

  duration = pulseIn(ECHO_PIN, HIGH);
  distance = (duration * 0.0343) / 2;

  // Play different melodies for different distance ranges
  if (distance > 0 && distance <= 5 && !soundProduced) {
    playMelody1();
    soundProduced = true;
    delay(2000);
  } else if (distance > 5 && distance <= 10 && !soundProduced) {
    playMelody2();
    soundProduced = true;
    delay(2000);
  } else if (distance > 10 && distance <= 20 && !soundProduced) {
    playMelody3();
    soundProduced = true;
    delay(2000);
  } else {
    noTone(SPEAKER_PIN);
    soundProduced = false;
  }
}

void playMelody1() {
  int melody[] = {262, 294, 330, 349, 392, 440, 494, 523}; // First melody
  int noteDurations[] = {250, 250, 250, 250, 250, 250, 250, 250};

  for (int i = 0; i < 8; i++) {
    tone(SPEAKER_PIN, melody[i], noteDurations[i]);
    delay(noteDurations[i]);
  }
}

void playMelody2() {
  int melody[] = {392, 440, 494, 523, 587, 659, 698, 784}; // Second melody
  int noteDurations[] = {200, 200, 200, 200, 200, 200, 200, 200};

  for (int i = 0; i < 8; i++) {
    tone(SPEAKER_PIN, melody[i], noteDurations[i]);
    delay(noteDurations[i]);
  }
}

void playMelody3() {
  int melody[] = {330, 330, 392, 392, 440, 440, 330, 330}; // Third melody
  int noteDurations[] = {500, 500, 500, 500, 500, 500, 1000, 500};

  for (int i = 0; i < 8; i++) {
    tone(SPEAKER_PIN, melody[i], noteDurations[i]);
    delay(noteDurations[i]);
  }
}
It was an interesting experience to use the ultrasonic sensor with the speaker and I hope to explore their working in more detail in future projects.
Week 10- Reflection
The author, who used to design cool future stuff, isn’t really feeling the video about the future of how we interact with things. They’ve got hands-on experience, not just theory, so when they say they’re a bit skeptical about some things in the video, you gotta listen. This vision of the future isn’t all that visionary. It’s like a tiny step from what we’ve got now.What the author really cares about is hands. They’re all about how our hands feel things and mess with stuff. But the video seems to be all about sacrificing that cool touchy-feely action for a flashy visual show. They argue that real-world interactions, like opening a jar or making a sandwich, are way more expressive than what we do with touchscreens. They’re not on board with the idea that the future of how we interact should be less exciting than putting together a sandwich! Be inspired by what humans can do; it is just a reminder that big ideas come from people who dared to dream big. They’re pushing for more people to get on board with exploring what we can really do instead of settling for small improvements. the moral of it all is “Hey, let’s not be boring with the future. Let’s make it cool and interactive, using all our awesome human abilities!” It’s a call to think big and not settle for the same old stuff.
I also agree with old people when they complain about touch-screen. Buttons are not only fun, but they are right there. Remote controls are very usuful becuase of the clear button that are clearly visible. Unlike touch screen where it was made for the object to just look advanced and cool with unclear objective.
Rekas & Boamah-Powers: Ab3n
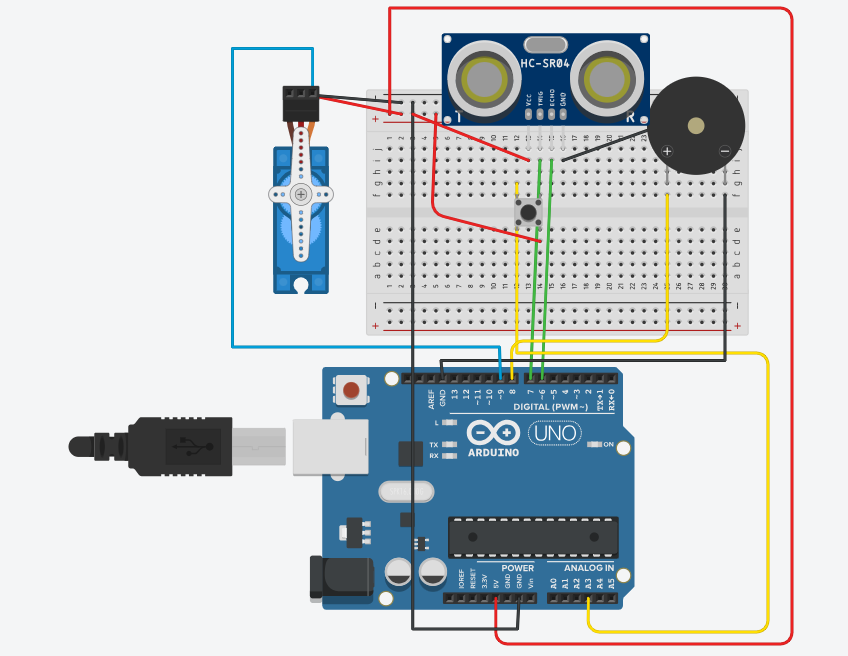
Concept:
Back home, we usually play the trumpet, but when we came to the UAE, we couldn’t find any trumpets. So, we decided to create our own – an electronic trumpet. It works by using a light sensor for the blowing effect and regular buttons for playing the notes. The sound comes out from a speaker. Simple as that!
The circuit diagram looks a bit messy but it works 🙂
Circuit Diagram:

Code:
#include "pitches.h"

//set the pins for the button, buzzer, and photoresistor
int firstKeyPin = 13;
int secondKeyPin = 12;
int thirdKeyPin = 11;
int buzzerPin = 9;
int blow = A2;

// variables regulate when value is read
const long interval = 200;
unsigned long previousMillis = 0;
int blowVal;


void setup() {

  Serial.begin(9600);
  //set the button pins as inputs
  pinMode(firstKeyPin, INPUT_PULLUP);
  pinMode(secondKeyPin, INPUT_PULLUP);
  pinMode(thirdKeyPin, INPUT_PULLUP);

  //set the buzzer pin as an output
  pinMode(buzzerPin, OUTPUT);

  // reads value on setup to avoid later error
  blowVal = analogRead(blow);
}

void loop() {

  // reads current time
  unsigned long currentMillis = millis();

  // checks if specified duration has passed
  if (currentMillis - previousMillis >= interval) {
    // updates time since value was read from sensor
    previousMillis = currentMillis;

    // reads value from sensor
    blowVal = analogRead(blow);
  }

  Serial.println(blowVal);

  // conditions to play specific notes
  if (blowVal <= 350) {
    if ((digitalRead(firstKeyPin) == HIGH) && (digitalRead(secondKeyPin) == HIGH) && (digitalRead(thirdKeyPin) == HIGH)) {
      tone(buzzerPin, NOTE_F3);
    }

    if ((digitalRead(firstKeyPin) == LOW) && (digitalRead(secondKeyPin) == HIGH) && (digitalRead(thirdKeyPin) == LOW)) {
      tone(buzzerPin, NOTE_G3);
    }

    if ((digitalRead(firstKeyPin) == LOW) && (digitalRead(secondKeyPin) == LOW) && (digitalRead(thirdKeyPin) == HIGH)) {
      tone(buzzerPin, NOTE_A3);
    }

    if ((digitalRead(firstKeyPin) == LOW) && (digitalRead(secondKeyPin) == HIGH) && (digitalRead(thirdKeyPin) == HIGH)) {
      tone(buzzerPin, NOTE_AS3);
    }

  }

  if (blowVal > 350) {
    if ((digitalRead(firstKeyPin) == HIGH) && (digitalRead(secondKeyPin) == HIGH) && (digitalRead(thirdKeyPin) == HIGH)) {
      tone(buzzerPin, NOTE_C4);
    }

    if ((digitalRead(firstKeyPin) == LOW) && (digitalRead(secondKeyPin) == LOW) && (digitalRead(thirdKeyPin) == HIGH)) {
      tone(buzzerPin, NOTE_D4);
    }

    if ((digitalRead(firstKeyPin) == HIGH) && (digitalRead(secondKeyPin) == LOW) && (digitalRead(thirdKeyPin) == HIGH)) {
      tone(buzzerPin, NOTE_E4);
    }

    if ((digitalRead(firstKeyPin) == LOW) && (digitalRead(secondKeyPin) == HIGH) && (digitalRead(thirdKeyPin) == HIGH)) {
      tone(buzzerPin, NOTE_AS3);
    }

    if ((digitalRead(firstKeyPin) == HIGH) && (digitalRead(secondKeyPin) == HIGH) && (digitalRead(thirdKeyPin) == LOW)) {
      tone(buzzerPin, NOTE_F4);
    }

  }
}
Highlights:
The light sensor passes value to the blowVal variable which uses either a high blow effect or a low blow effect. The part of the code that was a bit difficult for us was preventing unstable behavior we get in between the low blow and the high blow. To solve this we used millis() to cause a frameRate reduction effect as used in p5 when reading the blow value.
Video:
Thank you!
Rekas & Boamah-Powers: Ab3n
Concept
Back home, we usually play the trumpet, but when we came to the UAE, we couldn’t find any trumpets. So, we decided to create our own – an electronic trumpet. It works by using a light sensor for the blowing effect and regular buttons for playing the notes. The sound comes out from a speaker. Simple as that!
The circuit diagram looks a bit messy but it works 🙂
#include "pitches.h"

//set the pins for the button, buzzer, and photoresistor
int firstKeyPin = 13;
int secondKeyPin = 12;
int thirdKeyPin = 11;
int buzzerPin = 9;
int blow = A2;

// variables regulate when value is read
const long interval = 200;
unsigned long previousMillis = 0;
int blowVal;


void setup() {

  Serial.begin(9600);
  //set the button pins as inputs
  pinMode(firstKeyPin, INPUT_PULLUP);
  pinMode(secondKeyPin, INPUT_PULLUP);
  pinMode(thirdKeyPin, INPUT_PULLUP);

  //set the buzzer pin as an output
  pinMode(buzzerPin, OUTPUT);

  // reads value on setup to avoid later error
  blowVal = analogRead(blow);
}

void loop() {

  // reads current time
  unsigned long currentMillis = millis();

  // checks if specified duration has passed
  if (currentMillis - previousMillis >= interval) {
    // updates time since value was read from sensor
    previousMillis = currentMillis;

    // reads value from sensor
    blowVal = analogRead(blow);
  }

  Serial.println(blowVal);

  // conditions to play specific notes
  if (blowVal <= 350) {
    if ((digitalRead(firstKeyPin) == HIGH) && (digitalRead(secondKeyPin) == HIGH) && (digitalRead(thirdKeyPin) == HIGH)) {
      tone(buzzerPin, NOTE_F3);
    }

    if ((digitalRead(firstKeyPin) == LOW) && (digitalRead(secondKeyPin) == HIGH) && (digitalRead(thirdKeyPin) == LOW)) {
      tone(buzzerPin, NOTE_G3);
    }

    if ((digitalRead(firstKeyPin) == LOW) && (digitalRead(secondKeyPin) == LOW) && (digitalRead(thirdKeyPin) == HIGH)) {
      tone(buzzerPin, NOTE_A3);
    }

    if ((digitalRead(firstKeyPin) == LOW) && (digitalRead(secondKeyPin) == HIGH) && (digitalRead(thirdKeyPin) == HIGH)) {
      tone(buzzerPin, NOTE_AS3);
    }

  }

  if (blowVal > 350) {
    if ((digitalRead(firstKeyPin) == HIGH) && (digitalRead(secondKeyPin) == HIGH) && (digitalRead(thirdKeyPin) == HIGH)) {
      tone(buzzerPin, NOTE_C4);
    }

    if ((digitalRead(firstKeyPin) == LOW) && (digitalRead(secondKeyPin) == LOW) && (digitalRead(thirdKeyPin) == HIGH)) {
      tone(buzzerPin, NOTE_D4);
    }

    if ((digitalRead(firstKeyPin) == HIGH) && (digitalRead(secondKeyPin) == LOW) && (digitalRead(thirdKeyPin) == HIGH)) {
      tone(buzzerPin, NOTE_E4);
    }

    if ((digitalRead(firstKeyPin) == LOW) && (digitalRead(secondKeyPin) == HIGH) && (digitalRead(thirdKeyPin) == HIGH)) {
      tone(buzzerPin, NOTE_AS3);
    }

    if ((digitalRead(firstKeyPin) == HIGH) && (digitalRead(secondKeyPin) == HIGH) && (digitalRead(thirdKeyPin) == LOW)) {
      tone(buzzerPin, NOTE_F4);
    }

  }
}