Week 13 – Final Project Documentation

Concept

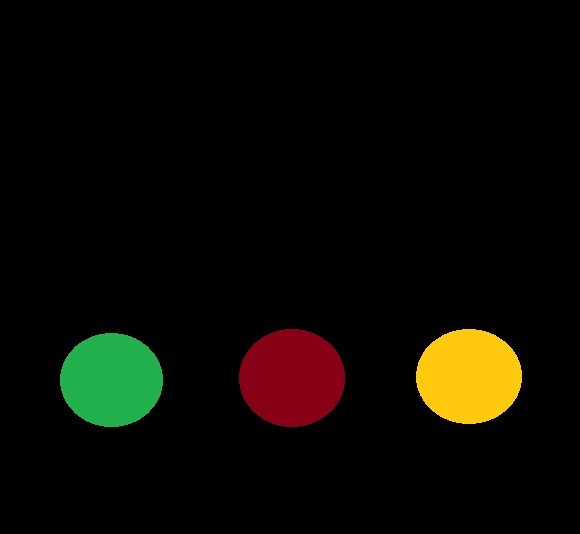
Reaction Game Based, or RGB, is a rhythm tool/game used to test your reaction time. Three randomized dots appear on the screen with two characteristics: number (1, 2, 3) and color (red, green, blue). Your objective is to hit each dot according to its assigned resistor, clearing the screen of all dots and obtaining the biggest score possible under the time limit of 40 seconds. After that, the user is presented with their score and their estimated age according to their reaction time.

Implementation

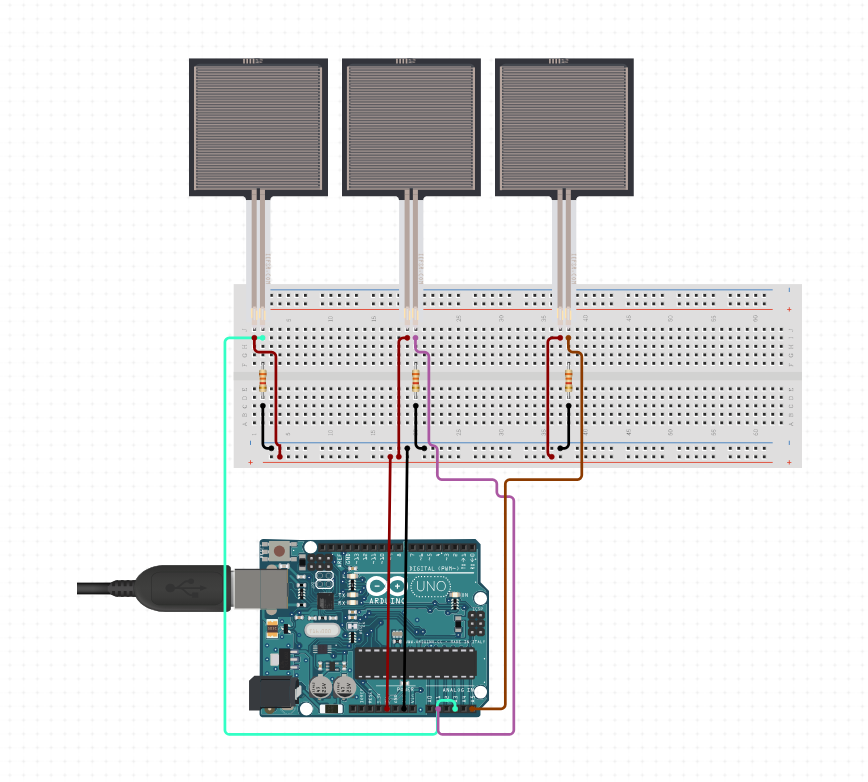
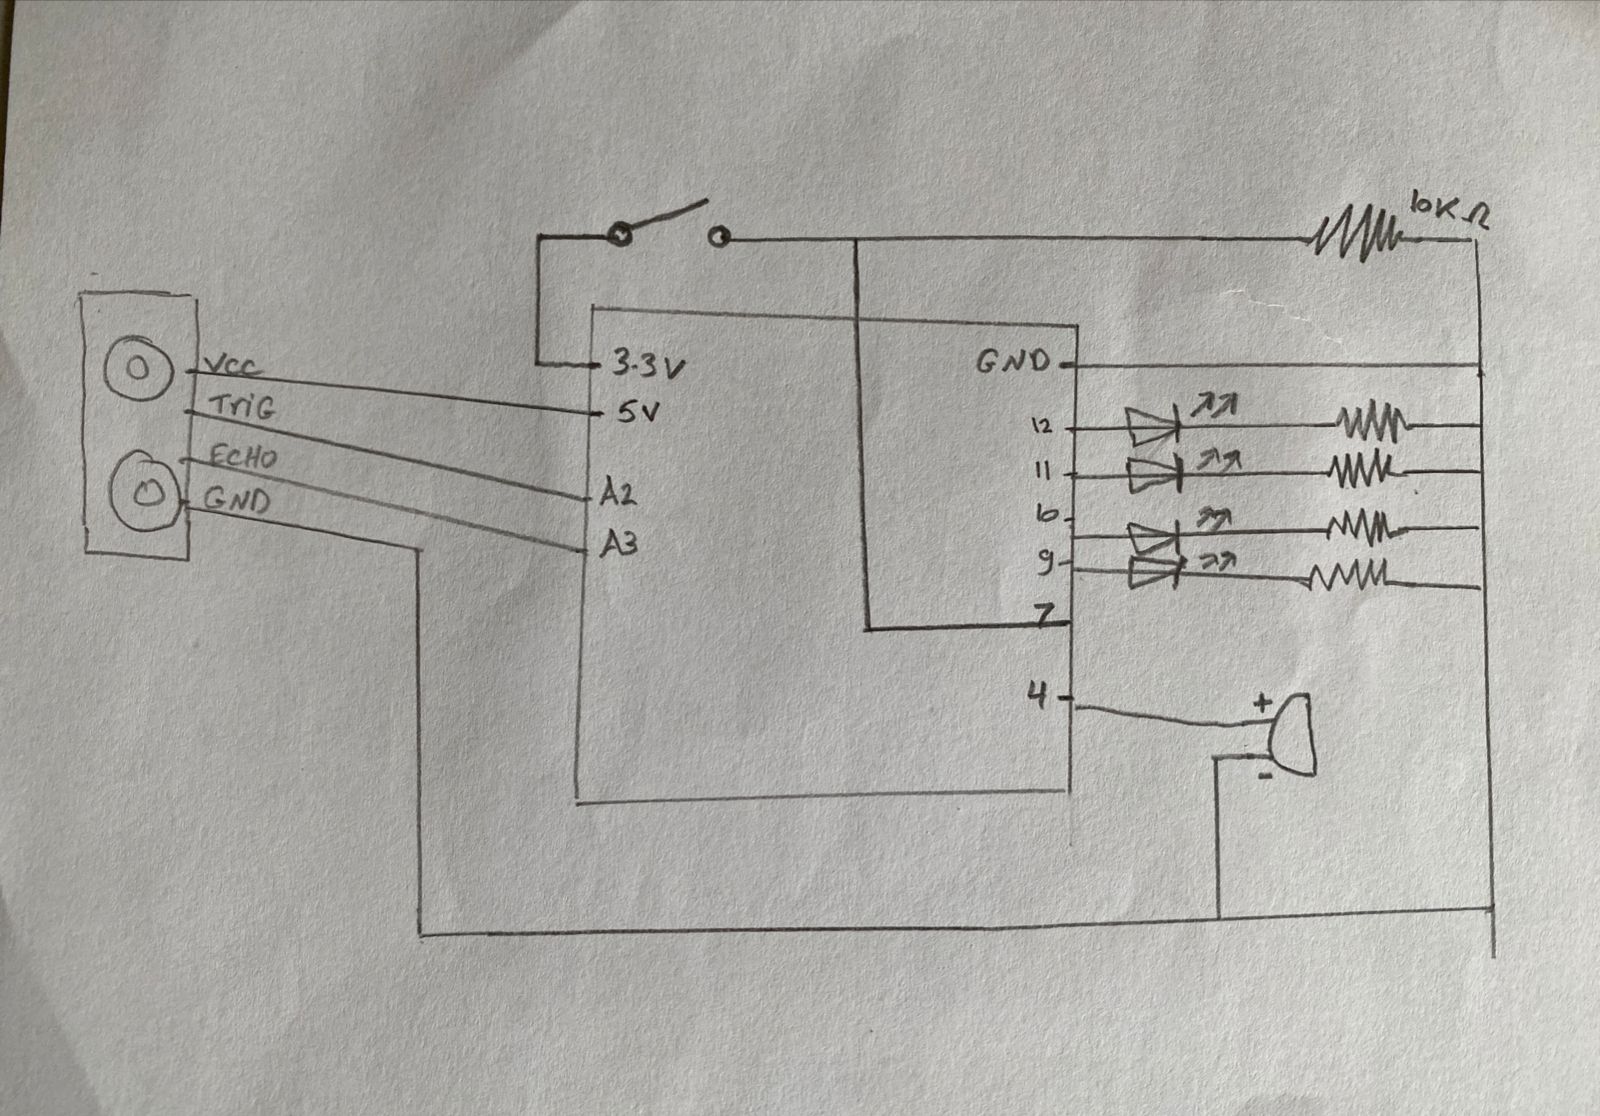
For the interaction, three force-sensitive resistors were used in order to hit the dots, along with a buzzer, which is responsible for playing a sound every time the user hits a resistor. As for the Arduino code, each input was declared, and the basic serial communication was established with P5.js, sending the data from each resistor. With each tap on the resistor, a sound is also played by the buzzer.

int fsrPin1 = A0;
int fsrPin2 = A1;
int fsrPin3 = A2;
int buzzerPin = 2;

void setup() {
  Serial.begin(9600);
}

void loop() {
  int fsrValue1 = analogRead(fsrPin1);
  int fsrValue2 = analogRead(fsrPin2);
  int fsrValue3 = analogRead(fsrPin3);

  // send FSR values to p5.js
  Serial.print(fsrValue1);
  Serial.print(",");
  Serial.print(fsrValue2);
  Serial.print(",");
  Serial.println(fsrValue3);

  // force sensitive resistor hits
  checkHit(fsrValue1, 1);
  checkHit(fsrValue2, 2);
  checkHit(fsrValue3, 3);
}

void checkHit(int fsrValue, int noteNumber) {
  if (fsrValue > 130) { // FSR threshold to activate sound
    Serial.println("Hit detected!");

    Serial.print("Note,");
    Serial.println(noteNumber);

    // buzzer sound on tap
    tone(buzzerPin, 1000, 100); // frequency and duration
  }
}

As for P5.js, the most important variables are the ones that keep track of the player’s score and the notes. The function “checkHit” is also important to determine whether a note has been successfully hit based on the input from force-sensitive resistors (FSRs). It iterates through the FSR values and compares them to predefined thresholds. If the FSR value exceeds its threshold and the associated note is not marked as already hit, it signifies a successful hit. The function then updates the score, initiates visual effects on the ellipses like glowing, sets a cooldown for the corresponding FSR, and checks if all notes are hit. If all notes are hit, it triggers the generation of new notes. Regarding serial communication, a p5.web-serial.js file provided in class by Michael Ang and Aaron Sherwood is responsible for the communication between Arduino and p5.js.

function checkHit() {
  for (let i = 0; i < fsrValues.length; i++) {
    if (resistorCooldowns[i] <= 0) {
      for (let j = notes.length - 1; j >= 0; j--) {
        let note = notes[j];
        if (fsrValues[i] > fsrThresholds[i] && !note.hit) {
          let expectedNote = i + 1; // expected note based on resistor index
          if (note.number === expectedNote) {
            console.log("Hit detected for note " + expectedNote + "!");
            score += 10;
            glowingFrames = glowingDuration;
            note.hit = true;
            resistorCooldowns[i] = cooldownDuration; // set cooldown for the resistor
            if (allNotesHit()) {
              setTimeout(generateNotes, 1000); // wait for 1 second before generating new notes
            }
            break; // exit the loop once a hit is detected
          }
        }
      }
    }
  }

Future improvements

Future changes to the project would depend on different purposes that it could offer, be it simply a reaction time test, a game focused on fun, or maybe a combination of both. Nonetheless, I believe that more colors could be added, and possibly music. Also, I would have liked to see different modes and dynamics for the notes, testing the user in different ways. Other than that, I am proud of offering a fun yet quite useful experience for the user.

User testing

User testing was conducted with three different people, and it went generally well. Most of them managed to figure out the controls and objectives of the game pretty much instantly, and they had no difficulty in obtaining quite high scores despite no prior knowledge of the game.

However, in one instance the controls did not seem as obvious, and the participant struggled a little bit to figure out the resistor and the timer.

Overall, the experience is working well, and not a lot of explanation is needed. Something that could be improved would be maybe utilizing different buttons other than the force-sensitive resistors. The reason is that the force-sensitive resistors do not work perfectly. Maybe they look less obvious than three huge buttons would, and it is a bit difficult to work with the force thresholds. Have too much necessary force for them, and you have to smash the table in order to register a hit, but if you have too little, they will register even if you barely touch them. Making it more obvious that each resistor is assigned to a number would also help.

Week 11 – Arduino and P5.js

1 – Make something that uses only one sensor on Arduino and makes the ellipse in p5 move on the horizontal axis, in the middle of the screen, and nothing on arduino is controlled by p5

Code:

const int potPin = A0;

void setup() {
  Serial.begin(9600);
}

void loop() {
  int potValue = analogRead(potPin);

  // send the potentiometer value to the serial port
  Serial.println(potValue);

  delay(50);
}

2 – Make something that controls the LED brightness from p5

Code:

int ledPin = 6;

void setup() {
  Serial.begin(9600);
  pinMode(ledPin, OUTPUT);
}

void loop() {
  while (Serial.available() > 0) {
    // read the incoming brightness value from p5.js
    int brightness = Serial.parseInt();

    // adjust the LED brightness based on the received value
    analogWrite(ledPin, brightness);
  }
}

3 – Take the gravity wind example and make it so every time the ball bounces one led lights up and then turns off, and you can control the wind from one analog sensor

int potPin = A0;
int ledPin = 6;

void setup() {
  Serial.begin(9600);
  pinMode(LED_BUILTIN, OUTPUT);
  pinMode(potPin, INPUT);
  pinMode(ledPin, OUTPUT);
}

void loop() {
  digitalWrite(LED_BUILTIN, LOW);
  while (Serial.available()) {
    digitalWrite(LED_BUILTIN, HIGH);
    int ambientBrightness = Serial.parseInt();
    if (Serial.read() == '\n') {
      int sensorReading = analogRead(potPin);
      Serial.println(sensorReading);
    }
    if (ambientBrightness >= 350 && ambientBrightness <= 360) {
      digitalWrite(ledPin, HIGH);
    } else {
      digitalWrite(ledPin, LOW);
    }
  }
  int sensorReading = analogRead(potPin);
  Serial.println(sensorReading);
}

Week 12 – Finalized Project Concept

Concept

For my final project, I have decided to change my idea. Now, I have settled on a rhythm music game, akin to Guitar Hero. Using force sensitive resistors (FSR), the user will have to quickly press the sensors to match the combinations that are being shown on the screen, almost like drums but using your hands. The design of the game on P5.js will be minimalistic, but it will also contain many colors and bright lights when the sensors are pressed. The more the user progresses, the more points will be accumulated, until the game eventually ends and restarts. To add more replayability, the rhythm of the sensors will be random.

Arduino

The Arduino will contain force sensitive resistors for inputs to capture the user’s input for the game. Each sensor will have an analog input assigned to it, which I will be able to manipulate with code. A cardboard box will also most likely be used around the breadboard to deliver a more aesthetically pleasing experience. Below is a schematic with the sensors for the board:

P5.js

The P5 program will be responsible for displaying the game, including the score and the notes that are necessary to be hit. The music could also be played by P5 instead of a buzzer on the breadboard, but that still needs to be decided. In terms of code, P5 will receive the information from the sensors and know when to activate a hit or miss in the notes. Below is a low-fidelity drawing of the game:


Week 11 – Final Project Concept

Growing up, I used to love playing with pinball machines in malls and carnival parks, so I would like to recreate the same fun that I had as a kid in my final project. My concept revolves around replicating a traditional pinball machine using Arduino and P5.js. By combining the power of Arduino and P5.js, I will be able to create a physically and digitally interactive pinball game, and I hope to bring the joy and challenge of playing pinball into a more modern and unique setting.

Pinball machine

Through switches that control the flippers on P5.js, users will have the objective of scoring as many points as possible before losing the ball, just like in a classic arcade setting, being able to mimic the experience of playing a pinball machine. Many dynamics could be added to the game, and I am excited to explore sensors that I could potentially use.

Week 11 – Reading Reflection

In “Design Meets Disability”, I found myself agreeing with most of the author’s arguments, especially when it came to balancing problem-solving and playful exploration in design. However, while I believe that products for people with disabilities could be more playful and focused on aesthetics, I also recognize that personal preferences vary. Some individuals may prefer traditional products that mimic the human body, while others may lean toward more fashionable or visually appealing options. Recognizing this diversity of taste and choice is essential.


Moreover, in exploring the history of design and utility in products for people with disabilities, the reading provided intriguing insights. It was interesting to learn about the various examples, such as glasses becoming more of a fashion item in some cases. This highlights the cultural role that fashion plays in the acceptance of products designed for individuals with disabilities, but it makes sense if you think about it. It is much easier to make glasses look more visually appealing than let’s say crutches because glasses are not as invasive and can sometimes even enhance visuals. From a positively stereotypical perspective, they can sometimes make someone appear smarter or more intellectual, but I cannot think of any appeal in a lot of other products for people with disabilities.

Week 10 – Reading Discussion

“The Future of Interactive Design” was an entertaining and reflective read about the future of interaction in digital products. I agree with all of the points made by the author, and I found his disappointment with the obsession with touchscreens in Future Technology very relatable. Watching the Microsoft productivity video reminded me of the hilarious fan creations of future video game consoles such as the infamous “Xbox 720” that you have probably seen 14 years ago. It is funny to see that this whole obsession with glassy touch screens and the use of hand motions represents a certain period of the past more than accurately representing the future of interactivity. 

Moreover, his points about the feelings with hands also made me reflect on the usage of everyday objects. I always had a strong preference for physical books rather than PDFs, but I never cared enough to think about it. It is pretty obvious though, that the sensation of the paper in your hands and the weight of the book makes the interaction way more pleasant than just staring at a screen and moving your fingers. I suppose that explanation works for many other objects as mentioned by the text, and from now on I will make sure to appreciate dynamic mediums much more. As a side note, I also related to the author’s frustrations with the response text. Not everything has to provide a solution, sometimes expressing problems is just as valuable. After all, we need to start somewhere if we want to change the course of how things are going, and for that reason, I admire the author’s text even more.

Week 10: Instrument

Concept

Instrument: piano.

Team members:  Fady John (fje3683) and Victor Alves Gomes Nadu (va2269).

For our instrument project, we have decided to create a piano that plays different tones of the musical scale depending on the measured distance that someone is from the sensor. To build the instrument on the breadboard, we utilized an ultrasonic sensor, LEDs, resistors, and jumper wires, creating an interactive and dynamic musical experience. The analog ultrasonic sensor was responsible for measuring the distance, allowing for an intuitive interaction with the piano. As the user moves closer or farther away, the musical output changes, providing a unique take on the instrument. As for the LEDs, they add a visual element to the project besides also offering an understanding of the distance-based musical scale since they light up corresponding to the played notes.

Code

In the code, we defined the specific pins used for each LED and provided the notes in the musical scale in the form of an array.

// notes in the musicalScale:

int musicalScale[] = {

262, 294, 330, 349, 392, 440, 493, 523

};

int ledPins[] = {

9, 12, 11, 10, 9, 12, 11, 10

};

void setup() {

Serial.begin(9600);

pinMode(trigPin, OUTPUT);

pinMode(echoPin, INPUT);

}


Schematic

Reflections and improvements

Initially, we planned to create drums, but we ended up settling on a piano since that was a more feasible and practical instrument. As for improvements, currently, the distance sensor is not that accurate, which is something that could be worked on. Other than that, we have managed to create something fun and so we are proud of our work.

Reading Reflection – Week 9

“Physical Computing’s Greatest Hits (and misses)” was a fun and inspiring read about physical computing and some examples of projects that were done throughout the years. Although this is my first time using hardware to create interactive projects, I have had a lot of enjoyment so far, and reading about these projects motivates me to learn more about Arduino and hopefully come up with my own takes on them. By far the projects that most caught my attention were the theremin-like instruments, the dolls and pets, and the remote hugs. 

First, when it comes to hardware, I believe that instruments are one of the most effective and fun tools to exercise creativity. For instance, the drum glove turns a mundane activity into something that people could actually use to learn drumming and spend their free time with. Not only is it entertaining, but it is also convenient, and I believe that people of all ages would find joy in such a technology. The dolls and pets one is also interesting, and it is something that I see many kids or even adults enjoying depending on the context of the product, such as a physical version of Tamagotchi which could captivate both Millennials and Gen Z. Finally, the remote hugs intrigued me. I do not think such a tool would be convenient as a commercialized product, but I do think it opens doors to a set of captivating technologies that could be used in virtual reality games or even in long-distance relationships.

Meanwhile, “Making Interactive Art: Set the Stage, Then Shut Up and Listen” made me reflect on the purpose of interactive art and how it should be conducted to the public. I strongly agree with the author when it comes to how people should approach interactive art. To me, it is intuitive that too much information can ruin an interactive experience. If the author is micromanaging the user and explaining every single detail based on his perspective, then there is no mystery in the project, no room for interpretation, and no way of knowing how people truly approach your work, leaving a diminished experience and a lack of observations.

Week 8 – Switch

For the unusual switch assignment, I have decided to utilize a keychain and a shot glass to create an unusual switch. The idea is that you signify that you are done drinking by closing the shot glass with the sombrero keychain on top. Because both items have conductive materials, the LED turns on after the shot glass that is connected with a jumper wire touches the keychain that also has another jumper wire attached to it. The result can be seen in the video:

Although that is an extremely simple concept, I had fun brainstorming until I came up with this. The visuals are also not the most pleasing since only tape was used, but my main concern was with the concept itself.