Data Visualization & Generative Text

For this week’s assignment, I created data visualization as well as a generative text output. Though I primarily focused on creating the data visualization, I also wanted to practice with OOP and decided to play with text.

For the data visualization, I found a CSV file with the number of votes received by vote Trump and Clinton by each state during the 2016 presidential election in the United States. My goal was to find an image of the map of America online and create circles on each of the states, with the size of the circle being determined by how many more people, as a percentage of the total voters, voted for Trump or Clinton.

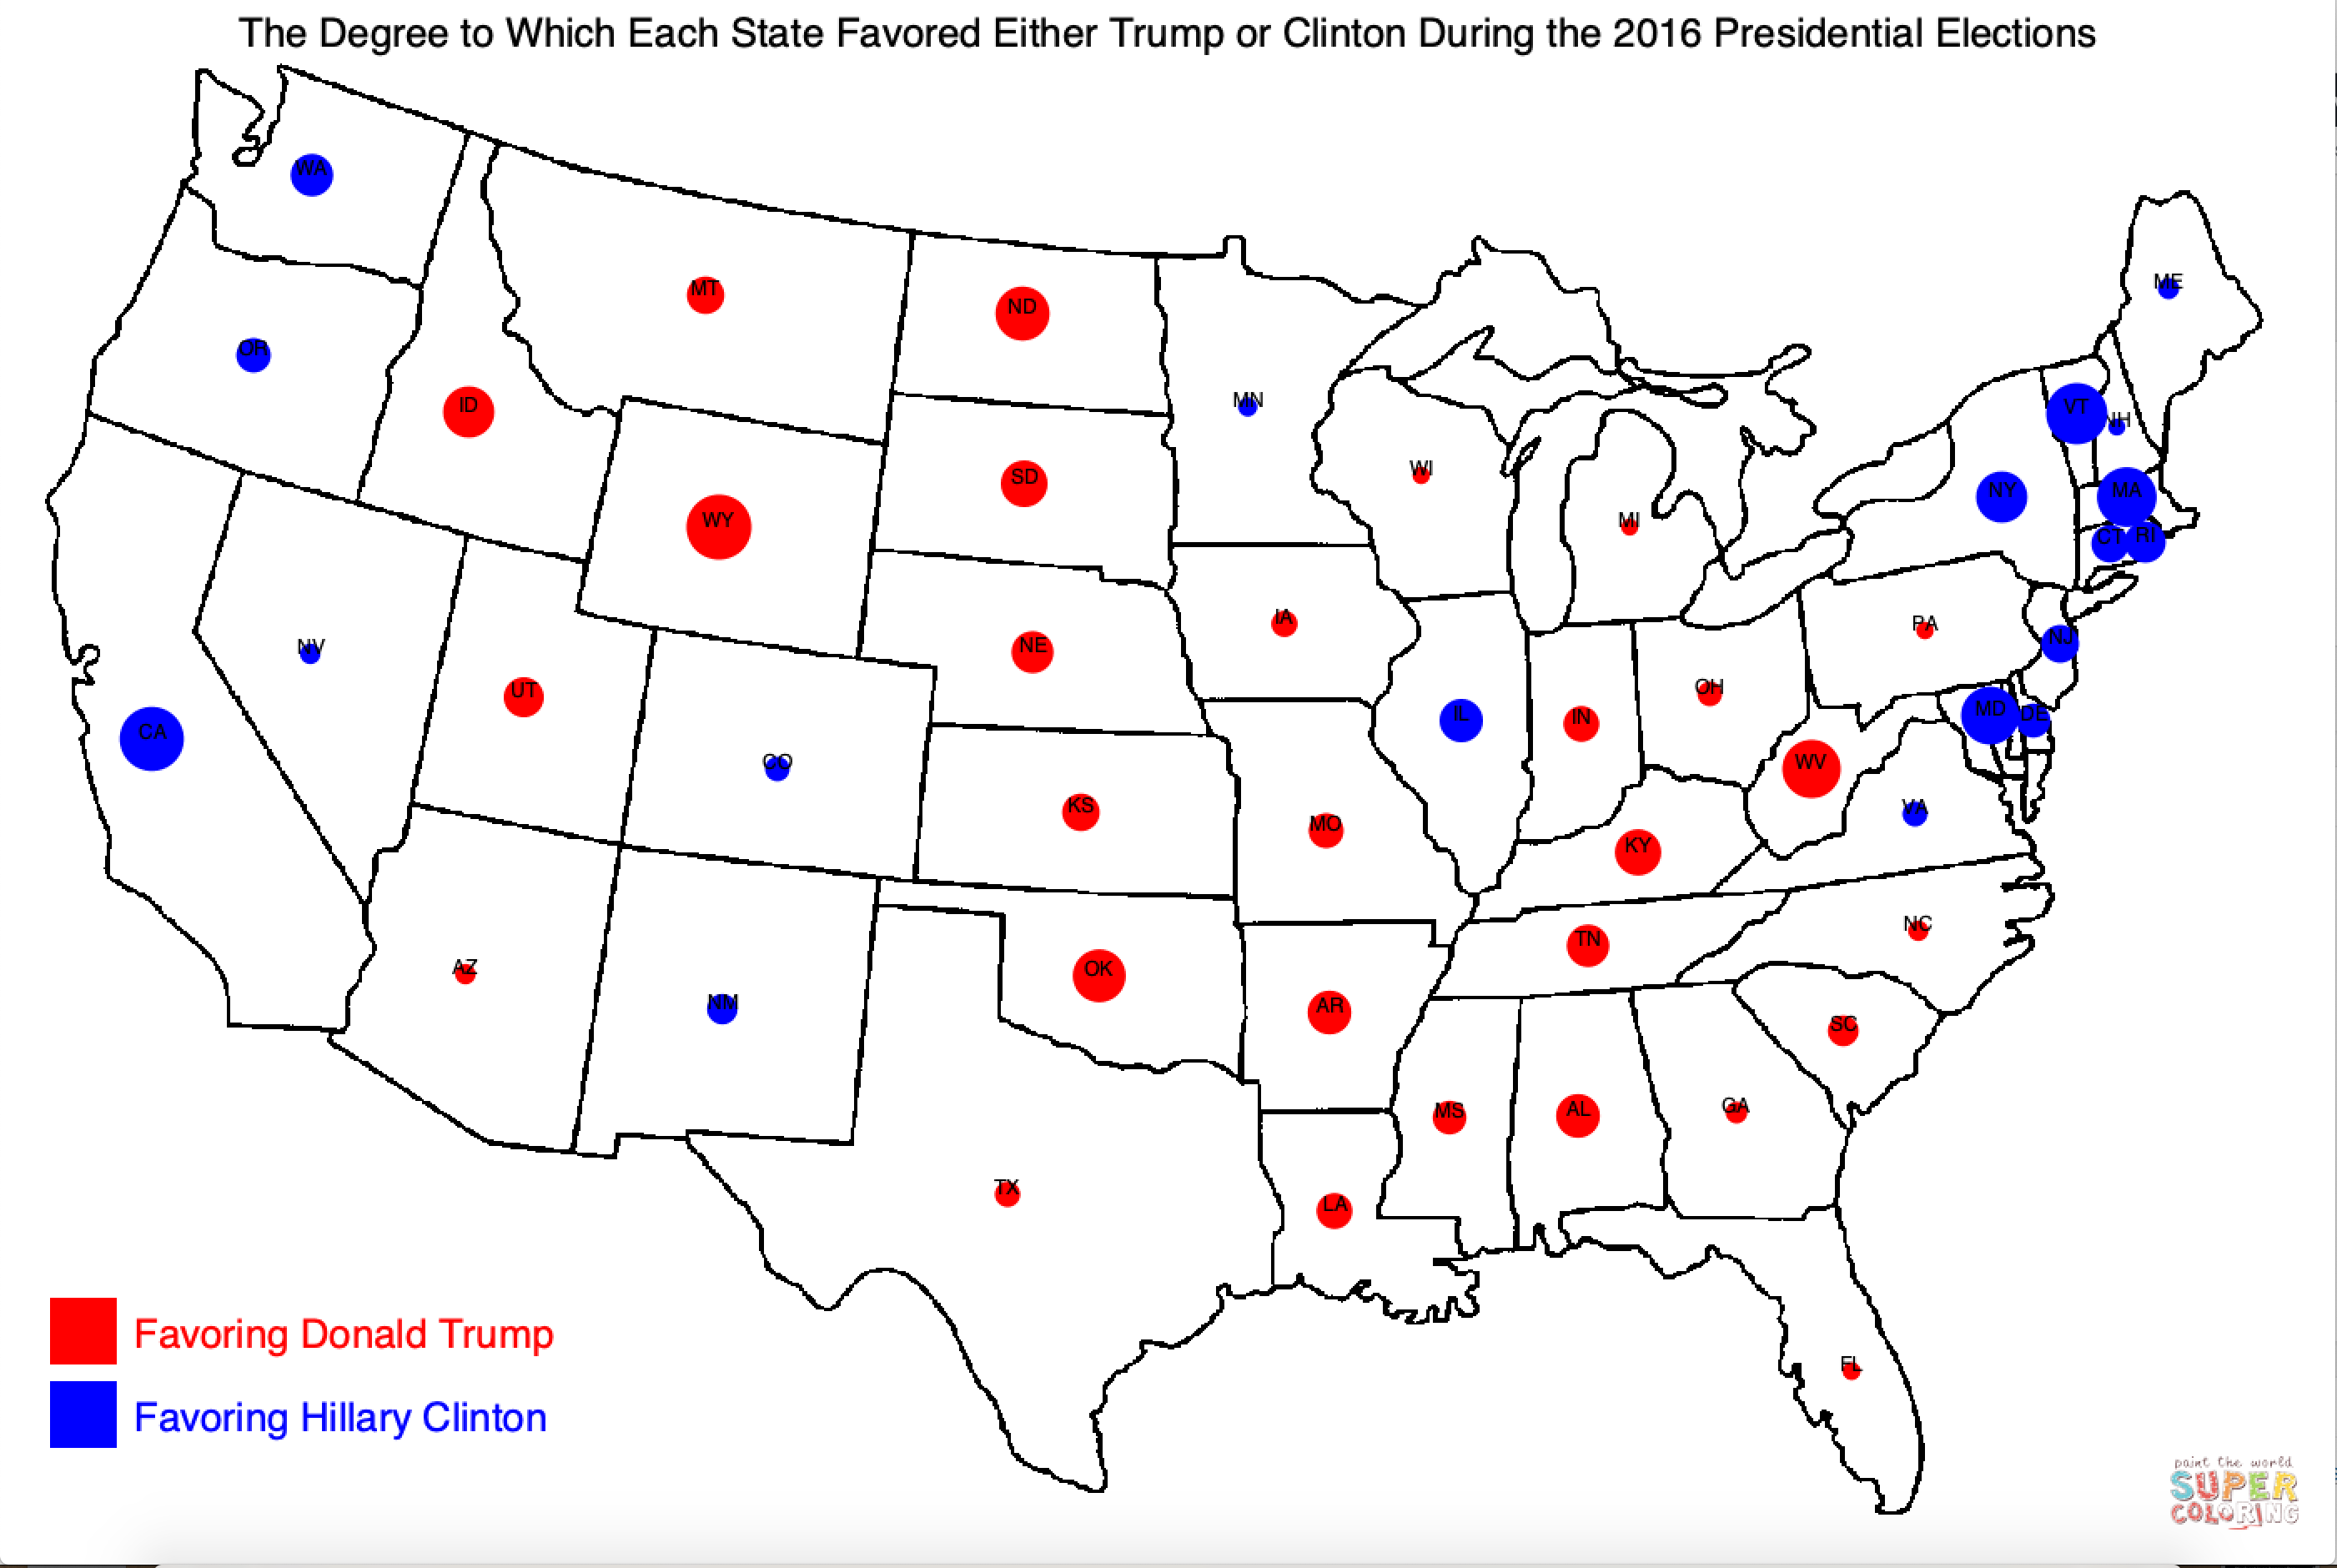
Accomplishing this was not as difficult as I thought since Processing has a built in for loop that is able to loop through different columns of the CSV data based on the header of each column. I then took this data and calculated the percentage of people in each state that voted for each candidate and compared it to how many votes the other candidate received as a percentage. If, for example, Clinton received more votes in a state, the size of the circle was determined by how large the difference was between her votes and Trump’s votes.

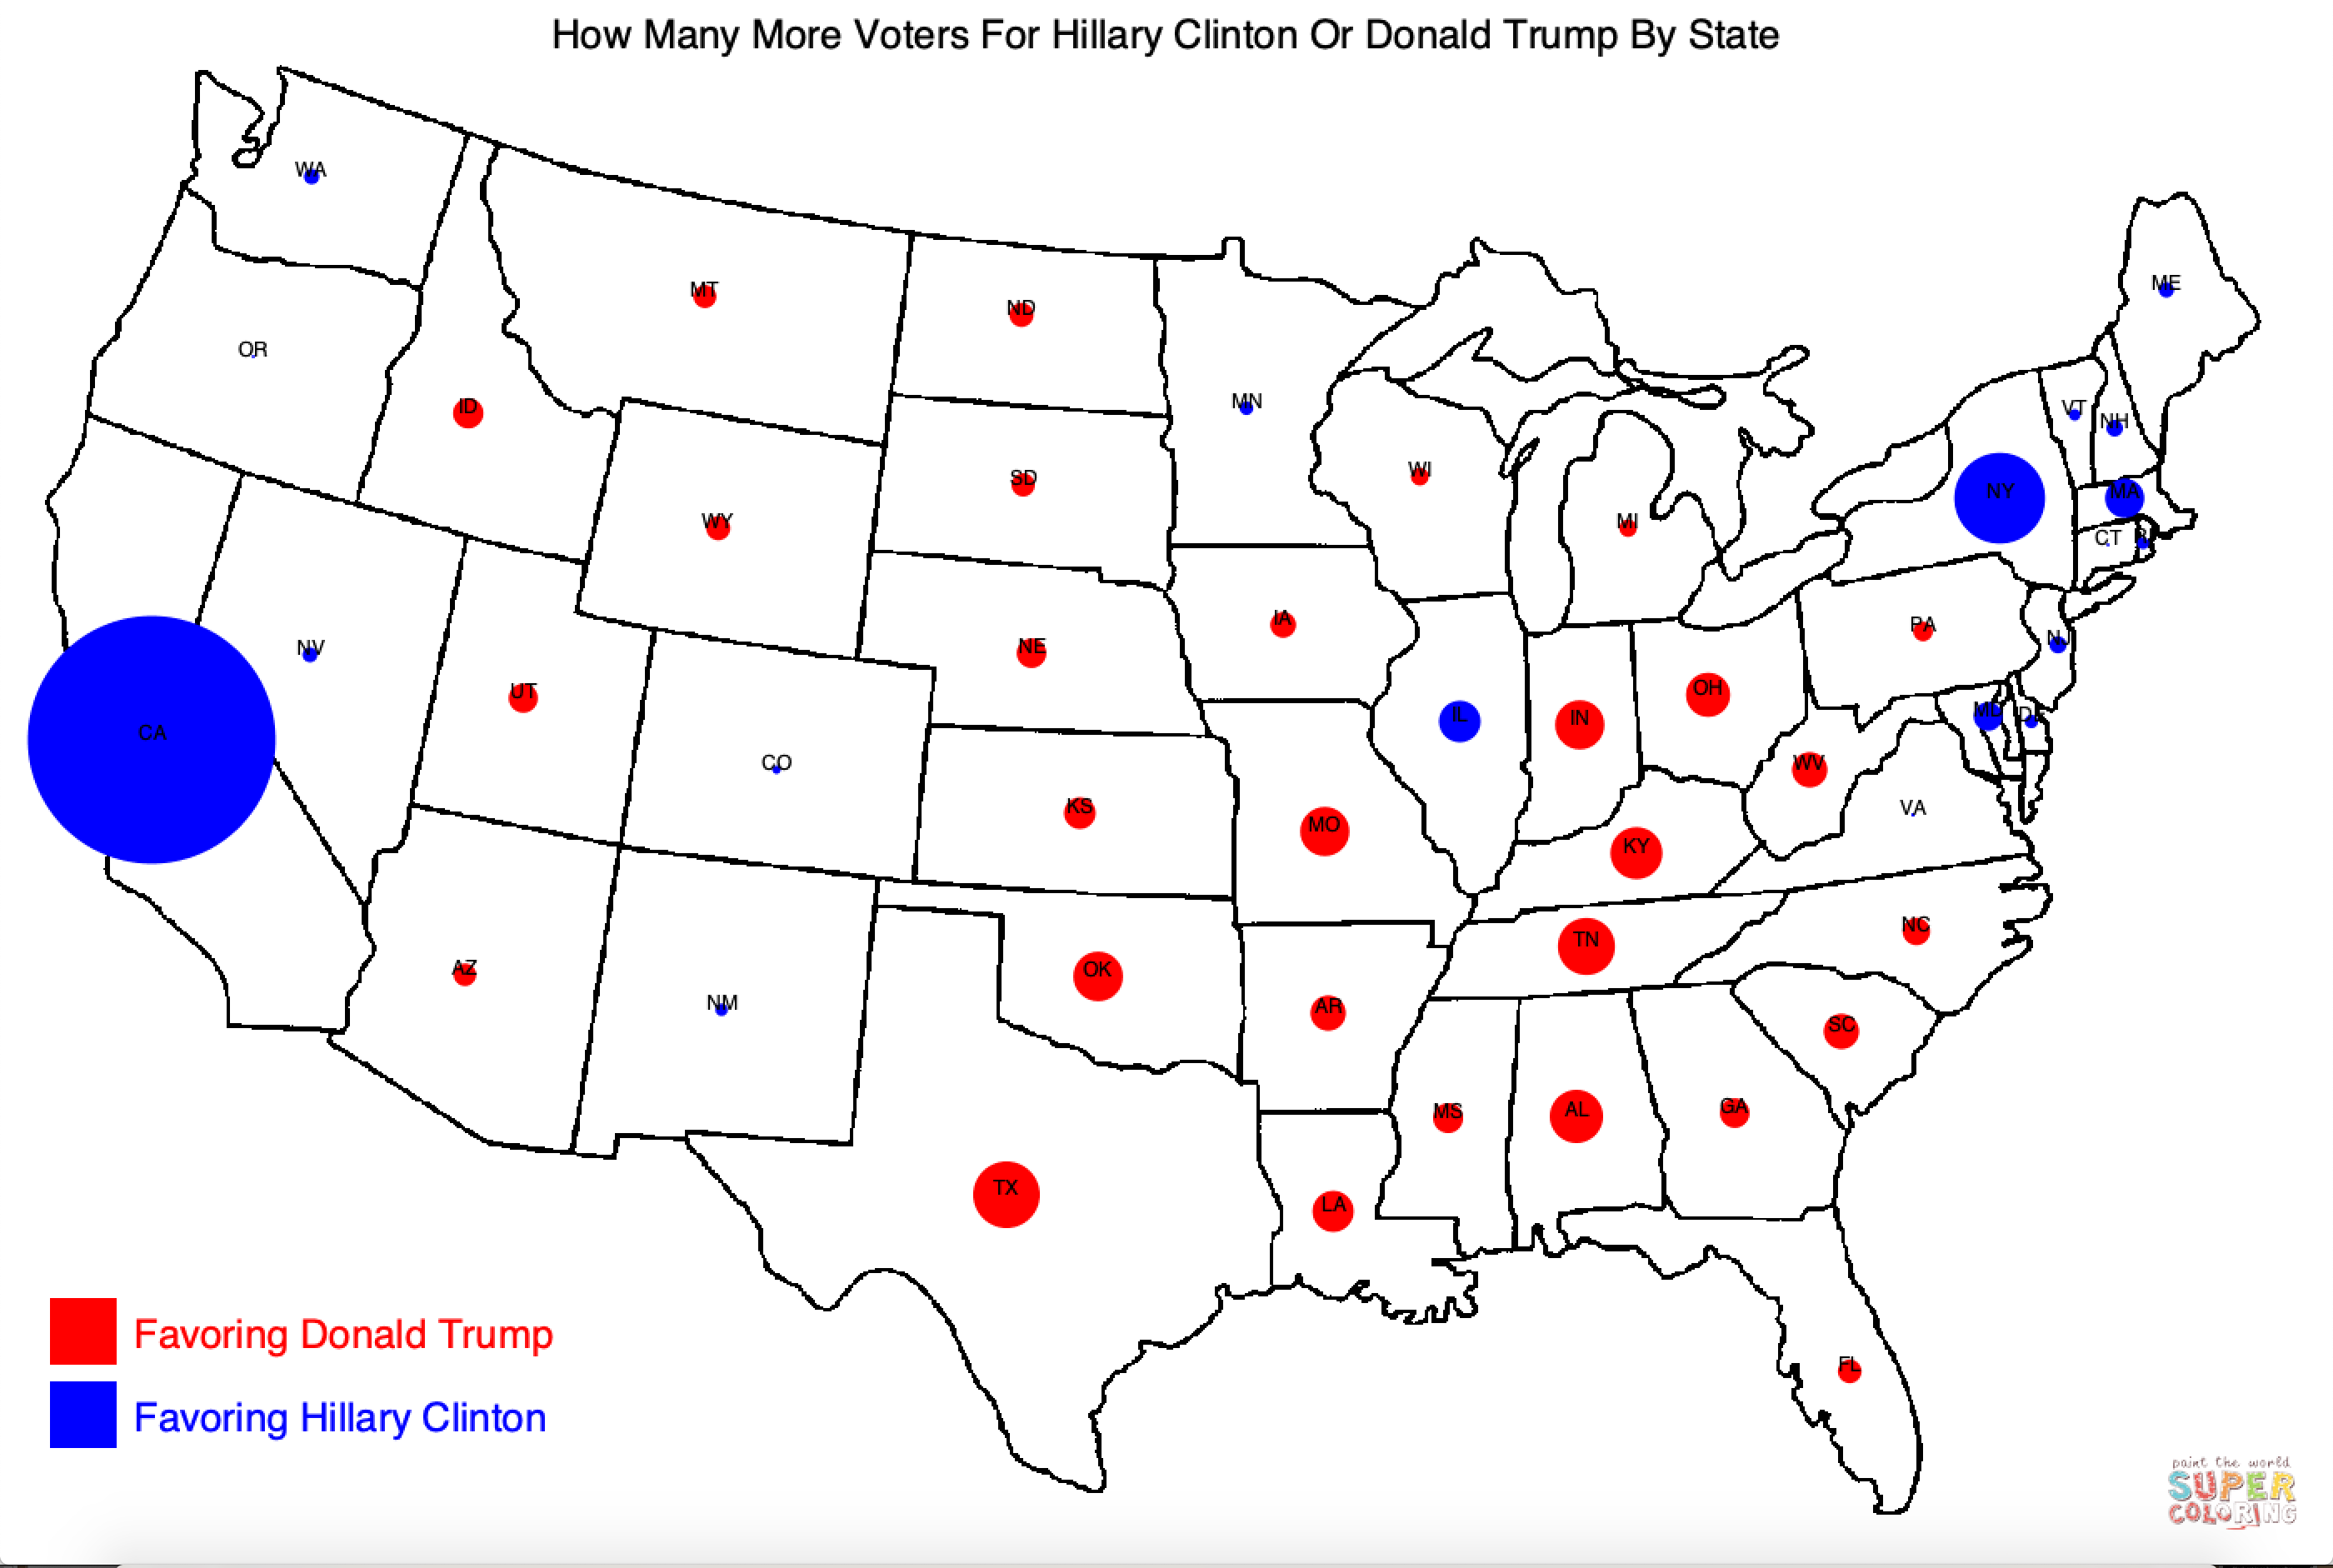
I also included a different map that appears on a keyPress, with the second map modeling the number of votes that one candidate received over the other. This resulted in an amplification of many of the states’ blue dots, although a lot of this may have been skewed by using the map() function.

Below is the code:

PImage unitedStates;
Table presidentData; 
PFont font;
int mapState = 0;

void setup() {
  size(1400, 940);
  unitedStates = loadImage("usamap.jpg");
  presidentData = loadTable("election3.csv", "header");
  font = createFont("Helvetica", 25);
}

void draw() {
  background(unitedStates);
  textFont(font, 12);
  if (mapState == 0) {
    for (TableRow row : presidentData.rows()) {
      String state = row.getString("State");
      float dem = row.getFloat("1");
      float rep = row.getFloat("2");
      float xPos = row.getFloat("4");
      float yPos = row.getFloat("5");
      float total = dem + rep;
      float demPercent = (dem / total) * 100; 
      float repPercent = (rep / total) * 100;
      float difference = demPercent - repPercent;
      float mappedDem;
      println(difference);
      if (difference >= 0) {
        noStroke();
        fill(255, 0, 0);
        float mappedRep = map(difference, 0, 53, 10, 40);
        ellipse(xPos, yPos, mappedRep, mappedRep);
        fill(0, 0, 0);
        textAlign(CENTER);

        text(state, xPos, yPos);
      }  
      if (difference < 0) {
        noStroke();
        fill(0, 0, 255);
        mappedDem = difference * -1;
        float newDem = map(mappedDem, 0, 34, 10, 40);
        ellipse(xPos, yPos, newDem, newDem);
        fill(0, 0, 0);
        textAlign(CENTER);
        text(state, xPos, yPos);
      }  
      //fill(255, 0, 0);
      //ellipse(xPos, yPos, mappedDem, mappedDem);
      //fill(0, 0, 255);
      //tint(255, 127);  // Display at half opacity
      //ellipse(xPos, yPos, mappedRep, mappedRep);
    }
    fill(255, 255, 255);
    rect(0, 0, 40, 40);
    fill(0);
    textAlign(CENTER);
    textSize(24);
    text("The Degree to Which Each State Favored Either Trump or Clinton During the 2016 Presidential Elections", width / 2, 30 );
    fill(255, 0, 0);
    rect(30, height - 160, 40, 40);
    textAlign(LEFT);
    text("Favoring Donald Trump", 80, height - 130);
    fill(0, 0, 255);
    rect(30, height - 110, 40, 40);  
    text("Favoring Hillary Clinton", 80, height - 80);
  } else if (mapState == 1) {
    for (TableRow row : presidentData.rows()) {
      String state = row.getString("State");
      float dem = row.getFloat("1");
      float rep = row.getFloat("2");
      float xPos = row.getFloat("4");
      float yPos = row.getFloat("5");
      float difference = dem - rep;
      float mappedRep = map(difference, 0, 807180, 10, 40);
      float mappedDem;
      //float mappedDifference = map(difference, 0, 4685047, 20, 70);
      println(difference);
      if (difference >= 0) {
        noStroke();
        fill(255, 0, 0);
        ellipse(xPos, yPos, mappedRep, mappedRep);
        fill(0, 0, 0);
        textAlign(CENTER);
        text(state, xPos, yPos);
      }  
      if (difference < 0) {
        noStroke();
        //smooth(4);
        fill(0, 0, 255);
        mappedDem = mappedRep * -1;
        ellipse(xPos, yPos, mappedDem, mappedDem);
        fill(0, 0, 0);
        textAlign(CENTER);
        text(state, xPos, yPos);
      }
      fill(255, 255, 255);
      rect(0, 0, 40, 40);
    }
    fill(0);
    textAlign(CENTER);
    textSize(24);
    text("How Many More Voters For Hillary Clinton Or Donald Trump By State", width / 2, 30 );  
    fill(255, 0, 0);
    rect(30, height - 160, 40, 40);
    textAlign(LEFT);
    text("Favoring Donald Trump", 80, height - 130);
    fill(0, 0, 255);
    rect(30, height - 110, 40, 40);  
    text("Favoring Hillary Clinton", 80, height - 80);
  }
}  
void keyPressed() {
  mapState++;
  if (mapState == 2) {
    mapState = 0;
  }
}

Secondly, I created a text output programming using OOP. The letters spell “Tyranny!” and separate at the start of the program. When I click anywhere on the screen, the letters flock to that location and once the mouse is released the letters scatter in different directions. When any key is pressed, the letters go to the middle to spell “Tyranny!”

Below is the code:

String word = "Tyranny!";
float xDisplace = -110;
Letter[] letters;

void setup() {
  size(600, 600);

  letters = new Letter[word.length()];
  for (int i = 0; i < word.length(); i++) {
    letters[i] = new Letter(width / 2 + xDisplace, height / 2, word.charAt(i));
    xDisplace += 40;
  }
}  

void draw() {
  background(255);
  for (int i = 0; i < word.length(); i++) {
    letters[i].run();
    if (mousePressed) {
      letters[i].zoom();
    }
    if (keyPressed) {
      letters[i].returnOrigin();
    }
  }
}

class Letter {
  char letter; 
  float x, y;
  float originX, originY;
  float xMove, yMove;
  float mouseXPos, mouseYPos;
  Letter (float _x, float _y, char _letter) {
    x = _x;
    y = _y;
    originX = x;
    originY = y;
    letter = _letter;
    xMove = random(-3, 3);
    yMove = random(-3, 3);
  }  

  void show() {
    fill(0);
    textSize(43);
    textAlign(CENTER);
    text(letter, x, y);
    if (x >= width) {
      x = 0;
    } else if (x <= 0) {
      x = width;
    } else if (y <= 0) {
      y = height;
    } else if (y >= height) {
      x = 0;
    } 
    println(originX);
  }
  void goNuts() {
    x += xMove;
    y += yMove;
    x += random(-1, 2);
    y += random(-1, 2);
  } 
//move letters to mouse position and randomize movement
  void zoom() {
    if (mouseX == 0 || mouseY == 0) {
    } else {
      mouseXPos = (mouseX - x) / 10;
      mouseYPos = (mouseY - y) / 10;
      x += mouseXPos;
      y += mouseYPos;
      xMove = random(-5, 5);
      yMove = random(-5, 5);
    }
  } 
  void returnOrigin() {
    mouseXPos = (originX - x) / 2;
    mouseYPos = (originY - y) / 2;
    x += mouseXPos;
    y += mouseYPos;
  }  
  void run() {
    this.show();    
    this.goNuts();
  }
}

Response: Digitize Everything

I think that this article is a fantastic introduction into data and the information age, where statistics and data can allow us to live more “efficient” lives through its processing by computers. When I read this article, I thought “this is fantastic that Waze is able to analyze traffic routes and Siri can dig through databases of information and users’ sound recordings,” but when data is used to create things more convenient for us, make us live more efficient lives, we are also giving this network data about ourselves. I think that this chapter, and I do recognize that this is a chapter of a book and probably does not discuss everything the whole book does, is not able to show that this is a double-edged sword, that there is a huge risk involved in providing this data that makes the auto-entry Gmail emails of today possible. I greatly appreciated reading this chapters because it provided statistics and examples that seemed objective in its analysis of how technology and data are utilized today. Oftentimes, most of what I read about the implications of data and technology are either completely against technology or completely confident that we can be living in a utopia because of all of this information and the proper technology used to process it. But this chapters focus on statistics of how data is being used and how much data is present, which was a welcome change from the often extreme viewpoints I see in the media.

Response: Graham Pullin

This reading made me think more about my life and how I use products though I tried to make a conscious effort to analyze how Pullin’s insights might be useful to the creation of my projects in this class. The discussion of medical aids and design choices was extremely interesting, although I honestly have not reached any conclusions of whether or not I believe that “fashion” should intrude into the design of prosthetics, hearing aids, etc.. This reading probably left me with more questions than answers to some of my beliefs on design and functionality. This brings me to discuss the other aspect of product design and creation in general that Pullin touches on: the importance of functionality and how it plays into the user experience. His discussion of James Leckey and his production of furniture for children with cerebral palsy. In what he calls the flying submarine, is it better to create products that are akin to a swiss army knife? Or are we better off creating products that suit a certain purpose/different people’s needs. Is the reason that Leckey decided to stop creating furniture that served many functions because of technological limitations of creating all these complex functions, or is cognitive overload the real cause in inhibiting its proper use? Like many of the readings, it is hard for me to reach any conclusions, but as I mentioned earlier, this reading made me think a lot about design decisions I make in creating as well as how design plays a role in my life and in others’ lives.

Assignment: Object-Oriented Programming

For this week’s assignment I decided to create a simple game using OOP, creating a game with a player-controlled rectangle that stays at the bottom of the screen. The player is able to control the rectangle across the x-axis as well as having it jump. The goal of the game is to avoid the falling ellipses, and the player’s score increases the longer they remain in the game. The number of ellipses increases as the duration of the game increases.

I created two classes for this game, the one for the ellipses and one for the player.

There were a few problems I encountered while making the game, and I had trouble detecting collisions between the rectangle and the falling ellipses. I was not sure how to loop through the array of ellipses created and detecting their contact with the player’s rectangle.  But thanks to Dan Shiffman’s helpful tutorials I was able to piece together how to detect this.

Below is a video showing the game in action:

Below is the code for the game:

float monsterSpotY = random(300, 560);
float monsterSpotX = random(200, 560);
float monsterRadius = 40;
int gravity = 1;

int counter = 0;
// gamestate to detect if player is dead and in play again menu or not
int gameState = 1;
Player myPlayer;
Monster myMonsters[];
void setup() {
  size(600, 600);
  myPlayer = new Player();
  int monsterCount = 500;
  myMonsters = new Monster[monsterCount];
  for (int i = 0; i < monsterCount; i++) {
    myMonsters[i] = new Monster();
  }
}    

void draw() {
  background(100);
  if (gameState == 1) {
    myPlayer.display();
    myPlayer.update();    
    myPlayer.stayDown();  
    gameOver();
    text(counter, width - 40, 30);
    
    int counterIncrement = counter /7;
    for (int i = 0; i < counterIncrement / 20; i+= 1) {
      myMonsters[i].run();
      //println("i is equal to " + i); 
      if (i == counterIncrement / 20) {
       i = 0; 
       println(i);
      }  
    }  
    counter++;
//increment counter to add elliipses falling
  } else {
     textAlign(CENTER);
     text("You Died! Your score is: " + counter, width/2, height / 2);
     text("Click here to play again", width / 2, height / 2 + 30);
     if (mousePressed == true && mouseX > 230 && mouseX < 360 && mouseY > 320 && mouseY < 340)  {
         setup();
         gameState = 1;
         counter = 0;
       }       
     }  
  }  

void keyPressed() {
  if (keyCode == UP && myPlayer.y == 580) {
    myPlayer.up = 2;
  }       
  if (keyCode == DOWN) {
    myPlayer.down = 2;
  }    
  if (keyCode == LEFT) {
    myPlayer.left = 2;
  }   
  if (keyCode == RIGHT) {
    myPlayer.right = 2;
  }
}     
void keyReleased() {
  if (keyCode == UP) {
    myPlayer.up = 0;
    myPlayer.down = gravity;
  } else if (keyCode == DOWN) {    
    myPlayer.down=0;
  } else if (keyCode == LEFT) {    
    myPlayer.left=0;
  } else if (keyCode == RIGHT) {    
    myPlayer.right=0;
  }
}    
void gameOver() {
  for (int i = 0; i < 30; i++) {
//detect if rect is hittiing any ellipse
    if (myPlayer.x + 20  > myMonsters[i].monsterSpotX - 20 && myPlayer.x - 20 < myMonsters[i].monsterSpotX && myPlayer.y - 20 < myMonsters[i].monsterSpotY && myPlayer.y + 20 > myMonsters[i].monsterSpotY - 10) {
      gameState = 0;      
  } else {
    }
  } 
}

The code for the ellipses and rectangle classes:

class Player { 
  float x;
  float y;
  float up;
  float down;
  float left;
  float right;
  float speed;
  float maxJump;
  float side;
  Player() {
    x = 0;
    y = 580;
    up = 0;
    down = 0;
    left = 0;
    right = 0; 
    speed = 4;
    maxJump = 200;
    side = 20;
  }    
  void display() {
    fill(0);
    rect(x, y, side, side);
  }    
  void update() {
    x = x + (right - left) * speed;
    y = y + (down - up) * speed;
    if (x <= 1) {
      x = 0;
      y = 580;
    } else if (x >= 580) { 
      x = 580;
      y = 580;
    } else if  (y <= 0) {
      y = 0;
    } else if (y >= 580) {
      y = 580;
    }
  }  
  void stayDown() {
    if (y < maxJump) {
      up=0;
      down = gravity;
    }
  }
}
class Monster {
  float x;
  float y;
  float radius;
  float ySpeed;  
  float monsterSpotY;
  float monsterSpotX; 
  color monsterColor;
  Monster() {

    radius = monsterRadius;
    ySpeed = random(2, 6);
    monsterSpotX = random(0, width);
    monsterSpotY = random(0,100);        
  }    
  void show() {
    monsterColor = color(map(monsterSpotY, 0, height, 0, 255), map(monsterSpotY, 0, height, 100, 150), map(monsterSpotY, 0, height, 150, 255));      

    fill(monsterColor);
    noStroke();
    ellipse(monsterSpotX, monsterSpotY, monsterRadius, monsterRadius);
  }
  void fall() {
    monsterSpotY = monsterSpotY + ySpeed;
    if (monsterSpotY > height) {
      monsterSpotY = random(-200, 300);
    }
}
  void run() {
    fall();
    show();
  }  
}


Computer Art

For this assignment, I decided to recreate computer art that I found on Dribble by an artist named Vlad Grama.

The challenging part of this assignment was creating the for loops and figuring out the coordinate system to place the elements. Because of my work on last week’s self-portrait assignment, it made things a lot easier, but this was still the most time-consuming part of the assignment.

The picture on top is what I created using Processing while the art on the bottom is from Vlad Grama’s work.

Link to Dribble image: https://dribbble.com/shots/6282364-B-R-Minimalist-poster-design/attachments


Here is the code in Processing:

void setup() {
  size(640, 680);
}  

void draw() { 
  background(219, 225, 230);
  //dotted triangle on upper half of art
  for (int i = 0; i < 240; i+= 8) {
      line(240 + i, 300 - i, 239 + i, 301 - i);
      line(238 + i, 70, 239 + i , 70);
      line(238, 70 + i, 239, 70 + i);

  }  
  //half-circle
  pushMatrix();
  translate(width / 2, height/2);
  noStroke();
  fill(color(190, 141, 137));  
  rotate(PI / 2);
  arc(-40, 0, 300, 300, -HALF_PI, HALF_PI);
  popMatrix();
  noFill();
  //white triangle
  noStroke();
  fill(255);
  triangle(200, 130, 310, 40, 420, 130);
  //outline of square (black)
  noFill();
  stroke(66, 65, 75);
  rect(100, 120, 190, 190);
  //white lines on bottom of semi circle
  for (int i = 300; i < 348; i += 6) {
    stroke(219, 225, 230);
    line(i, 430, i, 450);
  }    
  //pink lines to upper left of circle
  stroke(color(190, 141, 137));

  for (int i = 165; i < 213; i += 6) {
    line(i, 130, i, 150);
  }  
  for (int i = 165; i < 213; i += 6) {
    line(i, 160, i, 180);
  }    
  noStroke();
  fill(230, 142, 66);
  //orange rectangle
  rect(70, 255, 500, 40);
  //grid rectangle around
  strokeWeight(2);
  stroke(color(190, 141, 137));
  for (int i = 30; i < 290; i+= 20) {
    line(i, 220, i + 4, 220);
  }  
  for (int i = 30; i < 290; i+= 20) {
    line(i, 420, i + 4, 420);
  }  
  for (int i = 220; i < 440; i+= 20) {
    line(30, i, 30, i + 4);
  } 
  //red rect behind circle
  noStroke();
  fill(173, 83, 66);
  rect(160, 230, 340, 5);
  stroke(173, 83, 66);
  line(520, 230, 520, 235);

  for (int i = 140; i < 158; i += 6) {
    line(i, 230, i, 234);
  }   
  //circle in middle
  noStroke();
  fill(66, 65, 75);
  ellipse(width / 2, 240, 180, 180);
  //line below
  stroke(66, 65, 75);  
  strokeWeight(2);
  line(95, 308, 490, 308);
  line(530, 308, 534, 308);
  line(545, 308, 549, 308);
  
  //rectangle below line
  rect(110, 317, 226, 10);
  ellipse(190, 355, 6, 6);
  ellipse(234, 355, 6, 6);
  ellipse(390, 355, 6, 6);
  //red lines on circle
  stroke(173, 83, 66);
  line(60, 270, 140, 270);
  line(170, 270, 590, 270);
  line(170, 280, 590, 280);

  //black lines next to triangle
  stroke(66, 65, 75);  
  strokeWeight(2);
  line(300, 80, 380, 80);
  line(300, 86, 380, 86);
  //three triangles
  for (int i = 0; i < 45; i+= 15){
    triangle(165 + i, 206, 168 + i, 203, 168 + i, 209);
  }  
  //16 x 8 grid of squares
  for (int x = 0; x < 128; x += 8) {
    for (int i = 60; i < 124; i += 8) {
      noStroke();
      fill(230, 142, 66);      
      rect(293 + x, 60 + i, 3, 3);
    }  
   //orange line outside of 16 x 8 grid
  println(mouseY);
  stroke(230, 142, 66);
  strokeWeight(2);
  line(435, 155, 435, 177);
}  
}  


Response: Casey Reas Talk

I thought that watching this presentation was extremely interesting. Especially because I previously had a hard time wrapping my head around the novelty of using computers to generate art. I always thought: “if I can paint what I can do in Processing, why do I need to produce this art using computers?” But this cemented in my mind how useful creating patterns and art in both predictable and unpredictable ways is, and how computers are the perfect tool to do this. The examples Reas presented allowed me to understand just how flexible computer art is.

How can nature be effectively simulated using computer art? This is something that I wondered throughout the video, and Reas provided effective insight into how this can be done. Not only that, but his discussion of simulating nature and patterns extended to not just art but to the broader use of computing power to create patterns with various applications.

Self-Portrait

For this project, I made a self-portrait using processing. I decided to create a fairly basic human-looking face and incorporated a few features that I thought were very characteristic of me. This includes my really big eyebrows, along with my hair which frequently changes.

When any key is pressed, the hair changes between three different states: a top hat, a mohawk, and bald. I added more interaction by allowing the user to control which direction my mohawk was going in through the use of the mouse. Lastly, my pupils follow the mouse as well when the user moves it around.

I found it difficult to use the arc tool at first, but I was able to get it to do what I wanted more or less, though I still cannot say that I mastered it.

Here is the code I used for the project:

boolean hair1 = true;
boolean hair2 = false;
boolean hair3 = false;

int state = 0;

void setup() {
  size(400, 500); 
  rectMode(CENTER);  
  background(131, 206, 210);
}


void draw() {
  background(131, 206, 210);
  //create my white t-shirt
  fill(255, 255, 255);
  noStroke();
  beginShape();
  vertex(0, 500);
  vertex(160, 421);
  vertex(241, 421);
  vertex(400, 500);
  endShape(CLOSE);
  //hair 1 back of head
  if (hair1) {
    fill(0, 0, 0);
    strokeWeight(10);
    ellipse(200, 140, 80, 80);
  }
  //neck
  fill(224, 192, 134);
  noStroke();
  rect(200, 370, 80, 105);
  //ears 
  strokeWeight(14);
  fill(242, 160, 147);
  stroke(234, 192, 134);
  ellipse(100, 220, 40, 40);
  ellipse(300, 220, 40, 40);

  // face 
  noStroke();
  fill(234, 192, 134);
  ellipse(200, 250, 200, 250);

  //mouth
  strokeWeight(10);
  stroke(205, 115, 115);
  arc(200, 290, 60, 60, 0, PI);  // upper half of circle
  //more of hair 1 (on top of hair)
  if (hair1) {
    fill(0, 0, 0);
    noStroke();
    strokeWeight(20);
    arc(200, 145, 125, 50, 0, PI, OPEN);
    ellipse(200, 140, 105, 30);
  }
  //eyes
  noStroke();
  fill(255, 255, 255);
  ellipse(155, 220, 35, 35);
  ellipse(240, 220, 35, 35);

  //pupil
  strokeWeight(7);
  stroke(0, 0, 0);
  fill(139, 69, 19);
  ellipse(constrain(mouseX, 152, 158), constrain(mouseY, 217, 223), 8, 8);
  ellipse(constrain(mouseX, 237, 243), constrain(mouseY, 217, 223), 8, 8);

  //eyebrows
  strokeCap(ROUND);  
  strokeWeight(14);
  fill(0, 0, 0);
  line(125, 190, 178, 190);
  line(215, 190, 268, 190);

  strokeWeight(6);
//assign states of hair to change
  if (state == 0) {
    hair1 = true; 
    hair3 = false;
  } 

  if (state == 1) {
    hair1 = false; 
    hair3 = false;
  }  
  if (state == 2) {
    hair3 = true; 
    hair1 = false;
  }    
  if (hair3) {
    strokeWeight(20);
    line(160, 140, constrain(mouseX, 70, 210), constrain(mouseY, 60, 80));
    line(175, 140, constrain(mouseX, 90, 230), constrain(mouseY, 60, 80));
    line(190, 140, constrain(mouseX, 110, 250), constrain(mouseY, 60, 80));
    line(205, 140, constrain(mouseX, 130, 270), constrain(mouseY, 60, 80));
    line(220, 140, constrain(mouseX, 150, 290), constrain(mouseY, 60, 80));
  }
}

void keyPressed() {
    state += 1;
    if (state == 3) {
      state = 0;
    }
  }


Response: Her Code Got Humans on the Moon

This article was more inspiring than it was able to provide me directly with knowledge about interactive media. I truly enjoyed reading this, and it made me think about the complexity of this field. I previously would not be able to credit applications like Google Chrome, Spotify or Processing to the work of someone who developed software necessary for the Apollo space missions.

Although Hamilton’s work is more in the realm of computer science and mathematics rather than something in Interactive Media, seeing that the tools we use in the classes today stem from these discoveries in somewhat different fields, made me realize how dependent I am on interdisciplinary knowledge if I am to immerse myself in this field.

Furthermore, this article demonstrated the complexity of the field by showing how daunting it can be to develop these kinds of tools. Ideally, Hamilton and her fellow scientists would have decades to develop the perfect program, with all potential bugs and errors detected and solved, but sometimes this is simply impossible due to time constraints. I will definitely keep in mind the importance of prioritizing what needs to be done so that I might work more efficiently in all my projects.

Blog Post: Attractive Things Work Better

I found this reading extremely interesting, especially in its discussion of design and its effects on human decision-making and creativity. The part that I found most thought-provoking was Norman’s discussion of Elvish from The Lord of the Rings and the broader discussion of how language is designed to have words evoke certain emotions in the speaker/listener. Previously I have always thought of sounds as arbitrarily assigned, but the more I think about it Norman makes a great point about these sound associations being intuitive and natural to humans. I find it very fascinating how different colors, sounds, textures, etc. all evoke different feelings and thus impact our ability to use a product. Relating all of this to interactive design and design in general, I find myself thinking: how can I make the projects I make in this class enjoyable, usable and efficient for my users?

Midterm: Light-Loving/Light-Fearing Vehicle

My initial plan for my midterm project was to produce a vehicle that would behave differently depending on how far it was from an object that is in its way. However, Aaron gave me a brilliant idea, which was to have a look at Braitenberg Vehicles, vehicles that would behave differently depending on its distance from light. This solved one of the biggest problems with my initial idea, because the Braitenberg vehicle would allow for greater interaction with users, allowing people to use flashlights on their phone  to navigate the vehicle.

My initial prototype was made of cardboard, however, this was structurally very weak and the right wheel would constantly fall off after prolonged movement. The vehicle was also lopsided, with the front being much lower to the ground than the back of the vehicle. This was not aesthetically pleasing and it resulted in some performance issues.

So I instead decided to use wood for the vehicle, which provides a more solid foundation, and solved the issue of the tilted vehicle. For the program itself, I ran an analogRead on the photoresistors positioned at the front of the vehicle, which would determine the speed of the wheels when exposed to varying light levels. This was effective at first, and my vehicle ran smoothly, however, for some reason, one photoresistor was getting much higher read values than the other. Despite trying to debug this and rewire the circuit, I decided to somewhat hardcode the machine. This actually turned out to be more effective, allowing the vehicle to be more attracted to light when the light in the environment was higher. I am sure that my code could have been more efficient.

Here is a video of the vehicle running in a dark room:

I also created a light-fearing version of the vehicle by changing the code by flipping the values for the wheel movement speeds. The vehicle does not work as well as the light-loving version, especially in environments that are moderately lit.

Here is the code for the light-loving version of the vehicle

const int pwma = 11 ; 
const int in_1 = 13 ;
const int in_2 = 12 ;
//first wheel ^
const int pwmb = 10 ; 
const int in_3= 8 ;
const int in_4 = 9 ;
//first wheel ^

const int photo1 = A4;
const int photo2 = A5;

int direct = 0;
int direct2 = 0;
void setup() {
  // put your setup code here, to run once:
   pinMode(pwma,OUTPUT) ; //we have to set PWM pin as output
   pinMode(pwmb,OUTPUT) ; //we have to set PWM pin as output
   pinMode(in_1,OUTPUT) ; //Logic pins are also set as output
   pinMode(in_2,OUTPUT) ;
   pinMode(in_3,OUTPUT) ; //Logic pins are also set as output
   pinMode(in_4,OUTPUT) ;
   Serial.begin(9600);
}

void loop() {
  // put your main code here, to run repeatedly:
   direct = random(0, 1);
   direct2 = (direct + 1) % 2;
   int photoOneValue = map(analogRead(A4), 0, 1023, 0, 255);
   int photoTwoValue = map(analogRead(A5), 0, 1023, 0, 255);
   if (photoTwoValue > 105) {
     digitalWrite(in_1, direct2) ;
     digitalWrite(in_2, direct) ;
     digitalWrite(in_3, direct2) ;
     digitalWrite(in_4, direct) ;
     analogWrite(pwma, 70);
     analogWrite(pwmb, 250);
     Serial.println("1");
} // speed in opposite direction to light
   //previous value was 85 ^

   else if (photoOneValue > 160) {
     digitalWrite(in_1, direct2) ;
     digitalWrite(in_2, direct) ;
     digitalWrite(in_3, direct2) ;
     digitalWrite(in_4, direct) ;
     analogWrite(pwma, 250);
     analogWrite(pwmb, 70);
     Serial.println("2");
   } 
   //previous value was 160 ^
   else if (photoTwoValue < 20 && photoOneValue < 80) {
     digitalWrite(in_1, direct2) ;
     digitalWrite(in_2, direct) ;
     digitalWrite(in_3, direct2) ;
     digitalWrite(in_4, direct) ;
     analogWrite(pwma, 110);
     analogWrite(pwmb, 110);
     Serial.println("3");
//constant slow speed when room is dim
 }
  else if (photoTwoValue > 20 && photoOneValue > 80 && photoOneValue < 160 && photoTwoValue < 105) {
     digitalWrite(in_1, direct2) ;
     digitalWrite(in_2, direct) ;
     digitalWrite(in_3, direct2) ;
     digitalWrite(in_4, direct) ;
     analogWrite(pwma, photoOneValue + 20);
     analogWrite(pwmb, photoTwoValue + 60);
     Serial.println("4");
//environment not dim, but light not sensitive enough to activate the two if statements on top, allows vehicle to move faster towards light/
  }
}

And below is the code for the “light-fearing” version of the vehicle:

const int pwma = 11 ; 
const int in_1 = 13 ;
const int in_2 = 12 ;

const int pwmb = 10 ; 
const int in_3= 8 ;
const int in_4 = 9 ;

const int photo1 = A4;
const int photo2 = A5;

int direct = 0;
int direct2 = 0;
void setup() {
  // put your setup code here, to run once:
   pinMode(pwma,OUTPUT) ; //we have to set PWM pin as output
   pinMode(pwmb,OUTPUT) ; //we have to set PWM pin as output

   pinMode(in_1,OUTPUT) ; //Logic pins are also set as output
   pinMode(in_2,OUTPUT) ;
   pinMode(in_3,OUTPUT) ; //Logic pins are also set as output
   pinMode(in_4,OUTPUT) ;
   Serial.begin(9600);
}

void loop() {
  // put your main code here, to run repeatedly:
   direct = random(0, 1);
   direct2 = (direct + 1) % 2;
   int photoOneValue = map(analogRead(A4), 0, 1023, 0, 255);
   int photoTwoValue = map(analogRead(A5), 0, 1023, 0, 255);
   if (photoTwoValue > 105) {
     digitalWrite(in_1, direct2) ;
     digitalWrite(in_2, direct) ;
     digitalWrite(in_3, direct2) ;
     digitalWrite(in_4, direct) ;
     analogWrite(pwma, 250);
     analogWrite(pwmb, 70);
     Serial.println("1");
}
   //previous value was 85 ^

   else if (photoOneValue > 160) {
     digitalWrite(in_1, direct2) ;
     digitalWrite(in_2, direct) ;
     digitalWrite(in_3, direct2) ;
     digitalWrite(in_4, direct) ;
     analogWrite(pwma, 70);
     analogWrite(pwmb, 250);
     Serial.println("2");
   } 
   //previous value was 160 ^
   else if (photoTwoValue < 20 && photoOneValue < 80) {
     digitalWrite(in_1, direct2) ;
     digitalWrite(in_2, direct) ;
     digitalWrite(in_3, direct2) ;
     digitalWrite(in_4, direct) ;
     analogWrite(pwma, 110);
     analogWrite(pwmb, 110);
     Serial.println("3");

 }
  else if (photoTwoValue > 20 && photoOneValue > 80 && photoOneValue < 160 && photoTwoValue < 105) {
     digitalWrite(in_1, direct2) ;
     digitalWrite(in_2, direct) ;
     digitalWrite(in_3, direct2) ;
     digitalWrite(in_4, direct) ;
     analogWrite(pwma, photoTwoValue + 60);
     analogWrite(pwmb, photoOneValue + 20);
     Serial.println("4");
  }
}