Week 11 Reading Reflection

This week’s reading, Design Meets Disability, made me think differently about how we design for people with disabilities. Instead of just focusing on making tools that work, the reading talks about making them look good too. One idea that stood out to me was how assistive devices, like hearing aids, can be designed to match the user’s style. This turns them from something people might feel shy about into something they’re proud to wear.

I also liked the focus on working directly with the people who will use these designs. When users are involved, the tools are not only more useful but also feel more personal and meaningful. For example, the way glasses became a fashion statement over time shows how design can change how we see things, not just how they work.

This reading made me think about my own projects and how I can use similar ideas. I want to make designs that are simple and easy to use but still look creative and fun. I also want to involve users more, so the designs feel like they belong to them, not just something made for them.

In the end, this reading reminded me that design isn’t just about fixing problems—it’s about improving lives in ways that make people feel seen and valued. It’s a small change in thinking but one that can make a big difference.

Exercise 1:

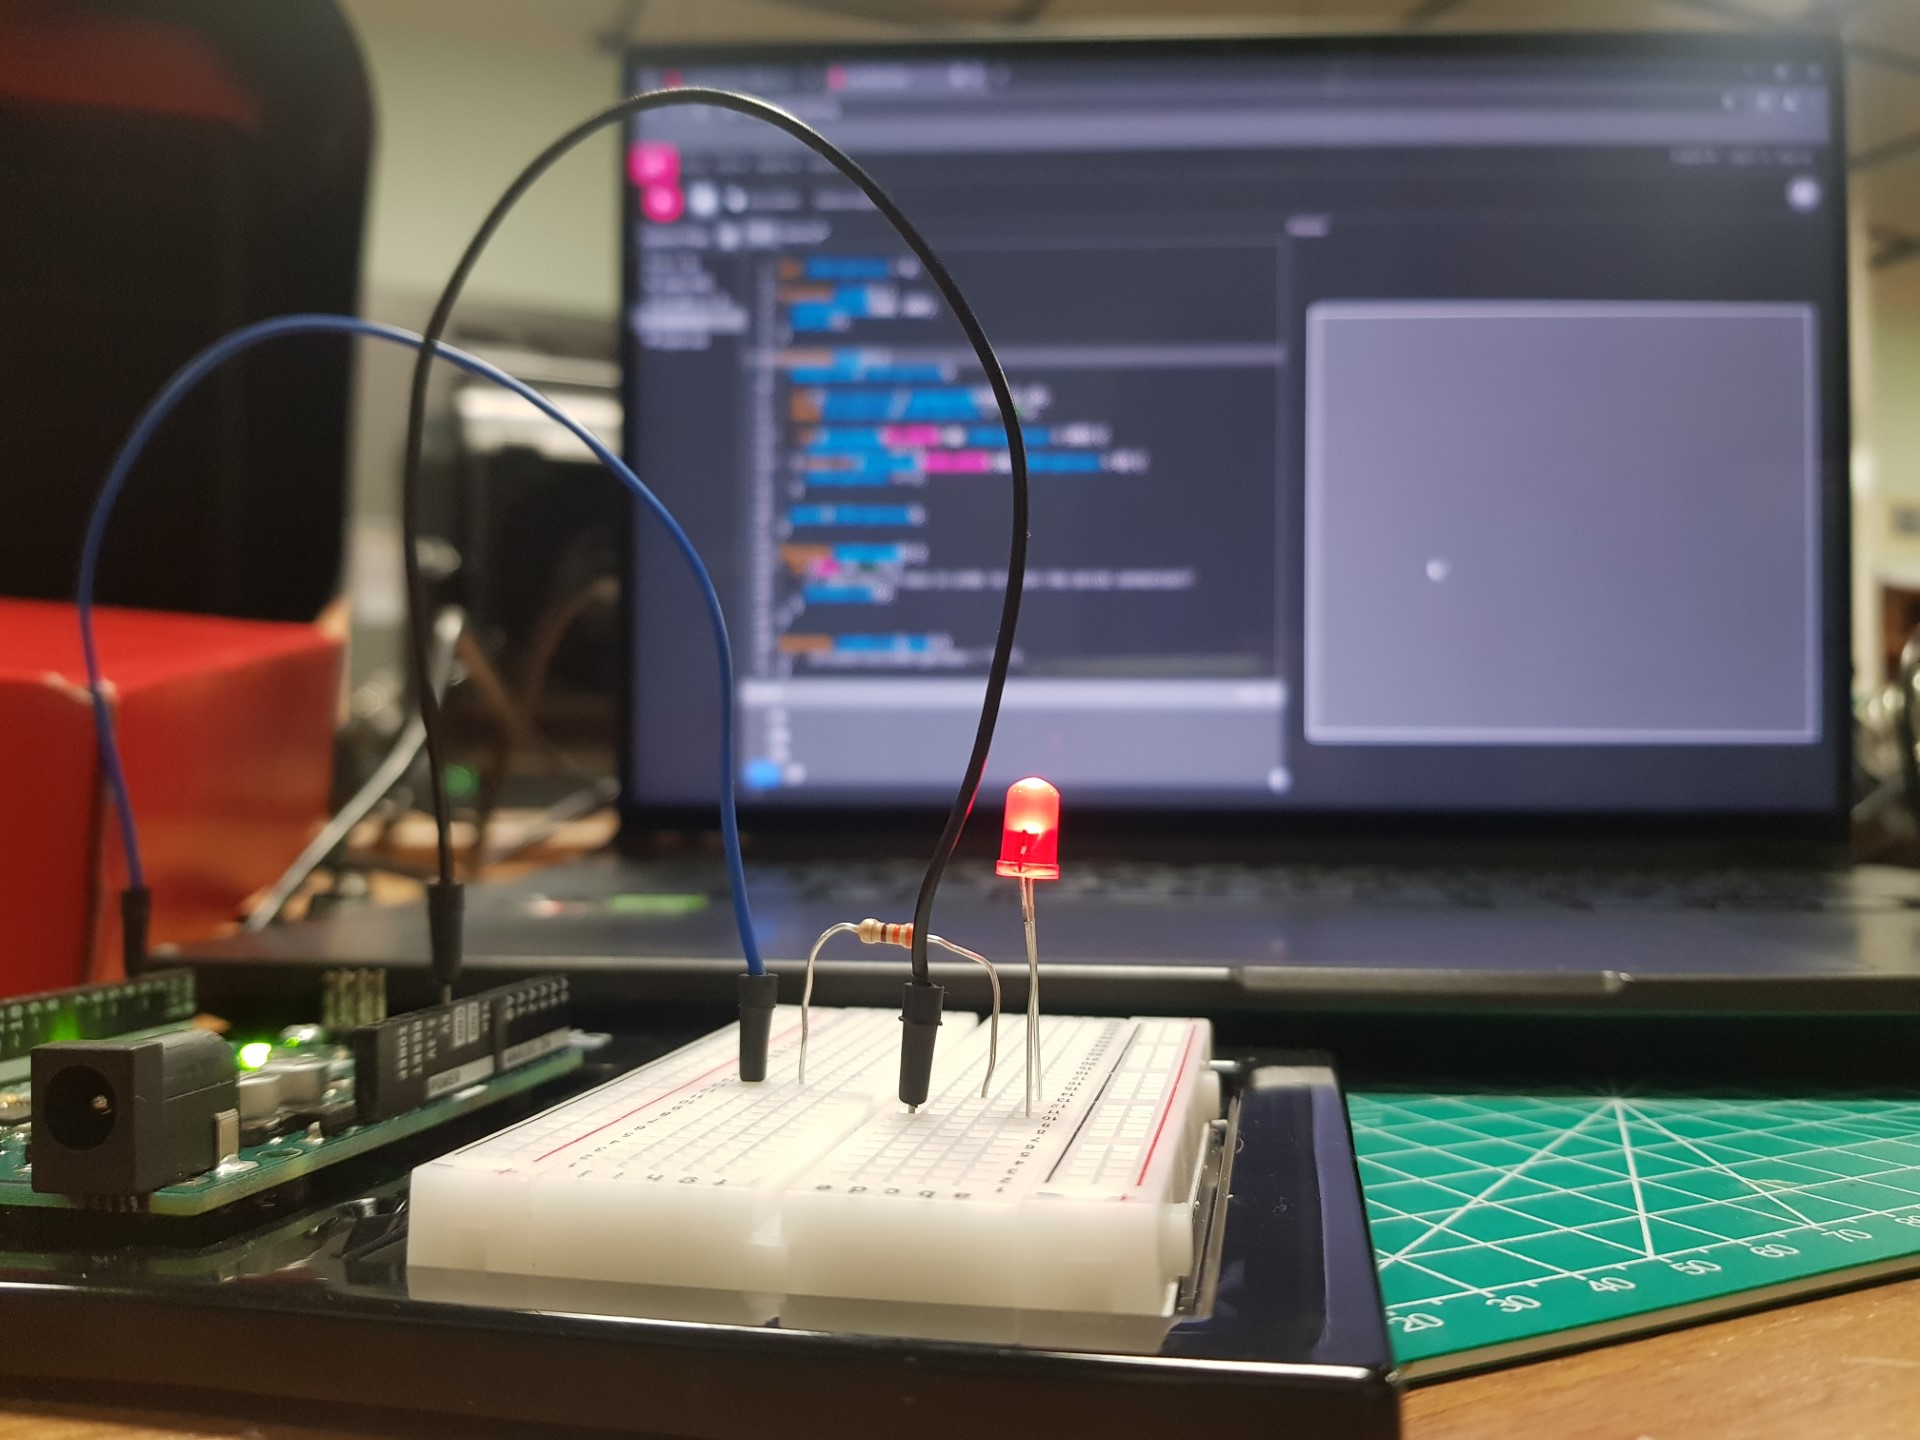
Make something that uses only one sensor on Arduino and makes the ellipse in p5 move on the horizontal axis, in the middle of the screen, and nothing on Arduino is controlled by p5.

The location of the x of ellipse is being altered by the potentiometer.

The value from the potentiometer is mapped between 0 and 640, the width of the canvas.

Utilizing a Potentiometer, the ellipse moves along the horizontal axis, while also changing colors by making changes to the B value of fill.

Arduino Code: 

P5 Code:

let ellipseX = 0; //x value of ellipse to be changed by potentiometer
let B =0;

function setup() {
  createCanvas(640, 480);
  ellipseMode(CENTER);
}

function draw() {
  clear();
  background(0)
  fill(255,0,B);
  ellipse(ellipseX, height/2, 50, 50);


  if (!serialActive) {
    text("Press Space Bar to select Serial Port", 20, 30);
  } else {
    text("Connected", 20, 30);  
    // Print the current values
    text('ellipseX = ' + str(ellipseX), 20, 50);
  }
}

function keyPressed() {
  if (key == " ") {
   
    setUpSerial(); //establish serial communication
  }
}

function readSerial(data) {  
  if (data) {    //run only if data is received
    data = data.trim(); // Remove any whitespace
    if (!isNaN(data)) { //check whether data is a number or not
      //debug: console.log("Received:", data);
      ellipseX = int(data);
    }
  }

Exercise 2:

Make something that controls the LED brightness from p5.

A slider is created and data from it is sent to the Arduino. Based on the input from the p5 sketch, the LED’s brightness is adjusted accordingly.

Arduino Code: 

P5 Code:

let slider;
let brightness = 0;
function setup() {
  createCanvas(400, 400);
  // Create a brightness slider
  slider = createSlider(0, 255, 128);
  slider.position(width/2, height/2);
  slider.style('width', '100px');
}
function draw() {
  background(255);
  if (!serialActive) {
    textAlign(CENTER)
    text("Press Space Bar to select Serial Port", width/2, height/3);
  } else {
    text("Connected", width/2, height/3);
  }
  brightness = slider.value();
}
function keyPressed() {
  if (key == " ") {
    // important to have in order to start the serial connection!!
    setUpSerial();
  }
}
function readSerial(data) {
  console.log(data);
    let dataToSend = brightness + ", \n";
    writeSerial(dataToSend);  
}

Exercise 3:

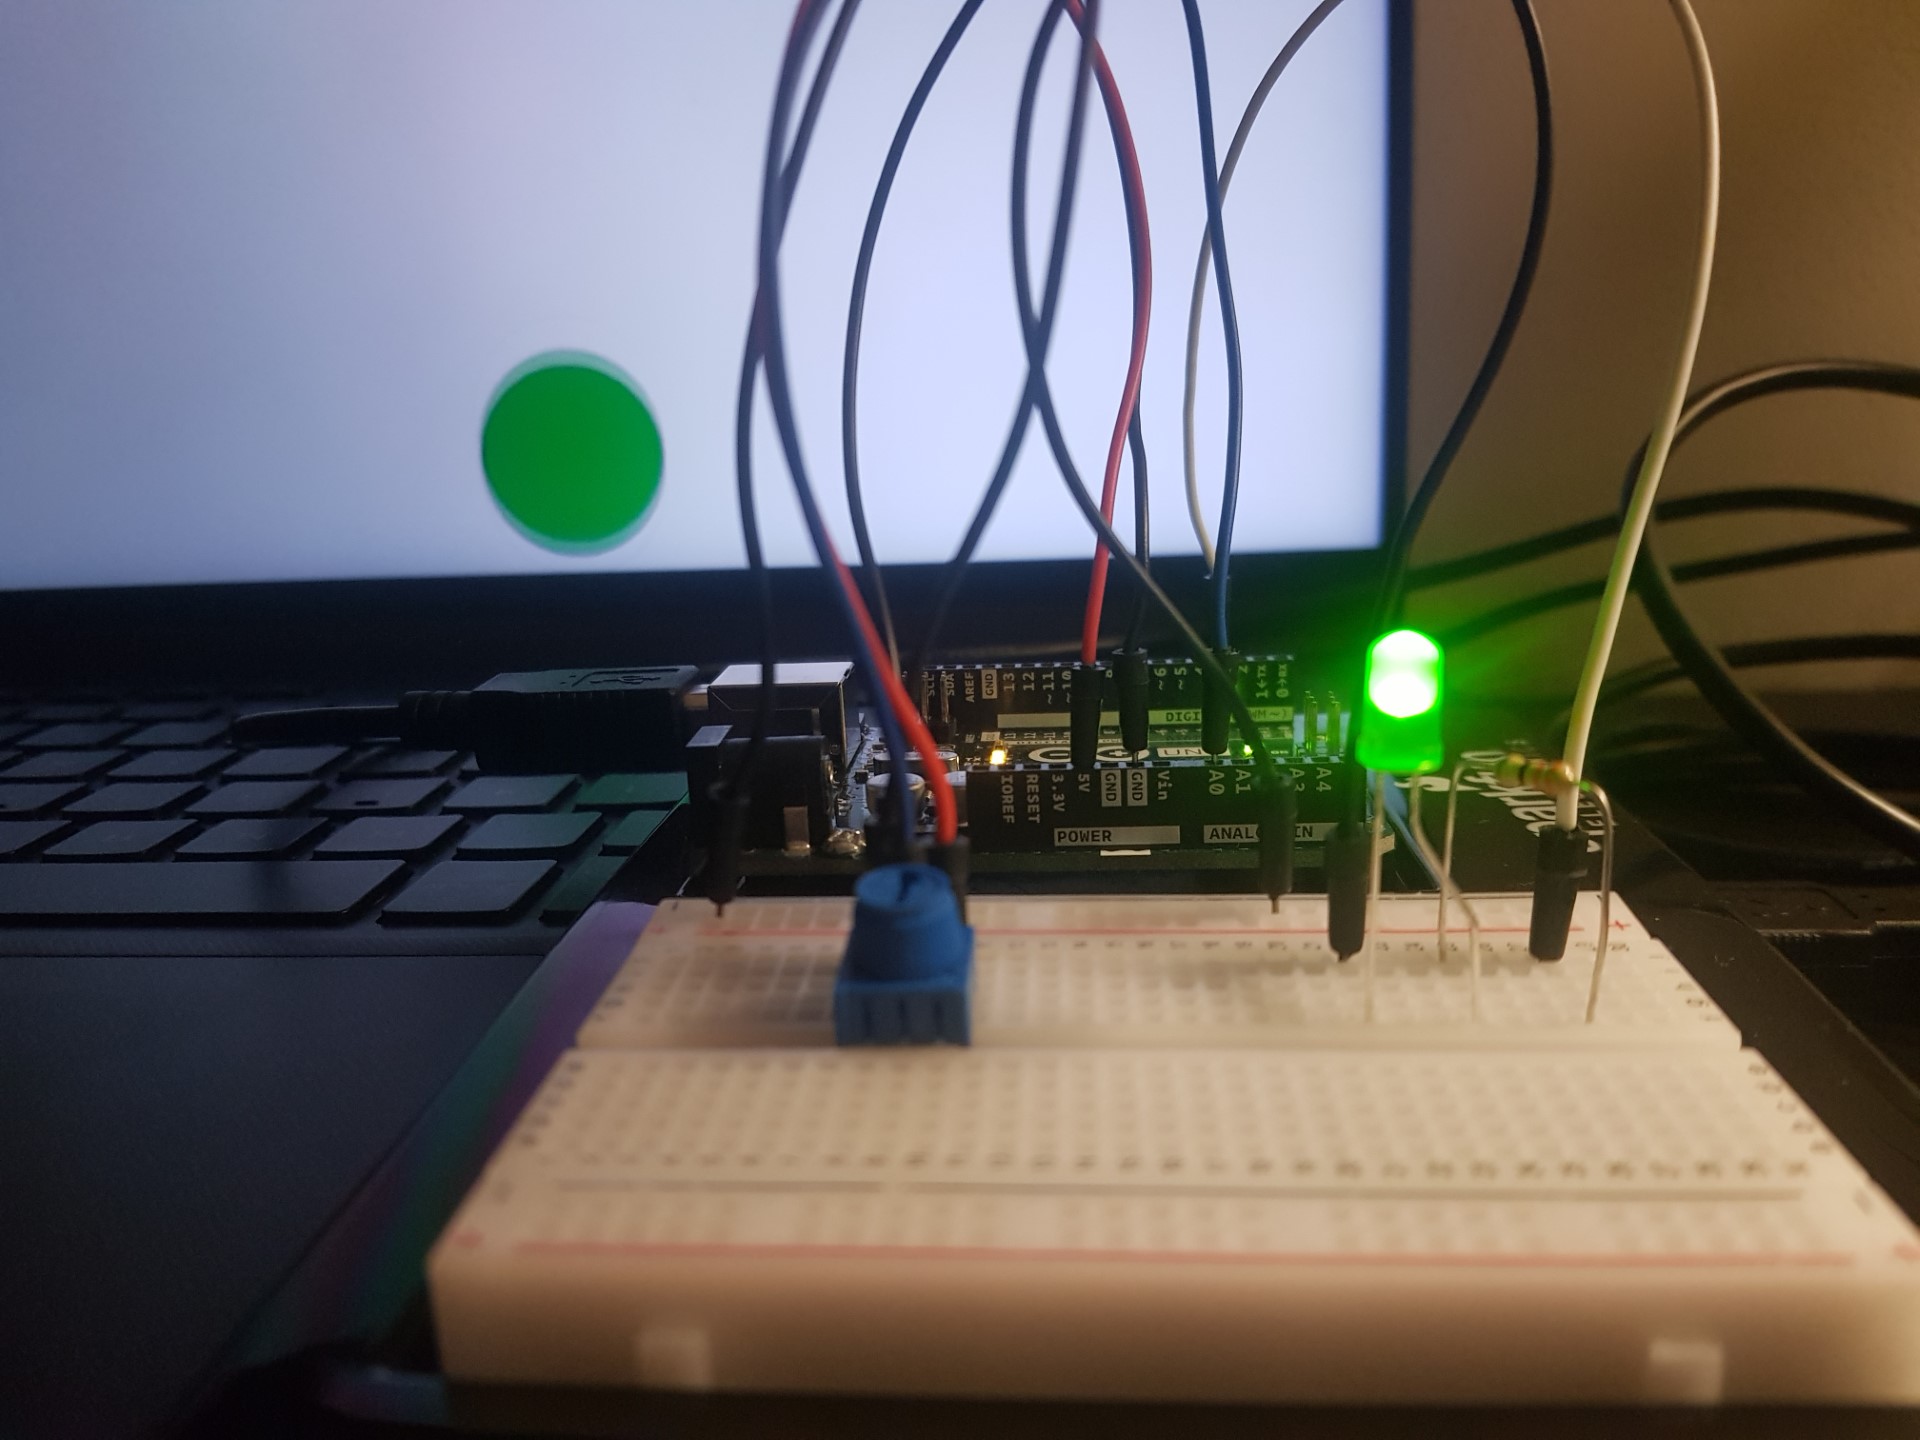
Take the gravity wind example and make it so every time the ball bounces one led lights up and then turns off, and you can control the wind from one analog sensor.

Using a potentiometer mapped from -2 to 2, when the potentiometer is towards the left, the wind blows towards the left, and vice versa. The LED lights up every time the ball touches the bottom edge of the canvas.

A serial signal is sent to arduino everytime the ball touches the bottom of the canvas, resulting in the led to light up on the arduino. The potentiometer’s value will be reflected in the direction that the wind is blowing on the ball. I also added two walls on the right and left sides of the canvas, to prevent the wind from blowing the ball outside of the canvas.

Arduino Code:

P5 Code:

let led;
let velocity;
let gravity;
let position;
let acceleration;
let wind;
let drag = 0.99;
let mass = 50;

function setup() {
  createCanvas(640, 360);
  noFill();
  position = createVector(width/2, 0);
  velocity = createVector(0,0);
  acceleration = createVector(0,0);
  gravity = createVector(0, 0.5*mass);
  wind = createVector(0,0);
}

function draw() {
  background(255);
  applyForce(wind);
  applyForce(gravity);
  velocity.add(acceleration);
  velocity.mult(drag);
  position.add(velocity);
  acceleration.mult(0);
  ellipse(position.x,position.y,mass,mass);
  if (position.y > height-mass/2) {
      velocity.y *= -0.9;  // A little dampening when hitting the bottom
      position.y = height-mass/2;
    
    
    if(serialActive){
      writeSerial("bounced\n");
    }
    }
  // Check for collisions with the left wall
  if (position.x < mass / 2) {
    velocity.x =0; // Reverse horizontal velocity (bounce)
    position.x = mass / 2; // Correct position
  }

  // Check for collisions with the right wall
  if (position.x > width - mass / 2) {
    velocity.x =0; // Reverse horizontal velocity (bounce)
    position.x = width - mass / 2; // Correct position
  }
}

function applyForce(force){
  // Newton's 2nd law: F = M * A
  // or A = F / M
  let f = p5.Vector.div(force, mass);
  acceleration.add(f);
}


function keyPressed() {
  if (key == " ") {
    // important to have in order to start the serial connection!!
    setUpSerial();
  }
  if (keyCode==DOWN_ARROW){
    //mass=random(15,80);
    position.y=-mass;
    velocity.mult(0);
  }
}


function readSerial(data){
  
  if (data != null){
    wind.x=int(data);
    console.log("working");

  }
}


In Class Activity: Zavier and Taskin

# Jump To:


# Introduction

Hi there! 👋

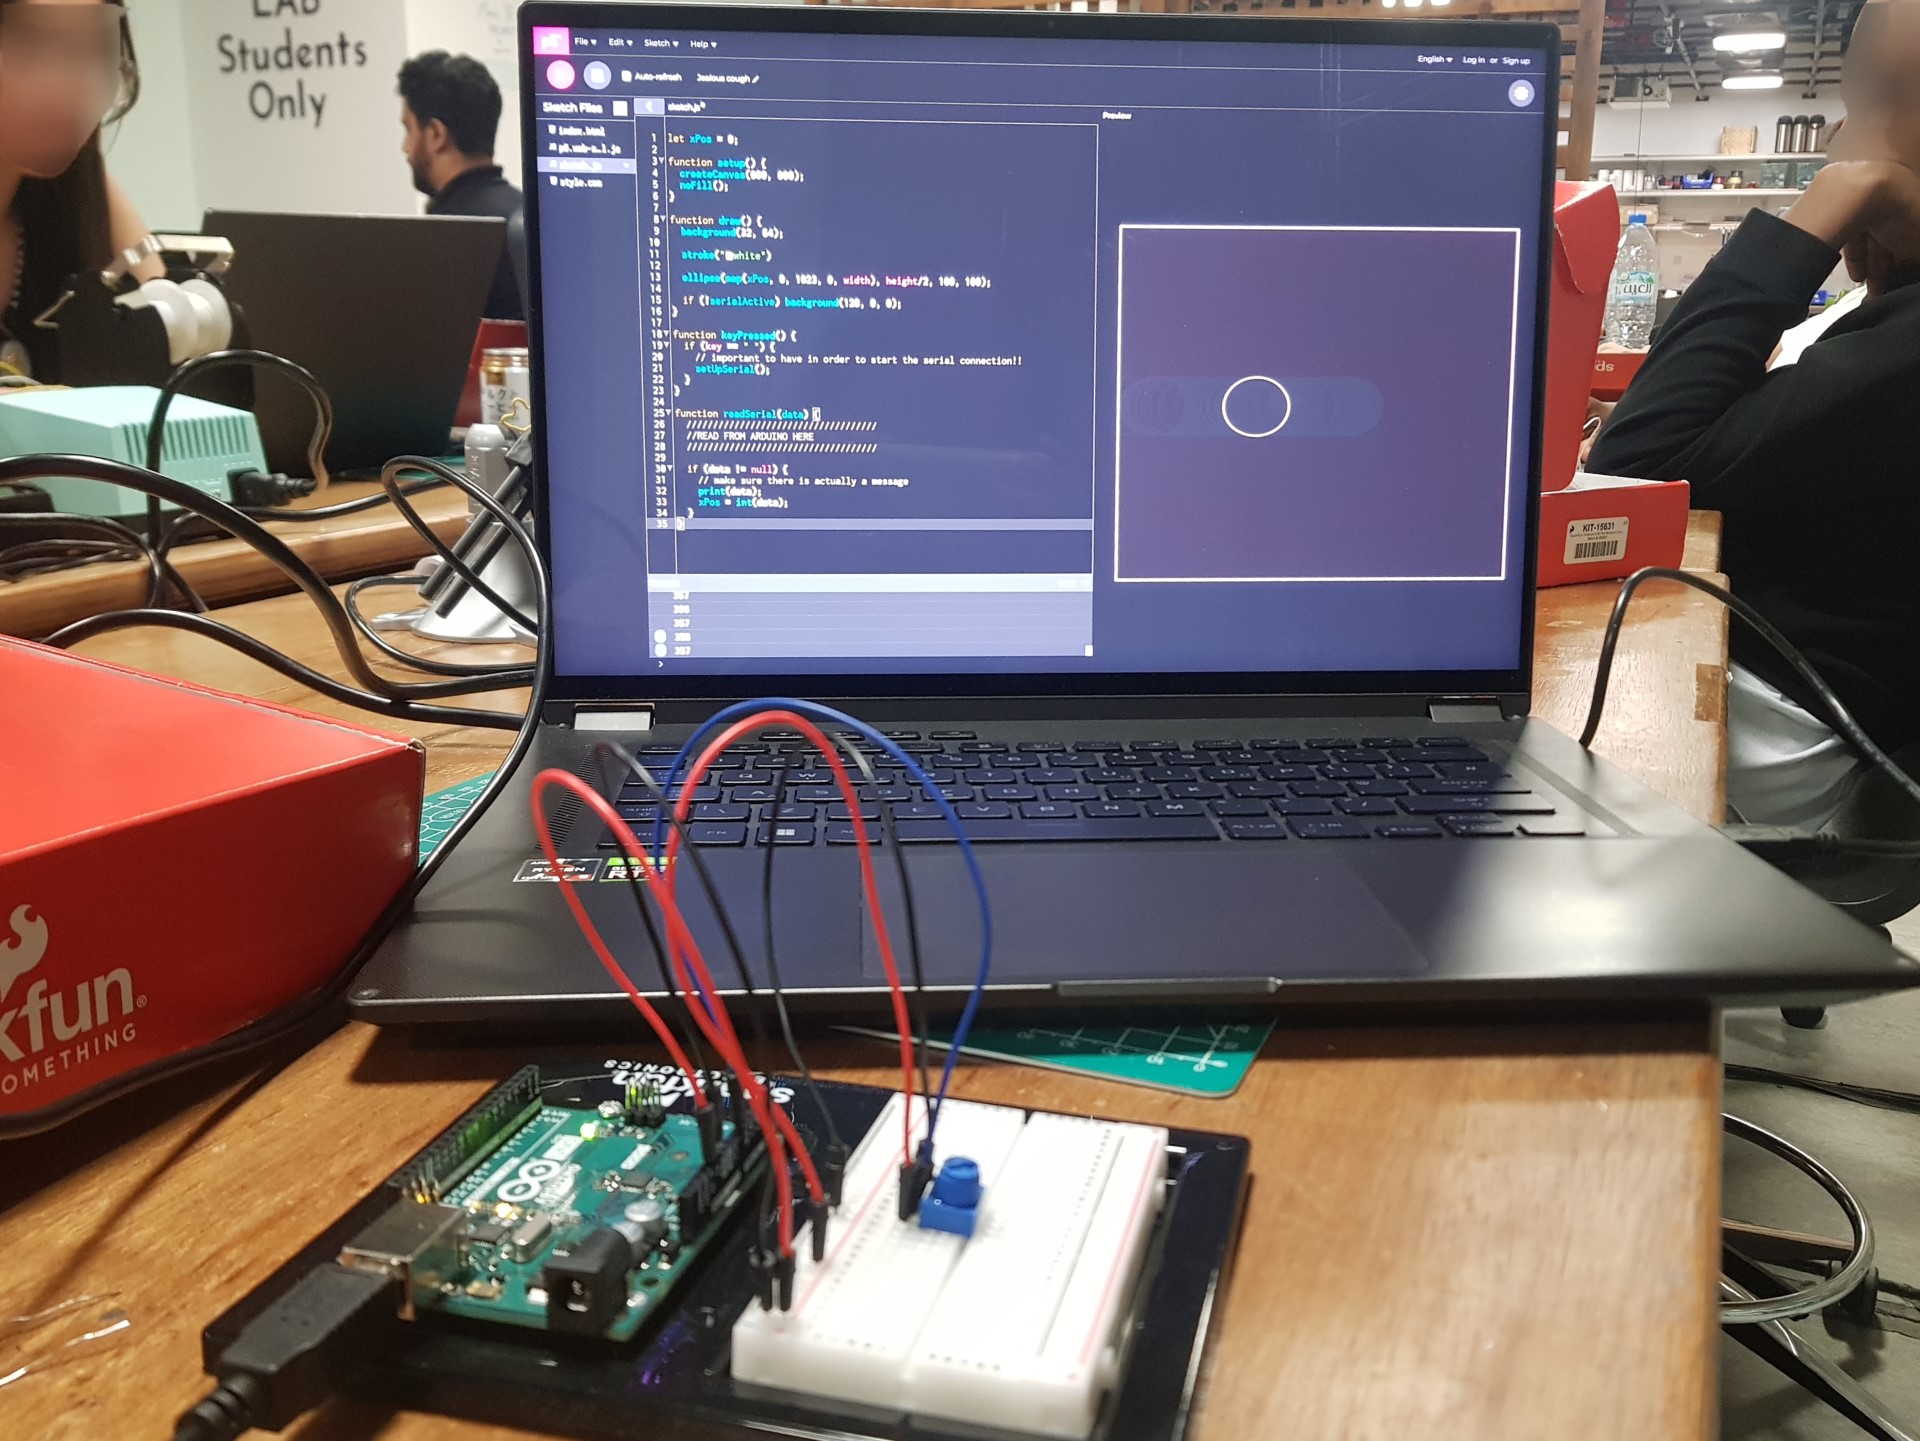
These are a few in-class activities Zavier and I did this week (and had to post), resolving around serial communication between p5 and Arduino.

# Exercise 1: Arduino Affecting p5


Task:

“Make something that uses only one sensor on Arduino and makes the ellipse in p5 move on the horizontal axis, in the middle of the screen, and nothing on arduino is controlled by p5.”


Code:
Arduino:
 
void setup() {
	Serial.begin(9600);
	pinMode(A0, INPUT);
}

void loop() {
	Serial.println(analogRead(A0));
	delay(10);
}
 
p5:
 
let xPos = 0;

function setup() {
	createCanvas(600, 600);
	noFill();
}

function draw() {
	background(32, 64);
	
	stroke("white")

	ellipse(map(xPos, 0, 1023, 0, width), height/2, 100, 100);
	
	// Turn the screen red to make it very clear that we aren't connected to the Arduino
	if (!serialActive)
		background(128, 0, 0);
}

function keyPressed() {
	if (key == " ")
		setUpSerial(); // Start the serial connection
}

function readSerial(data) {
	if (data != null) // Ensure there's actually data
		xPos = int(data);
}			


# Exercise 2: p5 Affecting Arduino


Task:

“Make something that controls the LED brightness from p5.”


Code:
Arduino:
 
void setup() {
	Serial.begin(9600);
	pinMode(3, OUTPUT);
}

void loop() {
	analogWrite(3, Serial.parseInt());
	Serial.println();
	delay(10);
}
 
p5:
 
let xPos = 0;
let LEDBrightness = 0; // 0 - 255

function setup() {
	createCanvas(600, 600);
}

function draw() {
	if (keyIsDown(UP_ARROW) && LEDBrightness < 255) LEDBrightness += 1; else if (keyIsDown(DOWN_ARROW) && LEDBrightness > 0)
		LEDBrightness -= 1;
	
	// Just a visual indicator of the brightness level on p5
	background(LEDBrightness);
	fill(LEDBrightness < 128 ? 'white' : 'black')
	text(LEDBrightness, 25, 25);
	
	// Turn the screen red to make it very clear that we aren't connected to the Arduino
	if (!serialActive)
		background(128, 0, 0);
}

function keyPressed() {
	if (key == " ")
		setUpSerial(); // Start the serial connection
}

function readSerial(data) {
	writeSerial(LEDBrightness);
}


# Exercise 3: Arduino and p5 Affecting Each Other


Demo:


Task:

“Take the gravity wind example and make it so every time the ball bounces one led lights up and then turns off, and you can control the wind from one analog sensor.”


Code:
Arduino:
 
const int LED_PIN = 3;
const int POT_PIN = A0;

void setup() {
	Serial.begin(9600);
	pinMode(LED_PIN, OUTPUT);
	pinMode(POT_PIN, INPUT);

	// Start the handshake
	while (Serial.available() <= 0) {
		Serial.println("0"); // Send a starting message
		delay(300); // Wait ~1/3 second
	}
}

void loop() {
	while (Serial.available()) {
		int LEDState = Serial.parseInt(); // 0 or 1
		
		if (Serial.read() == '\n') {
			digitalWrite(LED_PIN, LEDState);
			Serial.println(analogRead(POT_PIN));
		}
	}
}
 
p5:
 
let position, velocity, acceleration, gravity, wind; // vectors
let drag = 0.99, mass = 50, hasBounced = false;

function setup() {
	createCanvas(640, 360);
	noFill();
	position = createVector(width/2, 0);
	velocity = createVector(0,0);
	acceleration = createVector(0,0);
	gravity = createVector(0, 0.5*mass);
	wind = createVector(0,0);
	
	textAlign(CENTER);
	textSize(18);
}

function draw() {
	background(255);
	applyForce(wind);
	applyForce(gravity);
	velocity.add(acceleration);
	velocity.mult(drag);
	position.add(velocity);
	acceleration.mult(0);
	fill(hasBounced ? 'green' : 'white')
	ellipse(position.x,position.y,mass,mass);
	if (position.y > height-mass/2) {
		velocity.y *= -0.9;  // A little dampening when hitting the bottom
		position.y = height-mass/2;
		
		if (!hasBounced && abs(velocity.y) > 1) {
			hasBounced = true;
			setTimeout(() => hasBounced = false, 100); // Set hasBounced to false after 0.1 s
		}
	}  
	
	if (!serialActive) {
		background(8);
		fill('white');
		text("Press c to connect to the Arduino", width/2, height/2)
	}
}

function applyForce(force){
	// Newton's 2nd law: F = M * A
	// or A = F / M
	let f = p5.Vector.div(force, mass);
	acceleration.add(f);
}

function keyPressed(){
	if (key == ' '){
		mass = random(15,80);
		position.set(width/2, -mass);
		velocity.mult(0);
		gravity.y = 0.5*mass;
		wind.mult(0);
		
	} else if (key == 'c') {
		setUpSerial(); // Start the serial connection
	}
}

function readSerial(data) {
	if (data != null) { // Ensure there's actually data
		wind.x = map(int(data), 0, 1023, -2, 2);
		writeSerial((hasBounced ? 1 : 0) + '\n');
	}
}


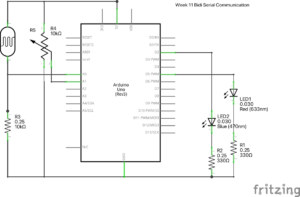
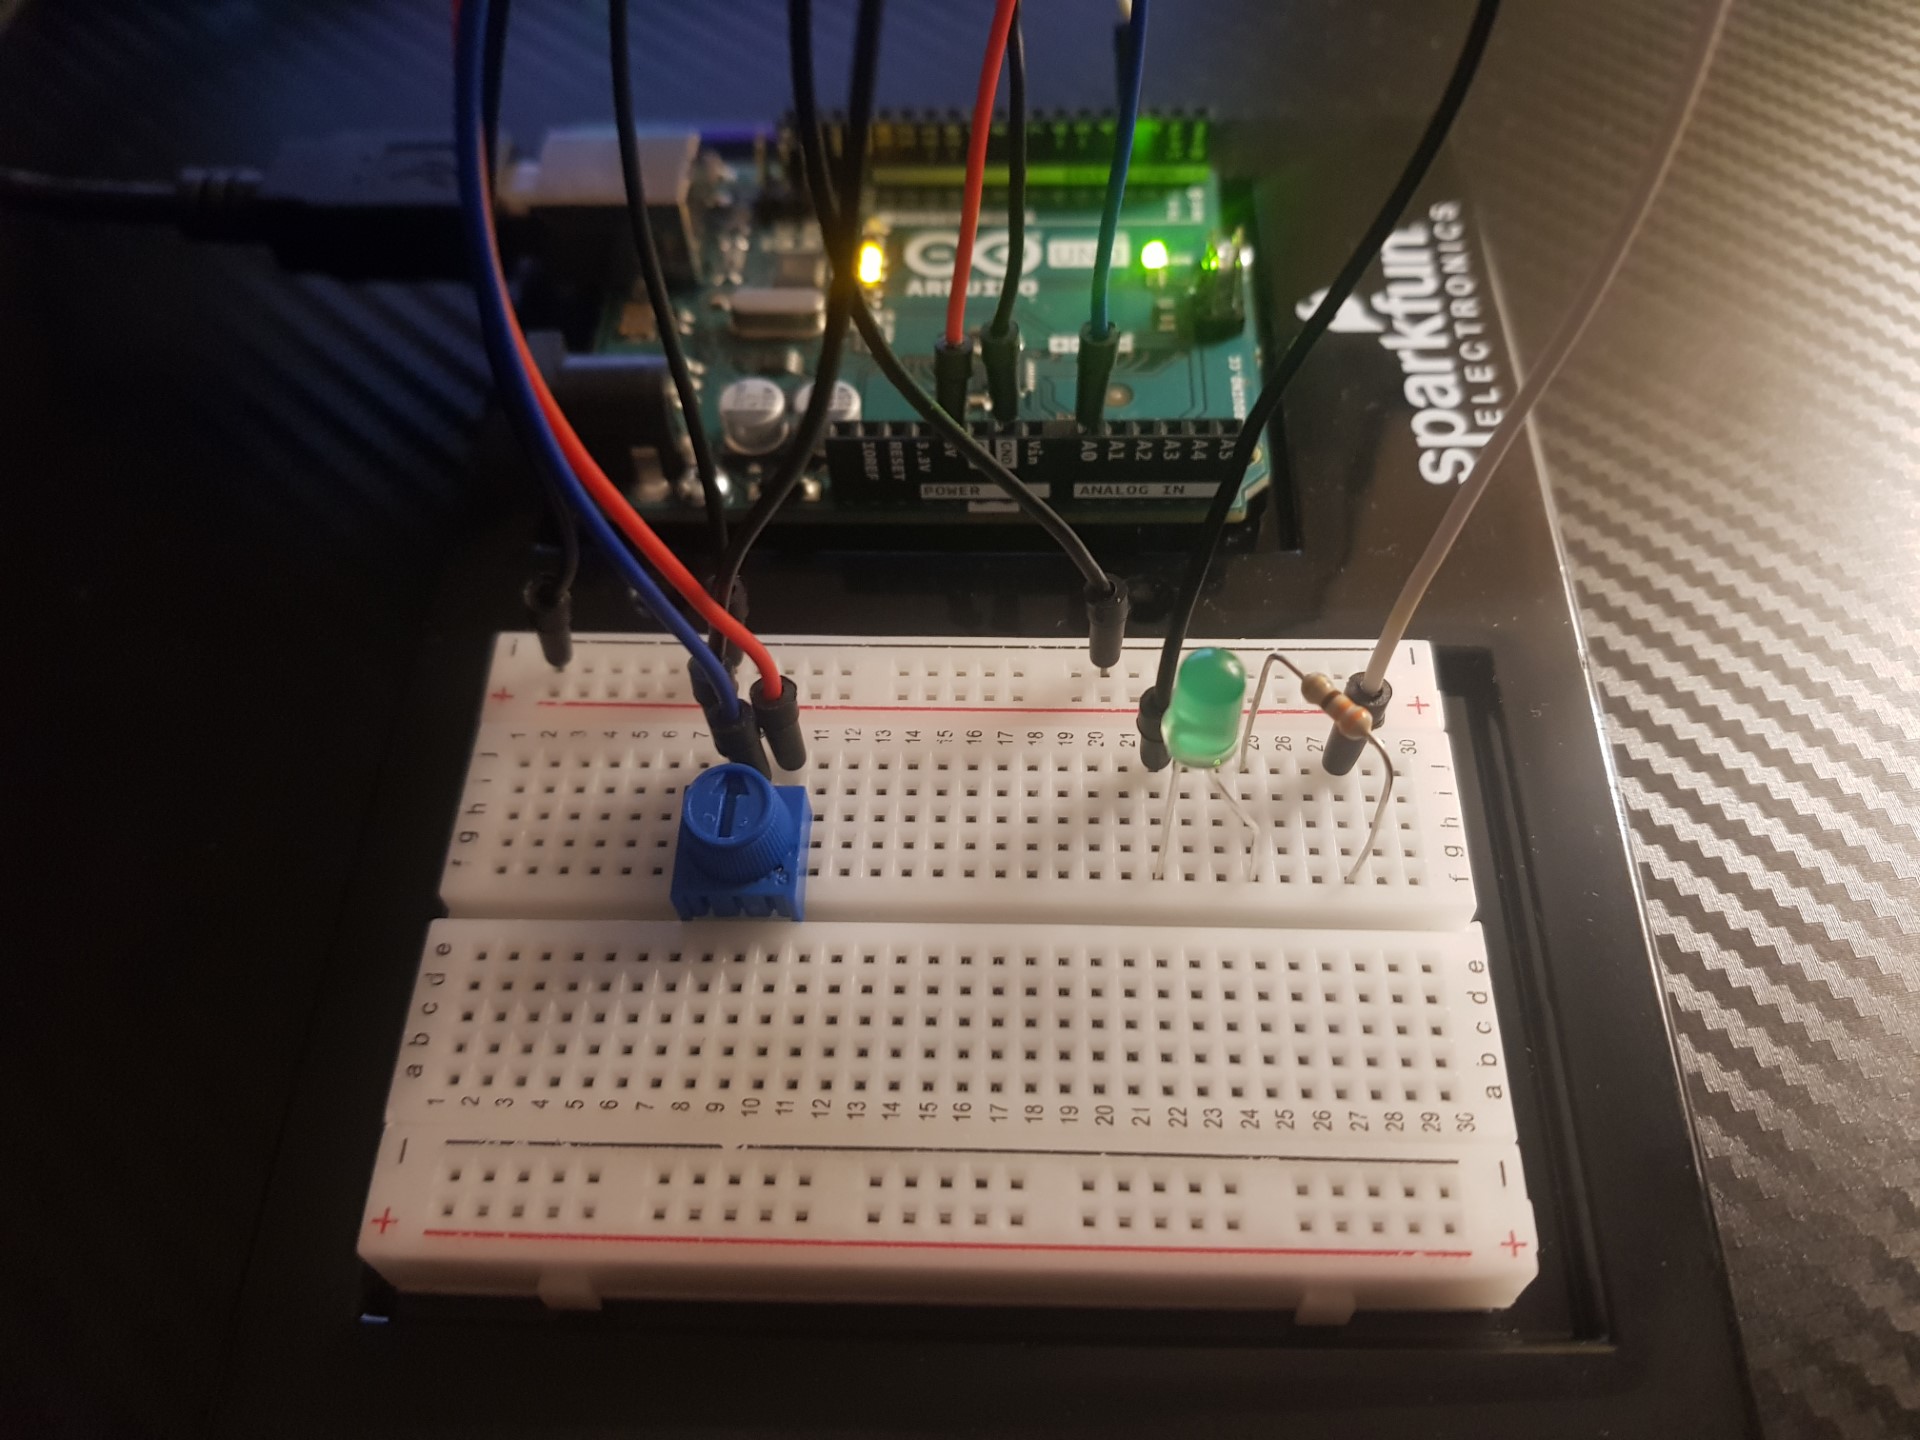
Circuit:


Week 11 Reading Reflection

In this week’s reading, the author studies and discusses the relationship between Style, fashion, and disability. One of the easiest and best examples of this that was given is in eyewear. Eyewear strikes the balance perfectly between showing off your style whilst being a tool of solving a problem of disability. The author believes that, even for larger forms of assitive products, such as legwear and armwear, there should be close attention payed to the aesthetics of these products. The author signifies the importance of product designs being inclusive, involving both designer and user. The aesthetics or design of a product should not be payed with any less attention to detail just because it is an assistive device. The author introduces the idea of universal design, in which the problems of accessibility and the needs and wants of a consumer is tackled. This reading helped me reflect upon the ideology that goes behind designing things, thinking about the intended audience and allowing not just a small population to be able to utilize a product.

Week 11: Reading Response

Design Meets Disability

The reading highlights some important points, especially on how we should rethink design for disability, emphasizing a balance between function and beauty. The examples given, such as the Eames’ leg splint, stood out to me because they show that disability products can be both useful and attractive. I was also inspired by the story of how glasses changed from a medical tool to a fashion item. This change made glasses a symbol of personal style rather than something to hide.

For my own designs going forward, I hope to focus on some key ideas from this text. First, I want to make designs that feel good to use—not only functional but also enjoyable and comfortable—so that even if a design is intended for people with disabilities, they feel comfortable using it. I plan to use creative solutions that combine usefulness with visual appeal. Second, I’ll seek to work with people from different backgrounds—such as artists, fashion designers, and people with disabilities—to create designs that are more thoughtful and inclusive. Lastly, I’ll avoid “one-size-fits-all” designs, instead creating products that allow people to show their unique personalities.

In the end, I believe designing for disability is a chance to make products that improve people’s lives in meaningful ways, so designers should prioritize combining beauty and function.


Final Project Ideas

Concept: 

Similar to part of my midterm project, I want to create another drum machine. However, instead of it being automated, I hope to create a drum machine that is based on human input.  The project would consist of audio and visual elements on the p5 side, and buttons, as inputs that activate the drum sounds on the arduino side.

Inspiration: 

Akai MPC Studio 2

I wish to use arduino, connected to buttons, which would activate the sounds that play through p5.js. I hope to utilize arcade style buttons, housed within a 3D printed, cardboard, or wood housing.  Leapiture Arcade Buttons, 5pcs Arcade Game Buttons Game Buttons 5V 12V With Professional LED Lighting Built-in Switch For Arcade Machine Games Parts ...

The project would be engaging, allowing participants to actively create new drum beats.

Production – Week 11

Exercise 1:

let circleX;

function setup() {
    createCanvas(500, 500);
    noFill();
}

function draw() {
    background('white');
    if (!serialActive) {
        console.log('ARDUINO IS NOT CONNECTED'); //output to check if Arduino connected or not
    }
  
    if (serialActive) {
        fill('violet')
        ellipse(map(circleX, 0, 1023, 0, width), height / 2, 100, 100); // using map to make the circle move
        console.log(circleX) //output position to check
    }
}

function keyPressed() {
    if (key == " ")
        setUpSerial();
}

function readSerial(data) {
    if (data != null) //
        circleX = int(data);
}            


// ARDUINO CODE

/* 


void setup() {
    Serial.begin(9600);
    pinMode(A0, INPUT);
}

void loop() {
    Serial.println(analogRead(A0));
    delay(5);
}
 
*/


Exercise 2:

let brightnessLVL = 0;

function setup() {
    createCanvas(500, 500);
}

function draw() {
    if (!serialActive) {
        console.log('ARDUINO IS NOT CONNECTED')
    }
  
    if (keyIsDown(UP_ARROW)) { 
      brightnessLVL += 1; 
    } 
    
    else if (keyIsDown(DOWN_ARROW) && brightnessLVL > 0) {
      brightnessLVL -= 1;
    }
    
    console.log(brightnessLVL)
}

function keyPressed() {
    if (key == " ")
        setUpSerial(); // Start the serial connection
}

function readSerial(data) {
    writeSerial(brightnessLVL);
}
 

// ARDUINO CODE

/*
 
void setup() {
    Serial.begin(9600);
    pinMode(10, OUTPUT);
}

void loop() {
    analogWrite(10, Serial.parseInt());
    Serial.println();
    delay(1);
}
 
*/


Exercise 3:

let velocity;
let gravity;
let position;
let acceleration;
let wind;
let drag = 0.99;
let mass = 50;
let checkBounce;
let outputBounce;

function setup() {
  createCanvas(640, 360);
  noFill();
  position = createVector(width/2, 0);
  velocity = createVector(0,0);
  acceleration = createVector(0,0);
  gravity = createVector(0, 0.5*mass);
  wind = createVector(0,0);
}

function draw() {
  background(255);
  applyForce(wind);
  applyForce(gravity);
  velocity.add(acceleration);
  velocity.mult(drag);
  position.add(velocity);
  acceleration.mult(0);
  ellipse(position.x,position.y,mass,mass);
    
  if (!serialActive) {
        console.log('ARDUINO IS NOT CONNECTED')
        fill('red')
    }
  
  if (serialActive) {
    textAlign(CENTER, TOP);
    textSize(24); 
    fill('green'); 
    text('ARDUINO IS CONNECTED', width / 2, 10);
}
  
  if (position.y > height-mass/2) {
      checkBounce = 1;
      velocity.y *= -0.9;  // A little dampening when hitting the bottom
      position.y = height-mass/2;
      }
  else {
      checkBounce = 0;
  }
}

function applyForce(force){
  // Newton's 2nd law: F = M * A
  // or A = F / M
  let f = p5.Vector.div(force, mass);
  acceleration.add(f);
}

function keyPressed(){
  if (key==' '){
    mass=random(15,80);
    position.y=-mass;
    velocity.mult(0);
  }
    
  if (key == "h") {
    setUpSerial();
  }
}

function readSerial(data) {
    if (data != null) {
        wind.x = map(int(data), 0, 1023, -2, 2);
        
        let sendToArduino = checkBounce + '\n';
        writeSerial(sendToArduino);
    }
}

// ARDUINO CODE

/* 

 
const int LED_PIN = 10;
const int POT_PIN = A0;

void setup() {
    Serial.begin(9600);
    pinMode(LED_PIN, OUTPUT);
    pinMode(POT_PIN, INPUT);

    while (Serial.available() <= 0) {
        Serial.println("0");
        delay(300);
    }
}

void loop() {
    while (Serial.available()) {
        int LEDtrigger = Serial.parseInt();
        
        if (Serial.read() == '\n') {
            digitalWrite(LED_PIN, LEDtrigger);
            Serial.println(analogRead(POT_PIN));
        }
    }
}
 
*/


Week 11: Final Project Proposal

For my final project I decided to put the user experience and immersion as the main priority, while being eye-catching and unique.

So, my idea at the very basic level is the “Escape the Room” type. We have a transforming robot (and arduino one, and connected to p5.js) trapped in a big box, which has puzzles to solve. On the other hand, our main task is to help the robot, and interact with it. However, we have our own share of puzzles which can grant the robot inside something special (I would have to think this one through).

However, to make this one completely unique, I decided to form a story around it. The basic premise of the story is simple:

A.R.I.S. (Adaptive Recollection and Interface System) is a memory-keeping robot that gets stuck in a safe box’s shutdown room after being sabotaged. To restart A.R.I.S., the player has to answer both physical and digital tasks. The robot’s broken memories and changing personality show shocking facts about its past.

The player works with Arduino-powered machinery and p5.js-based digital tasks to find clues inside the box. These clues are the author of A.R.I.S.’s last-ditch attempts to protect secret information. The Utopia Protocol is a secret plan that these pieces point to. It could change the course of human history. But things get more dangerous when A.R.I.S. starts to doubt its mission and goes back and forth between being a friend and a possible threat.

At the end of the story, there is a moral choice, which I haven’t figured out just yet. However, based on some ways in which we have interacted with A.R.I.S means that the player can experience at least two endings.

Week 11 – Final Project Proposal

What can physical computing provide/add on to the p5 experience? At least, this is the question for me when trying to devise my final project. It’s true that physicality is supposed to be more engaging, more intuitive, etc. While it is also true that the rich visual response p5 allows can easily overshadow the physical portion of a project. That being said, my mission would now become how to assigned the roles of p5 and physical computing.

Some tug-of-war staged in my mind, and it eventually came to me to stick to p5 as the centerpiece while harnessing physical computing as a means to improve the interactive experience. In a simple word, I’m thinking of leveraging my midterm project with the aid of the physical input—constructing a physical environment, simulating a pilot pod, and transforming the PVE experience into PVP.

From a technical perspective, there may be two approaches to achieving the vision that differ from each other by the number of computers involved in the project. On the one hand, if one computer plus an external screen would be supported by p5, then the physical installation should become easier; while if p5 does not allow it, then two computers may need to be set, and the burden on the physical part to communicate info would drastically increase. At this particular moment I believe it’s time to experiment a bit more with p5 and Arduino at large to find out the right pathway.

Week 11 – Reading Response

Graham Pullin’s Design Meets Disability is an insightful exploration of how design can transcend functionality to create assistive technologies that are inclusive, aesthetically appealing, and empowering for individuals with disabilities. Pullin’s central argument—that assistive devices should prioritize both usability and desirability—challenges conventional approaches that often view disability through a purely medical or technical lens.

What stood out most to me was Pullin’s emphasis on collaboration between designers and users. This participatory approach ensures that devices are not only practical but also reflective of personal identity and style. For instance, the idea of prosthetic limbs being treated as fashion statements rather than something to be concealed feels revolutionary, turning potential stigma into an opportunity for self-expression.

Pullin also highlights a broader societal impact: designing with disability in mind benefits everyone, not just individuals with disabilities. This aligns with the concept of universal design, where solutions developed for specific needs often lead to innovations applicable to all.

The reading left me questioning why more industries don’t adopt this approach. It’s a reminder that inclusive design is not just a moral imperative but a creative opportunity to enrich lives and push the boundaries of innovation.