WEEK 9 – traffic light

CONCEPT:

For my project, I’ll be creating a traffic light system. I got the idea for this project while driving, and I thought it would be interesting to implement this concept in my work by creating a sensor that reacts like a traffic light. My goal is to create a system that changes based on a car’s distance from the light, just like real traffic signals. I’ll use an ultrasonic sensor to detect the car’s proximity and control two LEDs: one red and one green.

In my code, I’ll program the red LED to start dim and gradually get brighter as the car gets closer, signaling the car to slow down and stop. When the car reaches a specific point, I’ll use a switch in the code to light up the green LED, showing that it’s safe for the car to proceed. This setup uses the sensor data to adjust the brightness of the red LED, while the switch allows for an easy transition to the green light, creating a basic but effective interactive traffic light system.

SETUP:

VIDEO DEMONSTARTION:

IMG_1442

HIGHLIGHT:

The part of my code I was really proud of was when I filled out the mapping and measuring distance while setting the LED brightness and figuring out a way to debug the code as it kept getting corrupted. This code snippet measures distance using an ultrasonic sensor and adjusts an LED’s brightness based on how close an object is. First, ‘pulseIn(echoPin, HIGH);’ measures the time for a sound wave to travel to an object and return, which I convert to centimeters using ‘int distance = duration * 0.034 / 2;’. I then map this distance to an LED brightness range (0-255): ‘int brightness = map(distance, 0, 100, 255, 0);’, making the LED brighter as the object gets closer. I use ‘Constrain()’ to keep the brightness within the allowed range. Finally, ‘analogWrite sets the LED brightness based on distance, and’ Serial.print() outputs the values in the serial monitor for easy debugging. This part of the code was a struggle as it was something new; however, with a couple of tries, i got it

// Measure the time it takes for the echo to return
long duration = pulseIn(echoPin, HIGH);

// Calculate the distance in centimeters
int distance = duration * 0.034 / 2; // Speed of sound is ~0.034 cm/us

// Map the distance to LED brightness
int brightness = map(distance, 0, 100, 255, 0); // Closer = brighter, max distance = dim
brightness = constrain(brightness, 0, 255);     // Keep brightness within 0-255

// Set the brightness of the distance LED
analogWrite(distanceLedPin, brightness);

// Print switch state, distance, and brightness to the Serial Monitor for debugging
Serial.print("Distance: ");
Serial.print(distance);
Serial.print(" cm, LED Brightness: ");
Serial.println(brightness);

CODE:

arduino file

REFLECTION:

For future improvements, I would like to add a yellow LED to create a full traffic light sequence, transitioning smoothly from red to green, with a yellow warning light in between. I also noticed that the brightness adjustment could be more gradual, so tuning the mapping range would improve the overall responsiveness.

RESOURCES:

https://projecthub.arduino.cc/Isaac100/getting-started-with-the-hc-sr04-ultrasonic-sensor-7cabe1


Reading Reflection – Week #9

Physical Computing’s Greatest Hits (and misses)

As I was scrolling through the article by Tigoe before reading it, I immediately recognised several works I have read about or saw before. As I started reading it in depth, I understood why – these categories of physical computing projects are indeed very popular. Nonetheless, some of them were still unexpected, for example, I have never thought that a popular Dance Revolution arcade game is in fact an example of physical computing. This illustrates how many systems we interact with actually belong to one or several of the outlined types of projects, but we tend to overlook this. I plan to experiment with these categories further, possibly creating something on the edge of several ideas.

Making Interactive Art: Set the Stage, Then Shut Up and Listen

Coming from Visual Arts background, I am used to providing a description for each of my works, explaining what was the idea behind the piece and sometimes how to look at it. After reading the article by Tigoe, my perception on the explanatory part had been changed – I have not thought about the importance of open interpretation for interactive works before. From perspective of the creator, I often feel that I have to define the ways audience should observe my art, otherwise they might overlook something. As a viewer, I do feel that sometimes installations and other immersive works in museums and galleries can seem too predefined. As the author mentions, the basics should be outlined and the rest of the job should be left for the interactor – and I agree with this balance.

Week 9 reading

Making Interactive Art: Set the stage then shut up and listen

I think the author makes a very important distinction between traditional art pieces and interactive art pieces by bringing up the importance of user interpretation within interactive pieces. When it comes to art, we would often want the viewers and users to have the same takeaways as we did when creating the project, however, the thing that sets interactive works apart is its ability to allow interpretation from people experiencing the piece instead of just being viewers of a story that is being told solely from the perspective of the artist. The essence of interactive works may be lost when we try to force 1 singular interpretation for it.

Physical Computing’s Greatest Hits (and misses)

The Article introduces many different hardware for physical computing which was very interesting to read about.  Each piece of hardware offered a different type of interaction between human and computers. For example, floor pads implemented buttons that you step on, much like arcade games like Dance Dance Revolution. The project Things to yell at is also very interesting to me. In general projects that is reactive and implements sounds are all fascinating to me, you hear things everyday, and its interesting to see how that is visualized.


Assignment 7 – Sensors and Push Buttons

Concept

My idea for this project was to come up with something similar to an alarm system. I chose to work with the ultrasonic distance sensor to create an alarm based on proximity. I implement the system using to LED’s where one is for indicating the distance and is the analog control and the other is the alarm indicator, digital control. The latter LED gives a visual feedback of the distance from an oncoming object and acts as an alert. When the object is outside the 40 cm radius of the sensor the LED is completely off indicating no threat but when an object moves into the 40cm radius the LED starts to light gradually depending on the distance from the sensor; when distance is big the LED is dim and when distance continues to be shorter and shorter the LED also gradually increases brightness to alert someone to turn on the alarm.

Sketch/Setup

Code Highlight

void loop() {
  // Distance from sensor
  int distance = getDistance();

  // State of the switch
  alarmEnabled = digitalRead(switchPin) == LOW; 

  // Analog LED brightness based on distance
  int brightness = map(distance, 5, 50, 255, 0); // distances between 5 cm and 50 cm
  brightness = constrain(brightness, 0, 255);     // Limit brightness to range
  analogWrite(analogLedPin, brightness);

  // If alarm is enabled and distance is below threshold, blink alarm LED
  if (alarmEnabled && distance < distanceThreshold) {
    digitalWrite(digitalLedPin, HIGH);
    delay(200);
    digitalWrite(digitalLedPin, LOW);
    delay(200);
  } else {
    digitalWrite(digitalLedPin, LOW); // Keep alarm LED off
  }

  //Debug
  Serial.print("Distance: ");
  Serial.print(distance);
  Serial.print(" cm | Alarm: ");
  Serial.println(alarmEnabled ? "ON" : "OFF");

  delay(100); 
}

The above is the part of my code which I am proud of how I implemented. In the code I use the distance value which is picked from the sensor to control both LEDs. I control the analog LED based on the distance and to do this I limit the LEDs readings to the distance by mapping then to have a gradual increase in brightness I use constrain so that the difference can be visually perceived.


Video demonstration

Reflection and Future improvements

Implementing the project was really fun as it gave me a space to actualise my idea of creating an alarm in an interesting way. I am proud of how I implemented the alarm system. However, there is still room for improvement as I would want  the system to have sound which goes off when the alarm is triggered. Overall, I enjoyed executing the project and further understanding Arduino.

Assignment 9: Watch out for cars! (Analog I/O)

Concept

I wanted to do some kind of distance sensor, so I tried to use the ultrasonic sensor, however I didn’t fully understand how it works yet, so I opted to use the photoresistor as my sensor. The reading from the photoresistor will affect the brightness of the yellow LED: the less light there is (the closer the car is tot he sensor), the brighter the yellow LED is, thus lighting up as a warning. As for my switch, I attached one connection to a strip of copper tape and the other to the car: whenever the car is in contact with the copper tape, the red LED lights up.

Photos and Videos

Code Snippet

// constraining and mapping sensor reading to range 0 - 255
sensorVal = constrain(sensorVal, 700, 725);
brightness = map(sensorVal, 725, 700, 0, 255);

This is a snippet of a code that I’m proud of: it’s when I used the map function to convert the sensor readings into analog output values, however I had to use the reverse logic since I want the LED to get brighter when there is low readings from the sensor (inverse relationship).

Circuit Illustration

Arduino Setup

This was made using Tinkercad.

Code

GitHub

Reflection

I want to try to fully understand the Ultrasonic sensor and then using it next time for projects regarding ranges.

Reading Response 9

Physical Computing’s Greatest Hits (and Misses)

This reading was very insightful and interesting! I really enjoyed learning about all the different kinds of physical computing and how it has developed. I love the reference to the Scooby-doo painting, I never thought it could be a type of physical computing.

There’s this idea of physical computing being used as a horror factor. In the idea of ‘interactive dolls’, to me, if they move on their own or make a sound of their own, it is slightly disturbing and unsettling to think about. Imagine seeing one move in a dark room and then it making a sound; I’d be very freaked out. But I guess my freaked out reaction is what makes ‘interactive dolls’ thrive in the market; the fact that they can incite such a strong reaction out of someone (though it’s not a positive reaction).

Making Interactive Art: Set the Stage, Then Shut Up and Listen

Tom Igoe highlights the importance of not interfering with the audience’s experience to an interactive piece. I think that this is a crucial note to consider for artists because the main idea behind an interactive art is to let the audience interact with the piece; it’s part of the art experience. Their confusion, excitement, all these reactions (or the lack thereof) is what makes a piece interactive.

In his words, artists are supposed to ‘listen’ to the audience. This reminds me of the three components to interactivity (according to Chris Crawford): listening, thinking and speaking. In the same way an interactive piece is supposed to listen to the audience’s actions, an artist should listen to the audience’s reaction to their piece; only then will the artist truly see the effect their piece has on the public.

Reading Reflection Week 9

Physical Computing’s Greatest Hits (and misses)

Reflecting on this writing, I am fascinated by how our interaction with technology can be both deeply personal and impersonal. Physical computing projects encourage people to touch, move and react but I question whether the create real human connections or if they are just interesting projects. Projects like the interactive gloves and theremins are playful and creative but does interacting with them leave a lasting experience? Are they just things for quick entertainment or is there something deeper? I was particularly interested by the “remote hugs” which made me think about how technology connects us emotionally even when we are far apart. Despite the effort to create warmth and closeness I still think that it still has a distance and I am not sure if a machine can really replace the feel of a real human connection. This made me wonder if we as humans are losing appreciation for physical presence when depending more on technology.
This reading made me think differently about what technology should achieve. Having always thought technology to be a way of getting things done efficiently, I have got to learn of it as a tool for emotional experiences also. Maybe, if we stopped focusing on the practical uses only we would get to appreciate the side that brings joy.

Making Interactive Art: Set the Stage, Then Shut Up and Listen

I found the authors advice to “step-back” to be very thought-provoking. The concept of creating something and releasing it without controlling how people experience it is something which I find to be difficult but I guess in the field of interactive art it makes sense. It made me realise that for art to be art it needs to not deliver a clear and defined message but leave space for audience to have their own interpretation.
To me, I perceived that good art should have a purpose and bear a specific idea but this writing opened my eyes. Maybe art is a means of conversation where the artist is more of a facilitator rather than a director. This makes me wonder if over-explaining art pieces limit artists work since this stops the art from becoming fully alive in other peoples minds. I have come to understand that letting the audience interpret the art freely means that each person gets their own unique experience which might not even be what the artist intended. This writing has made me see interactive art as more about curiosity and less about control


Week 9: Unusual Guitar Switch 2.0

Concept

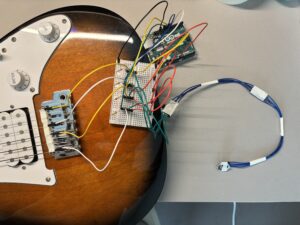
Expanding upon the unusual guitar switch I made for last week’s assignment, I decided to introduce a new feature that will detect the distance between the guitar and the edge of the table. I got the idea for this feature from my own carelessness, as I often knock my guitar into my desk on accident. Using input from the ultrasonic sensor in our arduino kit, a red LED light will light up as a warning whenever the body of the guitar gets too close to the edge of the desk.

Setup and Code

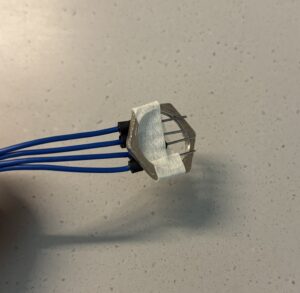
Like my previous assignment, I covered my guitar pick with aluminum foil to make it conductive and then taped it to a wire; another wire was attached to a larger sheet of aluminum foil and then the sheet was taped to the bridge of the guitar, allowing the yellow LED to light up when the pick makes contact with any of the guitar strings. On the other half of the breadboard, I installed the red LED bulb and the ultrasonic sensor on the edge facing outward so that it can be positioned on the edge of the desk.

I learned how to make the LED light turn on and off according to ultrasonic sensor input from these posts on the Arduino Forum:

  • https://forum.arduino.cc/t/ultrasonic-sensor-with-led-how-can-i-do-this/920861
  • https://forum.arduino.cc/t/hc-sr04-always-returns-zero/206641

While trying to get the red LED to work properly, I struggled for a good amount of time as the ultrasonic sensor kept retrieving 0 and only 0 as values on the serial monitor. I eventually realized that I, being my careless self, put the wrong number for the sensor’s echo pin in the definition at the start of the code.

Github code link

Demo

Reflection

The biggest challenge for this assignment was learning how to use the ultrasonic sensor, since we did not get to practice with it in class, but thankfully there were a lot of tutorials on the internet. And while it wasn’t particularly complicated, I’m proud of managing to get it working (despite the minor hiccup with the code as a result of my carelessness).

Reading Reflection #6

Physical Computing’s Greatest Hits (and misses)

This article was really fun and reassuring  to read. While listing recurring elements in physical computing projects,  the author stresses that old ideas can always be altered in creative ways and there is no need to actively steer clear of techniques that have been explored before. This was a wake-up call for me, as I have always struggled while trying to come up with ideas that didn’t overlap with those of Intro to IM students in previous semesters. We’re constantly taught and pressured to be different, to make something completely new, but we often forget that innovation isn’t just for the sake of “being different” but also to take existing concepts and technologies and improving upon them to suit new contexts and ideas.

I think the key is to remember that there is a creative side of physical computing that is arguably just as important as important as the technical side; it’s about how you incorporate the same elements into new narratives and fashion them for new purposes. From this point onwards, I will try not to shy away from looking at previous student works for inspiration.

Making Interactive Art: Set the Stage, Then Shut Up and Listen

Sometimes, artists have the tendency to over-explain their work, feeling the need to defend their work and themselves for validation. However, this mindset can be counterproductive when dealing with interactive art. Interactive pieces are meant to be experienced directly by the audience instead of having your audience be passive onlookers. Instead, you are creating a piece that performs and also lets the audience perform on it; you can guide your audience, but the ultimate goal is to let your audience explore what is possible with your design.

Reading reflection: Intentios

These examples are great. With digital and interactive art becoming more accessible, it’s easy to fall into the trap of relying on technology without fully considering the clarity of the message. This relates to the other reading, which emphasizes that when form becomes overly important, it can overshadow the experience, resulting in a lack of genuine interaction. I believe having a clear intention is essential. These examples work because they are all straightforward, with the philosophy of each piece rooted in interaction. For instance, Christopher Paretti’s SpeedDial is about the relationship between action and reaction to changes in sound. Similarly, other pieces that incorporate sensors, like camera, temperature, and light, prompt the user to make small inputs, which in turn produce subtle outputs. The simplicity of these interactions is very effective.

While I agree with limiting instructions in interactive art, I also think it can constrain the message being conveyed. Interactive art isn’t like a full play or novel, where the audience is guided through an experience that evolves alongside the characters. In those formats, audiences are almost manipulated by the characters’ emotions, similar to directing an actor. However, in a play, actors follow a defined structure, and that structure—together with the performance—conveys the underlying philosophy. Interactive art, on the other hand, is constrained by the duration and setting of the experience, which might require more intricate design to fully express its philosophy.