Reading the article reminded me of the time when I broke my arm. As a child, I broke my arm after jumping off my cousin’s bed and ended up with a pink cast on my arm. I hated the fact that I had a pink cast because it drew pity from people, which made me uncomfortable. I did my best to hide it by wearing a jacket wherever I went.
The author of the article points out that ‘the priority for design for disability has traditionally been to enable while attracting as little attention as possible,’ and it was about trying not to project the image of ‘disability’ after all. Interestingly, the article uses eyeglasses as an example of how perceptions can shift. Once a plain and purely functional aid for a disability, eyeglasses have evolved into a fashion statement, celebrated for their aesthetic value and the personal style they add.
According to the article, the eyeglasses were also once functional aid for a disability that tried to “camouflage” the disability by making the eyeglasses “invisible pink plastic glasses”. Now, we do not think at all that a person has poor eyesight or visional problems just because they wore glasses. This is because eyeglasses also serve as a fashion statement. Reading this article, I realized that “fashion” and “disability” are not two separate concepts that could never be integrated.
I thought that this shift in how eyeglasses are perceived and other examples in the article showcase the importance of projecting a positive image rather than trying not to project an image at all. And this made me think that this could transform aids from something that people feel they need to hide, as I did with my pink cast, to something they want to showcase.
Reflecting further on this concept, I realized that it is the mindset surrounding disability that often defines it. By adopting an approach that values visibility and style, I believe that we can challenge and change the stigmatizing attitudes that suggest disabilities should be concealed. We can shift from a mindset that views disabilities as deficits to one that recognizes them as a part of human diversity to be accepted and embraced.
Make something that uses only one sensor on Arduino and makes the ellipse in p5 move on the horizontal axis, in the middle of the screen, and nothing on Arduino is controlled by p5
For this exercise, we used a potentiometer as our analog sensor. The Arduino program sends the reading from the sensor over to p5, where it is mapped to the range [ellipseWidth/2, canvasWidth-ellipseWidth/2]. The mapped value is then used to determine the x position of the center of the ellipse. Since nothing on Arduino is controlled by p5, p5 sends dummy data that is ignored by p5 to maintain the two-way handshake.
// ===== P5 =========
let diameter = 60;
let sensorVal; // read from p5 transmitted message

function setup() {
  createCanvas(640, 480);
  sensorVal = 1023/2;
}

function draw() {
  background(220);


  if (!serialActive) {
    text("Press Space Bar to select Serial Port", 20, 30);
  } else {
    text("Connected", 20, 30);


  }
  fill(0);
  ellipse(map(sensorVal, 0, 1023, diameter/2, width-diameter/2), height/2, diameter, diameter)

}

// === ARDUINO ====
void loop() {
// wait for data from p5 before doing something
while(Serial.available()){
digitalWrite(LED_BUILTIN, HIGH); // led on while receiving data
int _ = Serial.parseInt(); // get dummy variable sent over by p5
if(Serial.read() == '\n'){
delay(5);
int sensor = analogRead(A1); // read sensor value
delay(5);
Serial.println(sensor); // send sensor value
}
}
digitalWrite(LED_BUILTIN, LOW);
}
2. Make something that controls the LED brightness from p5
For this exercise, we created a slider that controls the brightness of the LED. The range of the slider matches that of the LED analog value ranges, from 0 to 255. Hence, we only had to send that value over to the Arduino. Once received, the Arduino program writes that value to the LED PWM pin in an analog fashion. For visualization, our p5 sketch draws a circle whose diameter is proportional to the LED brightness.
// ===== p5 ======
let slider;

function setup() {
  createCanvas(640, 480);
  sensorVal = 1023/2;
  slider = createSlider(0, 255, 0);
}

function draw() {
  background(0);


  fill(0,0,255);
  noStroke();
  let diameter = map(slider.value(), 0, 255, 0, height);
  ellipse(width/2, height/2, diameter, diameter);

  fill(255);
  if (!serialActive) {
    text("Press Space Bar to select Serial Port", 20, 30);
  } else {
    text("Connected", 20, 30);
  }
}

function keyPressed() {
  if (key == " ") {
    setUpSerial();
  }
}

function readSerial(data) {
  if (data != null) {
    let sendToArduino = slider.value() + '\n';
    print(sendToArduino)
    writeSerial(sendToArduino);
  }
}

// ===== ARDUINO =====

void loop() {
  // analogWrite(leftLedPin, pwm);
  // wait for data from p5 before doing something
  while (Serial.available()) {
    digitalWrite(LED_BUILTIN, HIGH); // led on while receiving data
    pwm = Serial.parseInt(); // get dummy variable sent over by p5
    if (Serial.read() == '\n') {
      delay(5);
      analogWrite(rightLedPin, pwm);
      delay(5);
      Serial.println("0");
    }
  }
  digitalWrite(LED_BUILTIN, LOW);
}
3. Take the gravity wind example and make it so every time the ball bounces one LED lights up and then turns off, and you can control the wind from one analog sensor
We needed to establish bi-directional meaningful data exchange in this exercise. The first is to send the Arduino a signal from p5 when the ball hits the ground. This is done by checking if the bottom portion of the ellipse touches the canvas’s lower boundary position.y + mass/2 == height . If this evaluates to true, a signal of 1 is sent over. Otherwise, 0 is sent. When the Arduino program receives the signal, it turns the LED on or off accordingly. Similarly, the Arduino sends the value of the potentiometer (our chosen sensor) over to p5, where it gets mapped to the range [-1, 1]. The mapped value is set towind.x. The closer the potentiometer value is to the extremes, the stronger the wind effect on the ball. Sensor values below 512 also get mapped to negative values, and the ball motion trajectory goes leftward. Otherwise, the wind effect goes in the opposite direction.
// ===== p5 =======

let velocity;
let gravity;
let position;
let acceleration;
let wind;
let drag = 0.99;
let mass = 50;

let analogVal = 0;
let dir = 0;

function setup() {
  createCanvas(640, 360);
  noFill();
  position = createVector(width/2, 0);
  velocity = createVector(0,0);
  acceleration = createVector(0,0);
  gravity = createVector(0, 0.5*mass);
  wind = createVector(0,0);
}

function draw() {
  background(220);
  applyForce(wind);
  applyForce(gravity);
  velocity.add(acceleration);
  velocity.mult(drag);
  position.add(velocity);
  acceleration.mult(0);

  if (!serialActive) {
    text("Press S to select Serial Port", 20, 30);
  } else {
    text("Connected", 20, 30);
  }

  fill(0);
  ellipse(position.x,position.y,mass,mass);
  if (position.y > height-mass/2) {
      velocity.y *= -0.9;  // A little dampening when hitting the bottom
      position.y = height-mass/2;
    }
}

function applyForce(force){
  // Newton's 2nd law: F = M * A
  // or A = F / M
  let f = p5.Vector.div(force, mass);
  acceleration.add(f);
}

function keyPressed(){
  if (keyCode==LEFT_ARROW){
    wind.x=-1;
  }
  if (keyCode==RIGHT_ARROW){
    wind.x=1;
  }
  if (key==' '){
    mass=random(15,80);
    position.y=-mass;
    velocity.mult(0);
  }
  if (key == 's') {
    // important to have in order to start the serial connection!!
    setUpSerial();
  }
}

function readSerial(data) {
  if (data != null) {
    // make sure there is actually a message
    let fromArduino = data;
    // if the right length, then proceed
    if (fromArduino.length > 0) {
      analogVal = int(data);

    }
    wind.x = map(analogVal, 0, 1023, -1, 1);
    let sendToArduino;
    if (position.y + mass/2 == height){
      sendToArduino = 1 + '\n';
    }
    else{
      sendToArduino = 0 + '\n';
    }

    writeSerial(sendToArduino);
  }
}


// ======= Arduino ======
void loop() {
  // wait for data from p5 before doing something
  while (Serial.available()) {
    digitalWrite(LED_BUILTIN, HIGH); // led on while receiving data
    ledState = Serial.parseInt(); // get ball bounce indicator from p5.js
    if (Serial.read() == '\n') {
      // turn on LED accrodingly
      if (ledState == 1){
        digitalWrite(rightLedPin, HIGH);
      }
      else{
        digitalWrite(rightLedPin, LOW);
      }

      currSensorVal = analogRead(A1); // read sensor value
      Serial.println(currSensorVal); // send sensor value
    }
  }
  digitalWrite(LED_BUILTIN, LOW);
}
Reflecting on the concepts mentioned in “Physical Computing’s Greatest Hits (and Misses),” it is clear that some project ideas appear frequently in physical computing. The different topics provide unique learning opportunities of physical interaction. makes you see the charm in revisiting old project ideas. It’s cool to think about how each student puts their spin on classic assignments like making digital instruments or smart clothing. This whole process teaches us a lot about how we interact with the tech we build, which is super handy for learning and creativity. It makes you see the charm in revisiting old project ideas. It’s interesting to think about how each student puts their own twist or spin on classic assignments like making digital instruments or wearable devices. This whole process teaches us a lot about how we interact with the tech we build, which is extremely useful for learning and creativity.
The second article, “A Public Physical Computing Service,” discusses the integration of physical computing in public spaces. By making technologies like Arduino and Raspberry Pi accessible to a broader audience, everyone gets a chance to play around and learn something new. This showcases the importance of community in technology education, and how shared resources and collaborative spaces can empower people and enhance collective creativity in the physical computing field.
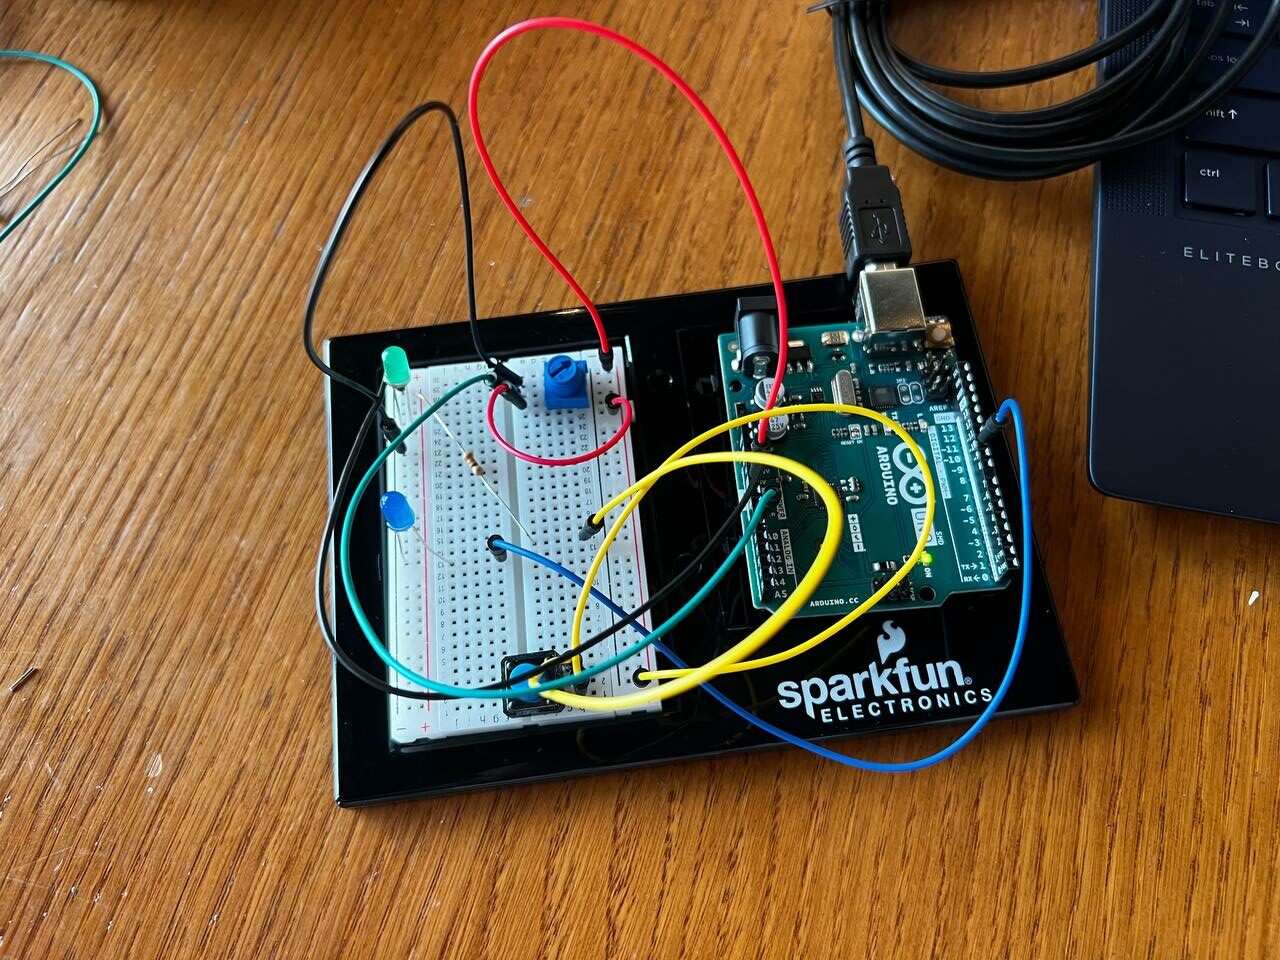
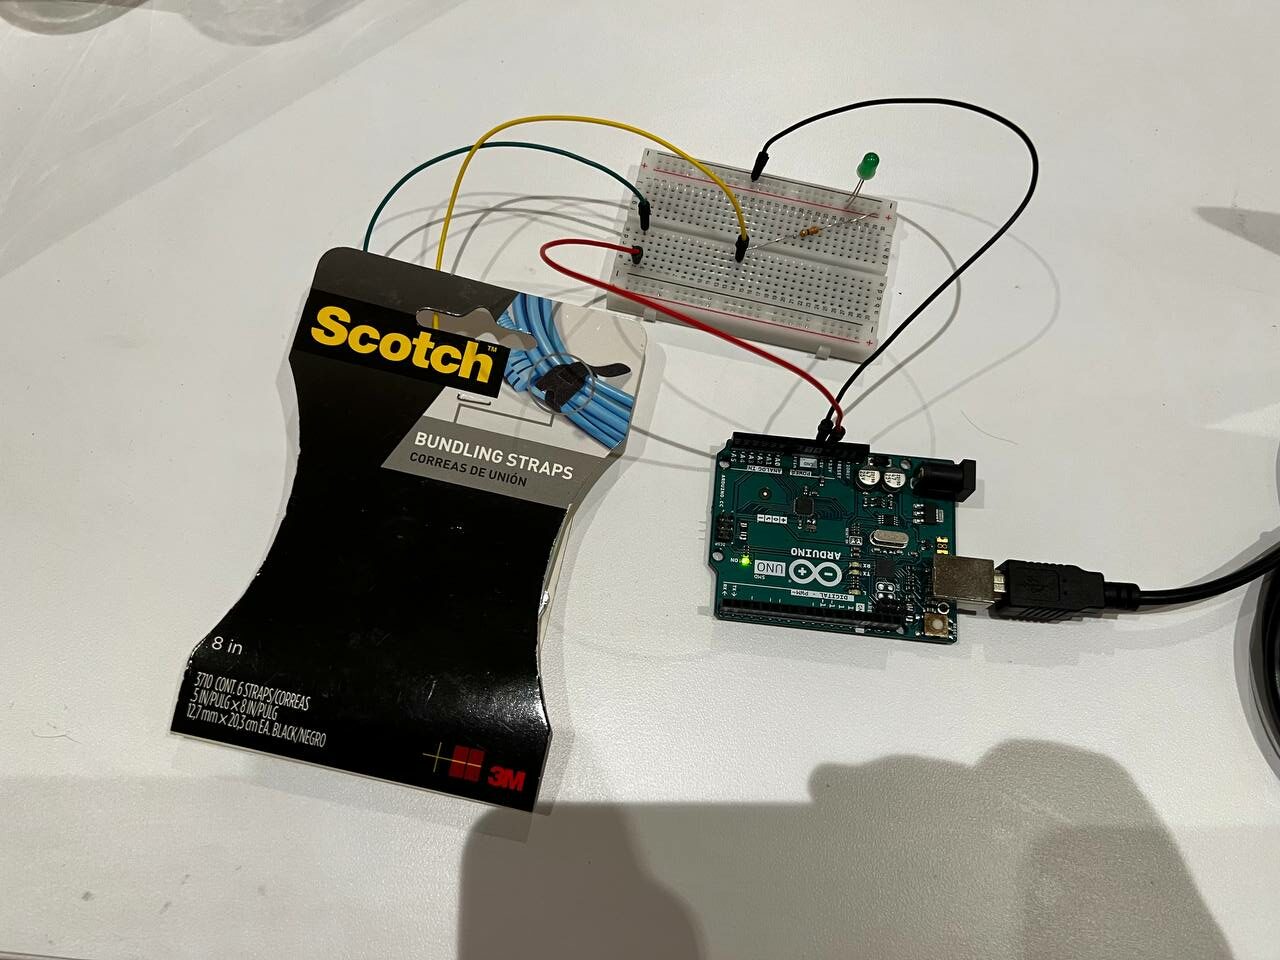
For this assignment, we were tasked with using one digital sensor (on/off) and one analog sensor (variable) to control an LED each.
I used a potentiometer as my analog sensor to control and dim a blue LED based on the reading, and used a regular button as my digital sensor (switch).
I used arduino to get the readings from the potentiometer and control the blue LED, but for the switch and green LED, I just used the 5V out to keep things simple.
Materials Used:
Jumper Wires
Blue LED
Green LED
Resistor
Potentiometer
Button
Code:
const int ledPin = 10;

void setup() {
  pinMode(ledPin, OUTPUT);
}

void loop() {
  int sensorLevel = analogRead(A0); // Read from potentiometer
  int brightness = map(sensorLevel, 0, 1023, 0, 255); // Map sensor reading to LED brightness

  analogWrite(ledPin, brightness); // Control LED

  delay(100);
}
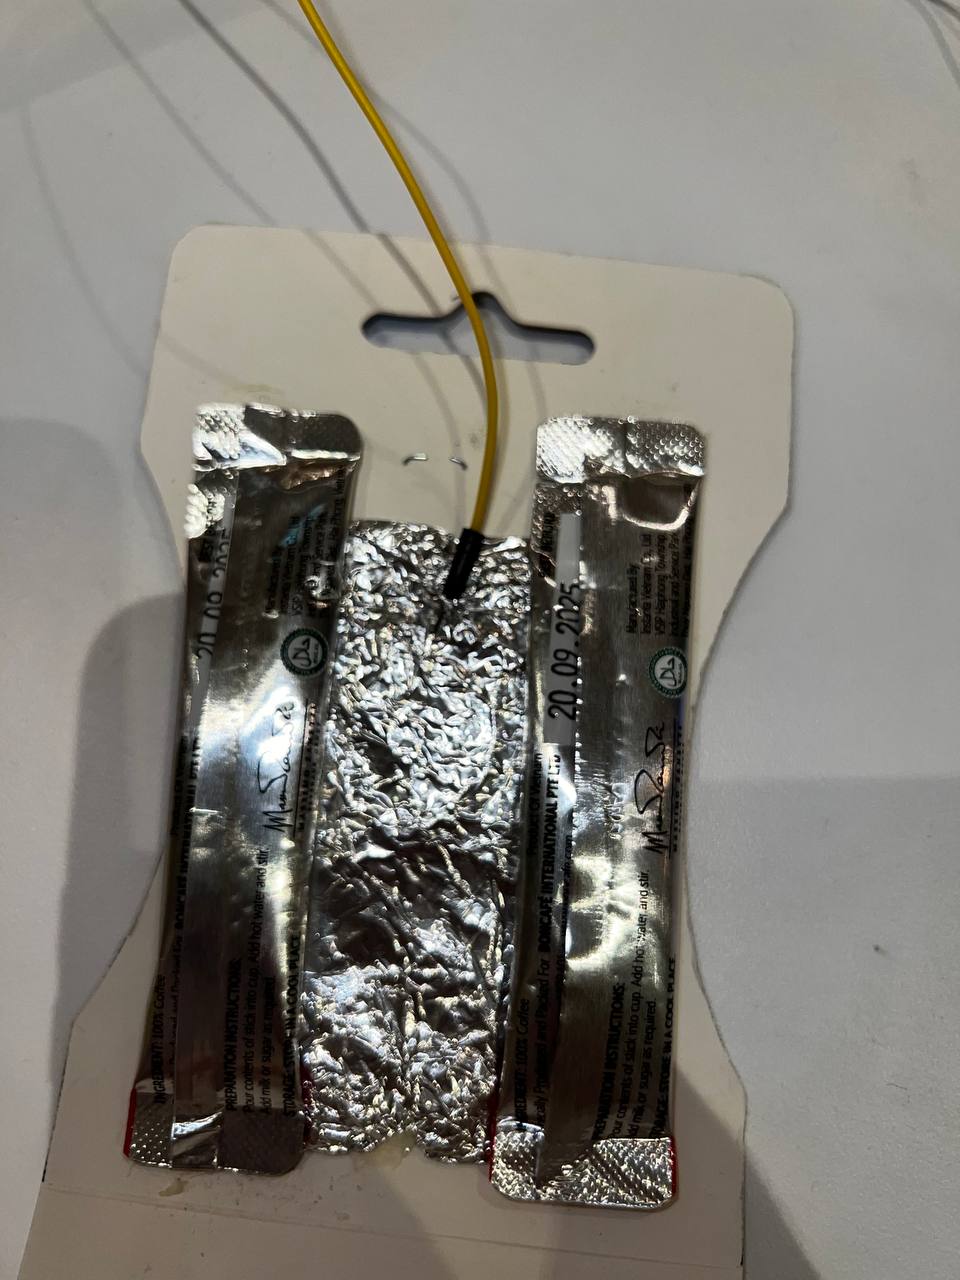
For this assignment, we were tasked to create an unusual switch without using our hands. I decided to create a pressure switch that can be stepped on to activate the LED.
I recycled some cardboard packaging I found to use as the casing, two sugar packets to create the spacing, two aluminum foil pads, some jumper wires, and an LED.
Demo:
Reflection:
Overall this was a fun project to work on, I could make it more durable to prevent it from falling apart.
Reflecting on the insights from Don Norman’s essay, I find his integration of aesthetics and usability particularly thought-provoking. Attractive products aren’t merely pleasing to the eye but also functionally better due to the positive effect they provide. It’s enlightening to see the psychological and emotional layers behind product interactions; that our reactions to design are not just superficial but come from our cognitive and emotional thinking.
Norman also makes you wonder if there’s a relationship between functionality and aesthetic design, where they complement each other. This idea is not only innovative but also inspiring for anyone involved in creative design, prompting us to consider how the objects we create affect the emotional and cognitive experiences of users.
In Design Meets Disability, Graham Pulin delves into the significance of crafting designs with both accessibility and inclusivity in mind. Something Pulin seems to continue to highlight though is the transformative potential of inclusive design in the design world we know of today. Pulin’s emphasis on reframing disability aids as fashion statements, for example, challenges the prolonged societal perception of aid being designed simply for it to be functional. This highlights the impact that design can have on shaping cultural attitudes, particularly towards certain communities, which in this case are those who are classified as people of determination. In my eyes, this perspective showcases the need for designers to push against their own assumptions about certain communities and consider not only the functional purpose of objects those people might need but also the aesthetics and means of personal expression that can come through with these creations.
This, however, is easier said than done. Designing for disability within a societal context filled with stigmas, biases, and misperceptions makes it incredibly difficult for people to design creations that are complex in terms of aesthetics and functionality. Given this, I believe that the first step to actually being able to design for disability in a way that is void from any biases is to acknowledge one’s own thoughts and how it may impact the way one would design. By actively engaging in understanding the ways one might think about certain communities such as people of determination, designers can gain invaluable insight into the lived experiences and preferences of those within the disability community, ensuring that these designs are reflective of their needs and desires. Actively engaging in a form of human-centered design can lead to not only more effective and sustainable designs but also fosters a sense of empowerment among those they serve, something that many current disability aids lack. It is only by truly rethinking the traditional paradigms and embracing a more human-centered and holistic approach to designing can we celebrate inclusivity and empower those we help through our designs.
This reading by Graham Pullin was quite interesting. I especially loved how Pullin set up the contrast between the medical model of disability (which focuses on symptoms and the ability/inability to perform certain tasks) and the social model of disability (which views disabilities arising from social barriers that make spaces and conversations inaccessible to people with impairments), and how using fashion for assistive devices addresses the social model. There is a major focus by Pullin to break down the long-held misconception that form does not matter for assistive devices as long as they are capable of performing their specified function in a discrete manner. The goal so far when crafting these devices is to hide them, which only perpetuates the wrong belief that having a disability is shameful.
In that regard, I liked the comparison Pullin drew to eyeglasses. Eyeglasses are technically assistive devices too, and in many cases essential to prevent a disability. Under the medical model, myopia with a power more than -2.5D would pretty much be a disability, as without the help of glasses, people with high myopia are unable to see the world normally. However, glasses, and the fact that glasses are socially acceptable, assist in mitigating the impairment and prevent it from being a disability, pointing to the influence of the social model. Thus, as Pullin points out, there’s an urgent need to reconcile other assistive devices with social acceptability. For that, assistive devices need to be optimized for nor just function but also for form and aesthetic design.
My final point was that while Pullin is making a revolutionary call to include fashion designers and artists into the designing process, there’s one group that he has forgotten. One that is already underrepresented in the assistive device design process: people with disabilities themselves. To make a successful assistive device that has a preferable design, people with disabilities need to be involved at every step, not just as customers.
Make something that uses only one sensor on Arduino and makes the ellipse in p5 move on the horizontal axis, in the middle of the screen, and nothing on arduino is controlled by p5
let rVal = 0;
let alpha = 255;
let left = 0; // True (1) if mouse is being clicked on left side of screen
let right = 0; // True (1) if mouse is being clicked on right side of screen
let xPos = 0; // Position of the ellipse

function setup() {
  createCanvas(640, 480);
  textSize(18);
  noStroke();
}

function draw() {
  // one value from Arduino controls the background's red color
  background(255, 255, 255);

  // Update the position of the ellipse based on the alpha value
  // Mapping alpha to the width of the canvas
  xPos = map(alpha, 0, 1023, 0, width);

  // Draw an ellipse that moves horizontally across the canvas
  fill(255, 0, 255, 255); // Same mapping as the text transparency
  ellipse(xPos, height / 2, 50, 50); // Position ellipse at center height with a diameter of 50

  if (!serialActive) {
    text("Press Space Bar to select Serial Port", 20, 30);
  } else {
    text("Connected", 20, 30);

    // Print the current values
    text('rVal = ' + str(rVal), 20, 50);
    text('alpha = ' + str(alpha), 20, 70);
  }

}

function keyPressed() {
  if (key == " ") {
    // important to have in order to start the serial connection!!
    setUpSerial();
  }
}

function readSerial(data) {
  if (data != null) {
    let fromArduino = split(trim(data), ",");
    if (fromArduino.length == 2) {
      rVal = int(fromArduino[0]);
      alpha = int(fromArduino[1]);
    }

    let sendToArduino = left + "," + right + "\n";
    writeSerial(sendToArduino);
  }
}
Production 2
Make something that controls the LED brightness from p5
let rVal = 0;
let alpha = 255;
let left = 0; // True (1) if mouse is being clicked on left side of screen
let right = 0; // True (1) if mouse is being clicked on right side of screen
let xPos = 0; // Position of the ellipse
let ledState = false; // To toggle LEDs


function setup() {
  createCanvas(640, 480);
  textSize(18);
  noStroke();
}

function draw() {
  // one value from Arduino controls the background's red color
  background(255, 255, 255);

  // Update the position of the ellipse based on the alpha value
  // Mapping alpha to the width of the canvas
  xPos = map(alpha, 0, 1023, 0, width);


  if (!serialActive) {
    text("Press Space Bar to select Serial Port", 20, 30);
  } else {
    text("Connected", 20, 30);

    // Print the current values
    text('rVal = ' + str(rVal), 20, 50);
    text('alpha = ' + str(alpha), 20, 70);
  }


  text("Then, press A to flash the police lights.",20, 100)
  //Edit the code below
  // Toggle LED state every frame if space is held down
  if (keyIsDown(65)) { // 32 is the ASCII code for space
    ledState = !ledState;
    if (ledState) {
      left = 1;
      right = 0;
    } else {
      left = 0;
      right = 1;
    }
  }
  // Edit the code above

}

function keyPressed() {
  if (key == " ") {
    // important to have in order to start the serial connection!!
    setUpSerial();
  }
}

function keyReleased(){
  if (key == "a") {
   left = 0;
      right = 0;


  }
}

function readSerial(data) {
  if (data != null) {
    let fromArduino = split(trim(data), ",");
    if (fromArduino.length == 2) {
      rVal = int(fromArduino[0]);
      alpha = int(fromArduino[1]);
    }

    let sendToArduino = left + "," + right + "\n";
    writeSerial(sendToArduino);
  }
}
let velocity;
let gravity;
let position;
let acceleration;
let wind;
let drag = 0.99;
let mass = 50;
let rVal = 0;
let alpha = 255;
let left = 0; // True (1) if mouse is being clicked on left side of screen
let right = 0; // True (1) if mouse is being clicked on right side of screen
let serialSetup = false;
// Declare a variable to store the time at which to trigger the action
let triggerTime = 0;

function setup() {
  createCanvas(640, 360);
  noFill();
  position = createVector(width / 2, 0);
  velocity = createVector(0, 0);
  acceleration = createVector(0, 0);
  gravity = createVector(0, 0.5 * mass);
  wind = createVector(0, 0);
  // Set the trigger time to be 5 seconds after setup runs
  triggerTime = millis() + 5000;
  textSize(20);
}

function draw() {
  // Check if the current time has passed the trigger time
  if (millis() >= triggerTime && !serialSetup) {
    serialSetup = true;
  }
  push();
  fill(0);
  if (!serialSetup) {
    text("Simulation starts in 5 seconds. Press a to set up serial.", 20, 50);
  }
  pop();

  if (serialSetup) {
    background(255);
    let windtext = "";
    if (alpha < 300) {
      wind.x = -1;
      windtext = "Wind : Right";
    } else if (alpha > 800) {
      wind.x = 1;
      windtext = "Wind : Left";
    } else {
      wind.x = 0;
      windtext = "No wind.";
    }

    push();
    fill(0);

    text(windtext, 20, 50);
    pop();

    applyForce(wind);
    applyForce(gravity);
    velocity.add(acceleration);
    velocity.mult(drag);
    position.add(velocity);
    acceleration.mult(0);
    ellipse(position.x, position.y, mass, mass);
    if (position.y > height - mass / 2) {
      velocity.y *= -0.9; // A little dampening when hitting the bottom
      position.y = height - mass / 2;
      console.log(
        "Bounce! Position Y: " + position.y + ", Velocity Y: " + velocity.y
      );
      left = 1;
    } else {
      left = 0;
    }
  }
}

function applyForce(force) {
  // Newton's 2nd law: F = M * A
  // or A = F / M
  let f = p5.Vector.div(force, mass);
  acceleration.add(f);
}

function keyPressed() {
  if (keyCode == LEFT_ARROW) {
    wind.x = -1;
  }
  if (keyCode == RIGHT_ARROW) {
    wind.x = 1;
  }
  if (key == " ") {
    mass = random(15, 80);
    position.y = -mass;
    velocity.mult(0);
  }
  if (key == "a") {
    // important to have in order to start the serial connection!!
    setUpSerial();
  }
}

// This function will be called by the web-serial library
// with each new *line* of data. The serial library reads
// the data until the newline and then gives it to us through
// this callback function
function readSerial(data) {
  ////////////////////////////////////
  //READ FROM ARDUINO HERE
  ////////////////////////////////////

  if (data != null) {
    // make sure there is actually a message
    // split the message
    let fromArduino = split(trim(data), ",");
    // if the right length, then proceed
    if (fromArduino.length == 2) {
      // only store values here
      // do everything with those values in the main draw loop

      // We take the string we get from Arduino and explicitly
      // convert it to a number by using int()
      // e.g. "103" becomes 103
      rVal = int(fromArduino[0]);
      alpha = int(fromArduino[1]);
    }

    //////////////////////////////////
    //SEND TO ARDUINO HERE (handshake)
    //////////////////////////////////
    let sendToArduino = left + "," + right + "\n";
    writeSerial(sendToArduino);
  }
}
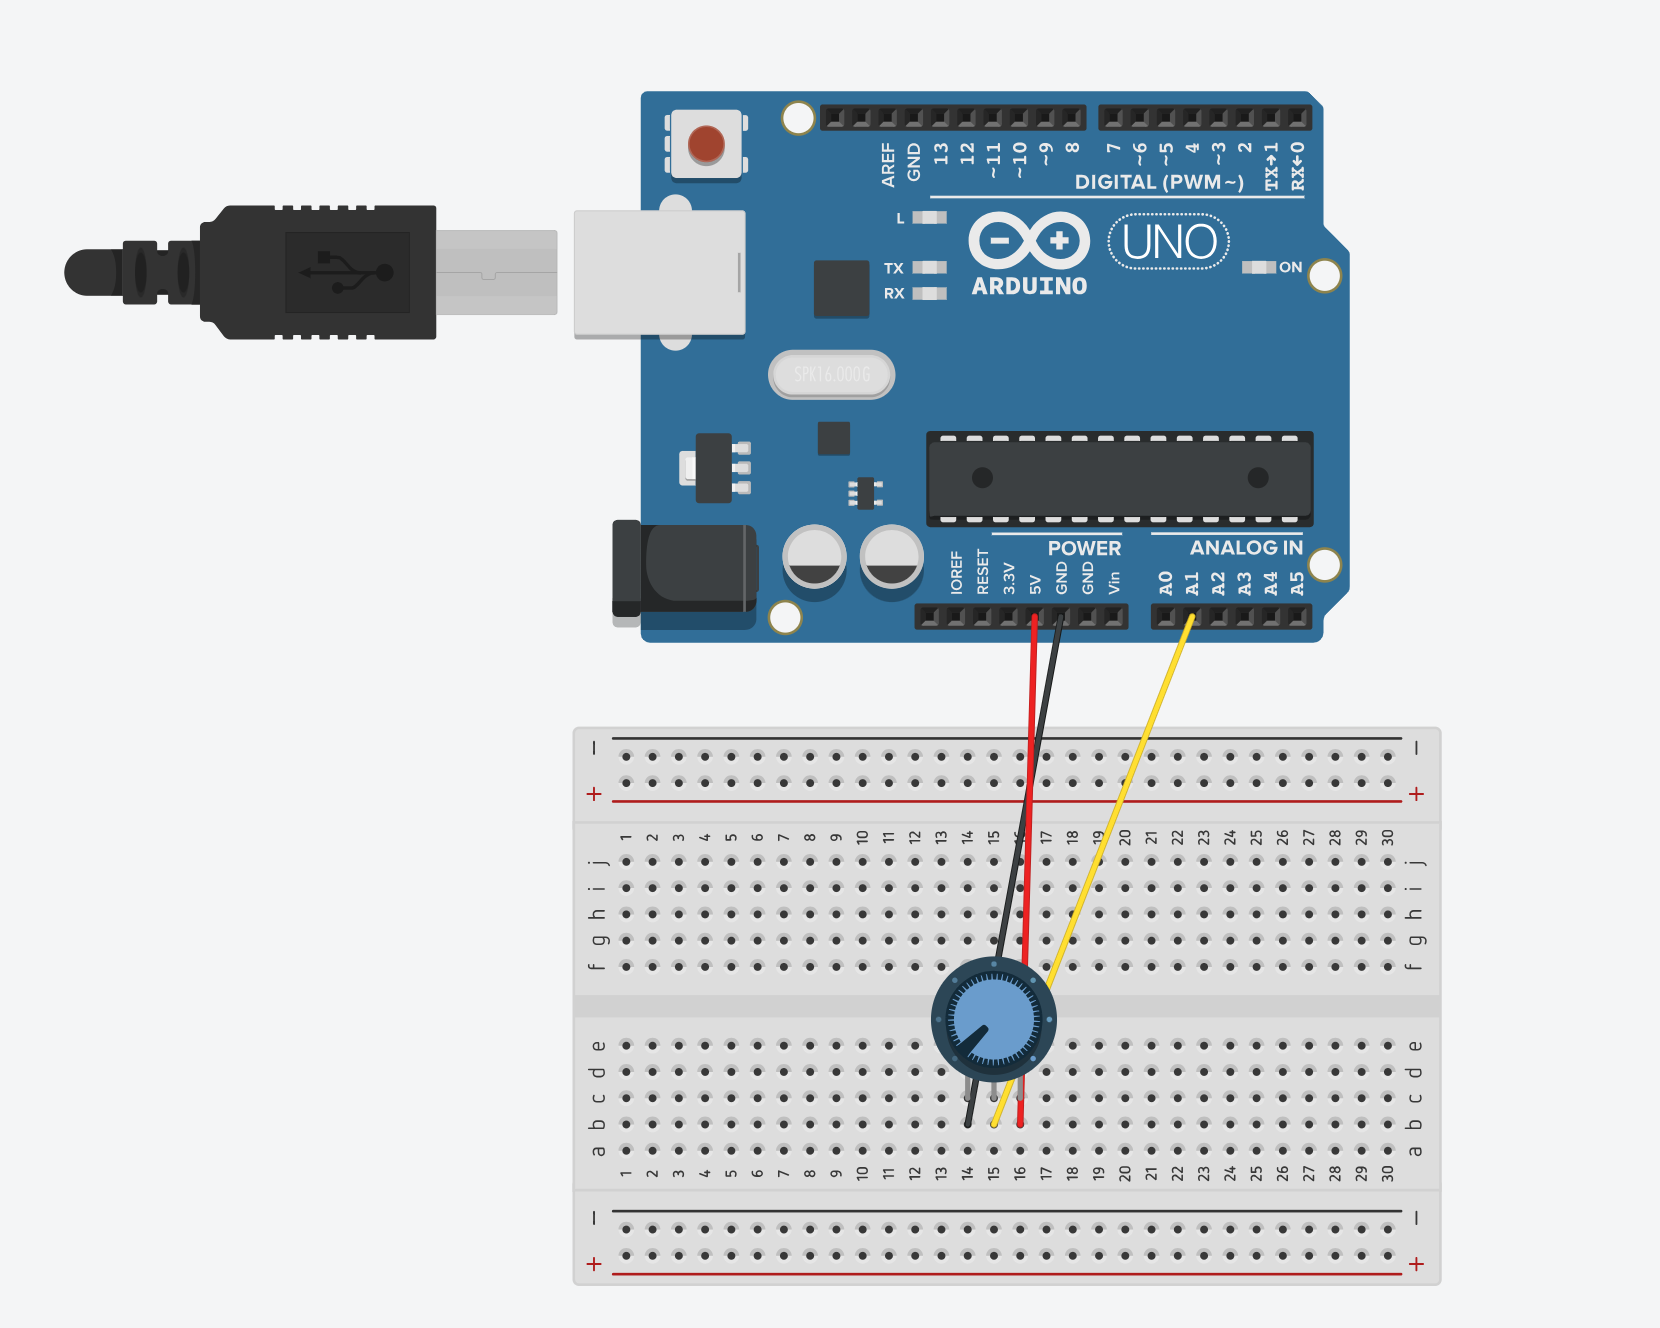
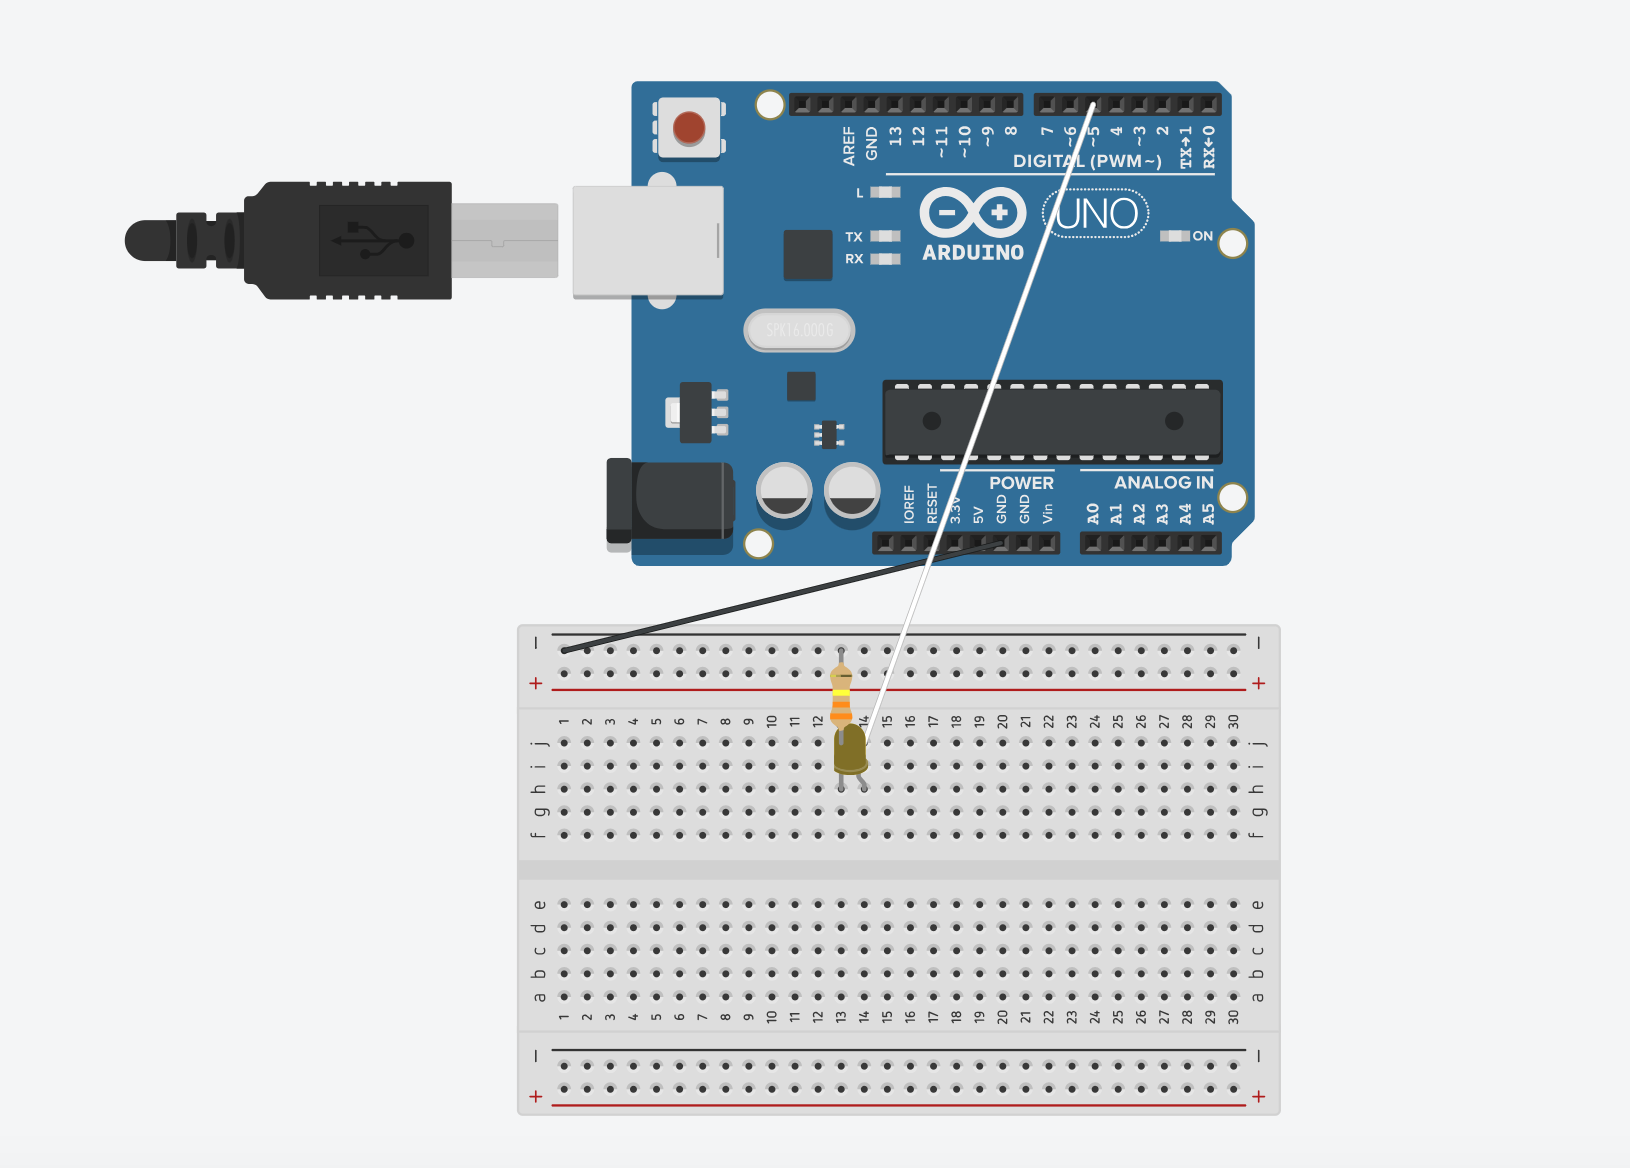
Using a potentiometer, we made an ellipse move left and right on the horizontal axis, ensuring that nothing on the Arduino is controlled by p5.
Schematic
P5js Code
//Variable to declare the ellipse moving acorss the x-axis
let ellipseX;

function setup() {
  //Canvas dimensions
  createCanvas(400, 400);
  //Set text size to 18 pixels
  textSize(18);
  //Initializes ellipse to half the width of the canvas, essentially centers it
  ellipseX = width/2;
}

function draw() {
  //Sets background to a light purple shade
  background("rgb(185,185,228)");
   // SetS fill color for the ellipse
  fill("rgb(142,142,228)");
  // Sets stroke color/outline for the ellipse
  stroke("rgb(91,91,233)");
  // Draw ellipse at ellipseX position, centered vertically, with a diameter of 120 pixels
  ellipse(ellipseX, height / 2, 120, 120);

  // If serial connection is not active, display message to prompt user to select serial port
  if (!serialActive) {
    //Sets fill color to white
    fill('white');
    // Sets stroke color to a gray shade
    stroke('#666666')
     // Display instructions at (15, 30)
    text("Press Space Bar to select Serial Port", 15, 30);
  }
  // If serial connection is active, display "Connected" message
  else {
    // Display instructions at (15, 30)
    text("Connected", 15, 30);
  }
}

// Function to handle key presses
function keyPressed() {
  // If space bar is pressed, call setUpSerial() function
  if (key == " ") {
    setUpSerial();
  }
}

// Function to read data from the serial port
function readSerial(data) {
  // Check if data is not null
  if (data != null) {
    // Split the received data into an array using comma as delimiter
    let fromArduino = split(trim(data), ",");
    // Map the potentiometer value to adjust the position of the ellipse
    ellipseX = map(int(fromArduino[0]), 0, 1023, 0, width);
  }
}
Arduino Code
const int potPin = A1;  // Analog pin connected to the potentiometer
void setup() {
  Serial.begin(9600);
}
void loop() {
    int potValue = analogRead(potPin);  // Read the value from the potentiometer
      // Send the potentiometer value to p5.js
      Serial.println(potValue);
}
Exercise 2-
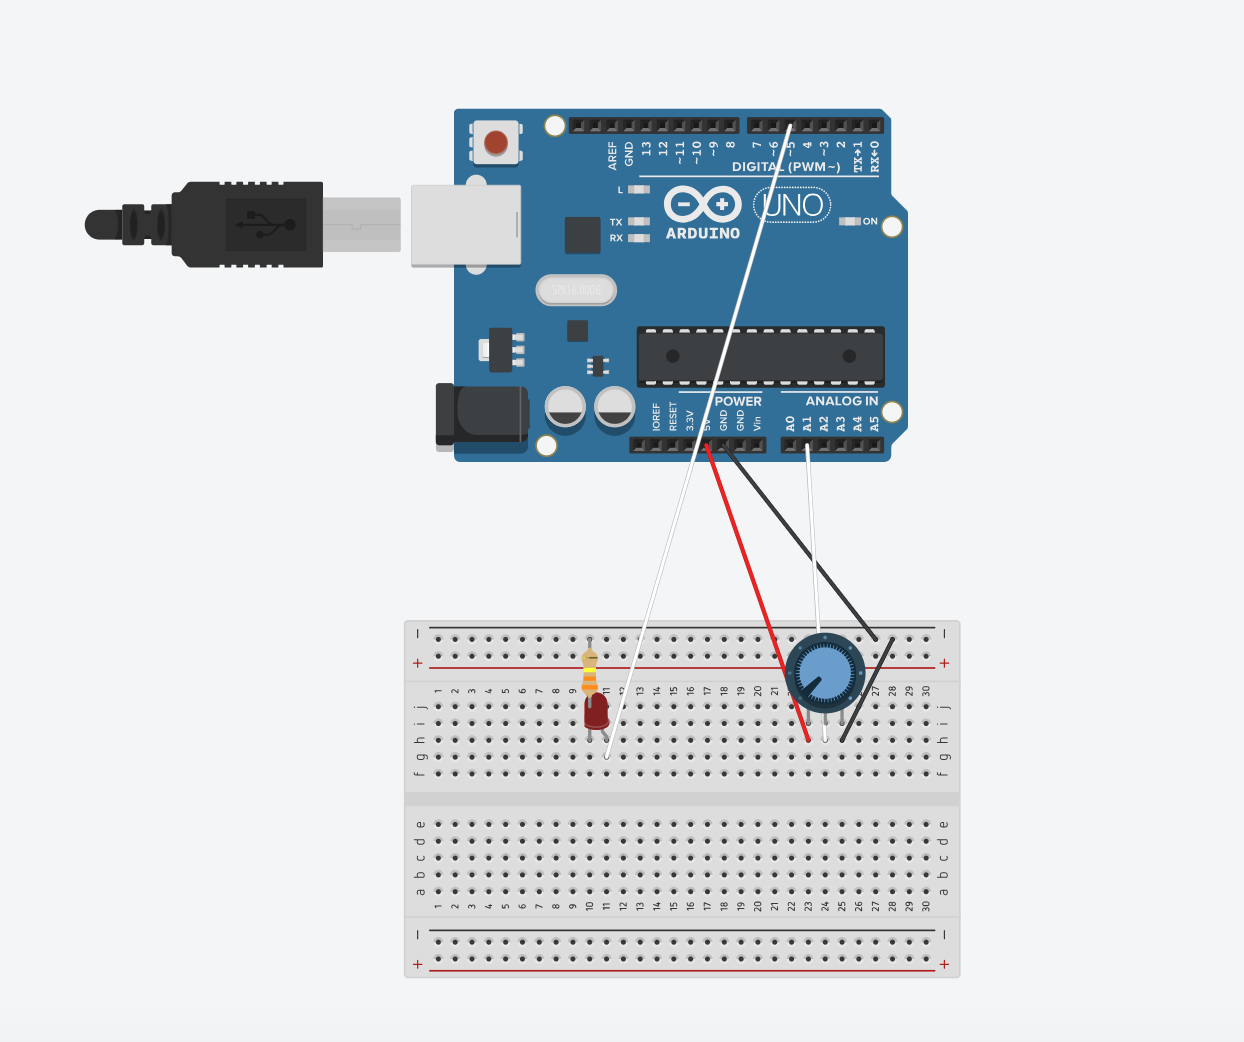
Using a slider, we controlled the LED brightness from p5.
Schematic
P5js Code
// Variable to hold the brightness value
let brightness = 0;
// Variable to hold the slider
let slider;

function setup() {
  //Canvas dimensions
  createCanvas(400, 400);
  // Create slider with range from 0 to 255 and initial value of 100
  slider = createSlider(0, 255, 100);
  // Positions slider horizontally centered and vertically centered
  slider.position(132, height/2);
}

function draw() {
  // Sets background color to a light gray shade
  background('#ADB9C7');
  // Gets  current value of the slider
  let val = slider.value();
  // Updates brightness variable with the slider value
  brightness = val;
  //If brightness is maximum (255), change background color to light blue
  if (brightness == 255) {
    // Changes background color to gold when brightness is max
    background('#DCECFF');
  }

  // If serial connection is not active, display message to prompt user to select serial port
  if (!serialActive) {
    // Set fill color to blue
    fill('#0876FF');
    // Set stroke color to a light gray shade
    stroke('#B2B2B2');
    // Set text size to 16 pixels
    textSize(16);
    // Display instructions at (20, 30)
    text("Press Space Bar to select Serial Port", 20, 30);
  }
  // If serial connection is active, display "Connected" message
  else {
    textSize(16);
    // Display instructions at (29, 30)
    text("Connected",29,30);
  }
}

// Function to handle key presses
function keyPressed() {
   // If space bar is pressed, start the serial connection
  if (key == " ") {
    setUpSerial();
  }
}

// Function to send data to the serial port
function readSerial(data) {
  // Check if data is not null
  if (data != null) {

  //Creates a string to send to Arduino with brightness value followed by newline character (HANDSHAKE)
    let sendToArduino = brightness + "\n";
  // Send data to Arduino
    writeSerial(sendToArduino);
  }
}
Arduino Code
// Define the pin for the LED (PWM PIN)
int LED = 5;

void setup() {
  // Set the LED pin as an output
  pinMode(LED, OUTPUT);
  // Start serial communication at 9600
  Serial.begin(9600);

  // Perform initialization handshake
  while (Serial.available() <= 0) {
    // Send a message to indicate initializing connection
    Serial.println("Initializing Connection");
    // Delay for a short time
    delay(200);
  }
}

void loop() {
  // Wait for data from p5.js sketch
  while (Serial.available()) {
    // Read the brightness value from serial communication
    int brightness = Serial.parseInt();
    // Check if the next character received is a newline character
    if (Serial.read() == '\n') {
      // Set the brightness of the LED using PWM (analogWrite)
      analogWrite(LED, brightness);
      // Send a message to indicate that LED is turned on
      Serial.println("ON");
    }
  }
}
Exercise 3-
Taking the gravity wind example provided, we made it so that every time the ball bounces and touches the bottom of the canvas, the led lights up and then turns off. We also added a potentiometer in order to control the wind of the ball, helping it move left and right.
Schematic
P5js Code
// Variables for physics simulation
// Velocity vector
let velocity;
// Gravity vector
let gravity;
 // Position vector
let position;
// Acceleration vector
let acceleration;
// Wind vector
let wind;
 // Drag coefficient
let drag = 0.99;
// Mass of the ellipse
let mass = 70;

// Flag to control LED based on ball bounce
let ballBouncing = 0;

function setup() {
  //Canvas dimensions
  createCanvas(400, 400);
  // Set text size based on canvas width
  textSize(width/25);

  // Initialize vectors for position, velocity, acceleration, gravity, and wind
  //Creates vector representing the initial position of the ellipse,set to be horizontally centered (width / 2) and positioned at the top of the canvas (0 on the y-axis)
  position = createVector(width / 2, 0);
  // Creates vector representing the initial velocity of the object,horizontal and vertical components are set to 0, so object is at rest
  velocity = createVector(0, 0);
  //Creates vector representing the initial acceleration of the object,horizontal and vertical components are set to 0, so object is at rest
  acceleration = createVector(0, 0);
  //Creates vector representing the gravitational force acting on the object, set to have a vertical component that depends on the mass of the object, stimulating the effect of gravity pulling the object downwards
  gravity = createVector(0, 0.5 * mass);
  //Creates vector representing the force of wind acting on the object, horizontal and vertical components are set to 0, so no wind affecting the object
  wind = createVector(0, 0);
}

function draw() {
  // Set background color
  background(210, 230, 250);

 // If serial connection is not active, display message to prompt user to select serial port
  if (!serialActive) {
    // Display instructions at (20, 30)
    text("Press Space Bar to select Serial Port", 20, 30);
  }
  else {
    // Apply forces (gravity and wind)
    applyForce(wind);
    applyForce(gravity);
     // Update position
    // Updates the velocity of the object by adding the current acceleration to it
    velocity.add(acceleration);
    //Multiplies the velocity vector by the drag coefficient, reducing its magnitude and stimulating air resistance
    velocity.mult(drag);
    //Updates the position of the object by adding the current velocity vector to it, helps move ellipse based on velocity
    position.add(velocity);
    //Resets acceleration to 0
    acceleration.mult(0);

 // Check boundaries for right and left movement
    //If condition to check if the x-coordinate of the object is exceeding the right boundary of the canvas
    if (position.x > width - mass / 2) {
      //If object's x-coordinate exceeds the right boundary, set the x-coordinate of the object's position to exactly width - mass / 2, placing the object right at the right boundary
      position.x = width - mass / 2;
      // Reverses velocity when hitting right boundary by multiplying it by -0.9, applying a dampening effect to the velocity
      velocity.x *= -0.9;
    }
   //Condition to check if the x-coordinate of the object is exceeding the left boundary of the canvas
    else if (position.x < mass / 2) {
      //If object's x-coordinate exceeds the left boundary, set the x-coordinate of the object's position to exactly width - mass / 2, placing the object right at the right boundary
      position.x = mass / 2;
      // Reverses velocity when hitting left boundary by multiplying it by -0.9, applying a dampening effect to the velocity
      velocity.x *= -0.9;
    }

    // Draw the bouncing ball
    ellipse(position.x, position.y, mass, mass);

    //Check boundary for vertical movement (bottom of the canvas)
    if (position.y > height - mass / 2) {
      //Set the y-coordinate of the object's position so that the bottom of the object aligns with the bottom edge of the canvas
      position.y = height - mass / 2;
       // Reverses velocity when hitting bottom boundary by multiplying it by -0.9, applying a dampening effect to the velocity
      velocity.y *= -0.9;
      //Sets flag to indicate ball bouncing
      ballBouncing = 1;
    }
    //Resets flag if ball is not bouncing
    else {
      ballBouncing = 0;
    }
  }
}

// Function to handle key presses
function keyPressed() {
   // If space bar is pressed, start the serial connection
  if (key == " ") {
    setUpSerial();
  }
  // Change mass and reset ball position when Enter key is pressed
  else if (key == "ENTER") {
    // Randomly set the mass of the object within the range of 15 to 80
    mass = random(15, 80);
    // Set the initial y-coordinate of the object's position above the canvas to simulate it entering the scene
    position.y = -mass;
    // Reset the velocity of the object to zero to ensure it starts from rest
    velocity.mult(0);
  }
}

// Function to send data to the serial port
function readSerial(data) {
  // Check if data is not null
  if (data != null) {
// Parse incoming data
    let fromArduino = split(trim(data), ",");
    // If it's the accurate length, then proceed
    if (fromArduino.length == 1) {
      // Store values here
       // Extract potentiometer value and map it to wind force
      let potentiometerValue = int(fromArduino[0]);
      //Mapping pontentiometer value to wind force
      wind.x = map(potentiometerValue, 0, 1023, -1, 1);
    }
   //Creates a string to send to Arduino with brightness value followed by newline character (HANDSHAKE)
    let sendToArduino = ballBouncing + "\n";
    writeSerial(sendToArduino);
  }
}

// Function to apply force to the object
function applyForce(force) {
  // Newton's 2nd law: F = M * A or A = F / M
  // Calculate the force acting on the object by dividing the applied force vector by the mass of the object
  let f = p5.Vector.div(force, mass);
  // Add the resulting force vector to the object's acceleration to calculate its new acceleration
  acceleration.add(f);
}
Arduino Code
// Define the pin for the LED
int ledPin = 5;
// Define the pin for the potentiometer
const int potPin = A1;

void setup() {
  // Start serial communication at 9600
  Serial.begin(9600);

  // Set the built-in LED pin as an output
  pinMode(LED_BUILTIN, OUTPUT);
  // Set the LED pin as an output
  pinMode(ledPin, OUTPUT);
  // Set the potentiometer pin as an input
  pinMode(potPin, INPUT);

  // Start the handshake
  while (Serial.available() <= 0) {
    // Blink the built-in LED while waiting for serial data
    digitalWrite(LED_BUILTIN, HIGH);
    // Send a starting message to the p5.js sketch
    Serial.println("0,0");
    // Delay for a short time
    delay(300);
    // Turn off the built-in LED
    digitalWrite(LED_BUILTIN, LOW);
    // Delay for a short time
    delay(50);
  }
}

void loop() {
  // Wait for data from p5.js sketch
  while (Serial.available()) {
    // Turn on the built-in LED while receiving data
    digitalWrite(LED_BUILTIN, HIGH);
    // Turn off the LED connected to ledPin
    digitalWrite(ledPin, LOW);
    // Read the integer value representing whether the ball is bouncing
    int ballBouncing = Serial.parseInt();

    // Check if the next character received is a newline character
    if (Serial.read() == '\n') {
      // Read the value from the potentiometer
      int potPinValue = analogRead(potPin);
      // Short delay to stabilize the reading
      delay(5);
      // Send the potentiometer value to the p5.js sketch
      Serial.println(potPinValue);
    }

    // Set LED brightness based on whether the ball is bouncing
    if (ballBouncing == 1) {
      digitalWrite(ledPin, HIGH); // Turn on the LED
    } else {
      digitalWrite(ledPin, LOW); // Turn off the LED
    }
  }
  // Turn off the built-in LED
  digitalWrite(LED_BUILTIN, LOW);
}