Reading Response – Physical Computing’s Greatest Hits (and misses)

This tour through the greatest hits (and misses) of physical computing projects was such a fun read!

One quote that particularly resonated with me was: “Sometimes when people learning about physical computing hear that a particular idea has been done before, they give up on it, because they think it’s not original. What’s great about the themes that follow here is that they allow a lot of room for originality.” As someone still finding my footing in creative disciplines, I can relate to that instinct to get discouraged if you feel like you’re just retreading old ground. But the author makes a compelling case for why revisiting familiar concepts is worthwhile – there’s an endless well of creative variations to explore.

Rather than dismissing these well-trod paths as clichés, the piece argues that putting your own spin on an established idea can make it feel totally fresh and novel. I was particularly struck by the examples under “Mechanical Pixels.” The artistic possibilities of combining precise kinetic movements with immersive audiovisuals seems endlessly fascinating. Dan Rozin’s mind-bending mechanical mirrors sound like they blur the boundaries between interactive art and raw mechanism in some delightfully bizarre ways.

At the same time, I’ll admit some of the Greatest Hits left me a bit puzzled. I’m still not 100% sure I grasp the emotional motivation behind things like “Remote Hugs” that aim to convey intimacy over a distance. Maybe I’m just a cynic, but I have a hard time imagining any unhuggable object truly capturing that warmth and connection.

The whole catalog is a humbling reminder of just how much creative ground has already been covered in this space – but also how unmapped the frontiers of invention still remain. I can only hope that I can someday create my own trail.

Colour-Changing Lamp

The challenge was to create something that blended analog and digital inputs to control a set of LEDs – one through an analog sensor and the other digitally.

The Concept:
I envisioned a vibrant desktop lamp that could cycle through a kaleidoscope of smoothly blending colours.

The Execution:
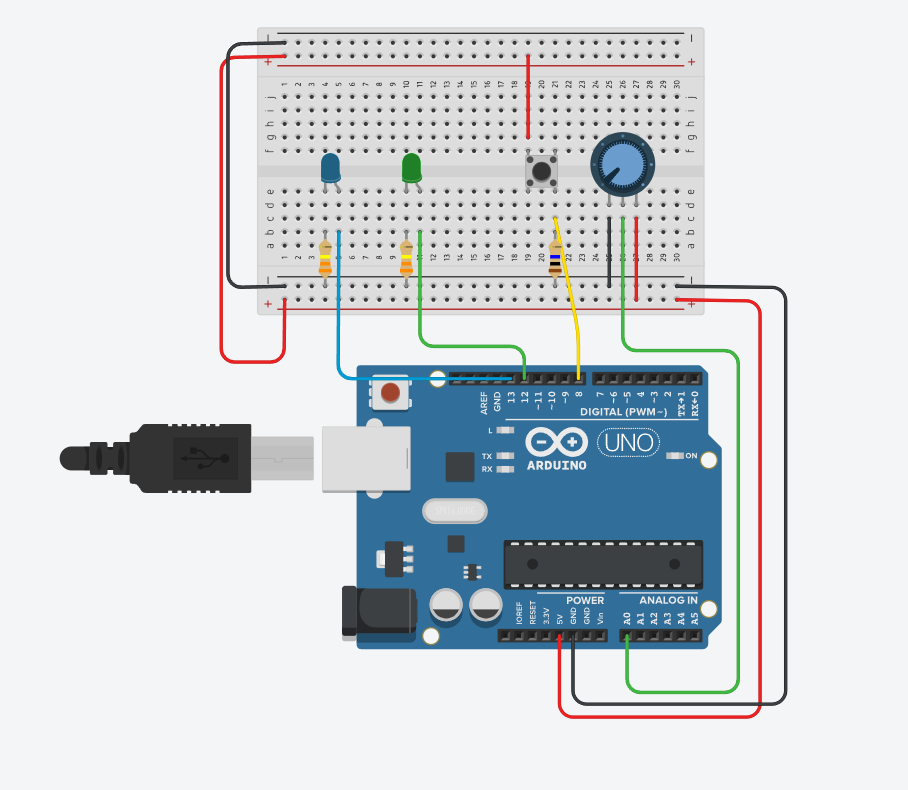
For the analog input, a potentiometer proved perfect – capable of outputting 1024 values just by twisting its knob. This enabled fluid color control.

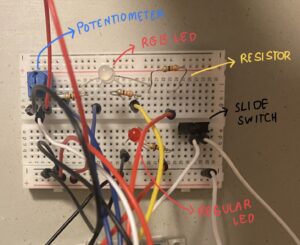
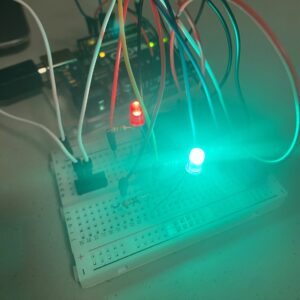
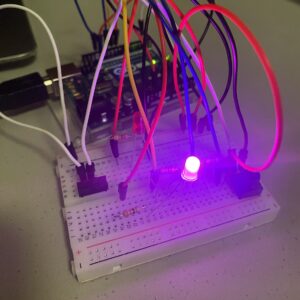
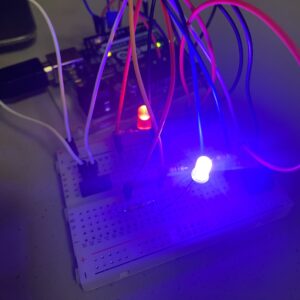
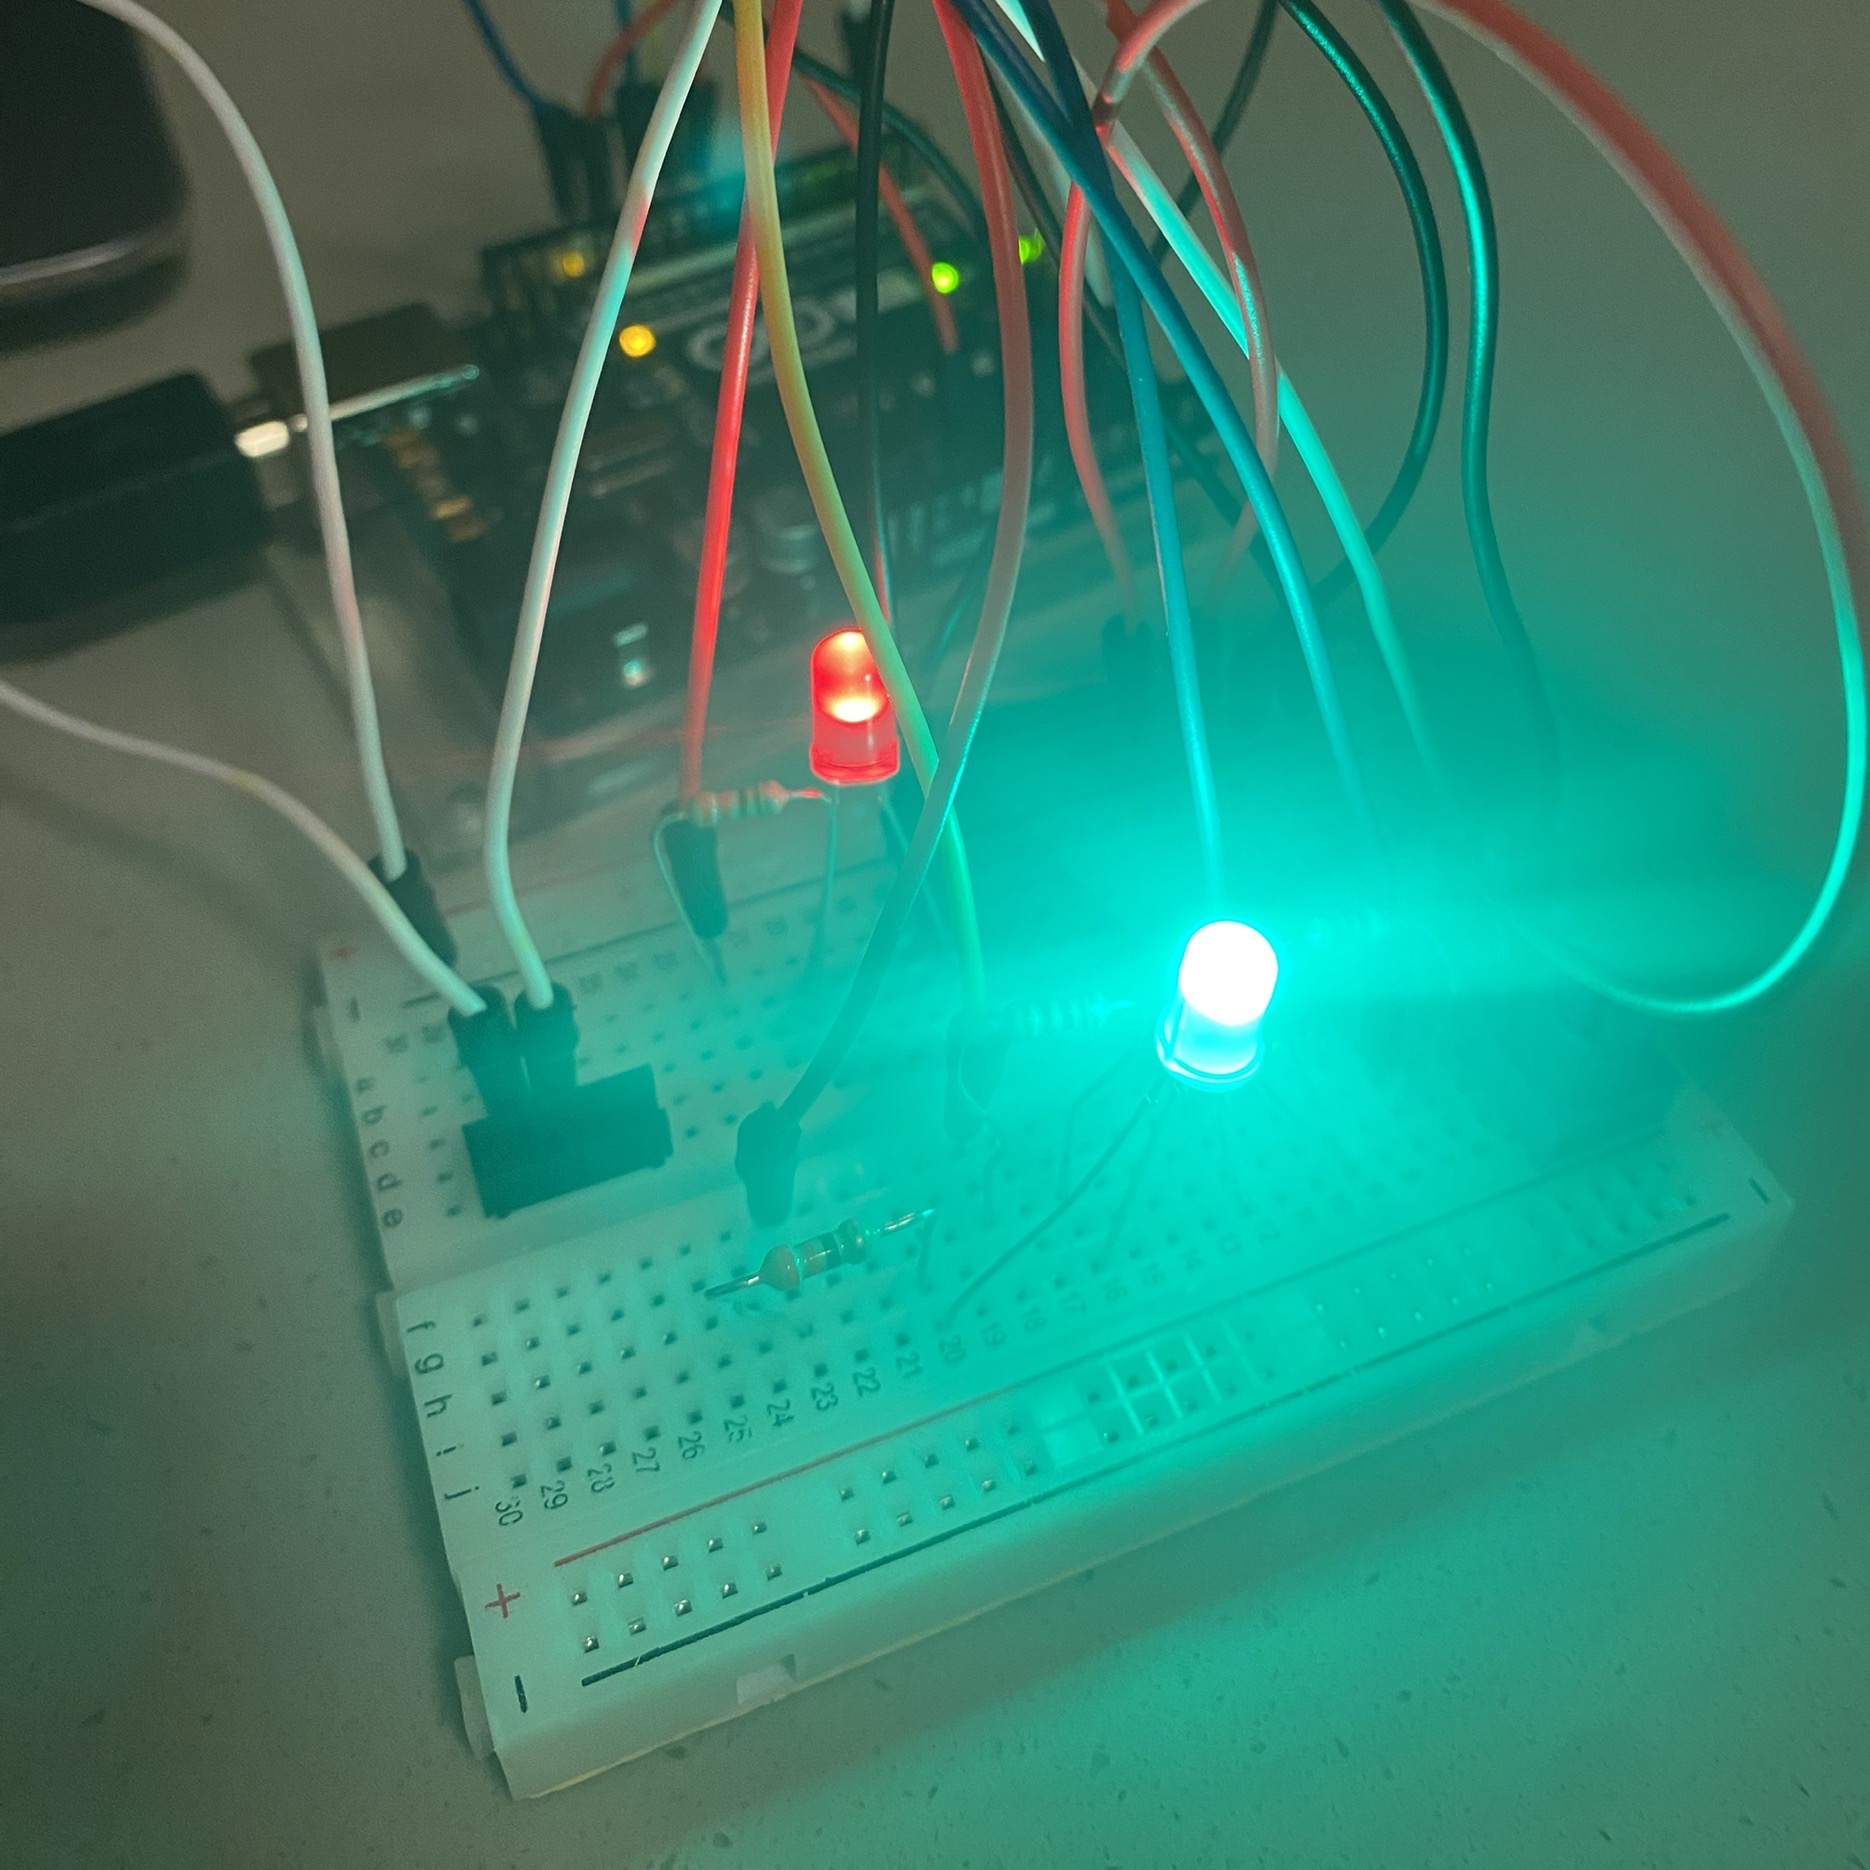
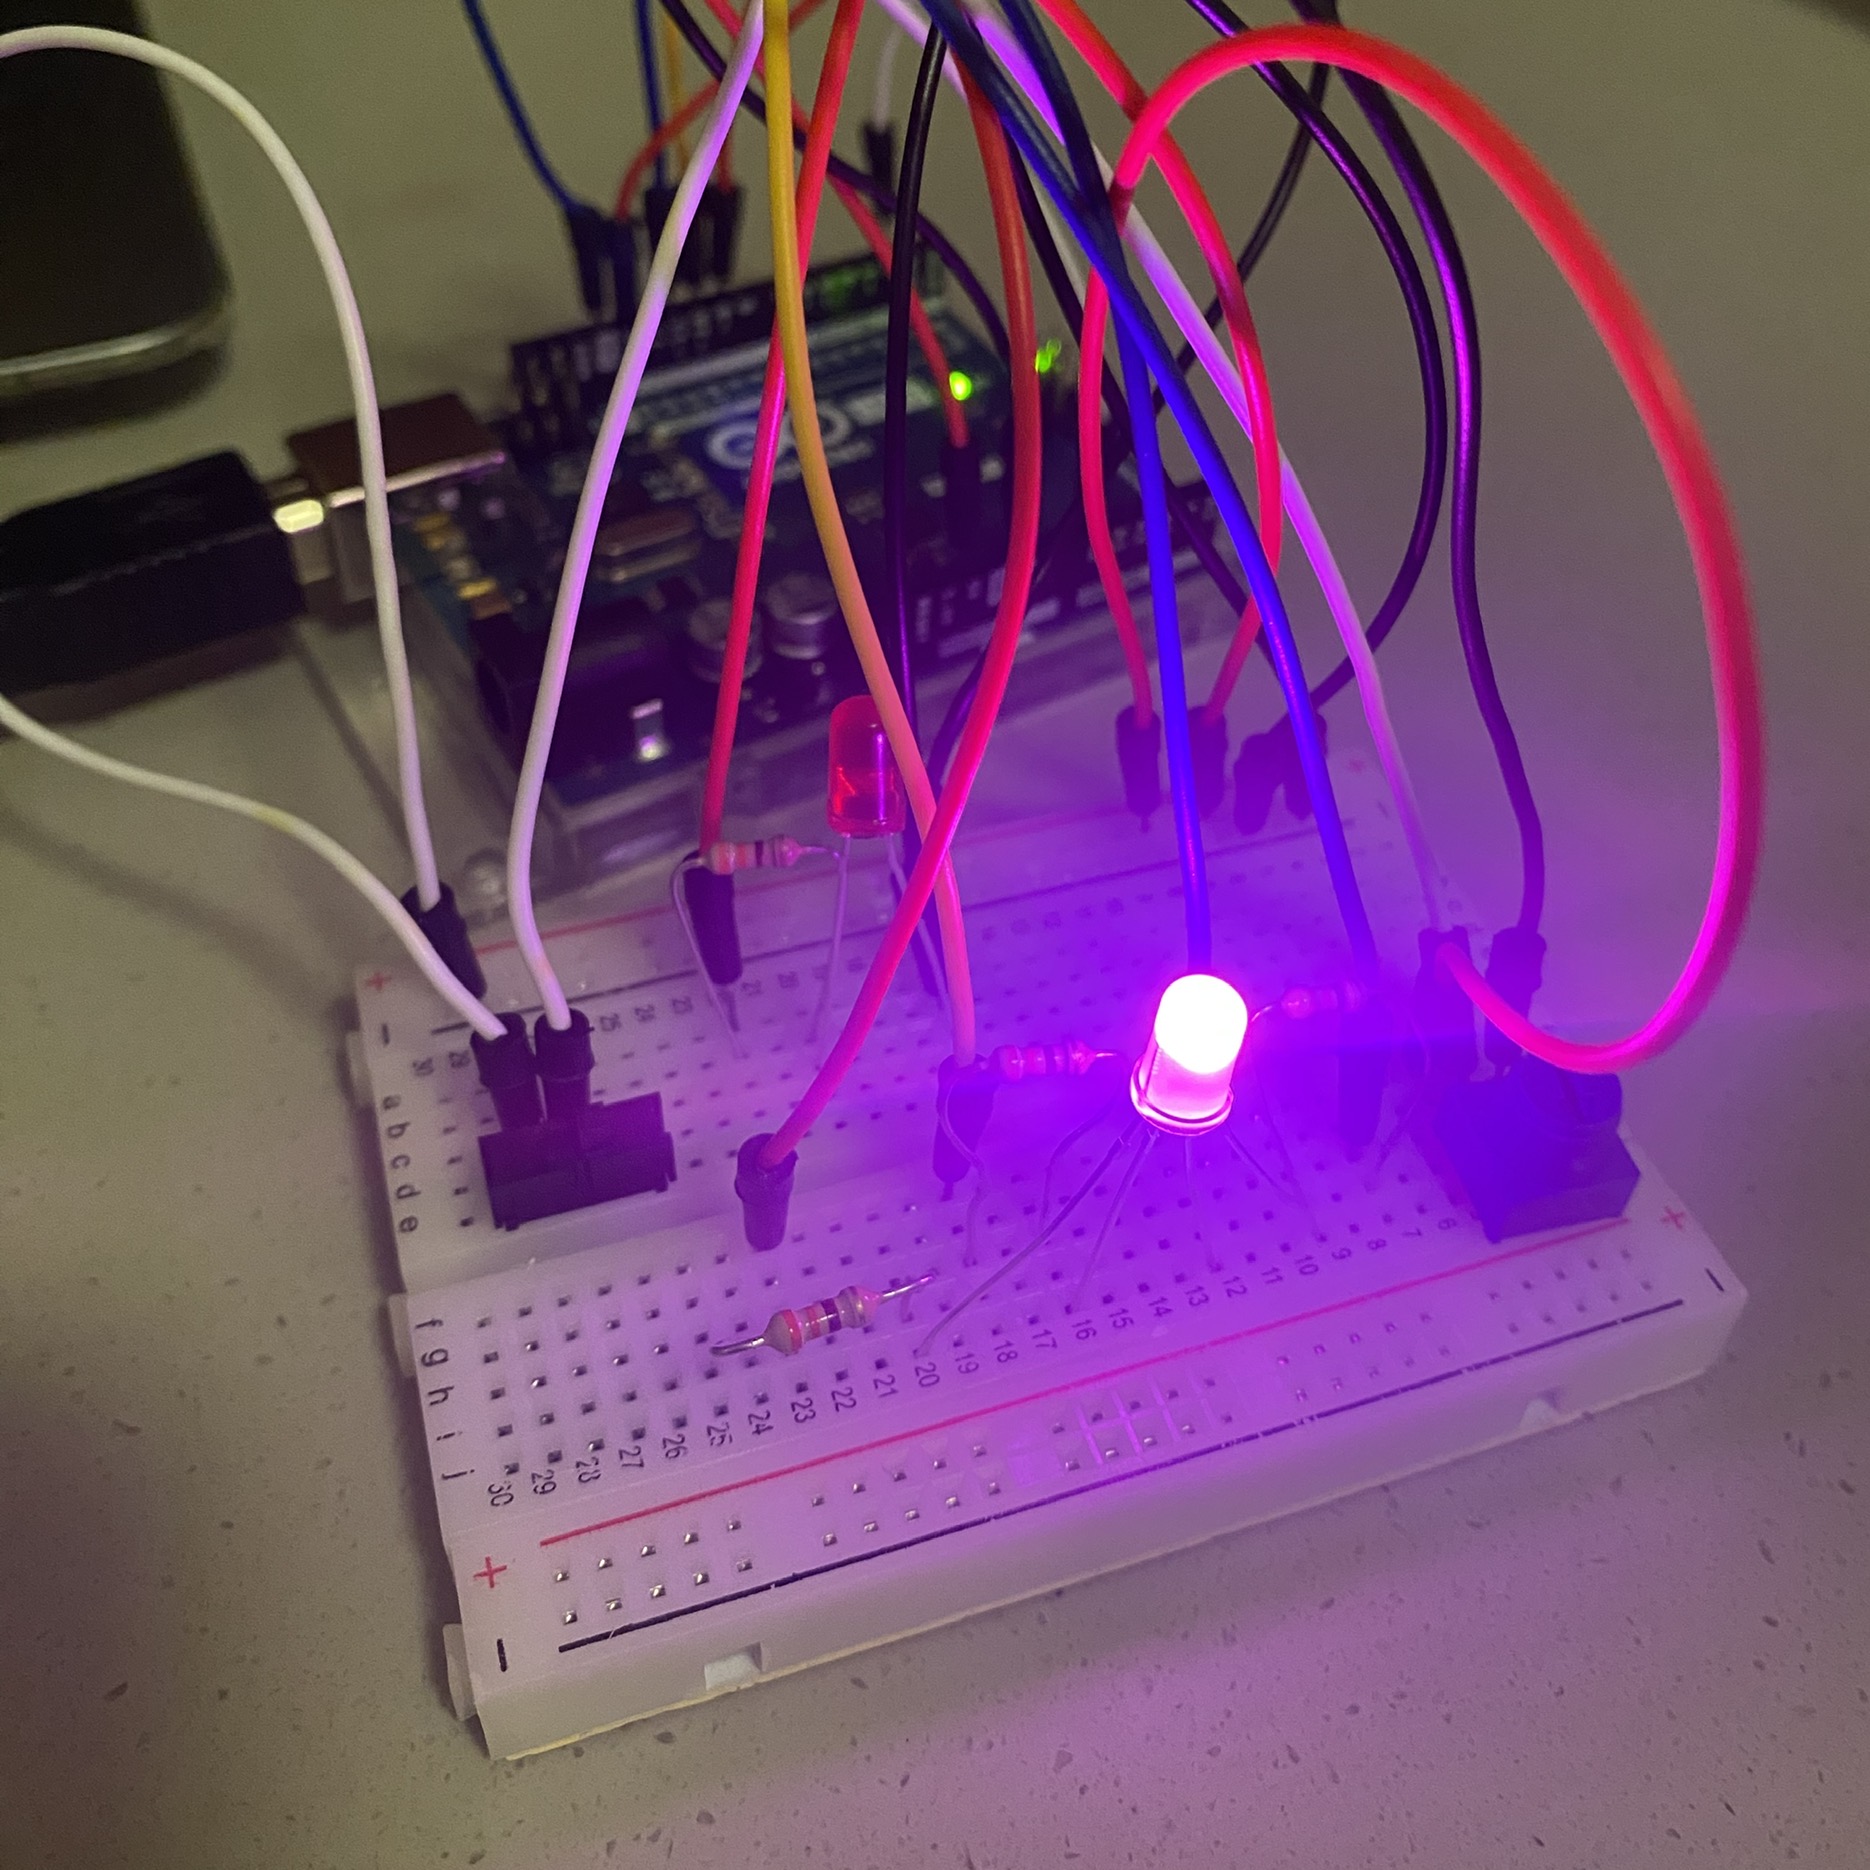
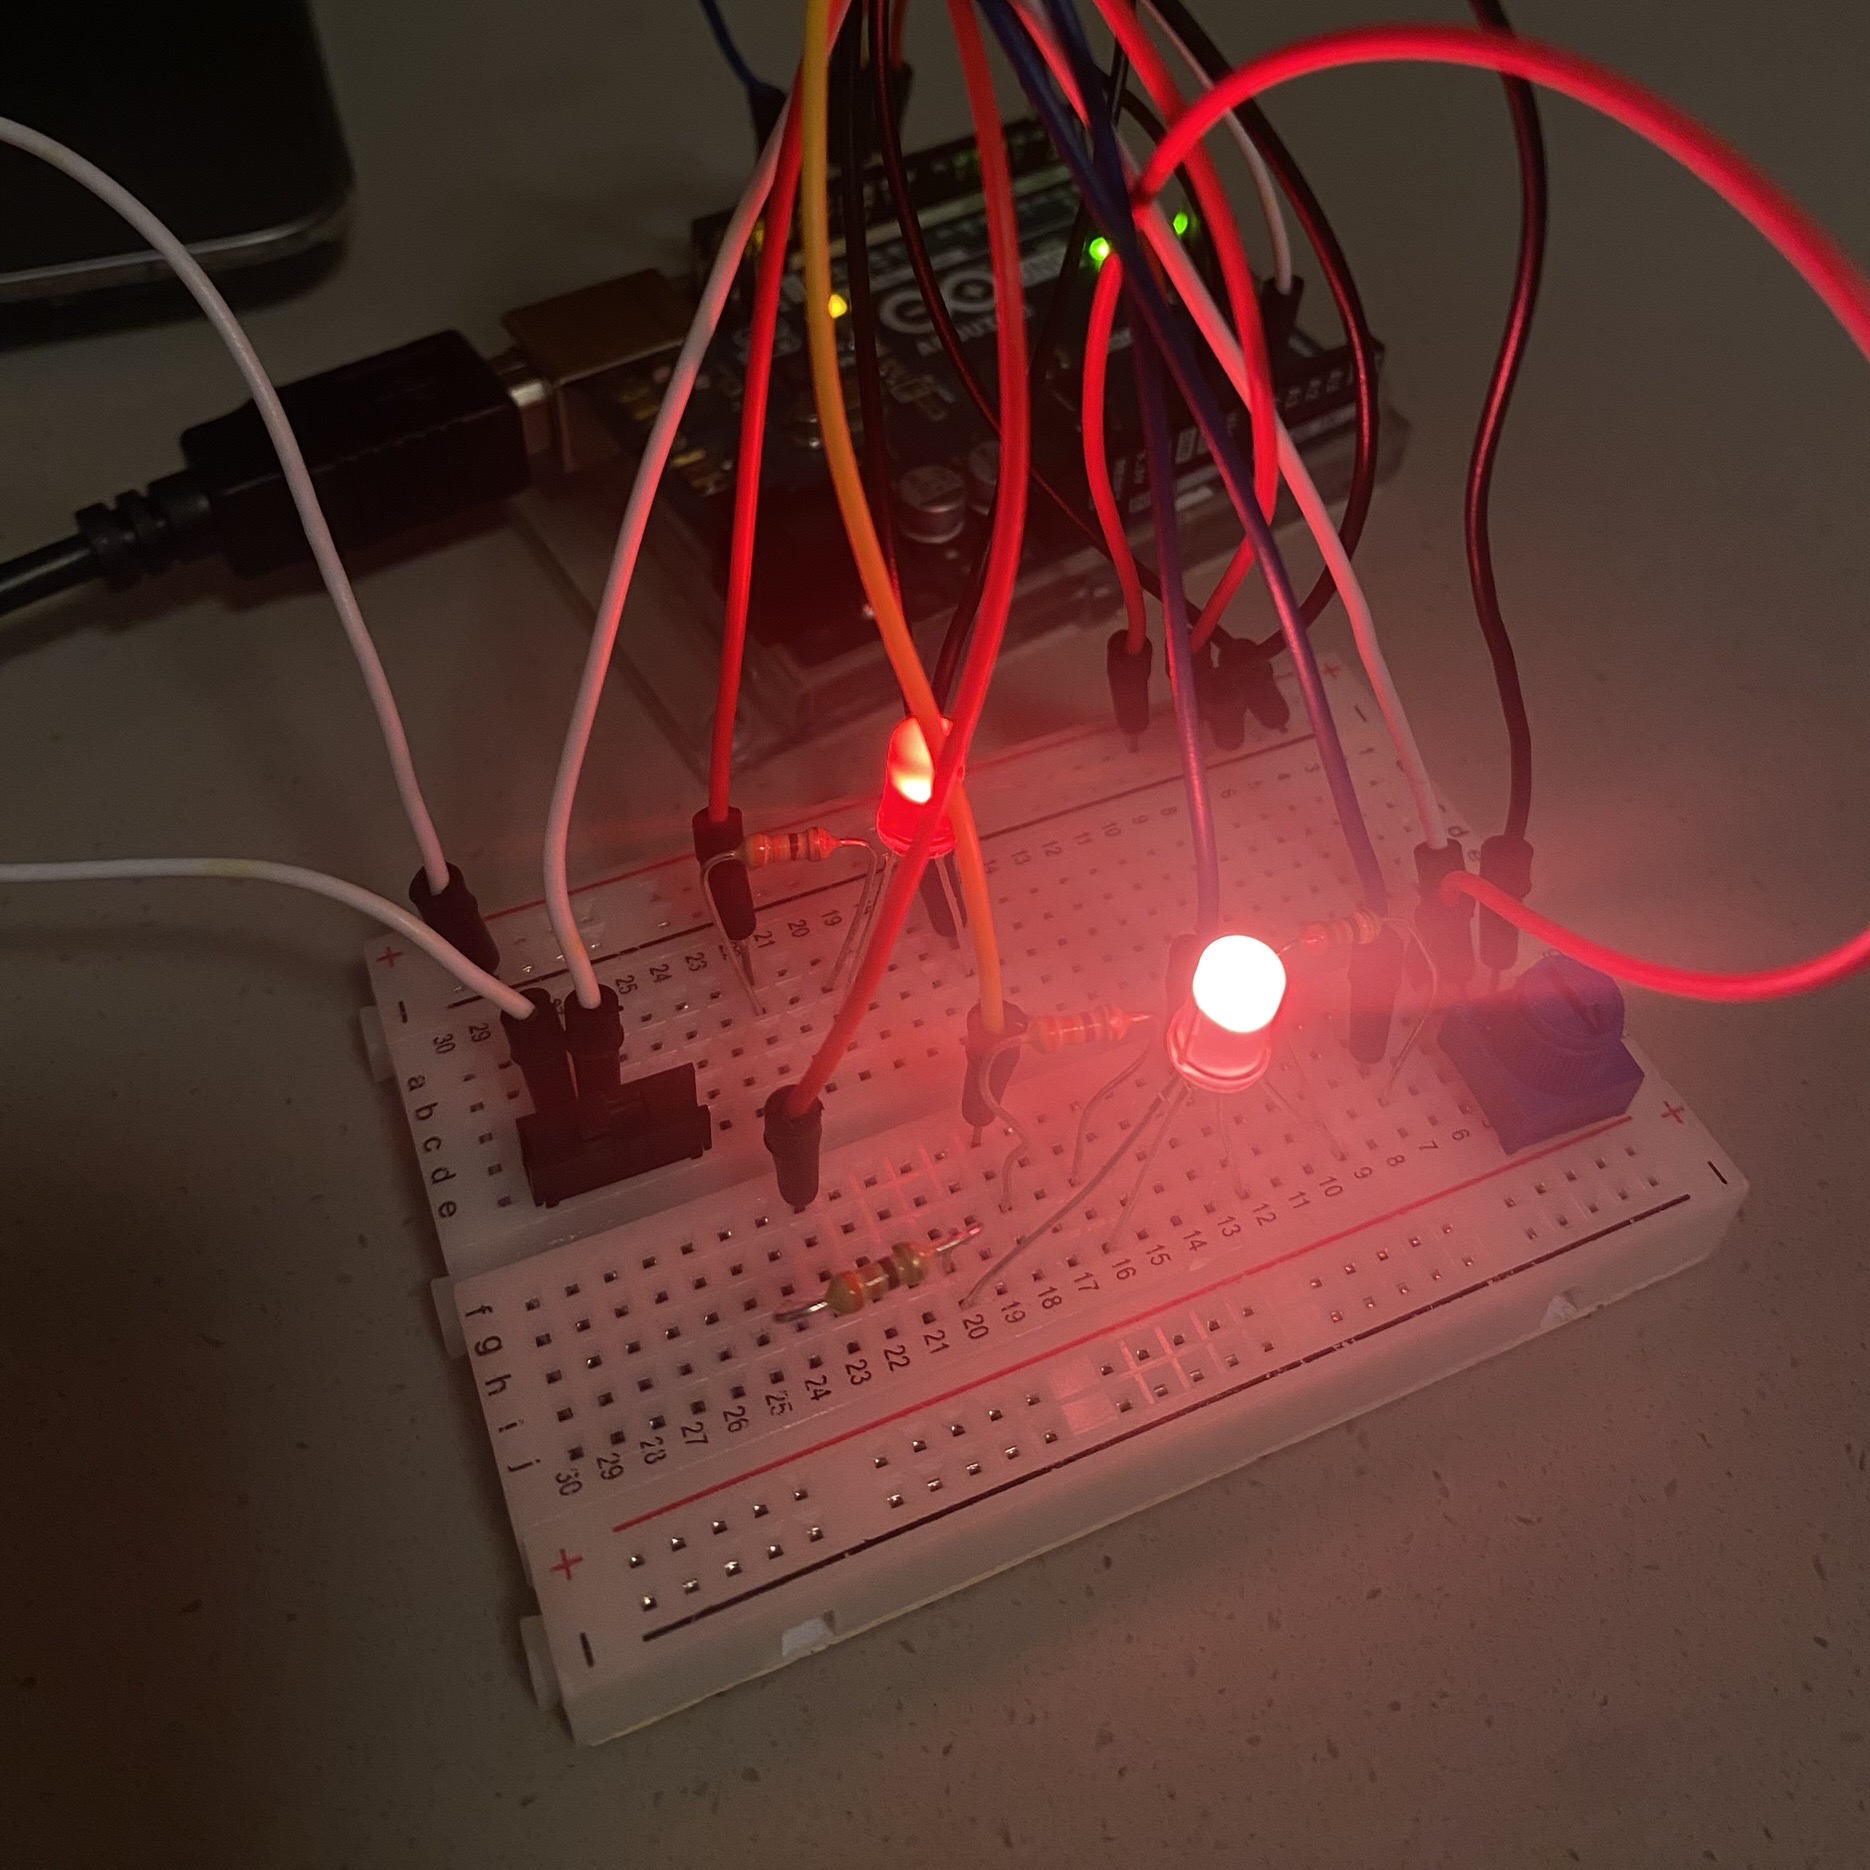
An RGB LED became the centerpiece light source. Its red, green, and blue elements could blend into any hue based on the potentiometer’s analog output levels. A regular red LED served as the digital indicator, powering on/off with the slide switch.

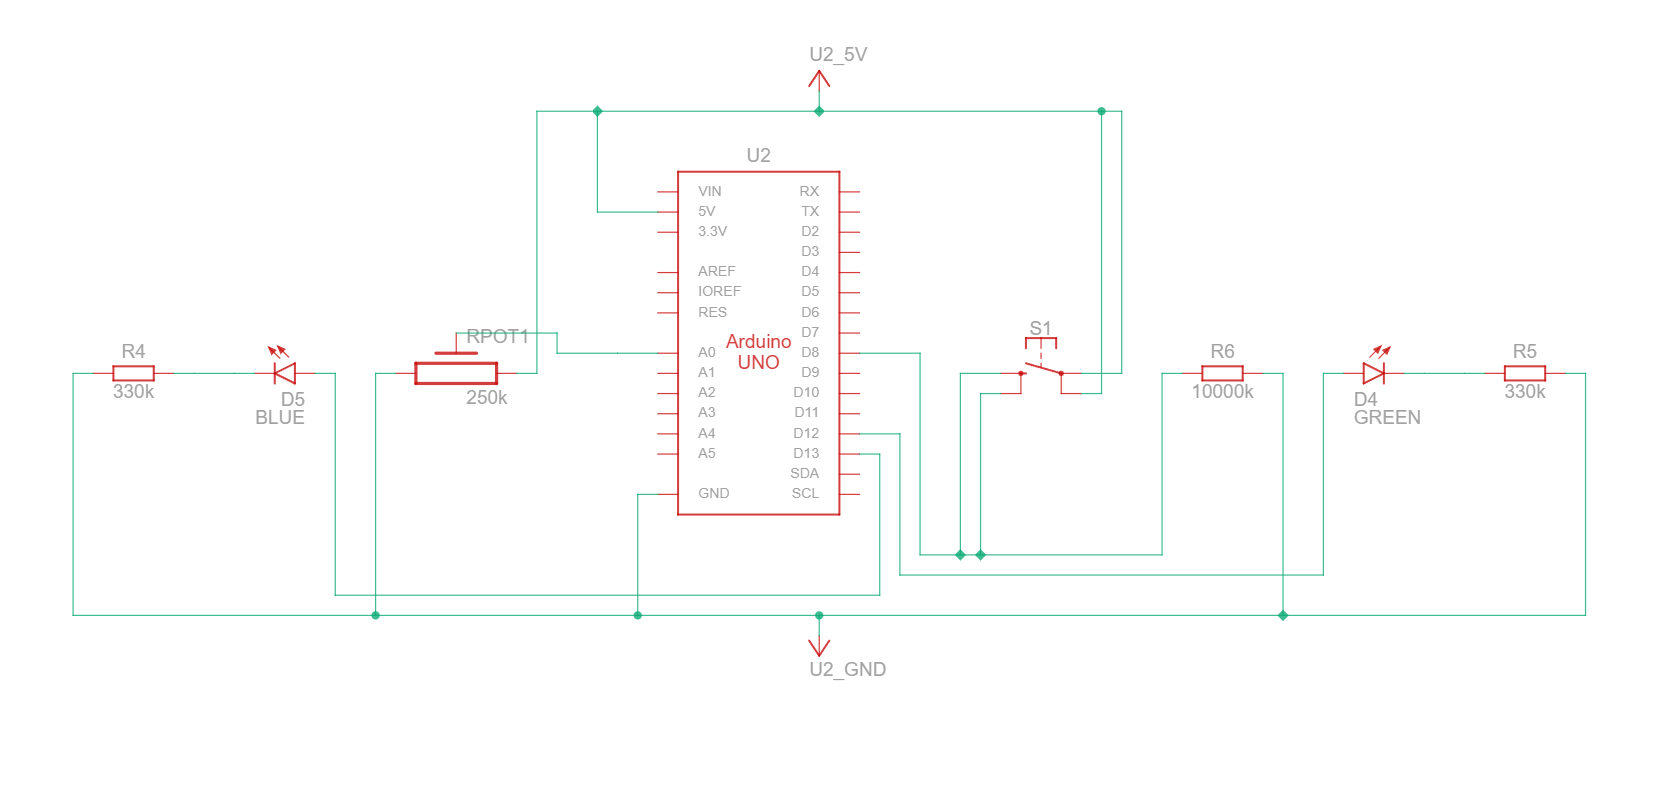
I wired the potentiometer to an Arduino analog input and the slide switch to a digital input pin. The RGB LED trio connected to three PWM analog outputs for mixable color output, while the red LED patched into a separate digital pin.

The Code:
The Arduino continuously read the potentiometer’s smooth analog value via analogRead(). I then mapped this range across the full RGB spectrum, setting the three LED output levels to precisely blend the corresponding hue on the RGB model. This proved to be slightly beyond my scope and I used the help of online resources to accomplish this

For the digital side, it just checked the slide switch state – HIGH powered the separate red LED, while LOW turned it off.

// Define pin connections
int potPin = A0;           // Potentiometer at analog pin A0
int redPin = 9, greenPin = 10, bluePin = 11; // RGB LED pins
int switchPin = 2;         // Digital pin for the toggle switch
int ledPin = 13;           // Pin for the additional standard LED

void setup() {
  pinMode(redPin, OUTPUT);
  pinMode(greenPin, OUTPUT);
  pinMode(bluePin, OUTPUT);
  pinMode(ledPin, OUTPUT);     // Set the additional LED pin as output
  pinMode(switchPin, INPUT_PULLUP); // Set the switch pin as input with pull-up
}

void loop() {
  int potValue = analogRead(potPin); // Read the potentiometer value
  int hueValue = map(potValue, 0, 1023, 240, 0); // Map pot value from blue to red hue values

  // Convert hue to RGB
  float r, g, b;
  hueToRGB(hueValue, r, g, b);

  // Write RGB values to LED pins
  analogWrite(redPin, r * 255);
  analogWrite(greenPin, g * 255);
  analogWrite(bluePin, b * 255);

  // Check the state of the switch
  if (digitalRead(switchPin) == LOW) {  // Switch is pressed (toggle switch connects to GND)
    digitalWrite(ledPin, HIGH);         // Turn on the additional LED
  } else {
    digitalWrite(ledPin, LOW);          // Turn off the additional LED
  }

  delay(10); // Short delay for stability
}

void hueToRGB(int hue, float &r, float &g, float &b) {
  int s = 1; // Saturation: 1 for full color
  int v = 1; // Value: 1 for max brightness
  float C = s * v;
  float X = C * (1 - fabs(fmod(hue / 60.0, 2) - 1));
  float m = v - C;
  float r1, g1, b1;

  if (hue >= 0 && hue < 60) {
    r1 = C, g1 = 0, b1 = X;  // Red to pinkish-red
  } else if (hue < 120) {
    r1 = X, g1 = 0, b1 = C;  // Pinkish-red to purple
  } else if (hue < 180) {
    r1 = 0, g1 = X, b1 = C;  // Purple to blue
  } else if (hue < 240) {
    r1 = 0, g1 = C, b1 = X;  // Lighter blue
  } else if (hue < 300) {
    r1 = X, g1 = C, b1 = 0;  // Skip greens
  } else {
    r1 = C, g1 = X, b1 = 0;  // Skip greens to yellow
  }
  r = (r1 + m);
  g = (g1 + m);
  b = (b1 + m);
}

Challenges:

My original vision was integrating this into a physical lamp with the RGB as the main light source. However, I struggled to find an easy way to run the component wires and extend the LEDs cleanly off the breadboard – a skill I’ll need to develop.

Future Improvements:
– Adding animation modes like pulsing, gradual color-cycling, and custom fading sequences between hues.
– Using light sensors to automatically adjust brightness based on ambient lighting.
– Exploring alternative RGB mapping patterns beyond the standard spectrum for unnatural, psychedelic hue blends.
– Integrating everything into a stylish 3D printed desktop lamp enclosure.


Week 10 | The Knob and The Bob

Throughout the Eid break, I tried to review the concepts that we have gone through so far. My goal for this assignment is not to create fancy circuitry but rather to design something from the back of my mind and understand what it does, how, and why.

I spent quite a time figuring out TinkerCAD, which is a program that really helps me to visualize and simulate my board before physically building it. I found this YouTube playlist that taught the program really well.

Concept

I want to light up two lights with a button and a knob. Because the knob is an analog input, there is a value that can be used there. So, I decided to make one LED blink in a specific amount of time decided by the knob, whereas the other LED is a simple on-off.

Schematic
How it Works

The code is separated for both green and blue LED.

In the code, I made a variable called sensorValue, which reads the signal from the knob. These values are then used to create blinking effect using delay for the blue light.

// Read Potentiometer Value
  sensorValue = analogRead(A0);
  // Turn the LED On
  digitalWrite(LED_BUILTIN, HIGH);
  // Pause program for <sensorValue> miliseconds
  delay(sensorValue); // Wait for sensorValue millisecond(s)
  // Turn the LED Off
  digitalWrite(LED_BUILTIN, LOW);
  // Pause program for <sensorValue> miliseconds
  delay(sensorValue); // Wait for sensorValue millisecond(s)
Demo
End Remarks

I am really proud of this whole assignment. It is not perfect, as in the video, the green LED sometimes does not turn off despite the button being pressed.

Nevertheless, while it may seem simple in the beginning, I was very confused by the whole arrangement of things. But, I did my best to actually sit down, take my time, and learn how these components work and interact with each other and reinforce my knowledge on Arduino itself.

Week 10 Reading Response – Khalifa Alshamsi

Tom Igoe’s blog posts offer the developmental and philosophical underpinnings of physical computing. In “Physical Computing’s Greatest Hits (and misses),” Igoe revisits a series of projects that have significantly influenced how physical computing is taught. By analyzing successful and less effective projects, Igoe highlights the iterative nature of learning in this field, which is crucial for students and educators aiming to refine their approach to technology and design.

On the other hand, “Making Interactive Art: Set the Stage, Then Shut Up and Listen” delves into the essence of interactive art. Igoe argues for the importance of minimal intervention by the artist, allowing the audience to engage freely with the artwork. This approach fosters a unique dialogue between the viewer and the piece, enhancing the personal connection and interpretive freedom. This philosophy not only redefines the role of the creator but also elevates the interactive experience, making it a personal journey for each participant.

Reflecting on Tom Igoe’s insights, I’ve learned about physical computing and art’s iterative and interactive nature. The blog posts illustrate the importance of trial, error, and refinement in developing effective educational strategies for technology and design. Moreover, Igoe’s approach to interactive art—emphasizing minimal artist intervention—has shown me how creating environments for audience engagement can transform the reception and meaning of art. These perspectives challenge traditional roles and invite a deeper understanding of how technology can facilitate more personalized and impactful experiences.

Week 10 Reading Response – Shaikha AlKaabi

Physical Computing’s Greatest Hits (and misses)

The article provides a fascinating exploration into the realm of physical computing, revealing a pattern of innovation that breathes new life into established concepts. It’s not merely about crafting something entirely new, it’s about the clever adaptation and imaginative expansion of familiar ideas. 

Starting with Theremin-like instruments and advancing through gloves equipped with sensors, the text underscores the perpetual evolution of interaction between humans and machines. Projects like ‘Hand-as-cursor’ and ‘Multitouch Interfaces’ take this further by translating human gestures into digital reactions, while ‘Tilty stands and tables’ employ physical manipulation to navigate virtual spaces. 

‘Tilty Controllers’ demonstrate the significance of object orientation, expanding our perception of how we can control and influence technology. ‘Things You Yell At’ and ‘Meditation Helpers’ show a more personal side, engaging with our voices and physiological states to guide or react in a context-sensitive manner. 

With ‘Fields of Grass’, we see a poetic application of sensor arrays, creating responsive textures that react to human touch. ‘Remote Hugs’ and ‘Dolls and Pets’ showcase the emotional and relational potentials of physical computing, emphasizing companionship and emotional communication. ‘LED Fetishism’ reminds us to push past the allure of visual feedback to discover deeper, more meaningful interactions. 

The text concludes with an ode to ‘Hybrid projects’, which combine different elements for novel experiences, like a flight simulator that mimics bird flight, showing the limitless potential when various facets of physical computing are merged.

Overall, the reading serves as an inspiration and a challenge to think beyond the conventional, urging creators in the field of physical computing to seek out the untapped potential in the interplay of the digital and physical worlds. It’s an invitation to innovate within the spectrum of sensory experiences, enriching our interaction with technology in both profound and playful ways.

Making Interactive Art: Set the Stage, Then Shut Up and Listen

The article on interactive art highlights a unique perspective on creation: the artist’s role is to set up an experience and then let the audience interact with it in their own way. It suggests that interactive art isn’t about dictating experiences but about creating opportunities for the audience to explore and interpret. This idea parallels a conversation where the artist ‘speaks’ through their work and then listens to the audience’s response through their interactions with it. Just as a stage director doesn’t perform but sets the scene for actors, the artist here provides the tools for expression and then steps back, allowing the audience to find personal meaning and contribute to the art’s ongoing narrative.

Week 10 Reading Response / Blinding Lights – Hamdah AlSuwaidi

In synthesizing the insights from TIGOE’s blog posts, “Physical Computing’s Greatest Hits (and misses)” and “Making Interactive Art: Set the Stage, Then Shut Up and Listen,” there emerges a compelling narrative about the nature of human interaction with technology and the role of the creator in guiding this interaction.

The first post examines the myriad ways in which creators harness technology to bridge the gap between art and the human experience. It underscores that the essence of physical computing is not in the machinery itself, but in the potential for human expression and interaction that it affords. TIGOE celebrates the diversity of approaches—from instruments that translate motion into sound to devices that sense and react to our emotions—each offering a unique dialogue between user and machine. This celebration is not just of the end product but of the process and potential for evolution, highlighting that even familiar ideas can be reinvigorated through creative reinterpretation.

The second post, meanwhile, delves into the philosophy behind interactive art. It champions the idea that art is a collaborative exchange and urges creators to step back after setting the scene, allowing the audience to bring their interpretations and experiences into play. This stance challenges the traditional static relationship between art and observer, proposing instead a dynamic interaction where the audience becomes an integral part of the art’s essence.

Both readings converge on the point that in the realm of interactive experiences, whether through physical computing or art, the creator’s role is not to dictate but to facilitate. It’s an invitation to viewers to engage, explore, and co-create, leading to a richer tapestry of experiences. The pieces do not stand as mere displays of technological or artistic prowess but as starting points for a journey that each participant completes in their own unique way.

By bringing together the physical and the interactive, TIGOE illuminates a future of creation that is ever-evolving, deeply personal, and universally accessible. In this future, the boundaries between the creator, the creation, and the consumer are not just blurred but are actively redefined with each interaction, fostering a space where art and technology serve as mediums for communication, learning, and exploration of the human condition. Both readings serve as a manifesto for the modern maker, encouraging a dialogue with technology and audience that is as open-ended as it is profound.

Blinding lights:

After being inspired by The Weeknd’s album ‘After Hours,’ I chose to name my assignment ‘Blinding Lights,’ which reflects the influence of his music had on me.

https://youtube.com/shorts/uRrlVS0TPpw?feature=shared

This Arduino code controls two LEDs (red and blue) based on the light detected by a photoresistor and the position of a potentiometer. The LEDs alternate based on the light level: if it’s dark (light level below 300), they alternate, with the speed of alternation controlled by the potentiometer. If it’s light, both LEDs remain off. The program uses serial output to display the light level detected by the photoresistor.

const int led0 = 3; // Red LED
const int led1 = 5; // Blue LED
const int photoResistor = A1;
const int potentiometer = A0; // Potentiometer connected to analog pin A0

void setup() {
  Serial.begin(9600);
  pinMode(led0, OUTPUT);
  pinMode(led1, OUTPUT);
}

void loop() {
  int lightValue = analogRead(photoResistor);
  Serial.print("Light Value: ");
  Serial.println(lightValue);

  // Read the potentiometer value to control the speed of LED alternation.
  int potValue = analogRead(potentiometer);
  int delayTime = map(potValue, 0, 1023, 50, 1000); // Adjust this range as needed.

  if (lightValue < 300) { // Threshold for photoresistor touch
    // Alternate LEDs when the photoresistor is touched.
    digitalWrite(led0, HIGH);
    digitalWrite(led1, LOW);
    delay(delayTime); // Delay controlled by potentiometer

    digitalWrite(led0, LOW);
    digitalWrite(led1, HIGH);
    delay(delayTime); // Delay controlled by potentiometer
  } else {
    // If the photoresistor is not being touched, turn both LEDs off or keep them in a default state.
    digitalWrite(led0, LOW);
    digitalWrite(led1, LOW);
  }
}


Reading Reflection – Week #10

I found the readings for today quite engaging in the sense that the first reading “Making Interactive Art: Set the Stage, Then Shut Up and Listen” offers vision for how interactivity should be executed by artists, and the second reading gives us widespread examples of such interactivity in the world of physical computing.

Firstly, I would like to address the points that resonated with me. I agree that exploring the interactive artwork by yourself is a better experience than being guided and directed along the way of that exploration. That could give audience a sense of emotional connection to the work, as the more modes and options of interaction there are, the more the artwork could “feel like home” for the individuals in the audience, hence leaving the audience and the artwork face-to-face is a great way of fostering emotional connection.

However, I do not agree with the distinction that the author makes between interactive artwork and other artwork. Many books, paintings are left for interpretation, which, I would argue, carries a sense of interactivity with the artwork, with the ideas, the perception of those ideas between audience members. So, I would not rush to call traditionally non-interactive artwork a “statement” or just an “expression”, as the author mentions. Vice versa, what we call interactive artwork can be understood solely as an expression in some cases, therefore the definition of “interactive artwork” is blurry and needs refinement in order to be categorized as needed to be left interpretation.

As a tangent to the last point, I, personally, do not appreciate the firm stances of guarding the intention of the author from audiences’ interpretation. I understand the value it can provide, as outlined in the beginning of this reflection, but I appreciate getting a chance for a glimpse of what was going on in the author’s mind while creating the artwork, as the process of creation could be as valuable as the creation itself, if not more.

Week 10 – Arduino: analog input & output

Concept 
I built a cool project using an ultrasonic sensor and an Arduino! It measures the distance to objects and tells me how far away they are using LEDs. If something is close, a red light blinks faster the closer it gets – like a warning. A green light turns on if it’s further away, so I know it’s safe. I can even start and stop the sensor with a button, which is pretty neat.

Video 

Components Required:
Arduino Uno (or any compatible board)
Ultrasonic Sensor (HC-SR04 or similar)
Red LED
Green LED
220-ohm resistors (2 pieces) & 10k-ohm resistor
Push button
Jumper wires
Breadboard

Schematic

Code

const int trigPin = 3;    //Trig
const int echoPin = 2;    //Echo
const int redLedPin = 13;  //RedLED
const int greenLedPin = 12; //GreenLED
const int buttonPin = 4;  //PushButton

int blinkInterval = 500; //BlinkInterval
bool projectRunning = false; //FlagToStart

void setup() {
  Serial.begin(9600);
  pinMode(trigPin, OUTPUT);  //SetUltrasonicSensor 
  pinMode(echoPin, INPUT);
  pinMode(redLedPin, OUTPUT);
  pinMode(greenLedPin, OUTPUT);
  pinMode(buttonPin, INPUT_PULLUP); //SetButton 
}

void loop() {
  if (digitalRead(buttonPin) == LOW) { 
    projectRunning = !projectRunning; //Toggle project state
  }

  if (projectRunning) {
    //Measure distance with ultrasonic sensor
    long duration = 0;
    long distance = 0;
    int retryCount = 0;
    const int maxRetries = 5; //Set a max number of retries
    while (duration == 0 && retryCount < maxRetries) {
      digitalWrite(trigPin, LOW);
      delayMicroseconds(2);
      digitalWrite(trigPin, HIGH);
      delayMicroseconds(10);
      digitalWrite(trigPin, LOW);
      duration = pulseIn(echoPin, HIGH);
      retryCount++;
    }
  
    if (duration != 0) {
      distance = duration * 0.034 / 2; //Convert to cm
    }
  
    //Print distance to Serial Monitor
    Serial.print("Distance: ");
    Serial.print(distance);
    Serial.println(" cm");
  
    //Control LED based on distance
    if (distance <= 50) { 
      digitalWrite(greenLedPin, LOW);  
      blinkInterval = map(distance, 0, 50, 100, 1000); 
      digitalWrite(redLedPin, HIGH);   
      delay(blinkInterval);
      digitalWrite(redLedPin, LOW);    
      delay(blinkInterval);             
    } else {
      digitalWrite(redLedPin, LOW);     
      digitalWrite(greenLedPin, HIGH);   
    } 
  } else {
    //Turn off both LEDs when the project is not running
    digitalWrite(redLedPin, LOW);
    digitalWrite(greenLedPin, LOW);
  }
}

Building this project was a real learning curve! Seeing the LEDs react to the distance measurements was super cool, but getting there wasn’t always smooth sailing. The sensor readings were a bit wonky at first, picking up on random noise and stuff. I had to get creative with the code to filter that out and make sure it was actually measuring the right things.

Reading Reflection: week 10

I’ve always been fascinated by the intersection of technology and art, so reading about these interactive projects really resonated with me. It’s incredible how specific themes, like theremins and video mirrors, keep popping up, proving that some ways of interacting are just inherently enjoyable. However, I realize that the true magic lies not in the technology itself but in the experience it creates.
Initially, I was drawn to the technical aspects of these projects: the sensors, the code, and the gadgets. But now I see them as tools, like a painter’s brush or a musician’s instrument. Technology is simply a means to an end, and the real focus should be on the interaction and the meaning it conveys.

One of my most important takeaways is the idea of “shutting up and listening.” As creators, it’s easy to fall into the trap of over-explaining our work, dictating how it should be interpreted. But that approach stifles the audience’s ability to explore and discover their own meaning. Instead, we should create experiences that invite participation, spark curiosity, and allow for diverse interpretations.

These readings have ignited my passion to explore interactive art more deeply. I want to create projects beyond mere novelty and offer meaningful experiences that evoke emotions and stimulate thought. I’m excited to experiment with different technologies and approaches, always considering the importance of observation and listening to understand how people interact with and interpret my work.

I believe that interactive art has the potential to bridge the gap between the creator and the audience, fostering a sense of connection and shared experience. By focusing on meaningful interaction and embracing the audience’s role in shaping the experience, we can create art that is not only engaging but also transformative.

Afra Binjerais – Week 10 reading response

Physical Computing’s Greatest Hits (and misses)

As I think back on this reading, the idea that creativity in physical computing—or any other creative field—comes from personalizing and reinterpreting existing concepts rather than from creating anything completely new encourages me. The theremin, for example, is a deceptively simple instrument that may develop into a very personal undertaking that expresses the creative and technical sensitivities of its maker in addition to being functional.

Furthermore, the discourse surrounding initiatives such as “Multitouch Interfaces” and “Body-as-cursor” emphasizes the need of human-centered design in physical computing. The way these initiatives connect human-machine interaction is remarkable, since physical gestures are translated into digital answers that are subsequently translated into tactile or visual outputs. The elegance of physical computing lies in its capacity to enhance technology’s intuitiveness and responsiveness to human presence and movements, as demonstrated by this smooth integration.

Making Interactive Art: Set the Stage, Then Shut Up and Listen

I found the emphasis on avoiding from dictating interpretation to be especially compelling while reading about the process of making interactive artworks. The reading  encourages artists to avoid assuming too much control over the meaning of their creations and the appropriate ways in which viewers should respond to them. Rather, artists are urged to see their works as interactive platforms that allow viewers to delve deeper and find meaning on their own. Furthermore, After establishing the interactive environment, the instruction to “shut up” is dramatic because it subverts conventional ideas of artistic power and control. It suggests faith in the audience’s capacity to interact with and participate in the creative process. This informal attitude enhances the viewing experience for the audience while simultaneously giving the artist insights about how viewers engage with the piece—what they do, what they overlook, and how they understand the tools and surroundings that are made available to them.