Week 11 – Creative Reading

A Brief Rant On The Future Of Interaction Design

https://worrydream.com/ABriefRantOnTheFutureOfInteractionDesign/

Introduction (Summary):

“A Brief Rant on the Future of Interaction Design” by Brett Victor is a critique of the direction that interaction design is currently taking. In particular, he takes issue with the fixation on “pictures under glass,” as most interactions are limited to swiping a flat screen. Victor is a champion of designs that make full use of our hands and body, appealing to more of our senses.

Thought (Personal Impact):

Victor’s enthusiastic defense of technology caused me to reevaluate its actual possibilities. His criticism of the pervasive touchscreens made me think of the enjoyable tactile feedback that conventional controls, such as knobs and sliders in music equipment, offer, something touchscreens do not. His viewpoint, which revealed a stalemate in truly inventive consumer technology interfaces, was both energizing and alarming.

Perspective Shift:

The essay caused me to reconsider what I consider to be “innovative” technology. In the past, I associated advancement with devices that were slimmer and had more fluid touch interfaces. Victor’s focus on tactile engagement offers a more expansive meaning of innovation, one that goes beyond merely digitizing human interaction and capability enhancement. His illustrations of more tactile and expressive experiences, such as making music or shaping clay, are potent reminders of the dimensions we lose when we depend just on touchscreen technology.

Novel Thoughts and Important Concerns:
I’m left wondering after reading this essay why interface design’s greater potential isn’t being investigated more thoroughly. Victor mentions this, but he doesn’t go into detail as to why the industry strongly favors touchscreens. Is it because of customer demand, simplicity of manufacturing, or maybe a lack of vision in the tech sector? This lack of conversation is a crucial component in comprehending the obstacles to the ideas Victor supports.

Conclusion:

I find it impossible to see how existing technologies, such as iPads and tablets, could be improved to greatly improve their physical involvement outside of the touchscreen concept. It appears that a different form of technology and product may be needed, one that radically rethinks how we use technology. Furthermore, we see a tendency toward even less hand use with the introduction of VR glasses, pointing to a time when manual engagement may become unnecessary. Victor’s appeal to rethink interaction design, highlighting the necessity to maintain and improve physical engagement in our increasingly digital environment, is made all the more meaningful by this tendency.


Responses: A Brief Rant on the Future of Interaction Design

https://worrydream.com/ABriefRantOnTheFutureOfInteractionDesign/responses.html

Bret When one considers how interaction design affects children, Victor’s criticism of contemporary interaction design in “A Brief Rant on the Future of Interaction Design” is particularly poignant. Victor highlights that instead of restricting interactions to “pictures under glass,” there is a need for more tactile and physically engaging interfaces. His interest for the learning and sensory development of youngsters is one really insightful feature. Children may grow reluctant to participate in more hands-on activities like building, crafting, or exploring the natural world if interactions are limited to touchscreens. This restriction may intensify anxieties about getting filthy, using real toys, and even connecting with the outdoors and animals. The article got me thinking about how modern technological trends might affect children’s perception of and interactions with their physical surroundings, in addition to changing how they learn. This could potentially impede children’s natural tendency toward exploration and general development.



Week 11: A Brief Rant on the Future of Interaction Design & Follow-Up Article

In my Spring semester of last year, I took a class called “Touch” that opened my eyes not only to the primacy of touch, but also to our consistent ignorance of the primacy of touch. Our tactile sensory system is the first to develop in the womb and is arguably the last to deteriorate as we get older. It is also the only reciprocal sense – we can only touch something if it touches us – providing us with a truly connective interface to interact with the diverse environments around us. The sense of touch is also extremely vital for normal cognitive and social development. Yet, prototypes of future technological interfaces reduce the full range of interaction that touch affords us or eliminate it altogether. The future vision for AR/XR technologies seems to be doing away with the tactile. Pictures-Under-Glass, the moniker Victor aptly coins and uses in this week’s readings, technologies already offer us limited tactile feedback that only our fingertips enjoy. We now see the future of AR/XR interfaces, such as headsets utilizing eye movement tracking systems, heading toward a direction where the visual is prioritized. Our rich haptic system is left to atrophy in the process.

It is indeed worrying that we might reach a time when kids struggle to use a pen or open lids. In attempting to connect to the world via modern-day interfaces, it seems like we are disconnecting from it in important ways. There must have been interfaces that we could have envisioned that integrate all of our varied sensory systems, had we invested the time to make that a priority. Victor’s rant and his follow-up article were both written in 2011. 13 years later, his call to invest in research that centers the full range of human capabilities in the design of technological interfaces seems to have gone unanswered. We have yet to make our capabilities a priority in design, but that could change if we collectively dare to choose a different way of envisioning tomorrow’s technologies.


Week 11 Reading Response

A Brief Rant on The Future of Interactive Design

I partially agree with the author about the vision of the future of interaction.  I do agree that the picture under glass interactivity narrows our capability in terms of hand usage, but it is wrong to just identify it as such. First of all, why was “picture under glass” chosen as a primary interactivity of the modern times in the first place? The main reason was because it is simple, therefore making the interactive process much more easier. Due to its simplicity, people can interact with it more efficiently, making it less time consuming. Other interactive designs that demands the user more hand capabilities may be interesting or more diversified but ultimately, they are inefficient in comparison to “picture under glass”.

Another point is inclusivity. The author talks about various capabilities of the hand, but what about those who are incapable of them? As an interactive product, they must be as inclusive as possible, otherwise it is difficult to classify it as a good design. “Picture under glass” utilizes touch and drag, which could be argued as one of the simplest actions that human can take, therefore making it much more inclusive than other interactive designs. As seen from the responses as well, the author completely dismisses this situation.

Another point in the responses section was about Dr.Seuss and Shakespeare. Maybe Shakespeare’s work is regarded as a marvel but when you think about who can understand it, Dr.Seuss has much wider range of people. Shakespeare’s works, while literary masterpieces, are certainly exclusive on who can understand and who cannot. This leads to the point of vision. The advancement of technology and the vision for interactive design always had inclusivity and ease of use in mind, which is why better tools appear in the end. Some tools will make life easier compared to other tools, therefore making it better. Making tools that requires higher level of capabilities would only encourage segregation, which is definitely unnecessary.

Week 11: Lullaby Box by Sihyun and Linh

Concept

While brainstorming for this assignment, we decided that we would like to make a project that utilizes the photocell and the buttons. The photocell changes its resistance value depending on the light intensity. And this inspired us to explore interactions between light presence and absence. We came up with a cute project called the “Lullaby Box”, which plays nursery rhymes when the photocell is covered and a button is pressed. This project features yellow, red, and green buttons, each corresponding to different songs: ‘Mary Had a Little Lamb,’ ‘Twinkle Twinkle Little Star,’ and ‘Happy Birthday Song,’ respectively. The rationale for the songs playing only when the photocell is covered is tied to the project’s purpose: to soothe children to sleep in the dark.

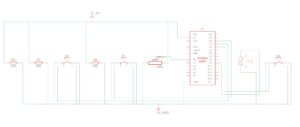
Schematics and Diagram

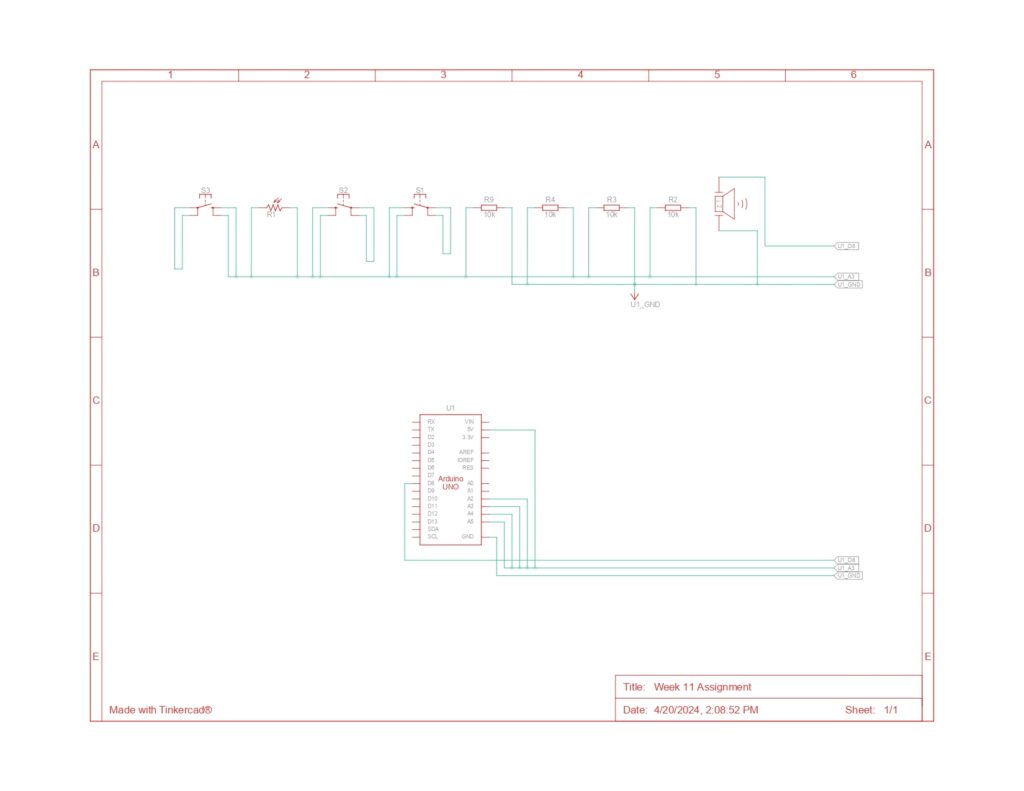
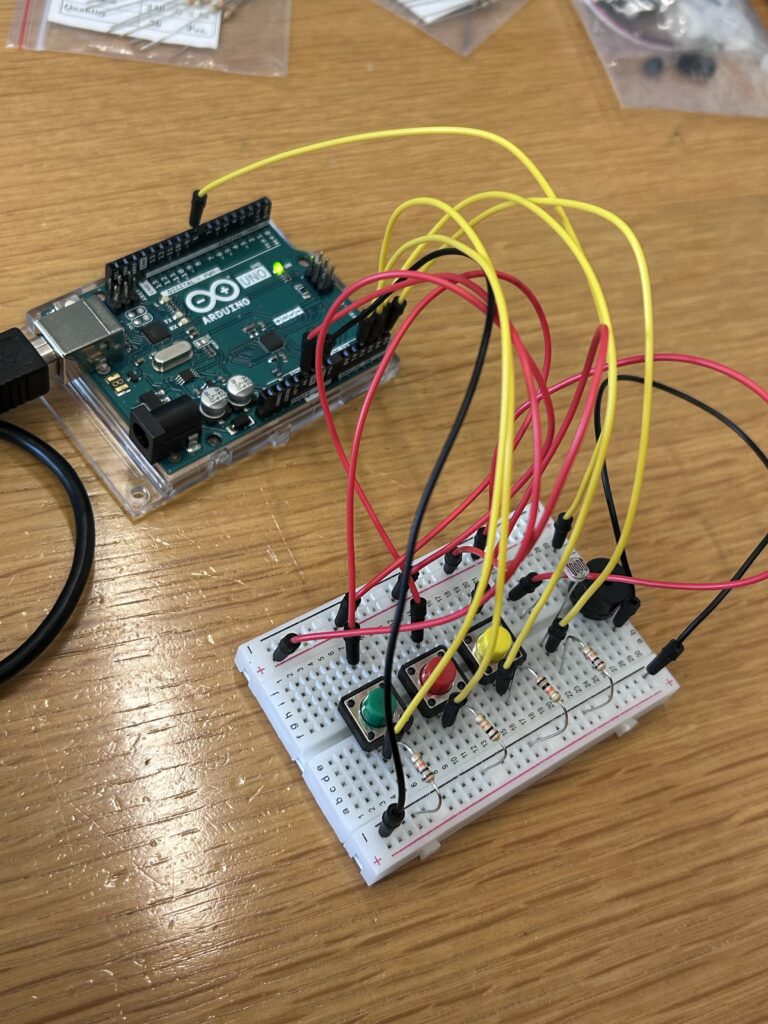
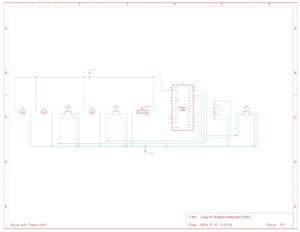
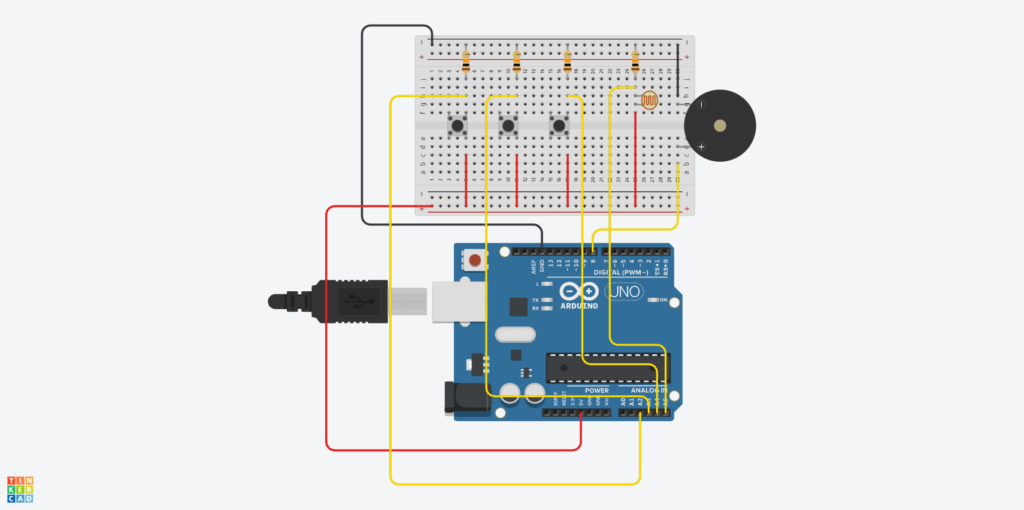
The circuit consists of three main parts: the light sensor, the Piezo Speaker, and the buttons. The light sensor is connected to port A5 for analog reading. It acts as a button in the circuit, allowing the song to play when the photocell is covered. The buttons are the main controller of this assignment. They are connected to ports A2, A3, and A4 for digital reading. The song will only play when the photocell is covered (its value is low) and the button is pressed. Each button is responsible for a different song that will be played by the Piezo Speaker (connected to port 8 for digital output).

Arduino Code

#include "pitches.h"
//mary had a little lamb
int melody1[] = {
  NOTE_E4, NOTE_D4, NOTE_C4, NOTE_D4, NOTE_E4, NOTE_E4, NOTE_E4, NOTE_D4, NOTE_D4, NOTE_D4,
  NOTE_E4, NOTE_G4, NOTE_G4, NOTE_E4, NOTE_D4, NOTE_C4, NOTE_D4, NOTE_E4, NOTE_E4, NOTE_E4,
  NOTE_E4, NOTE_D4, NOTE_D4, NOTE_E4, NOTE_D4, NOTE_C4
};
// twinkle twinkle little star
int melody2[]={
  NOTE_C4, NOTE_C4, NOTE_G4, NOTE_G4, NOTE_A4, NOTE_A4, NOTE_G4, NOTE_F4, NOTE_F4, NOTE_E4,
  NOTE_E4, NOTE_D4, NOTE_D4, NOTE_C4, NOTE_G4, NOTE_G4, NOTE_F4, NOTE_F4, NOTE_E4, NOTE_E4,
  NOTE_D4, NOTE_G4, NOTE_G4, NOTE_F4, NOTE_F4, NOTE_E4, NOTE_E4, NOTE_D4, NOTE_C4, NOTE_C4,
  NOTE_G4, NOTE_G4, NOTE_A4, NOTE_A4, NOTE_G4, NOTE_F4, NOTE_F4, NOTE_E4, NOTE_E4, NOTE_D4,
  NOTE_D4, NOTE_C4
};
// happy birthday
int melody3[] = {
  NOTE_G4, NOTE_G4, NOTE_A4, NOTE_G4, NOTE_C5, NOTE_B4,
  NOTE_G4, NOTE_G4, NOTE_A4, NOTE_G4, NOTE_D5, NOTE_C5,
  NOTE_G4, NOTE_G4, NOTE_G5, NOTE_E5, NOTE_C5, NOTE_B4, NOTE_A4,
  NOTE_F5, NOTE_F5, NOTE_E5, NOTE_C5, NOTE_D5, NOTE_C5
};


int noteDurations[] = {
  4, 4, 4, 4, 4, 4, 2, 4, 4, 2, 4, 4, 2, 4, 4, 4, 4, 4, 4, 4, 4, 4, 4, 4, 4, 1
};
int noteDurations2[] = {
  4,4,4,4,4,4,2,4,4,4,4,4,4,2,4,4,4,4,4,4,2,4,4,4,4,4,4,2,4,4,4,4,4,4,2,4,4,4,4,4,4,2
};

int noteDurations3[] = {
  8, 8, 4, 4, 4, 2,
  8, 8, 4, 4, 4, 2,
  8, 8, 4, 4, 4, 4, 4,
  8, 8, 4, 4, 4, 2
};


void setup() {
  Serial.begin(9600);
  pinMode(A4, INPUT); // yellow switch

}

void loop() {
  int sensorValue= analogRead(A5);
  int yellowButtonState = digitalRead(A4);
  int redButtonState = digitalRead(A3);
  int greenButtonState= digitalRead(A2);
  // Serial.println(sensorValue);
  if (sensorValue<=800){
  if (yellowButtonState == HIGH) {
    // Play the melody only if the button is pressed
    for (int thisNote = 0; thisNote < 26; thisNote++) {
      // Check the button state inside the loop
      yellowButtonState = digitalRead(A4);
      if (yellowButtonState == LOW) {
        noTone(8);
        break; // Exit the loop if the button is released
      }

      int noteDuration = 1000 / noteDurations[thisNote];
      tone(8, melody1[thisNote], noteDuration);
      int pauseBetweenNotes = noteDuration * 1.30;

      // Use non-blocking delay
      int startTime = millis();
      while (millis() - startTime < pauseBetweenNotes) {
        // Update the button state
        yellowButtonState = digitalRead(A4);
        if (yellowButtonState == LOW) {
          noTone(8);
          break; // Stop the tone if the button is released
        }
      }
      noTone(8); // Ensure the tone is stopped after the loop
    }
  }
  else if (redButtonState == HIGH) {
    // Play the melody only if the button is pressed
    for (int thisNote = 0; thisNote < 42; thisNote++) {
      // Check the button state inside the loop
      redButtonState = digitalRead(A3);
      if (redButtonState == LOW) {
        noTone(8);
        break; // Exit the loop if the button is released
      }

      int noteDuration = 1000 / noteDurations2[thisNote];
      tone(8, melody2[thisNote], noteDuration);
      int pauseBetweenNotes = noteDuration * 1.30;

      // Use non-blocking delay
      int startTime = millis();
      while (millis() - startTime < pauseBetweenNotes) {
        // Update the button state
        redButtonState = digitalRead(A3);
        if (redButtonState == LOW) {
          noTone(8);
          break; // Stop the tone if the button is released
        }
      }
      noTone(8); // Ensure the tone is stopped after the loop
    }
  }
    else if (greenButtonState == HIGH) {
    // Play the melody only if the button is pressed
    for (int thisNote = 0; thisNote < 25; thisNote++) {
      // Check the button state inside the loop
      greenButtonState = digitalRead(A2);
      if (greenButtonState == LOW) {
        noTone(8);
        break; // Exit the loop if the button is released
      }

      int noteDuration = 1000 / noteDurations3[thisNote];
      tone(8, melody3[thisNote], noteDuration);
      int pauseBetweenNotes = noteDuration * 1.30;

      int startTime = millis();
      while (millis() - startTime < pauseBetweenNotes) {
        // Update the button state
        greenButtonState = digitalRead(A2);
        if (greenButtonState == LOW) {
          noTone(8);
          break; // Stop the tone if the button is released
        }
      }
      noTone(8); // Ensure the tone is stopped after the loop
    }
  }
   else {
    noTone(8); // Ensure the tone is stopped if not in the loop
  }
}}

Firstly, we initialize the code with arrays of the melody we will play. There are 3 different songs: ‘Mary Had a Little Lamb,’ ‘Twinkle Twinkle Little Star,’ and ‘Happy Birthday Song’. Each song will have one array for the notes and another array for the note durations.

Next, we initialized all the input readings at A2, A3, A4, and A5 for the buttons and the photocell. To run the songs, we continuously check for the value of the photocell to allow the buttons to turn on the songs. If the photocell is covered (the value is low), the song will play according to the buttons. For each note that is about to play, the code will check for the state of the button whether it is pressed or not. If the button is not pressed, the song will stop playing immediately.

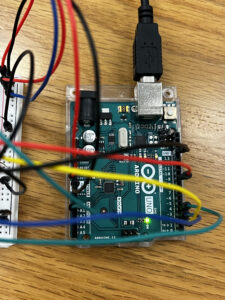
Built Circuit Based on the Diagram

Demonstration of the Final Outcome

Challenges and Reflection

We genuinely enjoyed tackling this assignment, despite its initial challenges. Creating the melodies was particularly tricky since neither of us is knowledgeable about musical composition and notes. Eventually, we grasped what was required and made progress.

A weird issue arose while we were constructing the circuits for this project. To determine the resistance value of the photocell, we attempted to use code and the serial monitor. However, we discovered that the photocell was malfunctioning. Initially, we suspected errors in our coding or circuit assembly. Despite repeatedly consulting past lecture slides, re-uploading the code, and rebuilding the circuit, we couldn’t pinpoint any mistakes. Then, quite mysteriously, the photocell began functioning correctly after another code upload. We still don’t understand the cause of this issue. Aside from this strange incident, we encountered no significant problems throughout the project

For improvement, we would like to add more button switches and songs for the variety of choices. In this way, the range of songs that the Lullaby box can offer would make this project more entertaining to play with during the nap time of children. Also, we think it would be nice if we could change the volume through the potentiometer. We think that this would enhance user control, allowing the sound level to be easily modified to suit the environment and preferences of the user.


Afra binjerais – Week 11 reading response

Reading 1:

I found great resonance in reading the assessment of the shortcomings of the interfaces used by modern technology, particularly the widespread “Pictures Under Glass” method. It caused me to reevaluate how I use technology and how these regular interactions lack the tactile depth. I became dissatisfied with the devices that rule my life after reading the author’s claim that our future interfaces will not be visionary; instead, they will only perpetuate the problems with the current system.
I was forced to consider how my devices, which are primarily touchscreens, feel impersonal and distant after reading the criticism. My laptop, phone, and even the smart devices at home operate with simple, repetitive motions that don’t have the complex feedback loop that comes with more tactile interactions. This insight made me uncomfortable since it brought to light a sensory deprivation that I was experiencing when interacting with the digital world. Compared to handling tangible objects like books or tools, I’m now more conscious of the shallowness of the experience and the flatness of the screens I swipe across on a regular basis.

Reading 2:

In reflecting on “A Brief Rant on the Future of Interaction Design,” a key question emerges: How can designers and technologists create interactive technologies that truly enhance human capabilities and foster a deeper connection with our physical environment, rather than simply replicating or replacing traditional physical interactions?

This reading essentially aligns with an argument for a more deliberate approach to technology, one that honors and strengthens rather than ignores our cognitive and physical abilities. It serves as a reminder that, whether we are using, designing, or developing technology, our relationship with it should not be passive. Rather, we should support and push for advancements that genuinely increase human potential in terms of interacting with the digital world. This mode of thinking encourages us to imagine a future where technology supports and enhances human talents in more comprehensive and meaningful ways, which is in line with a larger philosophical dilemma concerning the role technology should play in our lives.

Week 11: Lullaby Box by Sihyun and Linh

Concept

While brainstorming for this assignment, we decided that we would like to make a project that utilizes the photocell and the buttons. The photocell changes its resistance value depending on the light intensity. And this inspired us to explore interactions between light presence and absence. We came up with a cute project called the “Lullaby Box”, which plays nursery rhymes when the photocell is covered and a button is pressed. This project features yellow, red, and green buttons, each corresponding to different songs: ‘Mary Had a Little Lamb,’ ‘Twinkle Twinkle Little Star,’ and ‘Happy Birthday Song,’ respectively. The rationale for the songs playing only when the photocell is covered is tied to the project’s purpose: to soothe children to sleep in the dark.

Schematics and Diagram

The circuit consists of three main parts: the light sensor, the Piezo Speaker, and the buttons. The light sensor is connected to port A5 for analog reading. It acts as a button in the circuit, allowing the song to play when the photocell is covered. The buttons are the main controller of this assignment. They are connected to ports A2, A3, and A4 for digital reading. The song will only play when the photocell is covered (its value is low) and the button is pressed. Each button is responsible for a different song that will be played by the Piezo Speaker (connected to port 8 for digital output).

Arduino Code

#include "pitches.h"
//mary had a little lamb
int melody1[] = {
  NOTE_E4, NOTE_D4, NOTE_C4, NOTE_D4, NOTE_E4, NOTE_E4, NOTE_E4, NOTE_D4, NOTE_D4, NOTE_D4,
  NOTE_E4, NOTE_G4, NOTE_G4, NOTE_E4, NOTE_D4, NOTE_C4, NOTE_D4, NOTE_E4, NOTE_E4, NOTE_E4,
  NOTE_E4, NOTE_D4, NOTE_D4, NOTE_E4, NOTE_D4, NOTE_C4
};
// twinkle twinkle little star 
int melody2[]={
  NOTE_C4, NOTE_C4, NOTE_G4, NOTE_G4, NOTE_A4, NOTE_A4, NOTE_G4, NOTE_F4, NOTE_F4, NOTE_E4,
  NOTE_E4, NOTE_D4, NOTE_D4, NOTE_C4, NOTE_G4, NOTE_G4, NOTE_F4, NOTE_F4, NOTE_E4, NOTE_E4,
  NOTE_D4, NOTE_G4, NOTE_G4, NOTE_F4, NOTE_F4, NOTE_E4, NOTE_E4, NOTE_D4, NOTE_C4, NOTE_C4,
  NOTE_G4, NOTE_G4, NOTE_A4, NOTE_A4, NOTE_G4, NOTE_F4, NOTE_F4, NOTE_E4, NOTE_E4, NOTE_D4,
  NOTE_D4, NOTE_C4
};
// happy birthday 
int melody3[] = {
  NOTE_G4, NOTE_G4, NOTE_A4, NOTE_G4, NOTE_C5, NOTE_B4,
  NOTE_G4, NOTE_G4, NOTE_A4, NOTE_G4, NOTE_D5, NOTE_C5,
  NOTE_G4, NOTE_G4, NOTE_G5, NOTE_E5, NOTE_C5, NOTE_B4, NOTE_A4,
  NOTE_F5, NOTE_F5, NOTE_E5, NOTE_C5, NOTE_D5, NOTE_C5
};


int noteDurations[] = {
  4, 4, 4, 4, 4, 4, 2, 4, 4, 2, 4, 4, 2, 4, 4, 4, 4, 4, 4, 4, 4, 4, 4, 4, 4, 1
};
int noteDurations2[] = {
  4,4,4,4,4,4,2,4,4,4,4,4,4,2,4,4,4,4,4,4,2,4,4,4,4,4,4,2,4,4,4,4,4,4,2,4,4,4,4,4,4,2
};

int noteDurations3[] = {
  8, 8, 4, 4, 4, 2,
  8, 8, 4, 4, 4, 2,
  8, 8, 4, 4, 4, 4, 4,
  8, 8, 4, 4, 4, 2
};


void setup() {
  Serial.begin(9600);
  pinMode(A4, INPUT); // yellow switch

}

void loop() {
  int sensorValue= analogRead(A5);
  int yellowButtonState = digitalRead(A4);
  int redButtonState = digitalRead(A3);
  int greenButtonState= digitalRead(A2);
  // Serial.println(sensorValue);
  if (sensorValue<=800){
  if (yellowButtonState == HIGH) {
    // Play the melody only if the button is pressed
    for (int thisNote = 0; thisNote < 26; thisNote++) {
      // Check the button state inside the loop
      yellowButtonState = digitalRead(A4);
      if (yellowButtonState == LOW) {
        noTone(8);
        break; // Exit the loop if the button is released
      }

      int noteDuration = 1000 / noteDurations[thisNote];
      tone(8, melody1[thisNote], noteDuration);
      int pauseBetweenNotes = noteDuration * 1.30;

      // Use non-blocking delay
      int startTime = millis();
      while (millis() - startTime < pauseBetweenNotes) {
        // Update the button state
        yellowButtonState = digitalRead(A4);
        if (yellowButtonState == LOW) {
          noTone(8);
          break; // Stop the tone if the button is released
        }
      }
      noTone(8); // Ensure the tone is stopped after the loop
    }
  }
  else if (redButtonState == HIGH) {
    // Play the melody only if the button is pressed
    for (int thisNote = 0; thisNote < 42; thisNote++) {
      // Check the button state inside the loop
      redButtonState = digitalRead(A3);
      if (redButtonState == LOW) {
        noTone(8);
        break; // Exit the loop if the button is released
      }

      int noteDuration = 1000 / noteDurations2[thisNote];
      tone(8, melody2[thisNote], noteDuration);
      int pauseBetweenNotes = noteDuration * 1.30;

      // Use non-blocking delay
      int startTime = millis();
      while (millis() - startTime < pauseBetweenNotes) {
        // Update the button state
        redButtonState = digitalRead(A3);
        if (redButtonState == LOW) {
          noTone(8);
          break; // Stop the tone if the button is released
        }
      }
      noTone(8); // Ensure the tone is stopped after the loop
    }
  }
    else if (greenButtonState == HIGH) {
    // Play the melody only if the button is pressed
    for (int thisNote = 0; thisNote < 25; thisNote++) {
      // Check the button state inside the loop
      greenButtonState = digitalRead(A2);
      if (greenButtonState == LOW) {
        noTone(8);
        break; // Exit the loop if the button is released
      }

      int noteDuration = 1000 / noteDurations3[thisNote];
      tone(8, melody3[thisNote], noteDuration);
      int pauseBetweenNotes = noteDuration * 1.30;

      int startTime = millis();
      while (millis() - startTime < pauseBetweenNotes) {
        // Update the button state
        greenButtonState = digitalRead(A2);
        if (greenButtonState == LOW) {
          noTone(8);
          break; // Stop the tone if the button is released
        }
      }
      noTone(8); // Ensure the tone is stopped after the loop
    }
  }
   else {
    noTone(8); // Ensure the tone is stopped if not in the loop
  }
}}

Firstly, we initialize the code with arrays of the melody we will play. There are 3 different songs: ‘Mary Had a Little Lamb,’ ‘Twinkle Twinkle Little Star,’ and ‘Happy Birthday Song’. Each song will have one array for the notes and another array for the note durations.

Next, we initialized all the input readings at A2, A3, A4, and A5 for the buttons and the photocell. To run the songs, we continuously check for the value of the photocell to allow the buttons to turn on the songs. If the photocell is covered (the value is low), the song will play according to the buttons. For each note that is about to play, the code will check for the state of the button whether it is pressed or not. If the button is not pressed, the song will stop playing immediately.

Built Circuit Based on the Diagram

Demonstration of the Final Outcome

Challenges and Reflection 

 We genuinely enjoyed tackling this assignment, despite its initial challenges. Creating the melodies was particularly tricky since neither of us is knowledgeable about musical composition and notes. Eventually, we grasped what was required and made progress.

A weird issue arose while we were constructing the circuits for this project. To determine the resistance value of the photocell, we attempted to use code and the serial monitor. However, we discovered that the photocell was malfunctioning. Initially, we suspected errors in our coding or circuit assembly. Despite repeatedly consulting past lecture slides, re-uploading the code, and rebuilding the circuit, we couldn’t pinpoint any mistakes. Then, quite mysteriously, the photocell began functioning correctly after another code upload. We still don’t understand the cause of this issue. Aside from this strange incident, we encountered no significant problems throughout the project

For improvement, we would like to add more button switches and songs for the variety of choices.  In this way, the range of songs that the Lullaby box can offer would make this project more entertaining to play with during the nap time of children. Also, we think it would be nice if we could change the volume through the potentiometer. We think that this would enhance user control, allowing the sound level to be easily modified to suit the environment and preferences of the user.


Week 11 | Final Project Ideas – GryoMaze

In my final project, I wanted to create a maze game called GyroMaze. It would be a single-player game, where the player controls the ball with a physical input and drives it from the start to finish point.

Concept & Inspiration

I am super inspired by the gyroscope shrine from Nintendo’s Legend of Zelda: Breath of the Wild, where the player uses the Switch’s gyroscope feature to control the maze and drive the ball around.

However, unlike the video game, the player in GryoMaze would control the ball rather than the maze itself. The concept is similar, turn around the gyroscope device and drive the ball around.

Implementations & Things that would help me

I have been always curious about gyro scopes ever since I started the physical part of this class. For this project, I believe attaching the gyro device to a glove and letting the player control the ball from it would be super awesome!

In my midtern, I utilized p5 play to make the endless runner game Pyro Dancer. Likewise, this project would also use the same library due to its extensive features that would help me a lot (I am looking at you, physics >:) ).

I have also been exploring other options regarding gyro scope. But for now, this game seems very doable for me and intriguing. I also have checked the materials that I would require such as LCD Screens, Gyro Acceloremeters, etc. and booked the on Arts Booking system.

Notes

There are a few concerns that I am aware of. Mostly, I am also working on another class final project and the timings are conflicting with this class, so I will try my best to accomodate both projects.

Using gyro scopes would probably involve a lot of maths, so I will mostly require consulting with the professor or IM Lab assistants to see how feasible my idea is. Regardless, I’m very excited for this final project because it is an idea that i’ve been eager to build!

Resources

6 DOF IMU (3 axis accelerometer, 3 axis gyroscope), Arduino, OpenGL, Python, complementary filter (youtube.com)

How To Make DIY Arduino Gesture Control Robot At Home (youtube.com) (GLOVE INSPO)

How to Use Gyroscopes on the Arduino – Ultimate Guide to the Arduino #43 (youtube.com)

Assignment 7: Musical Instrument

Partner: Hyein Kim

Concept

When we were young, we were taught to sing and play instruments to a song called “떴다 떴다 비행기”. This song is about airplanes and with the introduction to airplanes through this song, we learn more about airplanes and dream of riding it one day. Furthermore, when we played as elementary students in the playground, we always sang this song and looked up to the sky to find some airplanes. Now, as older students, playing this song on our instrument reminds us of our childhood in South Korea.

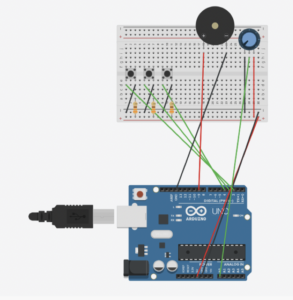
Circuit

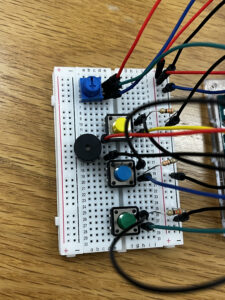
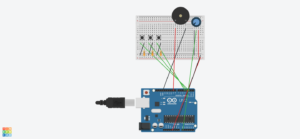
For digital, we used 3 buttons. Each button is connected to the Ground, a 330 ohm resistor and digital input (2, 3, 4). 

For analog, we used a potentiometer and a speaker. The speaker is connected to the Ground and analog input (~9). The potentiometer is connected to 5V, A0, and the Ground.

Playing the song

Changing the tone

Code

We have created a code so that when a button is pressed, the corresponding note is played with a frequency that can be altered up or down by the potentiometer. The constants BASE_NOTE_C4, BASE_NOTE_D4, and BASE_NOTE_E4 are defined at the top of the sketch. To simplify the code, we have used the INPUT_PULLUP function in the ‘setup’ function, which means that the button pin will read HIGH when unpressed and LOW when pressed. 

void setup() {
  for (int i = 0; i < 3; i++) {
    pinMode(buttonPins[i], INPUT_PULLUP); // Setup as pull-up to simplify wiring
  }
  pinMode(buzzerPin, OUTPUT);
}

In the main program loop, the potentiometer’s value is read from ‘potPin’ and mapped from its reading rand (0 to 1023) to a frequency adjustment range of -100 to +100 Hz. The loop checks each button in the buttonPins array to see if it’s pressed (reads LOW due to the pull-up resistor). If a button is pressed, the function playAdjustedTone() is called.

void loop() {
  int frequencyAdjustment = analogRead(potPin); // Read the potentiometer value
  frequencyAdjustment = map(frequencyAdjustment, 0, 1023, -100, 100); // Map the pot value to a frequency range adjustment

  for (int i = 0; i < 3; i++) {
    if (digitalRead(buttonPins[i]) == LOW) { // Check if button is pressed
      playAdjustedTone(i, frequencyAdjustment);
    }
  }
}

We wanted to use the potentiometer to adjust the tone. So we have written the playAdjustedTone() function. It calculates the adjusted frequency for the selected note by adding the frequency adjustment value from the potentiometer to the base frequency of the note. It then uses tone(buzzerPin, adjustedFrequency) to play the adjusted note for 100 milliseconds.

void playAdjustedTone(int noteIndex, int adjustment) {
  int baseFrequencies[] = {BASE_NOTE_C4, BASE_NOTE_D4, BASE_NOTE_E4}; // Base frequencies for C, D, E
  int adjustedFrequency = baseFrequencies[noteIndex] + adjustment; // Adjust the frequency based on potentiometer

  tone(buzzerPin, adjustedFrequency); // Play the adjusted note
  delay(100); // Duration of note
  noTone(buzzerPin); // Stop the tone
}

After playing the note, noTone(buzzerPin) stops the buzzer.

Here is the full version of our code:

// Define frequencies for musical notes C, D, E
#define BASE_NOTE_C4 261
#define BASE_NOTE_D4 294
#define BASE_NOTE_E4 329

// Define pin connections
const int buzzerPin = 9;
const int potPin = A0;
const int buttonPins[] = {2, 3, 4}; // Buttons for C, D, E notes

void setup() {
  for (int i = 0; i < 3; i++) {
    pinMode(buttonPins[i], INPUT_PULLUP); // Setup as pull-up to simplify wiring
  }
  pinMode(buzzerPin, OUTPUT);
}

void loop() {
  int frequencyAdjustment = analogRead(potPin); // Read the potentiometer value
  frequencyAdjustment = map(frequencyAdjustment, 0, 1023, -100, 100); // Map the pot value to a frequency range adjustment

  for (int i = 0; i < 3; i++) {
    if (digitalRead(buttonPins[i]) == LOW) { // Check if button is pressed
      playAdjustedTone(i, frequencyAdjustment);
    }
  }
}

void playAdjustedTone(int noteIndex, int adjustment) {
  int baseFrequencies[] = {BASE_NOTE_C4, BASE_NOTE_D4, BASE_NOTE_E4}; // Base frequencies for C, D, E
  int adjustedFrequency = baseFrequencies[noteIndex] + adjustment; // Adjust the frequency based on potentiometer

  tone(buzzerPin, adjustedFrequency); // Play the adjusted note
  delay(100); // Duration of note
  noTone(buzzerPin); // Stop the tone
}

Reflection

For improvement, we would like to add more buttons so that we can play more musical notes. In this way, the range of songs we can play on the instrument would widen and it would be more entertaining to play along on the instrument. Also, we tried to change the volume of the sound through the potentiometer but was unsuccessful at it. Therefore, for this assignment, we utilized the potentiometer to control the tone instead. In the future, however, we would like to learn and utilize volume control using the potentiometer. 


Reading Reflection: Week 11

From time to time, I feel like I rely too much on tools. My phone is an electric device that fulfills my needs in various ways. While my phone supports me in numerous ways, I don’t necessarily need to use my phone all the time for all purposes. For example, instead of reading a book, I use the internet on my phone for summaries. This causes me to miss the experience of reading a book and coming up with my interpretations. Yes, summaries available online are very helpful; however, I don’t have to use my phone to understand the ideas presented in the book. Therefore, my tendency to heavily rely on tools forces me to lose on experiences I could have by doing it myself.

Furthermore, the author talked about our hands, and reading this article made me realize how powerful our hands are. The nerves on our fingertips, the senses, and the strength all made me realize how useful our hands are. Not only do our hands feel the surfaces of things, but they can also manipulate things. Just as our hands naturally tilt to prevent water from pouring out of the cup, our hands have very much power. The article amazed me and I found myself agreeing with the author’s statement “I believe that hands are our future”. Our hands and the human body have great capabilities that we don’t always recognize. Once we recognize how much we can do, we don’t have to rely on other things or limit ourselves in what we can do.

Reading these two articles made me reflect on the current world. Nowadays, humans heavily rely on technology and AI to fulfill our needs. No matter how hard or easy the task may be, I feel like humans prefer to use tools such as technology and AI to do the work. Therefore, human capabilities are not used to their full potential. Sometimes, we think that it is impossible to live without certain tools we have now. However, if we consider the past, life was possible and not all tools available to use are necessary. Then I questioned why humans tend to not do the work themselves and use tools instead. The solution I arrived at was that it was due to convenience. Tools provide great convenience and efficiency. Therefore, even when we know that we can do the work on our own, we choose not to and use the tools. While convenience and efficiency are great, I believe that humans need to find the right balance between the use of tools and our bodies. Our body is the most amazing tool and we don’t have to always rely on other tools to meet our needs. Finding ways to use ourselves would help us utilize our potential and at the same time meet our needs.

Week 11 – “Playing Childhood song with Musical Instrument” by Hayeon Jeong and Hyein Kim

Concept

When we were young, we were taught to sing and play instruments to a song called “떴다 떴다 비행기”. This song is about airplanes and with the introduction to airplanes through this song, we learn more about airplanes and dream of riding it one day. Furthermore, when we played as elementary students in the playground, we always sang this song and looked up to the sky to find some airplanes. Now, as older students, playing this song on our instrument reminds us of our childhood in South Korea. 

Circuit

For digital, we used 3 buttons. Each button is connected to the Ground, a 330 ohm resistor and digital input (2, 3, 4). 

For analog, we used a potentiometer and a speaker. The speaker is connected to the Ground and analog input (~9). The potentiometer is connected to 5V, A0, and the Ground. 

Code

We have created a code so that when a button is pressed, the corresponding note is played with a frequency that can be altered up or down by the potentiometer. The constants BASE_NOTE_C4, BASE_NOTE_D4, and BASE_NOTE_E4 are defined at the top of the sketch. To simplify the code, we have used the INPUT_PULLUP function in the ‘setup’ function, which means that the button pin will read HIGH when unpressed and LOW when pressed. 

void setup() {
  for (int i = 0; i < 3; i++) {
    pinMode(buttonPins[i], INPUT_PULLUP); // Setup as pull-up to simplify wiring
  }
  pinMode(buzzerPin, OUTPUT);
}

In the main program loop, the potentiometer’s value is read from ‘potPin’ and mapped from its reading rand (0 to 1023) to a frequency adjustment range of -100 to +100 Hz. The loop checks each button in the buttonPins array to see if it’s pressed (reads LOW due to the pull-up resistor). If a button is pressed, the function playAdjustedTone() is called.

void loop() {
  int frequencyAdjustment = analogRead(potPin); // Read the potentiometer value
  frequencyAdjustment = map(frequencyAdjustment, 0, 1023, -100, 100); // Map the pot value to a frequency range adjustment

  for (int i = 0; i < 3; i++) {
    if (digitalRead(buttonPins[i]) == LOW) { // Check if button is pressed
      playAdjustedTone(i, frequencyAdjustment);
    }
  }
}

We wanted to use the potentiometer to adjust the tone. So we have written the playAdjustedTone() function. It calculates the adjusted frequency for the selected note by adding the frequency adjustment value from the potentiometer to the base frequency of the note. It then uses tone(buzzerPin, adjustedFrequency) to play the adjusted note for 100 milliseconds.

void playAdjustedTone(int noteIndex, int adjustment) {
  int baseFrequencies[] = {BASE_NOTE_C4, BASE_NOTE_D4, BASE_NOTE_E4}; // Base frequencies for C, D, E
  int adjustedFrequency = baseFrequencies[noteIndex] + adjustment; // Adjust the frequency based on potentiometer

  tone(buzzerPin, adjustedFrequency); // Play the adjusted note
  delay(100); // Duration of note
  noTone(buzzerPin); // Stop the tone
}

After playing the note, noTone(buzzerPin) stops the buzzer.

Here is the full version of our code:

// Define frequencies for musical notes C, D, E
#define BASE_NOTE_C4 261
#define BASE_NOTE_D4 294
#define BASE_NOTE_E4 329

// Define pin connections
const int buzzerPin = 9;
const int potPin = A0;
const int buttonPins[] = {2, 3, 4}; // Buttons for C, D, E notes

void setup() {
  for (int i = 0; i < 3; i++) {
    pinMode(buttonPins[i], INPUT_PULLUP); // Setup as pull-up to simplify wiring
  }
  pinMode(buzzerPin, OUTPUT);
}

void loop() {
  int frequencyAdjustment = analogRead(potPin); // Read the potentiometer value
  frequencyAdjustment = map(frequencyAdjustment, 0, 1023, -100, 100); // Map the pot value to a frequency range adjustment

  for (int i = 0; i < 3; i++) {
    if (digitalRead(buttonPins[i]) == LOW) { // Check if button is pressed
      playAdjustedTone(i, frequencyAdjustment);
    }
  }
}

void playAdjustedTone(int noteIndex, int adjustment) {
  int baseFrequencies[] = {BASE_NOTE_C4, BASE_NOTE_D4, BASE_NOTE_E4}; // Base frequencies for C, D, E
  int adjustedFrequency = baseFrequencies[noteIndex] + adjustment; // Adjust the frequency based on potentiometer

  tone(buzzerPin, adjustedFrequency); // Play the adjusted note
  delay(100); // Duration of note
  noTone(buzzerPin); // Stop the tone
}

Reflection

For improvement, we would like to add more buttons so that we can play more musical notes. In this way, the range of songs we can play on the instrument would widen and it would be more entertaining to play along on the instrument. Also, we tried to change the volume of the sound through the potentiometer but was unsuccessful at it. Therefore, for this assignment, we utilized the potentiometer to control the tone instead. In the future, however, we would like to learn and utilize volume control using the potentiometer.