Week 11: Response on A Brief Rant on the Future of the Interaction Design

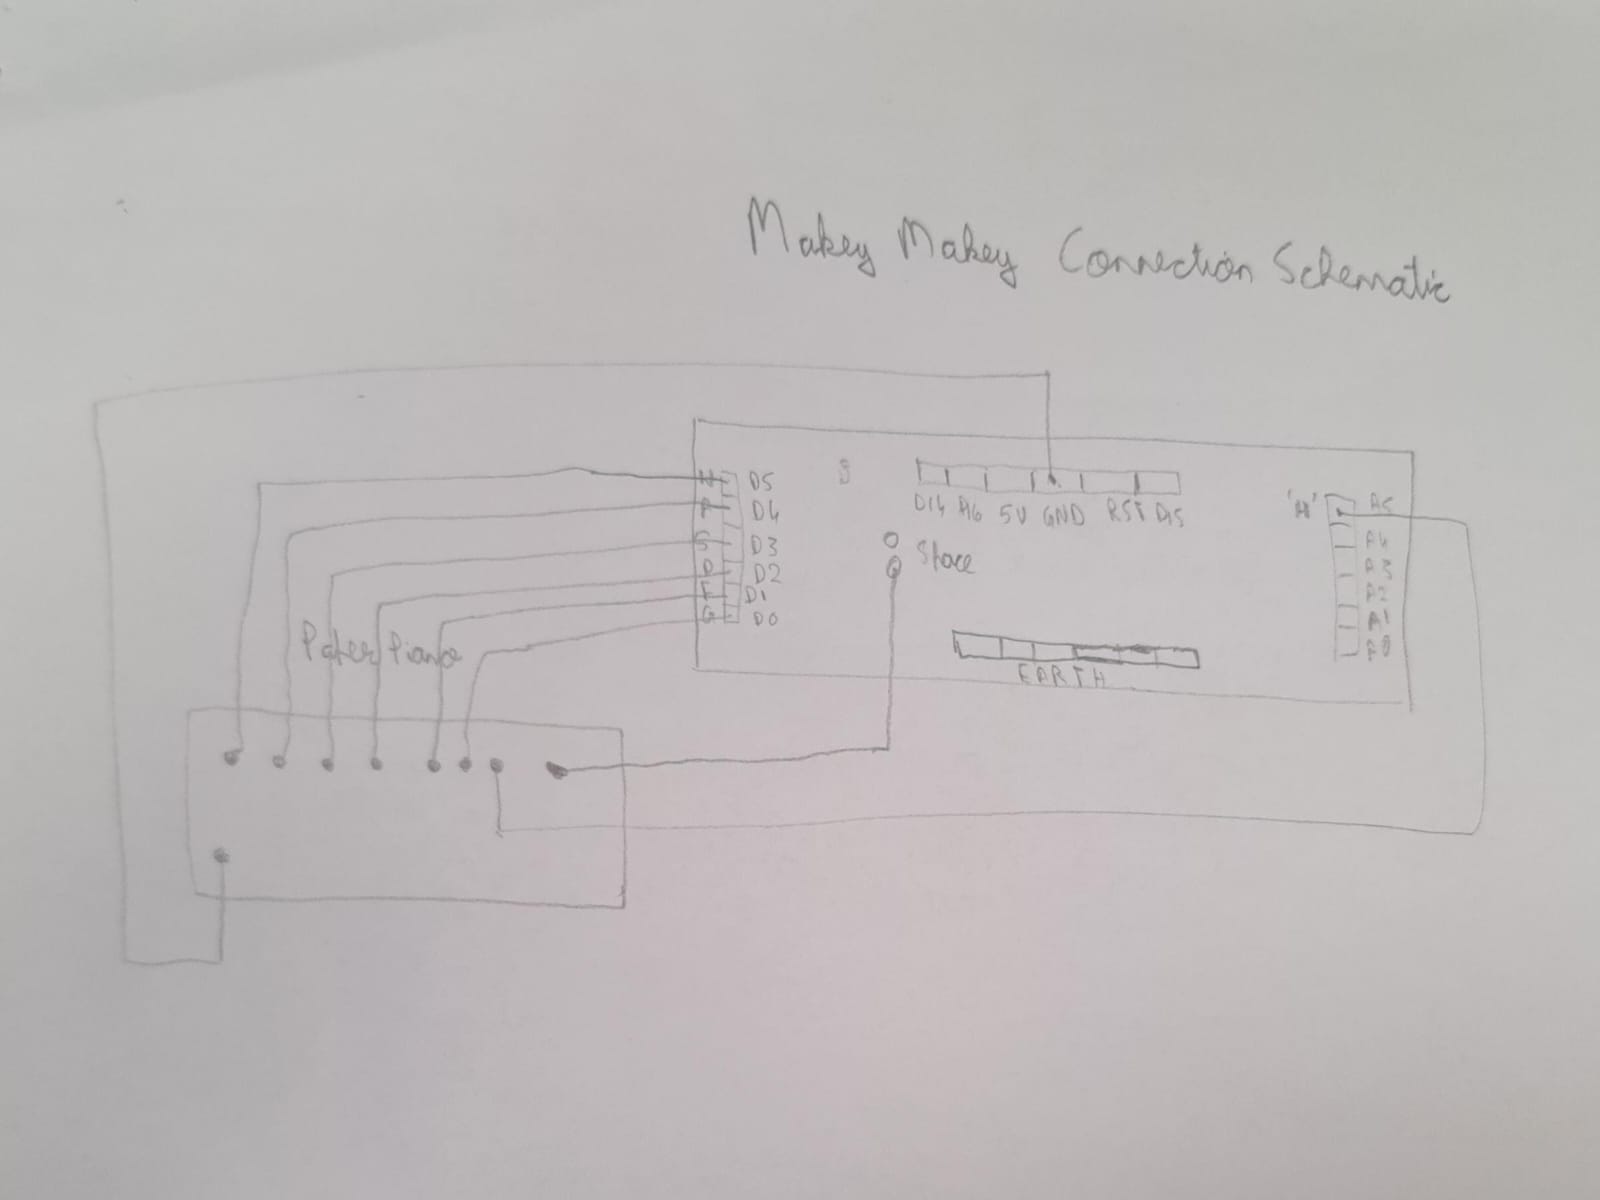
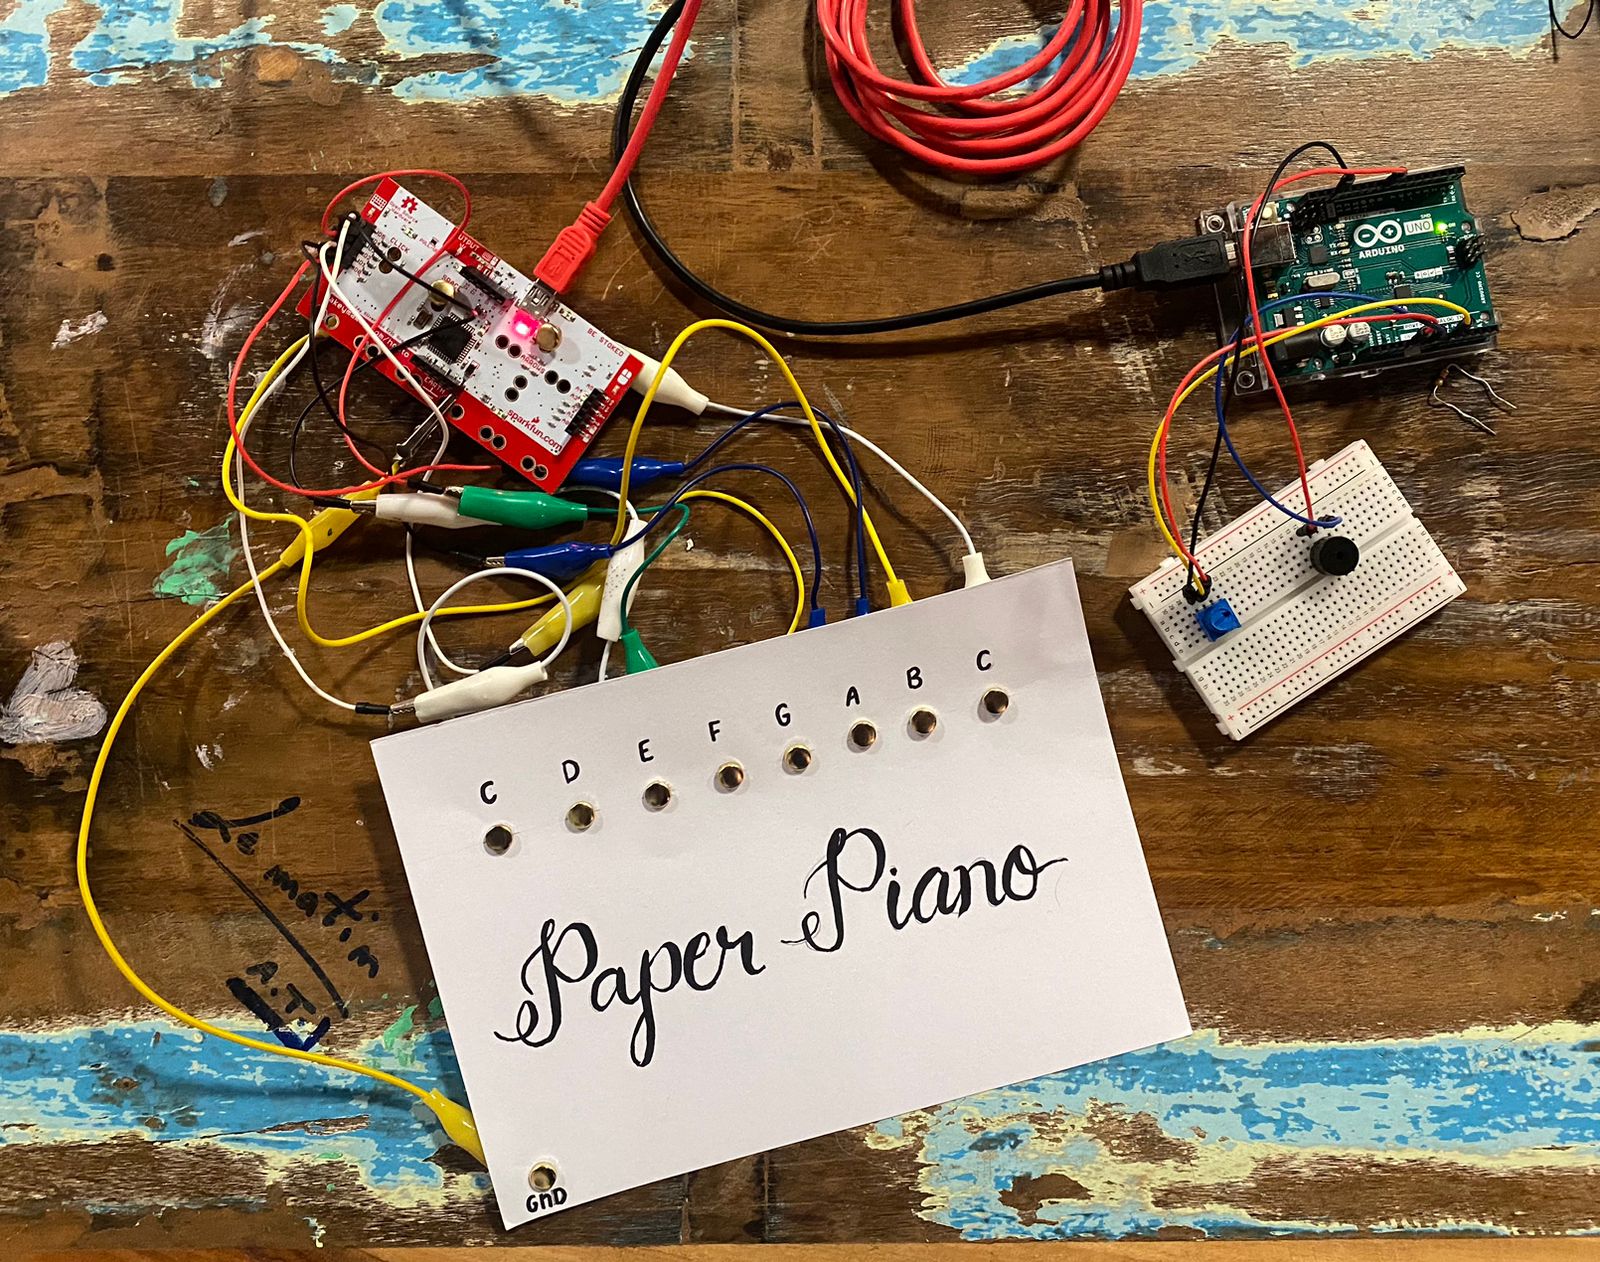
A brief rant on the future of interaction design

I thoroughly enjoyed reading ‘A Brief Rant on the Future of the Interaction Design’ by Bret. His article grabbed my attention from beginning to end with his discussion on the future of interactive design. It was fascinating to see his depiction of how everything might soon operate through mere hand movements. While this vision has its flaws, it opened up exciting possibilities for what the future could look like.

Bret makes an interesting transition by focusing on how current interactive designs primarily utilize hands for touch interactions – which he is also referring as ‘Pictures under Glass’. And I share his point of view too, **** for a decade of touch screen interactions it does seems limited when considering the full tactile and motor capabilities of hands, which are not fully exploited by today’s technologies. I was also intrigued by why Bret chose to critique the specific interactive design video. As we advance in the field of interactive design, it seems paradoxical that the way we interact with technology isn’t evolving in tandem.

Bret advocates for more varied hand interactions, which is a valid point given the context of the article’s 2011 publication. Back then, the predominant interaction models featured simple touch and slide gestures. Since then, technology has evolved. Devices like the Apple Vision Pro now incorporate gestures like pinching, using both hands to grasp and manipulate objects—yet, our hands’ full range of abilities remains largely underutilized in technological interfaces.

And this left me thinking some pressing questions: Will we see improvements that add greater depth to how we interact with technology, or are there inherent limitations in the systems we use that prevent them from fully embracing all possible interactions? or will we see innovations that allow for a richer, more intuitive user experience?

Responses: A Brief Rant on the Future of Interaction Design

I enjoyed reading Bret’s responses to the comments on his article, particularly two points that stood out to me.

Why is he forcing too much to add the other ‘hand involved’ interactions? — that was one of my questions when I was reading Bret’s article. I initially struggled to understand why adding other interactions was so important. Some suggested using voice commands, but Bret put it well by saying — that imagining, building, or designing things is something that our hands do better, because those voice instructions ‘just exist in space, and we manipulate space with our hands’. And this does make me think about how humans psychologically respond to the stimulus that require them to adjust, rebuild. And what is even the cognitive debate on ‘how human body are designed to interact?’, says that manual interaction is often preferred for creative tasks because it engages motor skills, spatial reasoning, and visual processing, enabling direct and nuanced control over the creative process. This mode provides immediate tactile and visual feedback, which is essential for fine-tuning and detailed work, making it more effective for tasks that require precision and sensory integration, such as painting or building models. So Bret’s point really resonates with me when he says ‘You come to understand the system by pointing to things, adjusting things, moving yourself around the space of possibilities. I don’t know how to point at something with my voice. I don’t know how to skim across multiple dimensions with my voice.’ But now here is another thing, ‘What about Vision?’, I thought maybe that debate was missing from the responses, I was curious to know what about, human interaction with other the technology that uses our ‘Eyes’ such as in this age our ‘Vision Pro’, it was later that I realized that this question was also well answer by his another response to a comment, where he quoted a neuroscientist; who stated that; If we don’t use our fingers to explore the world, especially during childhood, we lose a significant part of our brain’s potential, hindering our overall development which is going to be similar to having blindness.

Now it kind of makes me conclude that the push for more sophisticated hand interactions in technology stems from the need to preserve natural human capabilities in an increasingly advanced world. If we replace our everyday interactions with less interactive technologies, we risk losing a crucial part of ourselves in the process. While it might seem tangential, this issue is similar to how our reliance on small devices has reduced face-to-face social interactions. Although technology offers benefits, it also challenges us psychologically and biologically as we adapt, often leading to issues that affect both individuals and society as a whole.

Luke and Yaakulya – Week 11 Assignment – Turntable

Week 11 – Turntable

Concept & Inspiration:

Approaching this assignment, we wanted to create a turntable that can let user become a DJ controlling two songs. This DJ takes the party people from West to East, blending music from a Western country across the globe to an Eastern country. We have the supposedly the most popular song on the planet at the moment (no, it’s not Baby Shark), the pop song with the most views on YouTube, the song that caused a whirlwind, Despacito by Luis Fonsi and Daddy Yankee from Puerto Rico. We also have the all-time iconic Mario Theme Song hailed from Japan composed by Koji Kondo for the video game company Nintendo. The DJ user can control these two songs by using the switch button as the digital sensor and the potentiometer as an analog sensor. As for the songs, we picked the most memorable and recognizable parts: the chorus for Despacito and the gameplay theme for Mario Theme Song.

Circuit:

Circuit connections from above Schematics diagram.

1) Potentiometer Connections: The potentiometer is crucial for song selection and control. It has three pins: two for power and one for the signal. The outer pins are connected to the 5V and GND (ground) terminals on the Arduino to provide it with power. The middle pin, which is the wiper, is connected to the analog input A0 on the Arduino. As the user turns the knob of the potentiometer, the resistance changes, and the Arduino reads this as an analog value, allowing the user to blend between the two songs.

2) Button Connections: A push button is used to start or stop the song playback. One side of the button is connected to the digital pin 2 on the Arduino. The other side is connected to the GND terminal on the breadboard. A pull-up resistor is not necessary as the Arduino’s internal pull-up resistor is used in the code to avoid floating values when the button is not pressed.

3) Speaker Connections: The speaker, which outputs the sound, has two wires. The positive wire is connected to digital pin 8 on the Arduino. This pin is set up in the code to deliver a pulse-width modulation (PWM) signal that creates the audio tones for the songs. The negative wire from the speaker is connected directly to the GND terminal on the breadboard to complete the circuit.

4) Power Connections: The breadboard’s power rail is used to distribute the 5V and GND connections to the potentiometer and the button. Wires run from the 5V and GND pins on the Arduino to the power rail on the breadboard.

With this setup, the user interacts with the button and potentiometer to control the playback of “Despacito” and the “Mario Theme Song”. The code on the Arduino processes the input signals and triggers the speaker to play the appropriate song based on the state of the button and the value from the potentiometer.

What does the Analog and Digital Sensor do in this circuit? – Schematics:

The code and circuit are structured to respond to the interactions with the potentiometer and the push button:

1) Button Press: Initiates the playback of “Despacito” or stops the current song.

2) Potentiometer Rotation: Facilitates the blending from “Despacito” to the “Mario Theme Song.” and vice versa.

The user must press the button to start playing “Despacito.” They can then rotate the potentiometer to initiate the “Mario Theme Song” by pressing the button again. This interaction can be repeated to switch between the two songs.

Code (with comments):

The button acts as a trigger to play the music and the potentiometer act as a dial to alternate between the 2 songs. The first song is Despacito. The user have to press the button for it to play. Then they can turn the potentiometer to the other side and press the button again to play the second song, Mario Theme Song. They can repeat playing these two songs however much they want.

#include "pitches.h"
#define BUZZER_PIN 9
#define POTENTIOMETER_PIN A0
#define BUTTON_PIN 7
// Melody for the first song
int melody1[] = {
  NOTE_D4, NOTE_CS4, NOTE_B3, NOTE_FS3, NOTE_FS3, NOTE_FS3, NOTE_FS3, NOTE_FS3,
  NOTE_FS3, NOTE_B3, NOTE_B3, NOTE_B3, NOTE_A3, NOTE_B3, NOTE_G3, NOTE_G3, NOTE_G3, NOTE_G3, NOTE_G3,
  NOTE_G3, NOTE_B3, NOTE_B3, NOTE_B3, NOTE_B3, NOTE_CS4, NOTE_D4, NOTE_A3, NOTE_A3, NOTE_A3, NOTE_A3, NOTE_A3,
  NOTE_A3, NOTE_D4, NOTE_D4, NOTE_D4, NOTE_D4, NOTE_E4, NOTE_E4, NOTE_CS4
};
// Note durations for the first song
int noteDurations1[] = {
  4,4,8,8,16,16,16,16,
  16,16,16,8,16,8,16/3,16,16,16,16,
  16,16,16,16,8,16,8,16/3,16,16,16,16,
  16,16,16,16,8,16,8,16/3
};
// Melody for the second song
int melody2[] = {
  NOTE_E4, NOTE_E4, NOTE_E4, NOTE_C4, NOTE_E4, NOTE_G4, NOTE_G3, NOTE_C4, NOTE_G3, NOTE_E3, NOTE_A3, NOTE_B3, NOTE_AS3, NOTE_A3,NOTE_G3,NOTE_E4,NOTE_G4,NOTE_A4,NOTE_F4,NOTE_G4,NOTE_E4,NOTE_C4,NOTE_D4,NOTE_B3,NOTE_C4
};
// Note durations for the second song
int noteDurations2[] = {
  16,8,8,16,8,4,4,16/3,16/3,16/3,8,8,16,8,32/3,32/3,32/3,8,16,8,8,16,16,16/3,8
};
// Flag to indicate if a song is currently playing
bool songPlaying = false;
// Variable to store the previous state of the button
bool lastButtonState = false;
// Setup function to initialize the pins
void setup() {
  // Set the buzzer pin as output
  pinMode(BUZZER_PIN, OUTPUT);
  // Set the button pin as input with internal pull-up resistor enabled
  pinMode(BUTTON_PIN, INPUT_PULLUP);
}
// Loop function to continuously check for button presses and play melodies
void loop() {
  // Read the current state of the button
  bool buttonState = digitalRead(BUTTON_PIN);
  // Check if the button is pressed and it was not pressed in the previous loop iteration
  if (buttonState == LOW && lastButtonState == HIGH) {
    // Toggle the song playing state
    songPlaying = !songPlaying;
    // Start or stop playing the selected song
    if (songPlaying) {
      // If the potentiometer value is less than 512, play the first melody; otherwise, play the second melody
      if (analogRead(POTENTIOMETER_PIN) < 512) {
        playMelody(melody1, noteDurations1, sizeof(melody1) / sizeof(int));
      } else {
        playMelody(melody2, noteDurations2, sizeof(melody2) / sizeof(int));
      }
    } else {
      // If the song was playing, stop playing it
      noTone(BUZZER_PIN);
    }
  }
  // Update the last button state for the next iteration
  lastButtonState = buttonState;
}
// Function to play a melody
void playMelody(int melody[], int noteDurations[], int size) {
  // Iterate over each note in the melody
  for (int thisNote = 0; thisNote < size; thisNote++) {
    // Calculate the duration of the current note
    int noteDuration = 1000 / noteDurations[thisNote];
    // Play the current note on the buzzer pin
    tone(BUZZER_PIN, melody[thisNote], noteDuration);
    // Wait for the duration of the note
    delay(noteDuration * 2);
    // Stop playing the note
    noTone(BUZZER_PIN);
    // Add a short pause between notes
    delay(noteDuration * 0.1);
  }
}

Challenges and reflections:

Initially, we had a few issues with coding for the potentiometer to change from one song to another using the potentiometer. We also had a few issues with triggering the song to play when the button is pressed. We managed to do it after trial and error.

For future improvements, we would like to configure an intricate system of LEDs into the board and program them to blink following the notes of the song being played, simulating a “mini club” when the room lights are turned off. We also want to have one song easing into the other while turning the potentiometer’s knob instead of them playing separately.

Musical Instrument

For this week’s assignment, we made a simple musical instrument using the Arduino. It is more similar to DJ equipment than a traditional musical instrument – slowing down the music or speeding it up, switching between different speed quickly to add dynamics to the music, and, of course, flashy lights, which will make or break the party. As part of the assignment, we used the button switch as the digital input and the potentiometer as the analog input. The Arduino plays a melody through a buzzer, and  4 LEDs light up in correspondence with the melody. By pressing the button, you can play the melody. The potentiometer allows you to control the length or duration of the melody.

Components Used

  • Arduino Uno
  • Breadboard
  • Jumper wires
  • Button
  • Potentiometer
  • LED (4 of different colors)
  • Buzzer
  • Resistors (330 ohms x 2)


#include "pitches.h"

#define BUZZER_PIN 12
#define ANALOG_PIN A0
#define RED_PIN 11
#define GREEN_PIN 10
#define BLUE_PIN 9
#define YELLOW_PIN 6
#define DIGITAL_PIN A1

int melody[] = {
  NOTE_B4, NOTE_B5, NOTE_FS5, NOTE_DS5,
  NOTE_B5, NOTE_FS5, NOTE_DS5, NOTE_C5,
  NOTE_C6, NOTE_G6, NOTE_E6, NOTE_C6, NOTE_G6, NOTE_E6,

  NOTE_B4, NOTE_B5, NOTE_FS5, NOTE_DS5, NOTE_B5,
  NOTE_FS5, NOTE_DS5, NOTE_DS5, NOTE_E5, NOTE_F5,
  NOTE_F5, NOTE_FS5, NOTE_G5, NOTE_G5, NOTE_GS5, NOTE_A5, NOTE_B5
};

int durations[] = {
  16, 16, 16, 16,
  32, 16, 8, 16,
  16, 16, 16, 32, 16, 8,

  16, 16, 16, 16, 32,
  16, 8, 32, 32, 32,
  32, 32, 32, 32, 32, 16, 8
};

bool isPlaying = false;

void setup() {
  pinMode(BUZZER_PIN, OUTPUT);
  pinMode(DIGITAL_PIN, INPUT_PULLUP); 
  pinMode(RED_PIN, OUTPUT);
  pinMode(GREEN_PIN, OUTPUT);
  pinMode(BLUE_PIN, OUTPUT);
  pinMode(YELLOW_PIN, OUTPUT);
}


void playMelodyWithLEDs() {
  int size = sizeof(durations) / sizeof(int);

  for (int note = 0; note < size; note++) {
    if (!isPlaying) return;

    int duration = 1000 / durations[note];
    tone(BUZZER_PIN, melody[note], duration);

    int sensorValue = analogRead(ANALOG_PIN);
    float speed = map(sensorValue, 0, 1023, 1.3, 6.0); 

    int pauseBetweenNotes = duration * speed;

    int ledPattern[] = { RED_PIN, GREEN_PIN, BLUE_PIN, YELLOW_PIN };
    int ledIndex = note % 4;
    digitalWrite(ledPattern[ledIndex], HIGH);
    delay(pauseBetweenNotes);
    digitalWrite(ledPattern[ledIndex], LOW);

    noTone(BUZZER_PIN);

    delay(50); 
  }
}

void loop() {
  if (digitalRead(DIGITAL_PIN) == LOW) {
    isPlaying = false;
    digitalWrite(RED_PIN, LOW);
    digitalWrite(GREEN_PIN, LOW);
    digitalWrite(BLUE_PIN, LOW);
    digitalWrite(YELLOW_PIN, LOW);
  } else {
    isPlaying = true;
    playMelodyWithLEDs();
  }
  delay(200);
}

The map() function is a hidden gem in this code. It’s a versatile function that remaps a range of values from one scale to another. In our case, the potentiometer reading (analog input) ranges from 0 to 1023. We use map() to translate these values to a range of speeds between 1.3 and 6.0. This allows the potentiometer to control the tempo of the melody playback.

The loop() function continuously checks the button state. If the button is pressed (digitalRead(DIGITAL_PIN) == LOW), the isPlaying flag is set to false, effectively stopping the melody. Additionally, the LED lighting is turned off (digitalWrite(RED_PIN, LOW), etc.). When the button is not pressed (digitalRead(DIGITAL_PIN) == HIGH), the isPlaying flag is set to true, and the playMelodyWithLEDs() function runs.

As we were integrating the LEDs with the melody, we struggled a bit. Initially, the LED light-up function was different, and it had a separate delay() for the individual LED to match with the melody. It did not work as expected. We realized after playing a note if we move to the separate LED function and delay there, the melody becomes very slow due to using 2 separate delays. So, we removed the LED function and used the same delay() for both the notes and LEDs.

Reading Reflection – Week #11

This week’s reading reflection was about “A Brief Rant on the Future of Interaction Design” by Bret Victor. I agree with the notion of tapping into the potential of human body and its capabilities. The technology nowadays heavily relies on vision and touch and the use of our hands, but I like the idea of offering more comprehensive technology that goes beyond simple touch and sliding your hand across a screen.

It could be argued that there are voice controls that could be especially useful for user with visual impairments, but they are far from the usefulness of vision and hands. A next step in voice controlled software could be achieved by the use of LLMs and Artificial Intelligence, but the author talks about the incompleteness of audio controls and its limitations in the follow-up article about his rant. Although the touch technology has its constraints, it is getting better by involving the pressure neurons in our hands, like incorporating 3d touch sensors in our screens which makes the situation a little better, but still far from the ideal the author talks about.

The author does not offer solutions for the problems of current technology, but advocates for a more thoughtful use of the capabilities of our hands. deviating from the topic of hands, I was thinking of going a step further, but not necessarily in the direction of using our bogy. We are somewhat stepping over the solutions tat could be offered by our body and going directly into the brain with “Neuralink”. Brain chips and their future would not require detailed technology that uses our bodies, as the controls would be directly supplied by our brain. However, I still think that using the untapped potential of just our hands would be a great step towards much more interactivity in human technology.

Week 11 Production – Paper Piano

Concept

While looking for ideas for the musical instrument,  I came across something called HID (Human Interface Devices). These are devices that can be used to substitute for Devices that are used to interact with the computer, such as a keyboard or a mouse.  Unfortunately , The Arduino UNO board that we use is not HID compatible. Why did we need this? because we wanted to do something unique and use something unconventional for the digital input part of the assignment. This is when we came across the MakeyMakey board by Sparkfun. Using this board, we can use anything with a weak conductivity as a button that send an input to the computer. We can then use the computer as an interface between Arduino and Makey Makey and use the output of Makey Makey as an input to the Arduino via the Serial.

Once we had this figured out, It opened great possibilities. For the purpose of this assignment, we decided to draw a piano on a piece of paper and use each part as a button ( so a sound plays whenever you touch the paper).

Technical Plan (Abstract overview)

For Arduino UNO
  • Takes input from the serial , and reads it
  • Converts the letter input to a corresponding frequency (taking digital input)
  • Offsets the frequency by reading the value on the potentiometer (taking analog input)
  • Uses tone function to play this frequency on the buzzer
For Makey Makey
  • Takes input from the paper buttons and send a keystroke to the keyboard corresponding to what button is pressed.
  • Presses enter automatically so that the keystroke is entered in the serial of the Arduino board.
Other Technicalities
  • We need to make sure that the piano sounds good , for this we will use notes corresponding to an actual scale . The default scale we are using here is the C major Scale on the 4th Octave consisting of the notes C , D, E ,F , G, A and B .
  • While drawing the piano , we need to make sure that the keys are separated and each key separately conducts electricity.
  • Use alligator clips properly and make sure the connections work
  • Since the Arduino board default firmware can only output 6 letters ( w,a,s,d,f,g),  we need to configure it to replace some other outputs with letters. Here, we have reprogrammed it to output ‘h’ instead of the Up arrow and used ‘ ‘ (Blank space) as an input as well .
To use:
  • Connect both Arduino UNO and Makey Makey to the computer
  • Upload Code on Makey Makey
  • Open new Window of Arduino IDE and upload code on Arduino UNO
  • Open the Serial monitor and click on it to place the computer cursor there.
  • Start taking input from Makey Makey

Code

Code for the Arduino UNO board :
#include "pitches.h"
#include <Keyboard.h>

const int BUZZER_PIN = 8; // Pin for the buzzer
const int potentiometerPin = A0; // Pin for the potentiometer
const int duration = 200; // Duration of the tone

unsigned long lastPotReadTime = 0; // Variable to store the last time potentiometer was read
int offset =0;

void setup() {
Serial.begin(9600);
pinMode(BUZZER_PIN, OUTPUT);
}

void loop() {
// Read the potentiometer value only once every second
unsigned long currentTime = millis();
if (currentTime - lastPotReadTime >= 1000) {
offset = analogRead(potentiometerPin) / 3; // Offset the frequency based on potentiometer reading
lastPotReadTime = currentTime;

// Print the potentiometer value
Serial.println(offset);
}

// Check if there's any character available in the serial buffer
if (Serial.available() > 0) {
char receivedChar = Serial.read();
int frequency = 0; // Frequency value for the tone

// Map received character to frequency
switch (receivedChar) {
case 'w': frequency = NOTE_C5; break;
case 'a': frequency = NOTE_D5; break;
case 's': frequency = NOTE_E5; break;
case 'd': frequency = NOTE_F5; break;
case 'f': frequency = NOTE_G5; break;
case 'g': frequency = NOTE_A5; break;
case 'h': frequency = NOTE_C6; break;
case ' ': frequency = NOTE_B5; break;
default: break; // Do nothing if character is not recognized
}

if (frequency != 0) {
tone(BUZZER_PIN, frequency + offset, duration); // Play the tone
delay(duration); // Wait for the tone to complete
noTone(BUZZER_PIN); // Stop the tone
}
}
}
//CCDCFE
//CCDCGF
// for happy Birthday first two lines
Relevant Code for the Makey Makey board
To press enter (write newline) along with the character
void updateInputStates() {
inputChanged = false;
for (int i=0; i<NUM_INPUTS; i++) {
inputs[i].prevPressed = inputs[i].pressed; // store previous pressed state (only used for mouse buttons)
if (inputs[i].pressed) {
if (inputs[i].bufferSum < releaseThreshold) {
inputChanged = true;
inputs[i].pressed = false;
if (inputs[i].isKey) {
Keyboard.release(inputs[i].keyCode);
}
if (inputs[i].isMouseMotion) {
mouseHoldCount[i] = 0; // input becomes released, reset mouse hold
}
}
else if (inputs[i].isMouseMotion) {
mouseHoldCount[i]++; // input remains pressed, increment mouse hold
}
}
else if (!inputs[i].pressed) {
if (inputs[i].bufferSum > pressThreshold) { // input becomes pressed
inputChanged = true;
inputs[i].pressed = true;
if (inputs[i].isKey) {
Keyboard.press(inputs[i].keyCode);
// Print the key code before pressing Enter
Keyboard.write('\n');
}
}
}
}
#ifdef DEBUG3
if (inputChanged) {
Serial.println("change");
}
#endif
}
2. To configure the outputs of Makey Makey
#include "Arduino.h"

/*
/////////////////////////////////////////////////////////////////////////
// KEY MAPPINGS: WHICH KEY MAPS TO WHICH PIN ON THE MAKEY MAKEY BOARD? //
/////////////////////////////////////////////////////////////////////////

- edit the keyCodes array below to change the keys sent by the MaKey MaKey for each input
- the comments tell you which input sends that key (for example, by default 'w' is sent by pin D5)
- change the keys by replacing them. for example, you can replace 'w' with any other individual letter,
number, or symbol on your keyboard
- you can also use codes for other keys such as modifier and function keys (see the
the list of additional key codes at the bottom of this file)

*/

int keyCodes[NUM_INPUTS] = {
// top side of the makey makey board

KEY_UP_ARROW, // up arrow pad
KEY_DOWN_ARROW, // down arrow pad
KEY_LEFT_ARROW, // left arrow pad
KEY_RIGHT_ARROW, // right arrow pad
' ', // space button pad
MOUSE_LEFT, // click button pad

// female header on the back left side

'w', // pin D5
'a', // pin D4
's', // pin D3
'd', // pin D2
'f', // pin D1
'g', // pin D0aa

// female header on the back right side

'h', // pin A5
MOUSE_MOVE_DOWN, // pin A4
MOUSE_MOVE_LEFT, // pin A3
MOUSE_MOVE_RIGHT, // pin A2
MOUSE_LEFT, // pin A1
MOUSE_RIGHT // pin A0
};

///////////////////////////
// NOISE CANCELLATION /////
///////////////////////////
#define SWITCH_THRESHOLD_OFFSET_PERC 5 // number between 1 and 49
// larger value protects better against noise oscillations, but makes it harder to press and release
// recommended values are between 2 and 20
// default value is 5

#define SWITCH_THRESHOLD_CENTER_BIAS 55 // number between 1 and 99
// larger value makes it easier to "release" keys, but harder to "press"
// smaller value makes it easier to "press" keys, but harder to "release"
// recommended values are between 30 and 70
// 50 is "middle" 2.5 volt center
// default value is 55
// 100 = 5V (never use this high)
// 0 = 0 V (never use this low


/////////////////////////
// MOUSE MOTION /////////
/////////////////////////
#define MOUSE_MOTION_UPDATE_INTERVAL 35 // how many loops to wait between
// sending mouse motion updates

#define PIXELS_PER_MOUSE_STEP 4 // a larger number will make the mouse
// move faster

#define MOUSE_RAMP_SCALE 150 // Scaling factor for mouse movement ramping
// Lower = more sensitive mouse movement
// Higher = slower ramping of speed
// 0 = Ramping off

#define MOUSE_MAX_PIXELS 10 // Max pixels per step for mouse movement

/*

///////////////////////////
// ADDITIONAL KEY CODES ///
///////////////////////////

- you can use these codes in the keyCodes array above
- to get modifier keys, function keys, etc

KEY_LEFT_CTRL
KEY_LEFT_SHIFT
KEY_LEFT_ALT
KEY_LEFT_GUI
KEY_RIGHT_CTRL
KEY_RIGHT_SHIFT
KEY_RIGHT_ALT
KEY_RIGHT_GUI

KEY_BACKSPACE
KEY_TAB
KEY_RETURN
KEY_ESC
KEY_INSERT
KEY_DELETE
KEY_PAGE_UP
KEY_PAGE_DOWN
KEY_HOME
KEY_END
KEY_CAPS_LOCK

KEY_F1
KEY_F2
KEY_F3
KEY_F4
KEY_F5
KEY_F6
KEY_F7
KEY_F8
KEY_F9
KEY_F10
KEY_F11
KEY_F12

*/

Connections and Schematics


Images and Video

Challenges

  • Could not use a direct serial communication between Arduino and Makey Makey because the Makey Makey has only 2 digital output pins. The work around to this was using the PC as an interface.
  • Had to find the right notes so that the piano would sound good , after a bit of experimentation , the 4th Octave of the C scale sounded very good so we decided to go with it.
  • Had to find a correct value for the potentiometer offset, which we found through some experimentation.
  • Had to find a way to enter the output of makey makey in the serial of Arduino UNO for communication . Used the Laptop keyboard as an interface for this.
  • Had trouble using analogRead and Tone together. So,had to use the concept ofBlinkWithoutDelay using mills() function to take analogRead input only once every second.

Reflections and Further Improvements

This could be improved by :

Adding more notes
Better range
Improving aesthetics
It could be possible to ground without using one hand so that both hands are free.
Since we are using tone(),  we cannot press multiple keys at the same time .
Overall, The project turned out very well. Exploring using a different board also using Arduino to make a project that is interactable in a creative way was a great experience. This inspires us to explore further and discover new types of boards and sensors.  We hope to use what we have learned in our final projects too .

Week 11 Musical Instrument – Hasibur & Vahagn

For this week’s assignment, we made a simple musical instrument using the Arduino. As part of the assignment, we used the button switch as the digital input and the potentiometer as the analog input. The Arduino plays a melody through a buzzer, and  4 LEDs light up in correspondence with the melody. By pressing the button, you can play the melody. The potentiometer allows you to control the length or duration of the melody.

Components Used

  • Arduino Uno
  • Breadboard
  • Jumper wires
  • Button
  • Potentiometer
  • LED (4 of different colors)
  • Buzzer
  • Resistors (330 ohms x 2)

#include "pitches.h"

#define BUZZER_PIN 12
#define ANALOG_PIN A0
#define RED_PIN 11
#define GREEN_PIN 10
#define BLUE_PIN 9
#define YELLOW_PIN 6
#define DIGITAL_PIN A1

int melody[] = {
  NOTE_B4, NOTE_B5, NOTE_FS5, NOTE_DS5,
  NOTE_B5, NOTE_FS5, NOTE_DS5, NOTE_C5,
  NOTE_C6, NOTE_G6, NOTE_E6, NOTE_C6, NOTE_G6, NOTE_E6,

  NOTE_B4, NOTE_B5, NOTE_FS5, NOTE_DS5, NOTE_B5,
  NOTE_FS5, NOTE_DS5, NOTE_DS5, NOTE_E5, NOTE_F5,
  NOTE_F5, NOTE_FS5, NOTE_G5, NOTE_G5, NOTE_GS5, NOTE_A5, NOTE_B5
};

int durations[] = {
  16, 16, 16, 16,
  32, 16, 8, 16,
  16, 16, 16, 32, 16, 8,

  16, 16, 16, 16, 32,
  16, 8, 32, 32, 32,
  32, 32, 32, 32, 32, 16, 8
};

bool isPlaying = false;

void setup() {
  pinMode(BUZZER_PIN, OUTPUT);
  pinMode(DIGITAL_PIN, INPUT_PULLUP); 
  pinMode(RED_PIN, OUTPUT);
  pinMode(GREEN_PIN, OUTPUT);
  pinMode(BLUE_PIN, OUTPUT);
  pinMode(YELLOW_PIN, OUTPUT);
}


void playMelodyWithLEDs() {
  int size = sizeof(durations) / sizeof(int);

  for (int note = 0; note < size; note++) {
    if (!isPlaying) return;

    int duration = 1000 / durations[note];
    tone(BUZZER_PIN, melody[note], duration);

    int sensorValue = analogRead(ANALOG_PIN);
    float speed = map(sensorValue, 0, 1023, 1.3, 6.0); 

    int pauseBetweenNotes = duration * speed;

    int ledPattern[] = { RED_PIN, GREEN_PIN, BLUE_PIN, YELLOW_PIN };
    int ledIndex = note % 4;
    digitalWrite(ledPattern[ledIndex], HIGH);
    delay(pauseBetweenNotes);
    digitalWrite(ledPattern[ledIndex], LOW);

    noTone(BUZZER_PIN);

    delay(50); 
  }
}

void loop() {
  if (digitalRead(DIGITAL_PIN) == LOW) {
    isPlaying = false;
    digitalWrite(RED_PIN, LOW);
    digitalWrite(GREEN_PIN, LOW);
    digitalWrite(BLUE_PIN, LOW);
    digitalWrite(YELLOW_PIN, LOW);
  } else {
    isPlaying = true;
    playMelodyWithLEDs();
  }
  delay(200);
}


The map() function is a hidden gem in this code. It’s a versatile function that remaps a range of values from one scale to another. In our case, the potentiometer reading (analog input) ranges from 0 to 1023. We use map() to translate these values to a range of speeds between 1.3 and 6.0. This allows the potentiometer to control the tempo of the melody playback.

The loop() function continuously checks the button state. If the button is pressed (digitalRead(DIGITAL_PIN) == LOW), the isPlaying flag is set to false, effectively stopping the melody. Additionally, the LED lighting is turned off (digitalWrite(RED_PIN, LOW), etc.). When the button is not pressed (digitalRead(DIGITAL_PIN) == HIGH), the isPlaying flag is set to true, and the playMelodyWithLEDs() function runs.

As we were integrating the LEDs with the melody, we struggled a bit. Initially, the LED light-up function was different, and it had a separate delay() for the individual LED to match with the melody. It did not work as expected. We realized after playing a note if we move to the separate LED function and delay there, the melody becomes very slow due to using 2 separate delays. So, we removed the LED function and used the same delay() for both the notes and LEDs.

Week 11 | Paper piano

Concept

While looking for ideas for the musical instrument,  I came across something called HID (Human Interface Devices). These are devices that can be used to substitute for Devices that are used to interact with the computer, such as a keyboard or a mouse.  Unfortunately , The Arduino UNO board that we use is not HID compatible. Why did we need this? because we wanted to do something unique and use something unconventional for the digital input part of the assignment. This is when we came across the MakeyMakey board by Sparkfun. Using this board, we can use anything with a weak conductivity as a button that send an input to the computer. We can then use the computer as an interface between Arduino and Makey Makey and use the output of Makey Makey as an input to the Arduino via the Serial.

Once we had this figured out, It opened great possibilities. For the purpose of this assignment, we decided to draw a piano on a piece of paper and use each part as a button ( so a sound plays whenever you touch the paper).

Technical Plan (Abstract overview)

For Arduino UNO
  1. Takes input from the serial , and reads it
  2. Converts the letter input to a corresponding frequency (taking digital input)
  3. Offsets the frequency by reading the value on the potentiometer (taking analog input)
  4. Uses tone function to play this frequency on the buzzer
For Makey Makey
  1. Takes input from the paper buttons and send a keystroke to the keyboard corresponding to what button is pressed.
  2. Presses enter automatically so that the keystroke is entered in the serial of the Arduino board.

Other Technicalities 

  • We need to make sure that the piano sounds good , for this we will use notes corresponding to an actual scale . The default scale we are using here is the C major Scale on the 4th Octave consisting of the notes C , D, E ,F , G, A and B .
  • While drawing the piano , we need to make sure that the keys are separated and each key separately conducts electricity.
  • Use alligator clips properly and make sure the connections work
  • Since the Arduino board default firmware can only output 6 letters ( wasdfg),  we need to configure it to replace some other outputs with letters. Here, we have reprogrammed it to output ‘h’ instead of the Up arrow and used ‘ ‘ (Blank space) as an input as well .

To use 

  • Connect both Arduino UNO and Makey Makey to the computer
  • Upload Code on Makey Makey
  • Open new Window of Arduino IDE and upload code on Arduino UNO
  • Open the Serial monitor and click on it to place the computer cursor there.
  • Start taking input from Makey Makey

Code

Code for the Arduino UNO board :

#include "pitches.h"
#include <Keyboard.h>

const int BUZZER_PIN = 8;          // Pin for the buzzer
const int potentiometerPin = A0;   // Pin for the potentiometer
const int duration = 200;          // Duration of the tone

unsigned long lastPotReadTime = 0; // Variable to store the last time potentiometer was read
int offset =0;

void setup() {
  Serial.begin(9600);
  pinMode(BUZZER_PIN, OUTPUT);
}

void loop() {
  // Read the potentiometer value only once every second
  unsigned long currentTime = millis();
  if (currentTime - lastPotReadTime >= 1000) {
    offset = analogRead(potentiometerPin) / 3; // Offset the frequency based on potentiometer reading
    lastPotReadTime = currentTime;
    
    // Print the potentiometer value
    Serial.println(offset);
  }

  // Check if there's any character available in the serial buffer
  if (Serial.available() > 0) {
    char receivedChar = Serial.read();
    int frequency = 0; // Frequency value for the tone

    // Map received character to frequency
    switch (receivedChar) {
      case 'w': frequency = NOTE_C5; break;
      case 'a': frequency = NOTE_D5; break;
      case 's': frequency = NOTE_E5; break;
      case 'd': frequency = NOTE_F5; break;
      case 'f': frequency = NOTE_G5; break;
      case 'g': frequency = NOTE_A5; break;
      case 'h': frequency = NOTE_C6; break;
      case ' ': frequency = NOTE_B5; break;
      default: break; // Do nothing if character is not recognized
    }

    if (frequency != 0) {
      tone(BUZZER_PIN, frequency + offset, duration); // Play the tone
      delay(duration); // Wait for the tone to complete
      noTone(BUZZER_PIN); // Stop the tone
    }
  }
}
//CCDCFE
//CCDCGF
// for happy Birthday first two lines

Relevant Code for the Makey Makey board

  1. To press enter (write newline) along with the character
void updateInputStates() {
  inputChanged = false;
  for (int i=0; i<NUM_INPUTS; i++) {
    inputs[i].prevPressed = inputs[i].pressed; // store previous pressed state (only used for mouse buttons)
    if (inputs[i].pressed) {
      if (inputs[i].bufferSum < releaseThreshold) {  
        inputChanged = true;
        inputs[i].pressed = false;
        if (inputs[i].isKey) {
          Keyboard.release(inputs[i].keyCode);
        }
        if (inputs[i].isMouseMotion) {  
          mouseHoldCount[i] = 0;  // input becomes released, reset mouse hold
        }
      }
      else if (inputs[i].isMouseMotion) {  
        mouseHoldCount[i]++; // input remains pressed, increment mouse hold
      }
    } 
    else if (!inputs[i].pressed) {
      if (inputs[i].bufferSum > pressThreshold) {  // input becomes pressed
        inputChanged = true;
        inputs[i].pressed = true; 
        if (inputs[i].isKey) {
          Keyboard.press(inputs[i].keyCode);
          // Print the key code before pressing Enter
          Keyboard.write('\n');
        }
      }
    }
  }
#ifdef DEBUG3
  if (inputChanged) {
    Serial.println("change");
  }
#endif
}

2. To configure the outputs of makey makey

#include "Arduino.h"

/*
/////////////////////////////////////////////////////////////////////////
// KEY MAPPINGS: WHICH KEY MAPS TO WHICH PIN ON THE MAKEY MAKEY BOARD? //
/////////////////////////////////////////////////////////////////////////
  
  - edit the keyCodes array below to change the keys sent by the MaKey MaKey for each input
  - the comments tell you which input sends that key (for example, by default 'w' is sent by pin D5)
  - change the keys by replacing them. for example, you can replace 'w' with any other individual letter,
    number, or symbol on your keyboard
  - you can also use codes for other keys such as modifier and function keys (see the
    the list of additional key codes at the bottom of this file)

*/

int keyCodes[NUM_INPUTS] = {
  // top side of the makey makey board
 
  KEY_UP_ARROW,      // up arrow pad
  KEY_DOWN_ARROW,    // down arrow pad
  KEY_LEFT_ARROW,    // left arrow pad
  KEY_RIGHT_ARROW,   // right arrow pad
  ' ',               // space button pad
  MOUSE_LEFT,        // click button pad
  
  // female header on the back left side
  
  'w',                // pin D5
  'a',                // pin D4
  's',                // pin D3
  'd',                // pin D2
  'f',                // pin D1
  'g',                // pin D0aa
  
  // female header on the back right side
  
  'h',      // pin A5
  MOUSE_MOVE_DOWN,    // pin A4
  MOUSE_MOVE_LEFT,    // pin A3
  MOUSE_MOVE_RIGHT,   // pin A2
  MOUSE_LEFT,         // pin A1
  MOUSE_RIGHT         // pin A0
};

///////////////////////////
// NOISE CANCELLATION /////
///////////////////////////
#define SWITCH_THRESHOLD_OFFSET_PERC  5    // number between 1 and 49
                                           // larger value protects better against noise oscillations, but makes it harder to press and release
                                           // recommended values are between 2 and 20
                                           // default value is 5

#define SWITCH_THRESHOLD_CENTER_BIAS 55   // number between 1 and 99
                                          // larger value makes it easier to "release" keys, but harder to "press"
                                          // smaller value makes it easier to "press" keys, but harder to "release"
                                          // recommended values are between 30 and 70
                                          // 50 is "middle" 2.5 volt center
                                          // default value is 55
                                          // 100 = 5V (never use this high)
                                          // 0 = 0 V (never use this low
                                          

/////////////////////////
// MOUSE MOTION /////////
/////////////////////////
#define MOUSE_MOTION_UPDATE_INTERVAL  35   // how many loops to wait between 
                                           // sending mouse motion updates
                                           
#define PIXELS_PER_MOUSE_STEP         4     // a larger number will make the mouse
                                           // move faster

#define MOUSE_RAMP_SCALE              150  // Scaling factor for mouse movement ramping
                                           // Lower = more sensitive mouse movement
                                           // Higher = slower ramping of speed
                                           // 0 = Ramping off
                                            
#define MOUSE_MAX_PIXELS              10   // Max pixels per step for mouse movement

/*

///////////////////////////
// ADDITIONAL KEY CODES ///
///////////////////////////

- you can use these codes in the keyCodes array above
- to get modifier keys, function keys, etc 

KEY_LEFT_CTRL
KEY_LEFT_SHIFT		
KEY_LEFT_ALT		
KEY_LEFT_GUI		
KEY_RIGHT_CTRL		
KEY_RIGHT_SHIFT		
KEY_RIGHT_ALT	
KEY_RIGHT_GUI		

KEY_BACKSPACE		
KEY_TAB				
KEY_RETURN			
KEY_ESC				
KEY_INSERT			
KEY_DELETE			
KEY_PAGE_UP			
KEY_PAGE_DOWN		
KEY_HOME
KEY_END				
KEY_CAPS_LOCK	
    
KEY_F1				
KEY_F2				
KEY_F3				
KEY_F4				
KEY_F5				
KEY_F6				
KEY_F7				
KEY_F8				
KEY_F9				
KEY_F10
KEY_F11				
KEY_F12			

*/	


Connections and Schematics


Images and Video


Challenges

  • Could not use a direct serial communication between Arduino and Makey Makey because the Makey Makey has only 2 digital output pins. The work around to this was using the PC as an interface.
  • Had to find the right notes so that the piano would sound good , after a bit of experimentation , the 4th Octave of the C scale sounded very good so we decided to go with it.
  • Had to find a correct value for the potentiometer offset, which we found through some experimentation.
  • Had to find a way to enter the output of makey makey in the serial of Arduino UNO for communication . Used the Laptop keyboard as an interface for this.
  • Had trouble using analogRead and Tone together. So,had to use the concept ofBlinkWithoutDelay using mills() function to take analogRead input only once every second.

Reflections and Further Improvements

This could be improved by :

  • Adding more notes
  • Better range
  • Improving aesthetics
  • It could be possible to ground without using one hand so that both hands are free.
  • Since we are using tone(),  we cannot press multiple keys at the same time .

Overall, The project turned out very well. Exploring using a different board also using Arduino to make a project that is interactable in a creative way was a great experience. This inspires us to explore further and discover new types of boards and sensors.  We hope to use what we have learned in our final projects too .


Week 11- Our Musical Instrument

Project description:

This project involves using LEDs, buttons, a potentiometer, and a buzzer to create a fun and interactive experience. Below is a summary of how it works and what was learned.

Key Components:

  • Breadboard and Arduino UNO: These are the main platforms where the components are set up.
  • LEDs: Light up when a button is pressed to show visual feedback.
  • Buttons: Each one is linked to a specific LED. Pressing a button lights up the LED and makes a sound.
  • Potentiometer: Adjusts the sound’s pitch from the buzzer.
  • Buzzer: Produces sounds that change tone based on button presses and the potentiometer setting.
  • Resistors: Uses both 330-ohm and 10k ohm resistors to control the current.

Instrument:

https://youtube.com/shorts/6Bm-7NDI3RM?si=Vu55mtSy6QuivNm8

Code:

const int redLED = 6;
const int greenLED = 5;
const int yellowLED = 7;
const int redButton = 12;
const int greenButton = 11;
const int yellowButton = 13;
const int potPin = A2;
const int buzzerPin = 3;

void setup() {
  pinMode(redLED, OUTPUT);
  pinMode(greenLED, OUTPUT);
  pinMode(yellowLED, OUTPUT);

  pinMode(redButton, INPUT_PULLUP);
  pinMode(greenButton, INPUT_PULLUP);
  pinMode(yellowButton, INPUT_PULLUP);

  // Initialize Serial for debugging
  Serial.begin(9600);
}

void loop() {
  // Read potentiometer value
  int potValue = analogRead(potPin);
  // Map potentiometer value to a frequency range (e.g., 100 Hz to 2000 Hz)
  int frequency = map(potValue, 0, 1023, 100, 2000);

  // Check each button and activate the corresponding LED and buzzer
  if (digitalRead(redButton) == LOW) {
    digitalWrite(redLED, HIGH);
    tone(buzzerPin, frequency);  // Play buzzer at mapped frequency
    delay(100);  // delay
  } else {
    digitalWrite(redLED, LOW);
  }

  if (digitalRead(greenButton) == LOW) {
    digitalWrite(greenLED, HIGH);
    tone(buzzerPin, frequency + 100);  // Slightly higher pitch for green button
    delay(100);  // Debounce delay
  } else {
    digitalWrite(greenLED, LOW);
  }

  if (digitalRead(yellowButton) == LOW) {
    digitalWrite(yellowLED, HIGH);
    tone(buzzerPin, frequency + 200);  // Even higher pitch for yellow button
    delay(100);  // Debounce delay
  } else {
    digitalWrite(yellowLED, LOW);
  }
  delay(10);
}


Reflections:

Watching the LEDs light up and hearing the buzzer change pitch was very rewarding. It’s fascinating to see how basic parts and some coding can create a captivating interactive experience. Adjusting the buzzer’s pitch with the potentiometer was particularly enjoyable, as it required fine-tuning to get pleasant sounds and smooth transitions between pitches.

Challenges:

  • Debouncing: Making sure the buttons only register a single press at a time was challenging. The project uses simple delays now, but could benefit from more advanced debouncing methods.
  • Sound Complexity: Currently, the buzzer only creates basic tones. Using sound libraries like Mozzi might allow for more complex sounds.

Improvements:

  • Light Patterns: Could add flashing or fading lights for more visual appeal.
  • Multiple Tones/Melodies: Using libraries to generate more detailed sounds.
  • Interactive Games: Creating games based on pressing buttons and keeping time.
  • LCD Display: Adding a screen to display instructions or scores.

Week 11 Reading Reflection

For this week’s reading, I read “A Brief Rant on the Future of Interaction Design” by Bret Victor and the response article. Both articles left me with a lingering sense of dissatisfaction. Both shed a harsh light on the limitations of our current interaction paradigms, particularly the dominance of “Pictures Under Glass” interfaces. These flat, touch-based systems, while undeniably convenient, leave a significant part of the human experience untapped: our sense of touch.

Prior to this reading, I hadn’t truly considered the depth of information conveyed through touch. Victor’s words prompted a newfound awareness of the absence of tactile feedback in my daily interactions with technology. Scrolling through endless feeds on my phone or navigating menus on my laptop suddenly felt sterile and one-dimensional. The simple act of picking up a book and feeling the weight of its pages, the satisfying click of a pen against paper—these experiences, once taken for granted, now hold a newfound significance.

The articles sparked a desire for a more holistic approach to human-computer interaction (HCI). Victor’s vision of a “dynamic medium” that engages multiple senses, not just sight, resonates deeply. Imagine manipulating virtual objects with the same dexterity and finesse we use with physical ones. Imagine feeling the texture of a 3D model or the resistance of virtual clay as we sculpt it. Such interfaces hold the potential to revolutionize not just how we interact with technology but also how we learn, create, and explore the digital world.

However, the question remains: how do we bridge this gap between our current state and Victor’s ambitious vision? The answer lies not in simply discarding touchscreens but in building upon them. Perhaps the integration of haptic technology could provide simulated textures and feedback, enriching the interaction experience. Imagine a sculptor feeling the resistance of virtual clay under their fingertips as they mold it, or an architect being able to manipulate a 3D building model with the same ease they would a physical one.

Beyond touch, could future interfaces incorporate other senses like smell or even taste? While these concepts might seem far-fetched, they highlight the exciting possibilities of a multi-sensory HCI future. Imagine a virtual tour of a vineyard where you can not only see the rolling hills but also smell the grapes ripening in the sun. Or imagine experiencing a historical event through a VR simulation that incorporates the sounds and smells of the time period.

The articles also raise a crucial point about the role technology should play in our lives. Technology should not aim to replace existing interactions or diminish our physical capabilities. Instead, it should act as an extension of ourselves, enhancing and amplifying our skills. The future of HCI should strive to create a seamless and intuitive connection between the physical and digital worlds, one that respects and leverages the full spectrum of human senses and capabilities.

As Victor aptly argues, the choice for the future of interaction lies with us. By fostering research into advanced materials, haptics, and multi-sensory experiences, we can pave the way for a future where technology doesn’t just serve us but empowers us to interact with the digital world in a richer, more meaningful way. By prioritizing human potential and embracing the full range of human senses, we can move beyond “Pictures Under Glass” and create a future of truly immersive and interactive technology.

Reading Response Week 11 – Shaikha AlKaabi

In the text A Brief Rant on the Future of Interaction Design, the author argues for a thoughtful approach to tool design, emphasizing that a tool’s primary function should be to serve human needs and enhance our innate abilities. The essence of his argument is that tools should not be valued merely for their aesthetics, but for their ability to improve our efficiency and effectiveness. He expresses a certain dissatisfaction with current technology, particularly critiquing devices he describes as “Pictures Under Glass.” He suggests that such technologies diminish the sensory richness and the interactive potential of our hands, more specifically our fingertips. He’s worried that focusing too much on making interfaces look good might make us forget how important it is to actually touch and interact with things around us.The author urges us to think about all the ways we can interact with tools, suggesting we use interfaces that involve more of our senses and movements. He believes that just using one finger on a touchscreen doesn’t make full use of our ability to move and feel.

In conclusion, the author calls for a future where technology development is inspired by the full range of human abilities. Instead of adapting to the constraints of existing technology, he challenges designers to envision tools that integrate seamlessly with human capacity for manipulation and sensory experience, fostering a more intuitive and enriching interaction with our tools.

As for his follow-up article, the author has replied to some critiques about his previous article on the future of interaction design, where he ranted about current tech not being up to par. He clarifies he wasn’t out to offer a solution but to spark deeper research into better solutions that really fit human capabilities. He’s not against current tech like iPhones or iPads, but he’s worried if we don’t push for more, we’ll get stuck with something that’s only a bit better than what we have. He’s not keen on just adding physical keyboards or styluses to our devices because that doesn’t really tap into the full experience of interacting with the world around us. And when it comes to voice commands, he thinks they’re fine for simple questions or tasks, but for more complex stuff like exploring ideas or creating art, they fall short.The author isn’t thrilled with tech that’s all about swiping on screens either. It might be easy, but it’s not making the most of what our bodies can do, and it could even hold back kids’ development because it’s not challenging them enough. He thinks we’re meant to interact with our world in more dynamic ways, and our future tech should reflect that.