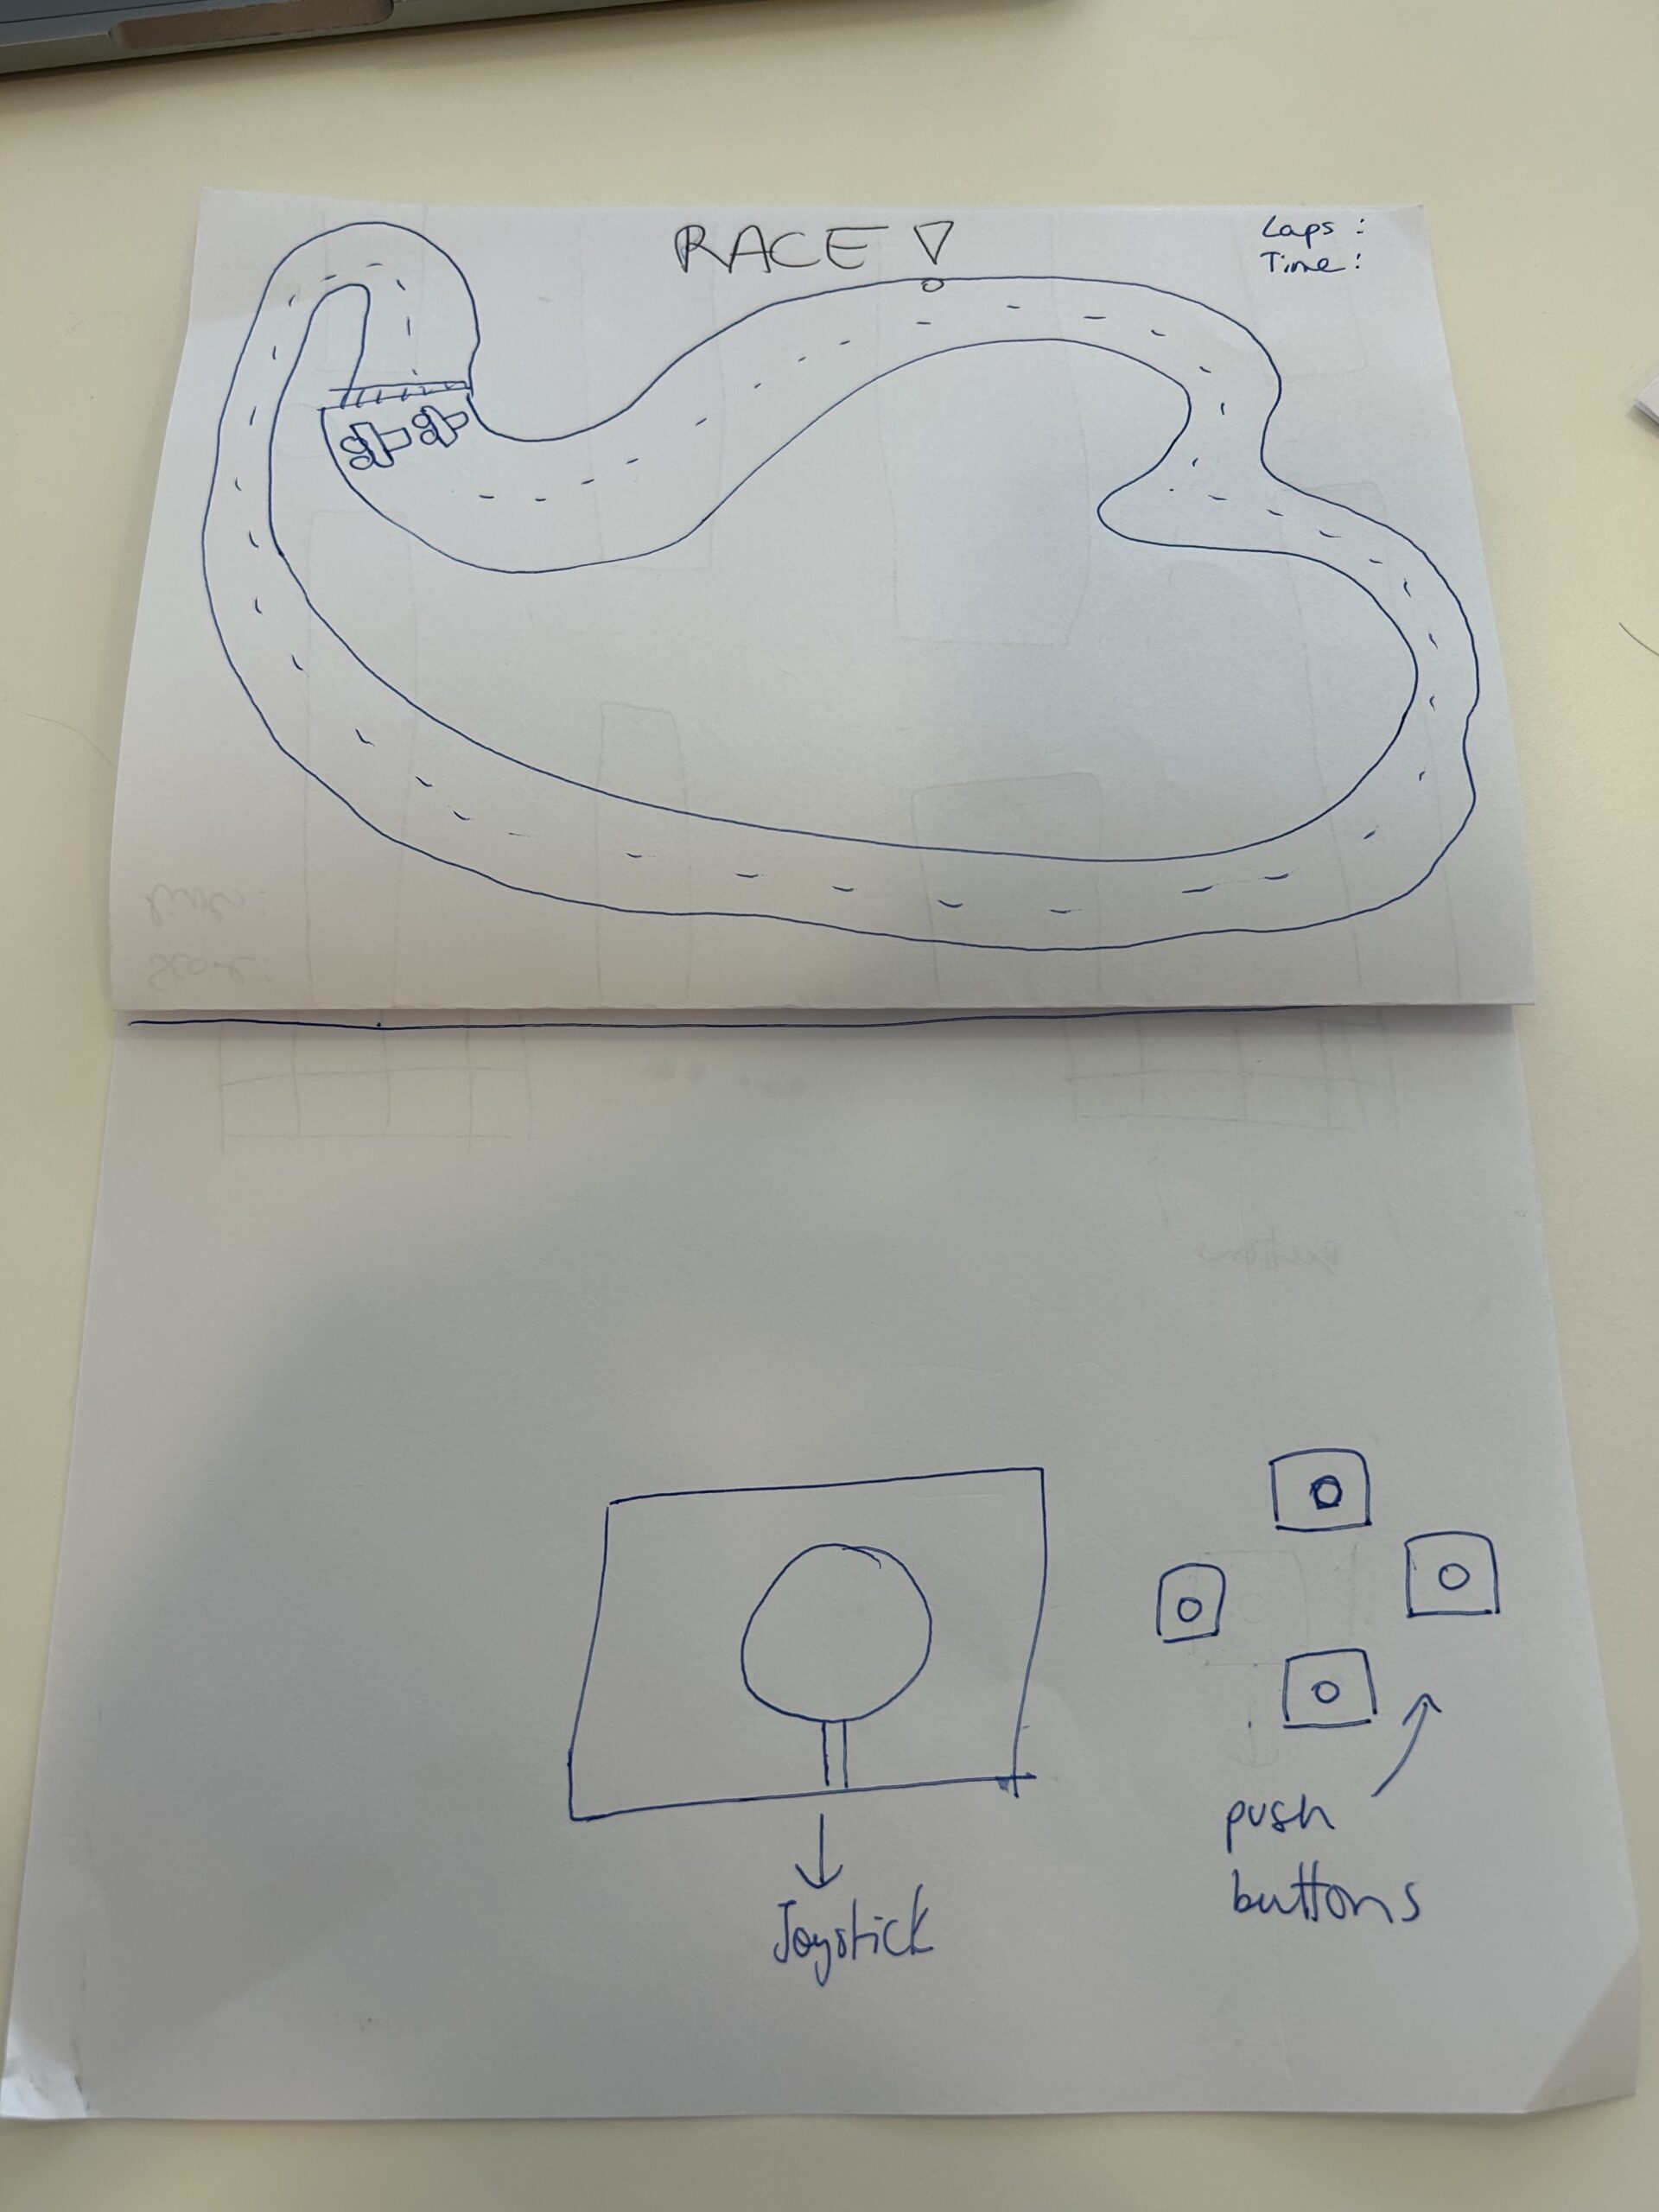
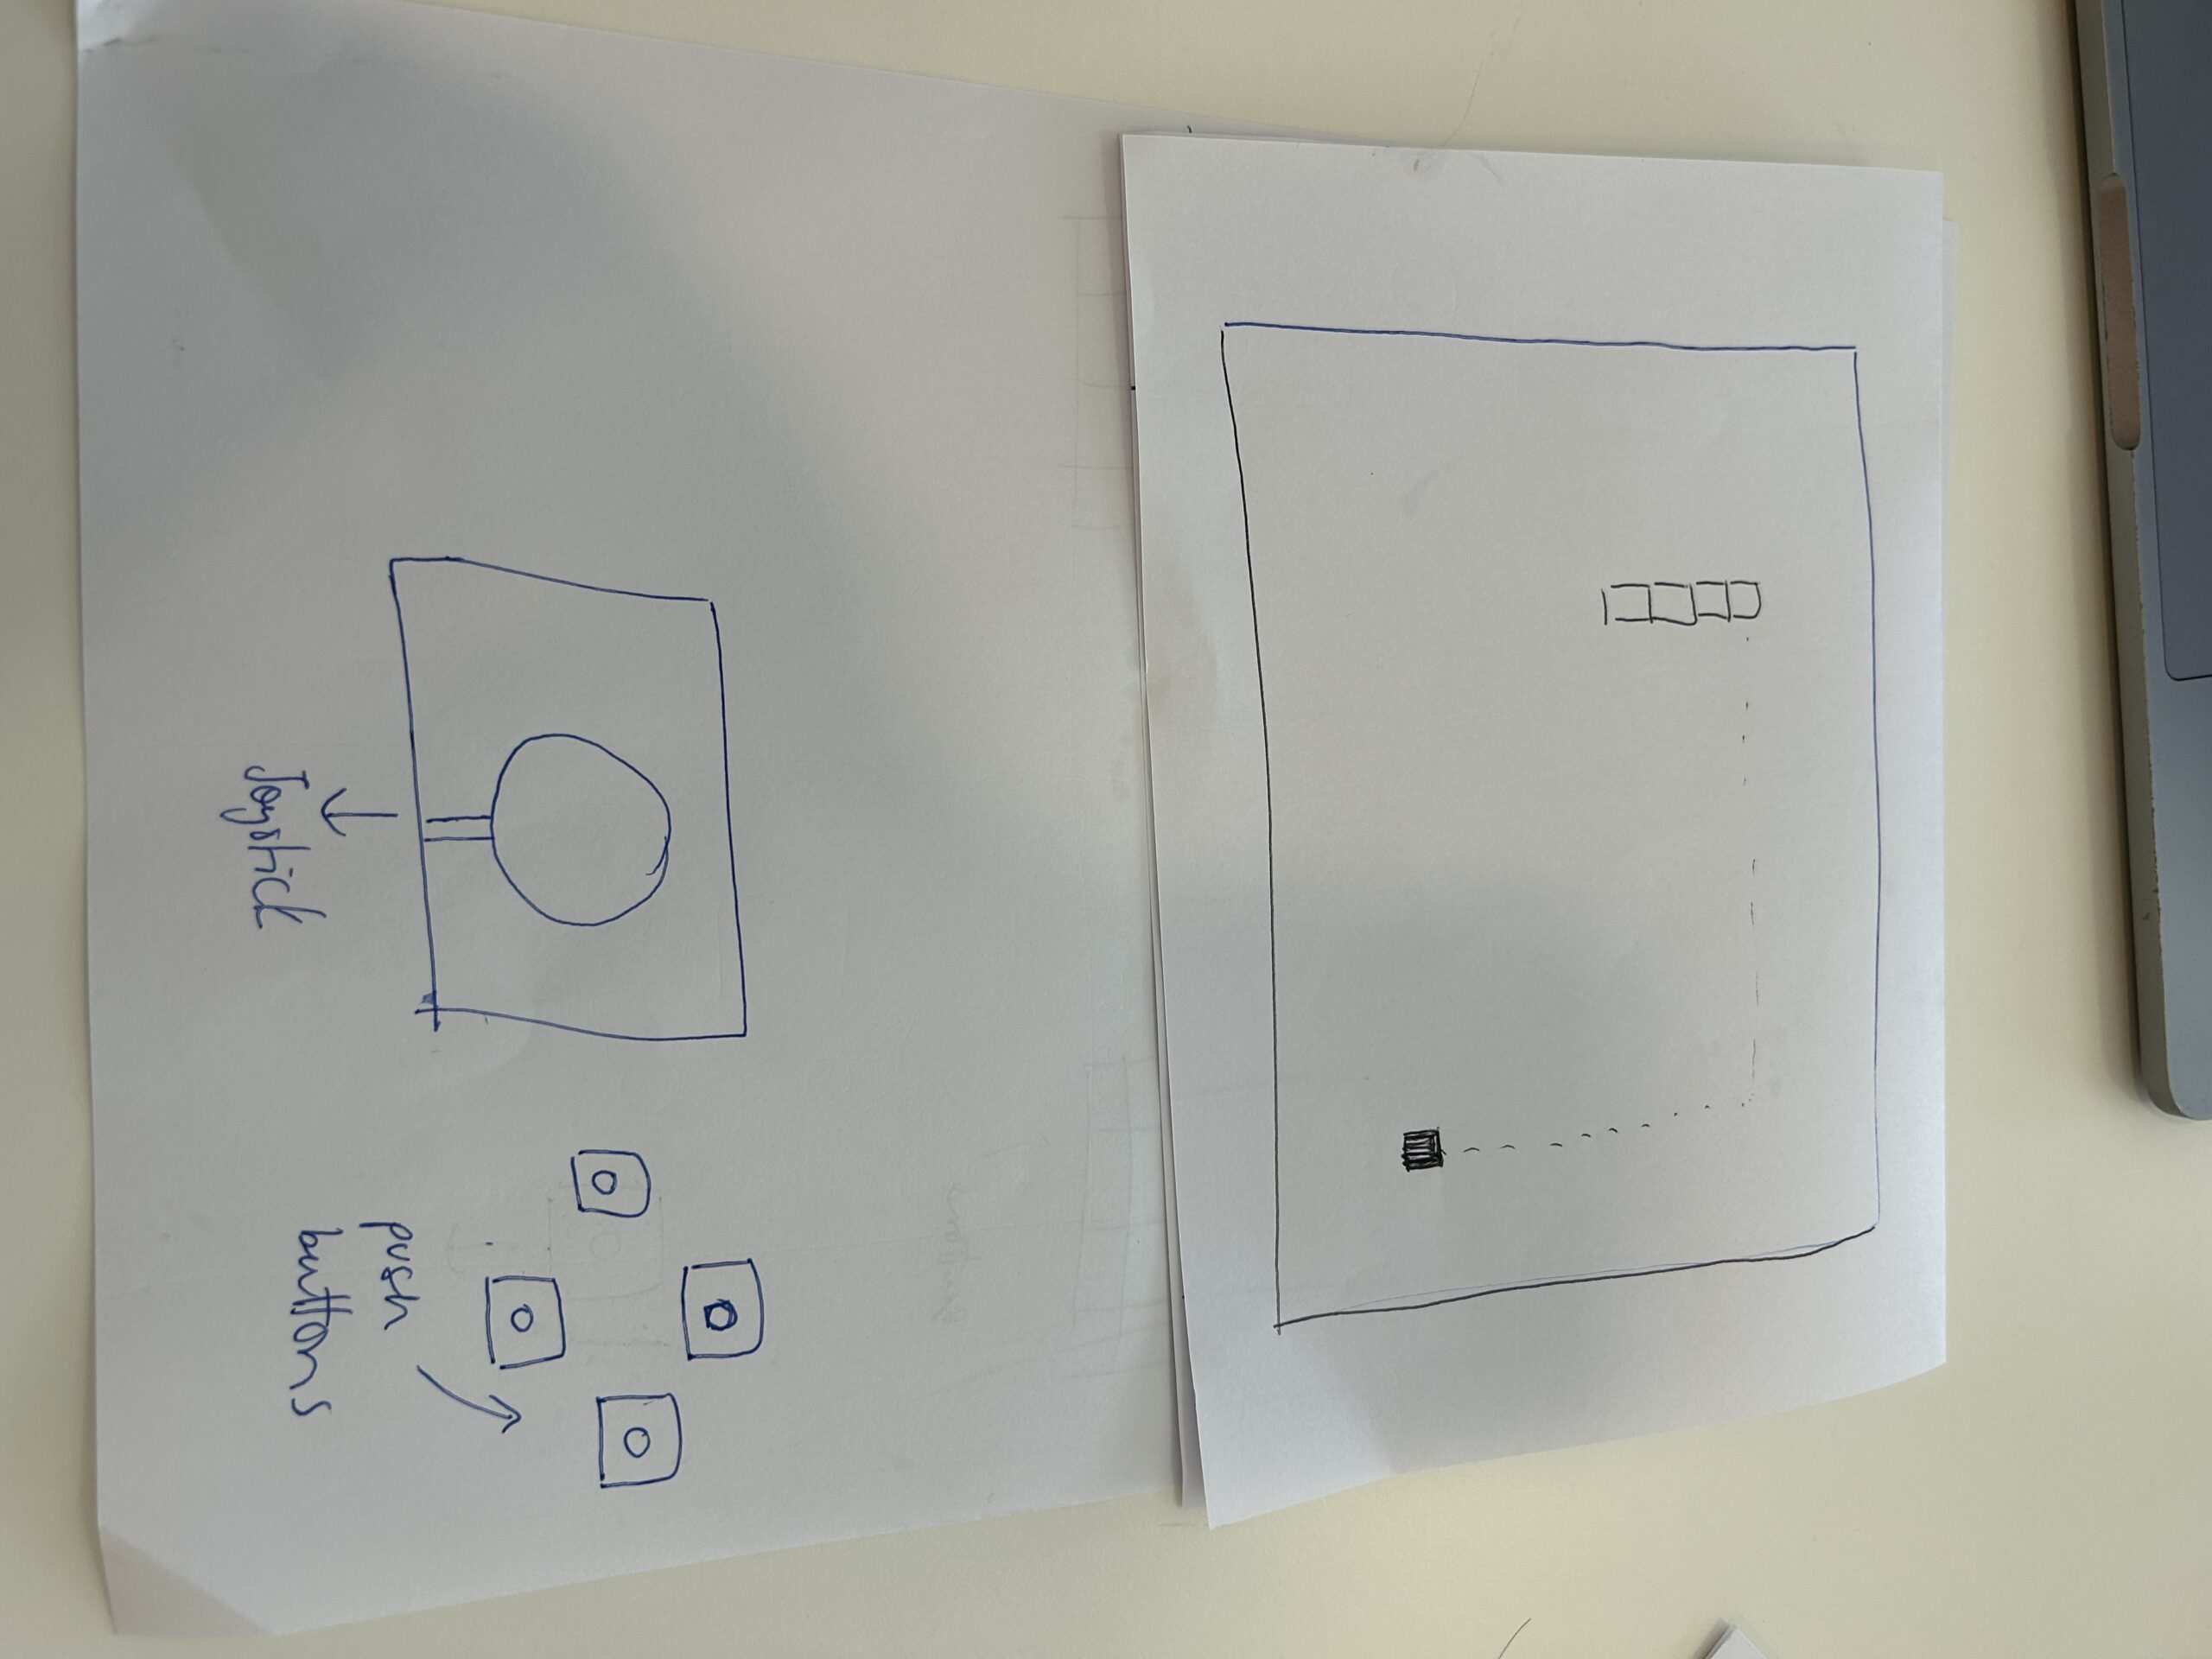
Idea 1:
Built a joystick and control a car in a game in p5
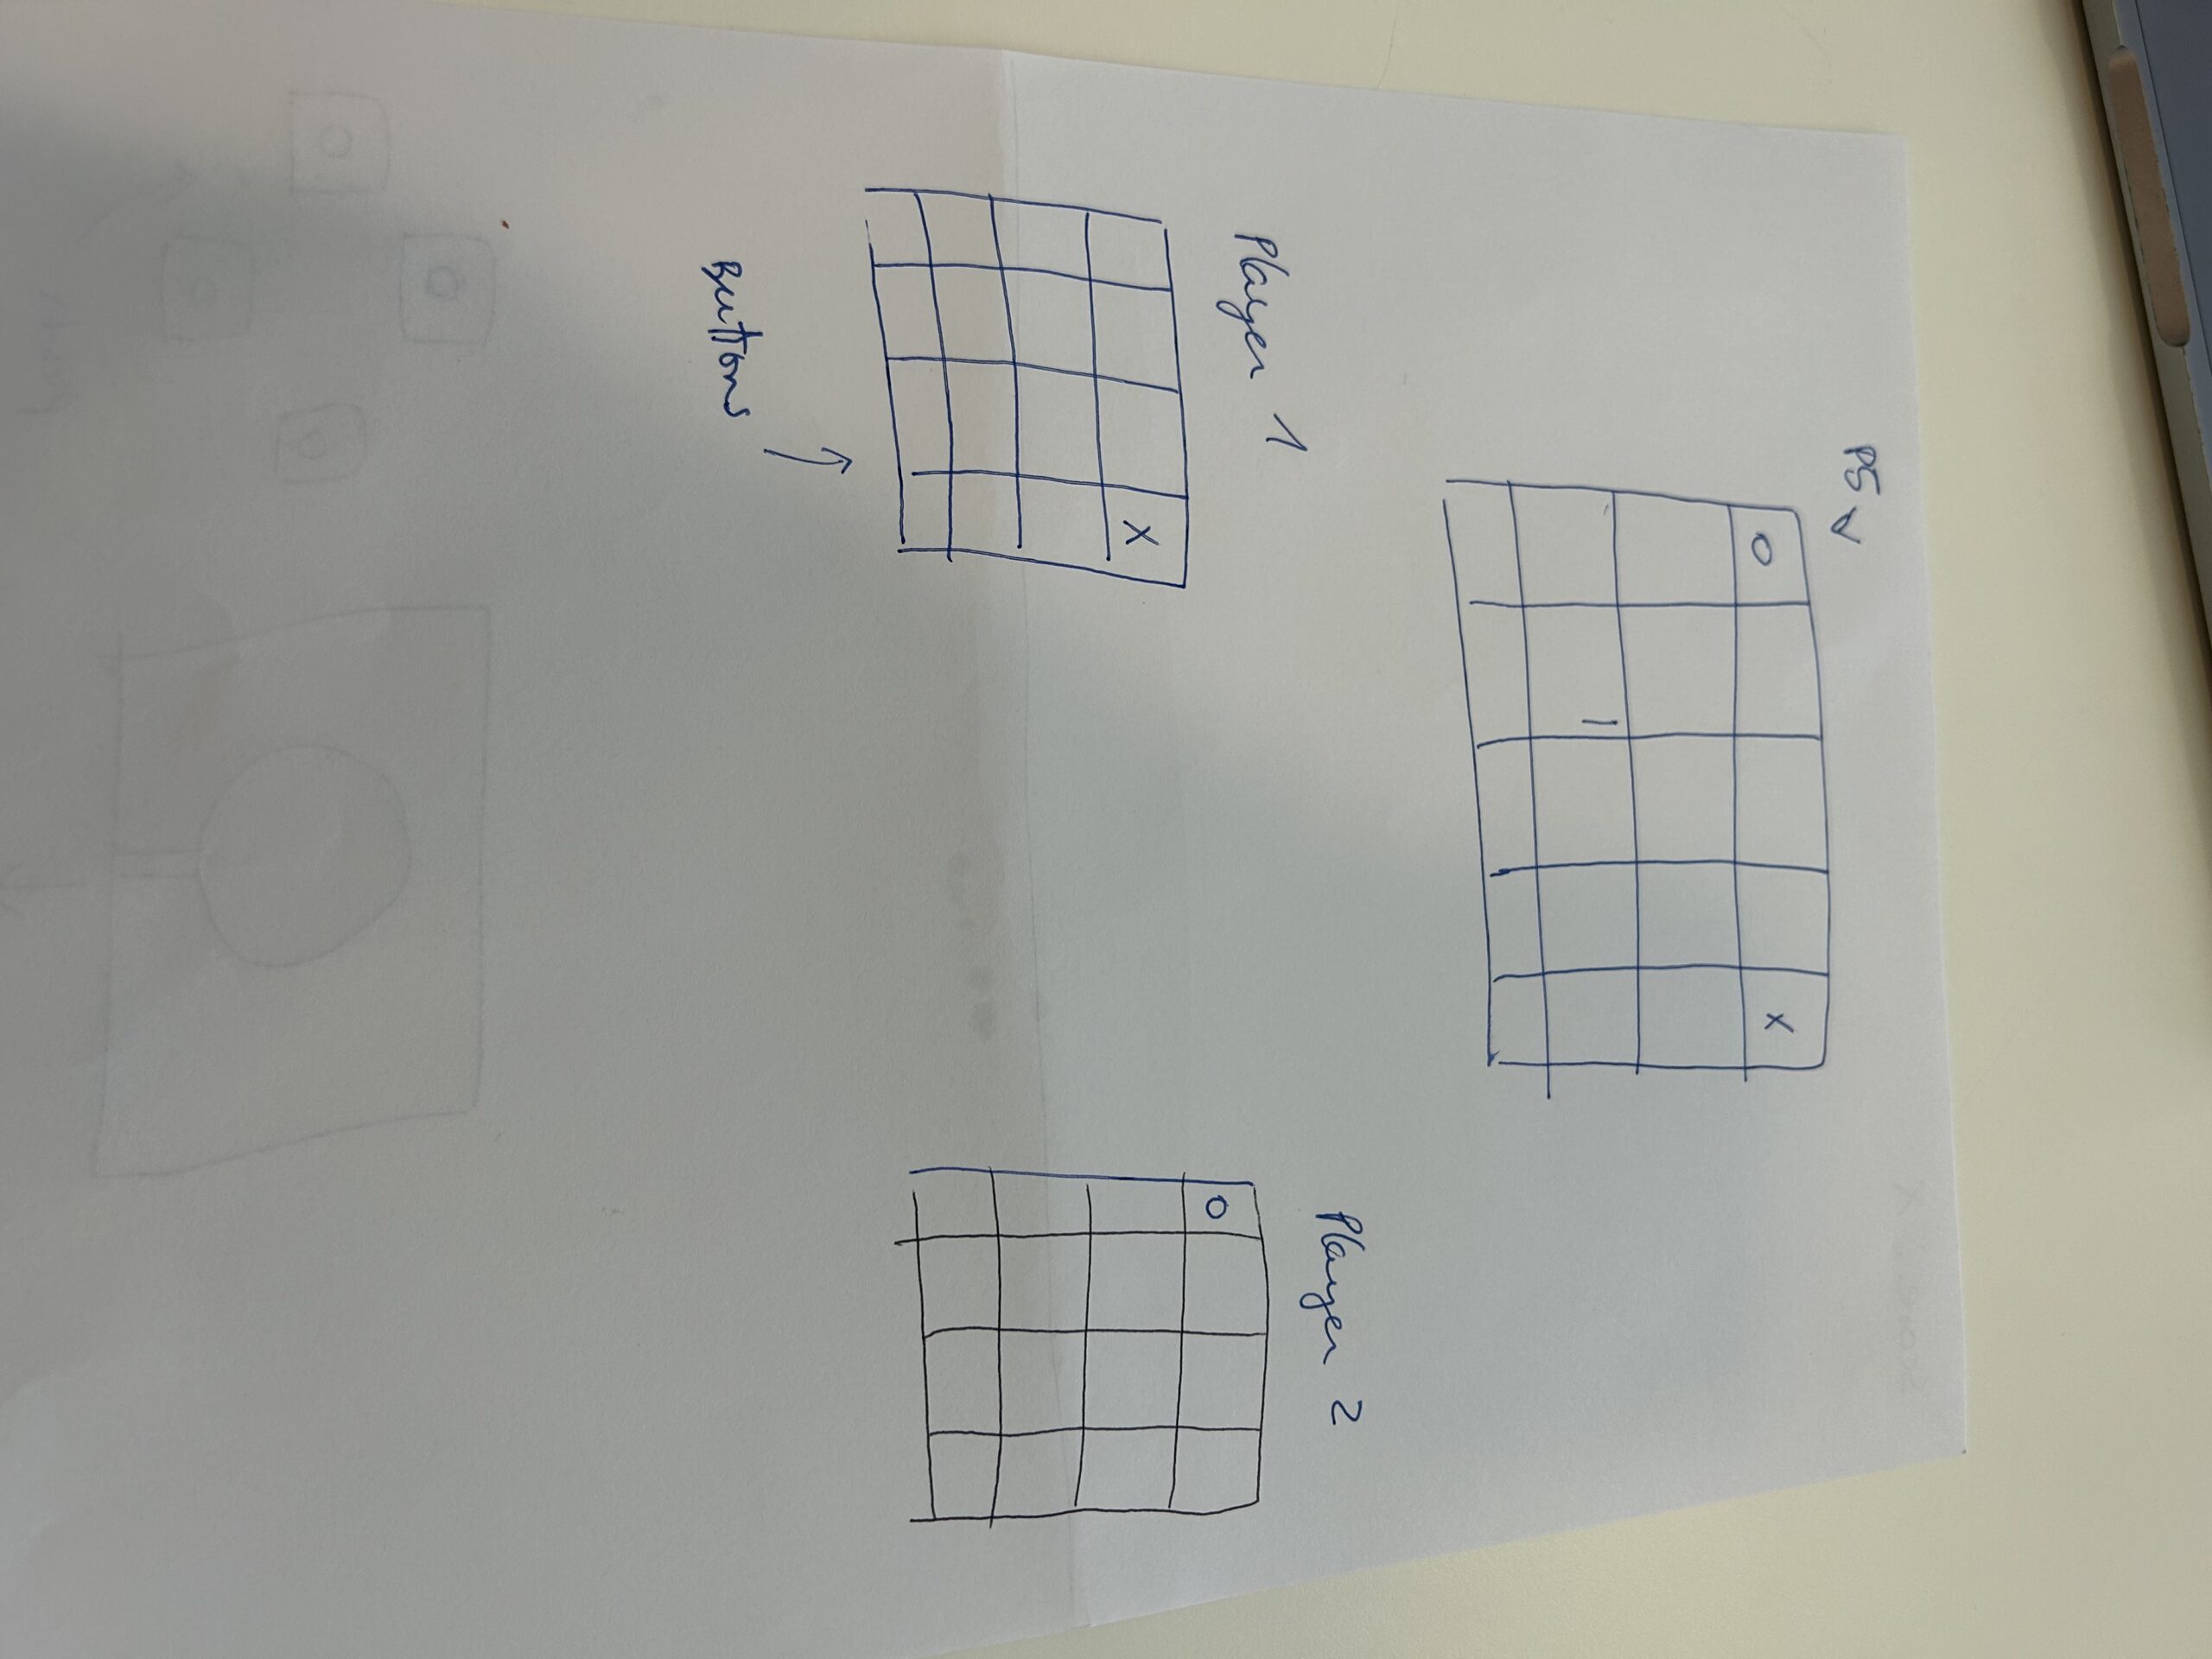
Idea 2:
3 in a row game. 9 buttons on the Arduino board and in p5 the board game.
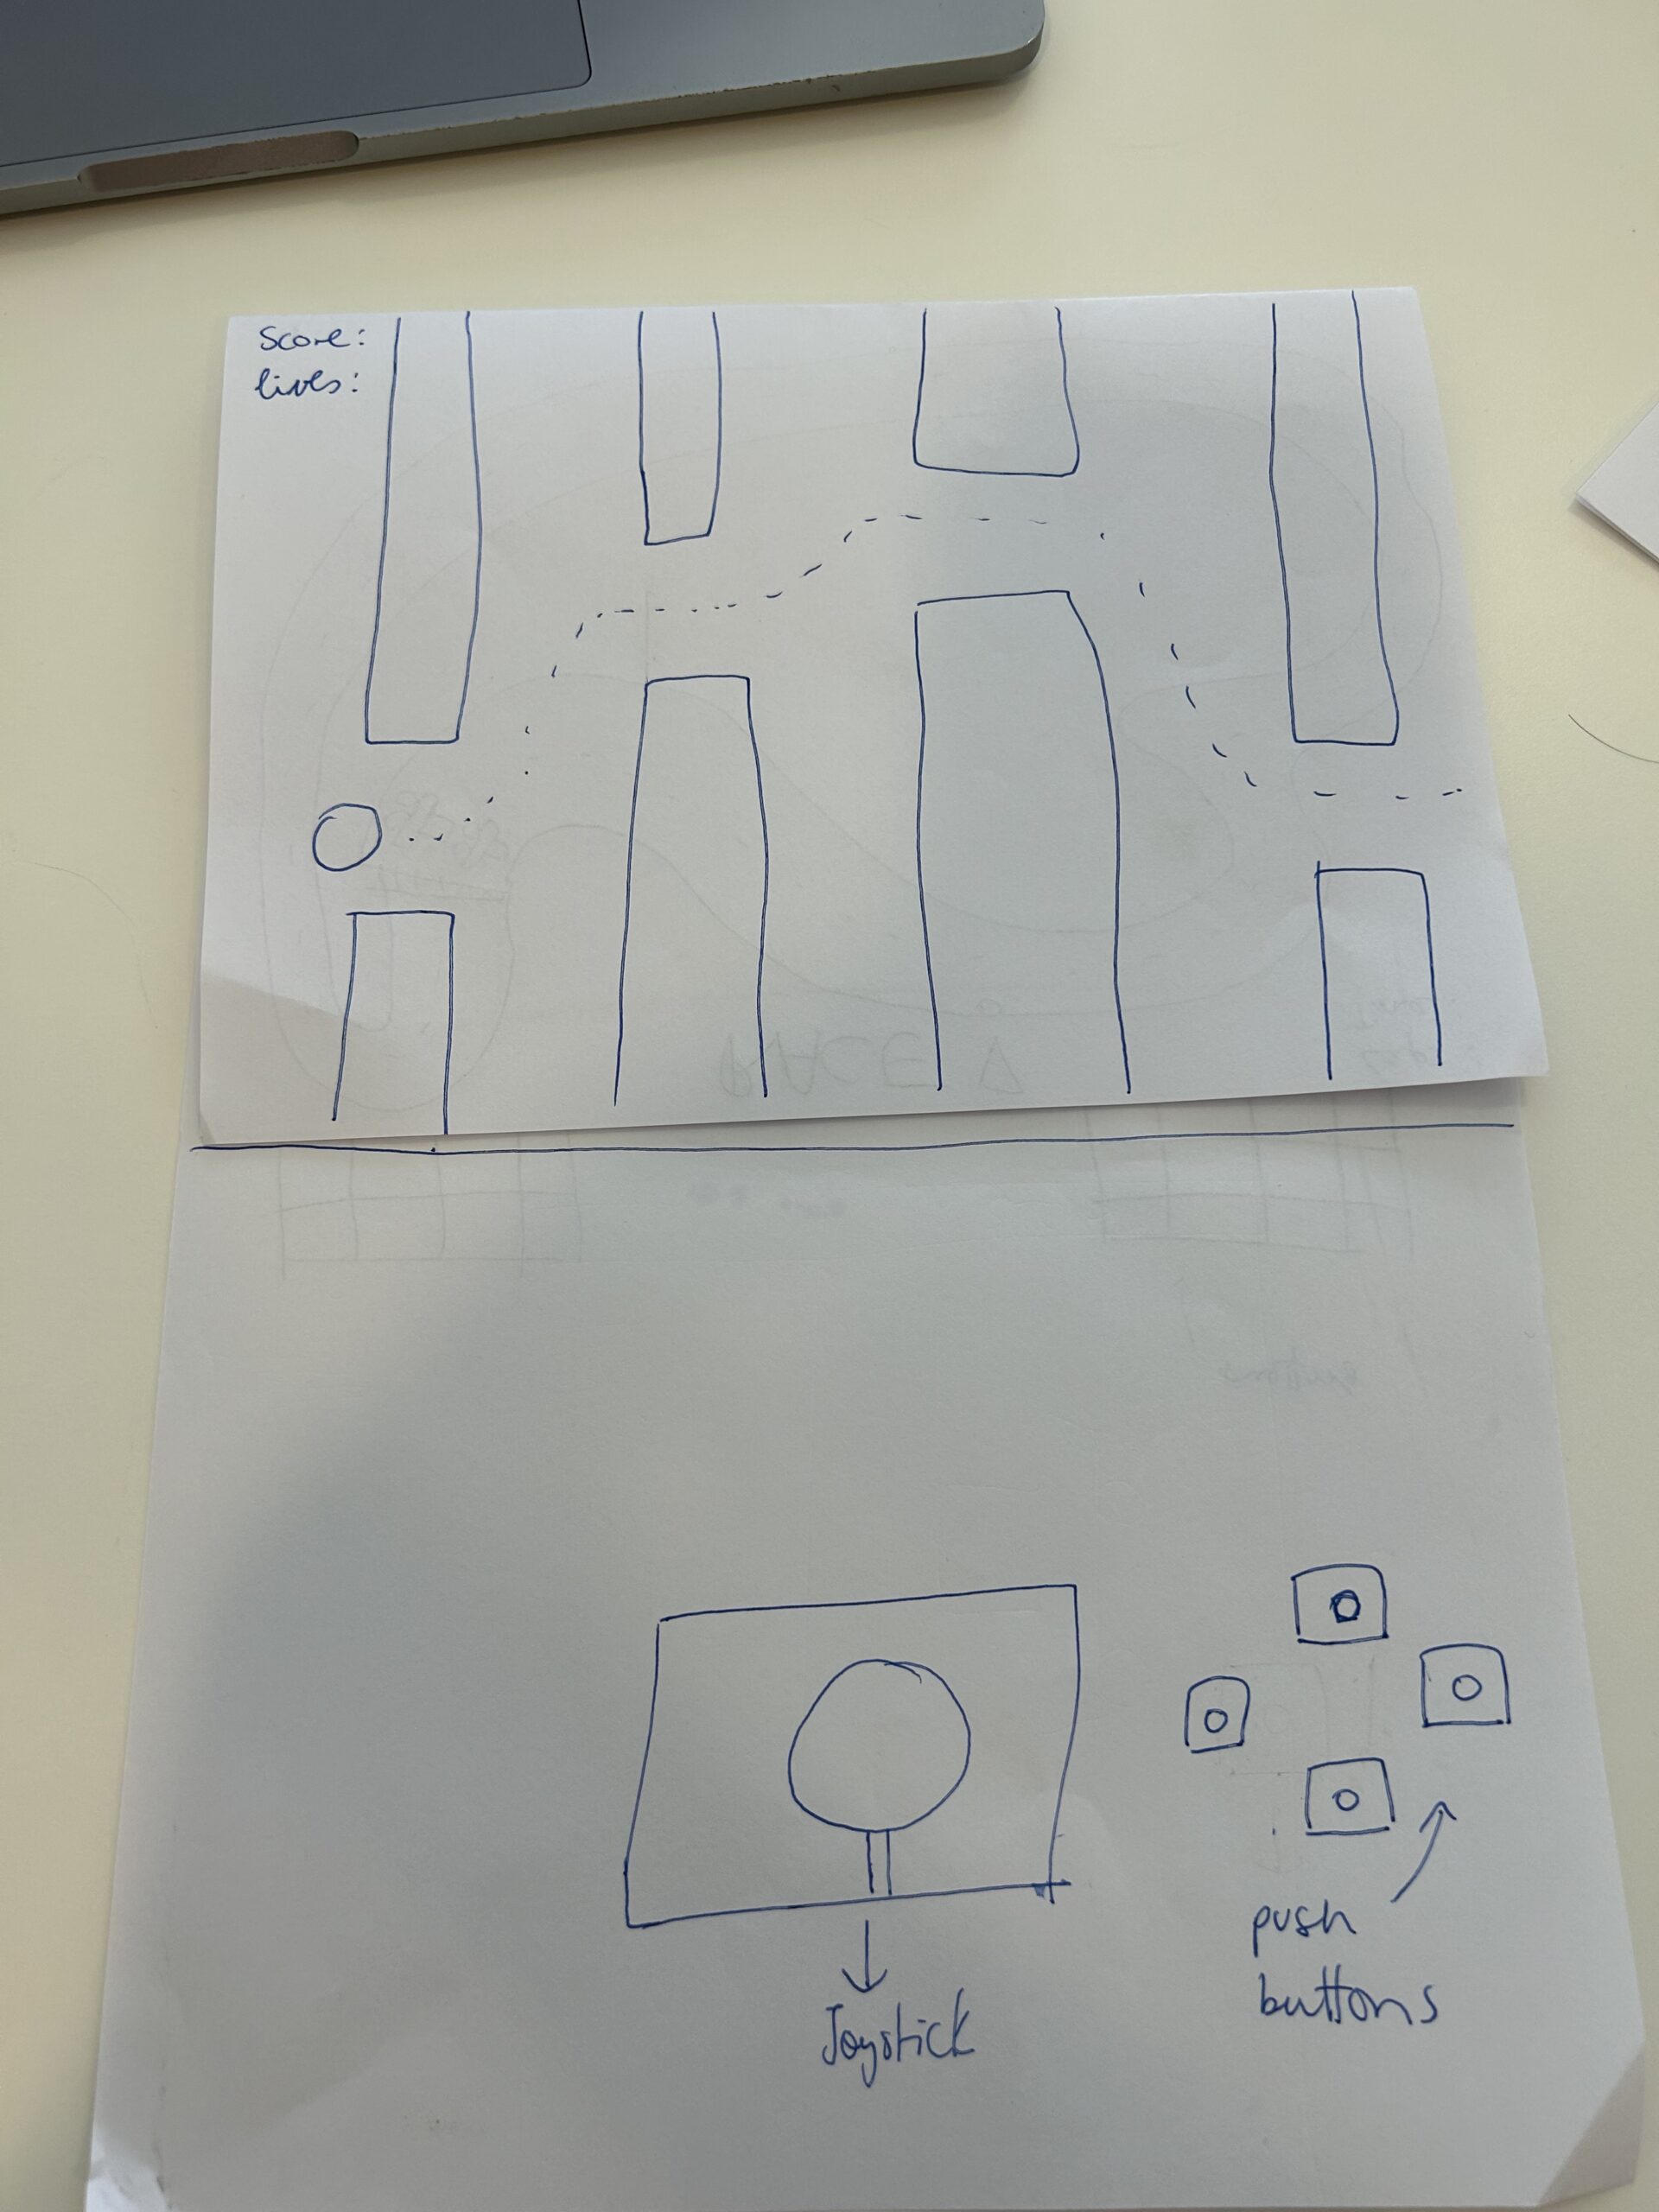
Idea 3:
build a sensor ultrasonic car that detects objects near it

Idea 1:
Built a joystick and control a car in a game in p5
Idea 2:
3 in a row game. 9 buttons on the Arduino board and in p5 the board game.
Idea 3:
build a sensor ultrasonic car that detects objects near it
As I was brainstorming potential ideas for my final project, I realized that a key concept I want to focus on is the essence of being human, specifically touching upon the elements that make us human such as emotion, heartbeat, facial expressions, etc. The reason why I want to focus on this specific topic is because I am intrigued by the ways in which humans and computers are able to interact with one another, and what the implications of such an interaction might be. Although this project will not lead to wide implications for the world of human-computer interaction, I believe that simply understanding how such an interaction can work is in of itself important. Therefore, it is through actually engaging with such interactions that we can understand the different ways in which the users and computers can interact to create a system/ illustration that exhibits data of some kind.
After brainstorming, I tried to find inspiration by looking up youtube videos related to the concept of humanness. A common project I noticed was the interactive glove, in which users are able to control certain projects with the movement of their hands. This, in my eyes, is a good utilization of humanness. It embraces a critical part of human nature and combines it with computer interaction. A good example that I found of this can be seen below:
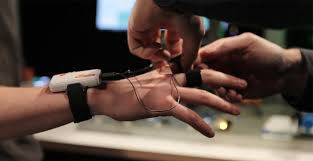
However, I know I do not want to do a project that has to do with building an interactive glove. Instead, I want to create a project in which the human heart beat is detected in order to create fast or slow paced interactive art. I want to create an even more comprehensive user-experience, which is why I want to add the option of changing the color of the interactive art displayed after detecting the user’s heartbeat. Although I do not know the intricate details of the project yet, I do know that committing to such a project will allow me to explore my interest in human computer interaction and utilize it to create personal interactive art for users.
Design Meets Disability:
https://intro.nyuadim.com/wp-content/uploads/2020/08/Design_meets_disability.pdf
In the reflection article on Graham Pullin’s book “Design Meets Disability,” important themes are discussed that relate design principles to real-world requirements and societal views on disability. Pullin is a proponent of minimalist design, contending that functionality demands it, particularly when creating for people with disabilities. I identify with this point of view since it goes against the grain of conventional thinking, which prioritizes aesthetics over usefulness. The user experience can be greatly improved by both useful and aesthetically pleasing aspects, therefore I find myself thinking about how to strike a balance between both.
An important ethical problem arises from Pullin’s claim that “disability inspires design” and that such designs should strive to make the user blend into their environment. It implies a hidden desire to hide a disability, which could reinforce the stigma instead than celebrating variety. Pullin uses eyewear as an example of how design and function can be successfully combined, turning glasses from basic medical devices into fashionable accessories that are generally accepted in society. This change demonstrates how design has the ability to affect society norms and perceptions.
But this begs the question of whether the goal of design ought to be to celebrate individuality and promote empowerment, or to assist people with disabilities in “blending in.” It may be restrictive to assume that excellent design equals to being discrete, as design has the power to question and transform social norms.
Furthermore, while its importance, Pullin’s emphasis on usefulness and simplicity ignores the nuanced interactions that exist between a person’s identity and their tools or assistance. This error makes me wonder about the possibilities of design as a means of expressing uniqueness as well as serving as a functional solution. Could designs celebrate and reflect the variety of user experiences in addition to meeting practical needs?
The book “Design Meets Disability” definitely made me rethink design concepts by highlighting how important it is to take an inclusive approach that prioritizes both beauty and practicality. It also made people think more deeply about how designs affect how society perceives identity and disability. After reading this, I’m left feeling that there are a lot of opportunities for careful design to make the world more inclusive.
Concept
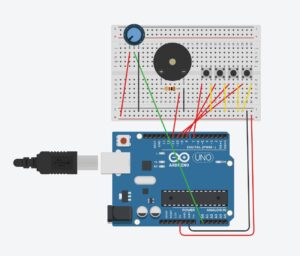
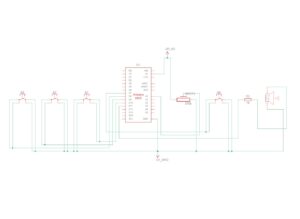
The Digital Piano with Distance-Sensing Percussions is an innovative musical instrument that blends traditional piano elements with modern sensor technology to create a unique and interactive musical experience. This project utilizes an array of digital push buttons connected to an Arduino board to simulate a piano keyboard, where each button triggers a distinct musical note. In addition to the conventional keyboard setup, the instrument incorporates an ultrasonic distance sensor, which introduces a dynamic layer of percussion sounds. These sounds vary depending on the distance of the player’s hand. Furthermore, a potentiometer is integrated to alter the pitch of the notes dynamically, offering musicians the ability to manipulate the sound palette expressively.
Images
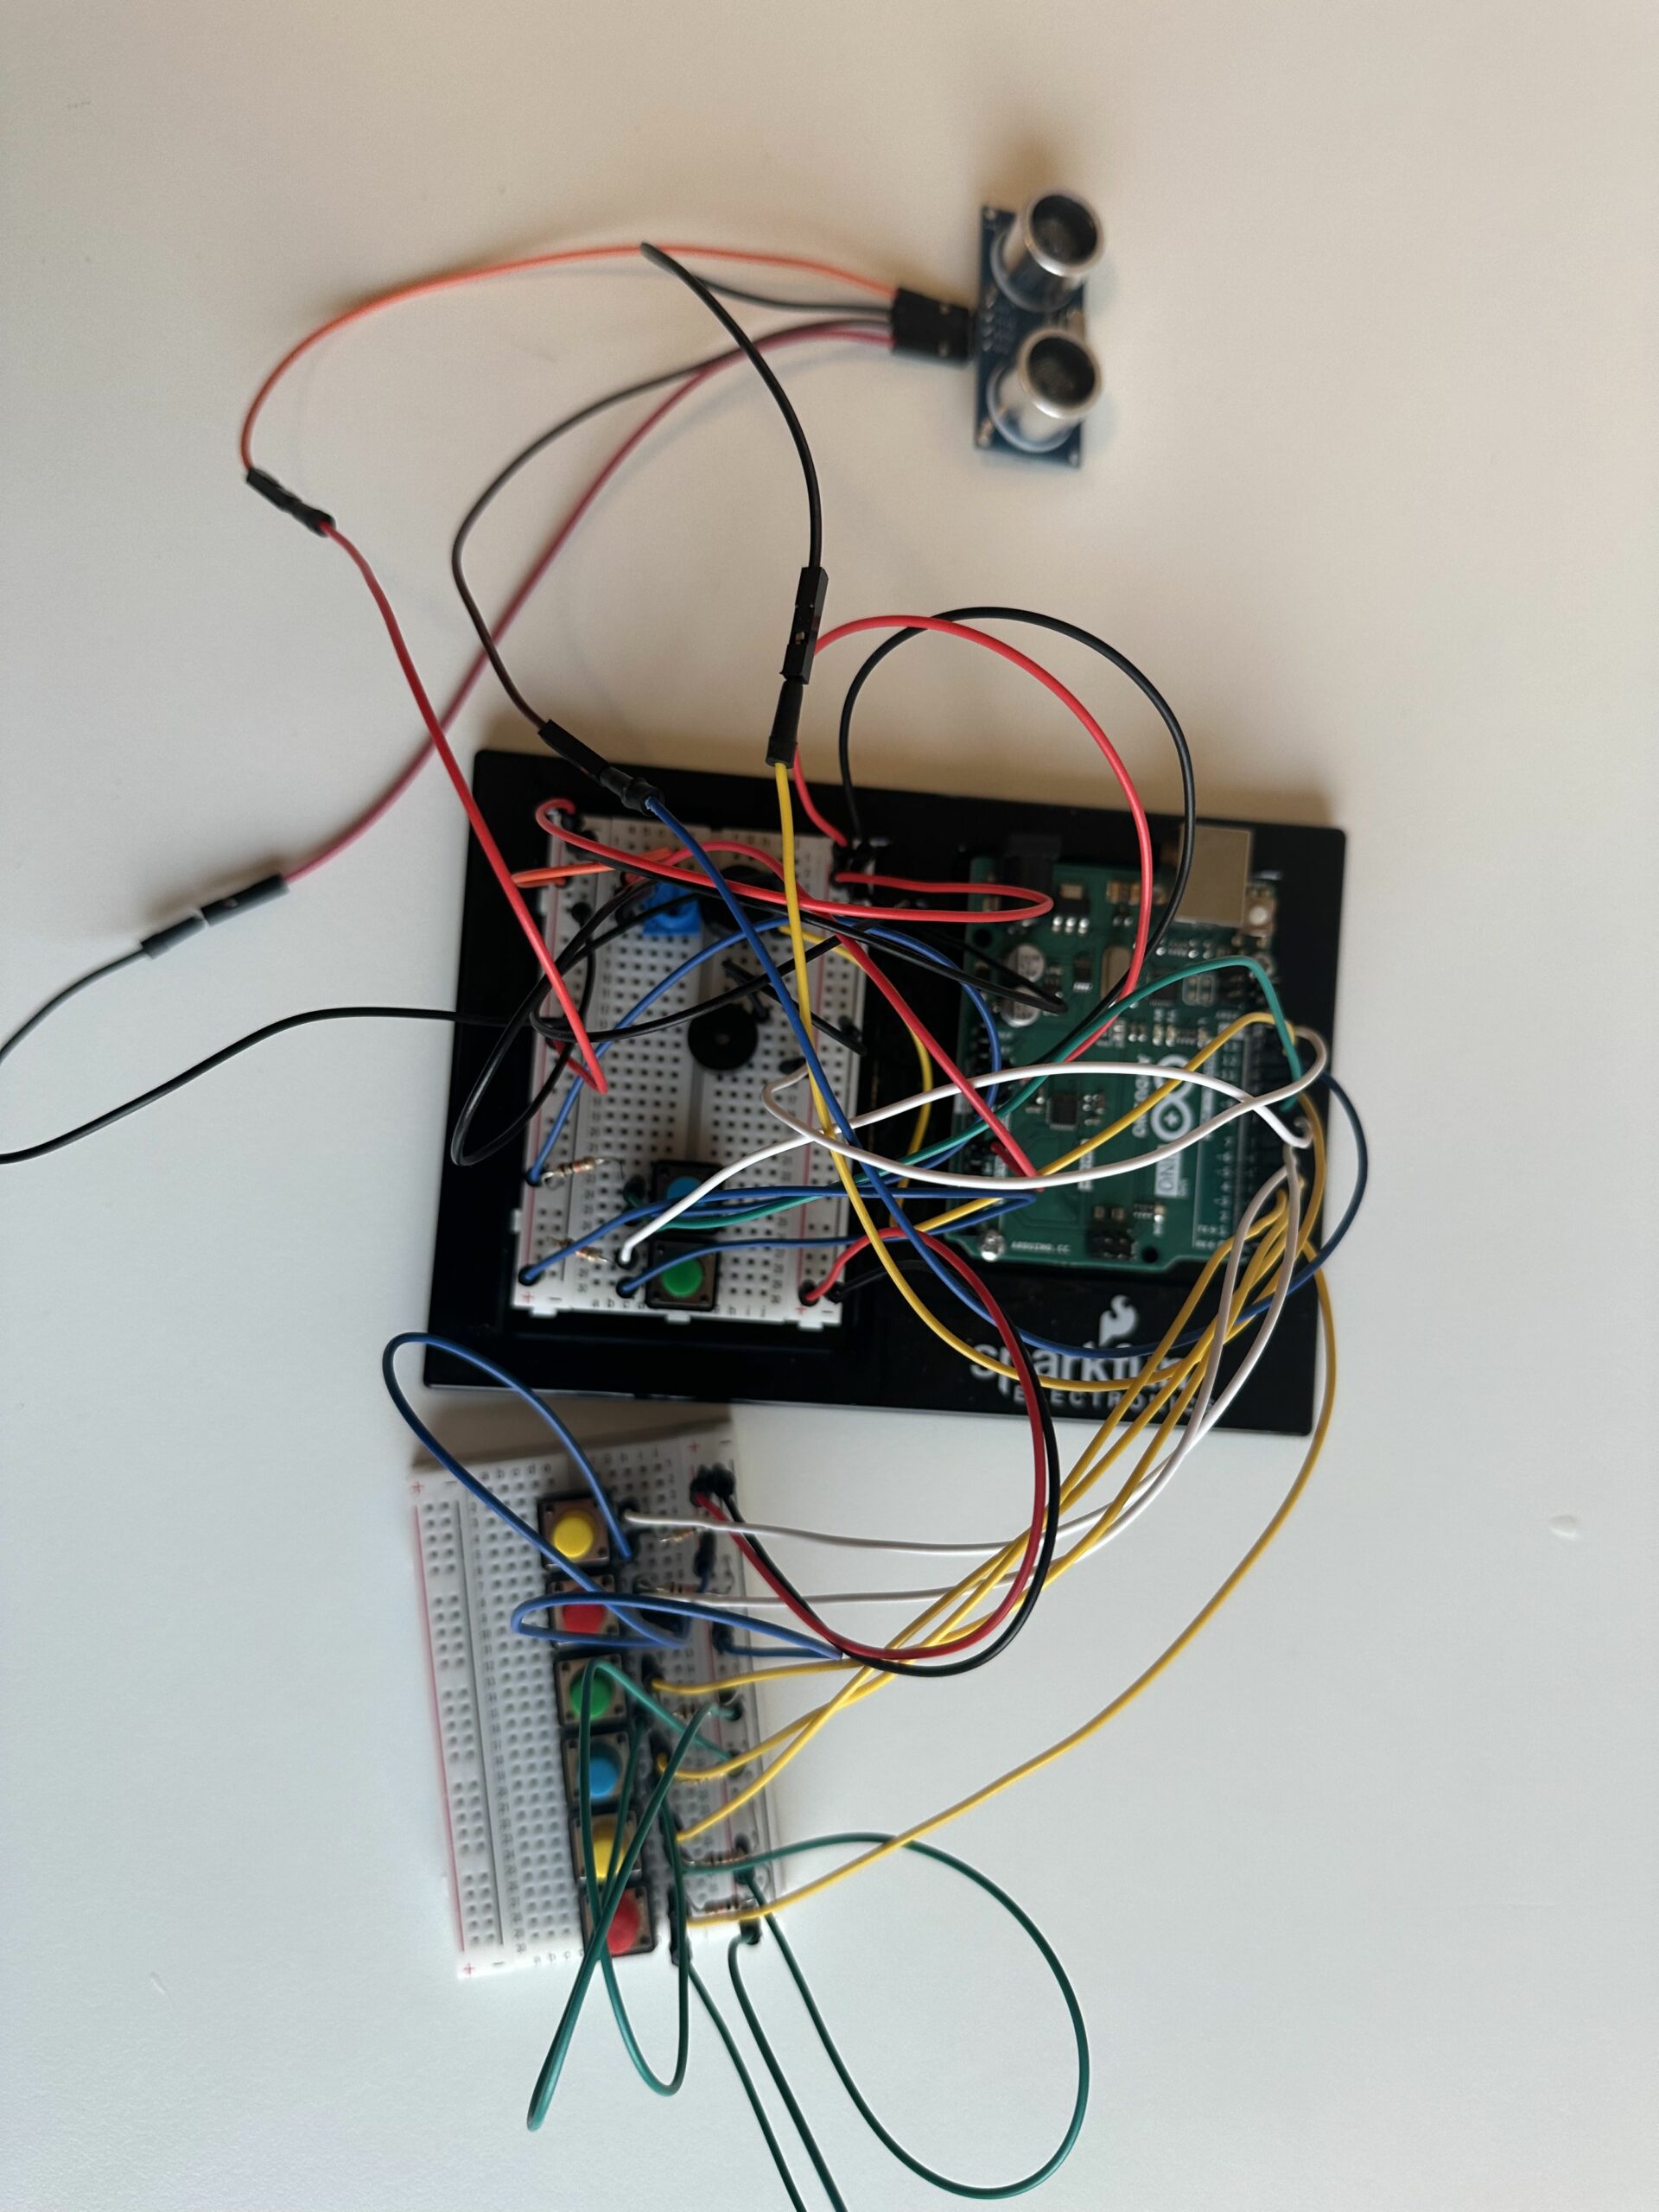
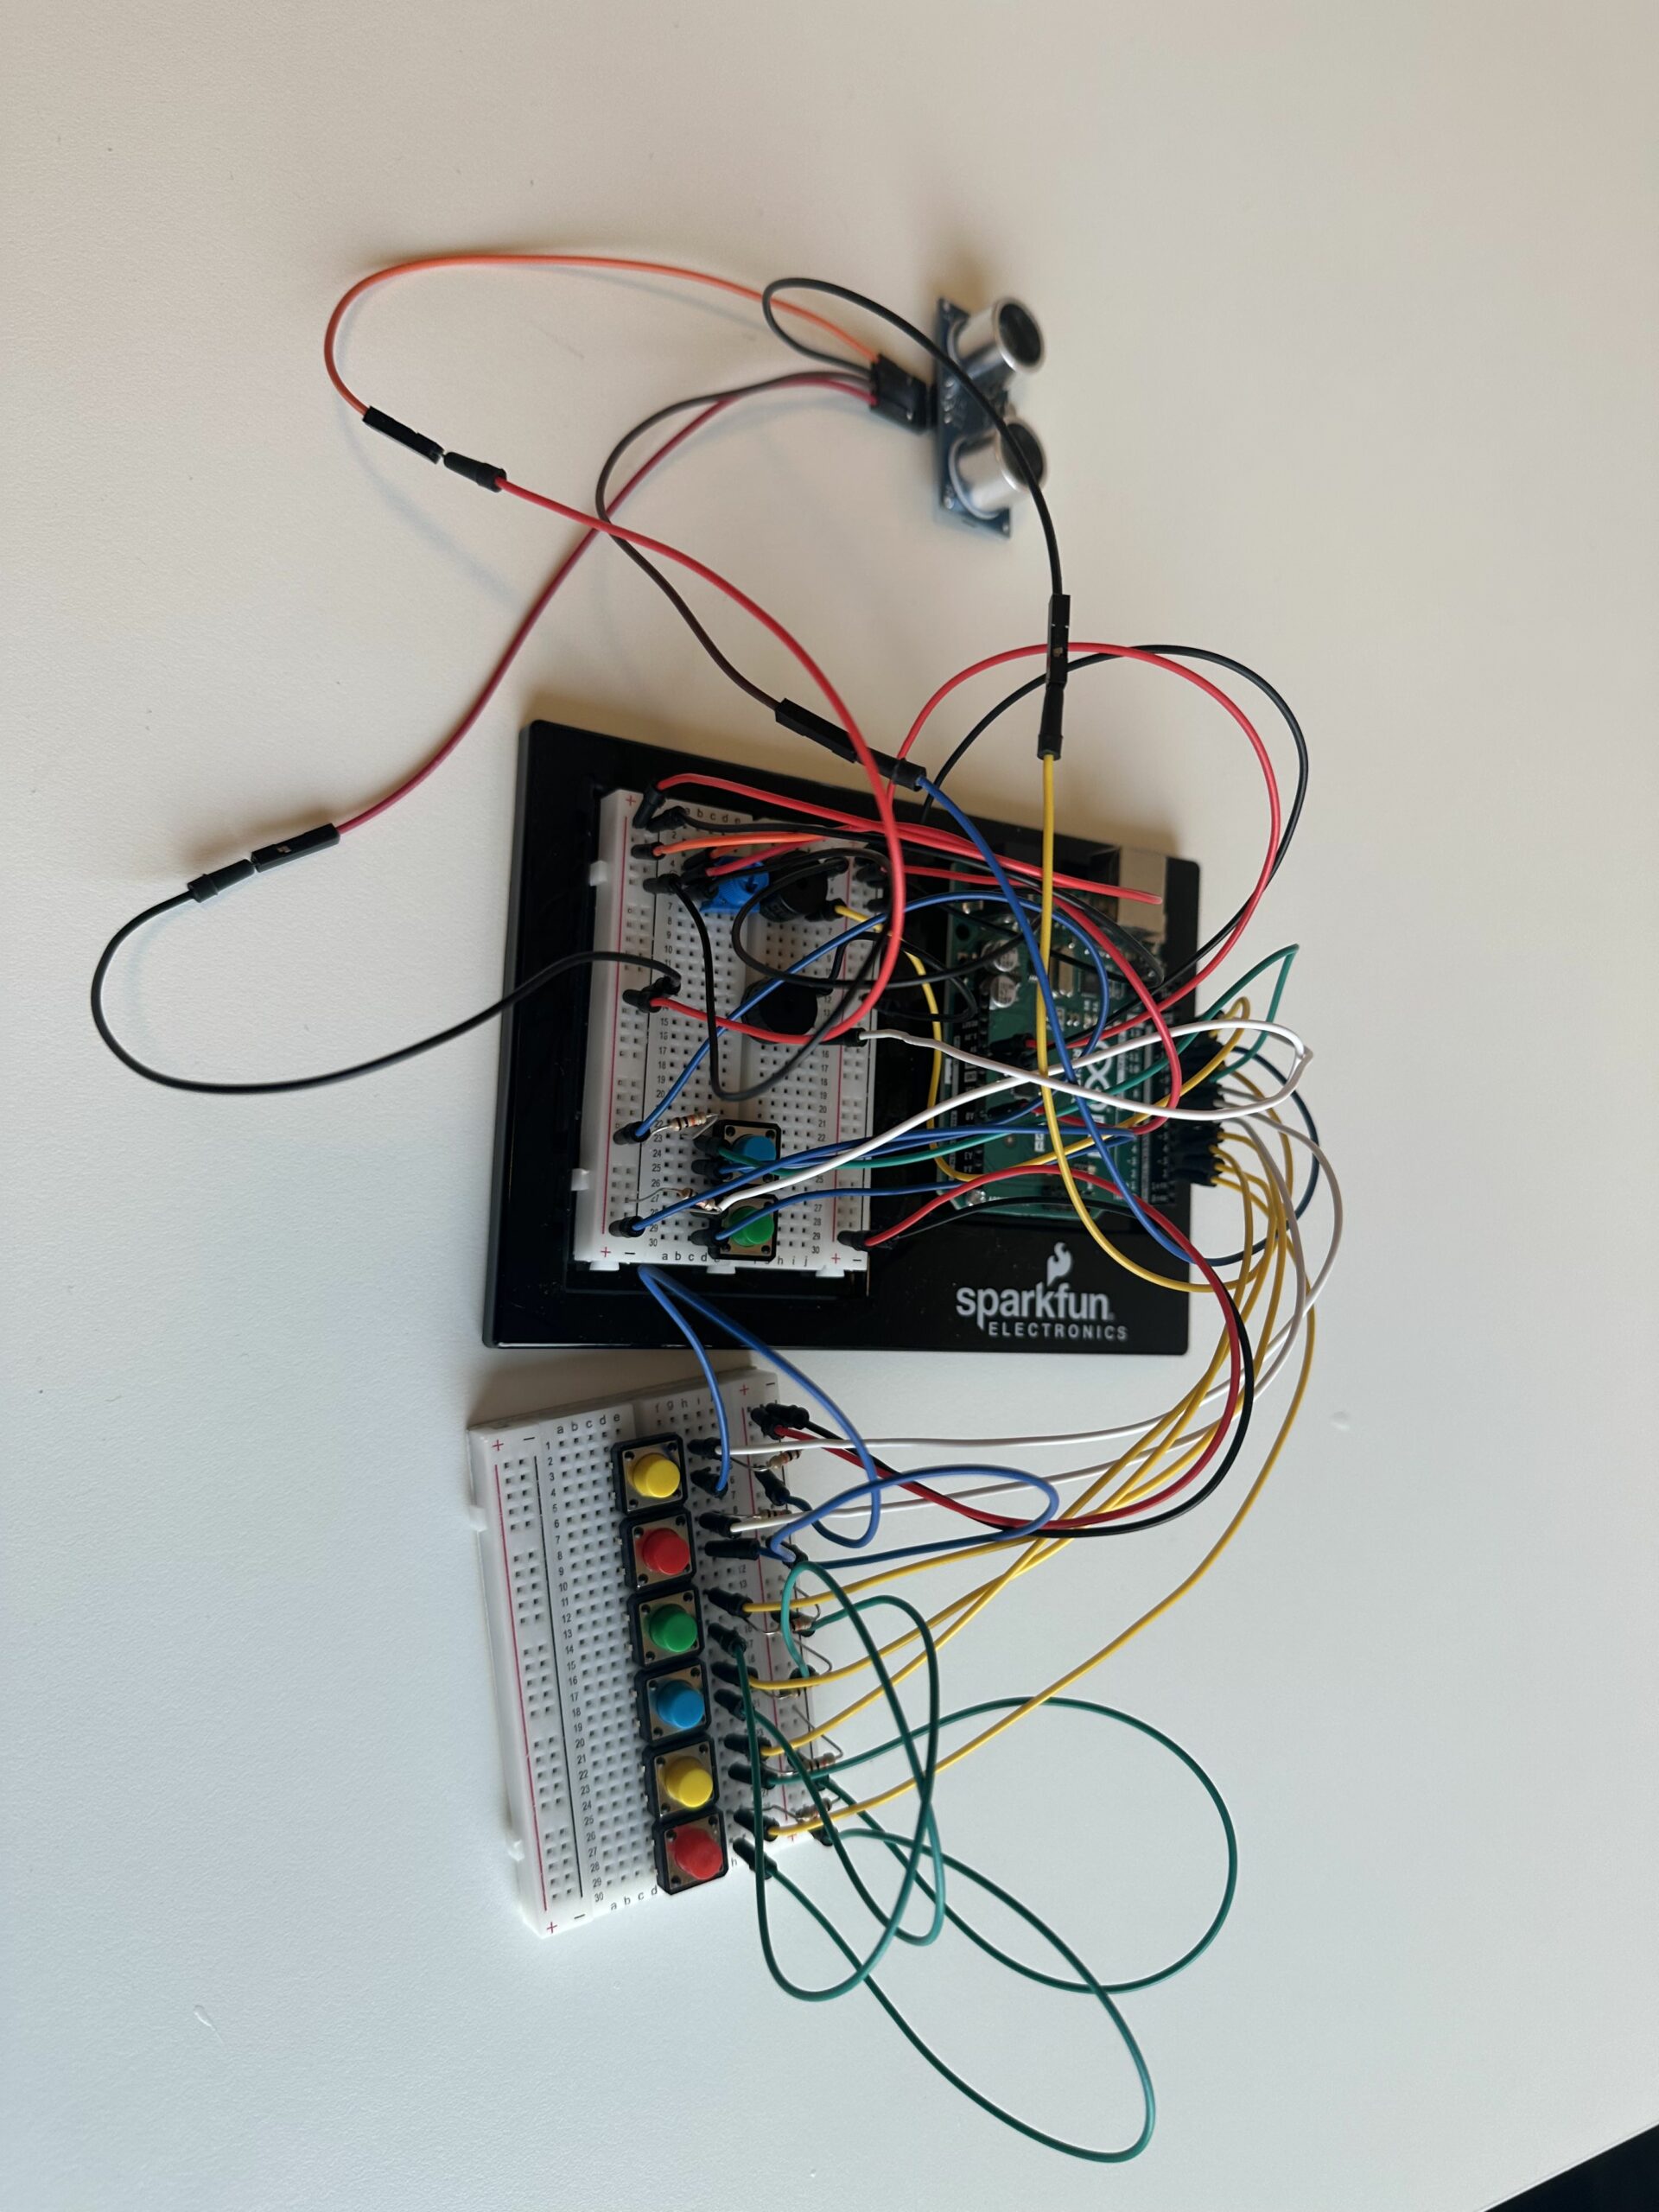
Components Used
Circuit Setup
Power Connections
Piezo Buzzers
Push Buttons
Potentiometer
Ultrasonic Sensor
Video
Code
int buzzerPin = 12;
int buzzer2 = 13;
int potPin = A0;
int keys[] = {2, 3, 4, 5, 6, 7, 8, 9};
// Frequencies for notes (C4 to C5)
int notes[] = {262, 294, 330, 349, 392, 440, 494, 523};
int trigPin = 10;
int echoPin = 11;
int bassDrum = 200;
int snare = 250;
int hiHat = 300;


void setup() {
  pinMode(buzzerPin, OUTPUT);
  pinMode(buzzer2,OUTPUT);
  pinMode(2,INPUT);
  pinMode(3,INPUT);
  pinMode(4,INPUT);
  pinMode(5,INPUT);
  pinMode(6,INPUT);
  pinMode(7,INPUT);
  pinMode(8,INPUT);
  pinMode(9,INPUT);
  pinMode(trigPin, OUTPUT);
  pinMode(echoPin, INPUT);
  Serial.begin(9600);
}

void loop() {
  int potValue = analogRead(potPin);
  int volume = map(potValue, 0, 1023, 0, 255); // Map the potentiometer value to a volume range

  // Measure distance using the ultrasonic sensor
  digitalWrite(trigPin, LOW);
  delayMicroseconds(2);
  digitalWrite(trigPin, HIGH);
  delayMicroseconds(10);
  digitalWrite(trigPin, LOW);
  long duration = pulseIn(echoPin, HIGH);
  int distance = duration * 0.034 / 2; // Calculate the distance

  Serial.print(distance);
  Serial.println(" cm");


  bool isAnyButtonPressed = false;
  for (int i = 0; i < 8; i++) {
    int modifiedNote = map(potValue, 0, 1023, notes[i] / 2, notes[i] * 2);
      if (digitalRead(keys[i]) == HIGH) {
          tone(buzzerPin, modifiedNote, 100);
          isAnyButtonPressed = true;
          break; // Stop the loop once a button is found pressed
      }
  }

  if (!isAnyButtonPressed) {
    noTone(buzzerPin);
  }
  if (distance < 10) {
    tone(buzzer2, bassDrum, 100);
  } else if (distance >= 10 && distance < 20) {
    tone(buzzer2, snare, 100);
  } else if (distance >= 20 && distance < 30) {
    tone(buzzer2, hiHat, 100);
  } else {
    noTone(buzzer2);
  }
    delay(100);
}
In the loop, the program first reads the potentiometer value and uses it to modify the frequency of the piano notes. Depending on the button pressed, it plays a modified note frequency. If no buttons are pressed, it stops any ongoing tone. Depending on the distance detected, it chooses a percussion sound to play, simulating a drum kit with different sounds for different ranges.
🌟 Inspiration:
Music possesses a remarkable capacity to bridge cultural and linguistic divides and unite individuals from diverse backgrounds. Motivated by the notion of promoting interactive experiences and democratizing music creation, we set out to build a one-of-a-kind musical instrument out of buttons and Arduino. Our intention was to enable people to use sound as a creative medium for self-expression, irrespective of their experience with music. We chose the piano as our main inspiration because we could recreate the chords using buttons.
💡 Process:
Using Arduino Uno we wired up buttons to serve as interactive triggers for different musical notes. Each button was assigned a specific pitch or sound, allowing users to create melodies by pressing combinations of buttons. We leveraged our programming skills to code the logic behind the instrument, ensuring seamless functionality and an intuitive user interface.
🚀 Difficulties:
Although our journey was exciting and innovative, there were certain difficulties. A major challenge we encountered was guaranteeing the reliability and consistency of button pushes. We have to use precise calibration and filtering techniques to get beyond problems like noise interference and debounce.
There were additional difficulties in creating an intuitive user interface. To ensure that users could simply grasp how to interact with the instrument while still having the freedom to explore and experiment with various musical compositions, we had to find a balance between simplicity and utility.

const int speakerPin = 9;  // Speaker connected to pin 9
int buttonPins[] = {2, 3, 4, 5};  // Button pins for C, D, E, F
int notes[] = {262, 294, 330, 349};  // Frequencies for C4, D4, E4, F4

void setup() {
  // Set up each button pin as an input with pull-up resistors
  for (int i = 0; i < 4; i++) {
    pinMode(buttonPins[i], INPUT_PULLUP);
  }
  // Set the speaker pin as an output
  pinMode(speakerPin, OUTPUT);
}

void loop() {
  // Check each button and play the corresponding note
  for (int i = 0; i < 4; i++) {
    if (digitalRead(buttonPins[i]) == LOW) {  // Check if button is pressed
      tone(speakerPin, notes[i]);  // Play the corresponding note
      delay(200);  // A short delay to help debounce the button
      while (digitalRead(buttonPins[i]) == LOW);  // Wait for the button to be released
      noTone(speakerPin);  // Stop playing the note
    }
  }
}
Preliminary Project Ideas:
Match the Color!
I would like to create a game inspired by popular TikTok challenges where users try to replicate the color of various objects by blending multiple colors. In this game, players will attempt to guess the RGB (Red, Green, Blue) values of a color displayed on their monitor. The interface will include three potentiometers, each dedicated to adjusting one of the RGB components. The goal is for players to match their potentiometer settings to the actual RGB values of the displayed color as closely as possible. Success in achieving a close match will result in a win.
Save the Cat
Inspired by Pou, a game I often played as a child, I would like to create a game where the user rescues an abandoned kitten from the street and helps it find a loving family. This game would consist of three stages:
Picture of Pou
Steak Cooking Game
Inspired by Cooking Mama, one of my favorite games from my childhood, I aim to create a steak cooking game. This game would consist of three stages:
Heartbeat-Based Music Player
In this project, I will use a pulse sensor to obtain the user’s heartbeat data. The system will then ask the user to select their mood from four options: happy, sad, angry, or calm. Based on these inputs, the system will recommend music to the user.
This week’s reading advocates for a more holistic approach to interaction design, one that fully engages human capabilities. The author criticizes current interfaces (i.e., touchscreens) for ignoring the full range of human hand functions—particularly our ability to feel textures and manipulate objects. Victor’s criticism of using just one finger made me wonder: if we could accomplish so much with just one finger, how many more opportunities might arise if we used our entire body? However, this also makes me that there is some level of bias because the author formerly worked in interaction design, I wonder if their strong opinions are a result of this experience.
Although I agree with the author’s perception that we can accomplish more with the use of our hands, what about the people who aren’t able to use them? “Picture under glass” is far more accessible than previous interactive designs since it makes use of touch and drag, which is perhaps one of the simplest human movements.
Furthermore, although more natural behaviors like grabbing and throwing are being incorporated into virtual reality systems, these systems are still mostly dependent on visual inputs and are unable to provide true haptic feedback due to limitations in existing technology. This makes me wonder what are innovative ways that technology can simulate these experiences without reverting to traditional physical forms?
“A Brief Rant on the Future of Interaction Design” by Bret Victor is a rant about the lack of innovative vision for future technologies. Seeing the video at the beginning, I first thought that this seems like a great future. However, as I read the article, I increasingly came to the realization that the future shown in the video could be much better and visionary . Victor’s criticism of the use of only fingers got me thinking that if we could do so many things with just a finger, how many possibilities could be unlocked if we used our entire hand? He talks about this in detail and heavily criticized visions of the future that focus on just screens. This made me realize that I should look to make something that involves interaction from the entire hand and involves as much touch interaction as possible using tactile interfaces such as buttons.
Although Victor does not offer a solution to his rant, his way of thinking inspires me. Although he does not present a solution, he states the problem very clearly and I agree with him. I would love to work on something that uses tactile input from more than just a fingertip for my future projects and for my Final project for this course too .
Group members: Muhammed Hazza, Iqra Bano
For our assignment, we decided to create a musical instrument, and we settled on making a piano with four keys. Each key, when pressed, will produce a different tone. Our circuit is straightforward, utilizing four push buttons and a buzzer. However, we’ve added an extra component: a potentiometer. This potentiometer allows us to change the frequency of the tones produced by the buzzer. By turning the potentiometer, we can adjust the pitch of the notes, adding more flexibility and range to our piano.
– Arduino Uno board
– Breadboard
– 330-ohm resistor
– 4x Tactile push-button switch
– Potentiometer
– Jumper wires
– Piezo buzzer
Upon pressing a button, the Arduino reads which button is pressed and plays a specific tone. The potentiometer’s position adjusts the base frequency of this tone, making the sound higher or lower based on its rotation.
The piano uses the Arduino’s built-in “tone” library to handle tone generation, which simplifies the creation of audible frequencies through digital pins
#include <Tone.h>

// Define the notes with more distinguishable frequencies.
#define NOTE_C 262 // Middle C (C4)
#define NOTE_G 392 // G above Middle C (G4)
#define NOTE_C_HIGH 523 // One octave above Middle C (C5)
#define NOTE_G_HIGH 784 // G above C5 (G5)

#define ACTIVATED LOW

const int PIEZO = 11;
const int LED = 13;

const int BUTTON_C = 10;  // Will play Middle C
const int BUTTON_D = 9;   // Will play G (above Middle C)
const int BUTTON_E = 8;   // Will play High C
const int BUTTON_F = 7;   // Will play High G

const int POTENTIOMETER = A0; // Analog input pin connected to the potentiometer

Tone toneGenerator;

void setup() {
  pinMode(LED, OUTPUT);

  pinMode(BUTTON_C, INPUT_PULLUP);
  pinMode(BUTTON_D, INPUT_PULLUP);
  pinMode(BUTTON_E, INPUT_PULLUP);
  pinMode(BUTTON_F, INPUT_PULLUP);

  toneGenerator.begin(PIEZO);
  digitalWrite(LED, LOW);
}

void loop() {
  int potValue = analogRead(POTENTIOMETER); // Read the potentiometer value
  int frequencyAdjustment = map(potValue, 0, 1023, 0, 255); // Map to a quarter of the full range for adjustment

  if (digitalRead(BUTTON_C) == ACTIVATED) {
    toneGenerator.play(NOTE_C + frequencyAdjustment); // Adjust Middle C frequency
    digitalWrite(LED, HIGH);
  } else if (digitalRead(BUTTON_D) == ACTIVATED) {
    toneGenerator.play(NOTE_G + frequencyAdjustment); // Adjust G frequency
    digitalWrite(LED, HIGH);
  } else if (digitalRead(BUTTON_E) == ACTIVATED) {
    toneGenerator.play(NOTE_C_HIGH + frequencyAdjustment); // Adjust High C frequency
    digitalWrite(LED, HIGH);
  } else if (digitalRead(BUTTON_F) == ACTIVATED) {
    toneGenerator.play(NOTE_G_HIGH + frequencyAdjustment); // Adjust High G frequency
    digitalWrite(LED, HIGH);
  } else {
    toneGenerator.stop();
    digitalWrite(LED, LOW);
  }
}
For future improvements we would like to:
Enhance the clarity and volume of the piano’s notes.
Add more keys and different types of tones to the piano.
Integrate LEDs to make it look more attractive and visually appealing.
For the 7th Assignment in our Introduction to Interactive Media course, we were assigned the task of creating a musical instrument that incorporates at least one digital and one analog sensor. After brainstorming various ideas, we decided to design an interactive project that combines functionality with musical creativity. Our concept is an “Automatic MusicalDoor Bell”.
Our concept envisions a scenario where, as a person approaches and comes within 20 centimeters of the distance sensor, the system is triggered to play melodious door bell music. This immediate and musical response not only alerts the presence of someone at the door but also enhances the interaction with a harmonious greeting.
In the development of our interactive door bell project, we aimed to create a distinctive auditory experience that went beyond the typical door bell chime. To achieve this, we programmed the Piezo buzzer to emit a unique melody rather than a standard tone. This melody was carefully chosen to be pleasant and welcoming, enhancing the interactive aspect of our device.
To further enrich the sonic experience, we introduced physical elements that function as percussive instruments. Specifically, we utilized a steel bottle and a glass cup, both positioned to serve as drums. These items were chosen for their resonant qualities and the distinct sounds they produce when struck.
The action of striking these improvised drums is controlled by a servo motor, to which a drumstick is attached. As the servo motor rotates in response to the proximity detected by the distance sensor, the attached drumstick swings. It hits the steel bottle on one side and the glass cup on the other. The combination of this sound with the melody from the buzzer results in a complex musical note that is triggered by the presence of a person within the sensor’s 20 cm range.
The entire system is designed to be responsive: as soon as the ultrasonic distance sensor detects something within its range, both the servo motor and the buzzer are activated, collaboratively producing a musical output. This not only signals the presence of a visitor but does so in an unexpectedly musical way, turning a simple functional alert into an engaging and enjoyable experience.
A demo video, in detail, can be seen here:


One of the significant challenges we faced during the implementation of our project was selecting the appropriate materials for the drum components. The process of determining the ideal materials involved extensive trial and error. We experimented with various types of cups and materials for the drumstick to achieve the desired sound quality and durability.
Looking ahead, for future iterations of the project, we aim to explore a broader range of frequencies for the buzzer, allowing for more diverse musical expressions. Additionally, adjusting the angles and speeds of the servo motor holds potential for creating a more dynamic and visually appealing interaction. These enhancements will not only improve the functionality of our device but also enrich the user experience, making each interaction with the door bell a unique and enjoyable moment.
#include <Servo.h>

// Constants for the pins
const int buzzerPin = 4;
const int servoPin = A5;
const int triggerPin = 6;
const int echoPin = 5;

// Create a Servo object
Servo myServo;

// Variables for the distance measurement
long duration;
int distance;

void setup() {
  // Set the buzzer pin as output
  pinMode(buzzerPin, OUTPUT);
  // Initialize the servo
  myServo.attach(servoPin);
  // Set the ultrasonic sensor pins
  pinMode(triggerPin, OUTPUT);
  pinMode(echoPin, INPUT);
  // Begin serial communication (for debugging purposes)
  Serial.begin(9600);
}

void loop() {
  // Measure the distance from the ultrasonic sensor
  digitalWrite(triggerPin, LOW);
  delayMicroseconds(2);
  digitalWrite(triggerPin, HIGH);
  delayMicroseconds(10);
  digitalWrite(triggerPin, LOW);
  duration = pulseIn(echoPin, HIGH);
  distance = duration * 0.034 / 2;

  // Check if something is within the desired range
  if (distance < 20) {
    // Rotate servo to 180 degrees
    myServo.write(60);
    // delay(10);
    // myServo.write(50);
    delay(100);
    // Rotate servo back to 0 degrees
    myServo.write(0);
    delay(250);

    // Play a melody
    playMelody();
  } else {
    // Keep the servo at 0 degrees when not activated
    myServo.write(0);
    // No sound
    noTone(buzzerPin);
  }


  // Serial.print("Distance: ");
  // Serial.println(distance);

  delay(100);
}

void playMelody() {
  // Note frequencies, e.g., C4, D4, E4, F4
  int melody[] = {262, 294, 330, 349};
  int noteDurations[] = {200, 200, 200, 200};  // duration of each note in milliseconds

  for (int thisNote = 0; thisNote < 4; thisNote++) {
    // To calculate the note duration, take one second divided by the note type.
    //e.g., quarter note = 1000 / 4, eighth note = 1000/8, etc.
    int noteDuration = noteDurations[thisNote];
    tone(buzzerPin, melody[thisNote], noteDuration);

    // To distinguish the notes, set a minimum time between them.
    // The note's duration + 30% seems to work well:
    int pauseBetweenNotes = noteDuration * 1.30;
    delay(pauseBetweenNotes);

    // Stop the tone playing:
    noTone(buzzerPin);
  }
}