My goal is to create an interesting way to explore NYUAD. This project will combine physical interactivity with digital technology, providing a unique and engaging way to learn about our campus.
How It works
I am planning to create a tangible, interactive experience with a physical 3D model of the NYUAD campus, where each building is equipped with sensors. Additionally, I will use a small model of a person outfitted with a compatible sensor. When this person model is placed near or inside one of the buildings on the campus model, the sensors will detect its proximity or contact. The Arduino will then send a signal to a computer system, indicating which building the person model has been placed in. This signal will trigger a p5.js application to display specific information about that building on a screen. The displayed information can include textual descriptions, historical facts, photographs, and potentially other multimedia elements.
Purpose and Benefits
When I was accepted to NYUAD, I was curious about the campus buildings, but I could not find much information or photographs of our campus on the internet. Mainly, I wanted to create this project as a unique way for our students, faculty, and prospective students to learn about our campus. Also, this tool is invaluable for orientation programs, helping new students and staff familiarize themselves quickly and effectively with the campus.
Main Challenges
Currently, I am not sure which sensor to use in both the buildings and the miniature person.
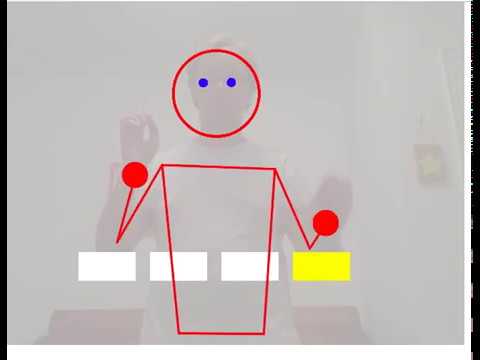
For my final project, my main focus is on p5.js and using posenet from ml5. I want to allow the user to be able to draw in the air by using their right hand as a brush. For the Arduino part, I will be adding different colored buttons to change the color of the ink in p5.js. I also want to add a potentiometer to control the opacity of the color. In addition to that, I might add a piezo buzzer and change the sound according to the position of their hand, something like the photo shown below.
I am going to build a parking for a self-driving car that parks itself.
There are various steps for building this parking.
First of all, I am going to concentrate on building the self-driving car. This car will follow a black line on the ground.
Functioning:
The car will drive straight. When the ultrasonic sensor detects the parking bar it will stop. Here is where all the parking function starts.
The parking will detect if there are free slots in the parking. If there is no room for the car, the P5 will tell the driver “Sorry, we’re full” and the red traffic light will light up. If there is an available slot a message in P5 will appear saying “Welcome, go to parking X (and the number). When this message is displayed the Stop bar will open controlled by a servo motor, the green LED in the traffic light will light and the car will go to the available spot.
(Question, how do I make the self-driving car go to the free parking slot)
Once the car is on top of the free parking slot the FSR(force-sensitive resistor) will detect the car and turn the traffic light red. the ultrasonic resistor will stop as it will detect the parking wall.
For this assignment, Amiteash and I wished to create our own recreation of a music box. This was a popular toy/gramophone in the past (depending on how you viewed it) and we even remember having a small old one back at home in India. While they have taken many different forms, we based ours on a simple electronic one that played music when you opened the box.
Components
1 Arduino Uno R3 SMD
1 Photoresistor
1 Slideswitch
1 Arduino Piezo Buzzer
2 10 kΩ Resistor
Jumper Wires
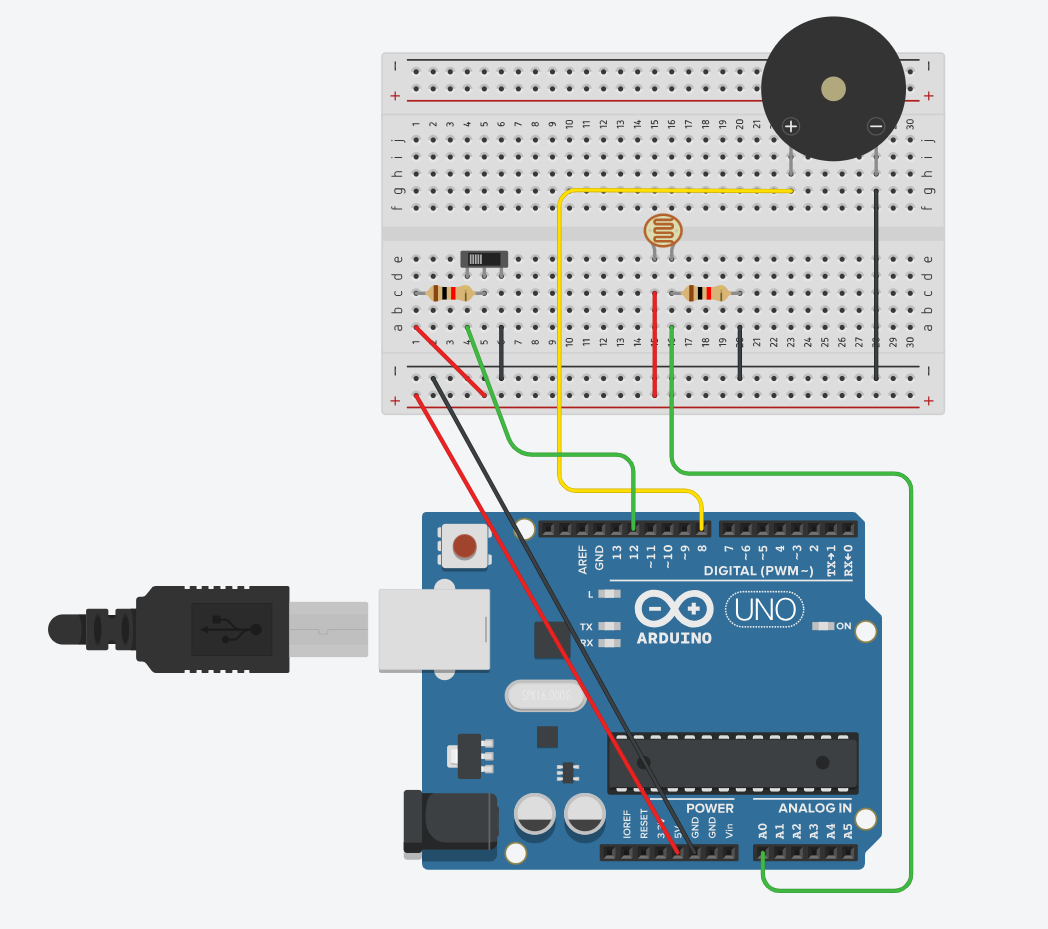
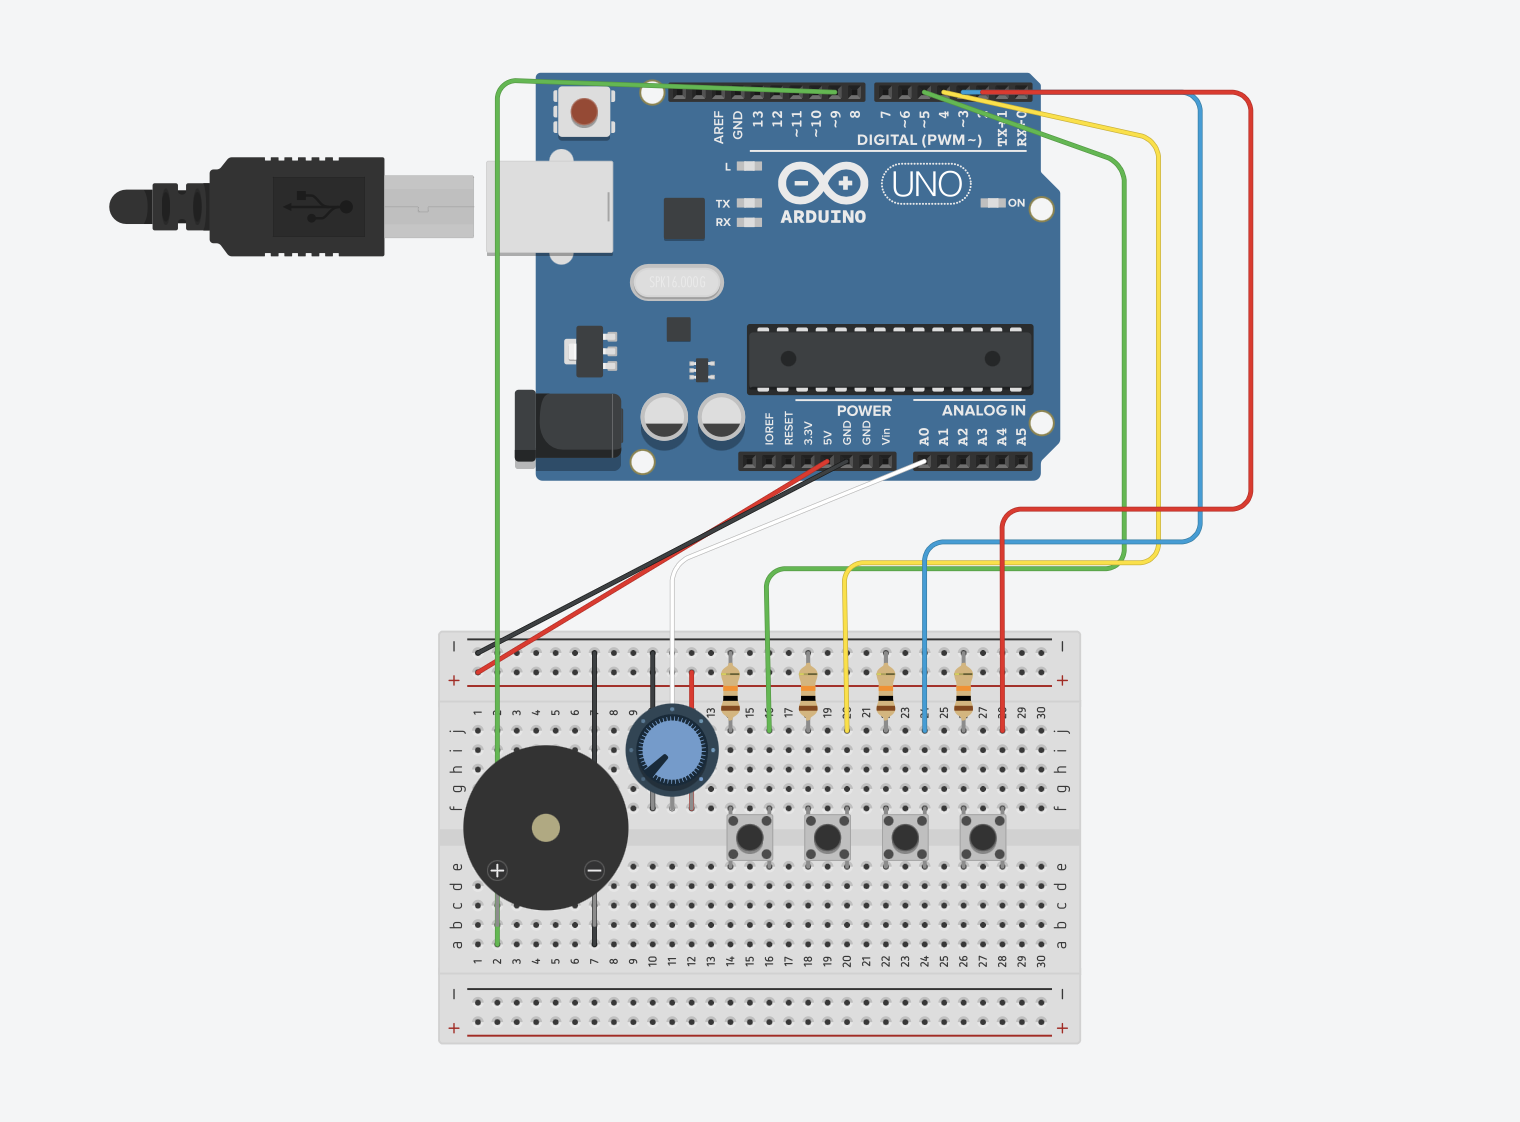
Circuit Schematic and Simulation
The first step was to prepare a circuit schematic on TinkerCAD. Basically, the digital input took the form of a slideswitch feeding into a digital input pin (pin 4) through a 10 kΩ pull-down resistor. Analog Input came from the photoresistor connected to pin A0. The buzzer output was from pin 8.
Figure 1: Component Simulation View
Figure 2: Schematic View
TinkerCAD also has a handy simulation functionality, that even allows to upload the Arduino code and test how the circuit would work under simulator conditions. This definitely helped in fixing bugs before even testing with the actual circuit, and also helped to individually simulate each component before assembling together.
Usage
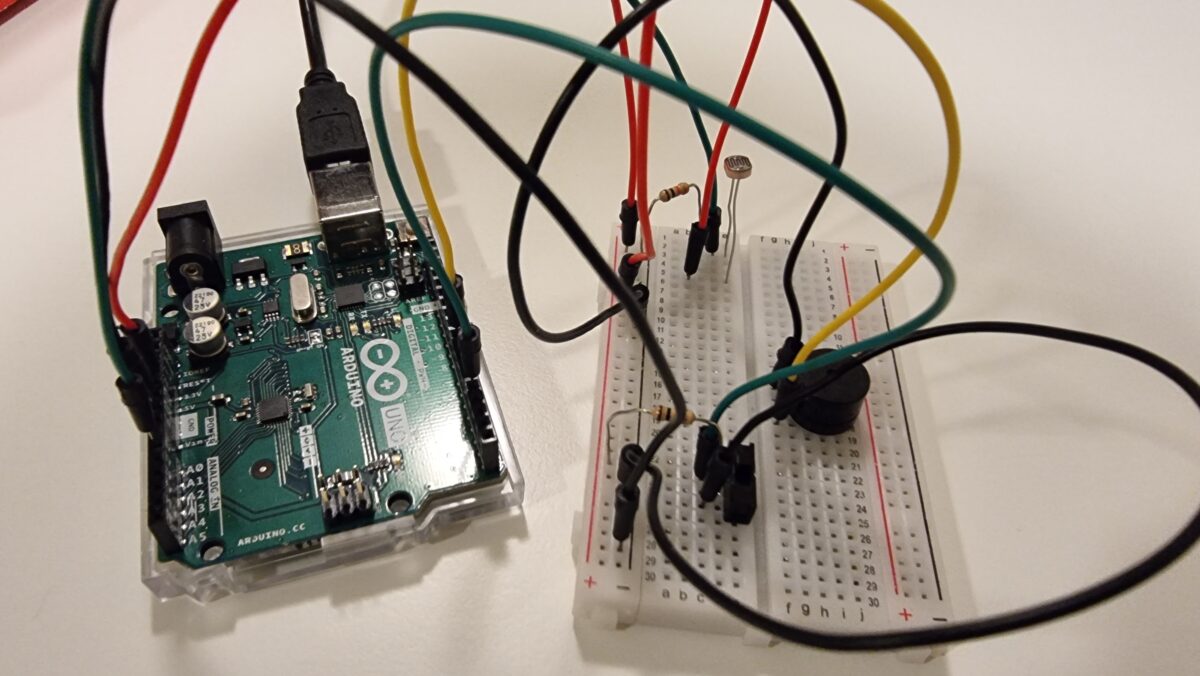
Figure 3: The circuit
Basically, there are two main control points: opening/closing the box, and sliding the switch between ON/OFF.
When the box is opened, light falling on the photoresistor exceeds the threshold and thus triggers the playSong() function, which iterates over the notes in the pre-assigned song and plays it using the buzzer. When the box is closed, the light intensity falls below the threshold and the for loop breaks / is not triggered again, causing the music to stop playing.
When the switch is ‘ON’, pin 4 detects a ‘HIGH’ voltage and thus the Arduino plays song 1, which for this example we chose to be Toby Fox’s Megalovania from the game Undertale.
When the switch is ‘OFF’, pin 4 detects a ‘LOW’ voltage and thus the Arduino plays song 2, which for this example we chose to be Mikkel Fabricus Smitt’s Subway Surfers Main Theme from the game Subway Surfers.
#define LDR_PIN A0
#define SWITCH_PIN 4
#define BUZZER_PIN 8

#include "pitches.h"

int ldrThreshold = 500;

void setup() {
  pinMode(LDR_PIN, INPUT);
  pinMode(SWITCH_PIN, INPUT);
  pinMode(BUZZER_PIN, OUTPUT);
}

void loop() {
  // Read the light level from the LDR
    int lightLevel = analogRead(LDR_PIN);
    Serial.println(lightLevel);
  // If the light level exceeds the threshold, play the first song
  if (lightLevel > ldrThreshold) {
      // Check if the switch is pressed to change to the second song
    if (digitalRead(SWITCH_PIN) == LOW) {
      playSong(2);
      // Add some delay to prevent rapid switching
      delay(10); }
    else {
      playSong(1);
      delay(10);    }
  }
  else {
    noTone(BUZZER_PIN);
  }
}

void playSong(int songNumber) {
  // Define the melody and duration for each song
  int melody1[] = { NOTE_D4, NOTE_D4, NOTE_D5, NOTE_A4, 0, NOTE_GS4, NOTE_G4, NOTE_F4, NOTE_D4, NOTE_F4, NOTE_G4,
  NOTE_C4, NOTE_C4, NOTE_D5, NOTE_A4, 0, NOTE_GS4, NOTE_G4, NOTE_F4, NOTE_D4, NOTE_F4, NOTE_G4,
  NOTE_B3, NOTE_B3, NOTE_D5, NOTE_A4, 0, NOTE_GS4, NOTE_G4, NOTE_F4, NOTE_D4, NOTE_F4, NOTE_G4,
  NOTE_AS3, NOTE_AS3, NOTE_D5, NOTE_A4, 0, NOTE_GS4, NOTE_G4, NOTE_F4, NOTE_D4, NOTE_F4, NOTE_G4
   };
  int noteDurations1[] = { 8, 8, 4, 4, 8, 4, 4, 4, 8, 8, 8,
   8, 8, 4, 4, 8, 4, 4, 4, 8, 8, 8,
   8, 8, 4, 4, 8, 4, 4, 4, 8, 8, 8,
    8, 8, 4, 4, 8, 4, 4, 4, 8, 8, 8
  };

  int melody2[] = {
  NOTE_C5, 0, NOTE_C5, 0, NOTE_AS4, 0, NOTE_A4, 0,
  NOTE_AS4, 0, NOTE_AS4, NOTE_C5, 0, NOTE_AS4, NOTE_A4, 0,
  0,
  NOTE_C5, 0, NOTE_AS4, 0, NOTE_A4, 0, NOTE_AS4, 0, NOTE_E5,
  0,

  NOTE_C5, 0, NOTE_C5, 0, NOTE_AS4, 0, NOTE_A4, 0,
  NOTE_AS4, 0, NOTE_AS4, NOTE_C5, 0, NOTE_AS4, NOTE_A4, 0,
  0,
  NOTE_C5, 0, NOTE_AS4, 0, NOTE_A4, 0, NOTE_AS4, 0, NOTE_E4,0
};

int noteDurations2[] = {
  8, 16, 8, 16, 8, 16, 8, 16,
  8, 16, 8, 8, 16, 8, 8, 16,
  4,
  8, 16, 8, 16, 8, 16, 8, 4, 8,
  4,

  8, 16, 8, 16, 8, 16, 8, 16,
  8, 16, 8, 8, 16, 8, 8, 16,
  4,
  8, 16, 8, 16, 8, 16,8,4,8,4
};

  // Select the melody and note durations based on the song number
  int *melody;
  int *noteDurations;
  int notes;

  if (songNumber == 1) {
    melody = melody1;
    noteDurations = noteDurations1;
    notes = sizeof(melody1) / sizeof(melody1[0]);
  } else {
    melody = melody2;
    noteDurations = noteDurations2;
    notes = sizeof(melody2) / sizeof(melody2[0]);
  }

  // Play the selected melody
  for (int i = 0; i < notes; i++) {
    //Read light level from LDR
    int lightLevel = analogRead(LDR_PIN);
    if(lightLevel > ldrThreshold){
      int duration = 1000 / noteDurations[i]; //duration in ms for each note
      tone(BUZZER_PIN, melody[i], duration);
      delay(duration * 1.3); // Add a slight delay between notes for better sound quality
      noTone(BUZZER_PIN);
    } else{
      break; //to stop playing song immediately if box is closed
    }
  }
}
The notes refer to the pitches.h header file from the toneMelody example on Arduino IDE.
To switch between two different songs, we assigned the information about the songs to pointers. Also, to ensure that the song switched off as soon as possible when the switch or photoresistor were toggled, we used an if statement that led to a statement to break the loop, which immediately stops playing.
The notes and durations were obtained from this Github repository: https://github.com/hibit-dev/buzzer/tree/master. Since the repository did not have the notes for Megalovania, that was manually transformed from its sheet music online.
Showcase
Reflections
We both really enjoyed working on this project. For something that was relatively simple, it was still quite impressive. We were especially happy with the solution we found in using the break statement. Because earlier, the photoresistor was only taking an input after the ‘for’ loop was completed, and thus the song kept playing even when the box was closed, contrary to our expectations. Breaking the loop avoids that issue. Overall, it was fun listening to our favorite game theme tunes on loop!
Going into the final project I had a few ideas, some of which I had before the midterm. One of the ideas I had was Russian Roulette, but you get electrocuted instead of getting shot. I felt this was a much safer way of playing Russian Roulette whilst also giving each player the chance to play again if they want to. I chose electrocution because I felt the game still needed some kind of stake, otherwise it’s not nearly as exciting.
Outline
The plan is to have a two player game where each player sits across from the other on a table. To the side of the table is a screen which displays the number of lives each player has as well as an animation that will play when the round starts, when the “gun” is shot, and when the shot is a blank. The screen will also display information about who’s turn it is, and also will allow the players to see a tutorial and also allow the players to play another round. In the game there wont be a physical gun as such, the players will use buttons to control who to electrocute, themselves or the the other person, and sometimes it will be a blank. I may represent the bullets as resistors in any of the drawings just to add to the effect of Russian roulette. As for the electrocution: There will be a device upon which the player will place their hand and in the event that the player will be electrocuted the device will only deliver a small electric shock. I will not make this device myself (I do not trust myself, nor am I willing to test it), so I will search, as I already have been doing, for a small device which can deliver a small, harmless, electric shock.
Side note: The game will be properly labeled with safety signs to indicate that only people above the age of 18 can play and that there are electric shocks involved.
For this project, Aneeka and I wished to create our own recreation of a music box (or musical box, for those from the Commonwealth). This was a popular toy/gramophone in the past (depending on how you viewed it) and we even remember having a small old one back at home in India. While they have taken many different forms, we based ours on a simple electronic one that played music when you opened the box.
Figure 1: A music box
Components
1 Arduino Uno R3 SMD
1 Photoresistor
1 Slideswitch
1 Arduino Piezo Buzzer
2 10 kΩ Resistor
Jumper Wires
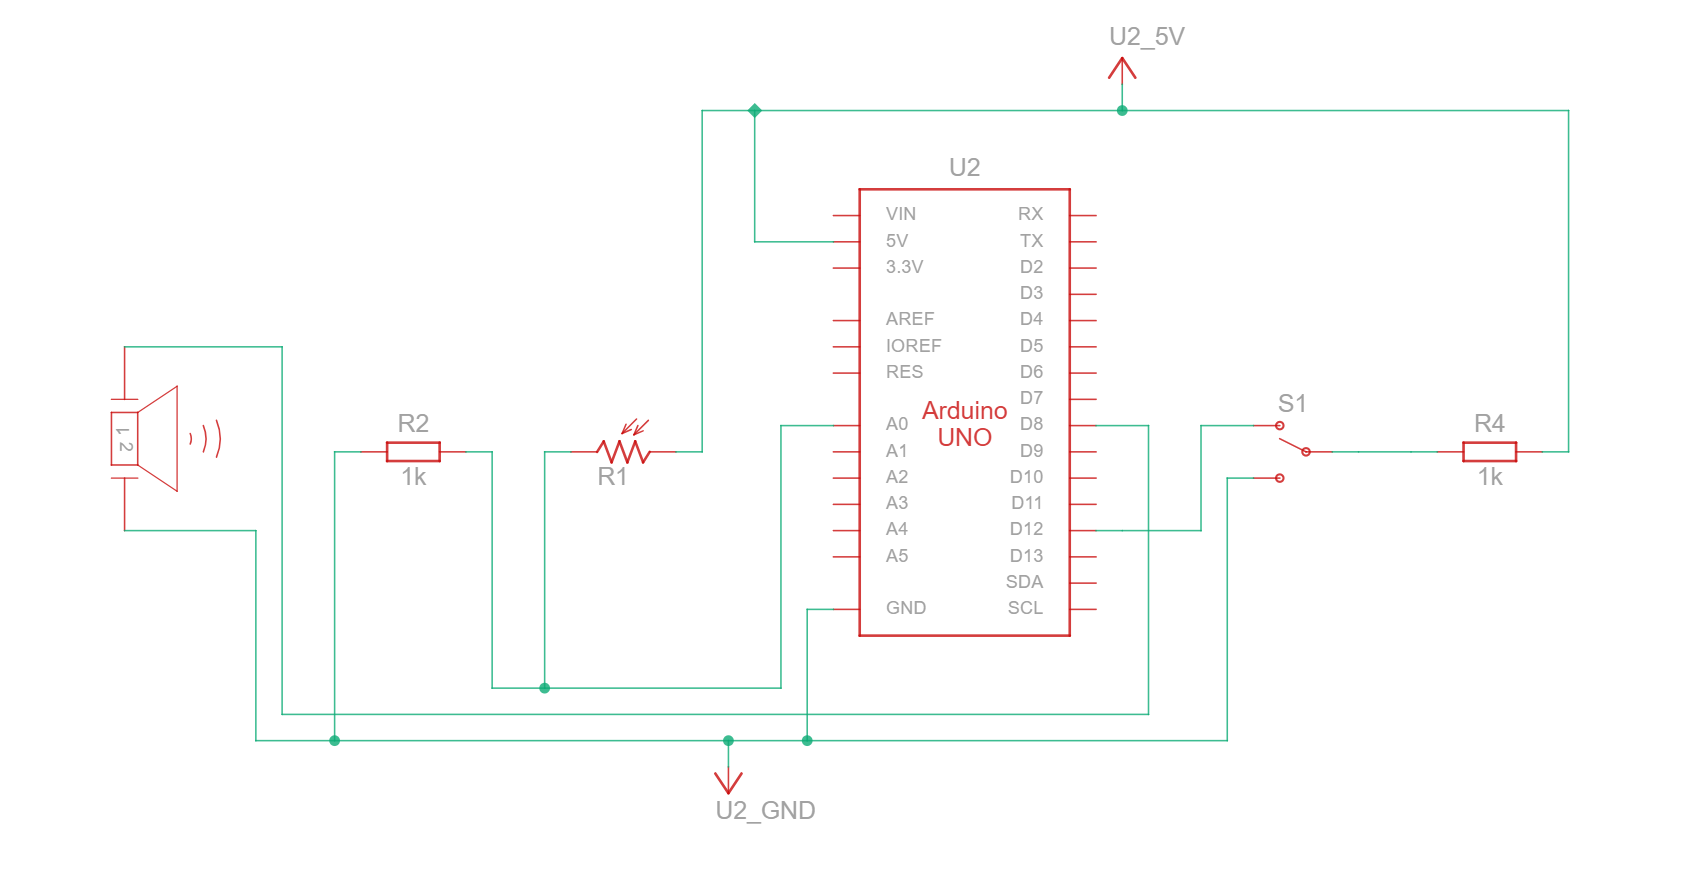
Circuit Schematic and Simulation
The first step was to prepare a circuit schematic on TinkerCAD. Basically, the digital input took the form of a slideswitch feeding into a digital input pin (pin 4) through a 10 kΩ pull-down resistor. Analog Input came from the photoresistor connected to pin A0. The buzzer output was from pin 8.
Figure 1: Component Simulation View
Figure 2: Schematic View
TinkerCAD also has a handy simulation functionality, that even allows to upload the Arduino code and test how the circuit would work under simulator conditions. This definitely helped in fixing bugs before even testing with the actual circuit, and also helped to individually simulate each component before assembling together.
Basically, there are two main control points: opening/closing the box, and sliding the switch between ON/OFF.
When the box is opened, light falling on the photoresistor exceeds the threshold and thus triggers the playSong() function, which iterates over the notes in the pre-assigned song and plays it using the buzzer. When the box is closed, the light intensity falls below the threshold and the for loop breaks / is not triggered again, causing the music to stop playing.
When the switch is ‘ON’, pin 4 detects a ‘HIGH’ voltage and thus the Arduino plays song 1, which for this example we chose to be Toby Fox’s Megalovania from the game Undertale.
When the switch is ‘OFF’, pin 4 detects a ‘LOW’ voltage and thus the Arduino plays song 2, which for this example we chose to be Mikkel Fabricus Smitt’s Subway Surfers Main Theme from the game Subway Surfers.
Code
#define LDR_PIN A0
#define SWITCH_PIN 4
#define BUZZER_PIN 8

#include "pitches.h"

int ldrThreshold = 500; // Adjust this value according to your LDR sensitivity
int song = 1;

void setup() {
  pinMode(LDR_PIN, INPUT);
  pinMode(SWITCH_PIN, INPUT);
  pinMode(BUZZER_PIN, OUTPUT);
  Serial.begin(9600);
}

void loop() {
  // Read the light level from the LDR
    int lightLevel = analogRead(LDR_PIN);
    Serial.println(lightLevel);
  // If the light level exceeds the threshold, play the first song
  if (lightLevel > ldrThreshold) {
      // Check if the switch is pressed to change to the second song
    if (digitalRead(SWITCH_PIN) == LOW) {
      playSong(2);
      // Add some delay or debounce to prevent rapid switching
      delay(10);
      int song = 1;}
    else {
      playSong(1);
      delay(10);
      int song = 2;    }
  }
  else {
    noTone(BUZZER_PIN);
  }
}

void playSong(int songNumber) {
  // Define the melody and duration for each song
  int melody1[] = { NOTE_D4, NOTE_D4, NOTE_D5, NOTE_A4, 0, NOTE_GS4, NOTE_G4, NOTE_F4, NOTE_D4, NOTE_F4, NOTE_G4,
  NOTE_C4, NOTE_C4, NOTE_D5, NOTE_A4, 0, NOTE_GS4, NOTE_G4, NOTE_F4, NOTE_D4, NOTE_F4, NOTE_G4,
  NOTE_B3, NOTE_B3, NOTE_D5, NOTE_A4, 0, NOTE_GS4, NOTE_G4, NOTE_F4, NOTE_D4, NOTE_F4, NOTE_G4,
  NOTE_AS3, NOTE_AS3, NOTE_D5, NOTE_A4, 0, NOTE_GS4, NOTE_G4, NOTE_F4, NOTE_D4, NOTE_F4, NOTE_G4
   };
  int noteDurations1[] = { 8, 8, 4, 4, 8, 4, 4, 4, 8, 8, 8,
   8, 8, 4, 4, 8, 4, 4, 4, 8, 8, 8,
   8, 8, 4, 4, 8, 4, 4, 4, 8, 8, 8,
    8, 8, 4, 4, 8, 4, 4, 4, 8, 8, 8
  };

  int melody2[] = {
  // NOTE_C4, 0, NOTE_G4, 0, NOTE_AS4, NOTE_C5, NOTE_AS4, 0, NOTE_F4, NOTE_DS4, 0,
  // NOTE_C4, 0, NOTE_G4, 0, NOTE_AS4, NOTE_C5, NOTE_AS4, 0, NOTE_F4, NOTE_DS4, 0,
  // NOTE_C4, 0, NOTE_G4, 0, NOTE_AS4, NOTE_C5, NOTE_AS4, 0, NOTE_F4, NOTE_DS4, 0,

  // NOTE_C4, 0, NOTE_E4, 0, NOTE_G4, NOTE_A4, NOTE_AS4,
  NOTE_C5, 0, NOTE_C5, 0, NOTE_AS4, 0, NOTE_A4, 0,
  NOTE_AS4, 0, NOTE_AS4, NOTE_C5, 0, NOTE_AS4, NOTE_A4, 0,
  0,
  NOTE_C5, 0, NOTE_AS4, 0, NOTE_A4, 0, NOTE_AS4, 0, NOTE_E5,
  0,

  NOTE_C5, 0, NOTE_C5, 0, NOTE_AS4, 0, NOTE_A4, 0,
  NOTE_AS4, 0, NOTE_AS4, NOTE_C5, 0, NOTE_AS4, NOTE_A4, 0,
  0,
  NOTE_C5, 0, NOTE_AS4, 0, NOTE_A4, 0, NOTE_AS4, 0, NOTE_E4,0
};

int noteDurations2[] = {
  // 4, 8, 4, 8, 4, 8, 8, 16, 8, 8, 16,
  // 4, 8, 4, 8, 4, 8, 8, 16, 8, 8, 16,
  // 4, 8, 4, 8, 4, 8, 8, 16, 8, 8, 16,

  // 4, 8, 4, 8, 4, 4, 4,
  8, 16, 8, 16, 8, 16, 8, 16,
  8, 16, 8, 8, 16, 8, 8, 16,
  4,
  8, 16, 8, 16, 8, 16, 8, 4, 8,
  4,

  8, 16, 8, 16, 8, 16, 8, 16,
  8, 16, 8, 8, 16, 8, 8, 16,
  4,
  8, 16, 8, 16, 8, 16,8,4,8,4
};

  // Select the melody and note durations based on the song number
  int *melody;
  int *noteDurations;
  int notes;

  if (songNumber == 1) {
    melody = melody1;
    noteDurations = noteDurations1;
    notes = sizeof(melody1) / sizeof(melody1[0]);
  } else {
    melody = melody2;
    noteDurations = noteDurations2;
    notes = sizeof(melody2) / sizeof(melody2[0]);
  }

  // Play the selected melody
  for (int i = 0; i < notes; i++) {
    //Read light level from LDR
    int lightLevel = analogRead(LDR_PIN);
    Serial.println(lightLevel);
    if((lightLevel > ldrThreshold) || (song == 1 && digitalRead(SWITCH_PIN) == HIGH) || (song == 2 && digitalRead(SWITCH_PIN) == LOW)){
      int duration = 1000 / noteDurations[i];
      tone(BUZZER_PIN, melody[i], duration);
      delay(duration * 1.3); // Add a slight delay between notes for better sound quality
      noTone(BUZZER_PIN);
    } else{
      break;
    }
  }
}
The notes refer to the pitches.h header file from the toneMelody example on Arduino IDE.
The code is not too different from the examples we did in class, which was a major advantage of this project. To switch between two different songs, we assigned the information about the songs to pointers.
Also, to ensure that the song switched off as soon as possible when the switch or photoresistor were toggled, we used an if statement that led to a statement to break the loop, which immediately stops playing.
The notes and durations were obtained from this Github repository: https://github.com/hibit-dev/buzzer/tree/master. Since the repository did not have the notes for Megalovania, that was manually transformed from its sheet music online.
Showcase
Reflections
We both really enjoyed working on this project. For something that was relatively simple, it was still quite impressive.
We were especially happy with the solution we found in using the break statement. Because earlier, the photoresistor was only taking an input after the ‘for’ loop was completed, and thus the song kept playing even when the box was closed, contrary to our expectations. Breaking the loop avoids that issue.
The article “A Brief Rant on the Future of Interaction Design” prompted me to reconsider the fundamental principles of interaction design. The “Pictures Under Glass” paradigm – our daily tapping and swiping on the screen – prioritizes visual feedback over tactile or physical interactions. Humans can do so much with their specialized appendages, yet this is all we do now. This reading thus prompted me to think about the potential limitations of current interaction models. It makes me wonder if we are settling for convenience over innovation and whether there are untapped (pun-intended) opportunities to create more immersive and intuitive interfaces.
In fact, current VR and AR technologies, coupled with advancements in computer vision and spatial computing, have the potential to realize many of the principles advocated by the author back in 2011. However, widespread adoption has been somewhat limited, and the reasons for this are multifaceted. One reason is the current limitations of hardware and software technology, such as the bulkiness of VR headsets or the limited field of view of AR glasses. Additionally, there may be practical challenges in integrating these technologies into everyday workflows or activities, as well as concerns about privacy, accessibility, and social acceptance. Furthermore, while VR and AR can offer compelling experiences for certain applications, they may not always be the most practical or necessary solution for every interaction scenario. In many cases, traditional interfaces like touchscreens or keyboards may be more efficient and effective for completing tasks, particularly in contexts where precision and speed are essential.
While the author’s arguments are compelling and align with my beliefs to some extent, I also recognize the need for balance between innovation and usability. Transitioning from fingertip-centric interfaces to more complex tactile and gestural inputs poses usability challenges and requires careful consideration of accessibility and inclusivity. Moreover, while tactile feedback and physical interaction are crucial, there are contexts where visual interfaces can complement and enhance user experiences. However, overall the reading has challenged me to reconsider the dominance of touchscreen devices and to explore alternative interaction paradigms that better leverage the full range of human capabilities.
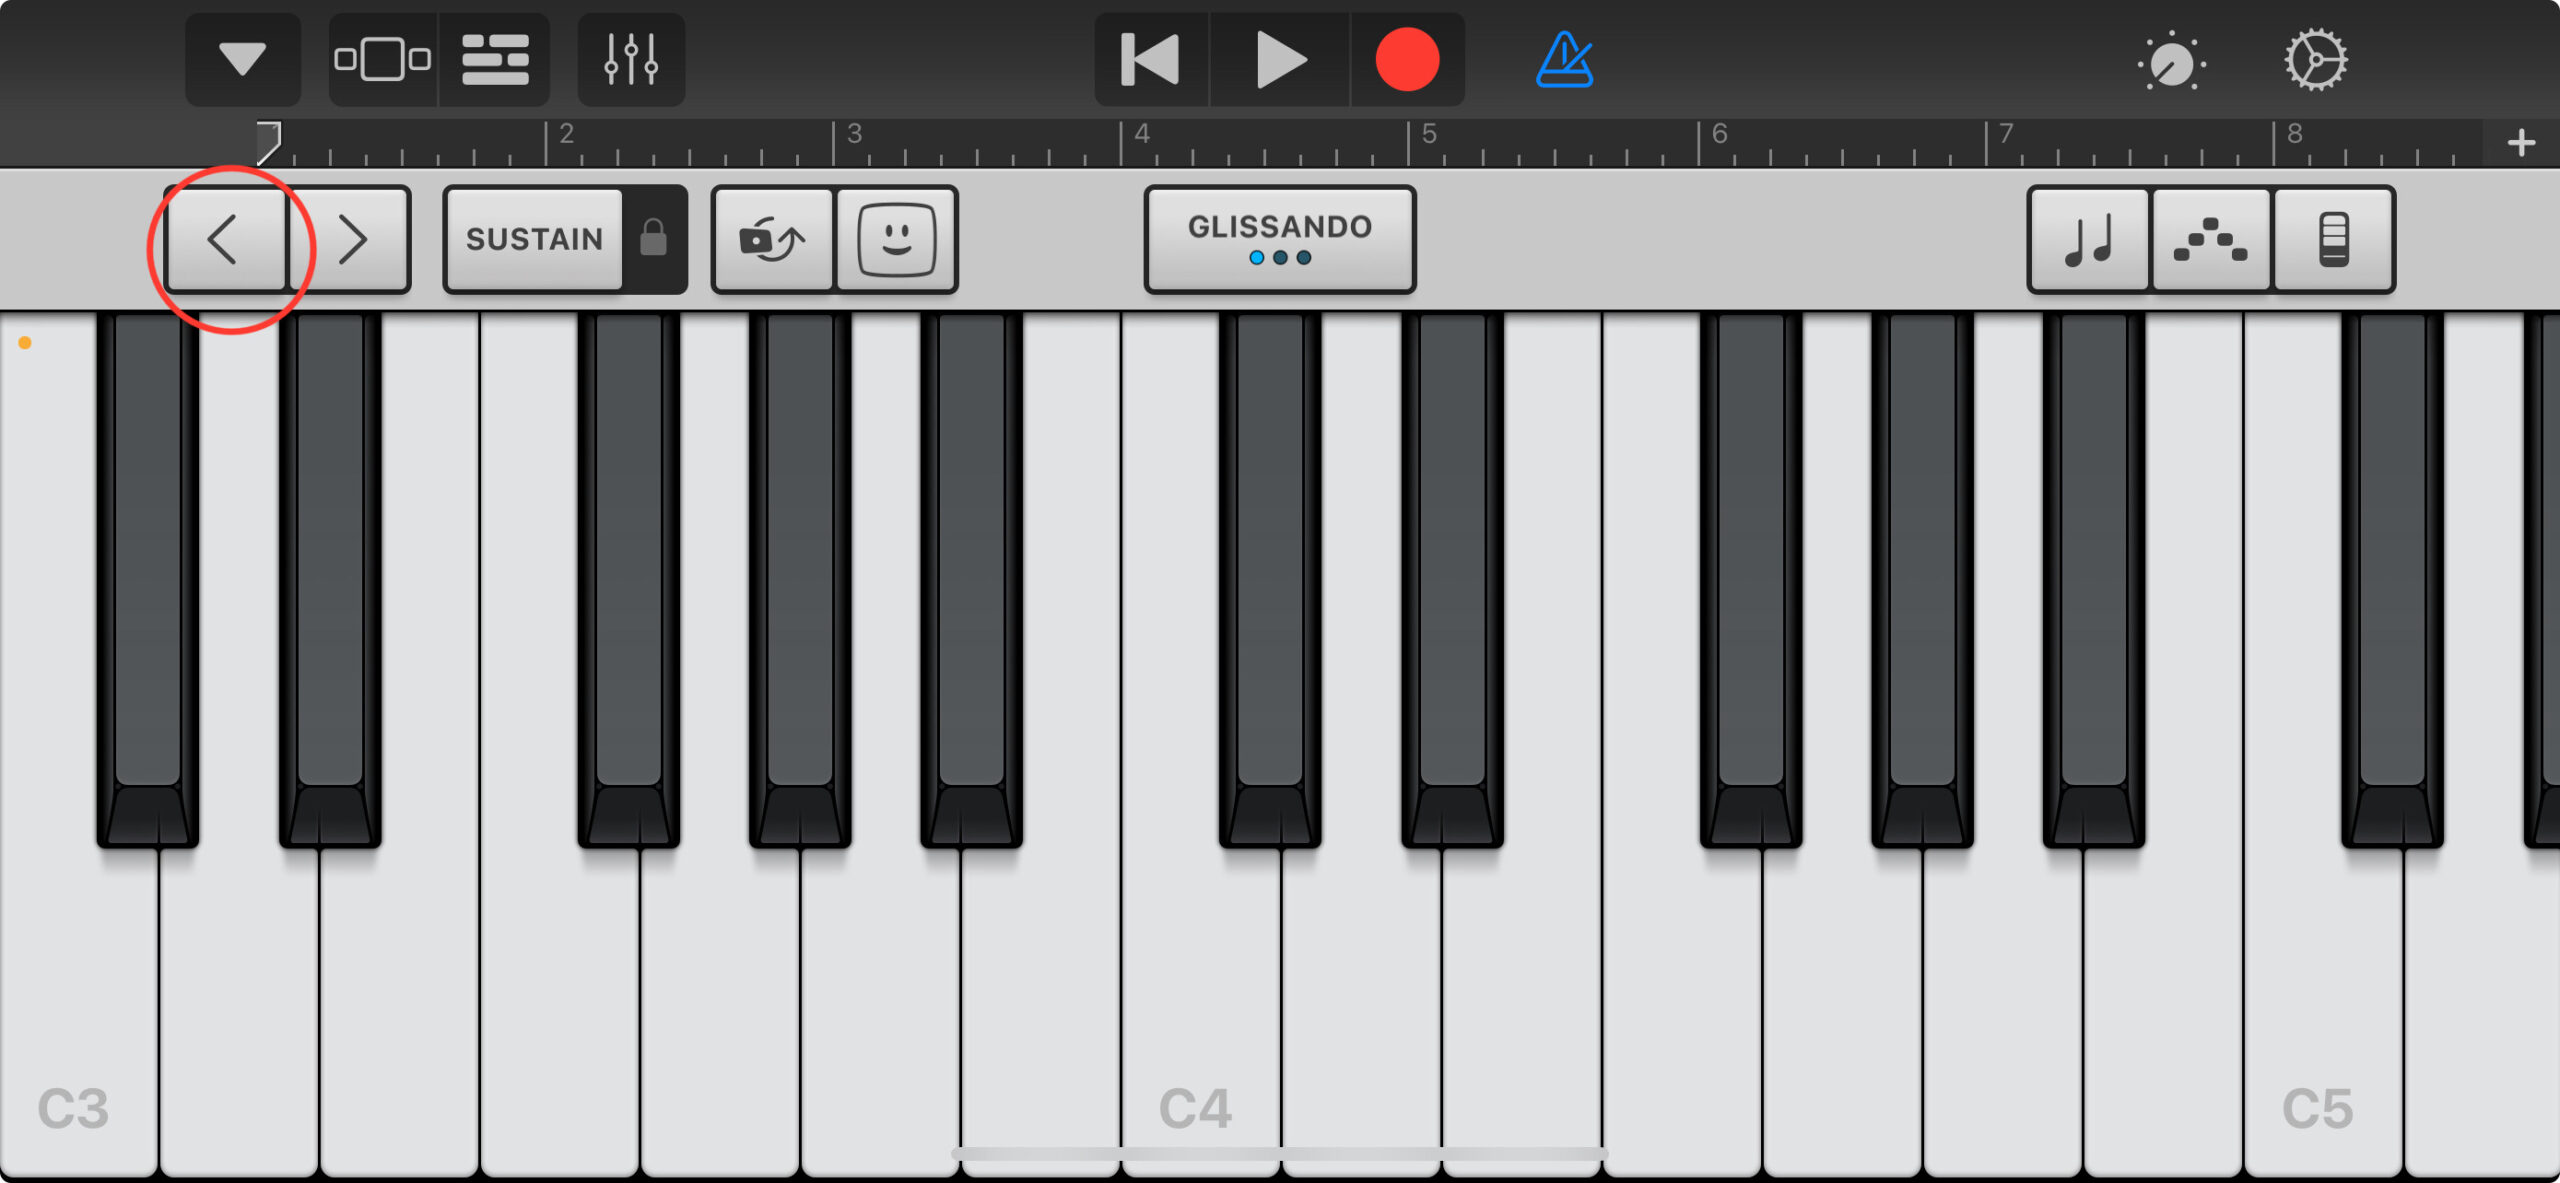
For this assignment, we wanted to go with something simple. Rashed is known for his love for music so I was excited to see what we would come up with. During our brainstorming session, Rashed was doing his hobby – which is music production- on his phone on GarageBand and he noticed how he had to click on the “arrow” button to change the pitch of the piano and we decided we wanted to do something like that but with the potentiometer.
The pitch-changing arrow I was referring to on GarageBand:
Materials used:
x11 Wires
x4 Buttons
x4 10k Resistors
x1 Buzzer
x1 Potentiometer
Production:
Writing this code was pretty challenging for us as both of us are still adapting to this new language.
We used the toneMelody example from the examples folder that we used in class to take the “pitches.h” tab from it in order to give a specific range. We collectively decided to have the buttons, by default, be the most basic notes “Do, Re, Me, Fa” also known as “NOTE_C4, NOTE_D4, NOTE_E4, NOTE_F4” which was pretty simple to implement.
However, we faced one major issue:
For some reason, the potentiometer would not cooperate at all. The buttons were working fine, but the pitch won’t budge. We, unfortunately, had to use ChatGPT to help us but it was still very helpful in helping us understand what we were doing wrong.
Here’s the code:
#include "pitches.h"

const int speakerPin = 9;  // Speaker connected to pin 9
int buttonPins[] = {2, 3, 4, 5};  // Button pins for notes
int potPin = A0;  // Potentiometer connected to A0

// Initialize an array of notes that will be used depending on the button press
int noteIndices[] = {NOTE_C4, NOTE_D4, NOTE_E4, NOTE_F4};  // Starting notes for each button

void setup() {
  for (int i = 0; i < 4; i++) {
    pinMode(buttonPins[i], INPUT_PULLUP);  // Setup button pins as input with pull-up resistor
  }
  pinMode(speakerPin, OUTPUT);  // Set speaker pin as output
}

void loop() {
  int potValue = analogRead(potPin);  // Read the current value from the potentiometer
  int noteRange = NOTE_C6 - NOTE_C4;  // Define the range of notes to span
  int noteOffset = map(potValue, 0, 1023, 0, noteRange);  // Map potentiometer value to note range

  for (int i = 0; i < 4; i++) {
    if (digitalRead(buttonPins[i]) == LOW) {
      int noteToPlay = noteIndices[i] + noteOffset;
      tone(speakerPin, noteToPlay);  // Play the note on the speaker
      delay(200);  // A short delay to help debounce the button
      while (digitalRead(buttonPins[i]) == LOW);  // Wait for button release
      noTone(speakerPin);  // Stop the note
    }
  }
}
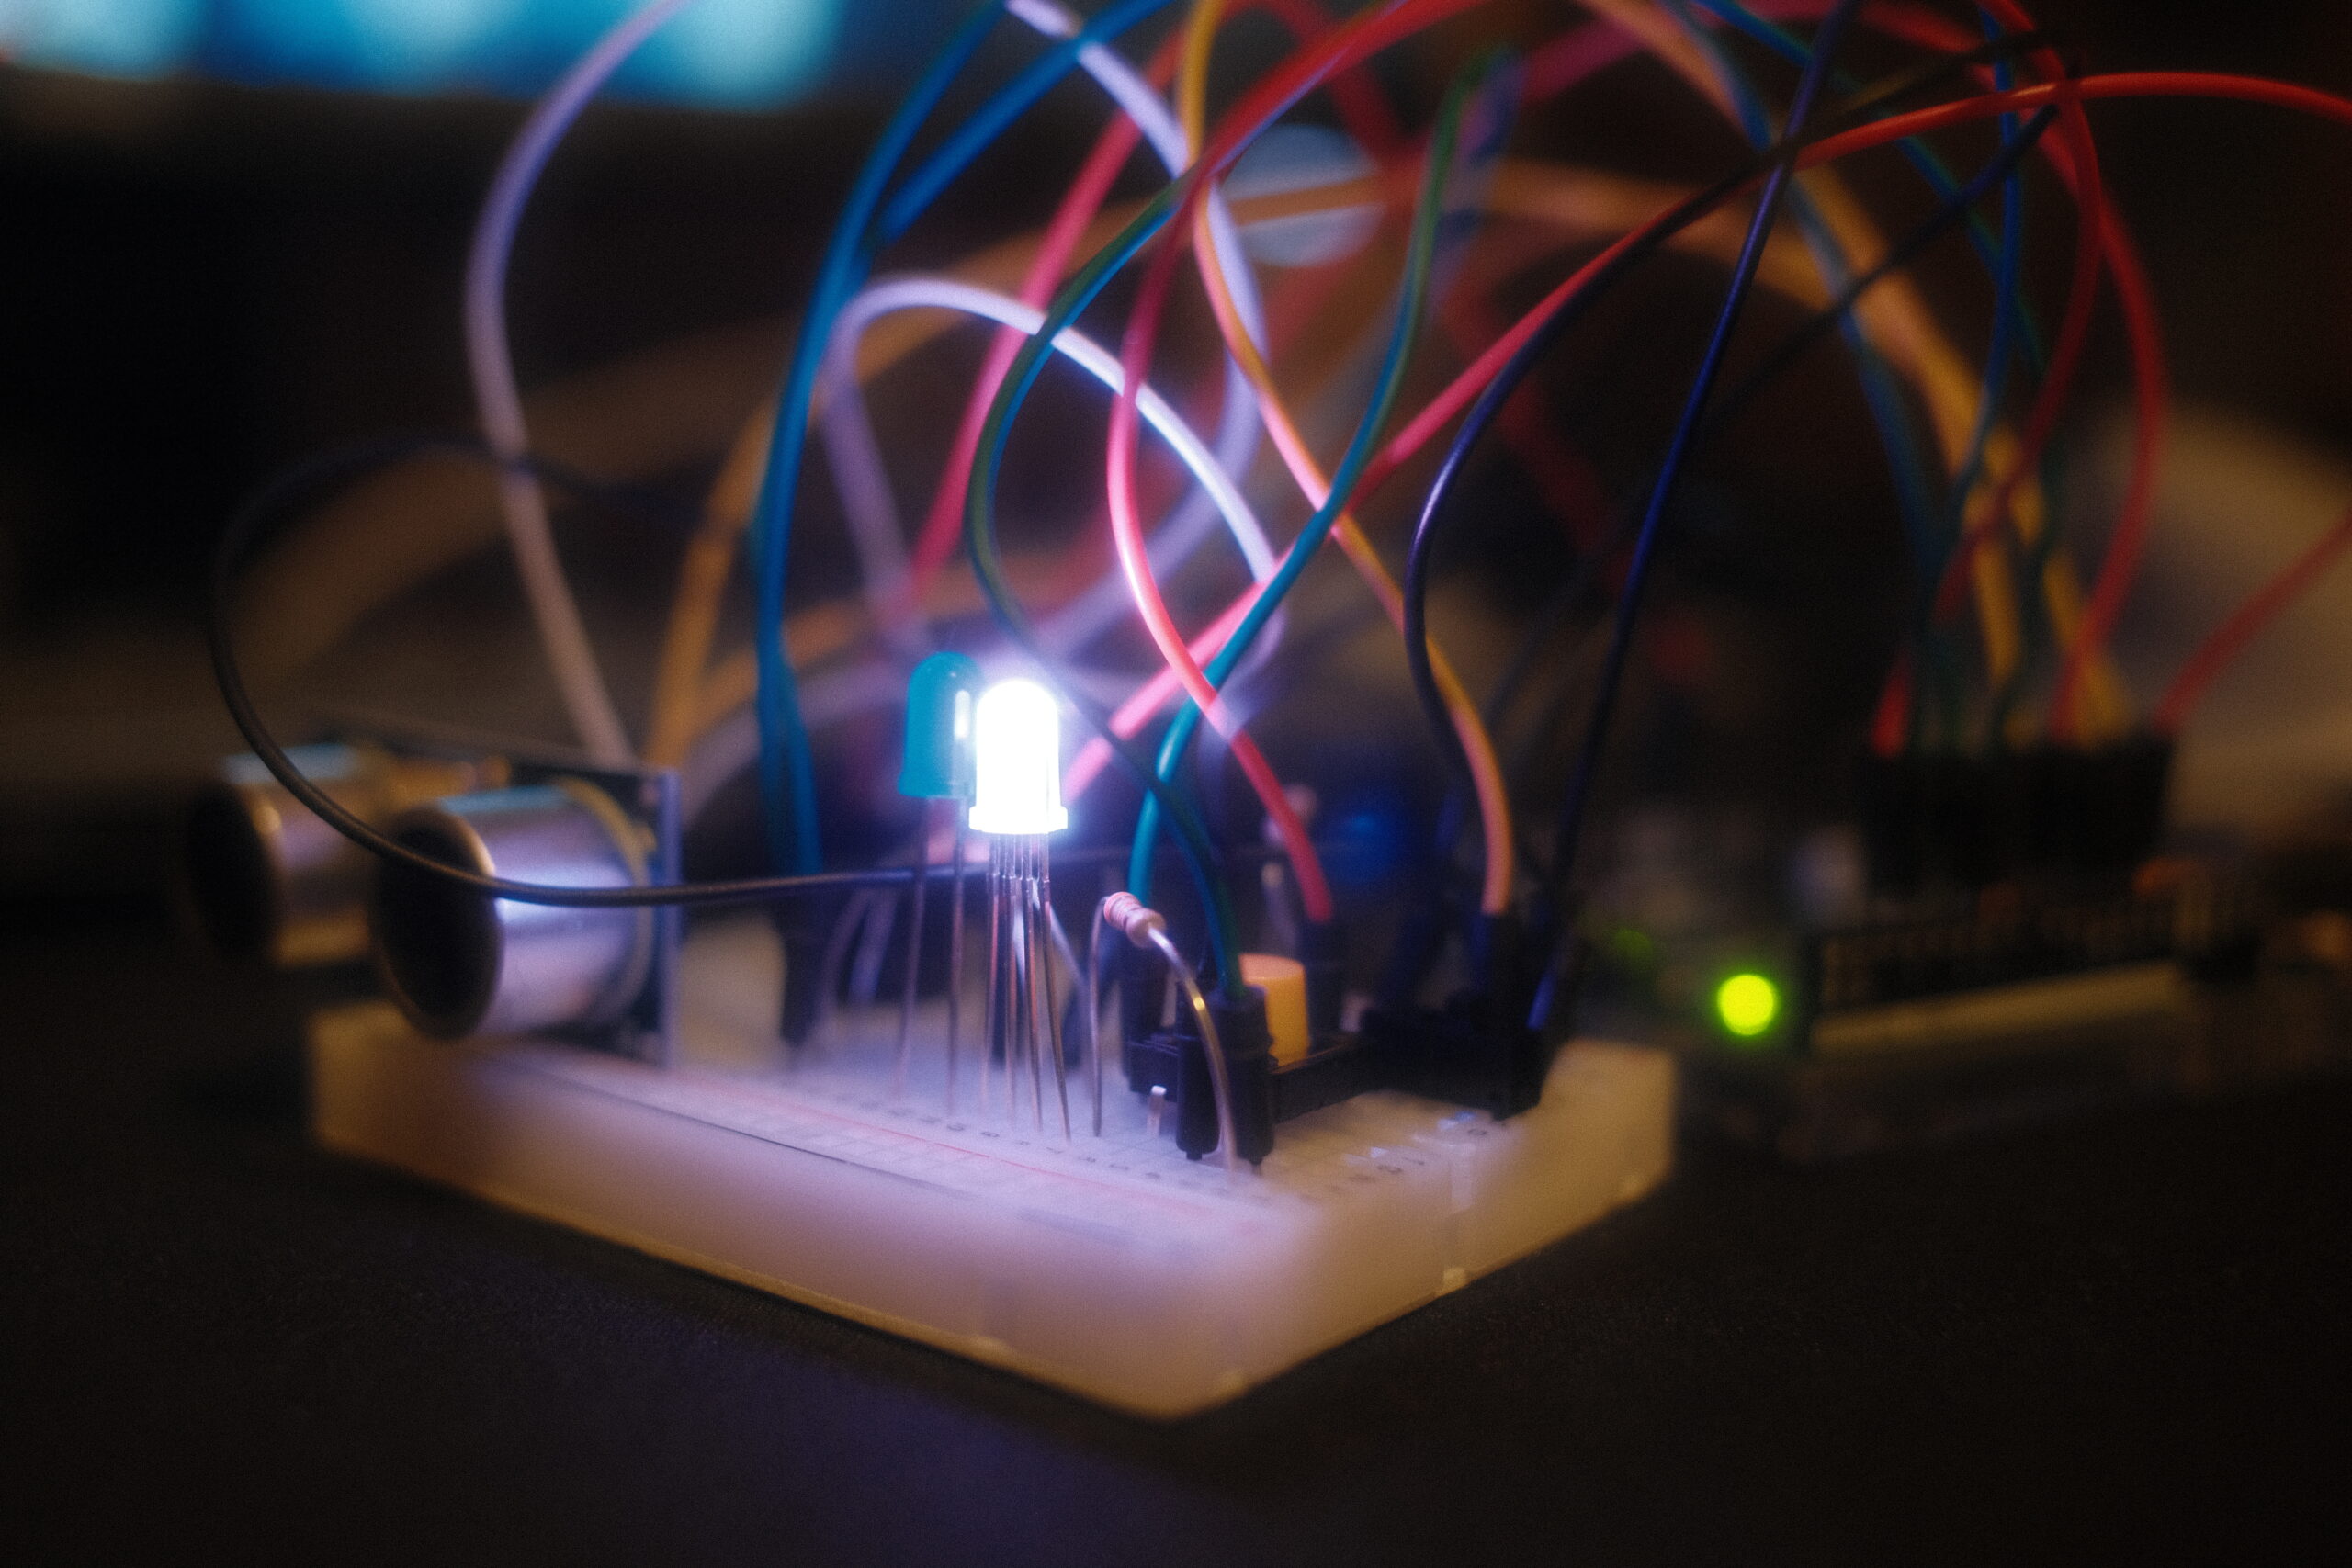
The Chroma Cassette is a fun and interactive project that plays pre-loaded songs and allows users to control the playback speed using a distance sensor. The name “Chroma” refers to the project’s ability to switch the color of LEDs based on the song being played, while “Cassette” reflects the inspiration behind the variable playback speed control, similar to the fast-forwarding feature of cassette tapes.
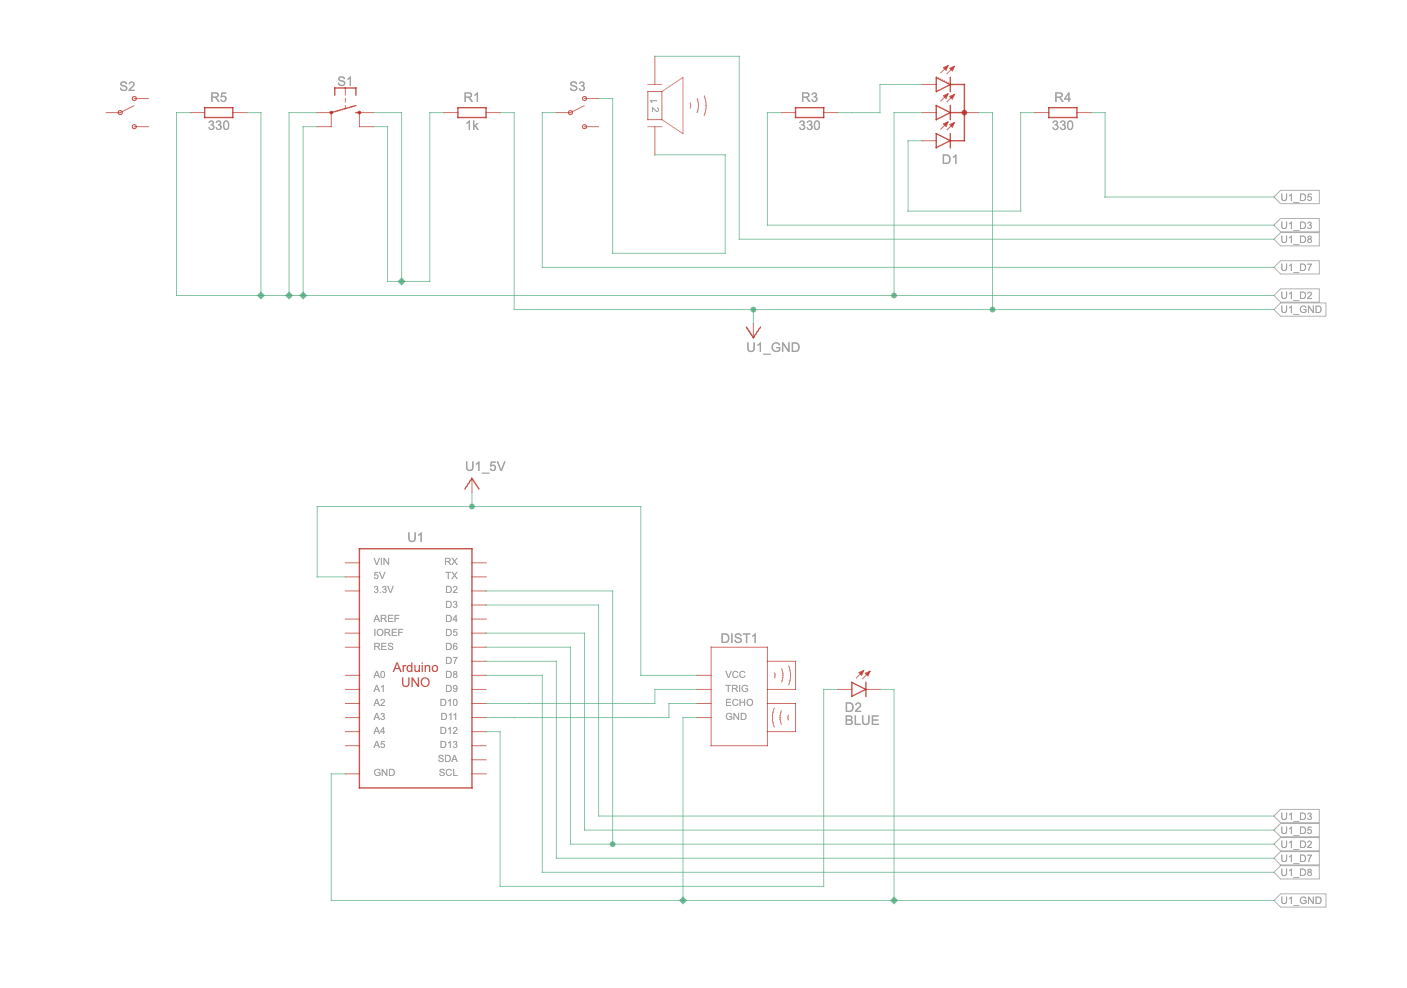
Hardware Components:
Arduino Uno microcontroller
Piezo Speaker for playback
Distance sensor (ultrasonic sensor) to detect distance
Button for manual song switching
LEDs (Red, Green, Blue) for colorful song indication
Jumper wires for connecting components
Breadboard
Software (Code):
An array named songNames stores the titles of the pre-loaded songs (Game of Thrones, Imperial March, Pirates of the Caribbean, Silent Night).
Each song melody is defined as an array representing musical notes and their corresponding durations.
A function named playSong iterates through each note in the current song and plays it based on its duration. The function also calculates a speedFactor based on the distance measured by the sensor. This speedFactor is used to adjust the note duration, essentially changing the playback speed. Higher distances from the sensor result in slower playback, mimicking the fast-forwarding effect.
The setRGBColor function assigns specific colors to the LEDs based on the current song being played, adding a visual element to the project.
An interrupt service routine is triggered when the button is pressed, and a flag named switchSong is set to true, indicating the need to switch to the next song in the playlist.
The Chroma Cassette project, initially, embarked on a path paved with frustration. Our initial goal was to directly control the volume of the pre-loaded songs. Countless hours were spent crafting code, only to be met with a difficulty: directly manipulating volume on the Arduino platform proved to be an insurmountable hurdle. This limitation stemmed from the inherent architecture of the Arduino kit, lacking dedicated hardware components for fine-grained volume control.
We brainstormed alternative approaches to achieve a dynamic audio experience, eventually agreeing on varying the playback speed of the music. This approach, however, presented its own set of challenges. After lots of trial and error, adjusting code and testing countless iterations. This phase, though time-consuming, ultimately yielded a solution that met our exacting standards.
The foundation of the Chroma Cassette lies in its pre-loaded song library. Each song, be it the epic theme from Game of Thrones or the whimsical melody of Pirates of the Caribbean, was meticulously chosen to complement the project’s functionality. Once the song selection was finalized, we embarked on a critical step: adjusting the speedFactor. This variable acts as the heart of the speed control mechanism. Meticulous adjustments were made to the speedFactorfor each song, ensuring that even at faster playback speeds, the music retained its integrity and remained pleasant to the ears.
The distance sensor served as the conductor in this symphony of sound and speed. It was calibrated to operate within a specific range, from 1 centimeter to 30 centimeters. This precise calibration ensured a smooth and responsive adjustment curve. As the distance between the sensor and an object increased, the playback speed would gradually slow down, mimicking the fast-forwarding effect of a cassette tape.
To enhance user interaction, we incorporated additional functionalities. Pressing the designated button would seamlessly switch between songs in the playlist. To provide a visual cue for song changes, an LED was integrated into the system. Whenever the user switched songs, the LED would illuminate briefly, acknowledging the user’s input.
The RGB LED added a captivating layer of visual flair to the project. This versatile LED, capable of displaying a spectrum of colors, was linked to the songIndex variable. As the user cycled through the song playlist, the RGB LED would change color, reflecting the currently playing song. This color association wasn’t random – it drew inspiration from the source material of each song. For instance, the vibrant hues of green, purple, yellow, and orange adorned the LED when playing the Harry Potter theme, a subtle nod to the four Hogwarts houses.
Faced with an initial hurdle, we pivoted our approach and ultimately delivered a unique and engaging audio experience. The project seamlessly blends pre-loaded songs, dynamic speed control based on sensor input, intuitive user interaction, and a captivating visual element through the RGB LED.
The Chroma Cassette might be a interesting blend of sound and light, but there’s always space to make it even better. For Instance, enhancing the audio quality, especially at faster playback speeds, could be a priority. Techniques like utilizing digital signal processing libraries on the Arduino might help reduce pitch shifting and distortion. Imagine users having the ability to upload their own personal soundtracks! This could be achieved by incorporating an SD card or a Bluetooth module, significantly expanding the song library and personalizing the experience for each user. The distance sensor integration could be taken a step further. By using a more advanced sensor with a wider range, users would have finer control over the playback speed across a larger distance. This refinement could create a more intuitive user experience. Another exciting possibility is an interactive light show. The RGB LED could be programmed to react to the music’s rhythm and melody, creating a dynamic visual spectacle that complements the audio. This would undoubtedly add a whole new captivating dimension to the user experience.
Picture:
Video:
Code Snippet:
void playSong(int *melody, int melodyLength) {
  // Check if the speaker is turned off
    if (digitalRead(SPEAKER_SWITCH_PIN) == LOW) {
        Serial.println("Speaker is turned off.");
        return; // Exit the function if the speaker is turned off
    }

    // Iterate through each note in the melody
    for (int noteIndex = 0; noteIndex < melodyLength; noteIndex += 2) {
        float distance = getDistance();  // Update distance with each note

        // Adjust speedFactor based on the song and distance
        float speedFactor;
        if (currentSong == 1) {
            // Slower scaling for Imperial March
            speedFactor = 1.1 + (distance / 30.0); //  slows down the max speed
        } else if (currentSong==2){
            speedFactor = 0.6 + (distance / 30.0);
        } else if (currentSong==3) {
            speedFactor = 0.4 + (distance / 30.0);
        } else {
            speedFactor = 1.2 + distance / 30.0;
        }

         // Calculate the note duration based on the speed factor
        int noteDuration = (int)(1000 / melody[noteIndex + 1] * speedFactor);

        // Check if the song should be switched or the speaker is turned off
        if (switchSong || digitalRead(SPEAKER_SWITCH_PIN) == LOW) {
            noTone(SPEAKER_PIN); // Stop tone when switching off
            break;
        }

         // Play the note
        tone(SPEAKER_PIN, melody[noteIndex], noteDuration);
        setRGBColor(currentSong, melody[noteIndex]);
        delay(noteDuration * 1.30);
        noTone(SPEAKER_PIN);

        Serial.print(songNames[currentSong]);
        Serial.print(": Playing note: ");
        Serial.print(melody[noteIndex]);
        Serial.print(" at duration: ");
        Serial.println(noteDuration);
        Serial.print("Distance: ");
        Serial.print(distance);
        Serial.println(" cm");
    }
}
The Chroma Cassette is a fun and interactive project that plays pre-loaded songs and allows users to control the playback speed using a distance sensor. The name “Chroma” refers to the project’s ability to switch the color of LEDs based on the song being played, while “Cassette” reflects the inspiration behind the variable playback speed control, similar to the fast-forwarding feature of cassette tapes.
Hardware Components:
Arduino Uno microcontroller
Piezo Speaker for playback
Distance sensor (ultrasonic sensor) to detect distance
Button for manual song switching
LEDs (Red, Green, Blue) for colorful song indication
Jumper wires for connecting components
Breadboard
Software (Code):
An array named songNames stores the titles of the pre-loaded songs (Game of Thrones, Imperial March, Pirates of the Caribbean, Silent Night).
Each song melody is defined as an array representing musical notes and their corresponding durations.
A function named playSong iterates through each note in the current song and plays it based on its duration. The function also calculates a speedFactor based on the distance measured by the sensor. This speedFactor is used to adjust the note duration, essentially changing the playback speed. Higher distances from the sensor result in slower playback, mimicking the fast-forwarding effect.
The setRGBColor function assigns specific colors to the LEDs based on the current song being played, adding a visual element to the project.
An interrupt service routine is triggered when the button is pressed, and a flag named switchSong is set to true, indicating the need to switch to the next song in the playlist.
The Chroma Cassette project, initially, embarked on a path paved with frustration. Our initial goal was to directly control the volume of the pre-loaded songs. Countless hours were spent crafting code, only to be met with a difficulty: directly manipulating volume on the Arduino platform proved to be an insurmountable hurdle. This limitation stemmed from the inherent architecture of the Arduino kit, lacking dedicated hardware components for fine-grained volume control.
We brainstormed alternative approaches to achieve a dynamic audio experience, eventually agreeing on varying the playback speed of the music. This approach, however, presented its own set of challenges. After lots of trial and error, adjusting code and testing countless iterations. This phase, though time-consuming, ultimately yielded a solution that met our exacting standards.
The foundation of the Chroma Cassette lies in its pre-loaded song library. Each song, be it the epic theme from Game of Thrones or the whimsical melody of Pirates of the Caribbean, was meticulously chosen to complement the project’s functionality. Once the song selection was finalized, we embarked on a critical step: adjusting the speedFactor. This variable acts as the heart of the speed control mechanism. Meticulous adjustments were made to the speedFactorfor each song, ensuring that even at faster playback speeds, the music retained its integrity and remained pleasant to the ears.
The distance sensor served as the conductor in this symphony of sound and speed. It was calibrated to operate within a specific range, from 1 centimeter to 30 centimeters. This precise calibration ensured a smooth and responsive adjustment curve. As the distance between the sensor and an object increased, the playback speed would gradually slow down, mimicking the fast-forwarding effect of a cassette tape.
To enhance user interaction, we incorporated additional functionalities. Pressing the designated button would seamlessly switch between songs in the playlist. To provide a visual cue for song changes, an LED was integrated into the system. Whenever the user switched songs, the LED would illuminate briefly, acknowledging the user’s input.
The RGB LED added a captivating layer of visual flair to the project. This versatile LED, capable of displaying a spectrum of colors, was linked to the songIndex variable. As the user cycled through the song playlist, the RGB LED would change color, reflecting the currently playing song. This color association wasn’t random – it drew inspiration from the source material of each song. For instance, the vibrant hues of green, purple, yellow, and orange adorned the LED when playing the Harry Potter theme, a subtle nod to the four Hogwarts houses.
Faced with an initial hurdle, we pivoted our approach and ultimately delivered a unique and engaging audio experience. The project seamlessly blends pre-loaded songs, dynamic speed control based on sensor input, intuitive user interaction, and a captivating visual element through the RGB LED.
The Chroma Cassette might be a interesting blend of sound and light, but there’s always space to make it even better. For Instance, enhancing the audio quality, especially at faster playback speeds, could be a priority. Techniques like utilizing digital signal processing libraries on the Arduino might help reduce pitch shifting and distortion. Imagine users having the ability to upload their own personal soundtracks! This could be achieved by incorporating an SD card or a Bluetooth module, significantly expanding the song library and personalizing the experience for each user. The distance sensor integration could be taken a step further. By using a more advanced sensor with a wider range, users would have finer control over the playback speed across a larger distance. This refinement could create a more intuitive user experience. Another exciting possibility is an interactive light show. The RGB LED could be programmed to react to the music’s rhythm and melody, creating a dynamic visual spectacle that complements the audio. This would undoubtedly add a whole new captivating dimension to the user experience.
// Function to play a song
void playSong(int *melody, int melodyLength) {
  // Check if the speaker is turned off
    if (digitalRead(SPEAKER_SWITCH_PIN) == LOW) {
        Serial.println("Speaker is turned off.");
        return; // Exit the function if the speaker is turned off
    }

    // Iterate through each note in the melody
    for (int noteIndex = 0; noteIndex < melodyLength; noteIndex += 2) {
        float distance = getDistance();  // Update distance with each note

        // Adjust speedFactor based on the song and distance
        float speedFactor;
        if (currentSong == 1) {
            // Slower scaling for Imperial March
            speedFactor = 1.1 + (distance / 30.0); //  slows down the max speed
        } else if (currentSong==2){
            speedFactor = 0.6 + (distance / 30.0);
        } else if (currentSong==3) {
            speedFactor = 0.4 + (distance / 30.0);
        } else {
            speedFactor = 1.2 + distance / 30.0;
        }

         // Calculate the note duration based on the speed factor
        int noteDuration = (int)(1000 / melody[noteIndex + 1] * speedFactor);

        // Check if the song should be switched or the speaker is turned off
        if (switchSong || digitalRead(SPEAKER_SWITCH_PIN) == LOW) {
            noTone(SPEAKER_PIN); // Stop tone when switching off
            break;
        }

         // Play the note
        tone(SPEAKER_PIN, melody[noteIndex], noteDuration);
        setRGBColor(currentSong, melody[noteIndex]);
        delay(noteDuration * 1.30);
        noTone(SPEAKER_PIN);

        Serial.print(songNames[currentSong]);
        Serial.print(": Playing note: ");
        Serial.print(melody[noteIndex]);
        Serial.print(" at duration: ");
        Serial.println(noteDuration);
        Serial.print("Distance: ");
        Serial.print(distance);
        Serial.println(" cm");
    }
}