Assignment 1: Move Ball With Potentiometer
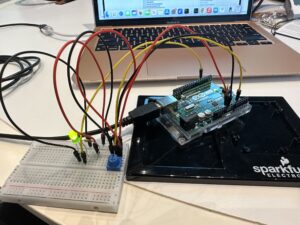
I attached a picture of our setup below:

I took the P5JS sketch we used in class and made a few changes, seen here. First, we created the ellipse. When writing the parameters, we made the x value alpha, because the sketch already set alpha as the value that is reading the Arduino board. In order to read Alpha, we had to make sure we mapped the potentiometer range to the range of the P5JS screen. So when you turn the potentiometer, the x value changes, making the ellipse move backwards and forwards. See the important code snippet below:
ellipse(map(alpha, 0, 1023, 0, width),height/2,60);
Assignment 2: Control LED Brightness From P5JS
We took the same P5JS sketch from the slides and altered it, seen here. Here are the changes we made:
let value = map(mouseX,0,width,0,255);
right = int(value);
We created a new variable called value and then mapped the width of the P5JS screen to the LED values, so that as you moved your mouse horizontally across the screen, the LED brightened and dimmed. We used pin 5 because it supports PWM. The LED connected to Pin 5 was the “right” one in the code we used in class, hence why used “right” above to connect the LED and the P5JS bit above. We also had to go into the Arduino code that we had used in class and changed a bit of that as well.
digitalWrite(leftLedPin, left);
analogWrite(rightLedPin,right);
// digitalWrite(rightLedPin, right);
As you can see, we commented out the digitalWrite regarding the right pin and replaced it with analogWrite so that the LED didn’t just turn on or off, but actually got dimmer and brighter on a spectrum.
Assignment 3: Make The LED Turn On When The Ball Bounces
Here is our video. Here is the link to our sketch.
We combined the Gravity Wind example from the slides with the other P5JS sketch from the slides and changed a few things, seen below:
ellipse(position.x,position.y,mass,mass);
if (position.y > height-mass/2) {
velocity.y *= -0.9; // A little dampening when hitting the bottom
position.y = height-mass/2;


right = 1;
}


else {
right = 0;
}
We went to the part of the code where the ball hits the ground, and made it so that the Arduino read the LED as “right,” and the LED turned on (1) and off (0) depending on whether the ball was touching the ground or not.
On a side note, we also made sure that whenever you pressed n, that was how a new circle appeared. Because when we combined the two sketches, it had already been written that pressing the space bar makes the serial bar pop up.
if (key=='n'){
mass=random(70,80);
position.y=-mass;
velocity.mult(0);
Assignment 4: Control Wind With Potentiometer
Last but not least, we made the ball move left and right with the potentiometer by adding this bit of code.
wind.x = map(alpha,0,1023,-1,1);
We mapped the values of the potentiometer onto the wind values already established in the code. So that when we turned the potentiometer right, the ball went right (1) and left (-1) when we turned the potentiometer left.


