Thinking about what I picked up from the reading, it’s pretty clear that finding the right balance in designing stuff for people with disabilities is key. Leckey’s take on furniture for kids with disabilities nails it keeping things visually cool without making it stand out too much. The bit about radios adding screens throwing a wrench into accessibility for visually impaired folks hits home. It’s a reminder that sometimes less is more, especially when it comes to simplicity making things work for everyone. Digging into multimodal interfaces, like beeping buttons and flashing lights, sounds like a game-changer for folks with sensory issues, giving them more ways to interact.
And then there’s the reminder that everyone’s different. The story about two folks with visual impairments wanting totally different things in their devices shows we can’t do a one-size-fits-all deal. It’s not just about functionality; it’s about personal vibes and choices.
The questions the reading left me with are pretty cool too. Like, how do designers juggle making things accessible without getting too complex? And what’s the deal with fashion designers in the accessibility game? Plus, prosthetics—it’s not just about how they work, but how they fit people’s attitudes and styles. The reading opened up this whole world of thinking about design and accessibility that goes way beyond just ticking boxes. It’s making me look at things with a whole new lens.
After learning about the functionalities and the means of communicating between P5 and Arduino platforms, we were given the assignments to initialize various scenarios to and from p5.
First Assignment:
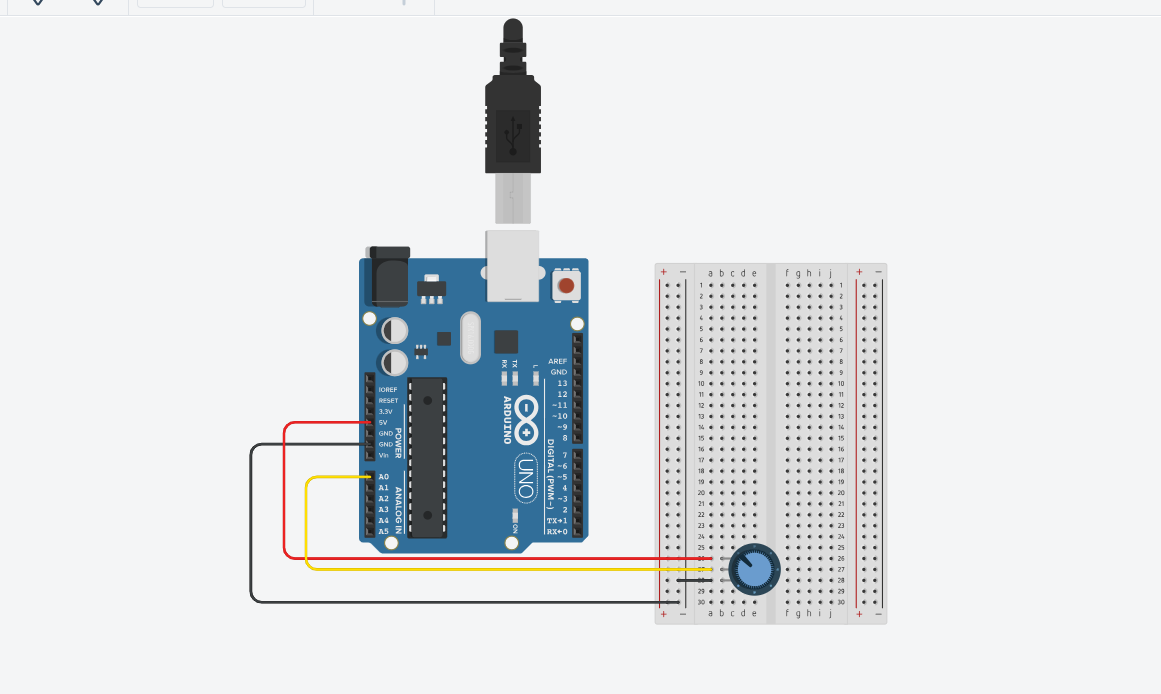
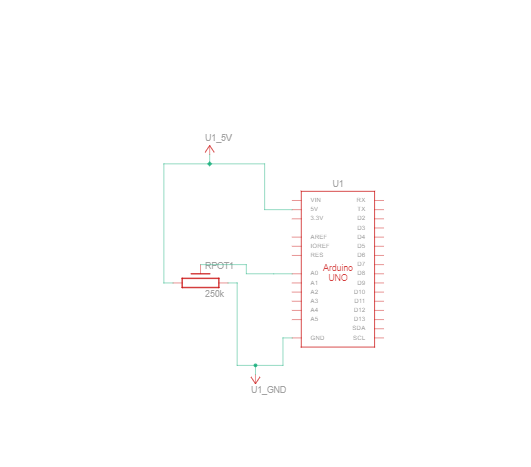
In this assignment, we initialized an Arduino to p5 connection using a potentiometer to control the horizontal position of an ellipse:
Arduino code:
const int potPin = A0;  // Analog pin connected to the potentiometer
void setup() {
  Serial.begin(9600);
}
void loop() {
    int potValue = analogRead(potPin);  // Read the value from the potentiometer
      // Send the potentiometer value to p5.js
      Serial.println(potValue);
}
P5 Code:
let ellipseHorizental;
function setup() {
  createCanvas(640, 480);
  textSize(18);
  ellipseHorizental = width/2;
}
function draw() {
  background(220);
  // Draw ellipse with width based on potentiometer value
  fill(255, 0, 255);
  ellipse(ellipseHorizental, height / 2, 100, 150);
  if (!serialActive) {
    text("Press Space Bar to select Serial Port", 20, 30);
  } else {
    text("Connected", 20, 30);
    // Print the current potentiometer value
    text('Potentiometer Value = ' + str(ellipseHorizental), 20, 50);
  }
}
function keyPressed() {
  if (key == " ") {
    setUpSerial();
  }
}
function readSerial(data) {
  if (data != null) {
    // convert the string to a number using int()
    let fromArduino = split(trim(data), ",");
    // Map the potentiometer value to the ellipse width
    ellipseHorizental = map(int(fromArduino[0]), 0, 1023, 0, 640);
  }
}
Video:
Assignment 2:
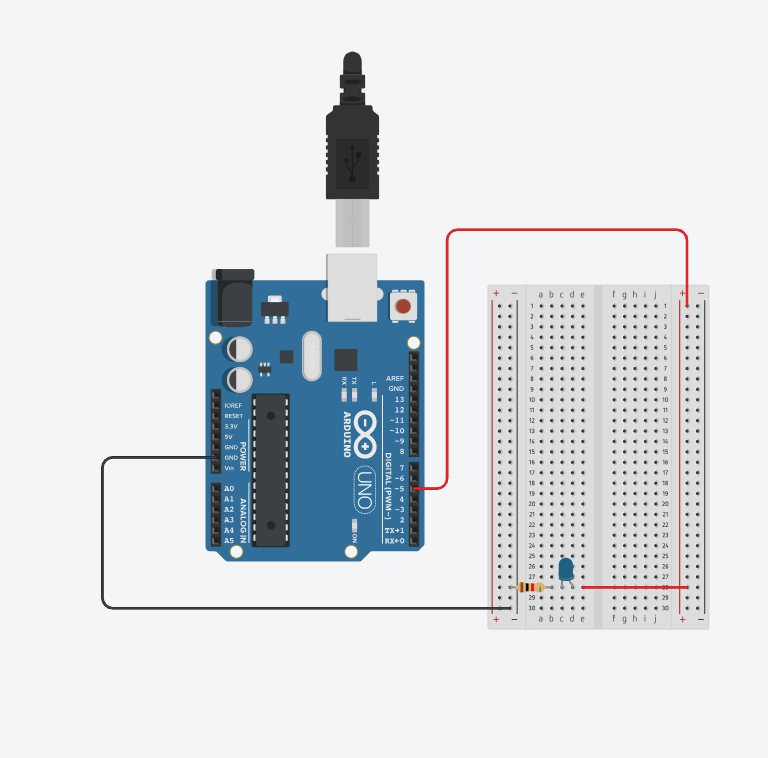
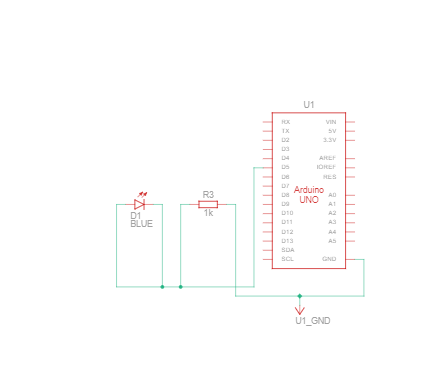
In this assignment, we initiated a p5 to Arduino response. The slider in p5 can control the brightness of an LED in Arduino.
Arduino code:
int LED = 5; // Digital pin connected to the LED
void setup() {
  Serial.begin(9600);
  pinMode(LED_BUILTIN, OUTPUT);
  pinMode(LED, OUTPUT);
  // start the handshake
  while (Serial.available() <= 0) {
    digitalWrite(LED_BUILTIN, HIGH); // on/blink while waiting for serial data
    Serial.println("0");             // send a starting message
    delay(300);                       // wait 1/3 second
    digitalWrite(LED_BUILTIN, LOW);
    delay(50);
  }
}
void loop() {
  // wait for data from p5 before doing something
  while (Serial.available()) {
    digitalWrite(LED_BUILTIN, HIGH); // led on while receiving data
    int brightnessValue = Serial.parseInt();
    if (Serial.read() == '\n') {
      delay(5);
      Serial.println(brightnessValue);
    }
    analogWrite(LED, brightnessValue);
    digitalWrite(LED_BUILTIN, LOW);
  }
}
P5 Code:
let brightnessSlider;
function setup() {
  createCanvas(640, 480);
  textSize(18);
  // Create a slider
  brightnessSlider = createSlider(0, 255, 128); // Set the range and initial value
  brightnessSlider.position(20, 100); // Set the position of the slider
}
function draw() {
  background(255);
  // Draw a slider
  fill(255, 0, 0);
  rect(brightnessSlider.x, brightnessSlider.y, brightnessSlider.width, brightnessSlider.height);
  if (!serialActive) {
    text("Press Space Bar to select Serial Port", 20, 30);
  } else {
    text("Connected", 20, 30);
    // Print the current brightness value
    text('Brightness = ' + brightnessSlider.value(), 20, 50);
  }
}
function keyPressed() {
  if (key == " ") {
    setUpSerial();
  }
}
function readSerial(data) {
  if (data != null) {
    let sendToArduino = brightnessSlider.value() + "\n";
    writeSerial(sendToArduino);
    }
}
int LED = 5; // Digital pin connected to the LED
void setup() {
  Serial.begin(9600);
  pinMode(LED_BUILTIN, OUTPUT);
  pinMode(LED, OUTPUT);
  // start the handshake
  while (Serial.available() <= 0) {
    digitalWrite(LED_BUILTIN, HIGH); // on/blink while waiting for serial data
    Serial.println("0");             // send a starting message
    delay(300);                       // wait 1/3 second
    digitalWrite(LED_BUILTIN, LOW);
    delay(50);
  }
}
void loop() {
  // wait for data from p5 before doing something
  while (Serial.available()) {
    digitalWrite(LED_BUILTIN, HIGH); // led on while receiving data
    int brightnessValue = Serial.parseInt();
    if (Serial.read() == '\n') {
      delay(5);
      Serial.println(brightnessValue);
    }
    analogWrite(LED, brightnessValue);
    digitalWrite(LED_BUILTIN, LOW);
  }
}
Video:
Assignment 3:
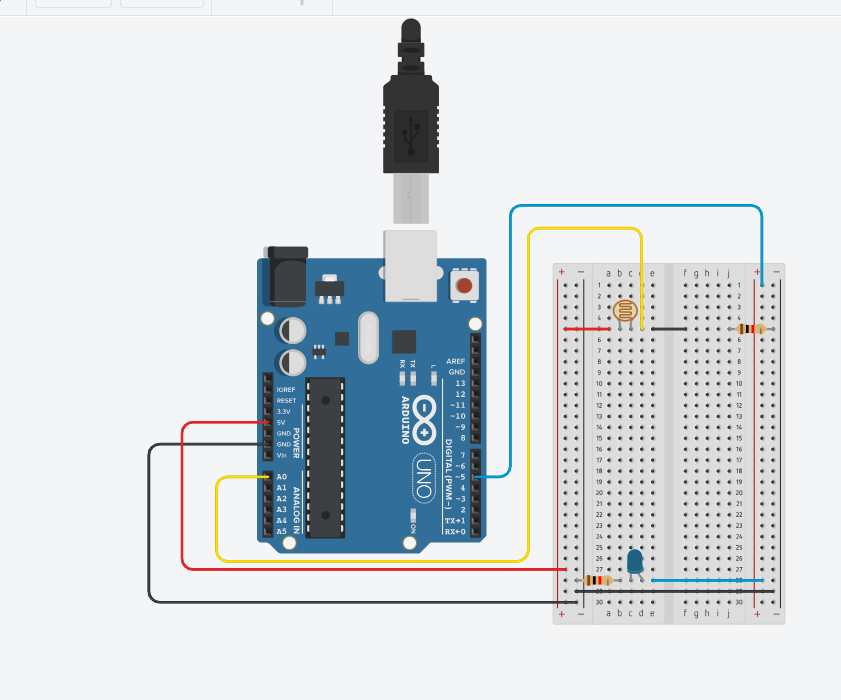
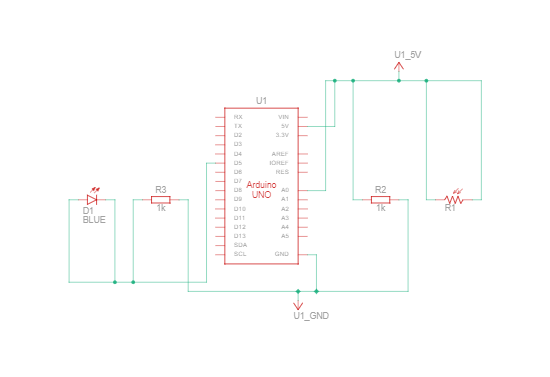
This assignment we spent an unholy and frankly embarrassing amount of time on this. We modified the code from class and figured out a way to light up both LEDs when the ball on the screen bounces. The wind speed depends on readings from the LDR, so the ball goes in different directions when the board is in light or dark conditions. At a certain light level, the ball remains stationary.
Arduino Code:
int leftLedPin = 2;
int rightLedPin = 5;
void setup() {
// Start serial communication so we can send data
// over the USB connection to our p5js sketch
Serial.begin(9600);
// We'll use the builtin LED as a status output.
// We can't use the serial monitor since the serial connection is
// used to communicate to p5js and only one application on the computer
// can use a serial port at once.
pinMode(LED_BUILTIN, OUTPUT);
// Outputs on these pins
pinMode(leftLedPin, OUTPUT);
pinMode(rightLedPin, OUTPUT);
// Blink them so we can check the wiring
digitalWrite(leftLedPin, HIGH);
digitalWrite(rightLedPin, HIGH);
delay(200);
digitalWrite(leftLedPin, LOW);
digitalWrite(rightLedPin, LOW);
// start the handshake
while (Serial.available() <= 0) {
digitalWrite(LED_BUILTIN, HIGH); // on/blink while waiting for serial
data
Serial.println("0,0"); // send a starting message
delay(300); // wait 1/3 second
digitalWrite(LED_BUILTIN, LOW);
delay(50);
}
}
void loop() {
// wait for data from p5 before doing something
while (Serial.available()) {
digitalWrite(LED_BUILTIN, HIGH); // led on while receiving data
int left = Serial.parseInt();
int right = Serial.parseInt();
if (Serial.read() == '\n') {
digitalWrite(leftLedPin, left);
digitalWrite(rightLedPin, right);
int sensor = analogRead(A0);
delay(5);
int sensor2 = analogRead(A1);
delay(5);
Serial.print(sensor);
Serial.print(',');
Serial.println(sensor2);
}
}
digitalWrite(LED_BUILTIN, LOW);
}
P5 Code:
let rVal = 0;
let velocity;
let gravity;
let position;
let acceleration;
let wind;
let drag = 0.99;
let mass = 50;
let groundFlag;
let dropFlag = false; // flag for when the spacebar is pressed and the ball should drop
let windFlag = false; // flag to start/stop wind
function setup() {
createCanvas(640, 500);
// noFill();
position = createVector(width / 2, 0);
velocity = createVector(0, 0);
acceleration = createVector(0, 0);
gravity = createVector(0, 0.5 * mass);
wind = createVector(0, 0);
groundFlag = 0;
frameRate(30);
textSize(20)
}
function draw() {
background(255);
text("rVal: "+str(rVal), 20, 55);
text("wind.x: "+str(wind.x), 20, 80);
if (!serialActive) {
text("Press Space Bar to select Serial Port", 20, 30);
} else {
text("Connected", 20, 30);
}
if (dropFlag == true) { // when spacebar is pressed, start the sketch
if (position.y == height - mass / 2) {
groundFlag = 1; // this value is sent to the LED in the Arduino end
} else {
groundFlag = 0;
}
applyForce(wind);
applyForce(gravity);
velocity.add(acceleration);
velocity.mult(drag);
position.add(velocity);
acceleration.mult(0);
ellipse(position.x, position.y, mass, mass);
if (position.y > height - mass / 2) {
velocity.y *= -0.9;
position.y = height - mass / 2;
}
if (windFlag == true) {
wind.x = map(rVal, 0, 1023, -1, 1);
}
}
}
function applyForce(force) {
let f = p5.Vector.div(force, mass);
acceleration.add(f);
}
function keyPressed() {
if (keyCode == UP_ARROW) {
windFlag = true // wind is enabled when up arrow key is pressed
}
if (keyCode == DOWN_ARROW) {
windFlag = false // wind is paused when down arrow key is pressed
wind.x = 0
}
if (key == " ") {
setUpSerial();
dropFlag = true;
}
}
function readSerial(data) {
////////////////////////////////////
//READ FROM ARDUINO HERE
////////////////////////////////////
if (data != null) {
// make sure there is actually a message
let fromArduino = split(trim(data), ","); // split the message
// if the right length, then proceed
if (fromArduino.length == 2) {
// only store values here
// do everything with those values in the main draw loop
// We take the string we get from Arduino and explicitly
// convert it to a number by using int()
// e.g. "103" becomes 103
rVal = int(fromArduino[0]);
alpha = int(fromArduino[1]);
}
//////////////////////////////////
//SEND TO ARDUINO HERE (handshake)
//////////////////////////////////
let sendToArduino = groundFlag + "," + groundFlag + "\n";
writeSerial(sendToArduino);
}
}
Video:
Reflection:
The overall exercises were a great way to comprehend further the logic behind the coding and how both platforms are intertwined. Knowing how things are operated between each other, we can now effectively work on our final projects and have so many possibilities of projects to work on.
We don’t typically discuss how disability influences design, so this was a very intriguing topic. Indeed, it was fascinating to observe how he connected glasses to disabilities, which influenced the creation of what we now refer to as eyewear. The author went on to discuss various disabilities and the medical equipment associated with them, as well as how fashion has improved their overall appearance and design. Graham Pullin talks about how important it is to make things like wheelchairs and hearing aids look good and easy to use for people with disabilities. He suggests calling them “chairwear” and “hearwear” to make them seem more like regular things you’d buy, not just medical stuff. But there’s a worry that making these things fashionable might make them more expensive, which could be a problem for people who don’t have a lot of money. Pullin doesn’t talk much about how to keep these cool designs affordable for everyone who needs them. He mentions how glasses used to be cheap for everyone, but now they can cost a lot because they’re seen as a fashion accessory. It’s important that making things look good doesn’t make them too pricey for people who really need them. There should be a balance between looking nice and being affordable for everyone who needs these tools.
For my final project, I’m considering several ideas but haven’t settled on one yet. One concept is to develop a memory pattern game, similar to the one where you observe a sequence of colors and replicate it in the same order, sometimes with timed intervals between each color—a classic memory challenge. Another option involves utilizing an ultrasonic sensor attached to a servo motor, scanning a 180-degree area to create a game where the player must accomplish a task without triggering detection on the “radar.” Another idea I’m really keen on exploring involves integrating Arduino and sensors to enhance my ongoing midterm project, which took weeks and weeks of work. These are just a few ideas I have for now that I need to look further into.
This week’s reading “Design meets Disability” seemed to capture the essence of a good design through the lens of disability. The author begins with the conversation regarding the traditional absence of design or focus on appearance in goods created to aid a disability. With an emphasis on discretion, the object often serves contrary to its purpose by depriving the wearer of a positive image and instead results in stigmatizing the disability. It was interesting to note that an object’s association with design often changes with the way it is categorized, evident in the example of eyewear transforming from an object of disability to that of fashion. Through this observation I was reminded of a previous reading that sparked a conversation about form versus function in a design. As mentioned in an earlier response, that an ideal design would be one that is able to strike a balance between the two. However, this article further prompted me to take into consideration the preference of people who often have varying needs. The inclusion of design can definitely be a boost for the self-confidence of people but it is useful only if it is done without compromising the intended functionality.
Reflecting on the ideas presented, I felt that it may be interesting to consider creating all existing items with more thought and consideration instead of creating an entire separate line of products for disability. While this brings us back to the debate around simple design over a universal design, I think making designs inclusive through simple tactile and auditory inputs can be done without complicating its usability. Finally, a user-centric design remains the top priority and it is necessary to ensure a product reflects simplicity, inclusion, design and allows the user to develop a positive self-image which can be achieved by involving all relevant people including designers in the creation of a product.
After learning about the functionalities and the means of communicating between P5 and Arduino platforms, we were given the assignments to initialize various scenarios to and from p5.
First Assignment:
In this assignment, we initialized an Arduino to p5 connection using a potentiometer to control the horizontal position of an ellipse:
Arduino code:
const int potPin = A0;  // Analog pin connected to the potentiometer

void setup() {
  Serial.begin(9600);
}

void loop() {

    int potValue = analogRead(potPin);  // Read the value from the potentiometer
      // Send the potentiometer value to p5.js
      Serial.println(potValue);
}
P5 Code:
let ellipseHorizental;

function setup() {
  createCanvas(640, 480);
  textSize(18);
  ellipseHorizental = width/2;
}

function draw() {
  background(220);

  // Draw ellipse with width based on potentiometer value
  fill(255, 0, 255);
  ellipse(ellipseHorizental, height / 2, 100, 150);

  if (!serialActive) {
    text("Press Space Bar to select Serial Port", 20, 30);
  } else {
    text("Connected", 20, 30);

    // Print the current potentiometer value
    text('Potentiometer Value = ' + str(ellipseHorizental), 20, 50);
  }
}

function keyPressed() {
  if (key == " ") {
    setUpSerial();
  }
}

function readSerial(data) {
  if (data != null) {
    // convert the string to a number using int()
    let fromArduino = split(trim(data), ",");

    // Map the potentiometer value to the ellipse width
    ellipseHorizental = map(int(fromArduino[0]), 0, 1023, 0, 640);

  }
}
Video:
Assignment 2:
In this assignment, we initiated a p5 to Arduino response. The slider in p5 can control the brightness of an LED in Arduino.
Arduino code:
int LED = 5; // Digital pin connected to the LED

void setup() {
  Serial.begin(9600);
  pinMode(LED_BUILTIN, OUTPUT);
  pinMode(LED, OUTPUT);

  // start the handshake
  while (Serial.available() <= 0) {
    digitalWrite(LED_BUILTIN, HIGH); // on/blink while waiting for serial data
    Serial.println("0");             // send a starting message
    delay(300);                       // wait 1/3 second
    digitalWrite(LED_BUILTIN, LOW);
    delay(50);
  }
}

void loop() {
  // wait for data from p5 before doing something
  while (Serial.available()) {
    digitalWrite(LED_BUILTIN, HIGH); // led on while receiving data

    int brightnessValue = Serial.parseInt();
    if (Serial.read() == '\n') {
      delay(5);
      Serial.println(brightnessValue);
    }
    analogWrite(LED, brightnessValue);
    digitalWrite(LED_BUILTIN, LOW);
  }
}
P5 code:
let brightnessSlider;

function setup() {
  createCanvas(640, 480);
  textSize(18);

  // Create a slider
  brightnessSlider = createSlider(0, 255, 128); // Set the range and initial value
  brightnessSlider.position(20, 100); // Set the position of the slider
}

function draw() {
  background(255);

  // Draw a slider
  fill(255, 0, 0);
  rect(brightnessSlider.x, brightnessSlider.y, brightnessSlider.width, brightnessSlider.height);

  if (!serialActive) {
    text("Press Space Bar to select Serial Port", 20, 30);
  } else {
    text("Connected", 20, 30);

    // Print the current brightness value
    text('Brightness = ' + brightnessSlider.value(), 20, 50);
  }
}

function keyPressed() {
  if (key == " ") {
    setUpSerial();
  }
}
function readSerial(data) {
  if (data != null) {
    let sendToArduino = brightnessSlider.value() + "\n";
    writeSerial(sendToArduino);
    }
}
int LED = 5; // Digital pin connected to the LED

void setup() {
  Serial.begin(9600);
  pinMode(LED_BUILTIN, OUTPUT);
  pinMode(LED, OUTPUT);

  // start the handshake
  while (Serial.available() <= 0) {
    digitalWrite(LED_BUILTIN, HIGH); // on/blink while waiting for serial data
    Serial.println("0");             // send a starting message
    delay(300);                       // wait 1/3 second
    digitalWrite(LED_BUILTIN, LOW);
    delay(50);
  }
}

void loop() {
  // wait for data from p5 before doing something
  while (Serial.available()) {
    digitalWrite(LED_BUILTIN, HIGH); // led on while receiving data

    int brightnessValue = Serial.parseInt();
    if (Serial.read() == '\n') {
      delay(5);
      Serial.println(brightnessValue);
    }
    analogWrite(LED, brightnessValue);
    digitalWrite(LED_BUILTIN, LOW);
  }
}
Video:
Assignment 3:
This assignment we spent an unholy and frankly embarrassing amount of time on this. We modified the code from class and figured out a way to light up both LEDs when the ball on the screen bounces. The wind speed depends on readings from the LDR, so the ball goes in different directions when the board is in light or dark conditions. At a certain light level, the ball remains stationary.
Arduino Code:
int leftLedPin = 2;
int rightLedPin = 5;
void setup() {
// Start serial communication so we can send data
// over the USB connection to our p5js sketch
Serial.begin(9600);
// We'll use the builtin LED as a status output.
// We can't use the serial monitor since the serial connection is
// used to communicate to p5js and only one application on the computer
// can use a serial port at once.
pinMode(LED_BUILTIN, OUTPUT);
// Outputs on these pins
pinMode(leftLedPin, OUTPUT);
pinMode(rightLedPin, OUTPUT);
// Blink them so we can check the wiring
digitalWrite(leftLedPin, HIGH);
digitalWrite(rightLedPin, HIGH);
delay(200);
digitalWrite(leftLedPin, LOW);
digitalWrite(rightLedPin, LOW);

// start the handshake
while (Serial.available() <= 0) {
digitalWrite(LED_BUILTIN, HIGH); // on/blink while waiting for serial
data
Serial.println("0,0"); // send a starting message
delay(300); // wait 1/3 second

digitalWrite(LED_BUILTIN, LOW);
delay(50);
}
}
void loop() {
// wait for data from p5 before doing something
while (Serial.available()) {
digitalWrite(LED_BUILTIN, HIGH); // led on while receiving data
int left = Serial.parseInt();
int right = Serial.parseInt();
if (Serial.read() == '\n') {
digitalWrite(leftLedPin, left);
digitalWrite(rightLedPin, right);
int sensor = analogRead(A0);
delay(5);
int sensor2 = analogRead(A1);
delay(5);
Serial.print(sensor);
Serial.print(',');
Serial.println(sensor2);
}
}
digitalWrite(LED_BUILTIN, LOW);
}
P5 Code:
let rVal = 0;
let velocity;
let gravity;
let position;
let acceleration;
let wind;
let drag = 0.99;
let mass = 50;
let groundFlag;
let dropFlag = false; // flag for when the spacebar is pressed and the ball should drop
let windFlag = false; // flag to start/stop wind

function setup() {
createCanvas(640, 500);
// noFill();
position = createVector(width / 2, 0);
velocity = createVector(0, 0);
acceleration = createVector(0, 0);
gravity = createVector(0, 0.5 * mass);
wind = createVector(0, 0);
groundFlag = 0;
frameRate(30);
textSize(20)
}
function draw() {
background(255);
text("rVal: "+str(rVal), 20, 55);
text("wind.x: "+str(wind.x), 20, 80);
if (!serialActive) {
text("Press Space Bar to select Serial Port", 20, 30);
} else {
text("Connected", 20, 30);
}
if (dropFlag == true) { // when spacebar is pressed, start the sketch
if (position.y == height - mass / 2) {
groundFlag = 1; // this value is sent to the LED in the Arduino end
} else {
groundFlag = 0;
}
applyForce(wind);
applyForce(gravity);
velocity.add(acceleration);
velocity.mult(drag);
position.add(velocity);
acceleration.mult(0);
ellipse(position.x, position.y, mass, mass);
if (position.y > height - mass / 2) {
velocity.y *= -0.9;
position.y = height - mass / 2;
}
if (windFlag == true) {
wind.x = map(rVal, 0, 1023, -1, 1);
}
}

}
function applyForce(force) {
let f = p5.Vector.div(force, mass);
acceleration.add(f);
}
function keyPressed() {
if (keyCode == UP_ARROW) {
windFlag = true // wind is enabled when up arrow key is pressed
}
if (keyCode == DOWN_ARROW) {
windFlag = false // wind is paused when down arrow key is pressed
wind.x = 0
}
if (key == " ") {
setUpSerial();
dropFlag = true;
}
}
function readSerial(data) {
////////////////////////////////////
//READ FROM ARDUINO HERE
////////////////////////////////////
if (data != null) {
// make sure there is actually a message
let fromArduino = split(trim(data), ","); // split the message
// if the right length, then proceed
if (fromArduino.length == 2) {
// only store values here
// do everything with those values in the main draw loop
// We take the string we get from Arduino and explicitly
// convert it to a number by using int()
// e.g. "103" becomes 103
rVal = int(fromArduino[0]);
alpha = int(fromArduino[1]);
}
//////////////////////////////////
//SEND TO ARDUINO HERE (handshake)
//////////////////////////////////

let sendToArduino = groundFlag + "," + groundFlag + "\n";
writeSerial(sendToArduino);
}
}
Video:
Reflection:
The overall exercises were a great way to comprehend further the logic behind the coding and how both platforms are intertwined. Knowing how things are operated between each other, we can now effectively work on our final projects and have so many possibilities of projects to work on.
make something that uses only one sensor on Arduino and makes the ellipse in p5 move on the horizontal axis, in the middle of the screen, and nothing on Arduino is controlled by p5
For Arduino, I used a potentiometer to change the position of the ellipse in the p5js sketch. The ellipse starts from the left of the canvas, and it moves horizontally as the values from the potentiometer increase. The values from the potentiometer are mapped to the x coordinates of the ellipse, moving it across the horizontal axis in the middle of the screen.
//// Arduino Code


//void setup() {
  // put your setup code here, to run once:
  Serial.begin(9600);

//}

//void loop() {
  // put your main code here, to run repeatedly:
  int sensor = analogRead(A0);
  delay(5);
  Serial.println(sensor);

//}


let left = 0;

function setup() {
  createCanvas(400, 400);
}

function draw() {
  background(220,110,250);
  fill("green");
  ellipse(left, 50, 50, 50);
}

function keyPressed() {
  if (key == " ") {
    // important to have in order to start the serial connection!!
    setUpSerial();
  }
}

function readSerial(data) {
  left = map(data, 0, 1023, 0, 400);
}
Exercise 2:
make something that controls the LED brightness from p5
In this p5.js sketch, moving the mouse horizontally controls the brightness of an LED, represented by the variable `mybrightness`. The canvas background changes in shades of blue with the mouse’s x-position. Pressing the space bar initiates a serial connection to the Arduino, enabling real-time communication. The `readSerial` function reads data from the Arduino, and the current brightness value is sent back by appending a new line character. This simple interaction allows the LED brightness to respond in real time to the horizontal mouse movement on the canvas.
// - 5 - LED
int ledpin=5;//pin for led to be used

void setup() {
  // Start serial communication so we can send data
  // over the USB connection to our p5js sketch
  Serial.begin(9600);

  pinMode(5,OUTPUT);//setting mode as output
  pinMode(LED_BUILTIN, OUTPUT);
}

void loop() {
  // wait for data from p5 before doing something
  while (Serial.available()) {//while we read from serial
    digitalWrite(LED_BUILTIN, HIGH); // led on while receiving data
    int brightness=Serial.parseInt();//the brightness is gotten from data from p5
    if (Serial.read() == '\n') {//if we read \n,
      analogWrite(ledpin, brightness);//turn on the led based on the intensity gotten from p5
      Serial.println();//send \n
    }
  }
  digitalWrite(LED_BUILTIN, LOW);//if it is not reading, turn of checker light
}
P5 code:
let mybrightness=0;
function setup() {
  createCanvas(255,255);//make the canvas size 255 by 255
  textSize(18);//set text size to 18
}

function draw() {

  background(0,0,mouseX);//background be shades of blue
  fill(255);//text be white

  if (!serialActive) {
    text("Press Space Bar to select Serial Port", 20, 30);
  } else {
    text("Connected", 20, 30);

  }
  mybrightness=mouseX;//equate the mouseX to mybrightness
}

function keyPressed() {
  if (key == " ") {
    // important to have in order to start the serial connection!!
    setUpSerial();//when space is pressed connect to arduino
  }
}

// This function will be called by the web-serial library
// with each new line of data. The serial library reads
// the data until the newline and then gives it to us through
// this callback function

function readSerial(data) {
    let sendToArduino = mybrightness+'\n';
    writeSerial(sendToArduino);//send mybrightness to arduino
}
Exercise 3:
take the gravity wind example and make it so every time the ball bounces one led lights up and then turns off, and you can control the wind from one analog sensor
The p5.js sketch features a blue ball that bounces on the canvas, and a corresponding LED turns on whenever the ball hits the floor. The wind effect on the ball’s movement is controlled by an analog sensor connected to the Arduino. When a ‘d’ key is pressed, a serial connection is established between p5.js and the Arduino. Pressing the space bar creates a new bouncing ball with a random mass and resets its position. The Arduino reads the wind intensity from an analog light sensor, and the LED is turned on or off based on the received brightness value from p5.js. The wind strength is then sent back to p5.js, completing the real-time interaction between the bouncing ball simulation and the Arduino-controlled LED.
Video :
Arduino Code:
int LedPin = 5;//pin to display light

void setup() {
  // Start serial communication so we can send data
  // over the USB connection to our p5js sketch
  Serial.begin(9600);

  // We'll use the builtin LED as a status output.
  // We can't use the serial monitor since the serial connection is
  // used to communicate to p5js and only one application on the computer
  // can use a serial port at once.
  pinMode(LED_BUILTIN, OUTPUT);

  // Outputs on these pins
  pinMode(LedPin, OUTPUT);//set pin as output

}

void loop() {
  // wait for data from p5 before doing something
  while (Serial.available()) {//while we read from serial
    digitalWrite(LED_BUILTIN, HIGH); // led on while receiving data for checker
    int bright = Serial.parseInt();//read data from p5 and store in bright
    if (Serial.read() == '\n') {//if the serial read is \n,
      digitalWrite(LedPin, bright);//turn on or off led depending on the value of bright
      int windsens=analogRead(A0);//read the windspeed from lightsensor
      delay(5);//wait small to get reading
      Serial.println(windsens);//send windspeed to p5
    }
  }
  digitalWrite(LED_BUILTIN, LOW);//if not active turn checker led off
}
P5 code:
let velocity;
let gravity;
let position;
let acceleration;
let wind;
let drag = 0.99;
let mass = 50;
let led=0;//variable controlling the led

function setup() {
  createCanvas(640, 360);
  fill(0,0,255);//ball to be blue
  position = createVector(width/2, 0);
  velocity = createVector(0,0);
  acceleration = createVector(0,0);
  gravity = createVector(0, 0.5*mass);
  wind = createVector(0,0);
}

function draw() {
  background(0,50);//background black with transperacy 50
  applyForce(wind);
  applyForce(gravity);
  velocity.add(acceleration);
  velocity.mult(drag);
  position.add(velocity);
  acceleration.mult(0);
  ellipse(position.x,position.y,mass,mass);
  if (position.y > height-mass/2) {
      velocity.y *= -0.9;  // A little dampening when hitting the bottom
      position.y = height-mass/2;
    }
  if(position.y==height-mass/2){led=1;}//if the ball touches the floor, turn on led
  else{led=0;}//otherwise turn led off
}

function applyForce(force){
  // Newton's 2nd law: F = M * A
  // or A = F / M
  let f = p5.Vector.div(force, mass);
  acceleration.add(f);
}

function keyPressed() {
  if (key == "d") {//when d is pressed create connection
    // important to have in order to start the serial connection!!
    setUpSerial();
  }
  if (key==' '){//when space is pressed create new ball and call bounce effect
    mass=random(15,80);
    position.y=-mass;
    velocity.mult(0);
  }
}
function readSerial(data) {
    wind.x=map(int(data),0,1023,-2,2);//map the value gotten from the arduino to wind.x
    let sendToArduino = led+'\n';
    writeSerial(sendToArduino);//send the value of led to the srduino
}
Reading through the examples given for the final project, I was inspired to explore the idea of creating an assistive device using the arduino and p5 communication. I believe this theme would allow me to apply the interactivity in coming up with something that is practical and useful. A concept that I found interesting is the creation of a sensory enhancement model for the visually impaired to provide feedback of their surrounding through different arduino sensors. However, I am still exploring existing assistive devices to get a better understanding of the requirements of a model and hope to come up with something unique for the final project.
For now, I am thinking of making an autonomous robot that acts like a pet. I plan to explore the machine learning library. Just because I haven’t really explored it and I plan to create a pet that uses sound to do something. I am still thinking of what to do but hopefully, I get some inspiration from somewhere and I create something awesome!
Last week I thought we were in the 11th week so I wrote the response for this week. To make up for that, I am writing the response for last week now.
Do you seriously think the Future Of Interaction should be a single finger? Throughout the article, I was mostly not in agreement with Bret. Why? Because, well I feel like he was writing as though he didn’t want a change in reality but we all know that development comes with change. The only part I kind of agreed with him was when he said that this form of interaction is a transition to the future but even with that, we must keep in mind that the future keeps changing. Today, the “then” future(using screens) is the current present, and saying that this form of interaction is a transition into the future is like saying the keypad is the transition to using smartphones. True but are smartphones still the future? What I am trying to say is, that development comes with change and one can not say he has developed without changing. As we grow, we tend to stop doing/using some things for example, even in biology, humans have evolved to a point where we do not have a use for the appendix or the spleen, some organs that were once vital. I feel like saying we should not develop into an age of pictures behind screens hinders our “capabilities” to grow. Through this, we got to create new word to which we now explore. A new future. For me I would say the future is not something that should be controlled cause then we can not explore our capabilities to the fullest.