Arduino + P5JS

Exercise 1

Link to the code

Moving ellipse with a potentiometer.

Exercise 2

Link to the code

Using the mouse location on the horizontal axis to change the LED brightness.

Exercise #3

Link to the code

Lighting up the LED when the ball touches the ground, controlling the horizontal direction of the ball using a potentiometer, and creating a new ball when the potentiometer reads 0.


Final Project Proposal

Concept

Our project is to create a remote-controlled car that can be controlled using hand gestures, specifically by tracking the user’s hand position. We will achieve this by integrating a P5JS tracking system into the car, which will interpret the user’s hand gestures and translate them into commands that control the car’s movements.

Implementation

To implement this project, we will first build the remote-controlled car using an Arduino Uno board and other necessary components. We will then integrate the P5JS system, which will detect the user’s hand position and translate it into movement commands for the car. We have two options for detecting user’s hand position, either PoseNet or Teachable Machine.  The camera tracking system will be programmed to interpret specific hand gestures, such as moving the hand forward or backward to move the car in those directions.

Potential challenges

One potential challenge we may face during the implementation is accurately interpreting the user’s hand gestures. The camera tracking system may require experimentation and programming adjustments to ensure that it interprets the user’s hand movements accurately. Also testing will be required to see if PoseNet performs better or Teachable Machine. Responsiveness will also be a factor as we would want the control to be fluid for the user. Additionally, ensuring the car responds correctly to the interpreted movement commands may also present a challenge, in terms of the physical construction of the cars and the variability of the motors. 

Exercises + Final Project Idea

Homework Exercises


Ellipse Moving:

Switch + LED:

Arduino code:

// Week 11.2 Example of bidirectional serial communication

int analog_pin = A2;
int led_pin = 9;

void setup() {
  // Start serial communication so we can send data
  // over the USB connection to our p5js sketch
  Serial.begin(9600);

  pinMode(analog_pin, INPUT);
  pinMode(led_pin, OUTPUT);

  // start the handshake
  while (Serial.available() <= 0) {
    Serial.println("-1"); // send a starting message
    delay(300);            // wait 1/3 second
  }
}

void loop() {
  // wait for data from p5 before doing something
  while (Serial.available()) {
    int led_brightness = Serial.parseInt();
    digitalWrite(led_pin, led_brightness);

    Serial.println(map(analogRead(analog_pin), 0, 1023, -1, 1));
  }
}

P5.js code:

/* Week 11.2 bidi serial example
 * Originally by Aaron Sherwood
 * Modified by Mangtronix
 *
 * Add this library to Sketch files
 *  https://github.com/mangtronix/IntroductionToInteractiveMedia/blob/master/code/p5.web-serial.js files
 *
 * Arduino code:
 * https://github.com/mangtronix/IntroductionToInteractiveMedia/blob/master/code/Week11Serial.ino
 */

let dir = 0;
let x = 40;
let r = 40;
let inc = 2;

function setup() {
  createCanvas(640, 480);
}

function draw() {
  // one value from Arduino controls the background's red color
  background(0);

  ellipse(x,height/2,r*2,r*2);
  if (serialActive)
    x = dir == 1 ? min(width - r, x + inc) : x = max(r, x - inc);
  
}

function keyPressed() {
  if (key == " ") {
    // important to have in order to start the serial connection!!
    setUpSerial();
  }
}

// This function will be called by the web-serial library
// with each new *line* of data. The serial library reads
// the data until the newline and then gives it to us through
// this callback function
function readSerial(data) {
  ////////////////////////////////////
  //READ FROM ARDUINO HERE
  ////////////////////////////////////

  if (data != null) {
    // make sure there is actually a message
    // split the message
    let fromArduino = split(trim(data), "\n");

    // if the right length, then proceed
    if (fromArduino.length == 1) {
      // only store values here
      // do everything with those values in the main draw loop
      dir = fromArduino[0];
    }

    //////////////////////////////////
    //SEND TO ARDUINO HERE (handshake)
    //////////////////////////////////
    console.log("X: ", x);
    let output = map(x, r, width - r, 0, 255);
    console.log("Output: ", int(output));
    writeSerial(int(output));
  }
}


Gravity:

Arduino code:

// Week 11.2 Example of bidirectional serial communication

int analog_pin = A2;
int led_pin = 9;

void setup() {
  // Start serial communication so we can send data
  // over the USB connection to our p5js sketch
  Serial.begin(9600);

  pinMode(analog_pin, INPUT);
  pinMode(led_pin, OUTPUT);

  // start the handshake
  while (Serial.available() <= 0) {
    Serial.println("-1"); // send a starting message
    delay(300);            // wait 1/3 second
  }
}

void loop() {
  // wait for data from p5 before doing something
  while (Serial.available()) {
    int led_brightness = Serial.parseInt();
    digitalWrite(led_pin, led_brightness);

    Serial.println(map(analogRead(analog_pin), 0, 1023, -1, 1));
  }
}

P5.js code:

let velocity;
let gravity;
let position;
let acceleration;
let wind;
let drag = 0.99;
let mass = 50;
let led_on = 0;

function setup() {
  createCanvas(640, 360);
  noFill();
  position = createVector(width/2, 0);
  velocity = createVector(0,0);
  acceleration = createVector(0,0);
  gravity = createVector(0, 0.5*mass);
  wind = createVector(0,0);
}

function draw() {
  background(255);
  if (serialActive) {
    applyForce(wind);
    applyForce(gravity);
    velocity.add(acceleration);
    velocity.mult(drag);
    position.add(velocity);
    acceleration.mult(0);
    ellipse(position.x,position.y,mass,mass);
    if (position.y > height-mass/2) {
        led_on = 1;
        velocity.y *= -0.9; 
        position.y = height-mass/2;
    } else {
      led_on = 0;
    }
  }
}

function applyForce(force){
  // Newton's 2nd law: F = M * A
  // or A = F / M
  let f = p5.Vector.div(force, mass);
  acceleration.add(f);
}

function keyPressed(){
  if (keyCode==UP_ARROW){
    mass=random(15,80);
    position.y=-mass;
    velocity.mult(0);
  }
  if (key == " ") {
    setUpSerial();
  }
}

// This function will be called by the web-serial library
// with each new *line* of data. The serial library reads
// the data until the newline and then gives it to us through
// this callback function
function readSerial(data) {
  ////////////////////////////////////
  //READ FROM ARDUINO HERE
  ////////////////////////////////////

  if (data != null) {
    // make sure there is actually a message
    // split the message
    let fromArduino = split(trim(data), "\n");

    // if the right length, then proceed
    if (fromArduino.length == 1) {
      // only store values here
      // do everything with those values in the main draw loop
      wind.x = fromArduino[0];
    }

    //////////////////////////////////
    //SEND TO ARDUINO HERE (handshake)
    //////////////////////////////////
    console.log(led_on);
    writeSerial(led_on);
  }
}


Final Project

My plan for the Final Project is an interactive device for my room. It is going to have at least 2 buttons one for “Good Morning” and a second for “Good Night”. When pressed “Good Night”, Arduino will turn off the lights, and turn off the AC, while P5.js will wish me “Good Night”, and tell me what time my alarm is set for tomorrow and how much time is left, and something more(TBD). For the “Good Morning” button, Arduino will turn on the AC, while P5.js will greet me, tell me what’s on my calendar today, read me a motivational quote, and tell me how many emails and from whom I received while I was sleeping.

Most of this is very new for me and will be complicated but I believe that if APIs of external services will work properly on p5.js this project is very doable and I’m very optimistic about it. I will have to learn how to use Google Calendar API, Gmail API, and Text-to-Voice API.

The idea came from a “Jarvis” AI from the Iron Man movie. Just like Jarvis, my project will be able to control some aspects of my room and become my companion.

Week 11 – Exercises

Exercise 1: Control p5js through Arduino 

For this exercise we had to establish serial communication between p5js and Arduino. Then we had to use an analog sensor to control some values in p5js. I used a photoresistor to control the movement of a circle in p5js.

p5js Code: 

// This program reads data from an Arduino board via serial connection and uses the data to control the position of an ellipse drawn on a P5JS canvas.

// Declare a variable to hold the x-coordinate of the ellipse.
let xValue = 0;  
// Set up the canvas.
function setup() {
  createCanvas(400, 400);
}
// Draw the ellipse on the canvas and display a message indicating whether or not the serial connection is active.
function draw() {
  background(0);
    // If the serial connection is not active, display a message telling the user to press the space bar to select a serial port.
  if (!serialActive) {
    fill(255);
    text("Press Space Bar to select Serial Port", width/4, 30);
  } 
   // If the serial connection is active, display a message indicating that it is connected and draw an ellipse at the current x-coordinate.
  else {
    fill(255);
    noStroke();
    text("Connected", 170, 30);
    stroke(255);
    fill("#39FF14")
    ellipse(xValue, height/2, 50, 50);
  }
}

// Set up the serial connection when the space bar is pressed.
function keyPressed() {
  if (key == " ") {
    setUpSerial();
  }
}

// Read the incoming data from the serial port and map it to the range of the canvas. 
function readSerial(data) {
  if (data != null) {
// Map the incoming data from the range of 0 to 1023 to the range of 0 to the width of the canvas.
    xValue = map(data, 840, 0, width, 0);
  }
}

Arduino Code: 

// This program reads data from a light sensor connected to analog pin A0 of an Arduino board and sends the data to a serial port (p5js).

// Define the analog pin to which the light sensor is connected.
const int lightSensor = A0;

// Set up the serial connection.
void setup() {
  Serial.begin(9600);
  
  // Set the light sensor pin as an input.
  pinMode(lightSensor, INPUT);
}

// Read the value from the light sensor and print it to the serial port.
void loop() {
  // Read the value from the light sensor.
  int lightValue = analogRead(lightSensor);
  
  // Print the light value to the serial port.
  Serial.println(lightValue);
}

Video:

Exercise 2: Control Arduino through p5js

For the second exercise we had to control Arduino through p5js. I designed a circuit with an LED whose brightness was controlled by clicking the mouse in different positions.

P5js Code: 

//Declare and intialize the duty variable to 0
let duty = 0;
//Create canvas and set text size to 18
  function setup() {
    createCanvas(640, 480);
    textSize(18);
  }

  function draw() {
  background(0);
    // Check if the serial port is not active
    if (!serialActive) {
      // Display a message to prompt the user to press the space bar to select a serial port
      fill(255);
      text("Press Space Bar to select Serial Port", 20, 30);
    } else {
      fill(255);
      // Display a message indicating that the serial port is connected
      text("Connected", 20, 30);
      // Log the duty value to the console
      console.log(duty);
      // Create a string to send to the Arduino over serial with the duty value and a newline character
      let sendToArduino = duty + "\n";
      // Send the string to the Arduino over serial
      writeSerial(sendToArduino);
    }  
   }
  function keyPressed() {
    // Check if the space bar is pressed
    if (key == " ") {
      setUpSerial();
    }
  }
  function mousePressed() {
    // Map the mouseY value to a duty value between 0 and 1023
    duty = int(map(mouseY, 0, height, 0, 1023));
  }
  function readSerial(data) {
  }

Arduino Code:

Unfortunately I lost the Arduino code as I over wrote it with the code from the 3rd exercise without previously saving.

Video: 

Exercise 3: Two-way communication between p5js and Arduino

For this exercise we had to establish a two-way communication. I used a photo receptor to control the direction of movement of a circle in p5js, and used p5js to turn on an LED every time that circle hit the ground.

P5js Code: 

// Ball simulation variables
let ballVelocity;
let ballGravity;
let ballPosition;
let ballAcceleration;
let ballWind;
let ballDrag = 0.99;
let ballMass = 50;

// Arduino communication variables
let arduinoWindSensorValue = 0;
let arduinoLedOn = 0;

function setup() {
createCanvas(400, 400);
ballPosition = createVector(width/2, 0);
ballVelocity = createVector(0,0);
ballAcceleration = createVector(0,0);
ballGravity = createVector(0, 0.5*ballMass);
ballWind = createVector(0,0);
}

function draw() {
background(0);
fill(255);
if (!serialActive) {text("Press Space Bar to select Serial Port", width/4, 30); }
else {text("Connected!", 165, 30); }

fill("#39FF14");
applyForce(ballWind);
applyForce(ballGravity);
ballVelocity.add(ballAcceleration);
ballVelocity.mult(ballDrag);
ballPosition.add(ballVelocity);
ballAcceleration.mult(0);
ellipse(ballPosition.x,ballPosition.y,ballMass,ballMass);

if (ballPosition.y > height-ballMass/2) {
ballVelocity.y *= -0.9; // A little dampening when hitting the bottom
ballPosition.y = height-ballMass/2;
arduinoLedOn = 1; //If the ball makes contact with the ground, the LED will be ON
}
else {arduinoLedOn = 0;} //Else the LED will be OFF

//If the arduinoWindSensorValue value from the Arduino that was mapped is greater than 0, then it will move the ball to the right
if(arduinoWindSensorValue > 0) {
ballWind.x = 0.5;
}

//Else if the arduinoWindSensorValue value from the Arduino is less than 0, it will move the ball to the left
else if(arduinoWindSensorValue < 0) {
ballWind.x = -0.5;
}

//If it's 0, aka no wind, then it will just keep the ball where it is, no wind.
else {
ballWind.x = 0;
}
}

function applyForce(force){
// Newton's 2nd law: F = M * A
// or A = F / M
let f = p5.Vector.div(force, ballMass);
ballAcceleration.add(f);
}

function keyPressed(){
if (key == "m"){
ballMass=random(15,80);
ballPosition.y=-ballMass;
ballVelocity.mult(0);
}

if(key == " ") {
setUpSerial();
}
}

function readSerial(data) {
if(data != null) {
//Sends the arduinoLedOn information to the Arduino
let sendToArduino = arduinoLedOn + "\n";
writeSerial(sendToArduino);
//Reads the arduinoWindSensorValue values from the Arduino and maps its value to either -1 or 1 to correspond to wind direction.
arduinoWindSensorValue = map(data, 0, 1023, -1 , 1);
}
}

Arduino Code: 

// Define pin constants
const int LED_PIN = 8;
const int LIGHT_SENSOR_PIN = A0;

void setup() {
  // Start serial communication
  Serial.begin(9600);

  // Set pin modes
  pinMode(LED_PIN, OUTPUT);
  pinMode(LIGHT_SENSOR_PIN, INPUT);

  // Check LED wiring
  digitalWrite(LED_PIN, HIGH);
  delay(200);
  digitalWrite(LED_PIN, LOW);

  // Wait for serial connection
  while (Serial.available() <= 0) {
    Serial.println("0");
  }
}

void loop() {
  while (Serial.available()) {
    // Read LED ON/OFF information from p5js and switch LED on/off accordingly
    int led_on = Serial.parseInt();
    digitalWrite(LED_PIN, led_on);

    // Read light value from the sensor and send it to p5js
    int light_value = analogRead(LIGHT_SENSOR_PIN);
    Serial.println(light_value);
  }
}

Video: 

Final Project – Arduino Radar: 

The project I am working on involves building a radar system using Arduino and P5JS. The radar will use an ultrasonic sensor to detect objects in the environment and display them on a graphical interface built with P5JS. The graphical interface will show the real-time location of the detected objects on a radar screen, with different colors indicating different distances. This project aims to showcase the capabilities of Arduino in building complex and interactive systems and to demonstrate the potential of radar technology in various applications, such as robotics, security, and environment monitoring. By combining hardware and software, this project will offer a unique and innovative solution for users who are interested in exploring the world of DIY electronics and sensor technology.

HW8: In-class Exercises (moving ellipse, LED brightness, gravity wind example…)

EXERCISE 1

Task description: Make something that uses only one sensor on Arduino and makes the ellipse in p5 move on the horizontal axis, in the middle of the screen, and nothing on Arduino is controlled by p5.

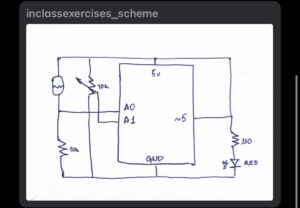
schematic used
setup used for all three exercises

Here is the link to the p5 code with the Arduino code commented out at the end of it.

If the video window doesn’t show, use this link to see the demo.

EXERCISE 2

Task description: Make something that controls the LED brightness from p5.

Here is the link to the p5 code with the Arduino code commented out at the end of it.

If the video window doesn’t show, use this link to see the demo.

EXERCISE 3

Task description: Take the gravity wind example and make it so that every time the ball bounces one led lights up and then turns off, and you can control the wind from one analog sensor.

Here is the link to the p5 code with the Arduino code commented out at the end of it.

If the video window doesn’t show, use this link to see the demo.


Week 11 – Serial Communication

Task 1:

make something that uses only one sensor on arduino and makes the ellipse in p5 move on the horizontal axis, in the middle of the screen, and nothing on arduino is controlled by p5

Code:

For the code, I used the Arduino and p5js code that was given to us in the class and edited it to suit my needs of moving the horizontal object with the help of a potentiometer. The code shown below is what I wrote in order to move the ellipse on the horizontal axis. As the task was quite simple, I also made the background change colors and gave the ellipse a “trail” effect by changing the transparency.

function draw() {
  var var1 = map(map(rVal,0, 1023, 0, width/2), 0, width/2, 150, 200);
  var var2 = map(map(rVal,0, 1023, 0, width/2), 0, width/2, 200, 50)
  background(var1, var2, var2, 0.9)

  if (!serialActive) {
    fill("black")
    text("Press Space Bar to select Serial Port", 20, 30);
  } else {

    noStroke()
    ellipse(map(rVal, 0, 1023, 50, width-50), height/2, map(rVal, 0, 1023, 5, 50))
  }
}

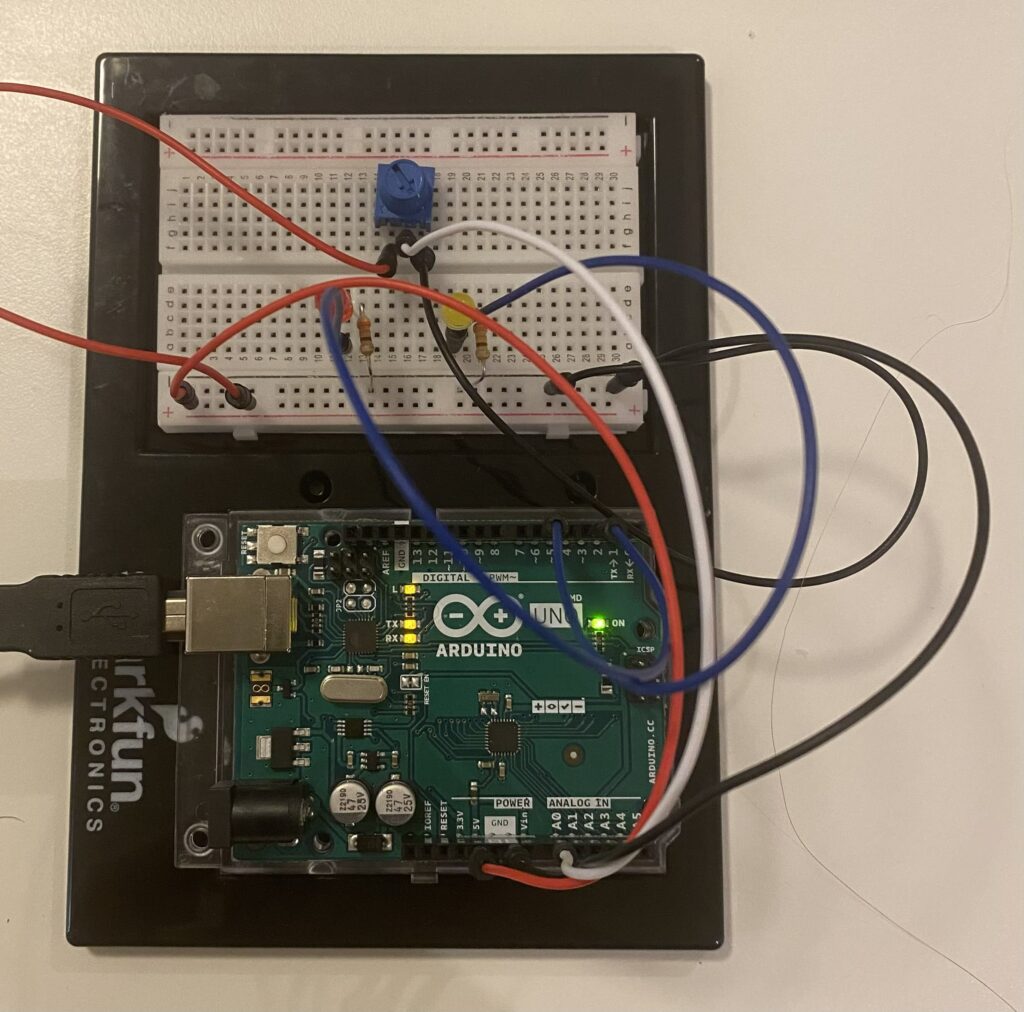
Picture of the circuit (The LEDs are used to check the wiring):
Task 2:

make something that controls the LED brightness from p5

Code:

As with the previous task, I used the already given code in order to change the brightness of the LED from p5js. However, I changed the digitalWrite() of the right LED (which was connected to pin 5 and could thus produce analog output) to analogWrite(). To change the brightness, I used a HTML slider in p5js. By extracting the value of the slider and sending the data to the right LED, I was able to change the brightness. Additionally, I changed the background color from black to white depending on the brightness of the LED such that the code is more intuitive.

function setup() {
  createCanvas(640, 480);
  textSize(18);
  
  slider = createSlider(0, 255, 0); // indicate the value range for slider
  slider.position(width/2-150, height/2);
  slider.style('width', '300px');
}

function draw() {
  var brightness_ = map(slider.value(), 0, 255, 0, 255);

  background(brightness_)
  
  if (!serialActive) {
  } else {
    right = brightness_;
  } 
}

The circuit looks the same as the one of the previous task but without the potentiometer.

Task 3:

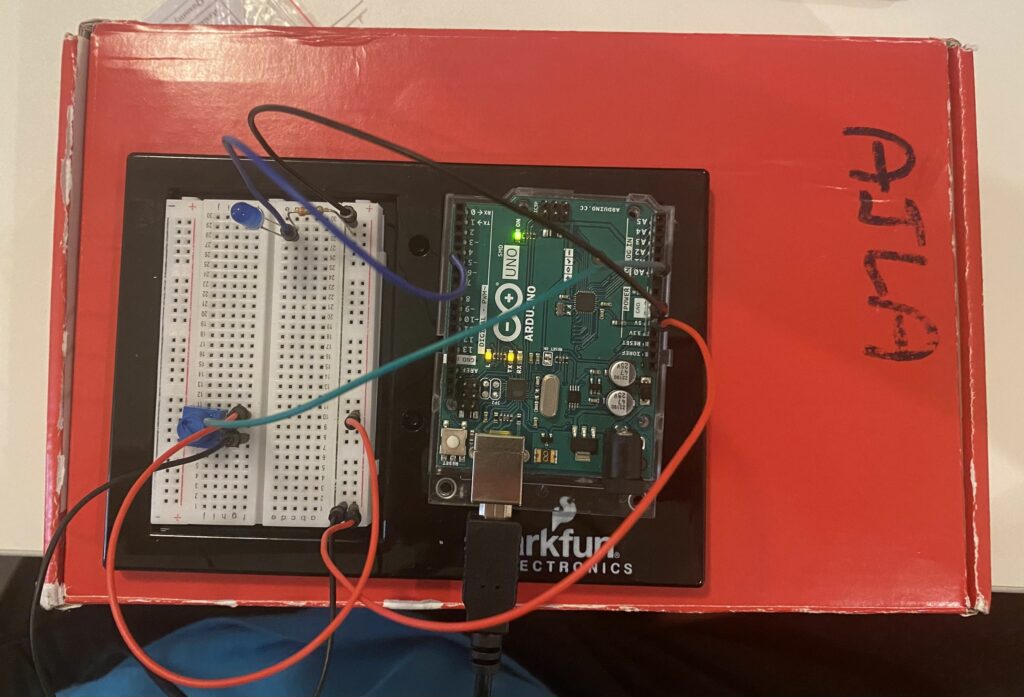
take the gravity wind example and make it so every time the ball bounces one led lights up and then turns off, and you can control the wind from one analog sensor
Code:

Combined with the code given in class before, I used the gravity example code for the assignment. By allowing for minor changes, I was able to establish communication from both p5js to Arduino (LED lighting up) and vice versa (potentiometer controlling the wind). While most of the code is from the example, I have annotated the parts which I have added below.

/* Week 11.2 bidi serial example
 * Originally by Aaron Sherwood
 * Modified by Mangtronix
 *
 * Add this library to Sketch files
 *  https://github.com/mangtronix/IntroductionToInteractiveMedia/blob/master/code/p5.web-serial.js files
 *
 * You must include this line in your index.html (in Sketch Files) to load the
 * web-serial library
 *
 *     <script src="p5.web-serial.js"></script>
 *
 * Arduino code:
 * https://github.com/mangtronix/IntroductionToInteractiveMedia/blob/master/code/Week11Serial.ino
 */

let left = 0;
let right = 0;
let rVal = 0;

function setup() {
  createCanvas(640, 480);
  textSize(18);
}


let velocity;
let gravity;
let position;
let acceleration;
let wind;
let drag = 0.99;
let mass = 50;

function setup() {
  createCanvas(640, 360);
  noFill();
  position = createVector(width/2, 0);
  velocity = createVector(0,0);
  acceleration = createVector(0,0);
  gravity = createVector(0, 0.5*mass);
  wind = createVector(0,0);
}

function draw() {
  background(255);
  applyForce(wind);
  applyForce(gravity);
  velocity.add(acceleration);
  velocity.mult(drag);
  position.add(velocity);
  acceleration.mult(0);
  // CONSTRAIN ELLIPSE SUCH THAT IT DOES NOT MOVE OFF SCREEN
  ellipse(constrain(position.x,mass/2, width-mass/2),position.y,mass,mass);
  if (position.y > height-mass/2) {
      // LIGHT UP LED ON COLLISION
      right = 1;

      velocity.y *= -0.9;  // A little dampening when hitting the bottom
      position.y = height-mass/2;
    }
  else{
    // LED SWITCHES OFF WHEN THERE IS NO COLLISON
    right = 0;
  }
  
  // CONTROL WIND WITH POTENTIOMETER READING
  if(!serialActive){
  }
  else{
    wind.x = map(rVal, 0, 1023, -1, 1)
  }
}

function applyForce(force){
  // Newton's 2nd law: F = M * A
  // or A = F / M
  let f = p5.Vector.div(force, mass);
  acceleration.add(f);
}

function keyPressed(){
  if (keyCode==UP_ARROW){
    mass=random(15,80);
    position.y=-mass;
    velocity.mult(0);
  }

  // REMOVED RIGHT AND LEFT KEY FOR WIND

  //  CONNECTING TO PORT
  if (key == " ") {
    setUpSerial();
  }
}

// CODE FROM CLASS
function readSerial(data) {
  ////////////////////////////////////
  //READ FROM ARDUINO HERE
  ////////////////////////////////////

  if (data != null) {
    // make sure there is actually a message
    // split the message
    let fromArduino = split(trim(data), ",");
    // if the right length, then proceed
    if (fromArduino.length == 1) {
      // only store values here
      // do everything with those values in the main draw loop
      
      // We take the string we get from Arduino and explicitly
      // convert it to a number by using int()
      // e.g. "103" becomes 103
      rVal = int(fromArduino[0]);
      // alpha = int(fromArduino[1]);
    }

    //////////////////////////////////
    //SEND TO ARDUINO HERE (handshake)
    //////////////////////////////////
    let sendToArduino = left + "," + right + "\n";
    writeSerial(sendToArduino);
  }
}

Video:

Reflection:

This assignment, although not as creative as the rest, was quite interesting. Setting up serial communication between p5js and the Arduino is something I found quite hard to understand in class, but since the assignment involved three Tasks, it became quite easy to navigate both the code and hardware side of things. One of the challenges I faced was failing to remember that Arudino does not work on Safari and that I need to re-compile code in order for it to run. It took me quite some time to remember that I needed to switch browsers for my code to run. However, I take both of these as valuable lessons and hope that I will not forget such details in the future, just to save myself from stressing as much as I did when beginning this project. All in all, I wish to do more creative stuff with the two components, which I hope can be seen in my final project.

Final Project Idea Proposal

Group: Vladimir, Dariga

Idea

A rhythm game where you are given instructions on which notes to play from a song. You must use our physical controller to play these sounds. You must keep up the tempo and always play the correct notes. We plan to prepare one to three songs for the player, which they will be able to select. Also, we can add a ‘freestyle’ mode where the song is generated at every moment.

Arduino: We have a square wooden box with the top open. We also have a ball or other smooth object which we place inside the box. We intend to use 2-4 ultrasonic sensors to track the position of the ball inside the box. For example in case of 2 sensors, one should track X position and the other should track Y position.

p5js: The canvas will be divided to include multiple colored regions that will correspond to a particular sound. Placement of the physical ball within the particular region will trigger a sound to play. One way to define the regions is by a 3×3 grid:

1 2 3
4 5 6
7 8 9

Here the cell 5 could not play a sound but the other ones would.

We haven’t decided yet on the particular sounds to play, with the preliminary idea for sounds to represent pre-defined notes.

On the screen, we also show the instructions (sequence of notes) that the player has to play. We can also color code the notes to make it easier to remember.

When the player misses enough notes they lose. Without missed notes, the player completes their music experience and may restart the game.


Musical Instrument

Concept

In this assignment, we were to create musical instruments but in groups. I could not find someone to work with so i decided to work on my own. One other reason was that i wanted to also have time to explore and learn more. My musical instrument is a basic one which uses two external libraries that are adapted for the ultrasonic sensor and the piezo buzzer. The libraries are the NewPing.h and the ToneAC.h library. The NewPing.h library is adapted to work with all types of ultrasonic sensors and increases the accuracy of the distance calculated. The ToneAC library has a higher frequency range, twice the volume and higher quality than the tone library. By combining these two libraries my instrument improved a lot more and had better quality sounds.

#include <NewPing.h> // newping library for the ultrasonic sensor
#include <toneAC.h> // tine library for the piezo buzzer

//pins of the ultrasonic sensor
const int trig=12; 
const int echo=11;

NewPing sonar( trig, echo, 35 ); // creating a new class for the ultrasonic sensor

void setup() {
  // put your setup code here, to run once:
Serial.begin(9600); // for debugging and printing the values stored
}


void loop() {
  // put your main code here, to run repeatedly:
  //calculate the distance to the obstacle
int f= sonar.ping_cm();
Serial.print("freq");
Serial.println(f);


//map the distance calculated to the notes c1 to e7
int frequency =map(f, 0, 35, 33, 4000);

//play the sound on the buzzer
toneAC(frequency, 10);

delay(200);
}


In-class Arduino + p5 exercises

Team: Dariga, Vladimir

First exercise

“Make something that uses only one sensor on arduino and makes the ellipse in p5 move on the horizontal axis, in the middle of the screen, and nothing on arduino is controlled by p5”

Arduino code, p5 code

Second exercise

“Make something that controls the LED brightness from p5”

Arduino code, p5 code

Third exercise

“take the gravity wind example and make it so every time the ball bounces one led lights up and then turns off, and you can control the wind from one analog sensor”

Arduino code, p5 code