Serial Communication Exercises

I worked with Armaan for the 3 exercises involving serial communication.

Exercise 1: Make something that uses only one sensor on Arduino and makes the ellipse in processing move on the horizontal axis, in the middle of the screen, and nothing on Arduino is controlled by processing.

For this exercise, we made the ellipse move in the middle of the screen using a potentiometer. I did this exercise in class with Shreya and it hardly took any time then, but it took some time to revise the concepts and get things right when I worked with Armaan on the weekend.

Arduino Code:

void setup() {
  Serial.begin(9600);
  Serial.println("0");
}
 
void loop() {
  while (Serial.available()) {
    if (Serial.read() == '\n') {
      int sensor = analogRead(A0);
      delay(1);
      Serial.println(sensor);
    }
  }
}

Processing Code:

import processing.serial.*;
Serial myPort;
int xPos=0;
int yPos=0;
 
void setup(){
  size(960,720);
  printArray(Serial.list());
  String portname=Serial.list()[1];
  println(portname);
  myPort = new Serial(this,portname,9600);
  myPort.clear();
  myPort.bufferUntil('\n');
}
 
void draw(){
  background(255);
  ellipse(xPos,height/2,30,30);
}
 
void serialEvent(Serial myPort){
  String s=myPort.readStringUntil('\n');
  s=trim(s);
  if (s!=null){
    println(s);
    int value=int(s);
    if (value >= 0){
      // changing the x position of the ellipse using the potentiometer
      xPos=(int)map(value,0,1023,0, width);
    }
  }
  myPort.write("\n");
}


Exercise 2: Make something that controls the LED brightness from Processing

For this exercise, we made use of the x coordinate of the mouse to control the brightness of the LED. This was fairly easy after completing the first exercise.

Arduino Code:

int brightness = 0;

void setup() {
  Serial.begin(9600);
  Serial.println("0");
  pinMode(3, OUTPUT);
}
 
void loop() {
  while (Serial.available()) {
    brightness = Serial.parseInt();
    if (Serial.read() == '\n') {
      analogWrite(3, brightness);
      int sensor = analogRead(A0);
      delay(1);
      Serial.println(sensor);
    }
  }
}

Processing code:

import processing.serial.*;
Serial myPort;
int xPos=0;
int yPos=0;
int brightness = 0;
 
void setup(){
  size(960,720);
  printArray(Serial.list());
  String portname=Serial.list()[1];
  println(portname);
  myPort = new Serial(this,portname,9600);
  myPort.clear();
  myPort.bufferUntil('\n');
}
 
void draw(){
  background(255);
  ellipse(xPos,height/2,30,30);
  // controlling a variable called brightness using the mouse value
  brightness = int(map(mouseX, 0, width, 0, 255));
}
 
void serialEvent(Serial myPort){
  String s=myPort.readStringUntil('\n');
  s=trim(s);
  if (s!=null){
    println(s);
  }
  myPort.write(brightness + "\n");
}


Exercise 3: take the gravity wind example (https://github.com/aaronsherwood/introduction_interactive_media/blob/master/processingExamples/gravityExamples/gravityWind/gravityWind.pde) and make it so every time the ball bounces one led lights up and then turns off, and you can control the wind from one analog sensor

I think this was the hardest exercise, because it was difficult to exactly determine the conditions when the LED had to be switched off. But then, we managed to handle this problem by using the y-position and y-velocity of the ball. Also, controlling the wind using the potentiometer was tricky. Eventually, we ended up the current value generated by the potentiometer and the previous value generated by the potentiometer and then sending them both to Processing. Processing would then compare the two values and decide if the ball had to move with the wind, and in case it did, decide the direction in which the wind was blowing (and the ball moving).

Arduino Code:

int brightness = 0;
int previousValue = 0;
int onOff = 0;

void setup() {
  Serial.begin(9600);
  Serial.println("0");
  pinMode(3, OUTPUT);
}
 
void loop() {
  while (Serial.available()) {
    onOff = Serial.parseInt();
    if (Serial.read() == '\n') {
      int sensor = analogRead(A0);
      delay(1);

      // sending the current and previous values to processing
      Serial.print(sensor);
      Serial.print(",");
      Serial.println(previousValue);

      // setting the previous value equal to current value
      previousValue = sensor;

      // turning the LED on or off based on signals from processing
      if (onOff == 1){
        analogWrite(3, 255);
      }
      else{
        analogWrite(3, 0);
      }
    }
  }
}

Processing Code:

PVector velocity;
PVector gravity;
PVector position;
PVector acceleration;
PVector wind;
float drag = 0.99;
float mass = 50;
float hDampening;

import processing.serial.*;
Serial myPort;
int wind_speed;

int xPos=0;
int yPos=0;
boolean onOff=false;

void setup() {
  size(640,360);
  printArray(Serial.list());
  String portname=Serial.list()[1];
  println(portname);
  myPort = new Serial(this,portname,9600);
  myPort.clear();
  myPort.bufferUntil('\n');
  
  noFill();
  position = new PVector(width/2, 0);
  velocity = new PVector(0,0);
  acceleration = new PVector(0,0);
  gravity = new PVector(0, 0.5*mass);
  wind = new PVector(0,0);
  hDampening=map(mass,15,80,.98,.96);
}

void draw() {
  background(255);
  if (!keyPressed){
    wind.x=wind_speed;
    velocity.x*=hDampening;
  }
  applyForce(wind);
  applyForce(gravity);
  velocity.add(acceleration);
  velocity.mult(drag);
  position.add(velocity);
  acceleration.mult(0);
  ellipse(position.x,position.y,mass,mass);
  if (position.y > height-mass/2) {
      velocity.y *= -0.9;  // A little dampening when hitting the bottom
      position.y = height-mass/2;
    }
}
  
void applyForce(PVector force){
  // Newton's 2nd law: F = M * A
  // or A = F / M
  PVector f = PVector.div(force, mass);
  acceleration.add(f);
}

void keyPressed(){
  if (keyCode==LEFT){
    wind.x=-1;
  }
  if (keyCode==RIGHT){
    wind.x=1;
  }
  if (key==' '){
    mass=random(25,80);
    position.y=-mass;
    velocity.mult(0);
  }
}

void serialEvent(Serial myPort){
  String s=myPort.readStringUntil('\n');
  s=trim(s);
  if (s!=null){
    println(s);
    int values[] = int(split(s,','));
    
    if (values.length == 2){
      // moving wind towards the right if the current value is greater than the previous value
      if (values[0] > values[1]){
        wind_speed = 20;
      }
      // moving wind towards the left if the current value is lesser than the previous value
      else if (values[0] < values[1]){
        wind_speed = -20;
      }
      // setting wind speed to 0 if both values are equal
      else if (values[1] == values[1]){
        wind_speed = 0;
      }
    }
  }
  
  if (round(position.y + mass) >= height && round(velocity.y) != 0){
    // sending a value of 1 if the ball touches the ground and is supposed to go back
    myPort.write(1 + "\n");
  }
  else{
    // sending a value of 0 if the ball doesn't touch the ground or touches and then stays on the ground (rest position)
    myPort.write(0 + "\n");
  }
}

The video for Exercise 3 is attached below

Final Project Preliminary Idea – Armaan And Thais

For our final project, we came up with around 5 ideas of how we could incorporate Arduino and Processing to make something cool and interesting! We still haven’t zeroed down on what to choose because we feel that we need to discuss it first with Professor Aaron to see which one is the perfect balance of feasibility and creativity but the following list is ordered according to which one we are looking forward to from our most to our not so much.

  • A First Person Racing Game

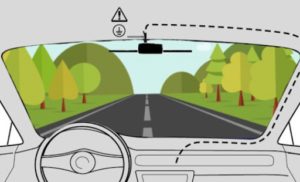
This is the one project that we are most excited about. For this project, we intend to use Arduino and Processing to create the experience of racing a F1 car for the user.  We intend to use the Arduino as an input and output piece in which we could use the buttons, distance sensors, potentiometers to drive the car around and also use the DC motor and wheels to construct a car-like object on the screen which would replicate the car that will be made on our processing interface. We plan on using the processing as a platform to welcome the users into the game and display the screen in such a way that they are inside a car and are driving it (see picture below). The upcoming scenery seen through the window screen in the car can keep changing to create the illusion of a race.

A prospective interface for the game

We were also thinking of converting this into a spaceship game in which the player rides a spaceship and avoids meteorites and is again, a first person experience!

  • A Horror Game

In our horror game, we thought of using the photo-resistor in Arduino to work in tangent with a flashlight that we imagined our character would be using to explore our horror landscape in processing. We also thought of using the LED lights to signal if there are ghosts nearby (red lights to indicate this) or batteries for the flash light (green lights for this). This idea was inspired from Five Nights at Freddy’s basically.

  • A Pin Ball based game

Basically, a game that works the classic pin ball game we all know and love except that the buttons are on arduino and the interface is in processing. We could then use the potentiometer to control the switches on either side to hit the ball.

  •  An “Episode” based RPG interactive movie/game

This one is more like a movie than a game in which we first plan on making separate room-like compartments using cardboard and then using Arduino and Processing to tell a story. This story would involve interactivity in which lets say the user presses a button to lit up a room and then that signals processing to inform the user of this other room that he can check out and we can craft a story using this.

  • Minigame Collection

This is basically a collection of minigames in which we plan on including games like Smack the Mole and a memory game in which you have to remember the sequence of LED lights and a bunch of other minigames.

Processing Handshake 3 Exercises

First Exercise

Arduino Code:

void setup() {
  Serial.begin(9600);
  Serial.println("0"); //CRITICAL sends a start of communication between arduino and processing
}

void loop() {
  while (Serial.available()) {
   if (Serial.read() == '\n') {
      int sensor = analogRead(A0);
      delay(1);
      Serial.println(sensor);
   }
 }
}

Processing Code:

import processing.serial.*;
Serial myPort;
int xPos=0;


void setup(){
  size(960,720);
  printArray(Serial.list());
  String portname=Serial.list()[5];
  println(portname);
  myPort = new Serial(this,portname,9600);
  myPort.clear();
  myPort.bufferUntil('\n');
}

void draw(){
  background(255);
  ellipse(xPos,height/2,30,30);
}

// there can only one serial connection
void serialEvent(Serial myPort){ //callback function; if there is anything in the serial, this function gets called
  String s=myPort.readStringUntil('\n');
  s=trim(s);
  if (s!=null){
    println(s);
    int value = int(s);
    if (value>=0){
      xPos=(int)map(value,0,1023,0, width);
    }
  }
  myPort.write("\n");
}

Comments: I feel like this was a pretty simple exercise and the one part where I was stuck was to figure out how to get the processing to communicate back with the arduino but it didnt take much time as all I had t o include was the myPort.write(“\n”); line


Second Exercise 


Arduino Code:

int brightness = 0;

void setup() {
  Serial.begin(9600);
  Serial.println("0"); //CRITICAL sends a start of communication between arduino and processing
  pinMode(3, OUTPUT);
}

void loop() {
  while (Serial.available()) {
      brightness = Serial.parseInt();
   if (Serial.read() == '\n') {
      analogWrite(3, brightness);
      int sensor = analogRead(A0);
      delay(1);
      Serial.println(sensor);
   }
 }


}

Processing Code:

import processing.serial.*;
Serial myPort;
int xPos = 0;
int brightness = 0;


void setup(){
  size(960,720);
  printArray(Serial.list());
  String portname=Serial.list()[5];
  println(portname);
  myPort = new Serial(this,portname,9600);
  myPort.clear();
  myPort.bufferUntil('\n');
}

void draw(){
  background(255);
  ellipse(xPos,height/2,30,30);
  brightness = (int)map(mouseX, 0, width, 0, 255);
}
// there can only one serial connection
void serialEvent(Serial myPort){ //callback function; if there is anything in the serial, this function gets called
  String s=myPort.readStringUntil('\n');
  s=trim(s);
  if (s!=null){
    println(s);
    int value = int(s);
    if (value>=0){
      xPos=(int)map(value,0,1023,0, width);
    }
  }
  myPort.write(brightness + "\n");
}

Comments: Following up from the first exercise, this was much easier because I retained the code of the first one which made the communication much easier.


Third Exercise

Arduino Code:

int brightness = 0;
int previousValue = 0;
int moving = 0;
int onOff = 0;

void setup() {
  Serial.begin(9600);
  Serial.println("0");
  pinMode(3, OUTPUT);
  
//  pinMode(5, OUTPUT);
}
 
void loop() {
  while (Serial.available()) {
    onOff = Serial.parseInt();
    if (Serial.read() == '\n') {


      int sensor = analogRead(A0);
      delay(1);
      
      
      Serial.print(sensor);
      Serial.print(",");
      Serial.println(previousValue);

      previousValue = sensor;

      
      if (onOff == 1){
        analogWrite(3, 255);
      }
      else{
        analogWrite(3, 0);
      }
    }
  }
}

Processing Code:

PVector velocity;
PVector gravity;
PVector position;
PVector acceleration;
PVector wind;
float drag = 0.99;
float mass = 50;
float hDampening;
int Mover = 0;

import processing.serial.*;
Serial myPort;
int wind_speed;

int xPos=0;
int yPos=0;
boolean onOff=false;
//boolean onOff2=false;

void setup() {
  size(640,360);
  printArray(Serial.list());
  String portname=Serial.list()[5];
  println(portname);
  myPort = new Serial(this,portname,9600);
  myPort.clear();
  myPort.bufferUntil('\n');
  
  noFill();
  position = new PVector(width/2, 0);
  velocity = new PVector(0,0);
  acceleration = new PVector(0,0);
  gravity = new PVector(0, 0.5*mass);
  wind = new PVector(0,0);
  hDampening=map(mass,15,80,.98,.96);
}

void draw() {
  background(255);
  if (!keyPressed){
    wind.x=wind_speed;
    velocity.x*=hDampening;
  }
  applyForce(wind);
  applyForce(gravity);
  velocity.add(acceleration);
  velocity.mult(drag);
  position.add(velocity);
  acceleration.mult(0);
  ellipse(position.x,position.y,mass,mass);
  if (position.y > height-mass/2) {
      velocity.y *= -0.9;  // A little dampening when hitting the bottom
      position.y = height-mass/2;
    }


  println(velocity.y);
}
  
void applyForce(PVector force){
  // Newton's 2nd law: F = M * A
  // or A = F / M
  PVector f = PVector.div(force, mass);
  acceleration.add(f);
}

void keyPressed(){
  if (keyCode==LEFT){
    wind.x=-1;
  }
  if (keyCode==RIGHT){
    wind.x=1;
  }
  if (key==' '){
    mass= random(15,80);
    position.y=-mass;
    velocity.mult(0);
  }
}

void serialEvent(Serial myPort){
  String s=myPort.readStringUntil('\n');
  s=trim(s);
  if (s!=null){
    //println(s);
    int values[] = int(split(s,','));
    
    
    if (values.length == 2){
      if (values[0] > values[1]){
        wind_speed = 20;
      }
      else if (values[0] < values[1]){
        wind_speed = -20;
      }
      else if (values[1] == values[1]){
        wind_speed = 0;
      }
    }
    
  }
    if (round(position.y + mass) >= height && round(velocity.y) != 0){
    onOff = true;
    }
    else{
      onOff = false;
    }
  
    myPort.write(int(onOff) + "\n");
  
}

Comments: This was by far the toughest of the lot and actually took Maaz and me a long time to figure this out but ultimately we decided to do it by using one sensor to send two values from arduino to processing, working on the mechanics of the previous Button state as explained by professor Aaron. For the LED, we just performed a check for the position and velocity of the ball to determine whether to turn on the LED or not. It is also important to note that there can be discrepancies based on the individual components on the board as both me and Maaz would often get differing results although our wiring and codes were similar.


Video: https://youtu.be/7IgCwE5suAU

Final Project Preliminary Idea – Ngoc and Maaz

Overview of game idea

For the final project, Ngoc and I plan on implementing a slightly modified version of the game “Tetris” by using both Arduino and Processing. The rules of the game are pretty simple. Blocks of different colors fall down the screen and stack on top of each other. The user controls the movement of the blocks (by gesturing in front of two different sensors in our version of the game), and the game speed increases by a certain value as blocks continue to drop. When the player manages to get 4 blocks of the same color in a sequence, the game speed is reset to the original value and the score increases by 1. The game ends when the entire screen is filled with blocks.

For the Processing part of the game, we plan on having two main classes, the block class and the game class.

  • Block Class: The block class will describe all the attributes of the blocks which continue to fall on the game screen. It will include methods which specify the limitations on the movement of the blocks, i.e. the block can not move out of the screen, the block can not cross another block, and that the block has to “sit” on top of another block if one is found directly below it.
  • Game Class: The game class will contain all the main features of the game. These include instantiating a new block to fall every time the previous block has stopped moving (i.e. settled at the last row or settled on top of another block). The game class will also check if blocks of the same color are found together in a sequence, then it will remove those blocks from the game screen and increment the score of the player. Moreover, it will control the number of lives a player has and what the game should do when the player uses a life. It will also control when the game ends.

For the hardware, we plan on using a number of different components corresponding to different game functions.

  • Buttons: we plan to have a few buttons for fundamental game control, for example starting a new game
  • Potentiometer: when presented with the options of levels at the beginning of the game, the player can use the potentiometer to traverse through the options and select a specific level
  • Photo resistor: the player can choose to spend one life by tapping on the photo resistor
  • LEDs: we plan to light up LEDs to signify the number of lives available to the player, and turning off one LED for each life spent
  • Ultrasonic sensors/distance measuring sensors: we plan to use two distance measuring sensors installed on two sides for the main game action. The initial concept is that the player can gesture in front of one of the two sensors to communicate which side to direct the block (i.e. tapping on the right moves the block one step to the right and vice versa)

Final Project Preliminary Idea – by Cole and Shreya

IDEA

Cole and I plan on making a game similar to the popular VR game “Keep Talking and Nobody Explodes.” This is a two-player game where one person is faced with a bomb and a timer counting down till it explodes. Depending on the level, the bomb will look different each time with a series of lights, buttons, symbols, etc. The bomb diffuser will have to communicate with a second player, the instructions reader. The instructions reader will have a list of instructions that they will have to communicate with the bomb diffuser within the time limit so they both together are able to diffuse the bomb. These instructions will be dependent on what the bomb defuser sees on-screen (Processing) or the Arduino board, so two-way communication is critical for success. 

The ‘Keep Talking and Nobody Explodes’ Game

GAME MECHANICS

Defusing the Bomb:

The bomb will be diffused when all the tasks provided by the instructions reader are completed. Tasks will include interaction with the on-screen bomb as well as the Arduino inputs such as lights, buttons, and dials. 

Communication:

We plan to give LED signals (visible to the bomb diffuser only) which they would have to communicate to the instructions reader. Based on the LED pattern, the instructions reader will be prompted to ask a series of questions from the bomb diffuser based on what they see in front of them. According to the replies, the instructions reader will provide appropriate instructions to the bomb diffuser to diffuse the bomb.

The Instructions Giving Process:

Each set of LEDs would correspond to a particular set of tasks. These tasks would unfold layer by layer by constant communication between instructions giver and bomb diffuser as to what the latter sees and what the former instructs to do based on that.

We will have different LED signals like different LED combinations lighting up (same or different colors), some or all blinking LEDs, speed of the blink, a combination of LED colors, blinks and numbers, etc. We plan to categorize the LED signals into broad to narrow structure which will enable the instructions-giver to navigate through and provide appropriate instructions. For example, the first category will be the number of LEDs lighting up. The diffuser will answer this question and suppose they say 4 LEDs are lit. Then the instruction giver will read the instructions corresponding to that and say, for example, press the blue button. After pressing the button, the diffuser needs to answer the next question, which in turn will enable them to get another instruction.

The purpose of each LED set will be to enable the bomb diffuser to cut a wire; and to cut this wire, there would be intermediate steps of above-mentioned question/answers (communication between the instructions-giver and bomb diffuser) and small tasks like pressing buttons, being at an appropriate distance from a sensor, etc. After a couple of them, the bomb diffuser will be instructed to cut a particular wire.

Once the wire is cut, the task provided by this set of LEDs is finished and the next set of LEDs will light up for the next wire to be cut. 

Game Over:

The game will get over in one of the 3 cases:

  • The bomb diffuser is able to cut all the wires within the time limit where the players win
  • The time runs out and the bomb explodes; the players lose here
  • Or the players cut a wrong wire, so still, the bomb explodes and they lose

We plan that if any of the intermediate instructions go wrong (for example the red button is pressed instead of the blue) before the wire cut action, those errors will result in the reduction of the time.

PRELIMINARY IMPLEMENTATION IDEA

  • We plan to create an array with a list of all possible LED combinations.
  • This array will drive our entire program
  • Depending on the series/types/color of LEDs lighting up, we will have the appropriate interface on Processing and appropriate wait for a particular set of inputs from the Arduino board. Once the set of actions are completed, we get another set of LED lightings (by picking a random index in our array).

TWO OR ONE PLAYER?

The way we plan to make our interface, this game can be played by either 2 or 1 player. However, the game is more fun and interesting when you are communicating with a friend.

In our game, the instructions will be amiable in the start menu. If 2 players are playing the game, each can open the Processing interface on their laptops. The instructions giver can open the instructions page while the bomb diffuser can continue to the bomb-diffusing screen. Arduino will be attached to the second player’s laptop. Then, the players can communicate and play the game.

If it is only one player, then the player will have the option to look at the instructions. In such a case, the player will themselves have to read the appropriate instructions based on what they see and perform the tasks.

Lab Exercises- Thais and Shaikha

Exercise 1

Make something that uses only one sensor  on arduino and makes the ellipse in processing move on the horizontal axis, in the middle of the screen, and nothing on arduino is controlled by processing
For this exercise we used the potentiometer to control the movement of the ellipse
Video:
https://youtu.be/HZbzQkfixq8
Arduino
//Exercise 1

const int pinPont = A0;
 
void setup() {
  Serial.begin(9600);
  Serial.println("0");
}
 
void loop() {
  while (Serial.available()) {
    if (Serial.read() == '\n') {

      //read the values of the potentiometer
      int sensor = analogRead(pinPont);
      delay(1);
      //print the value
      Serial.println(sensor);
    }
  }
}
Processing
//Exercise 1
import processing.serial.*;
Serial myPort;
int xPos = 0;
int yPos;

void setup() {
  size(960, 720);
  printArray(Serial.list());
  String portname=Serial.list()[3]; // "/dev/cu.usbmodem101"
  println(portname);
  myPort = new Serial(this, portname, 9600);
  myPort.clear();
  myPort.bufferUntil('\n');
}

void draw() {
  background(255);
  yPos = height/2;
  ellipse(xPos, yPos, 30, 30);
 
}

void serialEvent(Serial myPort) {
  String s=myPort.readStringUntil('\n');
  s=trim(s);
  if (s!=null) {
    //read value from Arduino (potentiometer)
    
    println(s);
    int value = int(s);
    
    //map the value to a position in range of the width
    xPos=(int)map(value, 0, 1023, 0, width);
  }
  myPort.write("\n");
}

Exercise 2

Make something that controls the LED brightness from processing.
For this exercise we used the x value of the position of the mouse to control the brightness of the LED.
Video: https://youtu.be/oJ8sW842y5c
Arduino
//Exercise 2

int ledPin = 5;

float brightness;

void setup() {
  Serial.begin(9600);
  Serial.println("0");
  pinMode(ledPin, OUTPUT);
}

void loop() {
  while (Serial.available()) {
    //get the brightness value from processing
    brightness = Serial.parseFloat();
    
    if (Serial.read() == '\n') {
    //turn on the LED with the given brightness
      analogWrite(ledPin, brightness);
      Serial.println(brightness);
    }
  }
}

Processing
//Exercise 2
import processing.serial.*;
Serial myPort;
int xPos = 0;
int yPos;

int brightness;

void setup() {
  size(960, 720);
  printArray(Serial.list());
  String portname=Serial.list()[3]; // "/dev/cu.usbmodem101"
  println(portname);
  myPort = new Serial(this, portname, 9600);
  myPort.clear();
  myPort.bufferUntil('\n');
}

void draw() {
  background(255);

  //map the mouseX position to the range of birghtness of the LED
  brightness = int(map(mouseX, 0, width, 0, 255));
  
  yPos = height/2;
  ellipse(mouseX, yPos, 30, 30);
}

void serialEvent(Serial myPort) {
  String s=myPort.readStringUntil('\n');
  s=trim(s);

  //write brightness so that Arduino can use it
  myPort.write(brightness+ "\n");
}

Exercise 3

Take the gravity wind example (https://github.com/aaronsherwood/introduction_interactive_media/blob/master/processingExamples/gravityExamples/gravityWind/gravityWind.pde) and make it so every time the ball bounces one led lights up and then turns off, and you can control the wind from one analog sensor.
The analog sensor we used was the potentiometer.
Video: https://youtu.be/iU62kg-Mad8
Video: https://youtu.be/CvLVrLY0g4A
Arduino
int left = 0;
int right = 0;

int light1 = 0;
int LED1 = LOW;

void setup() {
  Serial.begin(9600);
  Serial.println("0,0");
  pinMode(2, OUTPUT);
  pinMode(5, OUTPUT);
}

void loop() {
  while (Serial.available()) {
    //    right = Serial.parseInt();

    //get whether LED should be turned on from Processing
    light1 = Serial.parseInt();
    
    Serial.println(light1);

    if (Serial.read() == '\n')
    {
      
      if (light1 == 1)
      {
        LED1 = HIGH;
      }
      else
      {
        LED1 = LOW;
        
      }
      digitalWrite(5, LED1);

      //get the vvalues from the potentiometer
      int sensor = analogRead(A0);
      delay(1);
     
      //      delay(1);
      Serial.println(sensor);
      
      //      Serial.print(',');
      //      Serial.println(sensor2);
      
      //Serial.println(LED1);
    }
  }
}
Processing
import processing.serial.*;
Serial myPort;

PVector velocity;
PVector gravity;
PVector position;
PVector acceleration;
PVector wind;
float drag = 0.99;
float mass = 50;
float hDampening;
boolean light; 

int valueCapacitor;

void setup() {
  size(640,360);
  noFill();
  position = new PVector(width/2, 0);
  velocity = new PVector(0,0);
  acceleration = new PVector(0,0);
  gravity = new PVector(0, 0.5*mass);
  wind = new PVector(0,0);
  hDampening=map(mass,15,80,.98,.96);
  printArray(Serial.list());
  String portname=Serial.list()[3];
  println(portname);
  myPort = new Serial(this,portname,9600);
  myPort.clear();
  myPort.bufferUntil('\n');
}

void draw() {
  background(255);
  
  
  if (!keyPressed){
    wind.x= valueCapacitor;
    velocity.x*=hDampening;
  }
  
  
  applyForce(wind);
  applyForce(gravity);
  velocity.add(acceleration);
  velocity.mult(drag);
  position.add(velocity);
  acceleration.mult(0);
  ellipse(position.x,position.y,mass,mass);
  if (position.y > height-mass/2) {
      velocity.y *= -0.9;  // A little dampening when hitting the bottom
      position.y = height-mass/2;
    }
    
   if (position.y == height - mass/2){
     light = true;
   }
}
  
void applyForce(PVector force){
  // Newton's 2nd law: F = M * A
  // or A = F / M
  PVector f = PVector.div(force, mass);
  acceleration.add(f);
}

void keyPressed(){
  if (keyCode==LEFT){
    wind.x=-1;
  }
  if (keyCode==RIGHT){
    wind.x=1;
  }
  if (key==' '){
    mass=random(15,80);
    position.y=-mass;
    velocity.mult(0);
  }
  
}

void serialEvent(Serial myPort) {
  String s=myPort.readStringUntil('\n');
  s=trim(s);
  
  if (s!=null) {
    int value = int(s);
    valueCapacitor = (int)map(value, 0, 1023, 0, width*.01);
  }
  
  // we need to use velocity,y so that the light turns off when it is not moving
  // if we use position, the blinking is delayed 
  if (round(velocity.y) < 0) {
    myPort.write(1 + "\n");
    println(1);
  } else {
    myPort.write(0 + "\n");
    println(0);
  }
}


Class exercises

Here are the 3 examples that Minh and I did from our in class work.

Problem 1

const int sensorPin = A1;

void setup() {
Serial.begin(9600);
Serial.println("0,0");
}

void loop() {
// put your main code here, to run repeatedly:

//Read stuff from processing

while (Serial.available()) {
Serial.read() == '\n';

//Write to processing
int sensor = analogRead(sensorPin);
delay(1);

Serial.print(sensor);
Serial.print('\n');
}
}

//Processing code

//Move a ellipse on screen horizontally from arduino sensor

//import processing.serial.*;
//Serial myPort;
//int xPos = 0;
//
//void setup() {
// size(960, 720);
// printArray(Serial.list());
// String portname = Serial.list()[1];
// println(portname);
// myPort = new Serial(this, portname, 9600);
// myPort.clear();
// myPort.bufferUntil('\n');
//}
//
//void draw() {
// background(255);
// ellipse(xPos, height/2, 30, 30);
//}
//
//
////Wont do anything until there is something in serial buffer
//void serialEvent(Serial myPort) {
// String s = myPort.readStringUntil('\n');
// s = trim(s);
// if (s!=null) {
// println(s);
// int val = int(s);
// xPos = (int)map(val, 0, 1023, 0, width);
// }
// myPort.write('\n');
//}


Problem 2

const int ledPin = 11;
int brightness = 0;

void setup() {
Serial.begin(9600);
Serial.println("0,0");
pinMode(ledPin, OUTPUT);
}

void loop() {
while (Serial.available()) {
brightness = Serial.parseInt();
if (Serial.read() == '\n') {
analogWrite(ledPin, brightness);
// int sensor = analogRead(sensorPin);
delay(1);
Serial.println(brightness);
}
}
}

//Processing code

//Light an LED on the Arduino with varying brightness depending on how far left or right the mouse is

//import processing.serial.*;
//Serial myPort;
//int xPos = 0;
//int brightness = 0;
//
//void setup() {
// size(960, 720);
// printArray(Serial.list());
// String portname = Serial.list()[1];
// println(portname);
// myPort = new Serial(this, portname, 9600);
// myPort.clear();
// myPort.bufferUntil('\n');
//}
//
//void draw() {
// background(255);
// xPos = mouseX;
// ellipse(xPos, height/2, 30, 30);
// brightness = int(map(xPos, 0, width, 0, 255));
//}
//
//
////Wont do anything until there is something in serial buffer
//void serialEvent(Serial myPort) {
// String s=myPort.readStringUntil('\n');
// s=trim(s);
// int val = parseInt(s);
// if (s!=null){
// println("Brightness: " + val);
// }
// myPort.write(brightness+"\n");
//}


Problem 3

const int ledPin = 11;
int brightness = 0;
const int sensorPin = A0;

void setup() {
Serial.begin(9600);
Serial.println("0,0");
pinMode(ledPin, OUTPUT);
}

void loop() {
while (Serial.available()) {
int onOff = Serial.parseInt();
if (Serial.read() == '\n') {
digitalWrite(ledPin, onOff);
int sensor = analogRead(sensorPin);
delay(1);
Serial.println(sensor);
}
}
}

//Processing code

//import processing.serial.*;
//Serial myPort;
//int xPos=0;
//int yPos=0;
//boolean onOff=false;
//boolean onOff2=false;
//PVector velocity;
//PVector gravity;
//PVector position;
//PVector acceleration;
//PVector wind;
//float drag = 0.99;
//float mass = 50;
//float hDampening;
//
//void setup(){
// size(960,720);
// printArray(Serial.list());
// String portname=Serial.list()[1];
// println(portname);
// myPort = new Serial(this,portname,9600);
// myPort.clear();
// myPort.bufferUntil('\n');
// noFill();
// position = new PVector(width/2, 0);
// velocity = new PVector(0,0);
// acceleration = new PVector(0,0);
// gravity = new PVector(0, 0.5*mass);
// wind = new PVector(0,0);
// hDampening=map(mass,15,80,.98,.96);
//}
//
//void draw(){
// background(255);
//
// velocity.x*=hDampening;
//
// applyForce(wind);
// applyForce(gravity);
// velocity.add(acceleration);
// velocity.mult(drag);
// position.add(velocity);
// acceleration.mult(0);
// ellipse(position.x,position.y,mass,mass);
// if (position.y > height-mass/2) {
// velocity.y *= -0.9; // A little dampening when hitting the bottom
// position.y = height-mass/2;
// onOff = true;
// }
// else{
// onOff = false;
// }
//}
//
//void serialEvent(Serial myPort){
// String s=myPort.readStringUntil('\n');
// s=trim(s);
// int val = parseInt(s);
// if (s!=null){
// wind.x=map(val,0,1023,-2, 2); //2 instead of 1 to make it stronger
// }
// myPort.write(int(onOff)+"\n");
//}
//
//void applyForce(PVector force){
// // Newton's 2nd law: F = M * A
// // or A = F / M
// PVector f = PVector.div(force, mass);
// acceleration.add(f);
//}
//
//void keyPressed(){
// if (keyCode==LEFT){
// wind.x=-1;
// }
// if (keyCode==RIGHT){
// wind.x=1;
// }
// if (key==' '){
// mass=random(15,80);
// position.y=-mass;
// velocity.mult(0);
// }
//}


Integration of Arduino and Processing – Class Examples

For this week’s assignment, we had to complete 3 examples illustrating the use of Arduino and Processing together. Below are my codes for each of the tasks.

For my first 2 tasks, I partnered with Maaz, while for my third task, I partnered with Rock.

TASK 1:

Make something that uses only one sensor on Arduino and makes the ellipse in processing move on the horizontal axis, in the middle of the screen, and nothing on Arduino is controlled by Processing.

For this task, I used the potentiometer to control the horizontal position of the ball. The higher the value in the potentiometer, the closer the ball is towards the right end of the screen and vice versa. Since the ball position is variable and not just 0 and 1, this is an analog read from the potentiometer.

TASK 2:

Make something that controls the LED brightness from processing.

Here, I used the x position of the mouse on the screen to control the brightness of the LED. The extreme right position of the cursor means maximum (i.e. 255) brightness of the LEd and the extreme left means zero brightness. Since the position is variable, this is an analog write to the LED.

My Processing Code for the first 2 tasks is as follows:

import processing.serial.*;
Serial myPort;
int xPos=0;
int yPos=0;
boolean onOff=false;
boolean onOff2=false;

void setup() {
  size(960, 720);
  
  //keep the starting position of the ball in the middle of the screen
  xPos = width/2;
  yPos = height/2; //wont be using yPos for this task
  
  printArray(Serial.list());
  String portname=Serial.list()[3];
  println(portname);
  myPort = new Serial(this, portname, 9600);
  myPort.clear();
  myPort.bufferUntil('\n');
}

void draw() {
  background(255);
  ellipse(xPos,height/2,30,30); //for task 1
}

//this is a callback fn. - called whenever smthg comes in serial buffer
void serialEvent(Serial myPort) {
  String s=myPort.readStringUntil('\n');
  s=trim(s);
  if (s!=null) {
    println(s);
    int values[]=int(split(s, ','));
    if (values.length==2) {
      //for task 1
      //use the potentiometer readings to map the horizontal position off the ball on the screen
      xPos=(int)map(values[0], 0, 1023, 15, width-15); //eclipse position
      //yPos=(int)map(values[0], 0, 1023, 0, height); //when yPos == h
    }
  }

  //for task 2
  //control the led brightness using the mouseX position on screen. 
  //extreme left = 0 brightness, extreme right = max (i.e. 255) brightness
  float ledBrightness = map(mouseX, 0, width, 0, 255);
  myPort.write(int(false)+","+int(ledBrightness)+"\n");
}


TASK 3:

Take the gravity wind example and make it so every time the ball bounces one led lights up and then turns off, and you can control the wind from one analog sensor.

My Processing Code for this task is as follows:

import processing.serial.*;
Serial myPort;
//int xPos=0;
//int yPos=0;
boolean onOff=false;
boolean onOff2=false;

//for gravity - task 3
PVector velocity;
PVector gravity;
PVector position;
PVector acceleration;
PVector wind;
float drag = 0.99;
float mass = 50;
float hDampening;


void setup() {
  size(960, 720);

  printArray(Serial.list());
  String portname=Serial.list()[3];
  println(portname);
  myPort = new Serial(this, portname, 9600);
  myPort.clear();
  myPort.bufferUntil('\n');

  //for gravity - task 3
  noFill();
  position = new PVector(width/2, 0);
  velocity = new PVector(0, 0);
  acceleration = new PVector(0, 0);
  gravity = new PVector(0, 0.5*mass);
  wind = new PVector(0, 0);
  hDampening=map(mass, 15, 80, .98, .96);
}

void draw() {
  background(255);
  
  velocity.x*=hDampening;

  applyForce(wind);
  applyForce(gravity);
  velocity.add(acceleration);
  velocity.mult(drag);
  position.add(velocity);
  acceleration.mult(0);
  ellipse(position.x, position.y, mass, mass);
  if (position.y > height-mass/2) {
    velocity.y *= -0.9;  // A little dampening when hitting the bottom
    position.y = height-mass/2;
    //if hits the ground, then light the bulb
    onOff=true;
  } else
    onOff=false;

  myPort.write(int(onOff)+","+int(false)+"\n");
}

//this is a callback fn. - called whenever smthg comes in serial buffer
void serialEvent(Serial myPort) {
  String s=myPort.readStringUntil('\n');
  s=trim(s);
  if (s!=null) {
    println(s);
    int values[]=int(split(s, ','));
    if (values.length==2) {
      //use the potentiometer readings to map the wind value between -5 to 5
      wind.x=map(values[0], 0, 1023, -5, 5); //controlling the wind using potentiometer
    }
  }
}

//============================================================================
//for gravity - task 3

void applyForce(PVector force) {
  // Newton's 2nd law: F = M * A
  // or A = F / M
  PVector f = PVector.div(force, mass);
  acceleration.add(f);
}


My working video of the task is as follows:

Arduino Code:

The following is the Arduino code for all 3 examples:
I did not make any changes to this.

int left = 0;
int right = 0;

void setup() {
  Serial.begin(9600); //serial 9600 mean 9600 bits per sec - rate/frequency of communication
  Serial.println("0,0"); //vvv imp line - this is settong up the handshake - someone needs to speak first
  pinMode(2, OUTPUT);
  pinMode(5, OUTPUT);
}

void loop() {
  while (Serial.available()) {
    right = Serial.parseInt();
    left = Serial.parseInt();
    if (Serial.read() == '\n') {
      digitalWrite(2, right);
      analogWrite(5, left);
      int sensor = analogRead(A0);
      delay(1);
      int sensor2 = analogRead(A1);
      delay(1);
      Serial.print(sensor);
      Serial.print(',');
      Serial.println(sensor2);
    }
  }
}


Circuit:

The circuit diagram for these examples can be found here.

Final Project Idea (Shreya & Cole)

Idea

Shreya and I plan on making a game similar to the popular VR game “Keep Talking and Nobody Explodes.” This is a two player game where one person is faced with a bomb and a timer counting down till it explodes. Depending on the level, the bomb will look different each time with a series of lights, buttons, symbols, etc. The bomb defuser will have to communicate with a second player, the instruction reader. The instruction reader will have a list of instructions that they will have to communicate with the bomb defuser in the time limit. These instructions will be dependent on what the bomb defuser sees on screen so two way communication is critical for success.


Defusing Bomb:

The bomb will be defused when completing all the tasks provided from the instruction reader. Tasks will include interaction with the on screen bomb as well as the Arduino inputs such as lights, buttons, and dials.


Instructions

In our game, the instructions will be amiable in the start menu so that it can either be played with two laptops, if it is two player then the instructions will only be accessible to the second player. If playing alone, the bomb defuser will also have access to the instructions while playing, however the game is better when communicating with a friend. 


The general cycle of the game is as follow:

The instruction reader will have a choice in the instructions – “If the bomb looks like A, do B, if it looks like C, do D”. The instruction giver will ask about the state of the bomb which they cannot see.

The defuser player will relay back how the bomb looks

The instruction reader will read off the corresponding instruction based on the how the bomb looks

The defuser will interact with the bomb in the way instructed

This cycle repeats several times until the bomb is defused or the timer goes off!

Any wrong interrelation of course sets the bomb off and the players lose!


How do we plan to code this?

  • Create an array with a list of all possible LED combinations.
  • This array will drive our entire program
  • Depending on the series/types/color of LEDs lighting up, we will have the interface on Processing and that will also wait for a particular set of inputs from the Arduino board. Once the set of actions are completed, we get another set of LEDs lighting (by picking a random index in our array).


Categories of Instructions 

  • We plan to have categories of different LED setting, each of which will tell the diffuser what to do next
  • For example, the first category will be the number of LEDs lighting. The diffuser will answer this question and suppose they say 4 LEDs are lit. Then the instruction giver will read the instructions corresponding to that and say for example, press the blue button. After pressing the button, the diffuser needs to answer the next question. And this is how we envision the game to proceed.


[Week 11] Serial communication exercises

I want to finish exercises in serial communication early so that I can focus on the final project.

Exercise 1.

Make something that uses only one sensor on arduino and makes the ellipse in processing move on the horizontal axis, in the middle of the screen, and nothing on arduino is controlled by processing.

Arduino

const int poten = A0;
 
void setup() {
  Serial.begin(9600);
  Serial.println("0");
}
 
void loop() {
  while (Serial.available()) {
    if (Serial.read() == '\n') {
      int sensor = analogRead(poten);
      delay(1);
      Serial.println(sensor);
    }
  }
}

Processing

import processing.serial.*;
Serial myPort;
int xPos=0;
int yPos;

void setup() {
  size(960, 720);
  yPos=height/2;
  printArray(Serial.list());
  String portname=Serial.list()[4]; //[4] "/dev/cu.usbmodem1101"
  println(portname);
  myPort = new Serial(this, portname, 9600);
  myPort.clear();
  myPort.bufferUntil('\n');
}

void draw() {
  background(255);
  ellipse(xPos, yPos, 30, 30);
}

void serialEvent(Serial myPort) {
  String s=myPort.readStringUntil('\n');
  s=trim(s);
  if (s!=null) {
    println(s);
    int value = int(s);
    xPos=(int)map(value, 0, 1023, 0, width);
  }
  myPort.write("\n");
}
Exercise 2.

Make something that controls the LED brightness from processing

Arduino

const int led1 = 3;
float brightness;
 
void setup() {
  Serial.begin(9600);
  Serial.println("0");
  pinMode(led1, OUTPUT);
}
 
void loop() {
  while (Serial.available()) {
    brightness = Serial.parseFloat();
    if (Serial.read() == '\n') {
      analogWrite(led1, brightness);
      Serial.print("\n");
    }
  }
}

Processing

import processing.serial.*;
Serial myPort;
float brightness;
 
void setup(){
  size(960,720);
  printArray(Serial.list());
  String portname=Serial.list()[4]; //[4] "/dev/cu.usbmodem1101"
  println(portname);
  myPort = new Serial(this,portname,9600);
  myPort.clear();
  myPort.bufferUntil('\n');
}
 
void draw(){
  brightness = map(height-mouseY, 0, height, 0, 255);
  background(brightness);
  noStroke();
  fill(50, 150, 50);
  ellipse(width/2,mouseY,30,30);
}
 
void serialEvent(Serial myPort){
  myPort.write(int(brightness)+"\n");
}
Exercise 3.

Take the gravity wind example and make it so every time the ball bounces one led lights up and then turns off, and you can control the wind from one analog sensor

Demo

Arduino

const int poten = A0;
const int led1 = 3;
int onOff = 0;

void setup() {
  Serial.begin(9600);
  Serial.println("0");
}

void loop() {
  while (Serial.available()) {
    onOff = Serial.parseInt();
    if (Serial.read() == '\n') {
      int sensor = analogRead(poten);
      delay(1);
      Serial.println(sensor);
      if (onOff == 1) {
        analogWrite(led1, 255);
      } else {
        analogWrite(led1, 0);
      }
    }
  }
}

Processing

PVector velocity;
PVector gravity;
PVector position;
PVector acceleration;
PVector wind;
float drag = 0.99;
float mass = 50;
float hDampening;

import processing.serial.*;
Serial myPort;
int poten;

void setup() {
  size(640, 360);
  noFill();
  position = new PVector(0, 0);
  velocity = new PVector(0, 0);
  acceleration = new PVector(0, 0);
  gravity = new PVector(0, 0.5*mass);
  wind = new PVector(0, 0);
  hDampening=map(mass, 15, 80, .98, .96);

  String portname=Serial.list()[4]; //[4] "/dev/cu.usbmodem1101"
  myPort = new Serial(this, portname, 9600);
  myPort.clear();
  myPort.bufferUntil('\n');
}

void draw() {
  background(255);
  if (!keyPressed) {
    wind.x=poten;
    velocity.x*=hDampening;
  }
  applyForce(wind);
  applyForce(gravity);
  velocity.add(acceleration);
  velocity.mult(drag);
  position.add(velocity);
  acceleration.mult(0);
  ellipse(position.x, position.y, mass, mass);
  if (position.y > height-mass/2) {
    velocity.y *= -0.9;  // A little dampening when hitting the bottom
    position.y = height-mass/2;
  }
}

void applyForce(PVector force) {
  // Newton's 2nd law: F = M * A
  // or A = F / M
  PVector f = PVector.div(force, mass);
  acceleration.add(f);
}

void keyPressed() {
  if (keyCode==LEFT) {
    wind.x=-1;
  }
  if (keyCode==RIGHT) {
    wind.x=1;
  }
  if (key==' ') {
    mass=random(15, 80);
    position.y=-mass;
    velocity.mult(0);
  }
}

void serialEvent(Serial myPort) {
  String s=myPort.readStringUntil('\n');
  s=trim(s);
  if (s!=null) {
    int value = int(s);
    poten = (int)map(value, 0, 1023, 0, width*.01);
  }
  if (round(velocity.y) < 0) {
    myPort.write(1 + "\n");
  } else {
    myPort.write(0 + "\n");
  }
}

UPDATE APRIL 11. I made changes to the Processing file so that turning the potentiometer up and down can move the ball right and left.

PVector velocity;
PVector gravity;
PVector position;
PVector acceleration;
PVector wind;
float drag = 0.99;
float mass = 50;
float hDampening;

import processing.serial.*;
Serial myPort;
int poten;
int prevPoten = 0;
boolean movingRight = true;
int maxPoten;

void setup() {
  size(640, 360);
  noFill();
  position = new PVector(width/2, 0);
  velocity = new PVector(0, 0);
  acceleration = new PVector(0, 0);
  gravity = new PVector(0, 0.5*mass);
  wind = new PVector(0, 0);
  hDampening=map(mass, 15, 80, .98, .96);

  String portname=Serial.list()[4]; //[4] "/dev/cu.usbmodem1101"
  myPort = new Serial(this, portname, 9600);
  myPort.clear();
  myPort.bufferUntil('\n');
  
  maxPoten = (int)map(1023, 0, 1023, 0, width*.01);
}

void draw() {
  background(255);
  if (!keyPressed) {
    if (prevPoten < poten) {
      movingRight = true;
    } else if (prevPoten > poten) {
      movingRight = false;
    }
    if (!movingRight) {
      wind.x = -(maxPoten-poten);
    } else {
      wind.x = poten;
    }
    velocity.x*=hDampening;
  }
  applyForce(wind);
  applyForce(gravity);
  velocity.add(acceleration);
  velocity.mult(drag);
  position.add(velocity);
  acceleration.mult(0);
  ellipse(position.x, position.y, mass, mass);
  if (position.y > height-mass/2) {
    velocity.y *= -0.9;  // A little dampening when hitting the bottom
    position.y = height-mass/2;
  }
  prevPoten = poten;
}

void applyForce(PVector force) {
  // Newton's 2nd law: F = M * A
  // or A = F / M
  PVector f = PVector.div(force, mass);
  acceleration.add(f);
}

void keyPressed() {
  if (keyCode==LEFT) {
    wind.x=-1;
  }
  if (keyCode==RIGHT) {
    wind.x=1;
  }
  if (key==' ') {
    mass=random(15, 80);
    position.y=-mass;
    velocity.mult(0);
  }
}

void serialEvent(Serial myPort) {
  String s=myPort.readStringUntil('\n');
  s=trim(s);
  if (s!=null) {
    int value = int(s);
    poten = (int)map(value, 0, 1023, 0, width*.01);
  }
  if (round(velocity.y) < 0) {
    myPort.write(1 + "\n");
  } else {
    myPort.write(0 + "\n");
  }
}