Trash or Nah

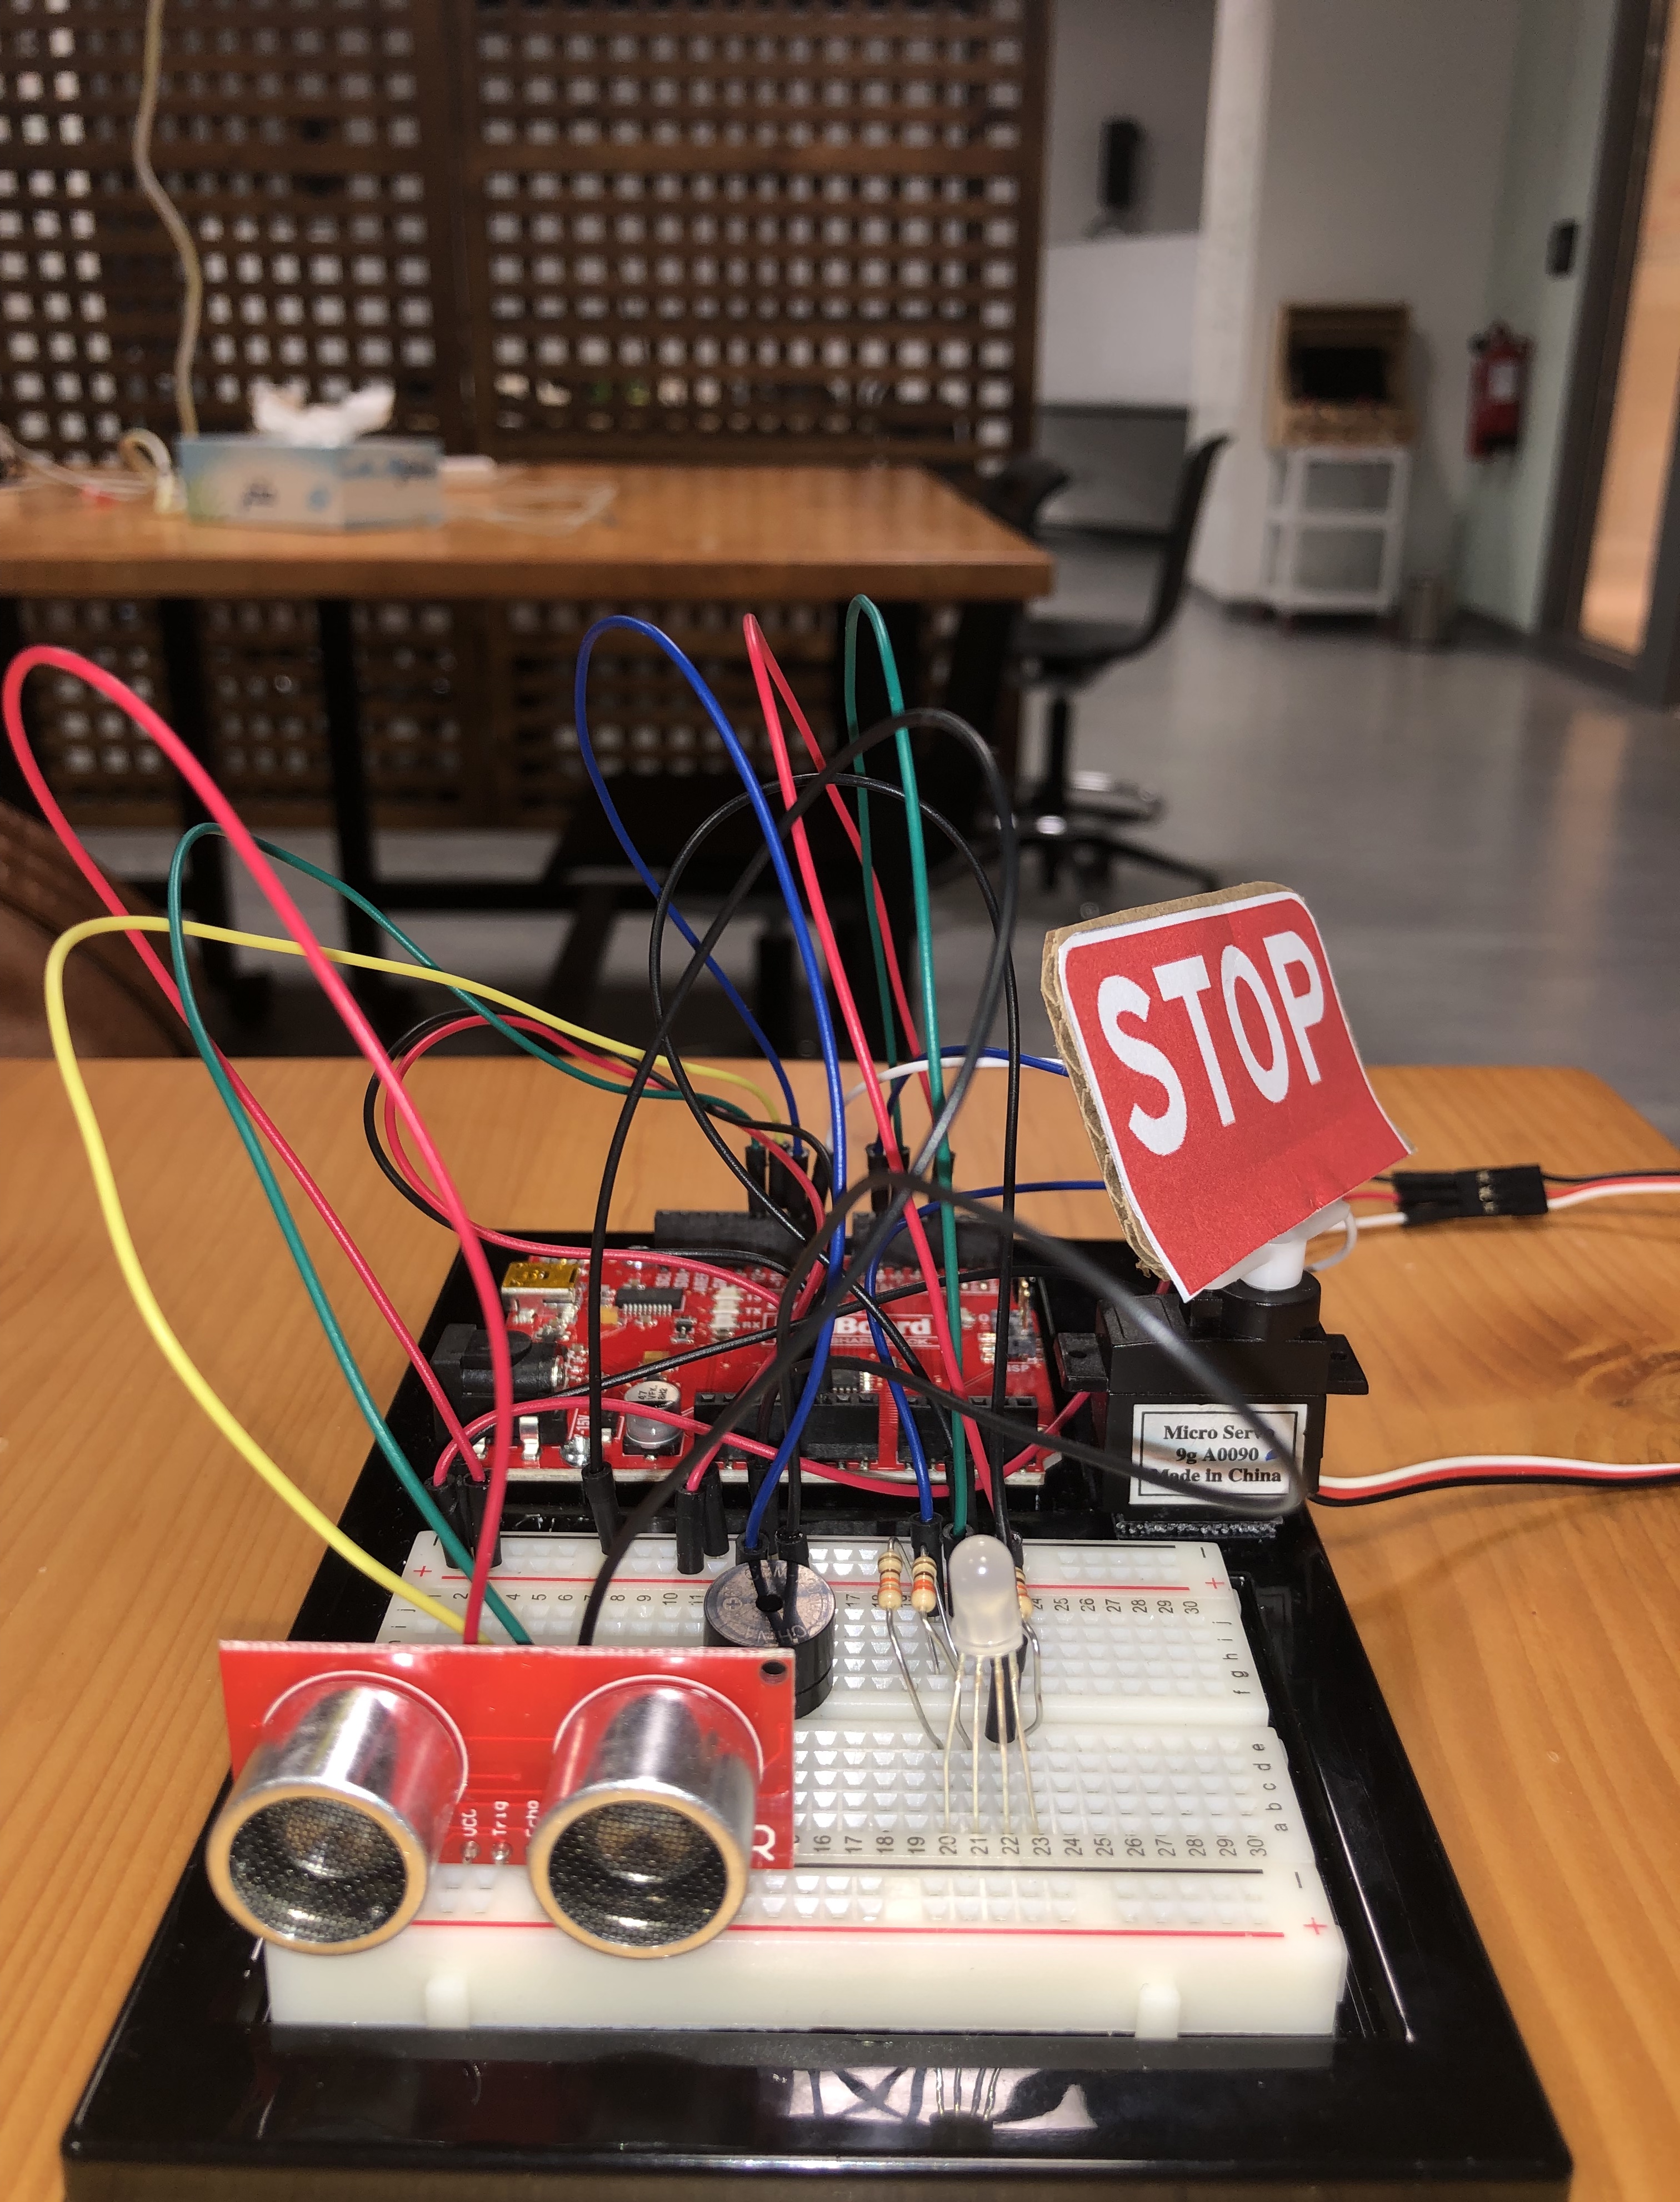
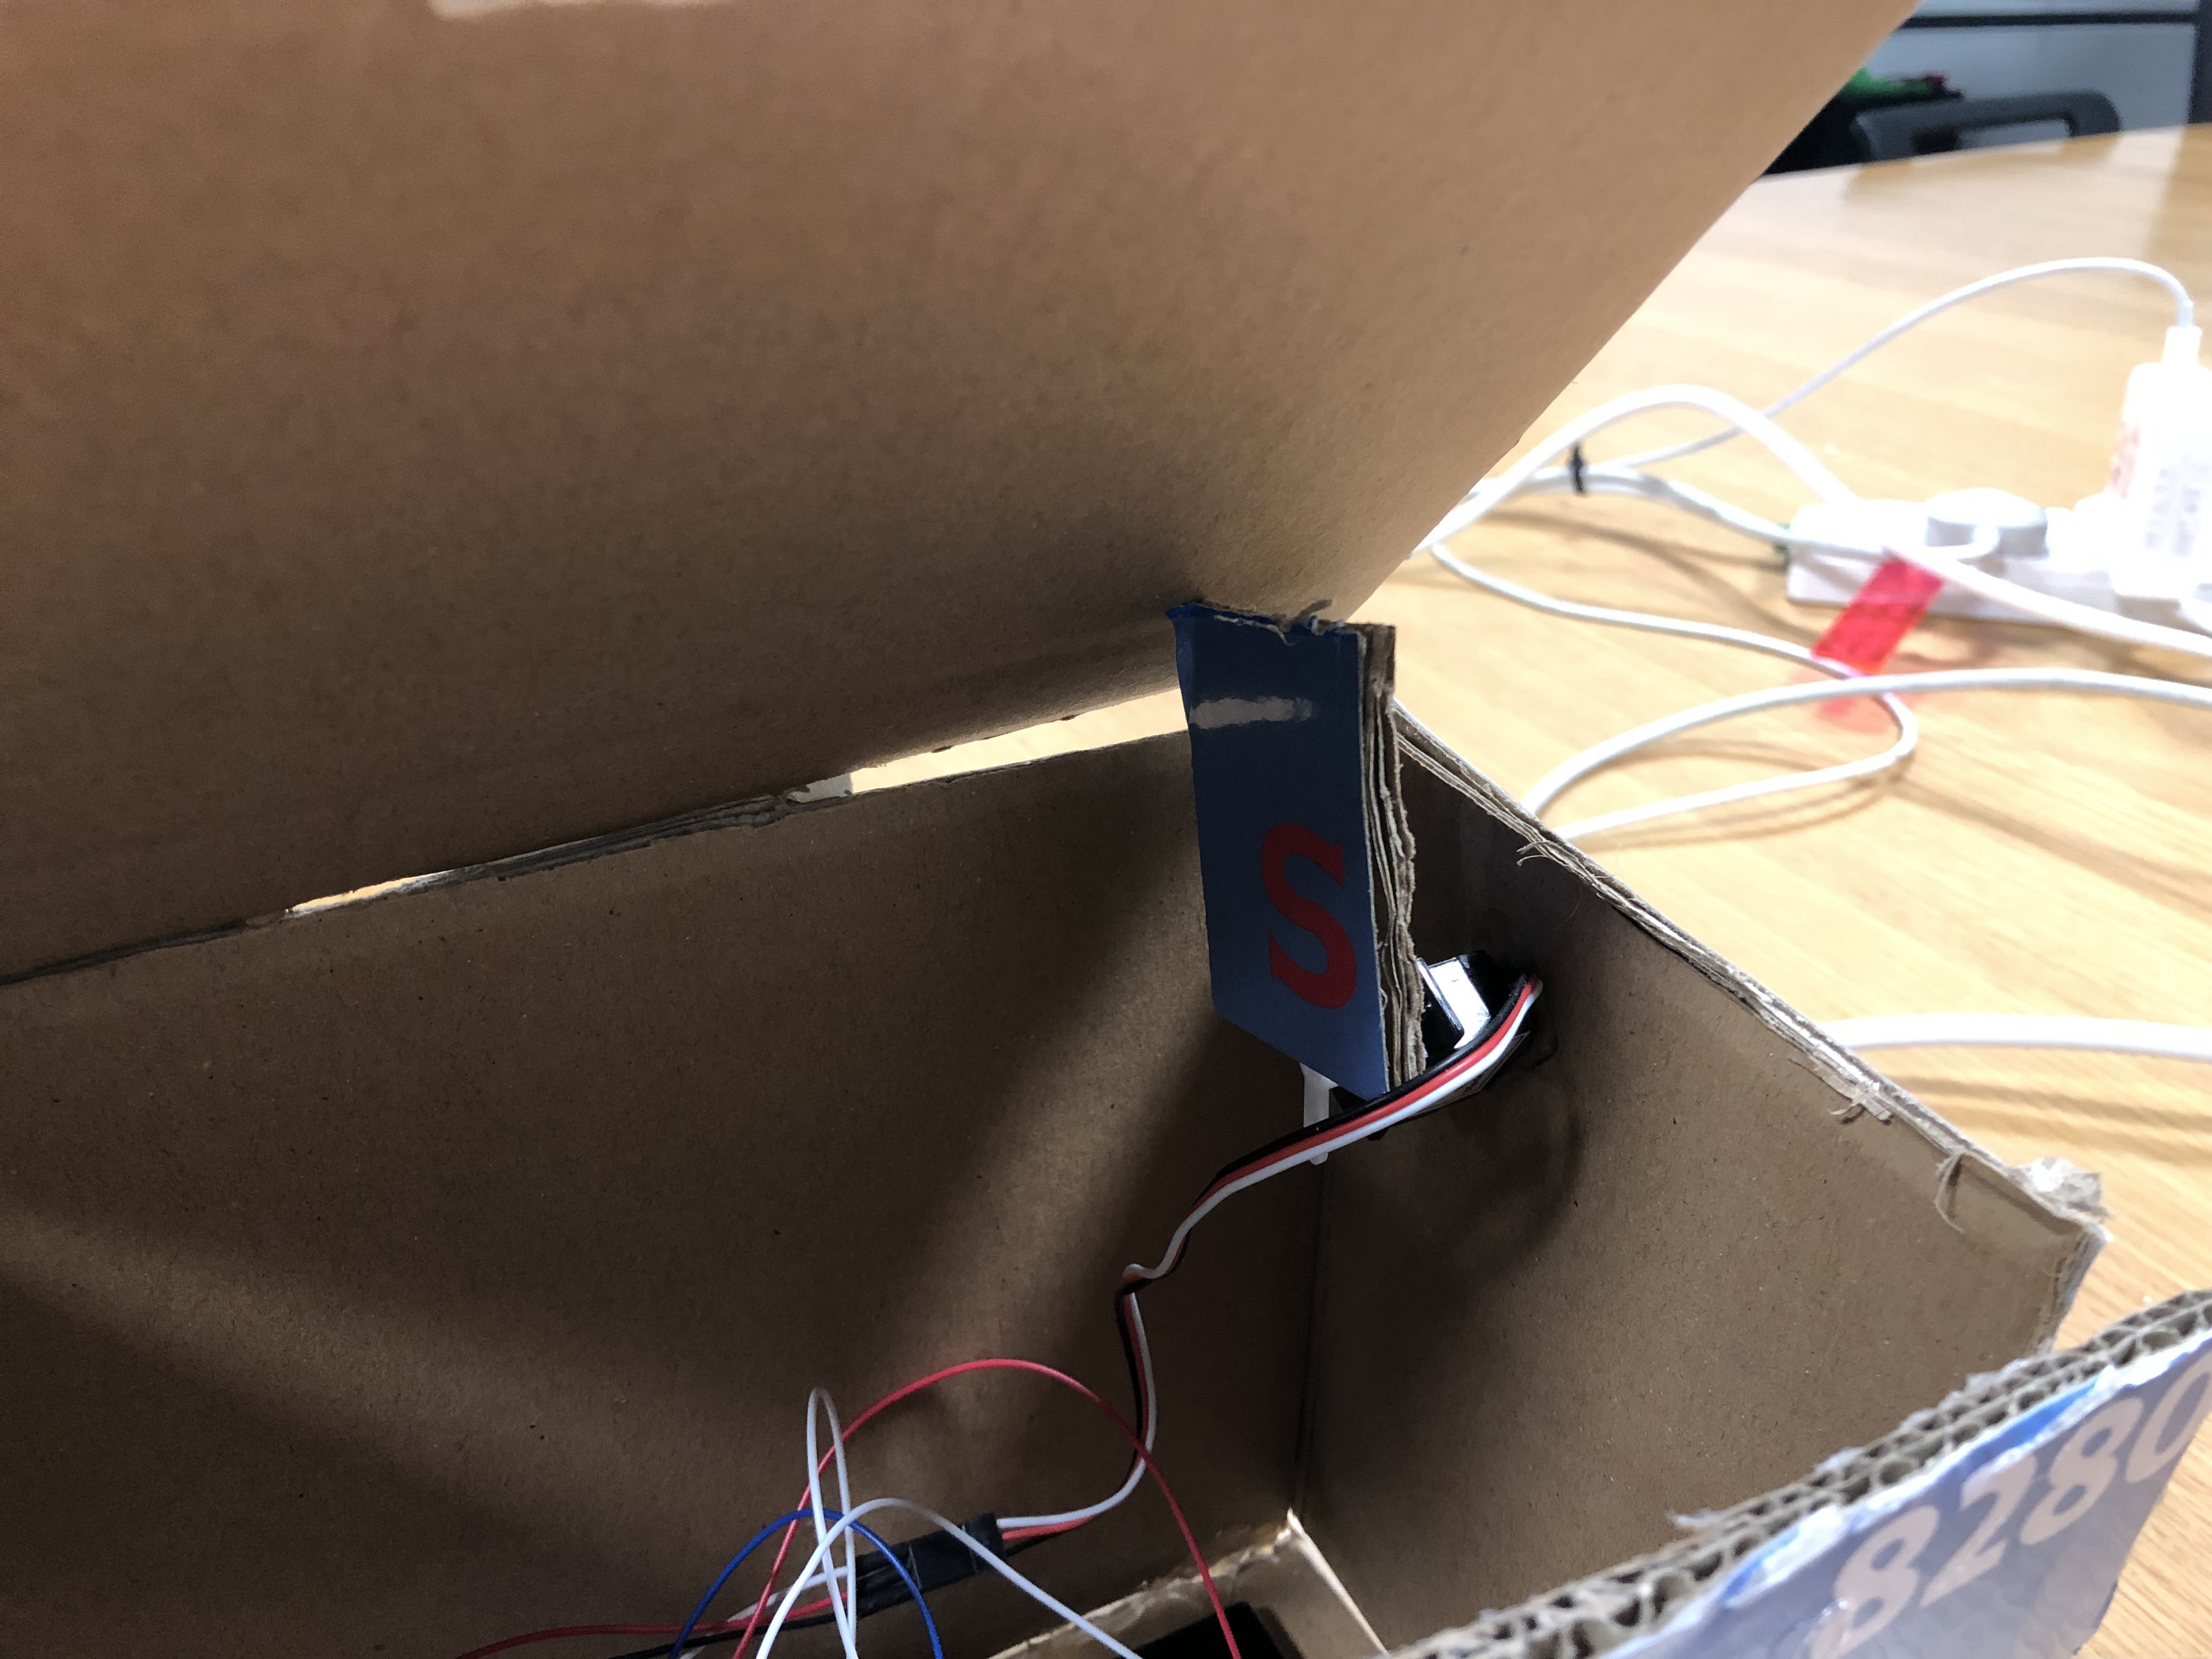
For this week’s project, I used an Ultrasonic distance sensor as my analog input to create a box that opens its lid when you are far away from it. Once you come close enough with your hands over the box, it will shut on you. The goal of the project is to tempt the user to come close, but once you come too close, it will surprise and close on you. Ideally, the cover would be much heavier so that if it shuts, the person’s hand would be trapped there.

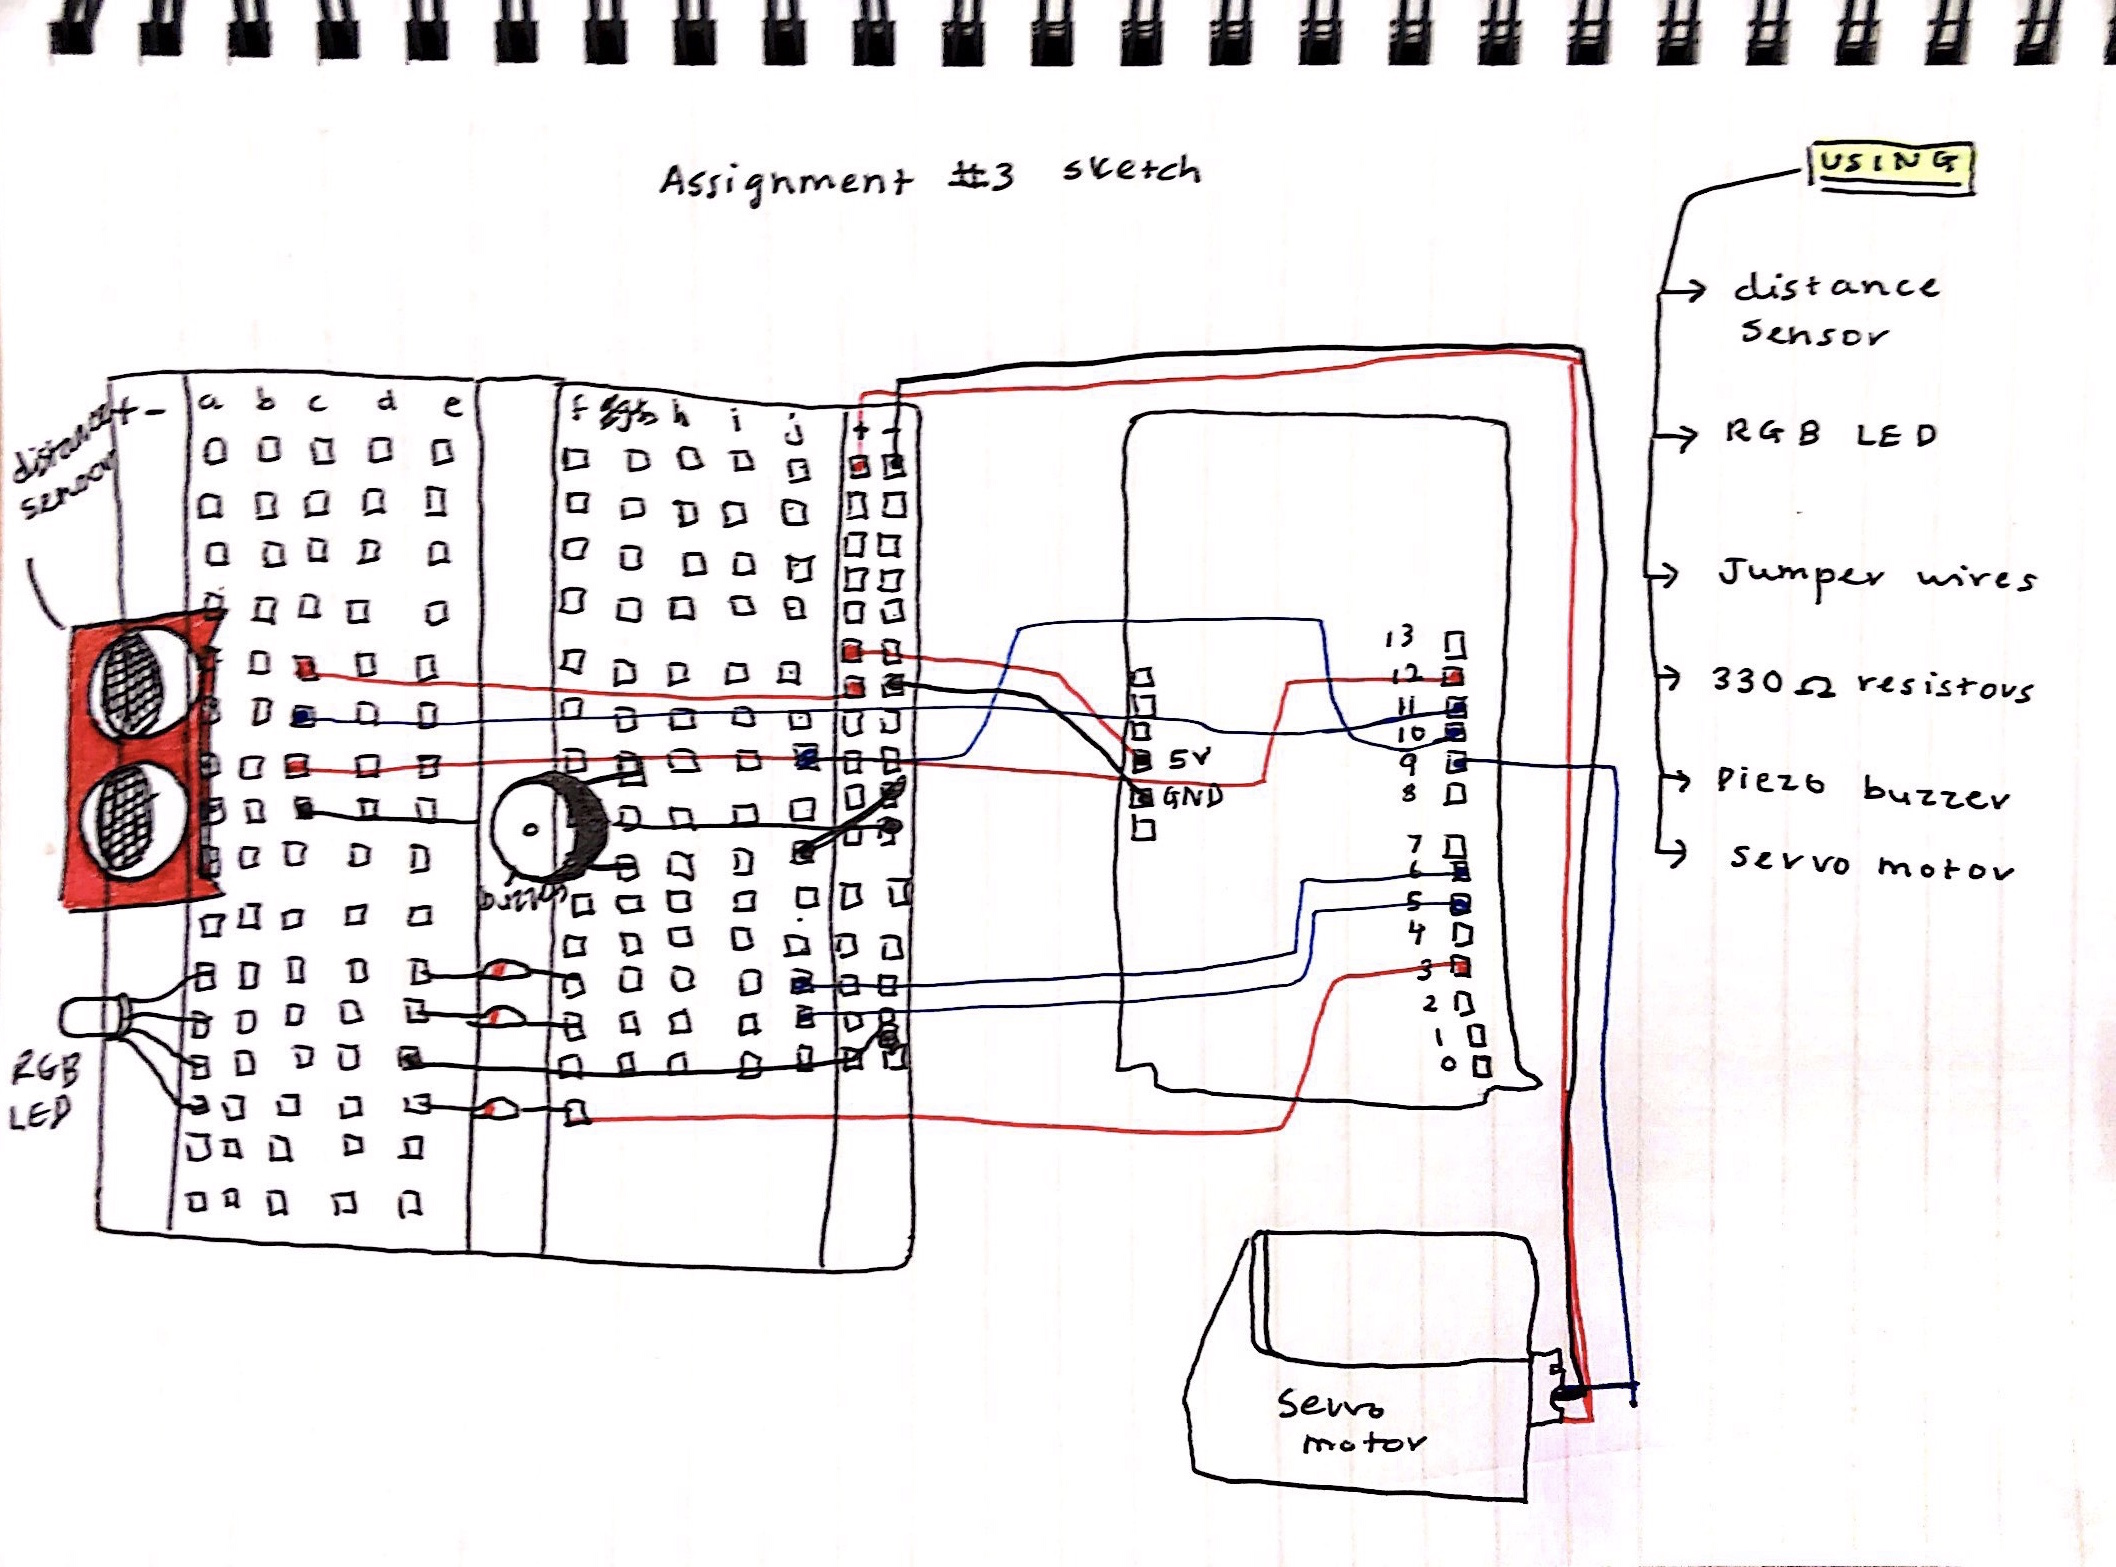
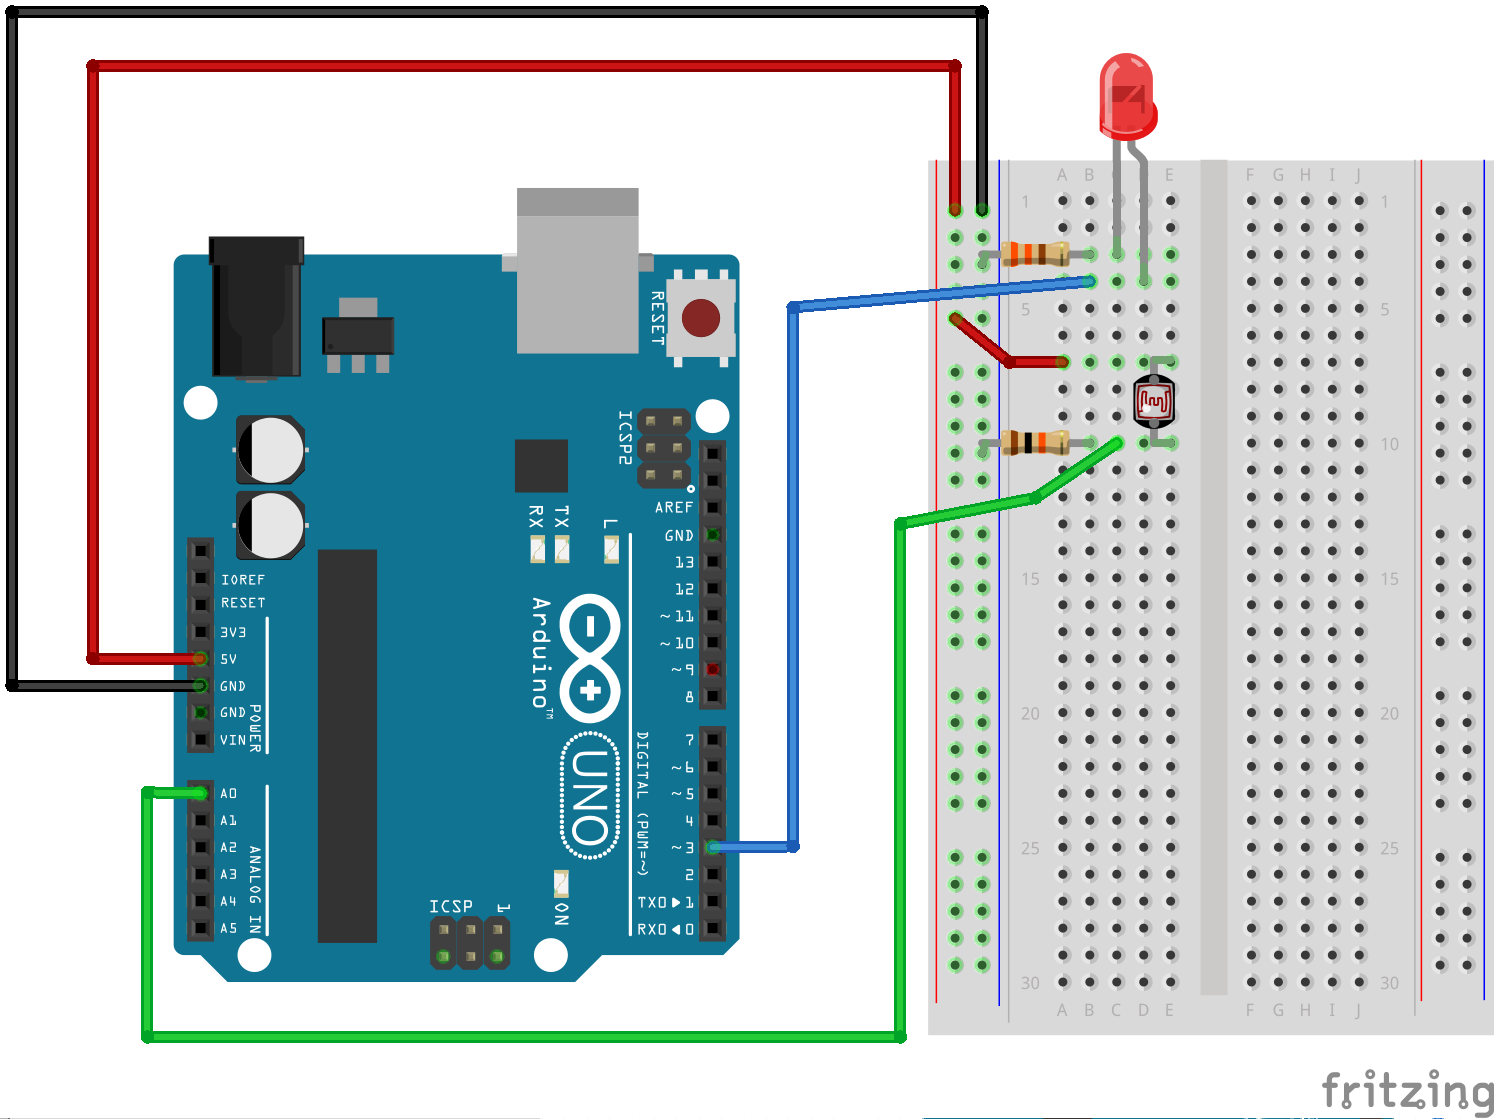
The Ultrasonic distance sensor is faced upwards so that it can detect whether there is a hand over it or not. Depending on its distance value, I map it to the servo, which will rotate between 50 to 180 degrees. I have attached a cardboard on the servo wing so that it is heavier and strong enough to hold up the cardboard box on top. In its neutral 50 degree, the cardboard does not push on the lid, however, once a hand gets close enough, the servo will rotate and will bring the cardboard with it to raise the lid. I have also included a Piezo buzzer that beeps more and more often once a hand gets close to it and a red LED light will also turn on.

During the project, I had problem figuring out what degrees to set the servo so that it went exactly between the 90 degrees needed to lift the lid. Additionally, the distance sensor takes a while to get the correct value, so there are times when every 10ms, it would jump between 1 and 403. To stop that from happening, I added a bit of a delay, but I’m not sure if that’s the correct way to fix it.

To improve on this project, I would probably also mount the servo in a more stable way rather than just hot gluing it to the side because it kept tilting to one side.


Attached is the code for the program :

#include <Servo.h>;

Servo servo;
int lightPin = 8;
int buzzerPin = 9;
int servoPin = 10;
int trigPin = 11;
int echoPin = 12;

void setup() {
  Serial.begin(9600);
  servo.attach(servoPin);
  pinMode(trigPin, OUTPUT);
  pinMode(echoPin, INPUT);
  pinMode(buzzerPin, OUTPUT);
  pinMode(lightPin, OUTPUT);
}

void loop() {
  int distanceInches = getCurrentDistance();
  int pos = 50;
  if (distanceInches <= 30) {
    pos = map(distanceInches, 1, 30, 150, 180);
    tone(buzzerPin, 3000, map(pos, 150, 180, 30, 200));
    delay(10);
  }

  if (pos != 50) {
    analogWrite(lightPin, map(pos, 150, 180, 50, 255));
  } else {
    digitalWrite(lightPin, LOW);
  }
  
  Serial.println(distanceInches);
  servo.write(pos);
}

float getCurrentDistance() {
  float dist;
  float echoT;

  digitalWrite(trigPin, LOW);
  delayMicroseconds(2);

  digitalWrite(trigPin, HIGH);
  delayMicroseconds(10);
  digitalWrite(trigPin, LOW);

  echoT = pulseIn(echoPin, HIGH);
  dist = echoT / 148.0; //microseconds to inches

  return dist;
}

Response: “The Psychopathology of Everyday Things”

In this chapter, Norman introduces principles of design using examples of unsuccessful everyday objects. He looks at these objects mostly from a conceptual viewpoint and attributes the most important characteristics of good design to understandability and discoverability. He then explains the different parts of design functionality using principles of interaction such as affordances, signifiers, mapping, and feedback.

I think the main challenge he presents in this chapter is the extent to which we could (and should) incorporate human-centered design (HCD) into devices. There are many different factors governing the process of design, such as functionality, profitability in the market, and usability. One ever-present challenge in designing devices is the human-machine interaction and our ability to reconcile the binarity or limitations of computers that run these devices with the complexities of humans that use them, especially when technology is exceeding at a faster speed than design.

However, I think he exaggerates the extent to which these everyday objects “complicate” our lives, as well as the extent to which designers should rely on the human aspect. Bad design is indeed harmful, especially when there are ways that we could make devices more efficient and easy to use, but in the same way that we attribute the faults of design to the designer, we could also attribute the faults of understandability to the user. Yes, Norman proposes that “human errors” are just excuses for poor design, but to what degree are we willing to extract the user’s effort from the process, and why? People are becoming increasingly critical of bad design, and that is an issue that Norman expresses clearly in the chapter, however, aside from pointing out the faults of such devices as the wristwatch or the refrigerator, for example–– he does not propose any useful solutions. That is not to disregard the importance of the frameworks he sets for designers as those are useful conceptual structures we can immensely benefit from in the field of design.

Analog Sensors: Safeguard

For this assignment, we were asked to control an LED in an “unexpected” way using information from an analog sensor. Going off of this prompt, I created a ‘Safeguard’ using a motion sensor, a servo motor, a buzzer, and an RGB LED light. Here is a rough circuit sketch:

The LED lights up based on readings from the motion sensor about the object’s proximity; so if the object or person is at a safe distance, the LED turns green. At a medium distance, it turns yellow. When the object gets too close to the sensor, the LED turns red and triggers sound from the buzzer along with a movement from the servo motor. Although the stop sign kind of hints at the outcome, there is a sense of ‘surprise’ in that you don’t know how or when it is triggered unless you interact with the sensor. Here is an image of the circuit:

One of the challenges I faced while making this was that I wanted the stop sign to be part of the circuit, rather than a mere cardboard cutout. However, I realized that using a servo to move the sign around reconciles that. If I were to improve this project, I would incorporate an LCD screen to use instead of the cardboard sign.

Here is a final video demonstration:

And here, you can find the code I used to make it work:


    #include <Servo.h>                
    const int trigPin = 11;                
    const int echoPin = 12;                  
    
    const int redPin = 3;             
    const int greenPin = 5;           
    const int bluePin = 6;            
    
    const int buzzerPin = 10;         
    
    float distance = 0;               
    
    Servo myservo;                    
    
    void setup()
    {
      Serial.begin (9600);        
    
      pinMode(trigPin, OUTPUT);   
      pinMode(echoPin, INPUT);    
    
      //set the RGB LED pins to output
      pinMode(redPin, OUTPUT);
      pinMode(greenPin, OUTPUT);
      pinMode(bluePin, OUTPUT);
    
      pinMode(buzzerPin, OUTPUT);   
    
      myservo.attach(9);            
    
    }
    
    void loop() {
      distance = getDistance();  
    
      Serial.print(distance);     
      Serial.println(" in");    
    
      if(distance <= 10){            //close distance            
    
        //make the RGB LED red
        analogWrite(redPin, 255);
        analogWrite(greenPin, 0);
        analogWrite(bluePin, 0);
    
        //this code moves the servo and triggers the buzzer
        tone(buzzerPin, 272);         //turn buzzer on
        myservo.write(60);            //move servo to 45 degrees
        delay(100);                   
    
        noTone(buzzerPin);            //turn buzzer off
        myservo.write(150);           //move servo to 135 degrees
        delay(100);                   
    
    
      } else if(10 < distance && distance < 20){  //medium distance
    
        //make the RGB LED yellow
        analogWrite(redPin, 255);
        analogWrite(greenPin, 50);
        analogWrite(bluePin, 0);
    
      } else{                                     //far distance
    
        //make the RGB LED green
        analogWrite(redPin, 0);
        analogWrite(greenPin, 255);
        analogWrite(bluePin, 0);    
      }
    
      delay(50);      //delay 50ms between each reading
    }
    
    
    float getDistance()
    {
      float echoTime;                  
      float calculatedDistance;       
    
      digitalWrite(trigPin, HIGH);
      delayMicroseconds(10); 
      digitalWrite(trigPin, LOW);
    
      echoTime = pulseIn(echoPin, HIGH);      
    
                                              
      calculatedDistance = echoTime / 148.0;  
      return calculatedDistance;              
      
    }
    
    
  //credits: SparkFun Electronics.


#3: Jack in the Box

When I thought of the word “unexpected”, the first cliche that popped into my head (no pun intended) was the ‘Jack in the Box’ toy every little kid knows. At first, I wanted to use a flex sensor to turn the LED on and off once the box was opened/closed but I realized that a photoresistor would do the same job. I really enjoyed creating this box from scratch, soldering the sensor and LED for the first time and then seeing it work; hence, the smile :).

int Pr = 0; // will be used for analog 0.
int PrValue = 0; // value of output
int Pr_Input = 700; // value of when light is on

void setup() {

Serial.begin(9600); 
pinMode(13, OUTPUT); // pin 13 as output

}

void loop() {

PrValue = analogRead(Pr);
Serial.println(PrValue); 
delay(100); 

if (PrValue < Pr_Input)

{ digitalWrite(13, HIGH); } else { digitalWrite(13, LOW);}

}


Charge the LEDs with Your Taps! – Analog Sensors & LEDs

Regarding analog sensors, I was curious how I can mimic one of the games where you have to tap countless times in order to win. At the same time, I thought of the idea that portrays a battery charging by tapping. So, the circuit I have made is a similar but simpler version where I utilized the pressure sensor and five LEDs to create the following experience for the users.

In the beginning, the problem I had was controlling the light of the LEDs. I was used to writing digitalWrite as an indicator for turning the LEDs on and off, but it did not allow me to control the faintness of the lights. After some research into Arduino, I figured out that I can manipulate the brightness of the LEDs by using analogWrite, where it would take the pin and the level of brightness (from 0 to 255) as arguments. By putting it together with the mapped value from the sensor, I was able to display a general fading of the LEDs.

However, the problem did not stop here. Through user testing, I realized that people can lit up the LEDs by just pressing onto the pressure sensor. So, I made a change to use the computedPressureValue, the difference between current value from the pressure sensor to the previous value, to increment the brightness. When the pressure difference is negative, meaning that the previous value is larger than the current value, it meant that the pressure is decreasing and the finger is lifted off from the sensor. Thus, only tapping on the sensor will slowly brighten the LEDs.

Below are the snapshot of the circuit, a run-through of the experience, and the code for the circuit.

The Circuit Layout of the Assignment

// Variables for LED Pin Outputs
const int ledPinOne = 3;
const int ledPinTwo = 5;
const int ledPinThree = 6;
const int ledPinFour = 9;
const int ledPinFive = 10;

// Variables for LED States
bool ledStateOne = true;
bool ledStateTwo = false;
bool ledStateThree = false;
bool ledStateFour = false;
bool ledStateFive = false;
bool ledStateComplete = false;

// Number of LED that the has lit up
int ledCount = 0;

// The number of blinking of LEDs after all five LEDs has lit up
int completedTask = 0;

// Previous value of the readings for the pressure sensor
int prevPressureValue = 0;

// Raw value for brightness
int brightness = 0;

void setup() {
  pinMode(ledPinOne, OUTPUT);
  pinMode(ledPinTwo, OUTPUT);
  pinMode(ledPinThree, OUTPUT);
  pinMode(ledPinFour, OUTPUT);
  pinMode(ledPinFive, OUTPUT);
  Serial.begin(9600);
}

void loop() {
  // ---- COMPUTATION OF VARIABLE ---- //
  // The brightness is computed by using a modulus of 200 so that it has the max-limits of 200.
  int computedBrightness = brightness % 200;
  
  int pressureValue = analogRead(A0);
  
  // The pressure sensor has a min. and max. values of 0 and 1010, which I have mapped for conversion from 0 to 100.
  int currentPressureValue = map(pressureValue, 0, 1010, 0, 100);

  // In order to increase the brightness for each tabs, I have used to difference of current and previous pressure values.
  int triggerPressureValue = currentPressureValue - prevPressureValue;

  if (triggerPressureValue < -10) {
    brightness += 2;
  }

  // ---- CONDITIONAL CHECKS FOR LED STATES & BRIGHTNESS ---- //

  if (ledStateFive) {
    analogWrite(ledPinFive, computedBrightness);
    if (computedBrightness > 190) {
      ledStateFive = false;
      ledCount += 1;
    }
  }

  if (ledStateFour) {
    analogWrite(ledPinFour, computedBrightness);
    if (computedBrightness > 190) {
      ledStateFour = false;
      ledStateFive = true;
      ledCount += 1;
      brightness = 0;
    }
  }

  if (ledStateThree) {
    analogWrite(ledPinThree, computedBrightness);
    if (computedBrightness > 190) {
      ledStateThree = false;
      ledStateFour = true;
      ledCount += 1;
      brightness = 0;
    }
  }

  if (ledStateTwo) {
    analogWrite(ledPinTwo, computedBrightness);
    if (computedBrightness > 190) {
      ledStateTwo = false;
      ledStateThree = true;
      ledCount += 1;
      brightness = 0;
    }
  }

  if (ledStateOne) {
    analogWrite(ledPinOne, computedBrightness);
    if (computedBrightness > 190) {
      ledStateOne = false;
      ledStateTwo = true;
      ledCount += 1;
      brightness = 0;
    }
  }

  // ---- THE PROCESS AFTER ALL FIVE LEDS ARE LIT UP ---- //

  if (ledCount == 5) {
    brightness = 0;
    while (completedTask < 10) {
      for (int i=0; i<6; i++) {
        analogWrite(ledPinOne, brightness);
        analogWrite(ledPinTwo, brightness);
        analogWrite(ledPinThree, brightness);
        analogWrite(ledPinFour, brightness);
        analogWrite(ledPinFive, brightness);
        brightness += 18;
        delay(20);
      }
      for (int i=0; i<6; i++) {
        analogWrite(ledPinOne, brightness);
        analogWrite(ledPinTwo, brightness);
        analogWrite(ledPinThree, brightness);
        analogWrite(ledPinFour, brightness);
        analogWrite(ledPinFive, brightness);
        brightness -= 18;
        delay(20);
      }
      completedTask += 1;
    }
  // Reset variable values to repeat the experience
    completedTask = 0;
    ledCount = 0;
    brightness = 0;
    ledStateOne = true;
    analogWrite(ledPinOne, 0);
    analogWrite(ledPinTwo, 0);
    analogWrite(ledPinThree, 0);
    analogWrite(ledPinFour, 0);
    analogWrite(ledPinFive, 0);
  }

  // ---- SETTING PREVIOUS PRESSURE VALUE WITH THE CURRENT VALUE BEFORE NEW LOOP ---- //
  
  prevPressureValue = currentPressureValue;
}


Week 3 Circuits & Code – Analog Read and Blink Without Delay

Potentiometer:

Photoresistor:

const int ledPin = 2;
bool ledState = LOW;

// a really longer number with no + or - sign
unsigned long toggleTime = 0;
int triggerInterval = 500;

void setup() {
  pinMode(ledPin, OUTPUT);
  Serial.begin(9600);
}

void loop() {
  // read the analog input
  int knobValue = analogRead(A0);
  // map that input to a range appropriate for our use
  // in this case, we take the range of the photocell and map it to millis between 10 & 500
  // this is the blink interval for the LED
  triggerInterval = map(knobValue, 190, 860, 10, 500);

  // print out the original value and the mapped value on the same line
  Serial.print(knobValue);
  Serial.print(" ");
  Serial.println(triggerInterval);

  // if the current time (millis) is more than the exact time when we are supposed to toggle
  if (millis() > toggleTime) {
    // flip the LED to the opposite of what it was
    ledState = !ledState;
    // set the next time the LED should toggle
    // to the current time + whatever the blink interval amount of time is
    toggleTime = millis() + triggerInterval;
  }

  // turn the LED on or off based on the ledState vaviable
  digitalWrite(ledPin, ledState);
}


Week 2 Assignment – Tilt Sensor

For this assignment, I had to combine a switch that doesn’t require the use of hands as well as produce multiple inputs and/or outputs. The main challenge for me was actually settling on a concept for the project. I went over several iterations of the project before deciding on building a scale-like structure that acts as an indicator for the water level. The circuit included a tilt center, which acts as a switch or trigger for the code to run. The code then alternates between blinking red and blue lights, depending on which side is tilted. The first iteration of the model included a simple wooden structure  with the breadboard attached to one side. There was a certain flaw in the balance of the structure, however, as the side with the breadboard kept leaning to the side. The only solution at the time was to place random objects on the opposite end of the wooden panel, and that didn’t seems like a very efficient solution.

The final iteration of the project included a plastic cup attached to the side opposing the breadboard with hot glue. Pouring water into that cup would allow the wooden piece to lean to the other side, so the effect of the tilt sensor can be observed in its full glory.

int tilt = 2;
int redled = 6;
int blueled = 7;


void setup() {
  // initialize serial communication at 9600 bits per second:
  Serial.begin(9600);
  // make the pushbutton's pin an input:
  pinMode(tilt, INPUT);
  pinMode(redled,OUTPUT);
  pinMode(blueled,OUTPUT);
}

// the loop routine runs over and over again forever:
void loop() {
  // read the input pin:
  int buttonState = digitalRead(tilt);
  if (buttonState){
    digitalWrite(redled,HIGH);
    digitalWrite(blueled,LOW);
  } else {
    digitalWrite(redled,LOW);
    digitalWrite(blueled,HIGH);
  }
  if(buttonState){
    digitalWrite(redled,HIGH);
    delay(500);
    digitalWrite(redled, LOW);
    delay(500);
  } else {
    digitalWrite(blueled,HIGH);
    delay(500);
    digitalWrite(blueled, LOW);
    delay(500);
  }
  // print out the state of the button:
  Serial.println(buttonState);
  delay(1);        // delay in between reads for stability
}


Assignment #2 if statements, some buttons, and a buzzer

My little device plays 4 different notes, (one when each of the buttons is pressed). I initially tried to write a program in which a tone would be played depending on the number of consecutive buttons pressed, but I found that difficult to work with> it also did not have the functionality i wanted. I researched online about how to make each function work, then slowly stitched it together. I programmed the notes, bu looking up how many Hertz each of my desired notes was, and plugging it into the program.

const int buttonPin1 = 2;
const int buttonPin2 = 3;
const int buttonPin3 = 4;
const int buttonPin4 = 5;// the number of the pushbutton pin
int Buzzer1 = 6;
int Buzzer2 = 7;
int Buzzer3 = 8;
int Buzzer4 = 9;
int led1 = 10;
int led2 = 11;
int led3 = 12;
int led4 = 13;
int led4State = LOW;

// variables will change:
int buttonState1 = 0;
int buttonState2 = 0;
int buttonState3 = 0;
int buttonState4 = 0;
// variable for reading the pushbutton status

void setup() {
  // initialize the piezo as output:
  pinMode(Buzzer1, OUTPUT);
  pinMode(Buzzer2, OUTPUT);
  pinMode(Buzzer3, OUTPUT);
  pinMode(Buzzer4, OUTPUT);
  pinMode(led1, OUTPUT);
  pinMode(led2, OUTPUT);
  pinMode(led3, OUTPUT);
  pinMode(led4, OUTPUT);
  // initialize the pushbutton pin as an input:
  pinMode(buttonPin1, INPUT);
  pinMode(buttonPin2, INPUT);
  pinMode(buttonPin3, INPUT);
  pinMode(buttonPin4, INPUT);
}

void loop() {
  // read the state of the pushbutton value:
  int buttonState1 = digitalRead(buttonPin1);
  int buttonState2 = digitalRead(buttonPin2);
  int buttonState3 = digitalRead(buttonPin3);
  int buttonState4 = digitalRead(buttonPin4);


  // check if the pushbutton is pressed.
  // if it is, the buttonState is HIGH:
  if (buttonState4 == LOW)
  {
    noTone(Buzzer1);
    digitalWrite(led4, LOW);
  }
  else if (buttonState4 == HIGH)
  {
    //digitalWrite(led2, LOW);
    digitalWrite(led4, HIGH);
    tone(Buzzer1, 261);
  }

  if (buttonState3 == LOW)
  {
    noTone(Buzzer2);
    digitalWrite(led3, LOW);
  }
  else if (buttonState3 == HIGH)
  {
    //digitalWrite(led2, LOW);
    digitalWrite(led3, HIGH);
    tone(Buzzer2, 349);
  }

  if (buttonState2 == LOW)
  {
    noTone(Buzzer3);
    digitalWrite(led2, LOW);
  }
  else if (buttonState2 == HIGH)
  {
    //digitalWrite(led2, LOW);
    digitalWrite(led2, HIGH);
    tone(Buzzer3, 392);
  }

  if (buttonState1 == LOW)
  {
    noTone(Buzzer4);
    digitalWrite(led1, LOW);
  }
  else if (buttonState1 == HIGH)
  {
    //digitalWrite(led2, LOW);
    digitalWrite(led1, HIGH);
    tone(Buzzer4, 440);
  }

Also, my post about the reading:

Despite initially finding myself strongly disagreeing with the author’s definition of Interactivity, I eventually found myself drawn in by his argument. The author has a very specific definition of interactivity:  a cyclic process in which two actors alternately listen, think, and speak. In other words, in his eyes at least, an interaction is like a conversation. He then proceeds to explain that a person cannot have a conversation with an object that does not speak back in any way, does not think, or cannot listen. (The way he says this is rather cheeky, and his self-importance gets on my nerves, but I’ll let it slide). He discusses variability in the level of interactivity a thing can have. The line that won me over was “How many times has your heart protested as you watched the protagonist in a movie do something disastrous?” I related to my lack of ability to have a conversation with a movie. That being said, I believe the author’s definition, as he defines it, is valid.

Here is a cheeky little picture I found one time that reminded me of the reading 🙂