Switch v2.0

Greetings.

So during last class we have created a switch (an actual switch, not the button) . I have used this wonderful creation of ours to make a fire (not only fire but any type of) alarm. The program runs the usual to us part of code where the LED is turned on as the button is pressed and turned off as the button is pressed again. Then I have added the piezo buzzer to the circuit. The most challenging part was to differ the frequency of the sound to make it sound like an alarm. I’ve made a while loop that changes the frequency of the buzzer and it turns on like the LED switch. Code is attached bellow and the video will be uploaded later on, after the class presentation.

int buzz = 4;
int buttonPin = 2;
int ledPin = 3;
int ledState = LOW;
int prevButtonState = LOW;
bool inter = 0;

void setup() {
  pinMode(ledPin, OUTPUT);
  pinMode(buttonPin, INPUT);
  Serial.begin(9600);
  attachInterrupt(0, pin_ISR, CHANGE);

}
void loop() {
  int currentButtonState = digitalRead(buttonPin);
  if (ledState == HIGH)
  {
    int i = 100;
    while (inter && i < 5000)
    {
      tone(buzz, i, 5);
      i++;
    }
  }
  if (currentButtonState == HIGH && prevButtonState == LOW) {
    if (ledState == HIGH) {
      ledState = LOW;
    } else if (ledState == LOW) {
      ledState = HIGH;
    }
  }

  digitalWrite(ledPin, ledState);
  prevButtonState = currentButtonState;
}

void pin_ISR()
{
  Serial.print("h");
  delay(100);
  inter = !inter;
}


Response to Interactivity

Chris Crawford’s paper on interactivity was very enlightening. Although I came in understanding the term “interactive”, I was pleasantly surprised that he had to argue/explain to others about what it is because many people confused it with “reaction”. When he mentioned what the difference was between the two, I realized that I also did not have a firm understanding of interaction (based on his definition).

Something interesting that he brought up was about how an interactive product is a weak link in a chain if not all three conditions (listening, speaking, and thinking) are met regardless of how strong the other two links are. It led to think whether that is actually true; does there exist a project that only takes 2/3 of the conditions, but was still able to make it interactive.

Overall, I think the paper was a bit too strict on what qualifies as an interactive piece. I personally think as long as the user can play around with a work piece and get a response out of it, it is interactive. Whatever the work is, the project doesn’t need to have thinking involved (the response does not have to come from thinking).

Dancing Glove

The second assignment was to expand our initial analogue switch and make a program in Arduino that combines more digital inputs and outputs.

Since I kind of needed the shoes used in last week’s switch, I used the very same principle and applied it on a glove that somehow found a way to my suitcase after winter break.

I constructed one aluminium board which was connected to power, while middle finger was programmed as a switch to light the yellow LED up when connected, index finger made the same with the red LED and thumb was programmed to act as a legit switch that turns both LEDs on, or off.

//blinking
int ledYellow = 3;
int ledRed = 4;
int MiddleButtonPin = 2;
int MiddleButtonState = LOW;
int IndexButtonPin = 5;
int IndexButtonState = LOW;


//Thumb switch
int ThumbButtonPin = 6;
int ledYellowState = LOW;
int ledRedState = LOW;
int prevThumbButtonState = LOW;

void setup() {
  // put your setup code here, to run once:
  pinMode(ledYellow, OUTPUT);
  pinMode(ledRed, OUTPUT);
  pinMode(MiddleButtonPin, INPUT);
  pinMode(IndexButtonPin, INPUT);
  pinMode(ThumbButtonPin, INPUT);
  Serial.begin(9600);

}

void loop() {
  // put your main code here, to run repeatedly:
  
//THUMB BUTTON SWITCH ON AND OFF
  int currentThumbButtonState = digitalRead(ThumbButtonPin);
  if (currentThumbButtonState == HIGH && prevThumbButtonState == LOW) {
  if (ledYellowState == HIGH){
    ledYellowState = LOW;
  } else if (ledYellowState == LOW) {
    ledYellowState = HIGH;
  }
}
  if (currentThumbButtonState == HIGH && prevThumbButtonState == LOW) {
    if (ledRedState == HIGH){
      ledRedState = LOW;
    } else if (ledRedState == LOW) {
      ledRedState = HIGH;
    }
  }
digitalWrite(ledYellow, ledYellowState);
digitalWrite(ledRed, ledRedState);
prevThumbButtonState = currentThumbButtonState;


  //MIDDLEFINGER WITH YELLOW LIGHT INTERACTION

  MiddleButtonState = digitalRead(MiddleButtonPin);

  if (MiddleButtonState == HIGH) {
    digitalWrite(ledYellow, HIGH);
  } else {
    digitalWrite(ledYellow, LOW);
  }


  //INDEX FINGER WITH RED LIGHT INTERACTION

  IndexButtonState = digitalRead(IndexButtonPin);
  if (IndexButtonState == HIGH) {
    digitalWrite(ledRed, HIGH);
  } else {
    digitalWrite(ledRed, LOW);
  }

}


Reaction to Crawford’s Interaction

The field of interactivity is conceptually new and yet to be explored. And, as usual, hand in hand with everything new comes a lot of disagreement too. However, Crawford gracefully, with a lot of humour, manages to draw some crucial distinctions and definitions to help us understand what interactivity actually is and why is it important. He brings up and redefines different situations in the way I never thought of before: a falling branch, book, fridge or theatre play are examples used to demonstrate the difference between reaction and interaction and how these terms get very mixed up and misused.

Right when I was strongly disagreeing with what he was arguing in terms of the interactivity of the fridge, he brought up a sensible idea of levels of interactivity. Crawford made a dialogue analogy as an example in which all of the elements have to work 100% in order to make it successfully work, and through which he managed to convince me that the dialogue itself is the core essence of interactivity. This really made me shift my way of thinking about interaction. Yet, to be fair, there was not much theoretical foundation to begin with, as I often take the art of interaction for granted and only question it when it fails (automatic doors all around the campus, I’m looking at you).

What also draw my attention was the recognition of graphic design and the role it plays in the dialogue of interaction. I really agreed with what Crawford said about graphic design and interaction design NOT being two separate steps. I feel like that both sides fail to adapt to the pace the world is evolving in, and sticking to the old categorisation prevents them from recognising that the field of graphic design and interactive design is inevitably merging.

Overall, I truly enjoyed reading Crawford’s witty piece, thanks to which I’m getting more and more excited to explore the field of interaction from the practical, creator’s side of it.


Reading response. Maxim Blinov.

Chris Crawford has changed my perspective of the definition “Interactive”. Going back to the class when we went out of the classroom to find something interactive on campus, Rick and I told that most of the things are “interactive”. It appears to be not. After understanding that interactive is “a cyclic process in which two actors alternately listen, think,and speak”, I have realized that most of the things on campus are just not interactive. They either think and speak, or just speak. For example, that class when we had to chose the interactive thing, I was about to chose the chalkboard in Baraha, but for some reasons I didn’t. I thought it was not interactive enough. But now, when I know the definition of interactive i can tell that it wasn’t interactive at all.

Step Switch 2

For this week’s project, I decided to build upon my initial Step Switch by stripping the middle connecting wire (which previously closed the circuit when contacted by a conductor) and creating two inputs that would be TRUE when my metallic sneakers came into contact with them. I also created a configuration of “traffic lights” that would have a different pattern depending on the input booleans.

This created two inputs for the project. When the circuit of my right foot input was closed on the board, the pattern of the traffic was slow, when the circuit of my left foot input was closed, the pattern was at a moderate speed, when both the left foot and right foot input circuits were closed, it would activate Crazy Mode™ where the lights would change at the fastest pace.

It was difficult to code my exit conditions if the state of the buttons changed. This was because the function would have to fully loop through if an input was TRUE, so I added return conditions at nearly every step of the process. I also wrote functions for each of the modes (slow, moderate, Crazy™) so my code was nearly 130 lines long with a few differences between the functions used.

Note: The aluminum sneakers will make a comeback during class today; I forgot them in my room when filming the video above.

Catch a Ball, Make It Sing

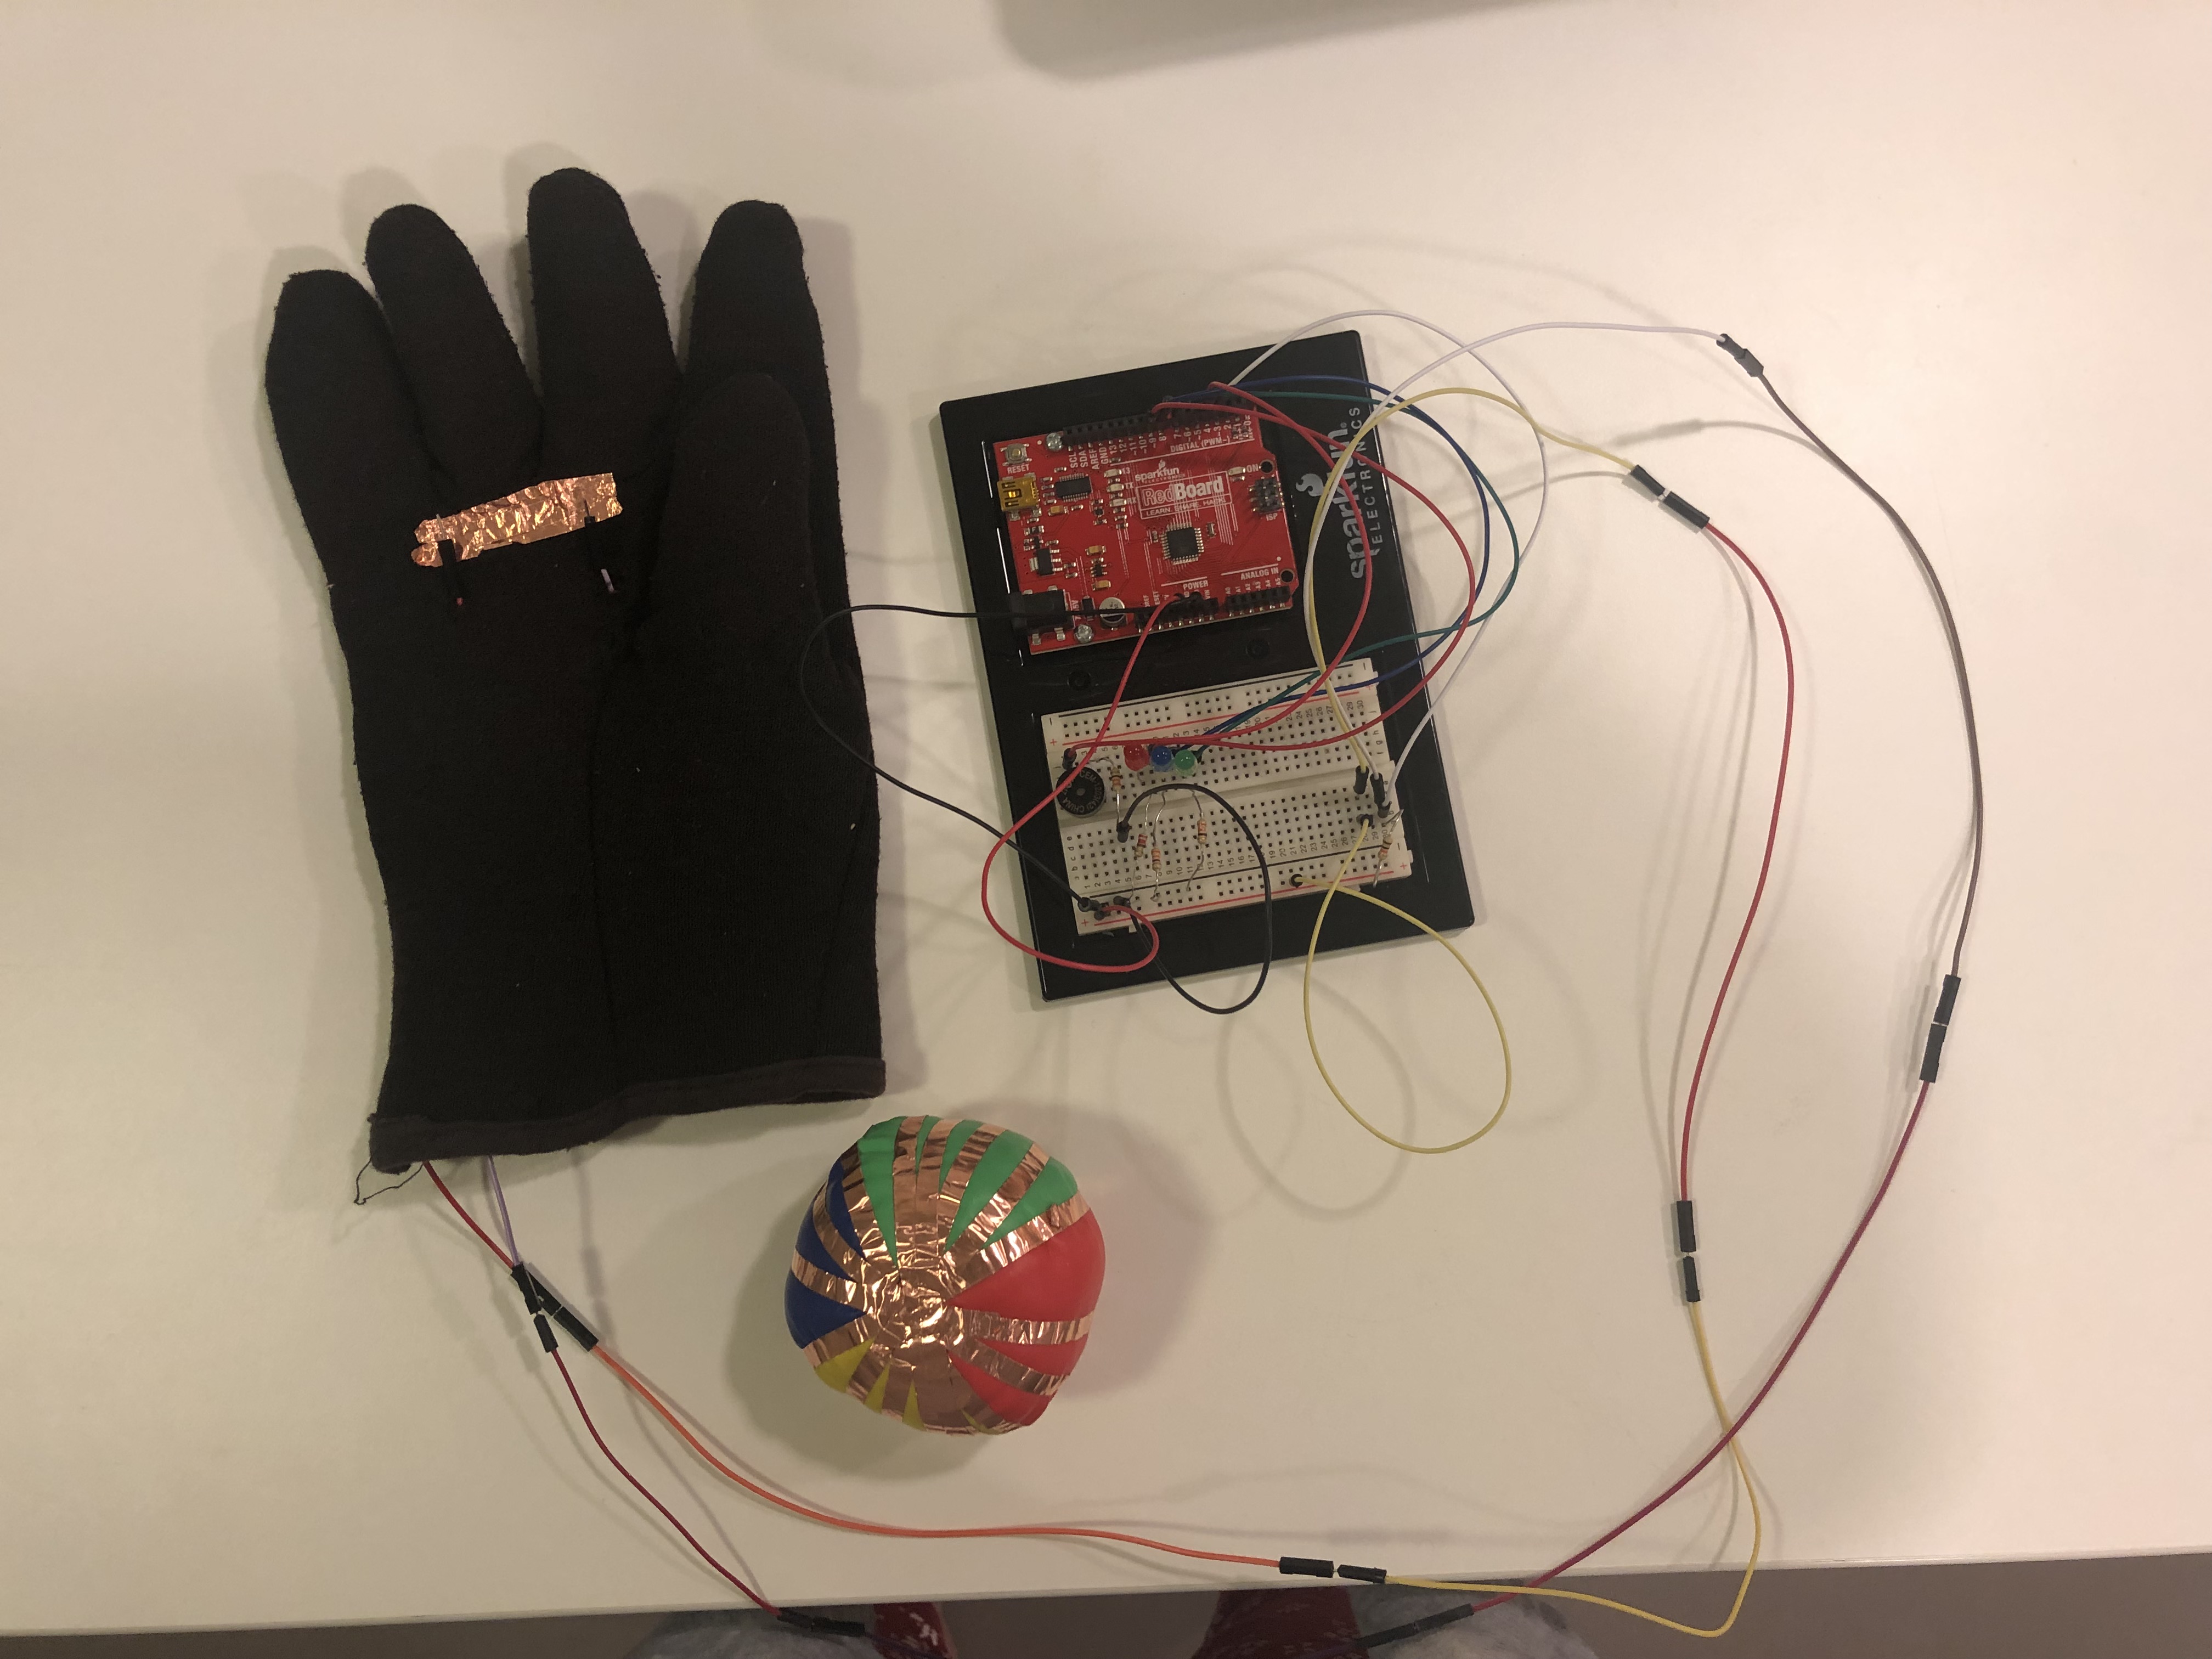
For this assignment, we were asked to make a switch which combines our knowledge of Arduino digital input and output programming. Based on that, I created a switch that connects two long wires through openings on a glove to a series of three blinking LEDs and a 12mm round speaker. To complete the circuit, you’d have to catch a ball which is plastered with copper tape–– thus switching on the LEDs and playing the short tune from the speaker. This project sort of plays on the idea of carnival games which use bright lights and catchy tunes, and I wanted to create something which I can both play with and learn from.

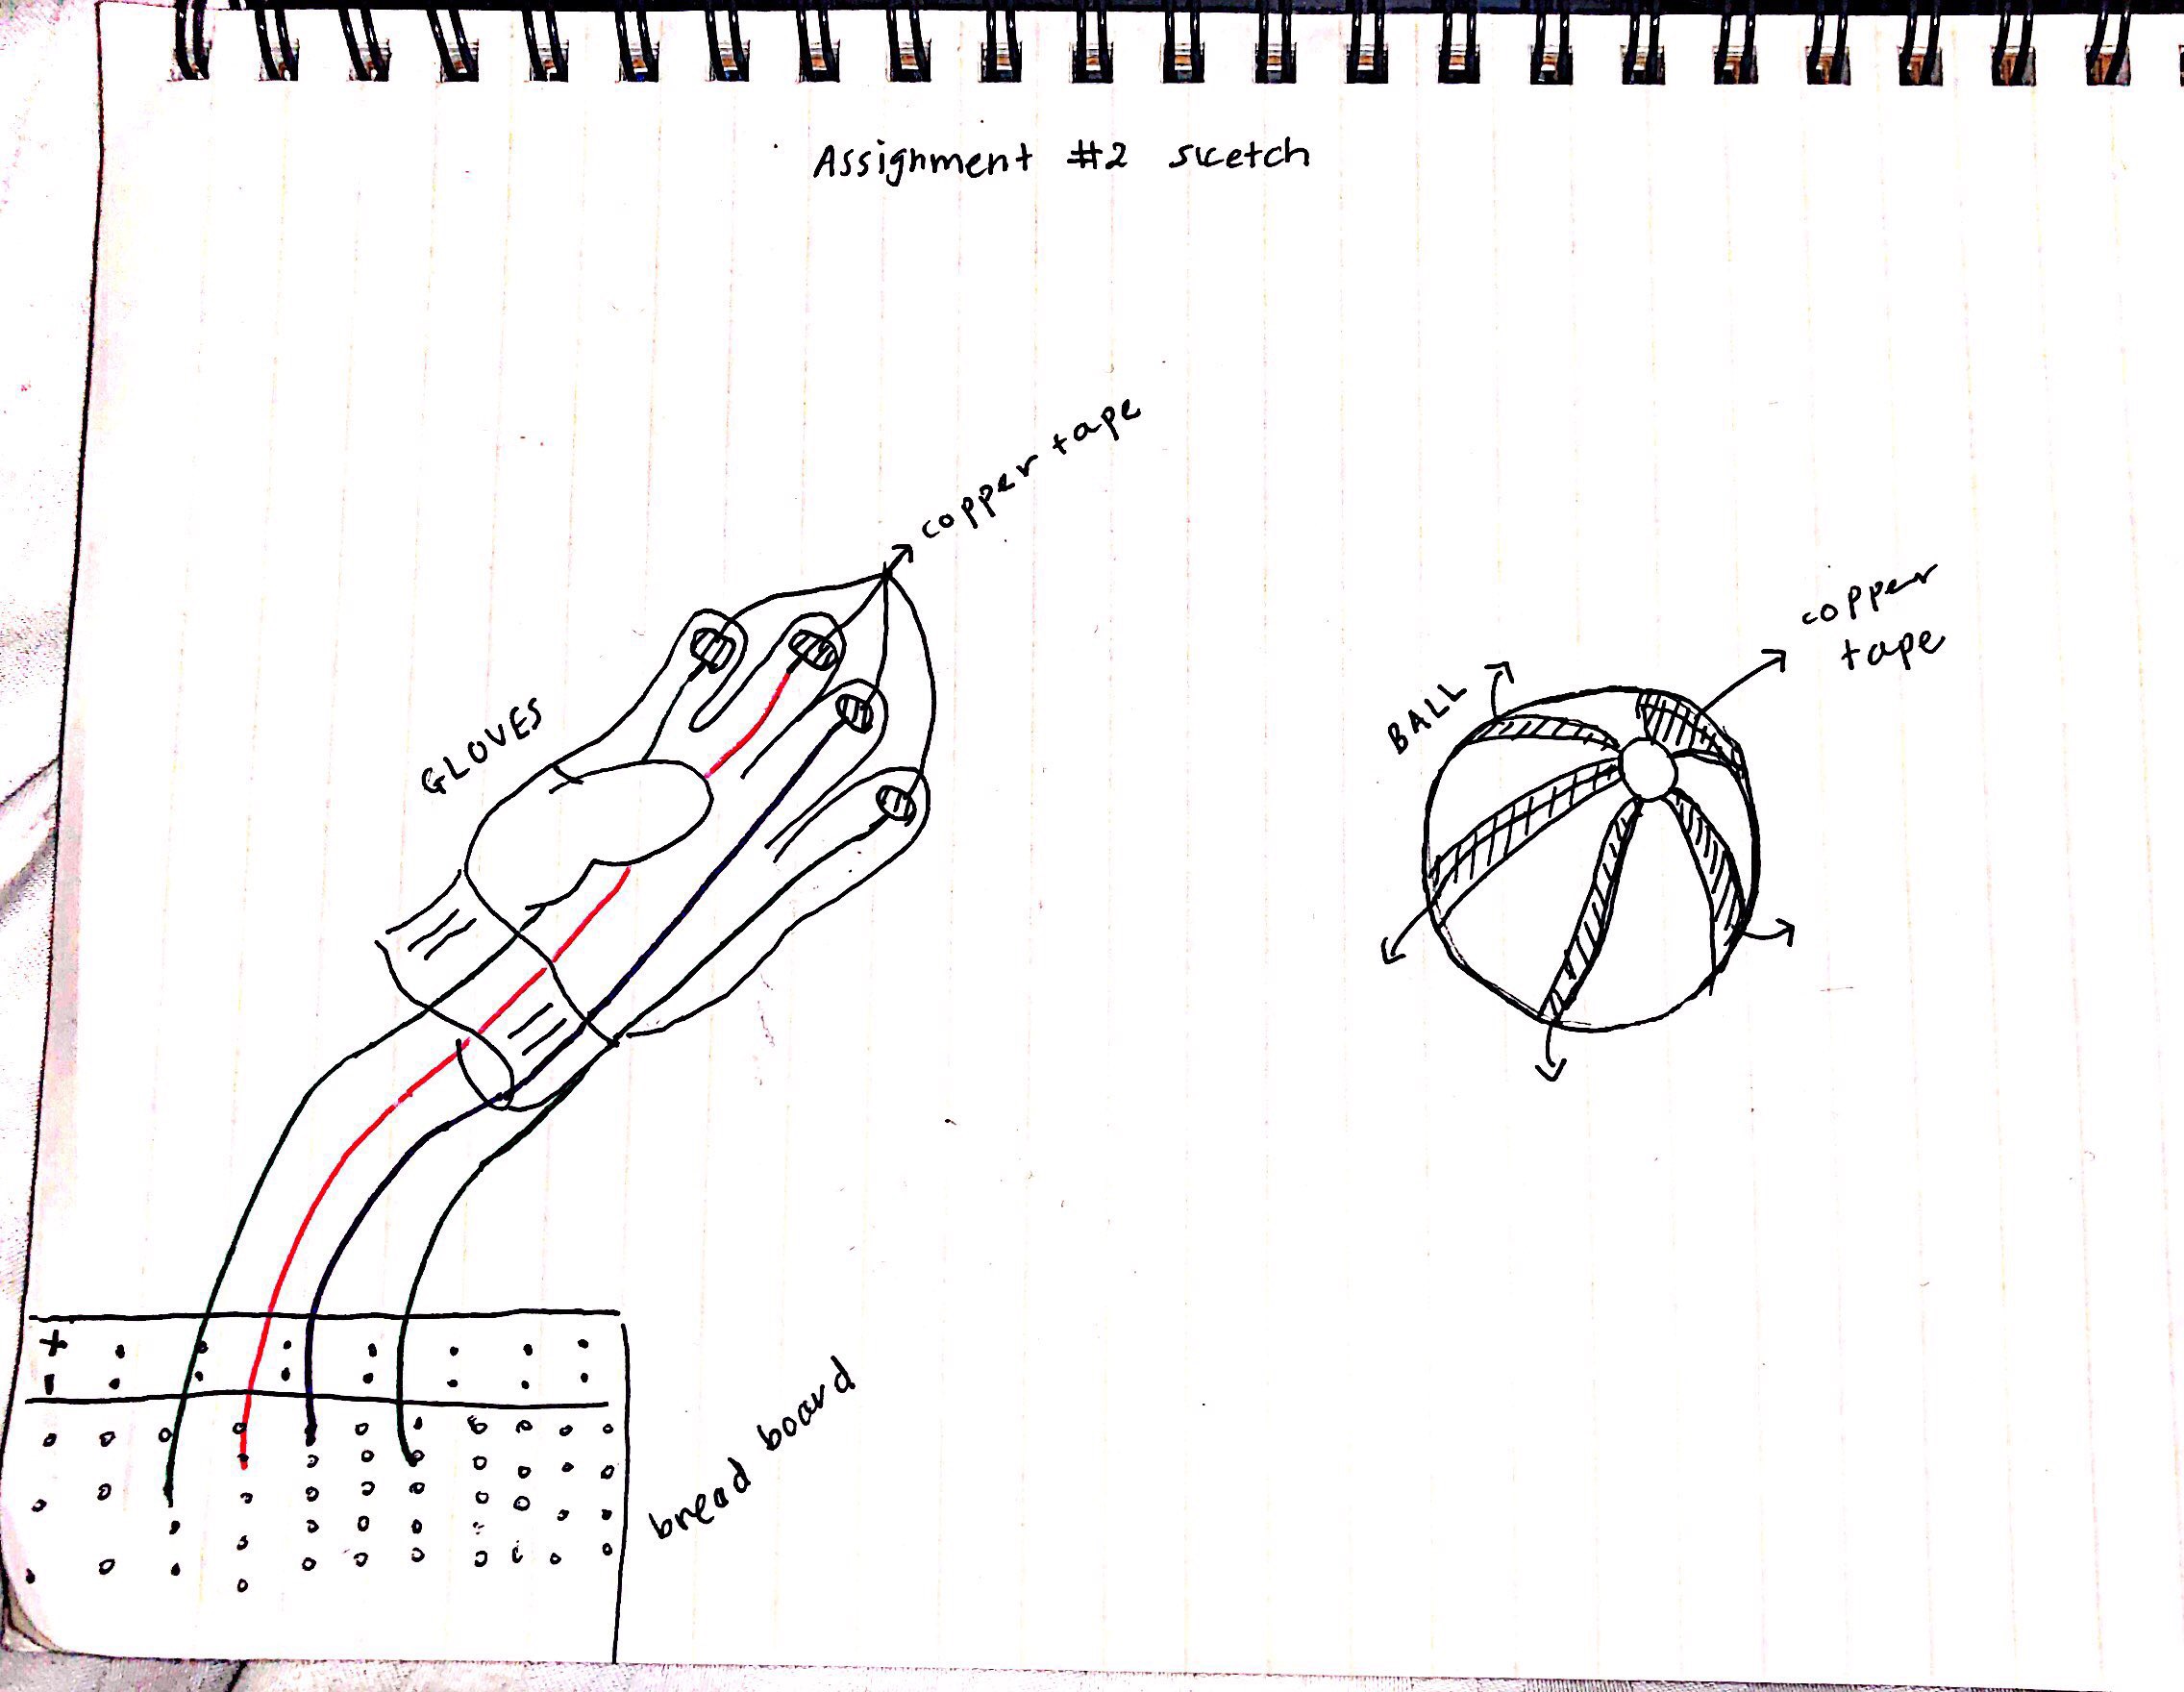
Initially, I had intended for the copper to be on the ball as well as the glove’s fingertips. Here’s a rough sketch of that thought:

However, I realized it would be better to have some copper tape between the wires in the center of the glove instead. This was so I could expand the conductive surface, and also have it all placed in one central position. In the end, this is how my glove and ball looked like:

Here’s a video demonstration of the final result:

When I started programming this on Arduino, I was able to figure out how to make the blinking LEDs work using knowledge from our previous class (and some extra help), but getting the speakers to work was challenging since I’ve never worked with music and code, so I resorted to some Arduino built-in examples which are credited below. Here’s my final code:


#define NOTE_G3  196
#define NOTE_A3  220
#define NOTE_B3  247
#define NOTE_C4  262


int redLed = 9;
int blueLed = 8;
int greenLed = 7;
int button = 3;

int melody[] = {
  NOTE_C4, NOTE_G3, NOTE_G3, NOTE_A3, NOTE_G3, 0, NOTE_B3, NOTE_C4
};

// note durations: 4 = quarter note, 8 = eighth note, etc.:
int noteDurations[] = {
  4, 8, 8, 4, 4, 4, 4, 4
};

// the setup routine runs once when you press reset:
void setup() {
  // initialize the digital pin as an output.
  pinMode(redLed, OUTPUT);
  pinMode(blueLed, OUTPUT);
  pinMode(greenLed, OUTPUT);
  pinMode(button, INPUT);
  Serial.begin(9600);
}

// the loop routine runs over and over again forever:
void loop() {
  int buttonState = digitalRead(button);

  if (buttonState == HIGH) {

    digitalWrite(redLed, HIGH);   
    delay(80);                      
    digitalWrite(redLed, LOW);    
    digitalWrite(blueLed, HIGH);    
    delay(80);                     
    digitalWrite(blueLed, LOW);     
    digitalWrite(greenLed, HIGH);   
    delay(80);                     
    digitalWrite(greenLed, LOW);     

    for (int thisNote = 0; thisNote < 8; thisNote++) {

      // to calculate the note duration, take one second divided by the note type.
      //e.g. quarter note = 1000 / 4, eighth note = 1000/8, etc.
      int noteDuration = 1000 / noteDurations[thisNote];
      tone(4, melody[thisNote], noteDuration);

      // to distinguish the notes, set a minimum time between them.
      // the note's duration + 30% seems to work well:
      int pauseBetweenNotes = noteDuration * 1.30;
      delay(pauseBetweenNotes);
      // stop the tone playing:
    }
  }
}

//credits: toneMelody Arduino built-in examples.


Reading Response – The Art of Interactive Design

In the reading, The Art of Interactive Design by Chris Crawford, it details a clear distinction between reactive and interactive, which is a crucial idea that resolves around when describing interactivity. And, Crawford offers a definition of interactivity as a process that involves listening, thinking and speaking – in other words, input, process, and output. Recalling back to the conversation about “what is interactive” in a previous class, we once mentioned that everything surrounding us – anything that deals with our five intrinsic senses – are interactive. However, even though Crawford indicates that interactivity can be subjective, it became evident that not everything around us are interacting with us – rather we are reacting to the things around us. For instance, as one of the medium brought up in the class, the magnetic door would not be considered interactive because there is no thinking involved in the process.

Response to Chris Crawford + Rotation Lights (Project 2)

“The Art of Interactive Design”

From what I have understood, Chris Crawford aims to provide his definition of what ‘interaction’ is. And according to him, interaction is “A cyclic process in which two actors alternately listen, think and speak”. In my perspective, after reading his work, I have found both advantages and disadvantages to this definition of ‘interaction’.

Advantage

The best part of this reading is that Crawford acknowledges that his own definition does not represent the word itself. Not only that, Crawford also believes that definitions of any word are subjective, which is a concept I highly agree with. This is why Crawford introduced the concept of the degree of interaction, where one would measure how “interactive” an act is. The notion that Crawford is inclusive about multiple views, even those of his oppositions, is highly applaudable and shows that he has though deeply about the definition.

Moreover, what Crawford said is true; interaction does involve listening, speaking, and thinking. And this part he clearly elaborates and how each task is significant towards interaction. But there are always exceptions, which is why I will now go to disadvantages.

Disadvantages

In the readings, there are numerous cases in which Crawford attempts to dispel any sort of rebuttal against his case. Yet the problem stems from not the hidden exceptions themselves (I will explain soon) but from his definition of ‘interaction’, mainly because it is so vague. What does he mean by actors? Is the expression figuratively directed towards humans only, or do any beings with a human-like behavior (breathing, moving) count? As I write this myself, I too know that this is arduous to define, but I believe that Crawford should have at least touched on this part of his definition.

Because one example of an exception I found was how humans interact with dogs. We do not know the language of dogs, so while we can talk to them we cannot converse with them. However, when you see someone petting a dog, while it wags its tail of joy, licking its owner, would you not see that as an interaction? A similar example has been presented by Crawford himself, where he states that some view plays to be interactive because the actors on the stage set the mood and sway the people watching them, thus being interactive. But in that case I do agree with Crawford: the actors aren’t directly interacting on a simultaneous time-space where immediate feedback is possible. However, with the example of the dog, everything makes sense, yet it does not comply with Crawford’s definition. What do you think?

Rotational Lights

I wanted to tinker around with LEDs (output) and switches (input), but I craved for something more. As my curiosity grew and grew, I searched about Arduino Uno online, and found out the Servo motors. With some luck, and some help, I managed to get it working and then it got me thinking, “I should link this with the lights I have.” So I wrote a condition saying that while the angles of the Servo motor was from 10 degrees to 180 degrees, the green light would flashing, indicating a sunset or a bright day (because green is positive). And while the angle was 180 degrees to 10 degrees, the red LED would flash (indicating a sunset).

Next to it is a small second project, where the blue switch would alternatively turn on and off both the green and the red LEDs. Here is a video showing the results of my project. Enjoy!