Final Project Idea | Moving Jigglypuff ?

Concept

This started off as a joke. A friend won a Jigglypuff at a fair and we joked how attaching wheels and a speaker to it would be amazing and how I should do it for my IM Final project.

So, I have decided I will do it for my IM Final Project.

I want to build A moving robot that has a Jigglypuff (which is a Pokemon) plushy at the top . It uses a gesture sensor to detect gestures and respond accordingly. The robot can be controlled through the laptop via P5. A speaker will be used to produce sounds depending on the ‘mood’ the JigglyPuff is currently in .


Some sensors that I plan on experimenting with and seeing what works :

  1. Infrared distance sensors (to check for collisions)
  2. Gesture sensors
  3. Speakers apart from the buzzer
  4. Some kind of camera module (or Go Pro that will stream video to P5)
  5. Maybe a makey makey that would allow sound response to certain touches. (such as if you pat the head of JigglyPuff)
  6. Maybe a mini-projector to project something’s on command

Initial Things to do

  1. Think of a container for the JigglyPuff. What kind of container will look good ? A large 3-D printed bowl? A decorated Wooden Cart ? The Whole module needs a reliable design and I would like to avoid sewing stuff into the plush.  Since it is a rounded plushy, placing components on top of it is not very practical.
  2. Code for the movement of the container.
  3. Check out gesture sensor and code if-else statements
  4. Attach a camera module to transfer input to P5.
  5. Get different sound clips from The Pokemon series for different emotions of JigglyPuff that are to be played for different gestures.
  6. Use Posenet to detect poses ?

Expected challenges

  1. Designing the container
  2. Connecting video feed to P5
  3. Coding for movement in P5
  4. May need multiple microcontrollers for the video feed if connecting to a goPro does not work
  5. Finding the sound clips and a speaker that can play them


Final Project Idea: Hear The World

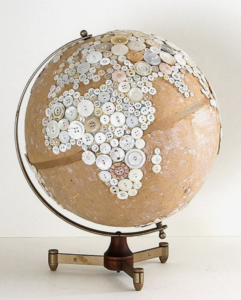
I am looking to create an interactive display using photosensors and P5.js animations. The main setup could be either a flatboard designed as a world map or a globe. This display will feature specific regions that, when touched, trigger music related to that region along with corresponding images or animations displayed using P5.js.

Project Concept:

  1. Interactive Display: Choose between a flat board or a globe. This will act as the base for your project.
  2. World Map/Globe with Regions Marked: The display will have different world regions marked. These could be continents, countries, or specific cities.
  3. Photosensors Embedded: There will be photosensors in these marked regions. These sensors will detect when they are touched.
  4. Music and Visuals: Touching a sensor will play music that is typical of that region. Simultaneously, P5.js will show relevant images or animations to enhance the experience.
  5. Technology Integration: I’ll use P5.js, a JavaScript library, to handle the visual and audio outputs based on sensor inputs.

Final Project Proposal – Bubble Buddy

Bubble Buddy:  Automated Bubble Maker 

I am planning to make an automated bubble maker that detects human presence and movement. The system will track the user’s location and adjust the bubble maker’s position to create bubbles and a bubble display on screen.  The experience will be interactive, as the bubble size and frequency will be based on human position.

System Overview:

The Automated Bubble Maker system consists of the following components:

  1. Human Detection Module:
    • Utilize Posenet, a machine learning model from ml5, to detect human presence and track their movement using a webcam.
    • The model will provide x, y coordinates of the human’s location, which will be used to control the bubble maker’s movement.
  2. Communication Module:
    • Send the x, y coordinates from p5.js to Arduino using serial communication.
    • Ensure seamless communication between the human detection module and the bubble maker’s control system.
  3. Platform Movement Module:
    • Employ 4 servo motors in 4 corners of the platform to move the bubble maker platform 180 degrees horizontally, aligning it with the detected human location.
  4. Bubble Generation Module:
    • Use two stands to support the bubble maker:
      • Stand 1: 5V DC motor fan to create air flow for bubble generation.
      • Stand 2: Servo motor with a threaded bubble maker rod to dip into the bubble solution and align with the fan.
  5. Control System:
    • Arduino board will control the servo motors, fan, and other components to ensure synchronized movement and bubble generation.

Key Features:

  • Real-time human detection and tracking using Posenet.
  • Automated platform movement using 4 servo motors.
  • Precise bubble maker rod alignment using a servo motor.
  • Adjustable bubble size and frequency.

Technical Requirements:

  • Webcam for human detection.
  • ml5 library for Posenet integration and serial communication.
  • Arduino board for servo motor control and fan activation.
  • 4 servo motors for platform movement.
  • 1 servo motor for bubble maker rod alignment.
  • 5V DC motor fan for bubble generation.
  • Bubble maker rod and solution.
  • Custom-designed platform and stands for bubble maker and fan.

Yaakulya Final Project Idea

Project Title: Interactive LineBot

Why a robot?
From childhood I’m always fascinated by robots. The inspiration for this project stems from a desire to create an engaging and interactive robotics experience just like Wall-E and DUM-E from Pixar and Marvel movies. I believe this project seeks to merge the worlds of hardware and software in a fun and accessible manner.

Objective: The objective of the Interactive LineBot project is to build a robot capable of autonomously following a black line on a white surface. By integrating an interactive p5.js interface, users can draw custom paths for the robot to navigate, providing a hands-on experience in robotics and programming. The project aims to foster curiosity, experimentation, and learning while exploring the principles of robotics, sensor integration, and graphical user interfaces.

Hardware Components:

1) Arduino board
2) Infrared (IR) sensors (typically two or more)
3) Motor driver
4) Motors and wheels for the robot chassis
5) Breadboard and jumper wires
6) Battery pack or power source

Steps I would like to proceed:

Building the Robot: Assemble the robot chassis and mount the motors, wheels, and IR sensors. Connect the IR sensors to the Arduino board and position them close to the ground in front of the robot. Connect the motors to the motor driver or shield, which will be controlled by the Arduino.

Programming: Write a program in the Arduino IDE to read data from the IR sensors and control the motors to follow the line. Implement logic or algorithms to interpret sensor readings and adjust motor speeds accordingly. Upload the Arduino code to the board and fine-tune parameters for optimal line following.

Creating the p5.js Interface: Develop a graphical user interface using p5.js where users can interactively draw custom lines representing the robot’s path. Implement functions to handle user input, such as mouse clicks or dragging, to draw lines on the canvas. Provide visual feedback to users as they draw lines and interact with the interface.

Integration: Establish communication between the Arduino board and the p5.js interface, typically via serial communication. Send commands from the p5.js interface to the Arduino to control the robot’s movements based on user-drawn trajectories.


(In a game it can be used to solve a maze)

Final Project Idea

This project aims to create an interactive art installation using a Flipdot display controlled by an Arduino UNO with a graphical interface powered by P5.js. The installation will allow users to create patterns or drawings on a web-based interface (using P5.js), which will then be replicated on a large Flipdot panel in real-time. This integration combines the digital and physical realms, making it a fascinating project for exhibitions, educational purposes, or interactive installations.

Final Project Brief – “Interactive NYUAD Campus Explorer”

My goal is to create an interesting way to explore NYUAD. This project will combine physical interactivity with digital technology, providing a unique and engaging way to learn about our campus.

How It works

I am planning to create a tangible, interactive experience with a physical 3D model of the NYUAD campus, where each building is equipped with sensors. Additionally, I will use a small model of a person outfitted with a compatible sensor. When this person model is placed near or inside one of the buildings on the campus model, the sensors will detect its proximity or contact. The Arduino will then send a signal to a computer system, indicating which building the person model has been placed in. This signal will trigger a p5.js application to display specific information about that building on a screen. The displayed information can include textual descriptions, historical facts, photographs, and potentially other multimedia elements.

Purpose and Benefits

When I was accepted to NYUAD, I was curious about the campus buildings, but I could not find much information or photographs of our campus on the internet. Mainly, I wanted to create this project as a unique way for our students, faculty, and prospective students to learn about our campus. Also, this tool is invaluable for orientation programs, helping new students and staff familiarize themselves quickly and effectively with the campus.

Main Challenges

Currently, I am not sure which sensor to use in both the buildings and the miniature person.

Final Project Idea

For my final project, my main focus is on p5.js and using posenet from ml5. I want to allow the user to be able to draw in the air by using their right hand as a brush. For the Arduino part, I will be adding different colored buttons to change the color of the ink in p5.js. I also want to add a potentiometer to control the opacity of the color. In addition to that, I might add a piezo buzzer and change the sound according to the position of their hand, something like the photo shown below.

ml5.js posenet xylophone

gikfun 12 x 12 x 7,3 mm taktile Tact Push Button Momentary SMD PCB Schalter mit Cap für Arduino (25 Stück) ae1027 : Amazon.de: Gewerbe, Industrie & Wissenschaft


Inputs: Arduino and camera (posenet)

Output: p5.js

Final idea final project – Self driving car in parking

I am going to build a parking for a self-driving car that parks itself.

There are various steps for building this parking.

First of all, I am going to concentrate on building the self-driving car. This car will follow a black line on the ground.

Functioning:

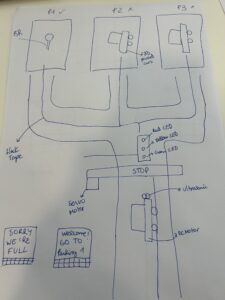
The car will drive straight. When the ultrasonic sensor detects the parking bar it will stop. Here is where all the parking function starts.

The parking will detect if there are free slots in the parking. If there is no room for the car, the P5 will tell the driver “Sorry, we’re full” and the red traffic light will light up. If there is an available slot a message in P5 will appear saying “Welcome, go to parking X (and the number). When this message is displayed the Stop bar will open controlled by a servo motor, the green LED in the traffic light will light and the car will go to the available spot.

(Question, how do I make the self-driving car go to the free parking  slot)

Once the car is on top of the free parking slot the FSR(force-sensitive resistor) will detect the car and turn the traffic light red. the ultrasonic resistor will stop as it will detect the parking wall.


Final Project Ideas

Idea 1: Concert

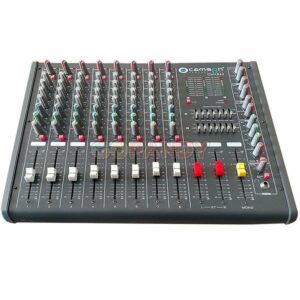
For this project, the user can design a concert environment. I am thinking of designing the Arduino and the breadboard as the mixer for controlling light and sound.

  • The photocell will be used to control the brightness of the room.
  • The potentiometer will be used to control the volume of the music.
  • A button will be used to switch songs.
  • A button will be used to change the color of the lights.
  • A speaker will be used to project the sound.
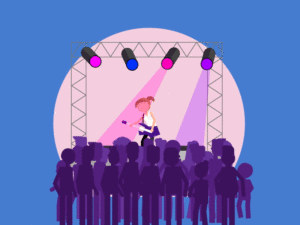
  • p5 will illustrate the concert setting.

This is what inspired me:

Idea 2: Musical Instruments

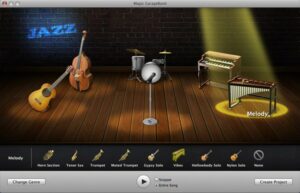
For this project, I am thinking of creating musical instruments. Like “Garageband” on Apple devices, I am thinking of providing a space for the users to play various instruments.

  • The potentiometer will be used to control the volume of the sound.
  • Buttons will be used as note keys.
  • A speaker will be used to project the sound.
  • p5 will illustrate the instruments on the screen and allow the users to select instruments.

This is “Garageband” that inspired me:


Week 11: Reading Reflection

Drawing upon the insightful critique presented in Bret Victor’s “A Brief Rant on the Future of Interaction Design,” I find myself resonating deeply with the underlying message of reimagining our interaction paradigms. Victor’s compelling argument against the myopic vision of future interfaces primarily reliant on fingertip interactions challenges us to broaden our conceptual horizons. Reflecting on the assertions made, it becomes evident that while touchscreen technology represents a significant advancement, it barely scratches the surface of our interactive potential.

Victor’s emphasis on utilizing the entire hand—not just the fingertips—invites us to explore the rich possibilities of tactile and gestural inputs. This approach not only enhances the depth of human-computer interaction but also aligns with ergonomic principles that advocate for natural, strain-free movements. The focus on whole-hand interaction could lead to more intuitive and physically engaging interfaces that leverage the full spectrum of human dexterity and sensory feedback.

Moreover, the notion of universal design emerges as a crucial consideration. By aspiring to create interfaces that are accessible to all, including those with different abilities, designers can cultivate inclusivity. This idea challenges us to think beyond the conventional target audience and design products that cater to a diverse user base without compromising on functionality or aesthetic appeal. Such an approach not only broadens the market reach but also reinforces the social responsibility of design.

In envisioning the future of interaction design, we should indeed consider a return to the basics, as suggested in the readings. The fundamental act of hands manipulating physical objects has shaped human tool use throughout history; thus, incorporating this intrinsic aspect of human behavior into modern technology could revolutionize how we interact with digital environments. It is not merely about enhancing existing technology but redefining what interaction entails in the digital age, moving from passive touchscreen gestures to dynamic, multi-dimensional engagements.

In summary, while advanced technologies like 3D cameras and AI-driven interfaces continue to push the boundaries, the essence of interaction design should remain grounded in the natural human experience. Emphasizing the full potential of our hands not only respects our biological heritage but also opens up a panorama of possibilities that could redefine the future landscape of technology, making it more intuitive, inclusive, and fundamentally human-centric. This perspective not only aligns with Victor’s critique but also propels it forward, suggesting a paradigm where technology complements rather than constrains human capabilities.