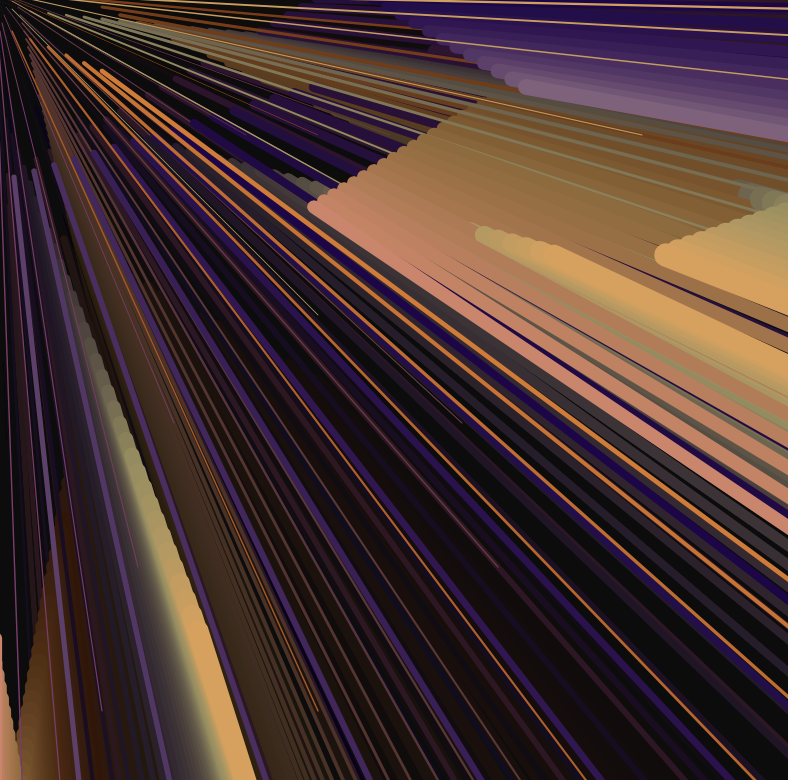
Production Assignment – Week #3

For this assignment, we were tasked with creating a generative artwork using Object-Oriented Programming. I wanted to use something we use everyday in our culture to create my artwork, and took inspiration from the Emarati Ghutra (Ghitra):

I tried to use its some of its colors (white, and the different shades of red) and shapes (zigzags, diamonds, checkered squares, etc) to create my artwork.

I created a class for the Ghutra elements, consisting of a constructor, display function, and changeColor function to change the color on mouse click.

class GhutraPatternElement {
  
  // Setup the constructor with the required attributes to draw the shapes
  constructor(x, y, size, color, shapeType) {
    this.x = x;
    this.y = y;
    this.size = size;
    this.color = color;
    this.shapeType = shapeType;
  }

  // Display function to draw the shapes based on the attributes passed to the constructor
  display() {
    fill(this.color);
    noStroke();
    
    // Diamond Shape
    if (this.shapeType === 'diamond') {
      beginShape();
      vertex(this.x, this.y - this.size);
      vertex(this.x + this.size * 0.8, this.y);
      vertex(this.x, this.y + this.size);
      vertex(this.x - this.size * 0.8, this.y);
      endShape();
    }
    
    // Checkered Squares
    else if (this.shapeType === 'checkered') {
      rectMode(CENTER);
      rect(this.x, this.y, this.size, this.size);
    } 
    
    // Zigzags
    else if (this.shapeType === 'zigzag') {
      let numZigs = 10;
      let zigzagWidth = this.size / numZigs;

      beginShape();
      for (let i = 0; i < numZigs; i++) {
        let x1 = this.x + i * zigzagWidth;
        let y1 = this.y + (i % 2 === 0 ? -this.size : this.size) * 0.5;
        vertex(x1, y1);
  
        let x2 = this.x + (i + 1) * zigzagWidth;
        let y2 = this.y + (i % 2 === 0 ? this.size : -this.size) * 0.5;
        vertex(x2, y2);
      }
      endShape();
    }
  }

  // Function to change color on mouse press
  changeColor() {
    // Change the color only when the mouse is pressed
    if (mouseIsPressed) {
      this.color = random(colorPalette);
    }
  }
}

I used ChatGPT to generate the color codes for the different shades of red I used to avoid having to manually sample each color and waste time:

let colorPalette = [
  '#FFFFFF',    // White
  '#FF0000',    // Red
  '#990000',    // Dark Red
  '#FF6666',    // Light Red
  '#CC0000',    // Medium Red
];

Overall, this was the result:

Looking to the future, there are definitely many things I can change to improve this artwork and make it more aesthetic. Additionally, there seems to be a bug in my code that changes the shape color multiple times per each mouse click instead of just once.

Week 3 Assignment: The Ant Life

For this assignment, I had initially planned to create Agar Plate V2, but quickly found out that there would be very few ways to add more features and convert it to follow the guidelines of OOP without overhauling some major parts, so I decided to start from scratch. The bouncing balls example we did in class inspired me to do a project on generative art using ants.

Four Tips to Keep Ants out This Spring · ExtermPRO

Fig.: A column of ants, hard at work carrying food back to their colony

The patterns formed by scout ants searching for food and then leading worker ants to the food using pheromones always fascinated me. I wanted to replicate something along those lines in a generative art project. Because this was generative art, most of it had to involve randomness in initial positions, direction, and motions. I first got to work to converting the bouncing balls to ants. For this, I also converted my simple speedX and speedY parameters to be calculated from polar coordinates instead. The hope was that using angles instead of plain coordinate directions would allow better control over the behavior when reflecting off surfaces. I also finally figured out how to set up the collision between two objects in p5.js, which I implemented as below:

collide(other) {
  var d = dist(this.x, this.y, other.x, other.y);
  if (d < this.rad + other.rad) {
  return true; 
  } else {
  return false;
  }
}
for (var j = 0; j < ants.length; j++) {
  if (i != j && ants[i].collide(ants[j]) && !(ants[i].collide(colony))) {
    ants[i].speedDir += PI/2;
    ants[j].speedDir += PI/2;
  }
}

I was initially having the ants go in opposite directions when they met, but decided that having them bounce off 90 degrees instead better matched the behavior of real ants, who often exchange information about the presence or lack of food along their already searched path and move off in different directions instead.

This is the final result:

Finally, I decided to add a bit of randomness to the motion to avoid having them go in exact straight lines and be a closer match to ant-like motion.

Overall, there are many more things that I wanted to include in this project, but figuring out direction and the p5.js rotate() function took the bulk of my time. I had initially planned to have user interactivity in the form of sugar cubes they could drop, which would cause all the ants nearby to rush towards it. But, I had already tired of the math required just to figure out which direction the ants would be oriented in when they bounced off the walls, and I wasn’t too eager for further math. If I have more time in the future, I would love to revisit this project and improve upon it.

Reading Response – Interactivity and Others

How can we define interactivity? I realize that the word “interactive” has been overused by many things that involve some kind of human’s action in it. However, I believe that similar to the reading, the human’s interaction with any object must also result in a response from the object. Hence, the object is interaction. To some sense, this is similar to having a conversation where the speaker expects a response from the listener. Furthermore, as in the reading mentioned, the interaction is just not simply the meaningless communication between communicators but it must involve the process of thinking in related to the given subject. It is worth noting that the level between the subjects in the interactive conversation should be similar.

Another aspect that interests me is the notion of whether interactivity is subjective. While the reading is trying define the term interactivity universally, I would like the think that interactivity is subjective. It does not limit to the functionality of the interaction, but I would rather argue that some interactivity are designed to target a certain group of people. For example, any interaction that requires a response from the text/quote questions without audio support could not consider as interactive to the young children who have not studied how to read yet. Each design for interaction seems to target a certain subject group, or all, but it is certain that interaction is not universal in my opinion.

Reading response 2: The Art of Interactive Design

Even though we are studying “Interactive Media”, I didn’t ponder much about how interactivity should be defined until I read this article. Crawford’s definition, framing it as a cyclic process where two actors alternately listen, think, and speak, seemed interesting but not all-encompassing. His skepticism about labeling everything as interactive, especially in the context of books or movies, got me thinking. It nudged me to consider a spectrum of interactivity rather than a black-and-white definition.

Low interactivity, for me, could be akin to interacting with a traffic light. While it responds to user input (pressing the button to cross the street), the interaction is limited to a predefined set of responses (changing the signal). Medium interactivity might resemble using a smartphone. While navigating through apps, users can input commands, receive feedback, and customize settings. The smartphone’s interface allows for a degree of personalization and responsiveness to user actions, but it still operates within the confines of preprogrammed functionalities. High interactivity can be exemplified by AI LLM chatbots since their capacity to comprehend intricate language inputs, showcase contextual understanding, respond coherently, and even generate creative content reflects a higher level of engagement. They can generate human-like text and personalized responses yet still lack the consciousness of a human being. However, it is starting to get borderline difficult to differentiate their responses from genuine understanding with bots like Character.ai.

Furthermore, Crawford’s distinction between user interface design and interactivity design struck a chord. It made me reflect on projects where the interface might be visually appealing but lacks the holistic experience that interactivity design aims to achieve. It aligns with my belief that interactive design should engage users not just visually but also cognitively. True interactivity is like a dance of ideas, not a one-way street.

Assignment 3: Dynamic Blend


(Click on screen)

For this assignment, I wanted to create a simple yet appealing and interactive artwork. When the user clicks on the canvas, a few balls of random color appear. These balls move independently, colliding and combining with other balls to form a new ball with the additive color of the two original balls, gradually filling the canvas with a visually striking pattern. I wanted to experiment with the Additive color theory and show how simple colors can create unexpected results.

I created a BouncingBall Class so that each ball is an object with the same properties. The part of the code I am most proud of is initializing the speed and direction for the ball using random and the ternary operator.

constructor(x, y, color) {
    this.x = x;
    this.y = y;
    this.color = color;
    this.radius = 20;
    //vaying speed and direction
    this.speedX = random(2, 4) * (random() > 0.5 ? 1 : -1); //50% chance of true and false; If the result is true, assigns 1, otherwise, assigns -1
    this.speedY = random(2, 4) * (random() > 0.5 ? 1 : -1);
  }

Initially, only one ball was formed using each click, but to make it more interesting, I decided to create balls around the click location in a triangular formation. I used polar coordinates for this, similar to my previous assignment.

function mouseClicked() {
  let randomColor = color(random(255), random(255), random(255));
  //creating multiple balls around location
  let formationRadius = 60; //distance from click
  for (let angle = 0; angle < 360; angle += 120) { //3 balls at equal angles
    //polar coordinates for position
    let x = mouseX + cos(radians(angle)) * formationRadius; 
    let y = mouseY + sin(radians(angle)) * formationRadius;
    let backgroundBall = new BouncingBall(x, y, randomColor);
    ball_array.push(backgroundBall);
  }
}

The only technical challenge I initially faced was making sure the two balls that collide create a new ball with their combined color and that the original balls disappear. The other challenge was to make it look aesthetically pleasing. This is why I decided to add the blurred trails for the balls.


I also wanted to highlight that final result was inspired from my initial idea: red and blue balls combine to make a growing purple ball.

(click on screen)
This idea was inspired by the same anime character in my portrait from the first assignment.

Overall, I am satisfied with my final output. It might not be as unique as I wanted it to be since it was also inspired by previous assignments we did in class. However, it looks visually pleasing and was fun to make. I would like to improve the artwork by creating a pattern in the background using the combined colors.

Assignment #3 – Reading Response – Are All Interactions Interactive?

After reading this text, it seems to me that there are two views on interactivity. The first is the overused, underunderstood meaning of interaction or interactivity, which Crawford criticizes. In that definition, interactivity bases itself on the premise that any person or object coming into contact with another object forms an interaction. The “interactive” rug, for example, is fitting, because the child logically “interacts” with the rug. Yet, the rug doesn’t return anything. That is the same for the fallen tree. In fact, in those cases, humans act or react, but do not interact. The other meaning of interact, which Crawford defines, claims that both entities should “listen, think, and speak” (that is, literally or metaphorically). But even when the two entities are capable of doing so, it doesn’t mean that they are doing it well. So, can “bad” interactivity be disregarded as interactivity altogether? Though bad, doesn’t it warrant already that the interactivity is present?

Another point that follows is that of interactivity design. Based on the aforementioned definitions, it is interesting to think about the role of the interactive designer. The latter, in “interactivizing” their design, acts on a computer. But then, can that be called interaction? Or is the interaction merely the exchange between the viewer and the final design? I believe that in a lot of cases, yes, we can say that the designer creating the design forms an interaction with the computer, but are there cases in which one of the three components of interaction lack?

Assignment #3 – Code – ☆Manic! At The Disco☆

For this assignment, I wanted to create a visual experience inspired by orange, purple, pink, and yellow club lights:

I love how the lights all stem from one source, but I did not want to limit myself to that, so I thought I could create some sort of tridimensional effect with trailing that could better represent the “feeling” of experiencing those club lights.

So I created a line class and made 10 lines (with bezier curves) that all begin at (0,0) with varying speeds. I also lowered the background alpha to 10, as transparency allows for trails, which I wanted in order to create this dynamic effect. I tried multiple shapes, but ended up opting for bezier curves. The points for the bezier curves all follow the same line, which is why there is no “curve” per se. However, the movement of the bezier curves looked much nicer than that of the lines, which is why I chose that. The bezier curves also emphasized the 3D effect better than the lines.

Every once in a while, then, the lines meet around the top corner, reproducing the effect of disco lights, before each going their own way once again:

For the colors, I created an array of five different colors which I then incorporated into a linear interpolation function in order to create a gradient:

With the help of ChatGPT, I set two data points, “this.currentColorIndex” and “this.nextColorIndex”. For the first, I randomized from the array so that the first color of each line varies. The second data point set the following color, incrementing the index of the previous “current” color by 1, ensuring that the “next” color that appears depends on the previous color.

this.currentColorIndex = floor(random(colors.length)); // set the starting color of each line as a random color from the "colors" array
this.nextColorIndex = (this.currentColorIndex + 1) % colors.length; // ensure the "next" color for each line depends on the initial randomized color
this.lerpAmount = 0; // begin with no interpolation

Then, in the display function inside the class, I set three variables: “currentColor”, “nextColor”, and “displayColor”, in which I set the data from above. The first two variables are then implemented in the third, which is itself incorporated in the stroke function. Altogether, this is what allows the lines to be displayed in the different colors.

display() {
  let currentColor = color(colors[this.currentColorIndex]); // setting the "current" color variable
  let nextColor = color(colors[this.nextColorIndex]); // setting the "next" color variable
  let displayColor = lerpColor(currentColor, nextColor, this.lerpAmount); // setting the "display" color variable
  stroke(displayColor);
  strokeWeight((this.x + this.y) / 40);

Finally, I created a last function called “updateColor” in which I set the linear interpolation amount and create an “if” function for it to reset (and hence for the colors to keep varying).

updateColor() {
    this.lerpAmount += 0.04; // linear interpolation amount to define the speed of the transition

    if (this.lerpAmount >= 1) { // when linear interpolation amount exceeds 1, reset it to 0
      this.lerpAmount = 0;
      this.currentColorIndex = this.nextColorIndex;
      this.nextColorIndex = (this.nextColorIndex + 1) % colors.length;

Overall, I really enjoyed creating this code. It was definitely hard as last week’s material was a bit dense, but it was good practice. I wanted to incorporate an “if mousePressed” function for the colors to change to a different color palette, but for some reason, it would lag after some time and the sketch would just freeze. That is something I would like to work on for another time, though!


Assignment 3 – Laser Skull

Inspiration:

I was inspired by a game that I used to play a few years ago: Quadropus Rampage. In the game, the final boss, which I unfortunately still could not defeat, is a head that can shoot laser to attack. Here is an illustration:

Therefore, I wanted to make something similar and I went for the skull. Similar to the first assignment of making a portrait, I made the skull using simple shapes available in p5.js. Then, I transformed the code into the class Skull so that I can easily manipulate the size of the skull as well as its position.

Next, I added the laser shooting from the skull eyes. I created a laser function in the Skull class and draw a line from the skull’s eyes position to the mouse position. The skull will only shoot laser if the mouse is pressed. Below is the code for the Skull class:

class Skull {
  constructor(posX, posY, scaleObj) {
    this.posX = posX;
    this.posY = posY;
    this.scaleObj = scaleObj;
    this.dirX = 2;
    this.dirY = -1;
  }
  
  //skull drawing
  show() {
    
    //head
    drawingContext.shadowBlur = 0;
    strokeWeight(0);
    fill("cyan");
    ellipse(
      this.posX * this.scaleObj,
      this.posY * this.scaleObj,
      100 * this.scaleObj,
      60 * this.scaleObj
    );
    rectMode(CENTER);
    rect(
      this.posX * this.scaleObj,
      (this.posY + 30) * this.scaleObj,
      70 * this.scaleObj,
      25 * this.scaleObj
    );

    //skull eyes
    fill("black");
    circle(
      (this.posX - 20) * this.scaleObj,
      this.posY * this.scaleObj,
      15 * this.scaleObj
    );
    circle(
      (this.posX + 20) * this.scaleObj,
      this.posY * this.scaleObj,
      15 * this.scaleObj
    );
    
    //skull mouth
    fill("black");
    rect(
      this.posX * this.scaleObj,
      (this.posY + 33.5) * this.scaleObj,
      3.5 * this.scaleObj,
      18 * this.scaleObj
    );
    rect(
      (this.posX - 15) * this.scaleObj,
      (this.posY + 33.5) * this.scaleObj,
      3.5 * this.scaleObj,
      18 * this.scaleObj
    );
    rect(
      (this.posX + 15) * this.scaleObj,
      (this.posY + 33.5) * this.scaleObj,
      3.5 * this.scaleObj,
      18 * this.scaleObj
    );
  }
  
  //laser starts from the eyes
  laser(x, y) {
    stroke("white");
    strokeWeight(4);
    drawingContext.shadowBlur = 10;
    drawingContext.shadowColor = color("red");
    line((this.posX - 20) * this.scaleObj, this.posY * this.scaleObj, x, y);
    line((this.posX + 20) * this.scaleObj, this.posY * this.scaleObj, x, y);
  }
  
  //constant movement
  update() {
    if (this.posX * this.scaleObj > width || this.posX < 0) {
      this.dirX *= -1;
    }
    if (this.posY * this.scaleObj > height || this.posY < 0) {
      this.dirY *= -1;
    }

    this.posX += this.dirX;
    this.posY += this.dirY;
  }
}

Furthermore, I reused the Ball class in the previous class to make this as an interactive experience. Every time the skull successfully shoot down 1 ball, a new ball will appear and the background color will randomly change.

Also, since I wanted to add the scale much later on, I have to add it for every function I used which is quite time consuming. Therefore, I think for every class I will add a scale component just in case I want to change any dimension.

Reflection:

I want to add much more interactivity such as users can control the skull by mouse. Furthermore, I want to add obstacles and enemies to the game so that it can be more similar to the game that I played.

Below is the canvas:

Assignment 3 – Reading on Interactivity

I found myself pleasantly surprised by the author’s voice throughout the text. This was definitely not something I expected from an academic text. The exploration of the concept of “interactivity” really got me thinking on if my understanding the idea with the text.

I was unsurprised that a fridge was considered interactive. I always assumed that there are definitely different levels to interactivity, and although a fridge would be on the lower spectrum of that, the fact that it is there, and you can do stuff with it make it, like anything else, interactive. Even a rock can be interactive if you put your mind (or muscle) to it.

In the end, I think I disagree with the author’s idea of what interactive is. I don’t think there needs to be two living things for interaction to take place. In fact, even a non-living thing can interact with something living, such as the case for a virus. Even more so, we see interaction between humans and AI on a level which the author’s definition does not account for.

In the end, perhaps the term “interactive” needs some reevaluation in today’s context. Maybe AI stands as the true form of non-human interaction, while everything else falls somewhere on a spectrum between participation and genuine engagement.

Assignment 3 – Fireworks

This project draws inspiration from the visual spectacle of fireworks displays, aiming to simulate the explosive bursts of color and light seen in real fireworks shows.

Overall Concept:
The artwork aims to simulate the vibrant and dynamic nature of fireworks displays. Each burst of particles represents a fireworks explosion, with colorful particles shooting outwards and leaving behind fading trails. The animation creates a mesmerizing display reminiscent of real fireworks shows.

Special Functions:

  1. setup(): Initializes the canvas and sets up the environment for drawing.
  2. draw(): Continuously updates and renders the scene, creating the effect of fireworks bursts.
  3. createParticles(): Generates new particles to simulate fireworks bursts.
  4. updateAndDisplayParticles(): Updates and displays the existing particles, including their movement and trails.
  5. createRandomVector(min, max): Helper function to create a random vector within a given range.
  6. createRandomColor(): Helper function to generate a random color for the particles.
  7. createRandomTrailColor(baseColor): Helper function to create a random trail color based on the base color of the particles.
  8. Particle class: Represents a single particle in the simulation. Includes methods for updating its position, displaying the particle, displaying its trail, and checking if it’s visible within the canvas.

Problems Encountered:

  • Ensuring smooth performance while maintaining a large number of particles.
  • Balancing the appearance of the particles and their trails to achieve a visually appealing effect without overwhelming the viewer.
  • Managing the lifespan of particles and their trails to prevent excessive resource consumption.