For this assignment, we were inspired by the toy pianos that we’ve all played with at least a few times as children. These toys were often quite limited, as they only had enough space to accommodate the keys for a single octave. We decided to create a miniature piano that could play the notes from C to A, with a knob that can be turned to change octaves.
Setup and Code
We set up a row of buttons that play a note when pressed, a potentiometer that changes the octave, and a switch that switches the notes to their respective sharp notes.
We created arrays that store the frequencies of the natural notes across seven octaves, doing the same for the sharp notes. The range of the potentiometer is mapped to a range of 0-6 and determines which octave the notes will be played in. When the switch is low, natural notes are played, and vice versa.
To prevent the notes from continuously playing, the noTone() function stops the buzzer playing any sound when no button is pressed.
if (buttonState7 == LOW && buttonState6 == LOW && buttonState5 == LOW &&

    buttonState4 == LOW && buttonState3 == LOW && buttonState2 == LOW) {

  noTone(8);  // Stop any tone on pin 8

}
Demo
Vid link
Reflection
Overall, this group project was a success as we managed to recreate our inspiration using Arduino. We were really satisfied with how we made sure to implement the natural notes as well as sharp notes in our project. A few struggles we faced was that the wires and resistors were really crowded on our small breadboards, making it a little difficult to reach the buttons. Ideally, we would want to get bigger breadboards in the future so that there would be more room for interacting with the product. Additionally, the bread board was just a little too small for us to add the 7th natural note, so we could only fit 6, as we’re missing a B note.
In the future, we would like to add two different colored led lights that switch on and off along with the natural or sharp notes. This way, it would help users know if they are currently playing natural or sharp notes, as not everyone is familiar with musical notes in that sense.
In this reading, the author voices his frustrations with current and future visions of input devices being centered on touch screens, or as he calls it Picture Under Glass. I aggree with the authors frustrations with ordinary objects moving to become less tactile and moving to resemble touch screens. For example, many new induction stoves utilize touch capacitive buttons, which become quite unresponsive when you’re cooking and have greasy fingers. Much of the “innovations” for the future now are fixing problems that were non-existent to begin with. As the author said, our hands and fingers can do much more than just touch and swipe, which is the only thin a touch screen allows us to do. What we need to innovate is a way to utilize more than this basic motion, to create technology that is able to make use off the various other features that our hands are capable of.
Responses:
The author acknowledges that no solution is possible with the current state of our technology, however, what he is trying to tell us is that our hands are capable of much more, and instead of “improving” everything by transitioning to touch screen interfaces, we need to aim to keep the tactile sensations that we are much used to and are much more used to.
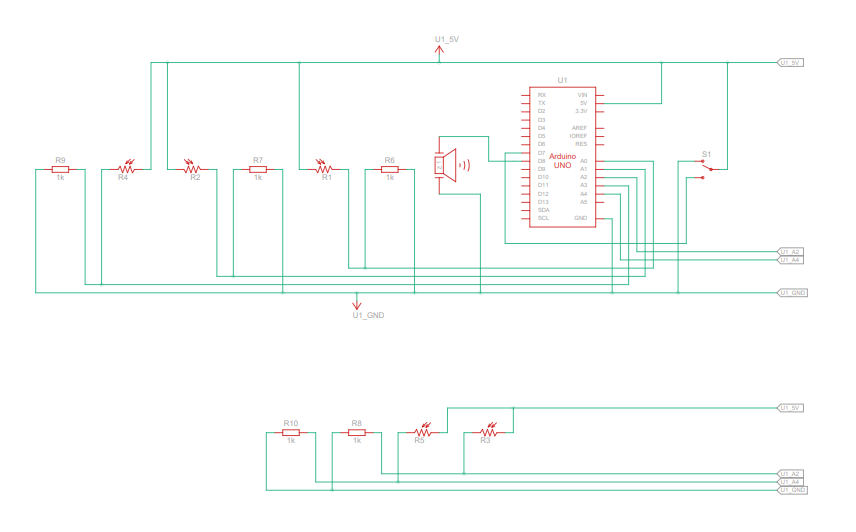
For this assignment, my partner Fasya and I designed a musical instrument that merges digital and analog elements to create an interactive, light-based piano. Our idea centers around a glowing wand that functions as a control interface. When moved over the keys, the wand activates notes from the C major scale (C, D, E, F, and G) like magic, and the brightness of its glow determines the octave. We integrated a potentiometer to adjust brightness, allowing users to easily shift the octave up or down. Additionally, we added a switch to toggle the instrument off, which prevents accidental note activation—particularly useful to avoid unintended sounds from ambient light sources like flashlights.
Highlight:
To bring our vision to life, we used five photoresistors to detect light from the wand and mapped each sensor’s range to specific notes (C, D, E, F, and G) and their octave scales. By setting sensor thresholds from a default minimum to a maximum value that a flashlight might produce, we could dynamically adjust the octave based on the brightness the photoresistor detects. Essentially, the brighter the wand, the higher the octave, allowing for an expressive range in tone.
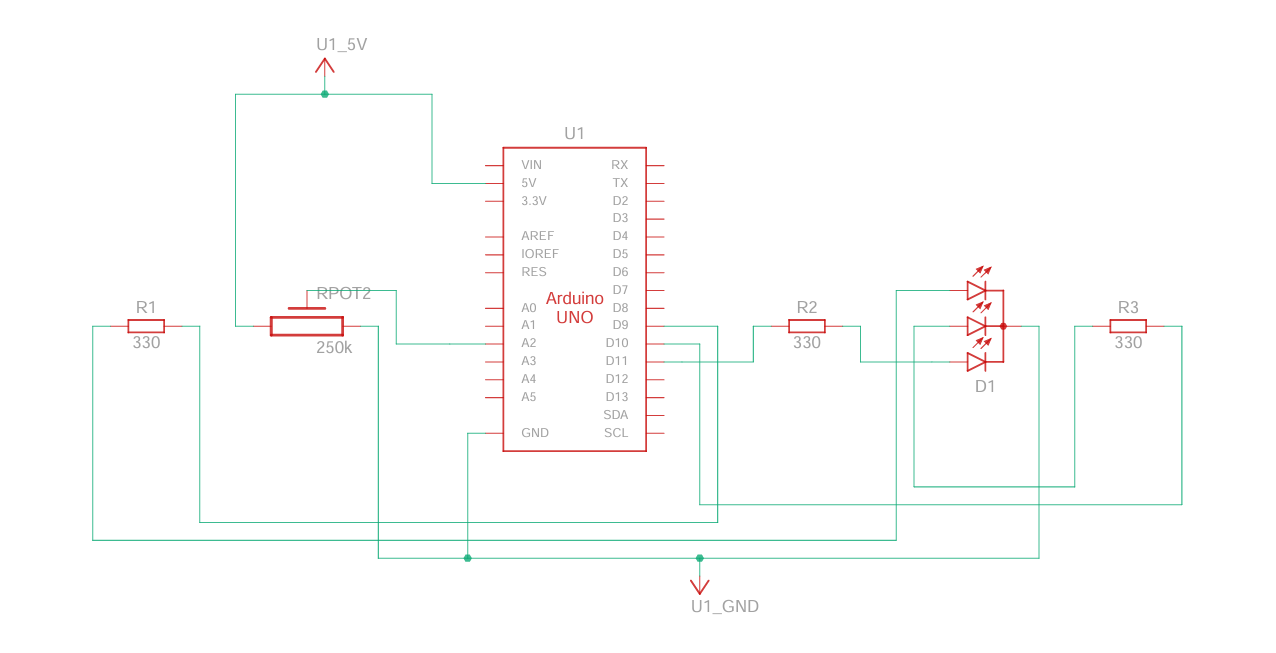
For the wand itself, we created a purple glow using a tricolored LED, giving the instrument an ethereal fairy-like visual quality. A potentiometer is attached to the LED to control brightness, making it easy for users to adjust octaves on the fly. The setup includes separate circuits for the keyboard and wand, creating flexibility for future enhancements, such as adding multiple wands for collaborative play.
Keyboard Code:
#include "pitches.h"
bool buttonState = false;
// Define the piezo buzzer pin
const int buzzerPin = 8;

// Define frequencies for each note across multiple octaves
const int fNotes[] = {NOTE_F4, NOTE_F5, NOTE_F6, NOTE_F7};  // Octaves of A
const int gNotes[] = {NOTE_G4, NOTE_G5, NOTE_G6, NOTE_G7};  // Octaves of B
const int cNotes[] = {NOTE_C4, NOTE_C5, NOTE_C6, NOTE_C7};  // Octaves of C
const int dNotes[] = {NOTE_D4, NOTE_D5, NOTE_D6, NOTE_D7};  // Octaves of D
const int eNotes[] = {NOTE_E4, NOTE_E5, NOTE_E6, NOTE_E7};  // Octaves of E

void setup() {
  // Initialize serial communication at 9600 bps for debugging
  Serial.begin(9600);
  pinMode(7,INPUT);
}

void loop() {
  // Array to store sensor values
  int sensorValues[5];
  int switchValue = digitalRead(7);
  if (switchValue == HIGH){
      buttonState = true;
  }


  // Read each sensor value and store in the array
  sensorValues[0] = analogRead(A3);  // f note
  sensorValues[1] = analogRead(A4);  // g note
  sensorValues[2] = analogRead(A0);  // C note
  sensorValues[3] = analogRead(A1);  // D note
  sensorValues[4] = analogRead(A2);  // E note

  // Play a note based on each sensor value
  for (int i = 0; i < 5; i++) {
    int note;
    if (sensorValues[i] < 850 || !buttonState) {
      // Stop any sound if the sensor value is below 900
      noTone(buzzerPin);
      continue;
    } else {
      // Map the sensor value (900 to 1100) to an index (0 to 3) for each note array
      int noteIndex = map(sensorValues[i], 850, 1100, 0, 3);

      // Assign the note based on the sensor index
      switch(i) {
        case 0: note = fNotes[noteIndex]; break;
        case 1: note = gNotes[noteIndex]; break;
        case 2: note = cNotes[noteIndex]; break;
        case 3: note = dNotes[noteIndex]; break;
        case 4: note = eNotes[noteIndex]; break;
      }

      // Play the mapped frequency on the piezo buzzer
      tone(buzzerPin, note);
    }

    // Delay to control the speed of tone change
    delay(100);
  }
}
Wand Code:
// *Interfacing RGB LED with Arduino
// * Author: Osama Ahmed

//Defining  variable and the GPIO pin on Arduino
int redPin= 9;
int greenPin = 10;
int  bluePin = 11;
int potPin = A2;
int sensorVal = 0;
double brightness = 0;

void setup() {
  Serial.begin(9600);
  //Defining the pins as OUTPUT
  pinMode(redPin,  OUTPUT);
  pinMode(greenPin, OUTPUT);
  pinMode(bluePin, OUTPUT);
}
void  loop() {
  sensorVal = analogRead(potPin);
  brightness = (double)sensorVal / 1023;
  Serial.println(brightness);

  setColor(170, 0, 255, brightness); // Purple Color
  // delay(1000);
}
void setColor(int redValue, int greenValue,  int blueValue, double brightValue) {
  analogWrite(redPin, (double) redValue * brightValue);
  analogWrite(greenPin,  (double) greenValue  * brightValue);
  analogWrite(bluePin, (double) blueValue  * brightValue);
}
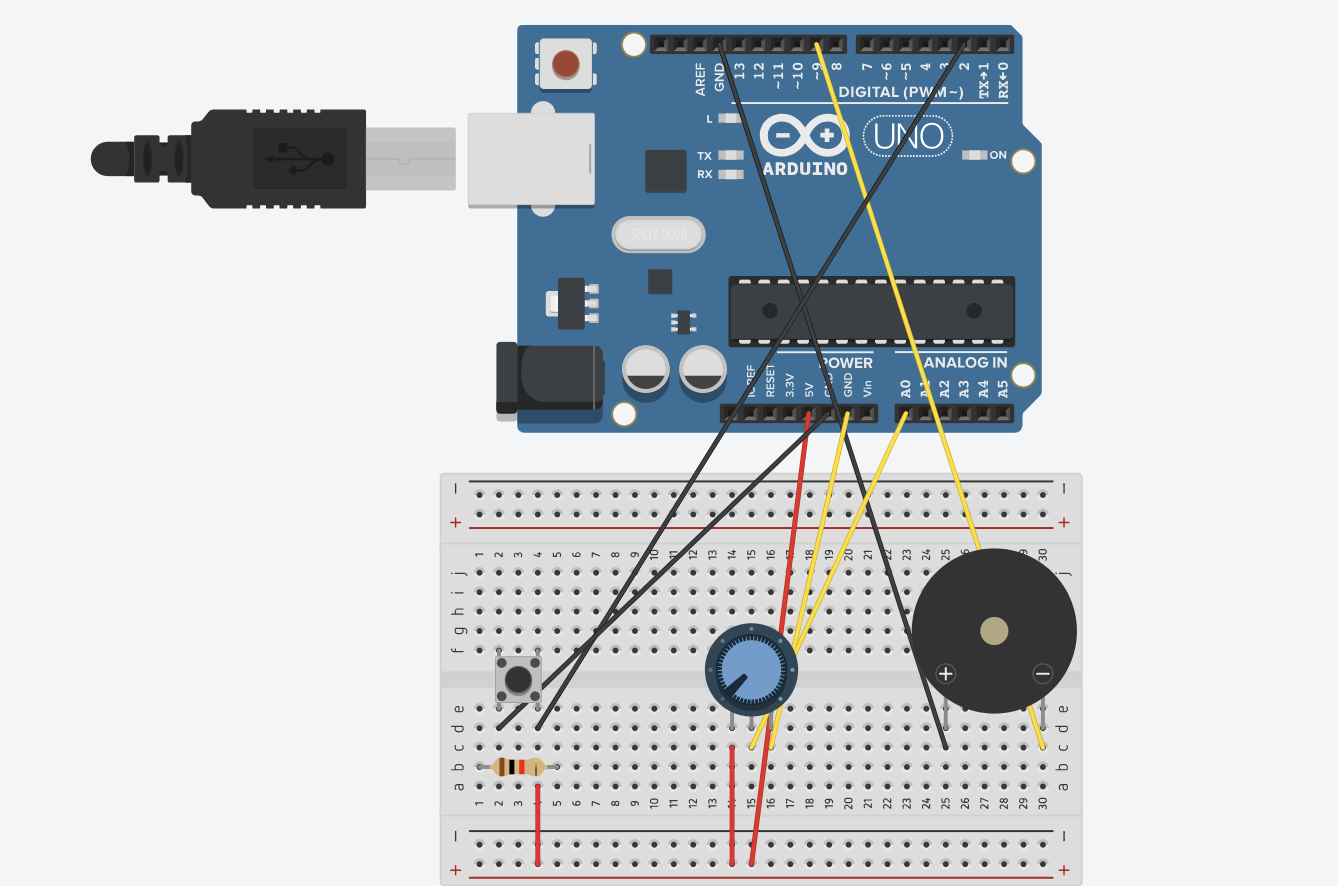
While brainstorming project ideas with Amna, we thought about how a radio works and decided it would be fun to make a simple version. Our goal was to create an Arduino “radio” that lets you switch between different songs, similar to tuning a real radio. We used a knob as the channel switch, allowing us to choose between three different songs that we got from Github and the exercises we did in class. Each channel has its own song, and turning the knob instantly switches to the next song, giving it a real radio-like feel. We also added a button that acts as a power switch to turn the radio on and off. This way, pressing the button starts the radio, and pressing it again turns it off. We even added a feature so that any song stops playing immediately when the channel changes, so you don’t have to wait for a song to finish before switching to a new one.
HIGHIGHT:
The part Amna and I are most proud of is getting the button to work smoothly with the debounce feature. At first, the button would trigger multiple times with a single press, turning the radio on and off too quickly. By adding a debounce function, we made sure the button only registers one press at a time, making it much more reliable. A former student in IM (Shereena) helped us understand how debounce works and guided us in fixing this issue, explaining how it makes the button’s response stable and accurate.
Here’s a snippet of the debounce code we used:
// Variables for debounce
int buttonState; // Current state of the button
int lastButtonState = LOW; // Previous state of the button
unsigned long lastDebounceTime = 0; // Last time the button state changed
unsigned long debounceDelay = 50; // Debounce time in milliseconds

void loop() {
int reading = digitalRead(buttonPin);

// Check if the button state has changed
if (reading != lastButtonState) {
lastDebounceTime = millis(); // Reset debounce timer
}

// If enough time has passed, check if the button is pressed
if ((millis() - lastDebounceTime) > de
bounceDelay) {
if (reading != buttonState) {
buttonState = reading;
if (buttonState == HIGH) {
radioState = !radioState; // Toggle radio on/off
}
}
}

lastButtonState = reading;
}
This debounce function prevents accidental multiple triggers, making the button interaction smoother. We’re also proud of how the radio switches songs instantly when we turn the knob, making it feel real.
REFLECTION:
Working on this project with Noura was a nice experience, as we got to share our thoughts and class experience by working together. One of our main struggles was making the button work without triggering multiple times, which led us to use debounce for stability. While adding Debounce solved the problem, in the future, we’d like to explore other ways to troubleshoot and fix issues like this without relying on debugging alone.
For future improvements, we’d like to add more interactive features, such as volume control with an additional knob and possibly a small speaker for clearer sound. We could also include more “channels” with various songs or sound effects, giving users a richer experience. Another idea is to add an LED indicator that lights up when the radio is on and changes brightness with volume, making the design even more engaging. These changes would make our project more realistic for a radio and enhance.
This rant on “Pictures Under Glass” made me realize how strange it is that we’re so comfortable reducing our interactions to something as flat and lifeless as a touchscreen. We have our hands (the most useful body part), and yet we limit them to swiping and tapping like we’re settling for the simplest form of interaction possible. It’s almost like we’re choosing numbness over true engagement, relying on a screen instead of exploring the world with our hands.
To me, this flat, touch-only future ignores a huge part of being human. While reading, I thought about how much richer experiences are when you can actually feel things. Imagine the difference between seeing a piece of pottery on a screen versus shaping it yourself. It’s a completely immersive experience that teaches you in ways a screen never could. If tech continues down this path, I feel like we’re just training ourselves to be satisfied with empty interactions that don’t ask much of us.
Furthermore, I think relying so heavily on screens is what’s making us lazy; it feels like we’re choosing convenience over truly connecting with the world. Screens limit how we explore and interact, reducing everything to a simple swipe or tap. Technology should be enhancing our natural abilities, not shrinking them down to one basic motion.
Moreover, the push for brain-computer interfaces is even worse. It takes away the real, physical experiences that make life interesting. Instead of cutting out physical interaction, I believe tech should work with our bodies, such as the Wii console or the VR, helping us connect in more meaningful, hands-on ways.
Reading the rant, it made me realize how much we’ve settled for touchscreens as our main way of interacting with technology. Sure, they’re easy to use, but I think they’re holding us back from something much richer. Kids today are glued to screens, swiping and tapping all day, and I feel like it’s making them “finger-blind.”. They’re losing the chance to understand the world through real touch. Instead of feeling textures and weights, they’re just seeing everything through glass. In my opinion, that’s robbing them of a huge part of learning and growing.
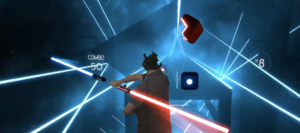
And it’s not just kids. Even for adults, I feel like we’re missing out on deeper connections with tech. Take virtual reality games. Everyone loves the visuals, but games like Beat Saber feel empty to me without any sense of touch or resistance. It’s a hollow experience, one that relies only on what we see, not what we feel. I think this disconnect leaves us with flashy visuals but no real engagement.
Beat Saber – VR
In addition, I also think that the obsession with brain-computer interfaces is just as disappointing. Sure, it sounds futuristic, but I think it’s actually a step back. The idea of controlling things with thoughts alone ignores the importance of our bodies. We’re already sitting at screens too much, and this just pushes us deeper into that immobility. I believe technology should encourage movement and real interaction, not trap us in a still, disconnected state.
“Pictures Under Glass” sums up the issue perfectly. It’s like we’re numbing one of our most powerful senses for convenience. When I pick up a book or a glass, my hands get all kinds of feedback from weight, texture, and balance. But with a screen? Nothing. Even something as simple as making a sandwich taps into a level of interaction that a screen can’t touch. In my view, designers need to stop treating screens as the final answer and start creating tech that actually respects our bodies’ abilities.
I share Bret Victor’s perspective on “pictures under glass” technology, and I believe touchscreen LEDs have overstayed their welcome in many fields. This includes devices like the Kindle—a non-glare touchscreen designed for reading that now also accommodates audiobooks. While these devices offer practical benefits, such as saving storage space and promoting a paperless world, they come at the cost of the rich sensory experience that traditional books provide.
Touchscreens have permeated so many areas of our lives, saturating us with constant notifications, flashing updates, and endless scrolling. This widespread use of touchscreens has left us overstimulated, as we’re constantly pulled in multiple directions by the same technology that now powers even our reading devices. This overstimulation detracts from the act of reading itself, making it harder to slow down and engage in the immersive, focused way that physical books invite. In fact, the Kindle’s interface, with its flat screen and standardized e-book format, feels more like another digital task than an invitation to read.
A physical book, by contrast, invites us to unplug, slow down, and focus. Its varied textures, the scent of the pages, and even the way it changes over time as it’s passed from one reader to the next all contribute to the act of reading as a sensory experience. Books are unique; each one feels different to the touch and engages the senses in ways that screens simply can’t emulate.
More than that, a well-worn book carries visible signs of love and use—cracked spines, dog-eared corners, or a few scribbled notes. These details create a sense of shared history and connection between readers across generations. No matter how advanced, a Kindle can never replicate that. Physical books leave an imprint not only on us but also of us, and in that way, they foster a relationship with readers that digital devices lack.
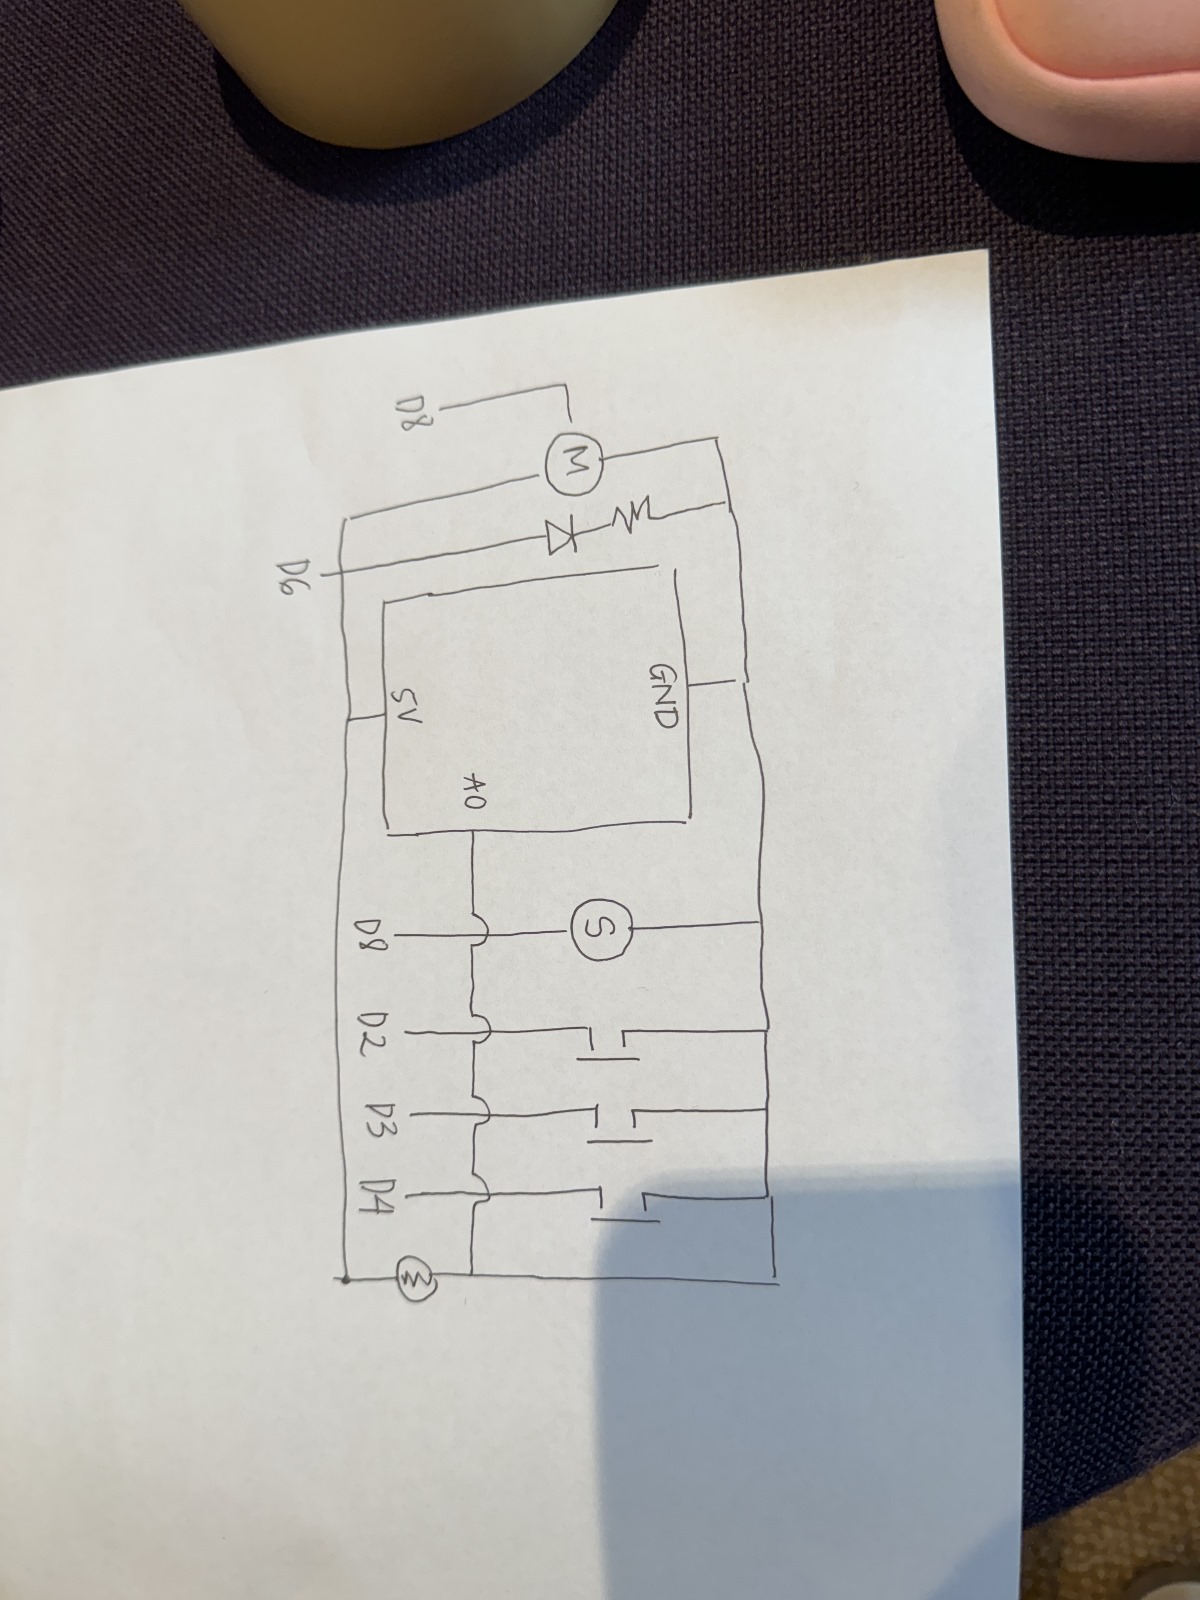
Implementation Tinh and I going into this were slightly stuck on the creative idea first. However, during a brainstorm session, we came across a video of a ballerina music box – inspiring us to create something similar to this whilst sticking to the ‘instrument’ concept of the assignments. As we did not have a mini ballerina, I had a mini figurine nonetheless – a small penguin rubber (Basil Jr). Now that we had a figurine, we had to figure out how to implement the ‘instrument’ concept into this, as we did not want to make it into a passive music box.
Therefore, we decided we wanted to control the movement of the penguin with the instrument. We ended up deciding that buttons could be used as the method to control movement — we decided that each button would correspond to a note, and each note has a specific rotation. Originally, we wanted to use 8 buttons to correspond to the 8 notes, however, due to the limited space on our breadboard, we chose to stick with three – C,D,E. Implementation
In the code, we use 2 functions for moving the motor and creating sound. The input button from the user will be recorded and passed into the function accordingly.
#include <Servo.h>
#include "pitches.h"


const int photoPin = A0;        // Photoresistor analog pin
const int ledPin = 6;           // LED pin
const int buttonPins[] = {2, 3, 4};  // Button pins for sound triggers
const int photoThreshold = 100; // Threshold for photoresistor reading
const int speakerPin = 8;

Servo penguinServo;             // Create servo object
const int servoPin = 9;         // Servo pin

void setup() {
    // Initialize the photoresistor, LED, and buttons
    pinMode(ledPin, OUTPUT);
    for (int i = 0; i < 3; i++) {
        pinMode(buttonPins[i], INPUT_PULLUP);  // Using internal pull-up resistor
    }

    // Attach servo to pin
    penguinServo.attach(servoPin);

    Serial.begin(9600);  // For debugging if needed
}

void loop() {
    // Read the photoresistor value
    int photoValue = analogRead(photoPin);
    Serial.println(photoValue);

    // Control the LED based on photoresistor value
    if (photoValue < photoThreshold) {
        digitalWrite(ledPin, HIGH);  // Turn on LED if it's dark
    } else {
        digitalWrite(ledPin, LOW);   // Turn off LED otherwise
    }

    // Check each button
    for (int i = 0; i < 3; i++) {
        if (digitalRead(buttonPins[i]) == LOW) { // Button pressed
            playPitch(i);
            movePenguin(i);  // Move penguin based on button pressed
        }
    }
}

// Function to move the penguin based on the button pressed
void movePenguin(int buttonIndex) {
    switch (buttonIndex) {
        case 0:
            penguinServo.write(0);   // Move penguin in one direction
            break;
        case 1:
            penguinServo.write(90);  // Move penguin to center
            break;
        case 2:
            penguinServo.write(180); // Move penguin in the other direction
            break;
    }
    delay(1000);  // Hold position for 1 second
    penguinServo.write(90);  // Return to center
}


void playPitch(int buttonIndex) {
    switch (buttonIndex) {
        case 0:
            tone(speakerPin, NOTE_C4, 300); // Play note C4
            break;
        case 1:
            tone(speakerPin, NOTE_D4, 300); // Play note D4
            break;
        case 2:
            tone(speakerPin, NOTE_E4, 300); // Play note E4
            break;
    }
    delay(300);
    noTone(speakerPin);
}
In reading Physical Computing’s Greatest Hits and Misses and Making Interactive Art: Set the Stage, Then Shut Up and Listen, I got a sense that while physical computing has been around for a long time, the approach to creating interactive art has evolved. Rather than focusing on creating fixed meanings, artists are now encouraged to let meaning emerge through interaction, giving audiences more freedom in their interpretation.
From my own experiences visiting new media art installations in Paris and London, I’ve noticed that many installations still tend to be defined by the artist’s initial inspiration, which can limit the ways audiences experience them. One example is an installation I saw in the meditation room at the Museum of the Future. The setup involved placing your hands over a column that emitted vibrations, designed to create a relaxing, full-body sensation. However, instead of allowing us to engage directly with the sensations, an interpreter was there to tell us how to think and feel as we experienced it, even instructing us to close our eyes and envision a door. This guidance controlled our interpretation, making it harder to form a personal connection with the piece.
This experience reinforced what the readings suggest: interactive art is most impactful when artists “set the stage” but avoid overly directing the audience’s interpretation. By allowing viewers to find their own meaning in the experience, the connection to the art becomes more personal and engaging.
Reading Tom Igoe’s ideas in “Making Interactive Art: Set the Stage, Then Shut Up and Listen” and “Physical Computing’s Greatest Hits (and Misses)” really clicked for me, especially after experiencing “Luminous Play” by Carsten Höller at Manarat Saadiyat in Abu Dhabi, which was in 2023. Igoe’s whole perspective on stepping back and letting the audience shape their own experience feels like it could have been written about Höller’s work. The exhibition is basically a playground of light, where the audience can wander, touch, and interact with installations in a way that feels completely open to interpretation.
In the Luminous Play exhibition, you are surrounded by all these moving, colorful light displays, and there are no set directions or explanations. You just go in and feel free to explore anything you want, including standing back and seeing the patterns or walking about to see how the light changes with your movement. The whole thing allows you to experience it in your own way, and you find yourself creating your meaning from the interaction. It’s a perfect example of Igoe’s point: sometimes, the most powerful art is when the artist just sets up the space and then “shuts up,” letting the audience take over.
Moreover, both readings reminded me that, as creators, we don’t always have to control every detail or push others to see things from a specific perspective. It’s enough to create an environment that allows individuals to discover at their own pace and leave it for the audience to interpret it whichever way. Igoe’s emphasis on simplicity and openness shows us to focus less on trying to be “original” and more on creating experiences that invite others to take part. It allows everyone who interacts with the work to complete it and makes the art itself feel more alive and human.

 Demo
Demo