Our project is to create a remote-controlled car that can be controlled using hand gestures, specifically by tracking the user’s hand position. We will achieve this by integrating a P5JS tracking system into the car, which will interpret the user’s hand gestures and translate them into commands that control the car’s movements.
IMPLEMENTATION
To implement this project, we will first build the remote-controlled car using an Arduino Uno board and other necessary components. We will then integrate the P5JS system, which will detect the user’s hand position and translate it into movement commands for the car. We have two options for detecting user’s hand position, either PoseNet or Teachable Machine. The camera tracking system will be programmed to interpret specific hand gestures, such as moving the hand forward or backward to move the car in those directions.
POTENTIAL CHALLENGES
One potential challenge we may face during the implementation is accurately interpreting the user’s hand gestures. The camera tracking system may require experimentation and programming adjustments to ensure that it interprets the user’s hand movements accurately. Also testing will be required to see if PoseNet performs better or Teachable Machine. Responsiveness will also be a factor as we would want the control to be fluid for the user. Additionally, ensuring the car responds correctly to the interpreted movement commands may also present a challenge, in terms of the physical construction of the cars and the variability of the motors.
Update
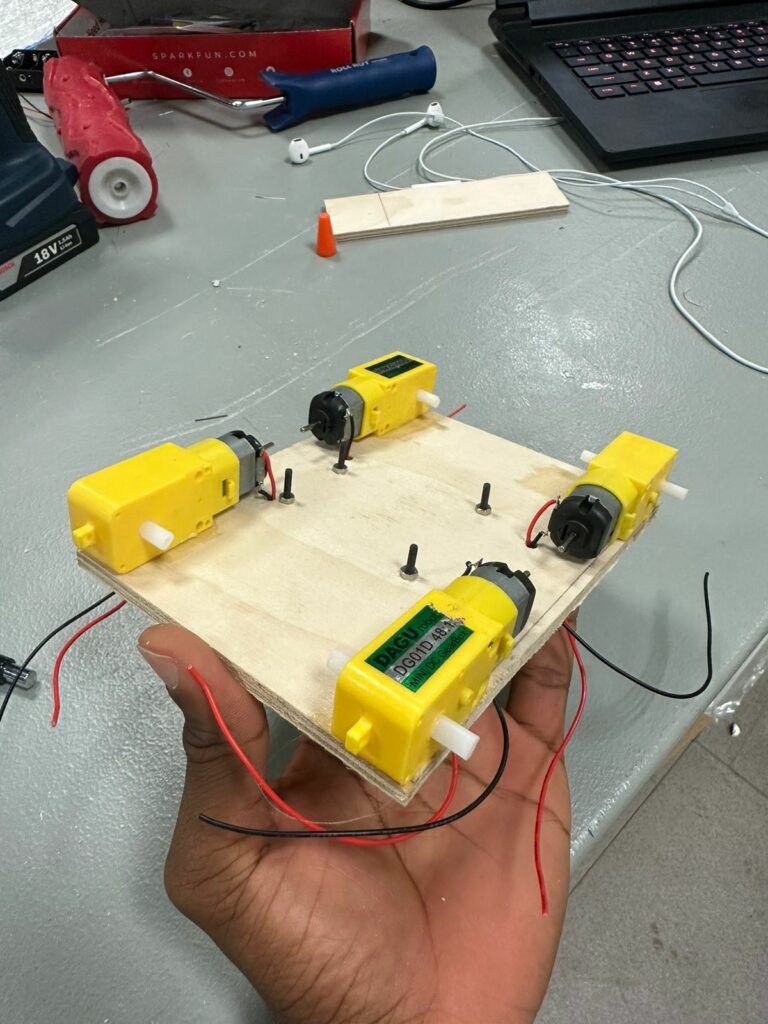
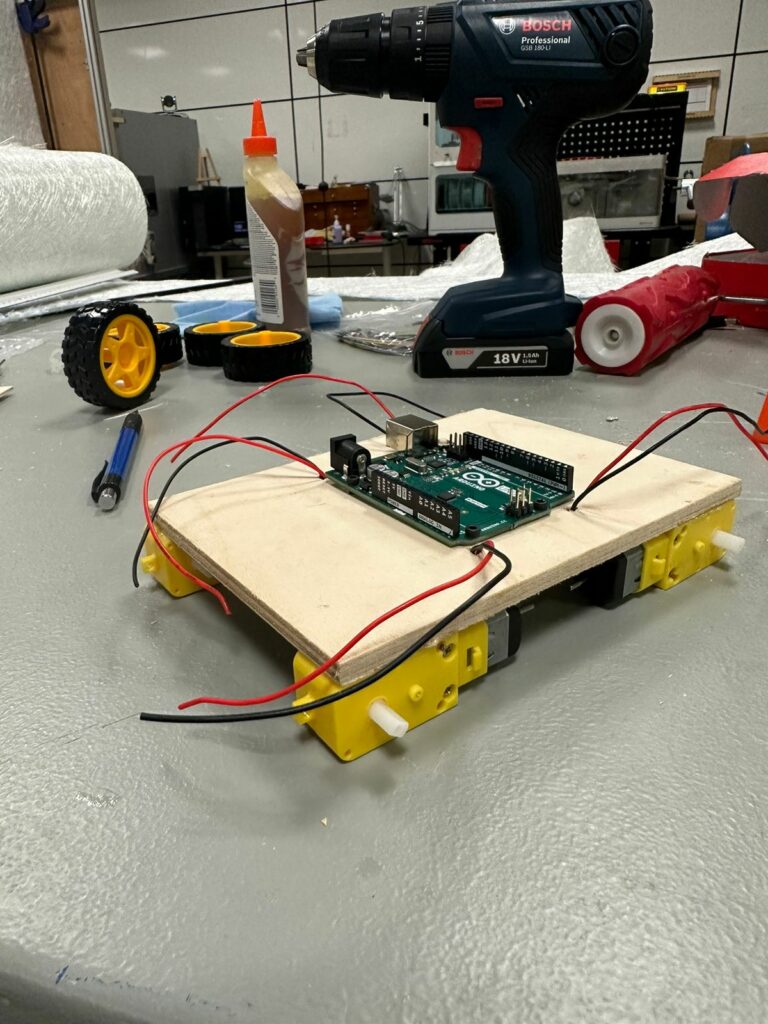
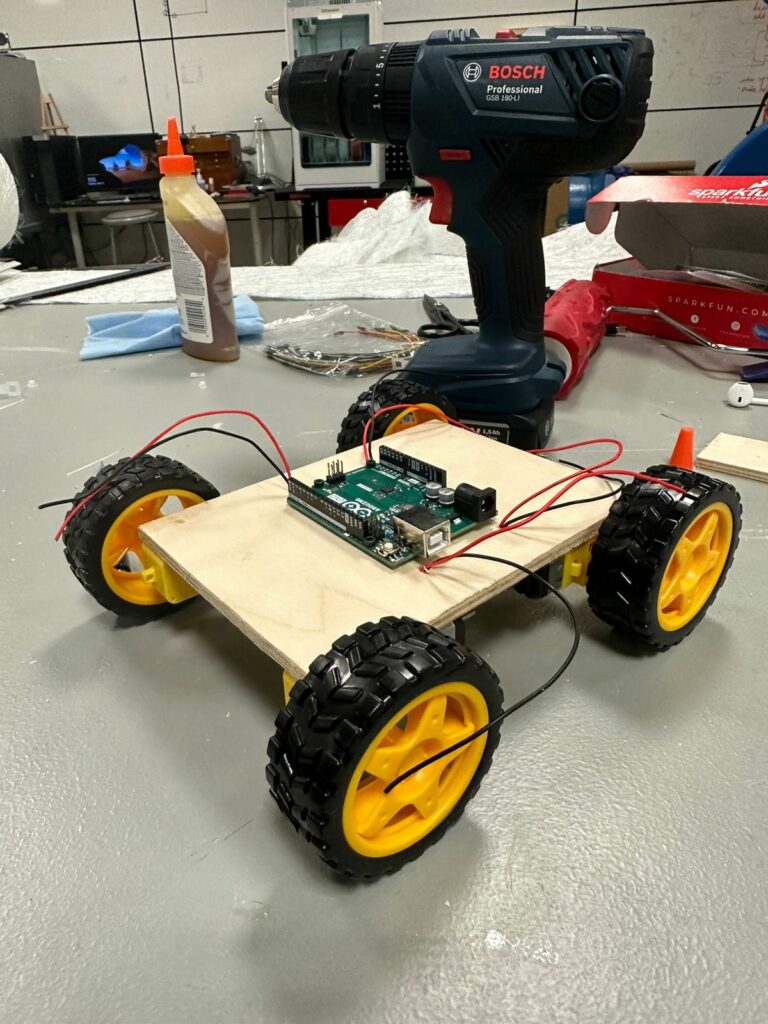
We were able able to come up with two car concept designs, but this was the best we decided to move ahead with. We believe we might need a motor driver, which we will connect to the Arduino Uno board to make controls possible.
When we get the code to control the car right and time is on our side, we will update the car model to an acrylic body. We also plan to use a vacuum former to create a body for the car.
A rhythm game where you are given instructions on which notes to play from a song. You must use our physical controller to play these sounds. You must keep up the tempo and always play the correct notes. We plan to prepare one to three songs for the player, which they will be able to select. Also, we can add a ‘freestyle’ mode where the song is generated at every moment.
Arduino: We have a cardboard box with the top open. We also have a ball or other smooth object which we place inside the box. We intend to use 2 ultrasonic sensors to track the ball’s position inside the box. So, for this project, one ultrasonic sensor should track the X position and the other should track the Y position. We have tested the use of two ultrasonic sensors to get (X, Y) coordinates for future use and this works for our project purposes. The distances to the ball from 2 ultrasonic sensors will be sent to p5js which will use these distances to map to (X, Y) coordinates and then associate with the screen regions for the game.
This functionality of Arduino & p5js to map the coordinates has been already implemented and tested:
p5js: The canvas is divided to include multiple coloured regions that will correspond to a particular sound. Placement of the physical ball within the particular region will trigger a sound to play. One way to define the regions is by a 3×3 grid:
1 2 3
4 5 6
7 8 9
Here, cell 5 could not play a sound, but the others would.
We haven’t decided yet on the particular sounds to play, with the preliminary idea for sounds to represent pre-defined notes.
On the screen, we also show the instructions (sequence of notes) the player has to play. We can also colour-code the notes to make them easier to remember. When the player misses enough notes they lose. Without missed notes, the player completes their music experience and may restart the game. We intend to use a physical speaker to play sounds, though we are open to using p5js as well.
We will work further on the music part of the game as we progress with the final project.
For my final project I want to utilize force sensors that are placed under placards to create a walking path. The path will be circular and walking a full circle will be enough to complete the experience. Basically, the person will be holding a tablet with headphones on while walking the path. The person will get to choose one of the 2 option from the computer in the middle: escape or commit. According to that what they will see image/video sequence will be decided and what is displayed on the screen will gain mess or clarity according to how much of the circular path the user finishes.
Goal
There are messages that will be displayed when the person returns to where they have started. For the person who chose to escape, the image and the song that they will be watching will be so strong and attention seeking that it will be truly interruption when the final screen comes by at the end, asking “Look around you, how did we end up here?”
Similarly, for the person who chose the commit sequence, there will be an ending message saying “Different stories but same circles. Where do you wanna go from here?”
Method
I will use nearly 5 force sensors, Arduino, p5js, a headphone, laptop and a tablet to make this experience.
The goal of this Final Project is to create a physically interactive system that relies on a multimedia computer for some sort of processing or data analysis. My Final Project uses BOTH P5 AND Arduino to create a Mini Basketball Arcade Machine. The mini Basketball Arcade Machine will be a tabletop-sized arcade game that will allow users to play basketball by shooting miniature basketballs into a hoop. Whenever the ball successfully passes through the hoop, it makes contact with the flex sensor causing alterations in its readings. As soon as a modification is identified in the flex sensor’s values, the player is credited with certain amount of points. Failing to score does not result in any reduction in points. The game has a time limit, and when the time runs out, a buzzer sounds, signaling the end of the game. The player can then view their score and the highest score achieved, and they have the option of playing again. The machine will use Arduino to sense when the user shoots the basketball and p5.js to display the score and time on the scoreboard.
Arduino
The Arduino program will read the sensor input to determine when the ball has been shot and passed through the hoop. The circuit will consist of a flex sensor and a resistor, with the flex sensor connected to an analog input on the Arduino board. The Arduino program will read the analog input to determine the current value of the flex sensor, which will change whenever a basketball passes through the hoop and contacts the sensor.
The Arduino program will send this flex sensor value to the P5.js program for processing and display on the scoreboard. The P5.js program will receive this data from the Arduino program and use it to update the score based on the number of successful shots made by the player. In summary, the Arduino program for the mini basketball arcade machine will read the flex sensor value from the circuit, send this value to the P5.js program for processing and display, and keep track of the time limit of the game.
Additionally, I am planning to test photoresistor and infrared distance measurer as potential types of sensors for detecting when the basketball passes through the hoop. Based on my testing I would determine whether flex sensor is the most accurate and well-designed option.
P5.js
The P5.js program for the mini basketball arcade machine will be responsible for displaying the game interface, keeping track of the player’s score, and communicating with the Arduino program to receive data about the current state of the game. The P5.js program will display the scoreboard on the computer screen, showing the player’s current score and the time remaining in the game. It will also display the basketball hoop and the basketballs for the player to shoot.
When the player shoots a basketball and it passes through the hoop, the flex sensor in the circuit will detect the change in resistance, and the Arduino program will send this data to the P5.js program. The P5.js program will receive the data from the Arduino program and update the player’s score based on the successful shot.
The concept behind my project is to create an experience rather than a game or a tool. Similarly to my midterm project, I want to use nature elements to create a slow, relaxing and enjoyable experience for the user. The experience will receive user input through the use of switches and potentiometers, and the output will be both on the screen (P5) and off it (Arduino, neopixels and a fan). The idea is that the user can choose to switch between 4 different elements to experience – water, fire, sun and flora. There will be 4 color coordinated switches which will display a different element on the screen for the user. Once the user chooses the element, they will be shown the simulation on screen (rain for water, fire, sun, and a tree with leaves falling for flora), and the corresponding colors will flash on the neopixels to create a more immersive feel. There will be a potentiometer for the user to change different magnitudes – amount of rain, the size of the fire, the number of rays/brightness of the sun, the amount of wind blowing the leaves. The changes will reflect on the colors and blinking/simulations on the neopixels. They will also affect the fan, with the wind and the rain controlling the speed of the fan.
Arduino
The arduino will have 4 buttons to choose between the elements. It will have a potentiometer to control magnitudes. It will also have neopixels and a fan which will help simulate the elements better for a more immersive feel.
It will send to P5 the values from the switches and the potentiometer.
It will use both of the above mentioned values to simulate the lights on the neopixels and the speed of the fan. There will be different light simulations for each element at different magnitudes.
P5
I will utilize arrays of objects to create things such as raindrops, fire particles, leaves and sun rays, in order to create the simulations.
The values of which element is currently on and at what magnitude will be pulled from the Arduino.
For my final project, I will create a version of the Kazakh traditional two-player board game, Togyzkumalak (transl. “nine pebbles”). Each player will be using three buttons connected through Arduino to p5 to control their movements in the game (left, right, enter). On p5 will be the visualization of the board, with 9 playing pits and 1 storehouse for each player. Players will use buttons to choose which pit to take the pebbles from.
Players will be given a minute to make their move. The player with the highest score wins (total of pebbles captured). To add something new to the game, chance games will be played between the turns.
after every 3rd turn, a player will be given a chance to roll a die in the game. The die will have both negative ((-3) to (-1)) and positive numbers (1 to 3). The number shown will be added to the score of the player.
after every 7th turn, a player will be given a choice between three cards shown backward. One of the cards will be empty, one will have a challenge, and the last one will have a bonus. Drawing an empty card will safely return you to the game. Drawing a challenge card will make decrease your turn time to 30s for the next two turns. Drawing a bonus card will add 1 more minute to your turn time for the next two turns.
2 shared buttons (instructions, return to the main menu).
Each of the buttons will be assigned a value directly related to its function (ex. user1_right_btn, instructions_btn, etc). On button press, this value will be sent to p5.
p5 will be sending information to Arduino every second. The information to be received is:
which player’s turn is it – to enable playing player’s buttons and disable not playing player’s buttons during playing player’s turn.
the number of turns played so far (tentative) – to switch controls after every 3rd and 7th turn to play the chance games.
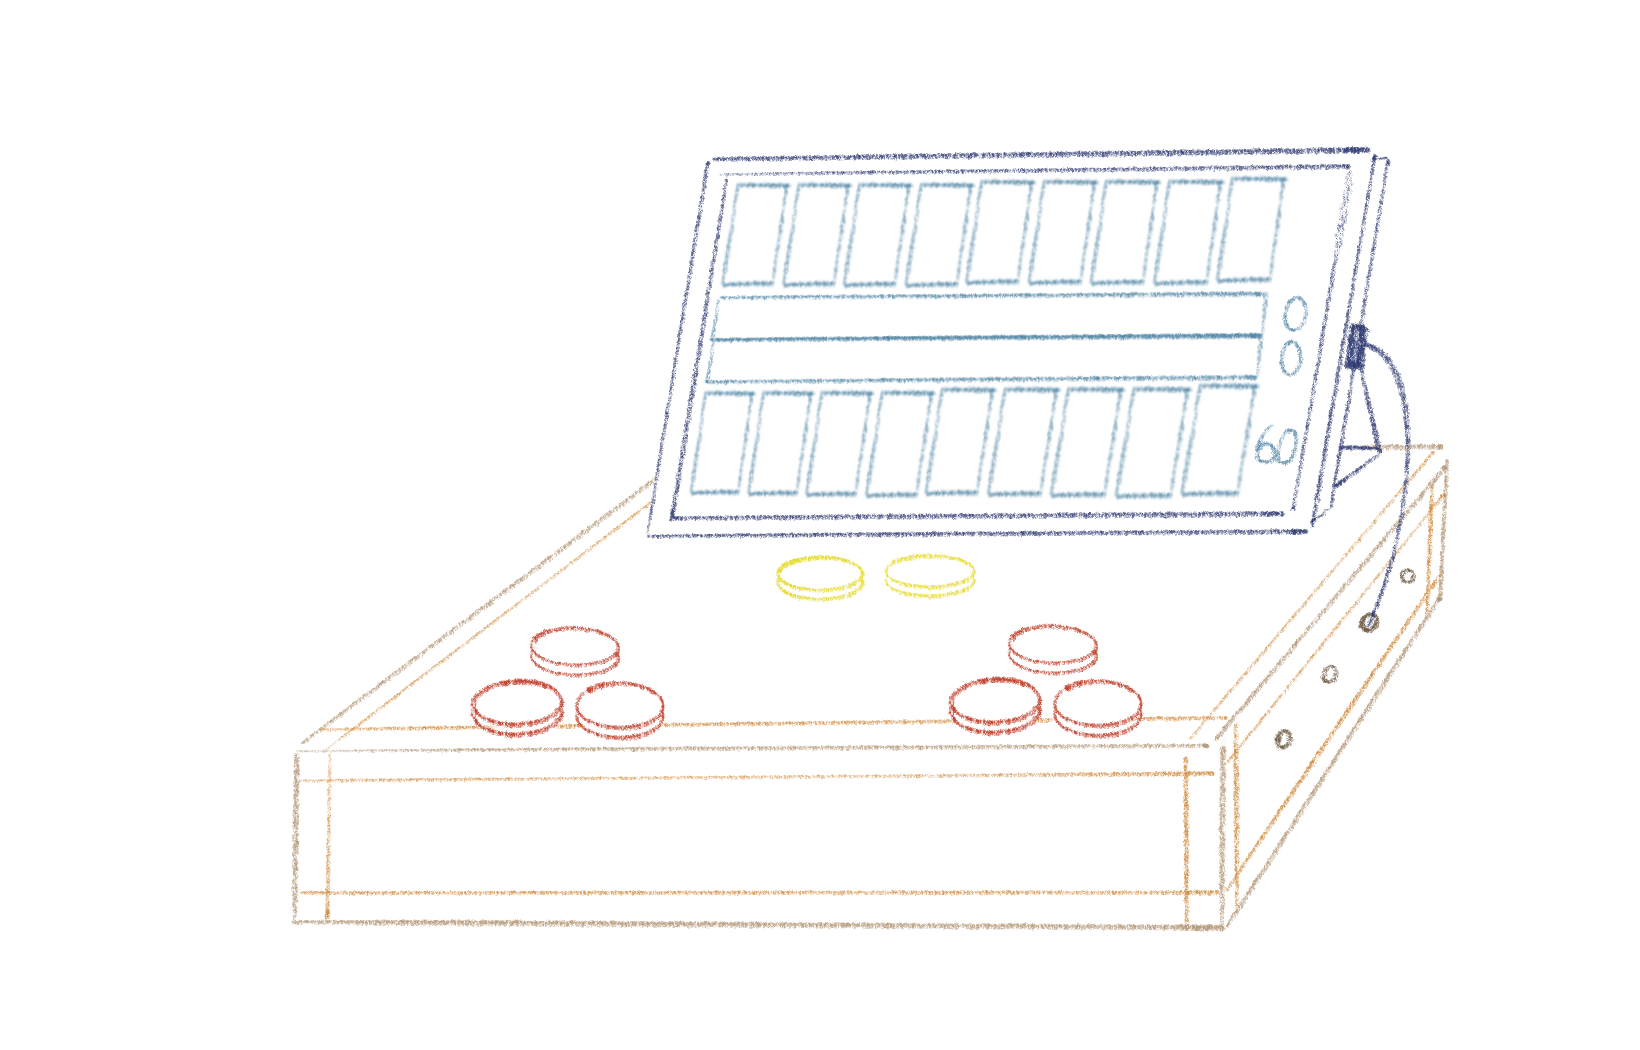
DESIGN
To add to the experience, I want to laser cut a custom playing board that will feature 8 arcade buttons for controls and an Ipad for the game display. The Arduino board and cord will be snuggly hidden under the box-like board. Below is the picture for reference:
Game Setup
P5
Description
P5 will receive information about the button pressed on Arduino to do one of the following:
“userX_left_btn” – move the user selection window from the current pit to index-1 with min_index = 0 (when reaching the left limit of the board the selection doesn’t move).
“userX_right_btn” – move the user selection window from the current pit to index+1 with max_index = 8 (when reaching the right limit of the board the selection doesn’t move).
“userX_enter_btn” – select the pit -> pebble distribution -> update turns played so far -> update current_player value.
“instructions_btn” –
if the instructions window is not displayed and the button is pressed -> display the instructions window,
if the instructions window is displayed and the button is pressed -> close the instructions window.
“mainMenu_btn” – end game and display main menu window.
P5 will send information about which player’s turn is it and the turns played by the current player so far.
Design
The whole game will be displayed on p5. There will be 3 game states to display three different windows:
gameState = “start” -> display main menu
instructions display;
“play” button (triggered by synch press of the “enter” button by two players);
gameState = “playing” -> display the game
game board (9 even-sized playing pits and one big storehouse for each player);
scores;
timer (if the player didn’t press “enter” by the end of the timer -> currently selected pit will be played);
chance games displayed over the game board (after every 3rd and 7th turn);
gameState = “end” -> display end screen with scores
scores;
end message;
“return to main menu button” (same as the one during the game);
It would be nice to have animation during:
pebble distribution – view each pebble put into a pit;
die roll – rotation of a cube or change of the number on the moving flat square;
card picking – rotation of a card or some revealing movement.
To add to the experience relevant sound effects will be played.
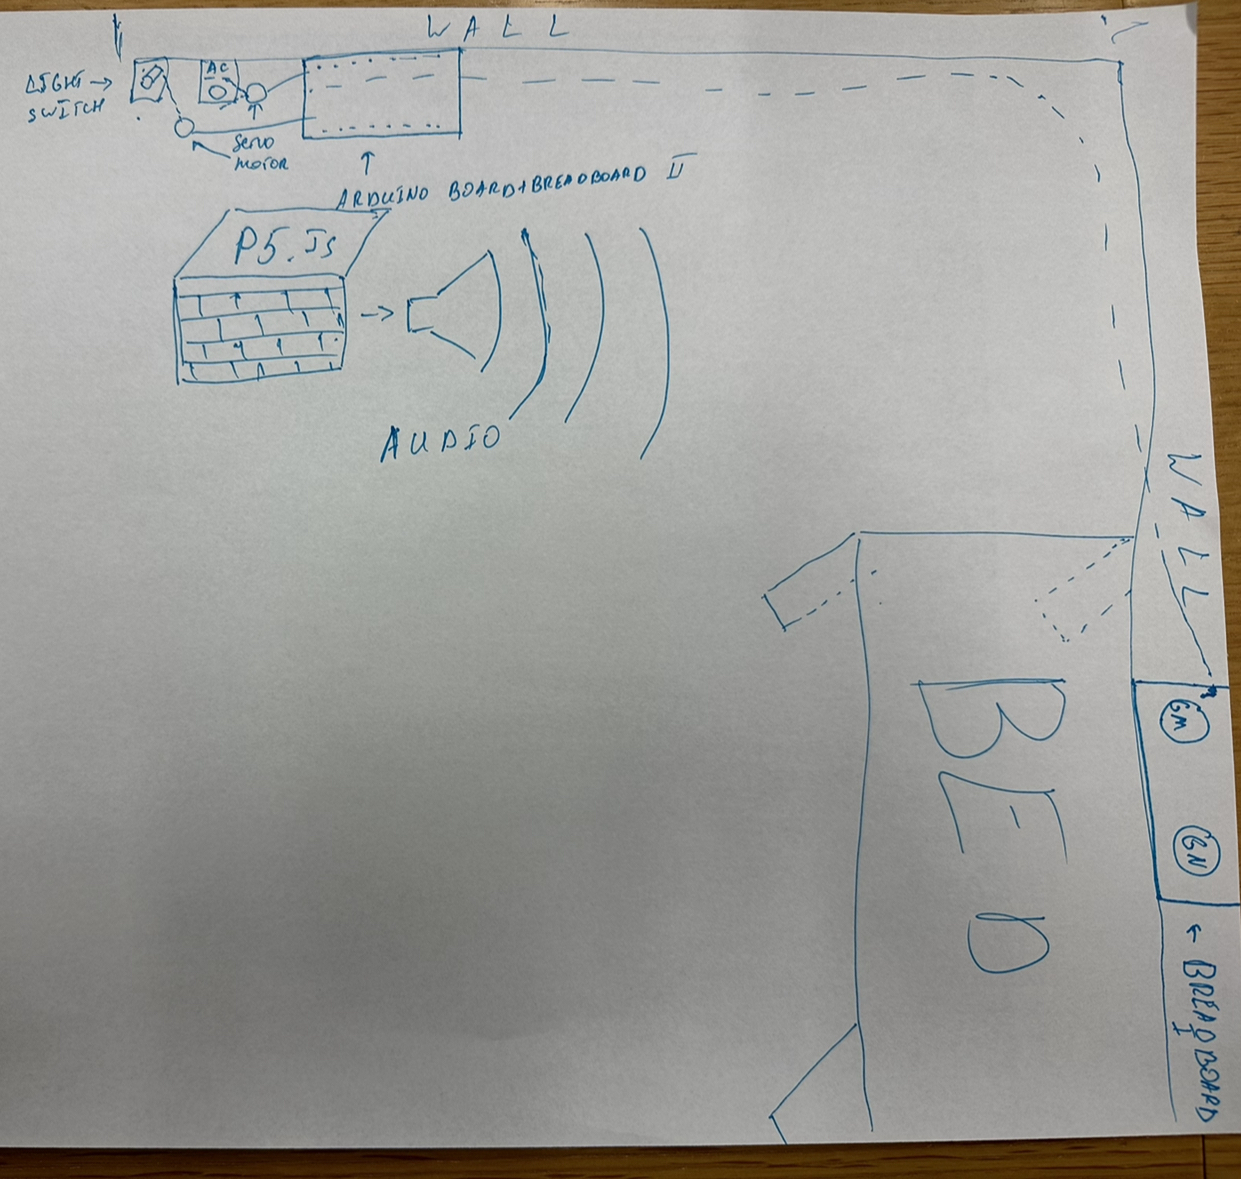
Akyn is a smart system that makes morning and night routines more pleasant. This device has 2 buttons, one for mornings and one for nights.
When the “Good Night” button is pressed, the system turns off the lights and AC with the servo motor. While Arduino does that, P5 will wish a random good night phrase(chosen out of a pre-established array of words) and notify the person what time the alarm is set and how many hours are left.
When the “Good Morning” button is pressed, Arduino will turn on the AC. P5 will greet the person with a good morning text, announce the daily schedule from the Google Calendar, announce how many emails in the user’s Gmail are, and play a random motivational song.
Design and description
As stated above, each button changes the state of the appropriate button variable, which when active will trigger either only one servo motor(Lights) or both of them(AC). When each button is active it sends a 0 or 1 code to P5 which will trigger the “Good Morning” code for 0 and “Good Night” code for 1(description of actions are at the top). P5 code fetches data from a person’s Google Calendar and Gmail which after some modifications will announce out loud. P5 will send a dummy value back to Arduino since the communication works one way only.
Room Design with Akyn
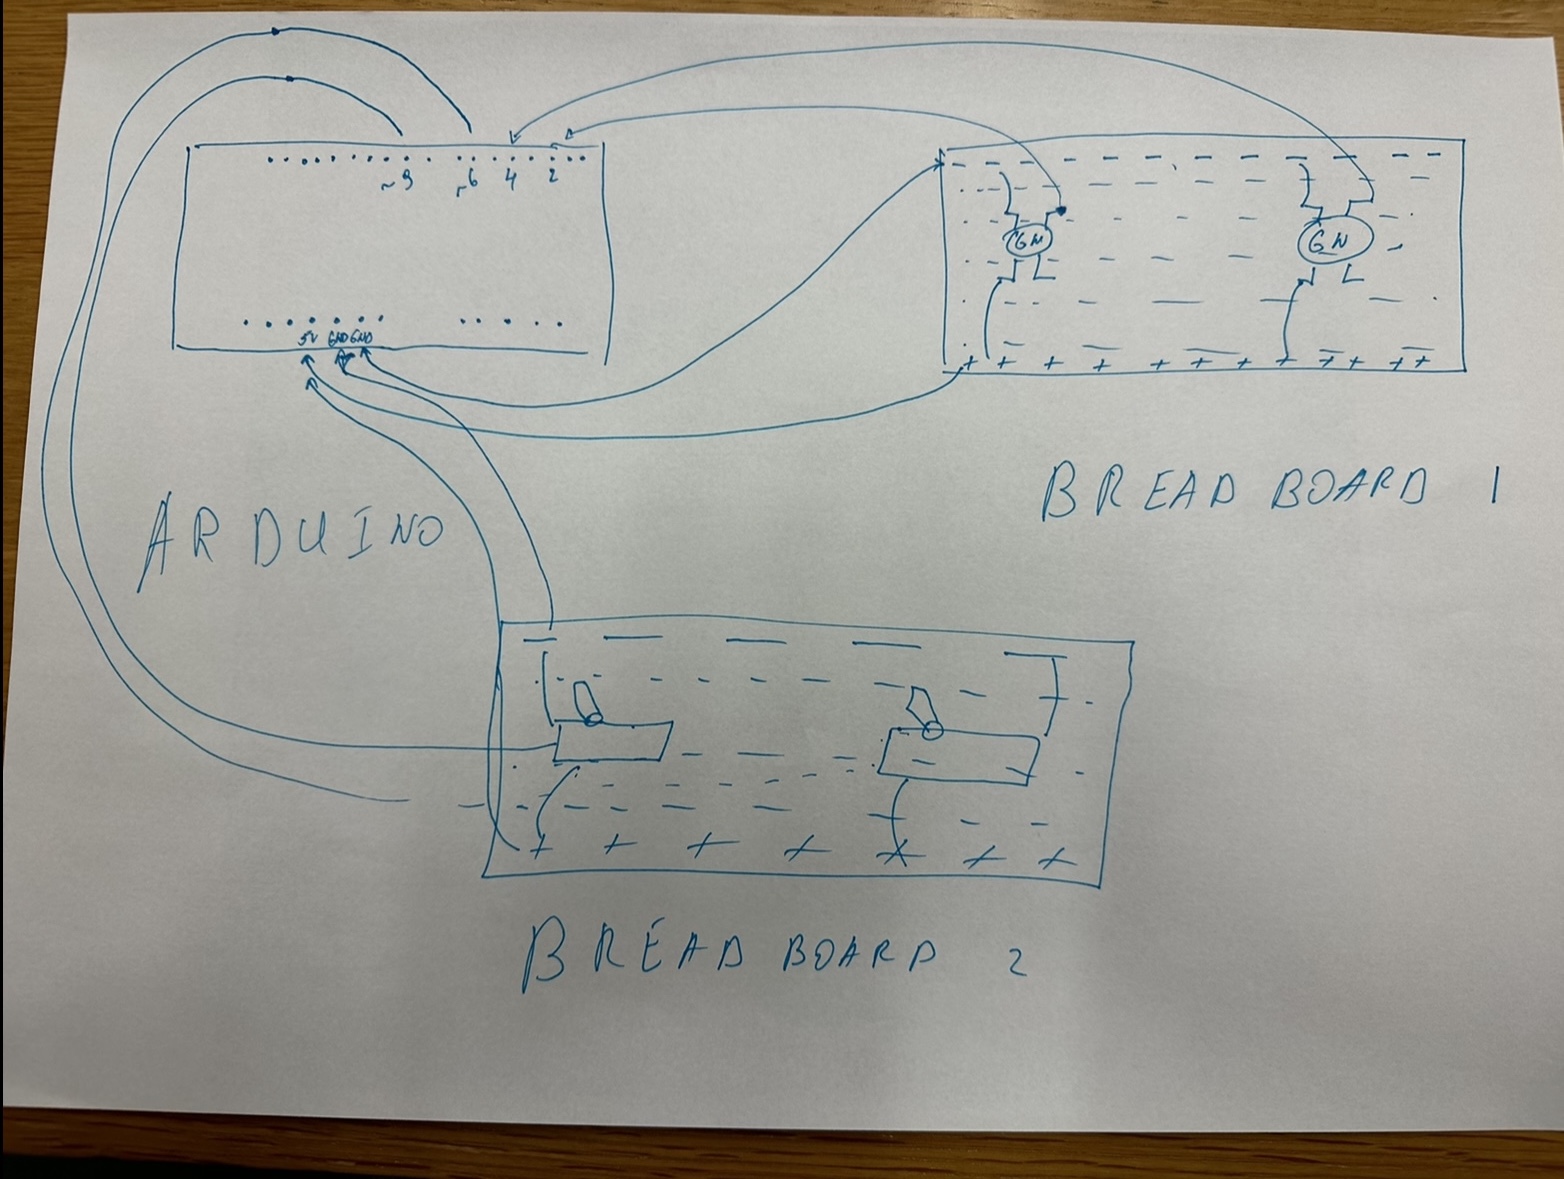
Akyn Arduino + Breadboard
Serial Control
1 & 3
Something that uses only one sensor on Arduino and makes the ellipse in p5 move on the horizontal axis, in the middle of the screen and nothing on Arduino is controlled by p5.
Using a slider to control the LED brightness from p5
Arduino Code
int ledPin = 2; // connect LED to pin 9
int brightness = 0;

void setup() {
  Serial.begin(9600); // start serial communication
  pinMode(ledPin, OUTPUT); // set LED pin as an output
}

void loop() {
  // read incoming serial data
  if (Serial.available() > 0) {
    brightness = Serial.read(); // read the incoming value
    brightness = constrain(brightness, 0, 255); // constrain the value between 0 and 255
    analogWrite(ledPin, brightness); // set the LED brightness
  }
  delay(10); // wait a short time before repeating the loop
}
P5.js code
let slider; // slider to control LED brightness
let serial;

function setup() {
  serial = new p5.SerialPort();

  serial.open("COM3");

  createCanvas(400, 400); // create a canvas
  slider = createSlider(0, 255, 0); // create a slider
  slider.position(50, 50); // set the position of the slider
}

function draw() {
  background(220); // clear the canvas

  let val = slider.value(); // get the slider value
  text("LED Brightness: " + val, 50, 50); // display the brightness value

  // send data to Arduino over serial
  if (frameCount % 10 == 0) { // limit the rate of sending data to avoid overloading the serial port
    serial.write(val); // send the slider value over serial
  }
}
The inspiration for this idea came from the different colored LEDs included in our kits. I saw each representing a different element/object in nature (blue-water, red-fire, yellow-sun, green-earth/plants), and I delved deeper into that to develop my idea. I would like to create a system in which the user can interact with the Arduino and see on the screen and on the Arduino their interaction with ‘nature’. Similarly to my midterm project, “Zen Garden”, I find nature to be very relaxing and an important component of life – and technology somewhat draws us away from nature by taking up a lot of what could potentially be ‘outdoors time’. This is my way of once again bringing nature to the technology.
Implementation
For the implementation, I intend to have a switch to switch between the different elements – or 4 switches so the used chooses which element they would like. P5js will show simulations of rain for water, fire, leaves falling off a tree for plants, and the sun and its rays for the sun. To create a slightly more immersive feel, I will use the RGB LED which will light up in the appropriate color, and animate dimness and brightness according to what is on the screen. Furthermore, there will be a potentiometer with which the user can control a different magnitude for each element. For water – the amount of raindrops, for fire – how large the fire is, for plants – the wind direction in which leaves fall, and for the sun – the number of sun rays shown.
“Make something that uses only one sensor on arduino and makes the ellipse in p5 move on the horizontal axis, in the middle of the screen, and nothing on arduino is controlled by p5”
The code provided in the lecture notes for both Arduino and P5.js was used as-is, except for the draw function in P5.js. We modified the code to make the ellipse’s horizontal location change when the potentiometer was turned, and the vertical location change when the LDR input was changed. To prevent multiple visual responses from P5.js when the potentiometer and LDR were manipulated, we removed the background and fill functions.
“Make something that controls the LED brightness from p5”
We made some changes to both the Arduino and P5.js code for this task. To adjust the brightness of the LED, we utilized the keyboard’s Up and Down arrows as the input for the P5.js code. This changing value was then sent to the LED connected to PWM pin 5. We used analog write to this pin, which increased or decreased the LED value. If the value exceeded 255, it reset to 0 and vice versa.
“Take the gravity wind example and make it so every time the ball bounces one led lights up and then turns off, and you can control the wind from one analog sensor”
To complete the exercise, we made changes only to the P5.js code by incorporating the gravity wind example. The original Arduino code from the lecture notes remained unchanged. We divided the range of the potentiometer into three intervals, which set the wind vector to -1, 0, and 1 depending on its direction. These values are acceptable for the wind. We also implemented a collision detection flag. When a collision occurs, the LED on pin 2 is turned on. Whenever there is no collision, the LED is turned off.