Mariam’s Final Project

For my final project, I want to combine one of my favorite hobbies, drawing, with p5.js and arduino.  I want to create a system that uses arduino to create an art piece on p5.js. I can use pressure pads to create lines on p5.js that eventually develop into an art piece. I want to create some generative art piece that uses a creative way to trigger the design. This is an example of the art I would like to generate.

https://editor.p5js.org/generative-design/sketches/P_2_2_3_01

A creative way to trigger it would be by using the camera to track your movement and then translate it into the design instead of using the mouse. Maybe another way would be to use a remote control where you press buttons and it triggers the design.

Dev & Yunho Reading Questions – Design meets Disabilities

  1. Think of an example of an invisible design.
  2. Think of an example of a positive design.
  3.  Some people might not want their disabilities to be shown to other people. Will these designs also be helpful for them?
  4. Do you think it is appropriate for a single design to accommodate everyone with a particular disability?
  5. What might be the effects of designs on inclusion if we keep making more emphasis on simplicity?

Final Project Concepts – Zaeem

For my final project, I want to make a game that can be controlled via Arduino. Within this general idea, I have three sub-ideas:

Piano Tiles

Building upon the project I worked on with Dev, I could make a game that prompts the user to use our piano – made with Piezoelectric pressure sensors – and hit specific notes to progress in the name. On the other hand, hitting the wrong keys on the piano will take away from the player’s progress in-game. My inspiration for this idea comes from the mobile game “Piano Tiles” that I used to play as a kid:

Fruit Ninja

Another game I used to play when I was younger was Fruit Ninja:

I could use motion sensors connected in a sequence with the Arduino to record input from the user that then cuts fruit in the p5js sketch (divided into grids to match the corresponding motion sensors).

Car Game

While browsing online for other ideas, I realized that I could also build a small robot car that can then be used to play a game in another p5js sketch. The robot car can be made using motors as the primary component. The car can be remotely connected with an Arduino, or the car can have an Arduino of its own that communicates with an Arduino connected with a computer via radio waves. I will have to check if equipment like this is available in the IM Lab though.  The player can use switches to control the car’s direction and pressure sensors to control acceleration and breaking. I think learning about motors this week will really help me think more about this idea.

Overall, by this week, I will finalize a final project idea from the list above.


Final Project idea – 3D controller

For my final project, I am planning to create a sort of interactive game with the use of Arduino and p5js. The idea is to create a 3D controller, which would allow the user to play a game. 

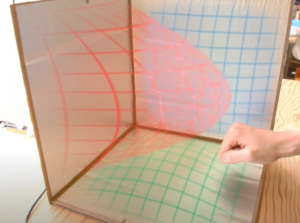
I got inspiration from watching this video → https://www.youtube.com/watch?v=ikD_3Vemkf0&feature=emb_title. In the video, the guy uses cardboard and foil, which can track the position of his hand. As he moves his hand, he can see the direction of the hand movement on the screen. So, I thought that I could connect Arduino to the cardboard with foil and make an interactive box, which sort of looks like this:

Turning to the screen, I thought to create a hidden object game. So there will be a picture presented on the screen with many objects and a gamer would need to find a red ball (for example) while moving their hand inside a cardboard box with a foil.

This idea also reminds me of a claw machine, so in any case, I have been thinking that I might use a joystick to find an object among many on the screen. 

I know that the idea still seems “half-baked”, so I am looking forward to discussing how to improve it and implement it with the use of appropriate components.

International Super Dancer 📸🤸 – Final Project Proposal

Inspiration 🕺🏼📺

When I was younger, I was OBSESSED with the Backyardigans. Maybe I still am a little 👀 . I watched it daily on Discovery Kids at 7:30pm before going to bed, and vividly remember there being one special two-part episode: Season 2 Episode 15: International Super Spy. (Yes this is the show and episode of that viral song.) I would pray for it to come on every night, and jump arround in joy when they did. For my final project for intro to IM, I am looking forward for constructing an interface similar to the one where Pablo has to dance to save Tasha from the lady in pink. (See Below or HERE if it does not work)

In this interface, Pablo stands on a pad and mimics a screen as it displays a character dancing. His movements are recorded and, if correct, marked in a progress bar. It indicates that he needs to complete the dance to earn a reward. I want to do something similar, where a displayed character can mimic or indicate specific dance moves from a person standing in front.

Idea ⌨️

For this concept, the display will be built with P5.Js, where a simple character, instructions and music will be shown. I would like to project this using one of the vertical projects. Furthermore, Arduino sensors will be used to record the position of the person. I imagine some pressure sensors in the floor to calculate where the user is standing (and with how many feet) , and a camera or infrared sensors to indicate the positions of key body parts (i.e hands, elbows, knees, toes, head). I would ask the person to get into a specific position, and record the difference in movement in a set period of time to determine if the movement is correct or not.

The feedback would mostly be similar to the one shown in the video, with a green progress bar that gets red and makes an error sound when a position is missed. I’d also like to include a reward system built with Arduino motors to give out a price for those of you who know how to dance.

I still want to develop this idea further, as I want to add elements to the design and concept that are mine. Yes, I want the vibe and situation of the Backyardigans, but I also want it to be signed Juanma. Perhaps adding more gimmicks or an extra step to the interface would be cool.

Final Project Idea – Sk8er

For my final project, I wanted to incorporate one of my hobbies, which is skating. I want to make a game where the player has to balance a character on a skateboard. The goal will be to obtain a high score while balancing the character. The pace of the game and balance will get more difficult as the player progresses.

The game will be made with p5js and the controls will be relayed from the Arduino. Currently, I am thinking of using touch sensors for input and motors for vibration feedback. I would like to discuss this further to see what would be the best components to use for input and if it is possible to include my penny board as a component.

Final Project Ideas

This final project must incorporate both Arduino and p5js. I have a few ideas, here is one –

Idea: Game – Catch the Butterflies 

{yes my butterfly obsession continues…}

The game would be made in p5js, which would have/be a butterfly garden. A catcher, which would be controlled using the Arduino (using a motion detecting sensor), would be used to catch butterflies and avoid unrelated/harmful items. The catcher would be the user’s hand, wherever the hand moves, the catcher will move the same direction. The more butterflies the user catches, the more points they get. If unrelated items are touched, a point will be deducted. It will be a timed game: How many butterflies can you catch in 1 minute?  This is just a brief idea and there are many areas to think about, in terms of aesthetics, execution, etc.

Motors

Slide deck

motors_electromagnetism

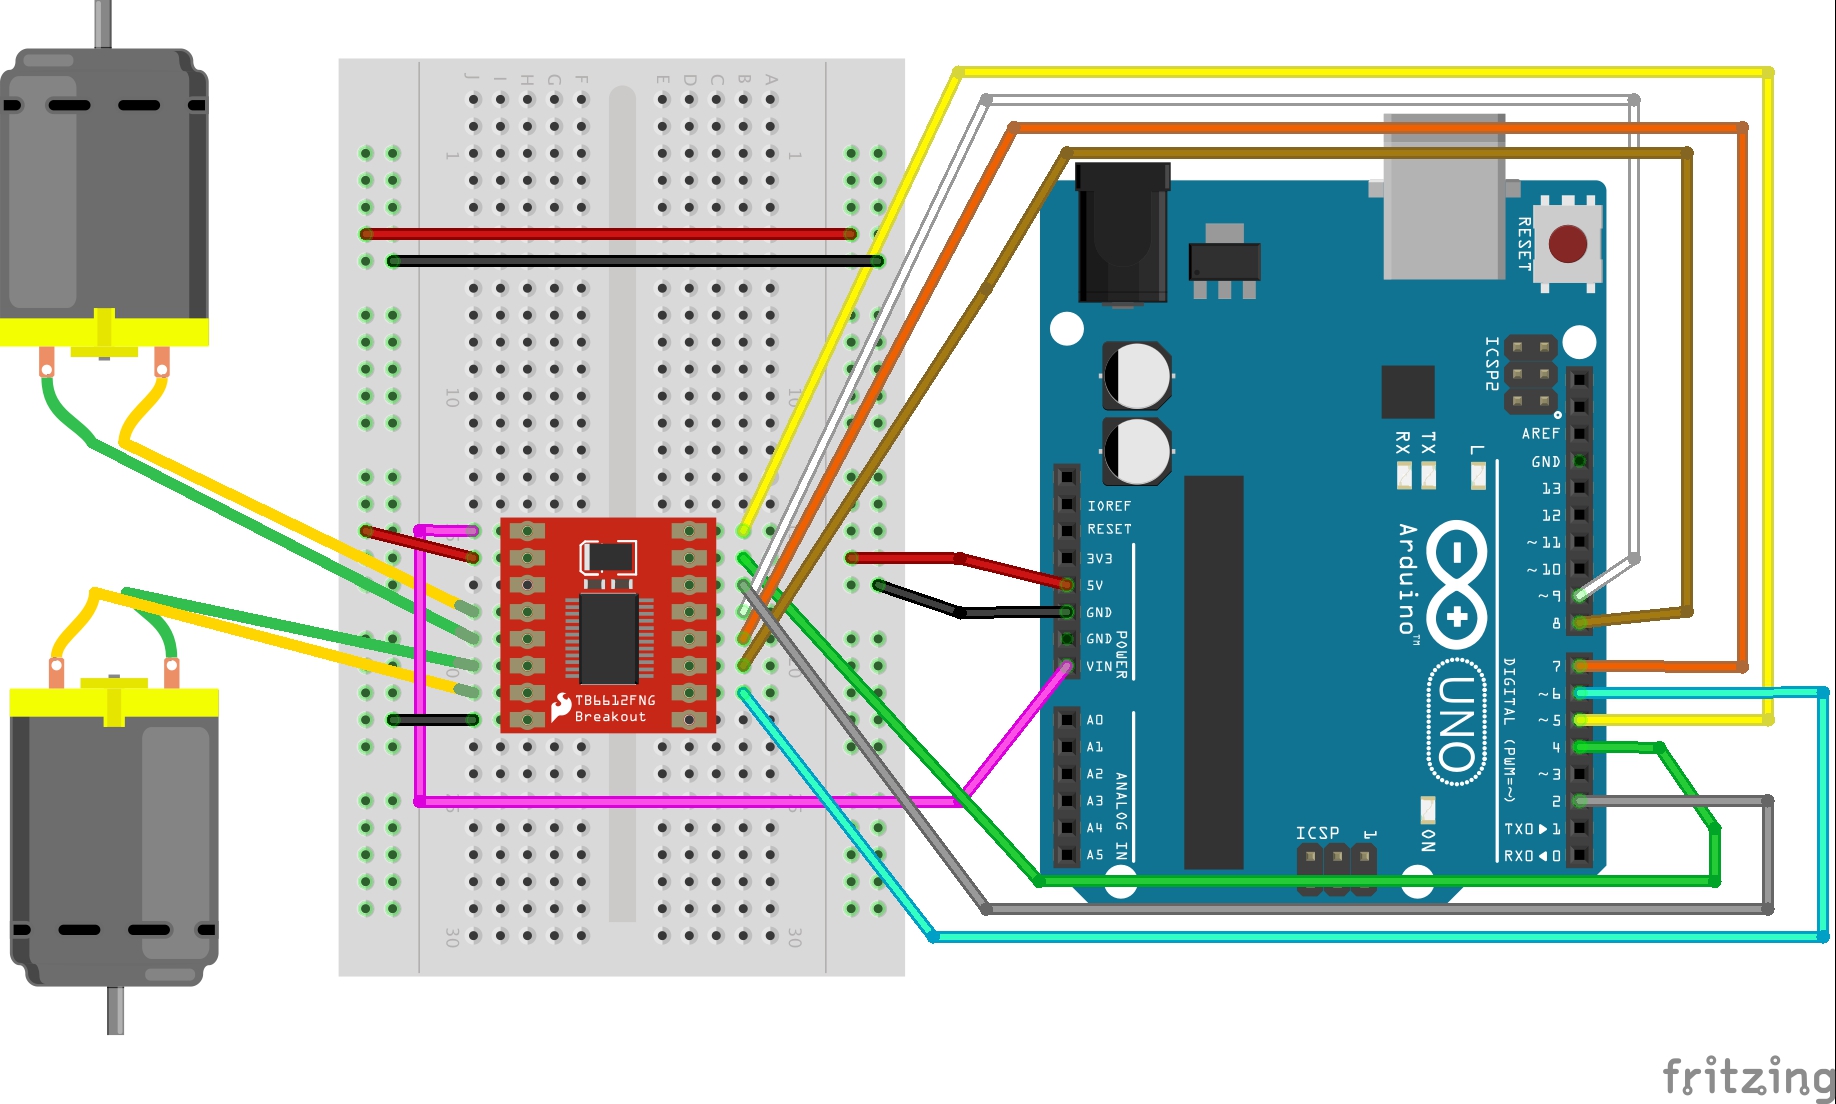
Motorshield

Link for Motor Shield tutorial: https://learn.sparkfun.com/tutorials/tb6612fng-hookup-guide?_ga=2.227433246.2072068385.1551701674-349683115.1523944725

Download the library here: TB6612FNG ARDUINO LIBRARY, or grab the latest version from Sparkfun’s GitHub repository. Once the library is installed, open the example code included in the Library through the Arduino IDE’s examples.

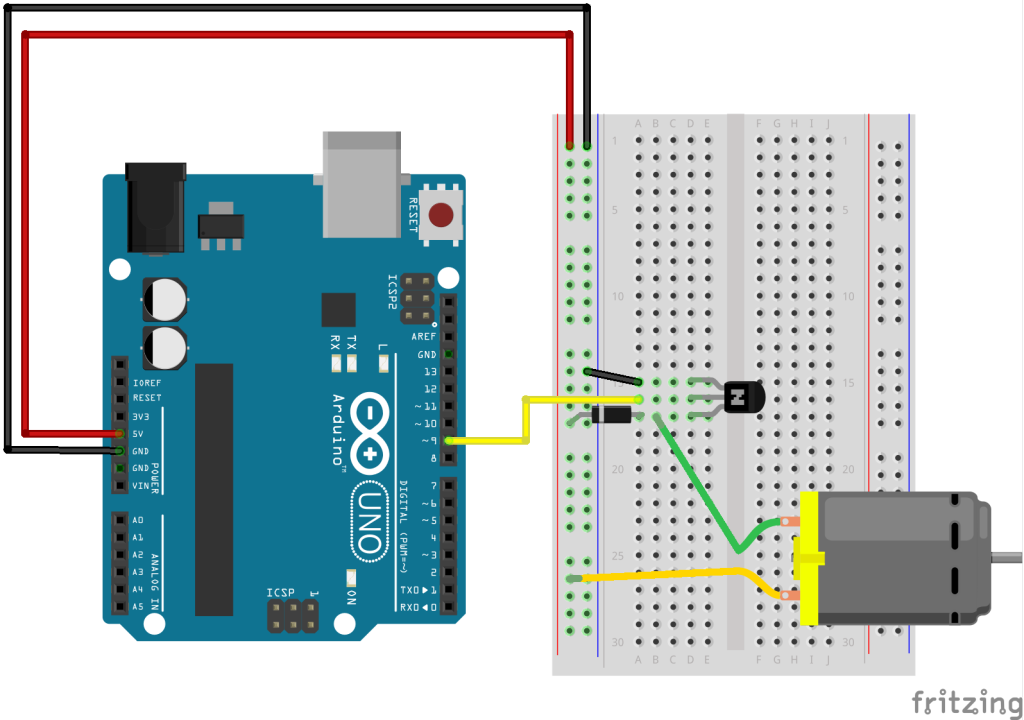
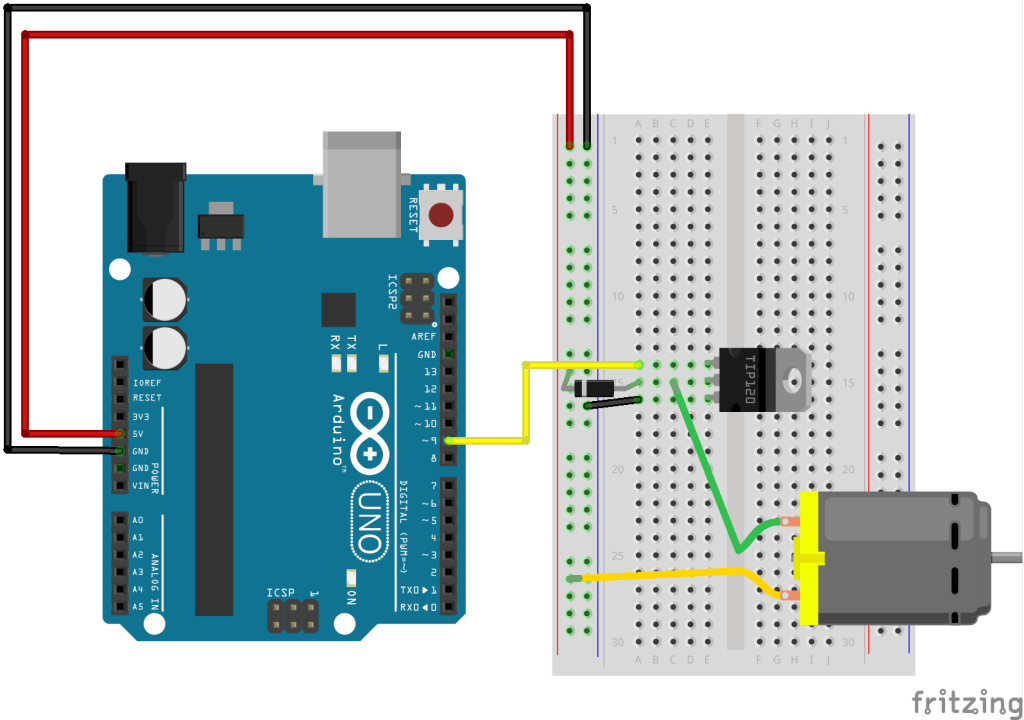
Transistor/diode

You would use the same set up with a diode and transistor for a solenoid as well.

With Smaller Transistor (P2N2222A or a BC337):

With Tip120:

Xylophone – Yesenia & Zaina

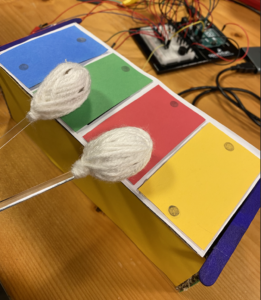
When we started thinking about a potential instrument to make we thought of a piano, xylophone or a guitar. We began by experimenting with different analog sensors including pressure/force sensors and piezo elements. We settled on making a xylophone using 4 pressure sensors so that each time the sensor is pressed, the buzzer would make a sound and at the same time a LED would light up (synced with when the note is pressed). Syncing the LEDs with the sensors is what we struggled with the most, we had the wiring as well as the code however we could not get it to work. 

First, we wired up the sensors & buzzer and wrote up the code to make each pressure sensor play a different note when pressed. 

We then wired up a button (digital sensor) with 4 different LEDs. We did these two steps independently in order to make sure each one worked well on its own. However, what we found most challenging was to combine the two circuits and codes to make the whole thing work altogether. We wanted (1) the buzzer to play sound when the pressure sensor was hit, (2) the LED to light up when the pressure sensor was hit and be off otherwise and (3) the button to enable the ON and OFF of the LEDs adding a light feature to the xylophone. 

#include "pitches.h"
#define FORCE_SENSOR_BLUE A0
#define FORCE_SENSOR_GREEN A1
#define FORCE_SENSOR_RED A2
#define FORCE_SENSOR_YELLOW A3

const int ledPinBlue = 7;
const int ledPinGreen = 2;
const int ledPinRed = 3;
const int ledPinYellow = 4;

const int buttonPin = 5;

bool onOff = HIGH;
byte prevButtonState = LOW;
bool blinking = false;

int notes [10] = {NOTE_C4, NOTE_D4, NOTE_E4, NOTE_F4, NOTE_G4, NOTE_A4, NOTE_B4, NOTE_C5, NOTE_D5, NOTE_E5};

void setup() { 
  Serial.begin(9600);
  
//  pinMode(ledPinBlue, OUTPUT);
//  pinMode(ledPinGreen, OUTPUT);
//  pinMode(ledPinRed, OUTPUT);
  pinMode(ledPinYellow, OUTPUT);
  pinMode(buttonPin, INPUT);
}

void loop() {

  byte buttonState  = digitalRead(buttonPin);
  Serial.println(buttonState);

  if (buttonState == HIGH && prevButtonState == LOW) {

    blinking = !blinking;
  }
  
  prevButtonState = buttonState;
  
  int analogReadYellow = analogRead(FORCE_SENSOR_YELLOW);
  int analogReadRed = analogRead(FORCE_SENSOR_RED);
  int analogReadGreen = analogRead(FORCE_SENSOR_GREEN);
  int analogReadBlue = analogRead(FORCE_SENSOR_BLUE);

  Serial.print(analogReadYellow);
  Serial.print(analogReadRed);
  Serial.print(analogReadGreen);
  Serial.print(analogReadBlue);// print the raw analog reading

  if (analogReadYellow > 100) {  
    Serial.println(" --> YELLOW ");
    tone (6, NOTE_C4, 200);
  }
  if (blinking == true){
    digitalWrite(ledPinYellow, HIGH);
    }
   else {
    digitalWrite(ledPinYellow, LOW);
    } 
    
  if (analogReadRed > 200) {   
    Serial.println(" --> RED ");
    tone (6, NOTE_D4, 200);
    pinMode(ledPinRed, HIGH);
    }
   else {
    digitalWrite(ledPinRed, LOW);
    } 
    
  if (analogReadGreen > 200) {   
    Serial.println(" --> GREEN ");
    tone (6, NOTE_E4, 200);
    pinMode(ledPinGreen, HIGH);
    }
   else {
    digitalWrite(ledPinGreen, LOW);
    } 

  if (analogReadBlue > 200) {   
    Serial.println(" --> BLUE ");
    tone (6, NOTE_F4, 200);
    pinMode(ledPinBlue, HIGH);
    }
   else {
    digitalWrite(ledPinBlue, LOW);
    }
}

We then spent time working on the aesthetics of the instrument. Using cardboard and paper we created the xylophone with a box underneath (where we planned to hide all the wires and breadboard). We made two mallets and had to make them heavy enough so that the sensors could detect the pressure. We also realized that by using the proper resistor (10k) the sensor was more sensitive and did not require for the mallet to be used with much force. Switching the sensors and the wires over to the cardboard box was very difficult as there are a lot of wires, but, what worked was checking the wiring for each sensor by attaching a spare sensor before attaching the wires to the sensor in the box, this was a quick and easy way to make sure it was working properly, before make it so that you can’t see where the wires are and if they’re touch. 

Final

https://youtube.com/shorts/9cNCOIGK0fQ

Piezo Piano (Dev & Zaeem)

Inspiration

For this assignment, using both analog and digital sensors, we were tasked to create a musical instrument. At first, we thought of creating a drum set. After doing some research we realized that we will have to connect a MIDI tool and use that as an interface in order to make a drum that mimics the actual sounds that come from a drum. Since we had already covered some notes in class (pitches), we decided to make a Piano instead but using the same methods we would use to make the drums.

Implementation

We started by researching all our possible analog sensors. We think the sensor best-suited for this task is a piezoelectric pressure sensor because we wanted to measure the force with which the user presses down on each key.

Next, we wanted to design our piano. For this, we used a cardboard box from the lab which had a piece of cardboard that could be flipped up and down. This flipping part would serve as the piano keys and the rest of the box can be used to hide the Arduino and the circuits. Piezo sensors are stuck underneath each key using double-sided tape. We also soldered wires together to make the circuit compact enough to fit inside the cardboard box and so that the wires may be led to the Arduino through holes in the box. Finally, we used a potentiometer to adjust for the volume of the buzzer.

Initial setup (testing)

Reflection

While we have made a piano that can play 6 notes, it’s biggest drawback is in how limited it is. We believe that this problem can be solved by either having a button (switch) that changes all the notes being played so that every key is now bound to a new note when the button is pressed or by achieving the same thing using a potentiometer.

We ran into a problem at the end. The last piezo sensor does not seem to work. We spent most of our time trying to figure out what’s wrong with our code that triggers the last sensor every time in draw loop. But, in the end, we figured that the sensor was faulty. Since we did not have enough time to fix this and use another sensor (we had already soldered the faulty one), we did not include that sensor in the piano.

Here is how the final setup looked. Of course, this was not how we imagined it to be, but it was the right thing to do since we didn’t want to break the connections and have the wires come loose. Even after all the soldering we did, there were few wires that did not connect properly to the alligator cables and thus the piezo disk would play any sound.

Arduino Code

#include "pitches.h"

int analogpin[6] = {A0, A1, A2, A3, A4, A5};
const int buzpin = 4;
int threshold = 200;
int flag = 0; 
bool a5 = false;

double curr;
double goal;

void setup()
{
  Serial.begin(9600);
  pinMode(buzpin, OUTPUT);
}

void loop()
{
//  int test = analogRead(analogpin[4]);
//  Serial.println(test);

  if (analogRead(analogpin[0]) < threshold && flag == 0) //&& flag == 0
  {
    flag = 1;
    Serial.println("A0");
    curr = millis();
    while(millis() < curr + 100){
      tone(buzpin, NOTE_B4, 100); //need the duration here?
    }
  }

  if (analogRead(analogpin[1]) < threshold && flag == 0) //&& flag == 0
  {
    flag = 1;
    Serial.println("A1, pressing");
    digitalWrite(buzpin, HIGH);
    curr = millis();
    while(millis() < curr + 100){
      tone(buzpin, NOTE_D4, 100); //need the duration here?
    }
  }
  
  if (analogRead(analogpin[2]) < threshold && flag == 0) //&& flag == 0
  {
    flag = 1;
    Serial.println("A2");
    curr = millis();
    while(millis() < curr + 100){
      tone(buzpin, NOTE_C4, 100); //need the duration here?
    }
  }
  
  if (analogRead(analogpin[3]) < threshold && flag == 0) //&& flag == 0
  {
    flag = 1;
    Serial.println("A3");
    curr = millis();
    while(millis() < curr + 100){
      tone(buzpin, NOTE_G4, 100); //need the duration here?
    }
  }

  
  if (analogRead(analogpin[4]) < threshold && flag == 0) //&& flag == 0
  {
    flag = 1;
    Serial.println("A4");
    curr = millis();
    while(millis() < curr + 100){
      tone(buzpin, NOTE_G3, 100); //need the duration here?
    }
  }
   
  if (analogRead(analogpin[5]) < threshold && flag == 0 && a5 == false) //
  {
    flag = 1;
    a5 = true;
    Serial.println("A5");
    curr = millis();
    while(millis() < curr + 100){
      tone(buzpin, NOTE_D3, 100); //need the duration here?
      a5 = false;
    }
  }

  flag = 0; 
}