Week 11 – Production Exercises

Exercise 1

  • Drawing an ellipse and making it move horizontally based on photoresistor

Code:

let x=0;

function setup() {
  createCanvas(400,400);
  textSize(18);
}

function draw() {
  if (serialActive){
    background("white");
    ellipse(map(x,0,1023,0,400),height/2,50,50);
  }else{
    background("white");
    console.log("not connected");
  }
}

function keyPressed() {
  if (key == " ") {
    // important to have in order to start the serial connection!!
    setUpSerial();
  }
}

function readSerial(data) {
  
  if (data != null) {
    x = int(data);
  }else{
    x = 0;
  }
}

//Arduino code
// void setup() {
//     Serial.begin(9600);
//     pinMode(A0, INPUT);
// }

// void loop() {
//   Serial.println(analogRead(A0));
// }

Exercise 2

  • Increase the brightness of the LED with mouse click

Code:

let bright=0;

function setup() {
  createCanvas(400,400);
  textSize(18);
}

function draw() {
  if (serialActive){
    background("white");
    text(bright,10,10);
  }else{
    background("white");
    console.log("not connected");
  }
}

function keyPressed() {
  if (key == " ") {
    // important to have in order to start the serial connection!!
    setUpSerial();
  }
}

function mousePressed(){
  if(serialActive){
    bright+=1;
    writeSerial(bright);
  }
  
}
function readSerial(data) {
  
}

//Arduino code
// int brightness;
// void setup() {
//     Serial.begin(9600);
//     pinMode(9, OUTPUT);
// }

// void loop() {
//   brightness = Serial.parseInt();
//   analogWrite(9,brightness);
// }

Exercise 3

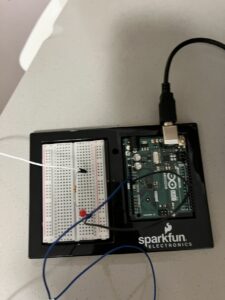
  • Turning on LED when the ball bounces and use photoresistor to control wind movement

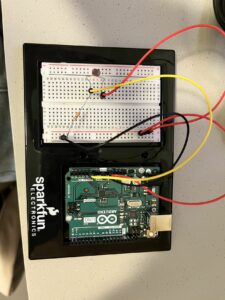
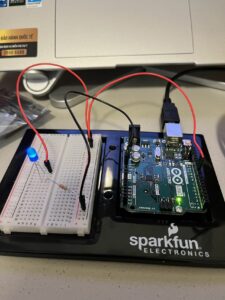
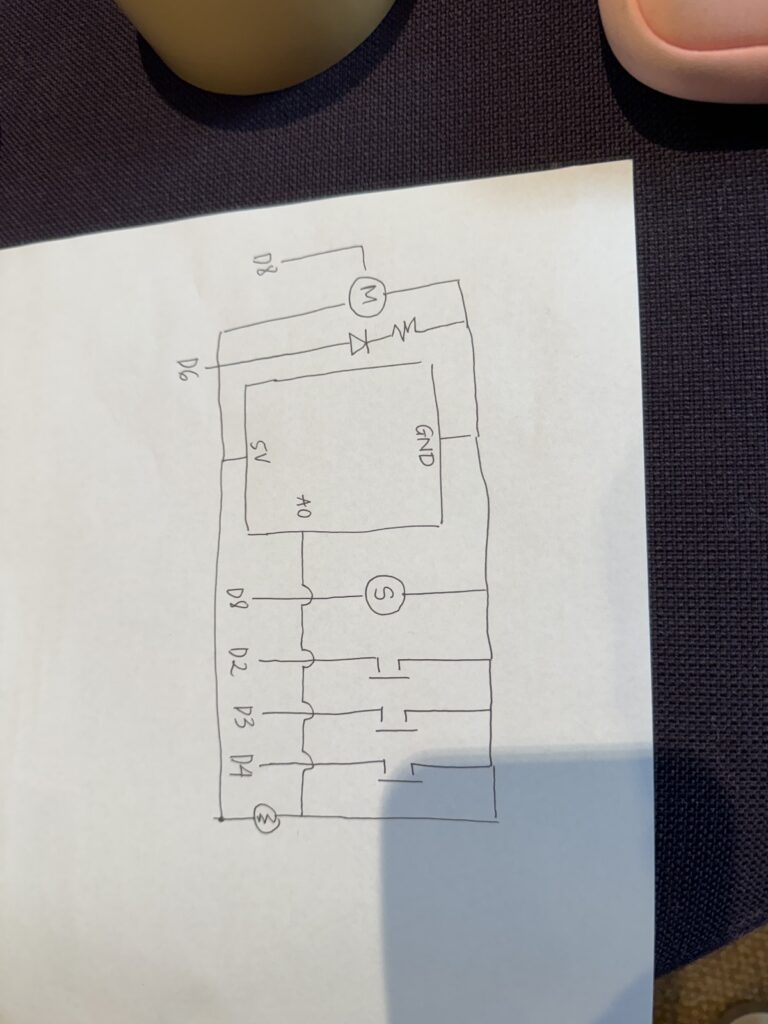
Circuit

Video:

Code:

let velocity;
let gravity;
let position;
let acceleration;
let wind;
let drag = 0.99;
let mass = 50;
let bounce = 0;

function setup() {
  createCanvas(640, 360);
  noFill();
  position = createVector(width/2, 0);
  velocity = createVector(0,0);
  acceleration = createVector(0,0);
  gravity = createVector(0, 0.5*mass);
  wind = createVector(0,0);
}

function draw() {
  background(255);
  if(!serialActive){
    console.log("PRESS a TO CONNECT");
  }
   else{
    applyForce(wind);
    applyForce(gravity);
    velocity.add(acceleration);
    velocity.mult(drag);
    position.add(velocity);
    acceleration.mult(0);
    ellipse(position.x,position.y,mass,mass);
    if (position.y > height-mass/2) {
        velocity.y *= -0.9;  // A little dampening when hitting the bottom
        position.y = height-mass/2;
        bounce = 1;
      }else{
        bounce = 0; 
      }
    
  }
}

function applyForce(force){
  // Newton's 2nd law: F = M * A
  // or A = F / M
  let f = p5.Vector.div(force, mass);
  acceleration.add(f);
}

function keyPressed(){
  if (keyCode==LEFT_ARROW){
    wind.x=-1;
  }
  if (keyCode==RIGHT_ARROW){
    wind.x=1;
  }
  if (key==' '){
    mass=random(15,80);
    position.y=-mass;
    velocity.mult(0);
  }
   if (key == "a") {
    // important to have in order to start the serial connection!!
    setUpSerial();
  }
}
function readSerial(data) {
  if (data != null) {
        console.log(data);
        wind.x = map(int(data), 0, 1023, -2, 2);
        writeSerial(bounce + '\n');
  }
}

//Arduino code
// int bounce;
// void setup() {
//   Serial.begin(9600);
//   pinMode(9,OUTPUT);
//   while (Serial.available() <= 0) {
//     Serial.println("0"); // send a starting message
//   }
// }

// void loop() {
//   while(Serial.available()){
    
//     bounce = Serial.parseInt();
//     if (Serial.read() == '\n') {
//       digitalWrite(9,bounce);
      
//     }
    
//   }
//   int sensor = analogRead(A1);
//   Serial.println(sensor);
//   // Serial.println(analogRead(A0));
  
// }


Final project concept

Concept

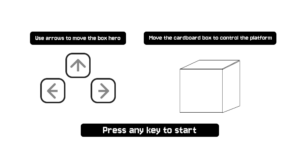
For my final project, I plan to create a game using Arduino and P5js. This game will allow user to use physical components (boxes, figures) in real life to control the game happening on the computer.

Particularly, I want to create a platformer game where player can alter the platforms or the obstacles. The physical components will include some card board boxes that looks like the platforms on the computer. When player moves these boxes or obstacles, the platforms on computer will also move. Based on this mechanism, I will design a few levels of puzzle for the player. The goal of the game is to move the boxes around so that the game character on the computer can get from one point to another.

An introductory or example of this game can be moving the boxes (2 different platforms) so that the game character can jump across.

Week 10 – Reading Response

For this reading, I agree with the author on the limitation of the types of interaction we are using today. He criticized today’s digital device for only limited to “pictures under class”. Of course this type of interaction only allow the hands to feel and receive limited signals. The “pictures under class” leaves out the potentials of texture, weight and multiple other factors, for example, playing piano on a screen does not have the same satisfying feelings as playing on the real piano with hands interaction feedback.

However, I disagree with the author in two main points. The reading focuses too much on the capability of humans but does not take into consideration how we can use that capability to fit our needs. Of course we can have a more dynamic medium, but would that be better than the functionality of the Iphone? Iphones are designed compact and multifunctional, which I think can only achieved best through the “pictures under glass” interaction type. The second thing is that even though our hands are magnificent in many ways, other body parts can create interactions that are not less interesting. For example, the eyes can calculate the distance between objects, recognizing colors, emotions, etc. The “picture under glass” fits well to this capability of the eyes. Hence, I think it’s not a bad medium, it’s just a medium that makes use of other human capability.

Week 10 – Musical Instrument

Implementation
Tinh and I going into this were slightly stuck on the creative idea first. However, during a brainstorm session, we came across a video of a ballerina music box – inspiring us to create something similar to this whilst sticking to the ‘instrument’ concept of the assignments. As we did not have a mini ballerina, I had a mini figurine nonetheless – a small penguin rubber (Basil Jr). Now that we had a figurine, we had to figure out how to implement the ‘instrument’ concept into this, as we did not want to make it into a passive music box.

Therefore, we decided we wanted to control the movement of the penguin with the instrument. We ended up deciding that buttons could be used as the method to control movement — we decided that each button would correspond to a note, and each note has a specific rotation. Originally, we wanted to use 8 buttons to correspond to the 8 notes, however, due to the limited space on our breadboard, we chose to stick with three – C,D,E.
Implementation

Circuit: Servo Motor, Sound sensors, 3 buttons, resistor, photoresistor.


In the code, we use 2 functions for moving the motor and creating sound. The input button from the user will be recorded and passed into the function accordingly.

#include <Servo.h>
#include "pitches.h"


const int photoPin = A0;        // Photoresistor analog pin
const int ledPin = 6;           // LED pin
const int buttonPins[] = {2, 3, 4};  // Button pins for sound triggers
const int photoThreshold = 100; // Threshold for photoresistor reading
const int speakerPin = 8;

Servo penguinServo;             // Create servo object
const int servoPin = 9;         // Servo pin

void setup() {
    // Initialize the photoresistor, LED, and buttons
    pinMode(ledPin, OUTPUT);
    for (int i = 0; i < 3; i++) {
        pinMode(buttonPins[i], INPUT_PULLUP);  // Using internal pull-up resistor
    }

    // Attach servo to pin
    penguinServo.attach(servoPin);

    Serial.begin(9600);  // For debugging if needed
}

void loop() {
    // Read the photoresistor value
    int photoValue = analogRead(photoPin);
    Serial.println(photoValue);

    // Control the LED based on photoresistor value
    if (photoValue < photoThreshold) {
        digitalWrite(ledPin, HIGH);  // Turn on LED if it's dark
    } else {
        digitalWrite(ledPin, LOW);   // Turn off LED otherwise
    }

    // Check each button 
    for (int i = 0; i < 3; i++) {
        if (digitalRead(buttonPins[i]) == LOW) { // Button pressed
            playPitch(i);
            movePenguin(i);  // Move penguin based on button pressed
        }
    }
}

// Function to move the penguin based on the button pressed
void movePenguin(int buttonIndex) {
    switch (buttonIndex) {
        case 0:
            penguinServo.write(0);   // Move penguin in one direction
            break;
        case 1:
            penguinServo.write(90);  // Move penguin to center
            break;
        case 2:
            penguinServo.write(180); // Move penguin in the other direction
            break;
    }
    delay(1000);  // Hold position for 1 second
    penguinServo.write(90);  // Return to center
}


void playPitch(int buttonIndex) {
    switch (buttonIndex) {
        case 0:
            tone(speakerPin, NOTE_C4, 300); // Play note C4
            break;
        case 1:
            tone(speakerPin, NOTE_D4, 300); // Play note D4
            break;
        case 2:
            tone(speakerPin, NOTE_E4, 300); // Play note E4
            break;
    }
    delay(300);
    noTone(speakerPin);
}

Final Product

Week 9 – Production Post

Idea

For this assignment, I came up with a simple idea of creating a personal space invasion detector. The circuit has two mode, turned on and off using digital input (switch), the space detection using analog input (photoresistor). If the hand comes to close the person, the yellow light will dim. I use the yellow LED because it normally symbolizes happiness, which means when it dims, the person becomes less happy because someone invaded his personal space.

Implementation

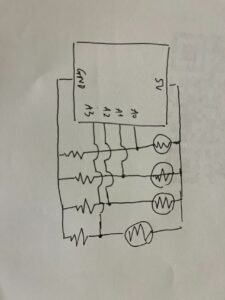
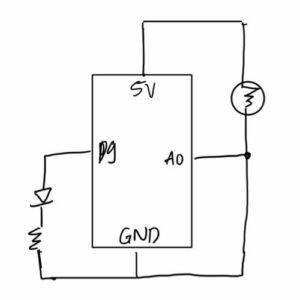
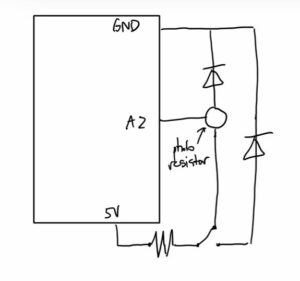
I drew a circuit of the detector, including 2 LEDs, 1 photoresistor, 1 resistor and 1 switch. The switch I use is the rectangular one with three connecting points. If points 1-2 are connected, turn on the red LED, if 2-3 are connected, turn on yellow LED (connected to photoresistor).

Video

Week 8 – Reading response

Small things overlooked

We often overlook small details and focus too much on assumed important features such as usability or practicality. In the reading “Her Code Got Humans on the Moon”, the suggestion to put a warning on a project was disregard because the assumption that the users are trained enough. This resulted in a disastrous problem, deleting all data when the astronauts actually press it. I think this example is similar to small lines of code or comments that we often consider insignificant. These parts may not make a project immensely better, but without them, issues could arise, as seen in the astronaut example.

Another takeaway from the reading is the importance of not making assumptions about users. Good design should account for worst-case scenarios or consider the perspective of someone with no prior knowledge of the product.

Similarly, Norman’s reading said that small details like warnings or the aesthetics of an interaction may not add specific usability to an object. However, it’s important to view design from multiple perspectives, not just functionality. While it’s logical to prioritize functionality, good aesthetics can sometimes offset weaknesses in other areas. In some cases, strong aesthetics prompt users to engage more based on emotional appeal rather than logical reasons. A good example of this is the vintage trend, such as using vinyl records or old flip phones. While these items don’t offer more functionality than recent models, they attract users by evoking nostalgia and a unique aesthetic.

Week 8: Hugging switch

Idea

For this project, my initial idea was to use a simple interaction as a switch to light up the LED light. I think hugs is the most suitable, because hugs usually gives us warmth and energy, which can symbolically ‘light up’ a light.

Implementation

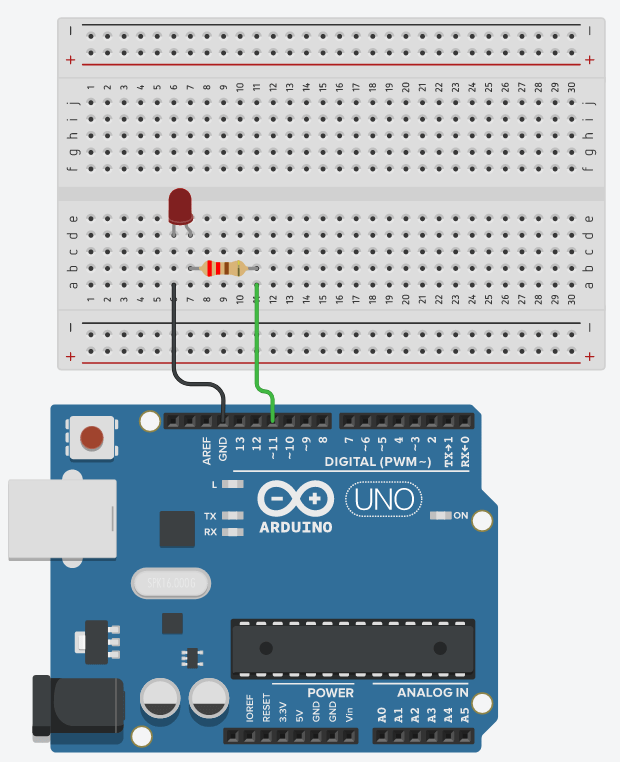
I create a simple circuit like in this one:

Arduino LED - Complete Tutorial - The Robotics Back-End

I connect the 3.3V to the resistor -> LED -> ground. However, from the 3.3V to the bread board, instead of connecting the wire directly to the resistor, I attach it with a piece of tin foil to my plushy. I also attach another tin foil on my T-shirt, this tin foil is attached to a wire, which is connected to the resistor. Hence, when I hug the plushy, the tin foils touch, completing the circuit and turn on the light.

Video


My project implementation was fairly simple, so I did not encounter many problems. Nevertheless, I do have some tips from my first experience working with Arduino. Initially, I tried connecting the wires with regular tape, which didn’t work at all since it isn’t conductive. I then switched to tin foil and wrapped it around the connecting points. Next time, I would use conductive tape or male-to-female wires instead.

Reflection

I enjoyed creating this project. I think the components provided in the Arduino kit make building physical projects much easier. I also try to look at “switch” in a different perspective to come up with a switch which is not only unusual but also has some kinds of meaning.

Midterm Project – Moves

Game Design

After receiving feedback and asking my friends to play through the game draft, I made some changes to the original game design:

  • Player control: Instead of mouse movement  + keyboard movement, I decided to use full keyboard movement.
  • Implementing two different obstacles instead of one: rock and destroyable dancing keys.
  • I initially plan to make the game full screen, however, the player movement will then be too wide and decrease the difficulty of the game when the character moves around to avoid asteroids.

End game and winning mechanism: a progress bar to track how many obstacles the player has destroyed. If player manages to stay alive and fill the whole progress bar, they win. Else if player used of all of their lives, they lose. I also give the player 9 lives as a reference to the saying “cats have 9 lives”.

The player lose lives when: got hit by asteroids, miss a key or press the wrong key.

Story

I am particularly proud of the story and implementation of arts in this game. I have experience with coding before, so I decided that for this project in IM I want to make the game more conceptual and tell a comprehensive story.

I draw a few scenes at the start of the game to create a storyline for the cat hero. The story is about a normal cat who enjoys music but one day a extraterrestrial comet hit the Earth and gave him superpower that can be unlocked with his dance moves. With great power came great responsibility, he has to use his power to protect the Earth from alien invasion.

All of the arts in this game or created by me except for the background photo, the asteroid and the heart in the winning screen.

Main character – cat hero drawn by me with background photo generated by AI

Final game (size 400×400)

Struggles

The main struggle I have was with the game design. I was basing my game on normal dancing game, for example, Just Dance now. However, there are some factors I want to change, mainly the movement left and right of the character, hence, the same game mechanism does not work very well for my game. After the first game demo, I realized what was missing from my game was response to the player interaction. For example, key disappearing or asteroid disappearing when interacting with users. In the final, I make the asteroid disappear after hitting the cat and implement a progress track bar for the scores. However, if I have more time to work on this project in the future, I would implement sound response or visual cue like displaying the key user just pressed or signs when user loses live.

Reflection

Making game has always interested me before and I really enjoyed making this midterm project, especially the story telling part. Some particular part I identified to improve in the future are sound design and visual design. Some feedback I received from my friend also help me think about the game design. For example, a feedback I received was how the asteroids were coming towards the Earth and the cat was avoiding it instead of destroying it, which clash with the storyline. I think it’s a good observation that I did not realize when creating the game.

Week 5 – Midterm Progress

Concept

Whenever I went to the arcade, the dance machine was always the most fascinating and fun for me. This inspired me to create a dancing game, but with a twist. The story takes place on a planet about to be invaded by aliens, where a cat is granted a superpower to defeat them. The catch is that his superpower is activated through dance moves.

Arcade Dance Machine Hire | Arcade & Games Machines | Odin Events

Game design

The game mechanism will be moving your mouse to avoid falling asteroids/aliens and using UP,DOWN,LEFT, RIGHT arrows to destroy them. After destroying a number of enemies, extra moves will be unlocked to destroy multiple aliens at the same time.

Implementation design

Structure of code:

  • class for cat: display, move, unlock moves, variables: x, y, dance (current key pressed).
  • class for enemies: display, move (fall), variables: x, y, arrow, velocity.
  • starting screens: including story screens that tell the story of the cat.

Không có mô tả.

Starting screens and tutorial

Không có mô tả.

Game screens

Progress

Currently, I have implemented the basics of cat class: move, display and arrow class: move, display. I also implemented the randomly generated arrows and mechanism to remove it from the screen when users input a key.

Struggle

For this project, my main concern is how to synchronize the music with the gameplay. Typically, dancing games generate arrows in time with the beat. In the current version, the arrows in my game are randomly generated with random timing and velocity. Therefore, in the next step, I plan to improve this by generating arrows based on the music’s beats.

Another struggle I have is finding the sprite for the game. There was not a lot of resources online for sprites in dancing game. I was trying to generate from gif to sprite, however the file size was too large and cannot be imported to p5js. During the next step, I will try to create my own sprites and design the visuals for the game.

Next steps

  • Implement extra moves
  • Add collision when arrows fall on the cat
  • Apply visuals
  • Create starting scenes
  • Fix initialization of falling arrows


Week 5 – Reading Response

One fundamental difference between human and computer is that computer cannot easily distinguish between objects. They only recognize sources as pixels and algorithms have to be implemented to distinguish a specific object. What impressed me most in the reading is Myron Krueger’s Videoplay. The system he built has a diverse enough reaction bank that users can play with. Based on the movement of the participants, the computer generates visual cues accordingly to that input. Based on the participants’ actions, the computer generates visual cues accordingly. I think the ability to respond flexibly gives the system an impression of intellectual thinking, rather than just following rigid algorithms. I also noticed how Krueger interpreted physical interaction in human-computer interaction. For example, squeezing a virtual character on the screen causes it to pop and disappear (4:12), making the interaction between human and computer feel more realistic and reducing the sense of untouchability of objects on the screen.

Other techniques that I find interesting to be used in interactive design are detecting presence and simple interactions described by Jonah Warren. Because the way computer is used in daily life is mostly rigid and only tailored to specific needs, tweaking computer’s reaction based on the aforementioned input can create an interesting art media. For example, the Cheese Installation by Christian Möller is a unique way of interpreting computer data. Normally, we would not perceive the intensity of a smile in specific percentage. However, the way the machine interprets how we smile and return it into visual cue create a creative material for artwork. As such, a simple footage of smiling can be turned into a scrutiny of someone’s emotions.