Assignment 4: Generative Text

Concept

The demo for generative text we saw in class piqued my interest, and I knew I wanted to try my hand at it. After reviewing the code and how it all worked (it took a little bit of time, but I think I got it!), I decided to write a generative poem of my own.

Highlights from the Process

I started off by writing a short poem, then deciding which words would be interchangeable. After settling on seven such words, I used Google Sheets to type up a CSV file containing five possible options for each word. It was on to the coding from then.

The first order of business was to create constant variables for the seven words, which I convenient named WORD0 ~ WORD6, and assigned them the corresponding values of 0~6. This looked like const WORD0 = 0; const WORD1 = 1; and so on. These values are to be used as index numbers later on.

I then created an array named wordArray[] for the interchangeable words, then loaded the CSV file into the array using this block of code:

//Create Array for Words
let wordArray = [];

//Load CSV File; The file is named thoughts.csv
function preload() {
  wordArray = loadStrings("thoughts.csv");
}

After creating the canvas in the setup() function, I moved on to the draw() function. This is where the real challenge lie. I first created an array named lines[] for the 8 lines of the poem (it will later be called for displaying the actual poem) and then created 8 blank values by using the for() loop:

//This is in the draw() function.
  //Create Array for 8 Lines of Poem
  let lines = [];
  //Load Array with 8 Blank Values
  for (let i = 0; i < 8; i++) {
    lines[i] = "";
  }

And now, the following block of code is perhaps the most important:

//This is in the draw() function.
  //Create Array for Retrieving Words from CSV File Array
  let singleRow = [];
  //Retrieve Random Word from First Column of File Array
  singleRow = split(wordArray[int(random(0, wordArray.length))], ',');
  //Using Constant as Index Value, Load Array with Line 1 of Poem
  lines[0] = "There we sat in the " + singleRow[WORD0] + ",";
  //Repeat Process for Each Word and Line

As explained in the comments, this code block  1) creates an array named singleRow[] that will be used as the designated container for words chosen from the aforementioned wordArray[]; 2) retrieves a random word from the first column of wordArray[]; 3) loads lines[] with the first line of the poem. 2) and 3) are then repeated for each word and line to fill lines[] with the rest of the lines of the poem with randomly chosen words.

After all 8 lines of the poem are loaded in lines[], a for() loop is used to display the poem as text in the canvas:

//This is in the draw() function. 
  //Display Poem
  for (let i = 0; i < 8; i++) {
    let xPos = 40;
    let yPos = 95;
    textSize(16);
    textFont('Georgia');
    text(lines[i], xPos, yPos + 30 * i);
  }
  //Stop Loop Until Mouse is Clicked
  noLoop();
  }

As seen at the bottom, noLoop() is used to stop the draw() function from looping. And finally, using mouseClicked(), a condition for generating a new poem is created.

//New Poem is Generated When Mouse is Clicked
function mouseClicked() {
  loop();
}

The final product:

Click on the canvas to generate a new poem.

Reflections

I initially had a little trouble wrapping my head around the mechanics of generative text, but figuring out how the code worked was an exciting journey in itself. It was gratifying to be able to make my own little piece and prove to myself that I had really understood everything.

It’s undoubtedly a very simple piece, but I’m not sure if embellishing it would really add to it. There’s certainly more I could have done with it, like making the background flashier or adding music—but I do rather like the silent atmosphere in which it basks. Such complexities will be plentiful in the midterm.

There we sat.

Assignment 3: OOP-Based Art

Concept

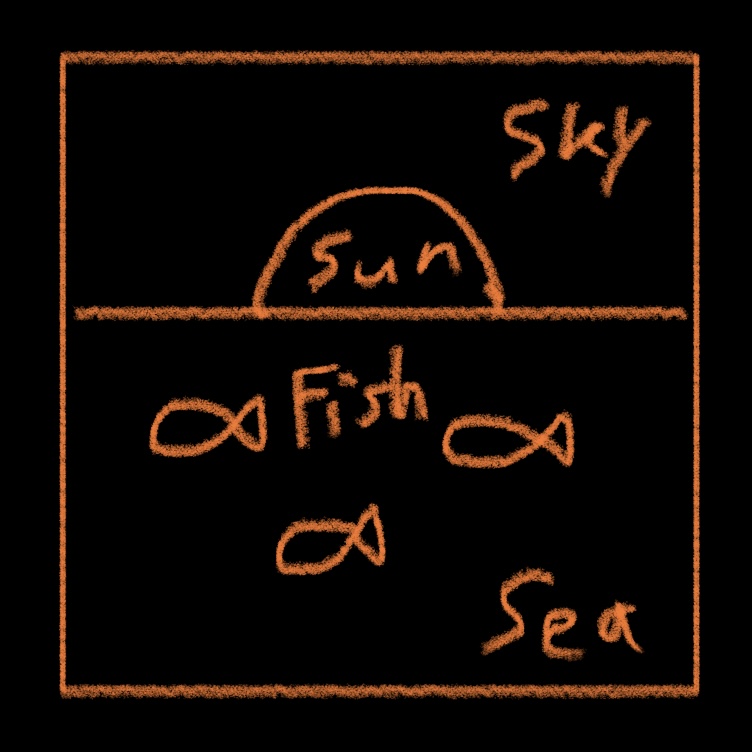
Based on the ability to create multiple objects with ease using OOP and arrays, I envisioned colorful schools of fish swimming in the sea for my third assignment. One that looked something like:

Image courtesy of my Notes app.

Coding Highlights

I first wanted to create a still picture before adding in the movement. Before coding in the fish, I sought to paint in the scenery they would soon inhabit. A highlight here was managing to give the sky and sea a nice gradient, which I achieved with the following code:

//Canvas size is 600 by 600.
//Sunset Sky
for (let i = 0; i < 200; i = i + 2){
  fill(255, 170 - i/1.5, 85);
  rect(0, i, 600, 5);
}
//Sea
for (let i = 0; i < 400; i = i + 4){
  fill(100 - i/4, 130 - i/4, 255);
  rect(0, i + 200, 600, 5);
}
//Sun
fill(255, 190, 40);
arc(300, 200, 200, 200, radians(180), radians(0));

Using two for() loops (one for the sky and the other for the sea), I painted in thin rectangles that slightly darken with each iteration of the loop, giving off the impression of a gradient. Upon the sunset sky, I drew in the setting sun using a simple arc function. Thus the scenery was complete, waiting for the fish to move in. Time to make these schools of fish an actual class.

//Create Class for Fish
class Fish{
  constructor(){
    this.xPos = random(0, 600);
    this.yPos = random(230, 600);
  }
  //Function for Drawing Fish
  draw(){
    fill(240, 145, 40);
    //Body
    ellipse(this.xPos, this.yPos, 60, 30);
    //Tail
    triangle(this.xPos + 10, this.yPos, this.xPos + 40, this.yPos - 15, this.xPos + 40, this.yPos + 15);
    //Eye
    fill(0);
    ellipse(this.xPos - 20, this.yPos - 4, 5);
    //Smile
    arc(this.xPos - 30, this.yPos, 15, 7, radians(0), radians(90));
  }
}

With this class established, I could now make objects that could call upon the draw() function described in the class to draw in fish at random locations. I churned out these objects by creating an array, generating multiple values—and in turn objects—within the array using a for() loop in the setup() function, and then calling upon said objects with another for() loop in the draw() function:

//Only Included Code Pertaining to Fish Creation
//Create Array for Fish
let fish = [];

function setup() {
  createCanvas(600, 600);
  noStroke();
  //Generate Multiple Values in Array for Fish
  for (let i = 0; i < 10; i++){
    fish[i] = new Fish();
  }
}

function draw() {
  //Draw In Fish
  for (let i = 0; i < 10; i++){
    fish[i].draw();
  }
}

With these ingredients, the still-picture draft was done!

A school of 10 nice fish. This assignment was going swimmingly.

Now, to make the fish move. This meant that I would have to add a new function into the Fish() class. I did so by creating and using two new variables, this.xSpeed and this.ySpeed, for which I assigned random values to make the fish swim at different speeds.

//Only Included Movement Part of the Class

//Create Class for Fish
class Fish{
  constructor(){
    this.xPos = random(0, 600);
    this.yPos = random(230, 580);
    //New Variables for Fish Movement
    this.xSpeed = random(-5, -1);
    this.ySpeed = random(-2, 2);
  }
  //New Function for Fish Movement
  move(){
    this.xPos += this.xSpeed;
    //Check to Stop Fish from Leaving Water
    if (this.yPos > 230){
      this.yPos += this.ySpeed;
    }
    else {
      this.ySpeed = random(0, 1);
      this.yPos += this.ySpeed;
    }
    //Check to Stop Fish from Staying Below Frame
    if(this.yPos < 610){
      this.yPos += this.ySpeed;
    }
    else {
      this.ySpeed = random(-1, 0);
      this.yPos += this.ySpeed;
      }
    }
}

As described in the comments, this code continually moves the position of the fish and stops them from moving out of the water by checking for their y positions and adjusting their vertical “speed” as necessary.

To spice things up, I also decided to randomize the RGB values of the fish by making three new variables (for each value) within the constructor(), setting each of them to random(255), and incorporating them within the draw() function of the Fish() class.

All I needed now was one more function in the Fish() class, one that resets the position of the fish, to make them loop around back into the canvas:

//This function is within the Fish() class.

//Function for Resetting + Rerolling Values of Fish Out of Frame
reset(){
  if(this.xPos < -50){
    this.xPos = 650;
    this.yPos = random(230, 580);
    this.xSpeed = random(-5, -1);
    this.ySpeed = random(-2, 2);
    this.rValue = random(255);
    this.gValue = random(255);
    this.bValue = random(255);
  }

This code resets the x positions of the fish to the right of the canvas and ensures that they keep swimming within view. Their horizontal and vertical speeds, along with their RGB values, are also rerolled to keep things fresh. The fish were ready to swim.

There they go. You can click on the canvas to see them move smoothly!

And so they swam.

Reflections

Yet another fun assignment to work on! The thrill of watching your code work the way you intended never gets old. It really does feel like solving a puzzle that I’ve presented for myself, one that yields tangible results when solved.

If I had more time, I would have liked to make the fish stay within the water in a more natural way rather than bouncing off the surface boundary as they are now. The key here would be to devise a block of code that simulates acceleration/deceleration, a challenge to tackle at a later date for sure.

By working on this piece, I feel like I’ve gotten a better sense of OOP and a taste of what classes can do when paired with arrays. I eagerly look forward to the next step in our coding journey!

Assignment 2: Loop-Based Digital Art

Concept

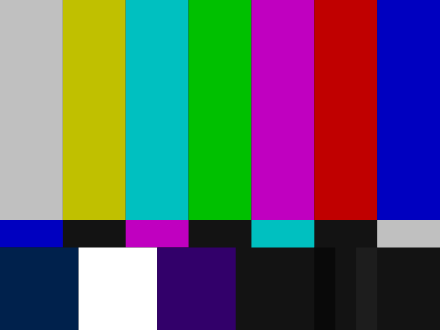
It took a little thought, but an image that soon sprung to mind for me was the pattern of multicolored rectangles that you see when a TV channel is off-air, the one that is accompanied by that awfully grating (and sometimes eerie) high-pitched beep. The one that looks like:

This pattern is called the SMPTE color bars (SMPTE stands for the Society of Motion Picture and Television Engineers). Image courtesy of its Wikipedia article: https://en.wikipedia.org/wiki/SMPTE_color_bars

I thought this would serve as good inspiration for my own artwork of patterns. After getting just a little invested in trivia (Did you know that that continuous beep is usually a 1000 Hz sine wave?), I set off to work.

Coding Highlights

I first sought to recreate the pattern. After a little tinkering, I was able to write up a function that would draw the pattern across the canvas when repeated.

//Set Variables
let x = 0;
let x2 = 0;
let i = 0;

//Function for Generating One Color Bar of Each Row
function colorBars(){
  noStroke();
  fill(random(255), random(255), random(255));
  rect(x, 0, 63, 220);
  fill(random(255), random(255), random(255));
  rect(x, 220, 63, 30);
  x = x + 63;
  fill(random(255));
  rect(x2, 250, 73.5, 80);
  x2 = x2 + 73.5;
}

This function is then embedded within a simple while() loop, which runs just enough times to make the pattern fill the canvas.

//Repeat for Pattern
function draw() {
  while (i < 7) {
    colorBars();
    i += 1;
  }

The x = x + 63; and x2 = x2 + 73.5; lines of code in the colorBars() function move the position of the future rectangles’ starting points to the end of the now-drawn rectangle, thus allowing for the pattern to be continued seamlessly when the function is repeated. I also chose to make the colors random (the bottom row is in grayscale for contrast and to match the feel of the reference image), which makes each iteration of my program unique. Here is the complete draft:

Draft in hand, I now wanted to add a layer of animation and make the bars change color (or more precisely, generate new bars over the preexisting ones). I also wanted to keep the animation from looking too stale by varying the cycle speeds of each row of bars—this meant that I had to break up the colorBars() function into three separate functions (one for each row) and establish separate variables for each function.

//Establish Variables

  let x1 = 0;
  let x2 = 0;
  let x3 = 0;
  let i1 = 0;
  let i2 = 0;
  let i3 = 0;

//Establish Functions for Each Row of Bars

function barTop(){
  noStroke();
  fill(random(255), random(255), random(255));
  rect(x1, 0, 63, 220);
  x1 = x1 + 63;
}

function barMid(){
  fill(random(255), random(255), random(255));
  rect(x2, 220, 63, 30);
  x2 = x2 + 63;
}


function barBot(){
  fill(random(255));
  rect(x3, 250, 73.5, 80);
  x3 = x3 + 73.5;
}

With the functions established, I could move on to the draw() function. First in line was the initial setup, which follows the same logic used for the while() loop in the draft (now with three functions looping within it).

//Initial Setup - This is in the draw() function.
while (i1 < 7) {
  barTop();
  barMid();
  barBot();
  i1 += 1;
  i2 += 1;
  i3 += 1;
}

The stage was set, and this was where the function separation came in handy. I was able to write three blocks of code that would determine the cycle speeds of each row, as well as reset their positions as needed:

//This is in the draw() function following the setup.
  //Top Bar Generation
  if (i1 % 5 == 0){
  barTop();
  }
  if (i1 % 35 == 0){
    x1= 0;
  }
  i1 += 1;
  
  //Middle Bar Generation
  if (i2 % 7 == 0){
    barMid();
  }
  if (i2 % 49 == 0){
    x2 = 0;
  }
  i2 += 1;
  
  //Bottom Bar Generation
  if (i3 % 6 == 0){    
    barBot();
  }
  if (i3 % 36 == 0){
    x3 = 0;
  }
  i3 += 1;

The i1, i2, and i3 here act as counters for the number of draw() loops the program has gone through—by pairing them with the % remainder operator, I was able to vary the speeds at which the new bars are drawn over the preexisting ones. The first if() function in each block controls the rate at which a new bar is generated, while the second if() function resets the position of generation back to the beginning when the new pattern has gone across the width of the canvas. And finally, the result:

Reflections

Overall, this assignment was a fun one to work on! I was especially satisfied with how I was able to separate the initial bar-drawing function into three and make them run at differing intervals using the loop counters and the remainder operator. Each feature I want to implement in a project is a puzzle of its own, and it feels rewarding when I successfully devise a solution (sometimes after much frustration).

One feature I would have liked to adjust is to have the bars scroll across the screen rather than (seemingly) just change color. This was the initial idea I had, but I soon realized that making all the bars move, especially with each row at different speeds, was a much more complicated task than I had imagined. A task for a different time, perhaps.

Exploring the capabilities of p5.js—and that of my own with the editor—has been an exciting journey thus far, and I look forward to what more may lie in store!

Assignment 1: Self Portrait

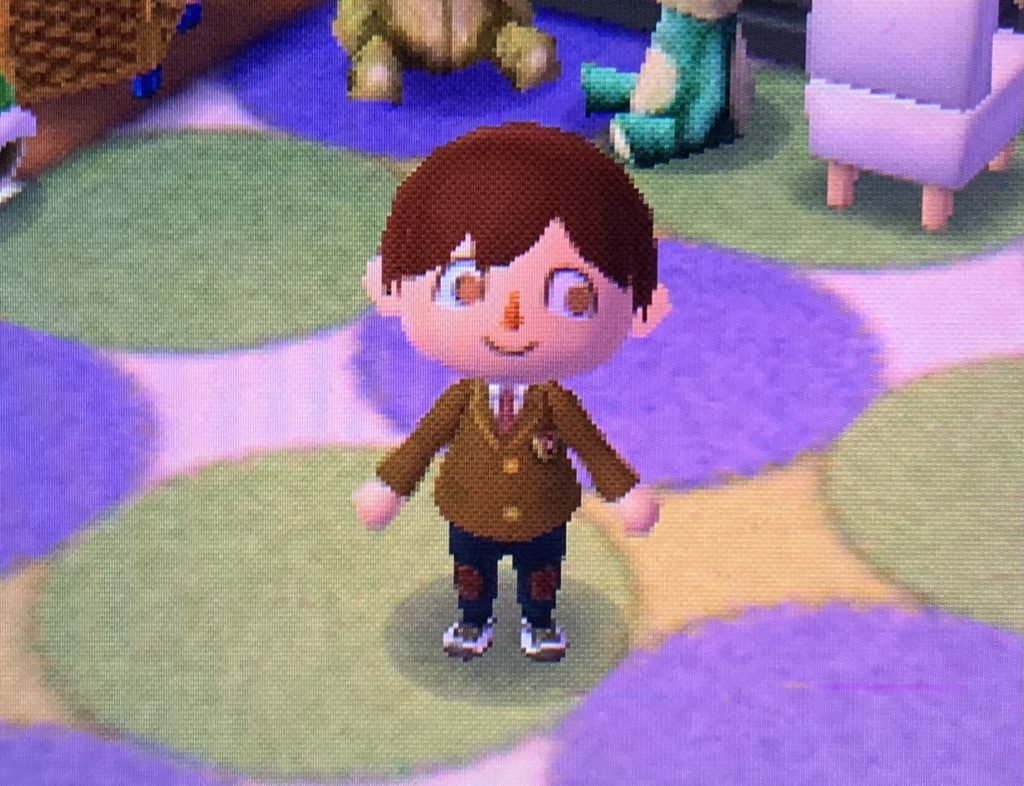
Following our first class, I fiddled around with the code and got a feel for what I might be capable of drawing. With the ability to generate simple shapes, my mind immediately went to my Animal Crossing avatar. Booting up my game, I took a picture of my avatar to serve as my reference image:

Picture taken from personal copy of Animal Crossing: New Leaf.

While I initially struggled a bit with the arc() function—an essential tool for drawing hair and eyelids—I was soon able to get the hang of it. With the power of the arc at my fingertips, I was able to draw myself a rough draft of what my portrait might look like.

Rough sketch in hand, I now wanted to add a layer of interactivity to the portrait. Following our second class, I sought out to implement the if() function that we learned in class together with the (mouseIsPressed) variable to realize this next step.

//Top Half
if (mouseIsPressed && mouseY < 200){//effect1}
//Bottom Half
if (mouseIsPressed && mouseY > 200){//effect2}

Using these if statements, clicking on the top half and bottom half would yield different effects—a top half click would make my avatar happy, while a bottom half click would make him sad. As the effect would only change the eyes and the mouth of the avatar, I decided to move the rest of the drawing into its own function of face():

//Function for Drawing Base of Face
function face() {
  //Halfline
  line(0, 200, 400, 200);
  strokeWeight(3);
  //Ears
  fill(240, 184, 160);
  strokeWeight(1.7);
  ellipse(110, 210, 40, 50);
  ellipse(290, 210, 40, 50);
  //Face
  ellipse(200, 200, 180, 200);
  //Hair
  fill(60, 19, 33);
  arc(200, 165, 185, 160, 3.14, 0);
  arc(107.5, 165, 110, 61.6, 0, 1.57);
  arc(162.5, 165, 100, 61.6, 0, 1.57);
  arc(292.5, 165, 160, 61.6, 1.57, 3.20);
  line(107.6, 166, 107.6, 196);
  line(292.4, 166, 292.4, 196);
  //Nose
  fill(215, 107, 0);
  triangle(190, 240, 200, 220, 210, 240);
}

I also edited the if statements to become a set of if, else if, and else statements to respectively accommodate the three statuses of 1) top half is clicked 2) bottom half is clicked 3) nothing is clicked (the neutral state).

//Top Half
if (mouseIsPressed && mouseY < 200){//effect1}
//Bottom Half
else if (mouseIsPressed && mouseY > 200){//effect2}
//Neutral
else {//effect 3}

With everything in place, all I needed to do was code in the different shapes of the eyes and mouth for the two expressions. I also added in changing background colors, indicative lines, and some text bespeaking my avatar’s mood.

The final touch I decided to employ was scrolling text encouraging the user to click the portrait; I got this to work by setting up the variables first:

//Variable Setup for Scrolling Text
let scrollSpd = 3;
let textX = -260;

Then I used said variables in the following block of code, which continually executes in the draw() function and moves the text along, with the if() statement resetting its position when it moves out of the screen.

//Scrolling Text
strokeWeight(0);
textSize(20);
textStyle(BOLD);
fill(0);
textX = textX + scrollSpd;
if (textX > 400){
textX = -250;
}
print (textX);
text('Try Clicking & Holding!', textX, 335);

All the parts were now in place! The final version of my self portrait:

Try clicking and holding the upper and lower halves of the portrait!

There it is! This was my first time using Javascript, and I’m very satisfied what I was able to achieve. One feature I wanted to include but could not was  falling stars, but I soon realized that drawing one—let alone animating one—would be quite the task (perhaps one that I may tackle later on). As I feel that I’ve now gotten a preliminary grip of p5.js, I look forward to what more I may be able to make in the future!