Long ago the three great nations, Rock, Paper and Scissors lived harmoniously with one another. But their prosperity came to a sudden end when a false messiah had risen and taken power. For nearly a century now, large scale conflict has consumed all beings, only leaving behind sliced paper, shattered rocks and bent scissors. You are our last hope. The Avatar, the chosen one. Having been bestowed all three elements, you are now tasked with defeating the this messiah the most challenging of duels, ‘rock, paper, scissors’.
I had a lot of fun making this assignment. I always been passionate about computer vision, and am glad with this being my first project using it.
You can primarily move around the game just using hand gestures. A thumbs-up signals the code to move forward, while the rock, paper, scissors gestures are used in the 3 round game.
Image Classification Model
I used teachable machine to create and train a model that classifies my different hand gestures. This model was made only using my hand for the samples, and so may be less accurate in classifying other hands in different environments. But this can be easily remedied by creating a new model with varying hands and environments and pasting its link into the p5jscode under the preload function.
Arduino Component
The arduino lights up a green LED when the user wins a round and lights up a red RED when the user loses a round. It also uses a servo to open a box, revealing candy for the user if he/she wins, as a rewards for saving the kingdoms.
Challenges
It was difficult figuring out the timings of the countdown in the code. I spent a lot of time trying to slow down the code, and make it follow strict timely guidelines to simulate a normal game of rock, paper, scissors. Also, I had trouble connecting the arduino to my p5js code, but I managed to do it in the end.
#include <Servo.h>

Servo servo;
int servoPos = 100;

void setup() {
  Serial.begin(9600);
  servo.attach(4);
  pinMode(2, OUTPUT);
  pinMode(5, OUTPUT);
  // start the handshake
  while (Serial.available() <= 0) {
    Serial.println("0,0"); // send a starting message
    delay(300);            // wait 1/3 second
  }
}

void loop() {
  // wait for data from p5 before doing something
  while (Serial.available()) {
    int left = Serial.parseInt();
    int right = Serial.parseInt();
    int victory = Serial.parseInt();
    if (Serial.read() == '\n') {
      digitalWrite(2, left);
      digitalWrite(5, right);
      if (victory == 1){
        servoPos = 20;
        servo.write(servoPos);
         }
      servoPos = 100;
      servo.write(servoPos);


    }
  }
}
So far, my code is able to recognize the user’s different poses, for the rock, paper, scissors game. By uploading the training data (images of different poses) to Teachable Machine, the model is now able to reliably distinguish between the 3 actions in the game. I tested this out myself, shown in the video below. I was glad to see that the image recognition model also worked well when users other than myself tested it out, even though the training data only included me.
I want to build off of this code that was on ml5js. I need to train the program to recognize the different hand gestures (rock, paper, scissors).
I started with the Arduino part of the ‘rock, paper, scissors’ game, by trying to build a reward system. When the project is complete, the green LED should light up whenever the user wins a round, and the red LED should light up whenever the user loses a round. And if the user wins the game (eg. wins 5 rounds before the computer) he/she receives candy that is hidden under the box (video link below).
#include <Servo.h>

Servo servo;
int servoPos = 100;
int gameOver = 1 ;

int gledPin = 2;
int rledPin = 4;
int winloss = 1;

void setup() {
  servo.attach(9);
  pinMode(gledPin, OUTPUT);
  pinMode(rledPin, OUTPUT);
  Serial.begin(9600);
}

void loop() {
  if (gameOver == 1){
    servoPos = 20;
    servo.write(servoPos);
    }
   servoPos = 100;
   servo.write(servoPos);

  if (winloss == 0){
    digitalWrite(rledPin, HIGH);
    }
   else{
    digitalWrite(gledPin, HIGH);}

  delay(2000);

}
I controlled the horizontal movement of the circle using the potentiometer
p5JS
let serial; // variable to hold an instance of the serialport library
let portName = "COM3"; // fill in your serial port name here
let xPos=0;
let yPos=0;
let onOff=0;

function setup() {
  createCanvas(640, 480);
  serial = new p5.SerialPort(); // make a new instance of the serialport library
  serial.on("list", printList); // set a callback function for the serialport list event
  serial.on("connected", serverConnected); // callback for connecting to the server
  serial.on("open", portOpen); // callback for the port opening
  serial.on("data", serialEvent); // callback for when new data arrives
  serial.on("error", serialError); // callback for errors
  serial.on("close", portClose); // callback for the port closing

  serial.list(); // list the serial ports
  serial.open(portName); // open a serial port
}

function draw() {
  background(255);
  ellipse(xPos, yPos, 50, 50); // draw the circle
}

// get the list of ports:
function printList(portList) {
  // portList is an array of serial port names
  for (let i = 0; i < portList.length; i++) {
    // Display the list the console:
    print(i + " " + portList[i]);
  }
}

function serverConnected() {
  print("connected to server.");
}

function portOpen() {
  print("the serial port opened.");
}

function serialEvent() {
  // read a string from the serial port
  // until you get carriage return and newline:
  let inString = serial.readLine();

  //check to see that there's actually a string there:
  if (inString.length > 0) {
    let sensors = split(inString, ","); // split the string on the commas
    if (sensors.length == 2) {
      // if there are three elements
      xPos = map(sensors[0], 0, 1023, 0, width); // element 0 is the locH
      yPos = width/2;
    }
  }

  serial.write(onOff);
}

function serialError(err) {
  print("Something went wrong with the serial port. " + err);
}

function portClose() {
  print("The serial port closed.");
}
Arduino
void setup() {
  Serial.begin(9600);
  pinMode(2, OUTPUT);
  pinMode(5, OUTPUT);
  while (Serial.available() <= 0) {
    Serial.println("0,0"); // send a starting message
    delay(300);              // wait 1/3 second
  }
}

void loop() {
  while (Serial.available() > 0) {
    // read the incoming byte:
   int inByte = Serial.read();
    switch (inByte) {
      case 0:
        digitalWrite(2, LOW);
        digitalWrite(5, LOW);
        break;
      case 1:
        digitalWrite(2, HIGH);
        break;
      case 2:
        digitalWrite(5, HIGH);
        break;
    }

    int sensorValue = analogRead(A0);
    Serial.print(sensorValue);
    Serial.print(",");
    sensorValue = analogRead(A1);
    Serial.print(sensorValue);
    Serial.println();
  }
}
Exercise 2
I controlled the brightness of the LED using the mouseX value on p5JS
p5JS
let serial; // variable to hold an instance of the serialport library
let portName = "COM3"; // fill in your serial port name here
let xPos=0;
let yPos=0;
let onOff=0;

function setup() {
  createCanvas(640, 480);
  serial = new p5.SerialPort(); // make a new instance of the serialport library
  serial.on("list", printList); // set a callback function for the serialport list event
  serial.on("connected", serverConnected); // callback for connecting to the server
  serial.on("open", portOpen); // callback for the port opening
  serial.on("data", serialEvent); // callback for when new data arrives
  serial.on("error", serialError); // callback for errors
  serial.on("close", portClose); // callback for the port closing

  serial.list(); // list the serial ports
  serial.open(portName); // open a serial port
}

function draw() {
  background(255);
  ellipse(xPos, yPos, 50, 50); // draw the circle
  if (mouseIsPressed){
    if(mouseX<=width/2)
      onOff=1;
    else
      onOff=2;
  }else{
    onOff=0;
  }
}

// get the list of ports:
function printList(portList) {
  // portList is an array of serial port names
  for (let i = 0; i < portList.length; i++) {
    // Display the list the console:
    print(i + " " + portList[i]);
  }
}

function serverConnected() {
  print("connected to server.");
}

function portOpen() {
  print("the serial port opened.");
}

function serialEvent() {
  // read a string from the serial port
  // until you get carriage return and newline:
  let inString = serial.readLine();

  //check to see that there's actually a string there:
  if (inString.length > 0) {
    let sensors = split(inString, ","); // split the string on the commas
    if (sensors.length == 2) {
      // if there are three elements
      xPos = map(sensors[0], 0, 1023, 0, width); // element 0 is the locH
      yPos = map(sensors[1], 550, 250, 0, height); // element 1 is the locV
      // yPos = height/2;
    }
  }
  lightValue = map(mouseX, 0, width, 0, 255);


  // serial.write(onOff);
  serial.write(lightValue);
}

function serialError(err) {
  print("Something went wrong with the serial port. " + err);
}

function portClose() {
  print("The serial port closed.");
}
Arduino
int lightValue = 0;

void setup() {
  Serial.begin(9600);
  pinMode(2, OUTPUT);
  pinMode(5, OUTPUT);
  while (Serial.available() <= 0) {
    Serial.println("0,0"); // send a starting message
    delay(300);              // wait 1/3 second
  }
}

void loop() {
//  while (Serial.available() > 0) {
//    // read the incoming byte:
//   int inByte = Serial.read();
//    switch (inByte) {
//      case 0:
//        digitalWrite(2, LOW);
//        digitalWrite(5, LOW);
//        break;
//      case 1:
//        digitalWrite(2, HIGH);
//        break;
//      case 2:
//        digitalWrite(5, HIGH);
//        break;
//    }
  while (Serial.available() > 0) {
    // read the incoming byte:
   int lightValue = Serial.read();
   analogWrite(5, lightValue);
    }


    int sensorValue = analogRead(A0);
    Serial.print(sensorValue);
    Serial.print(",");
    sensorValue = analogRead(A1);
    Serial.print(sensorValue);
    Serial.println();
}
Exercise 3
The LED turns on when the circle bounces and the wind is controlled by the potentiometer.
p5JS
let velocity;
let gravity;
let position;
let acceleration;
let wind;
let drag = 0.99;
let mass = 50;
let hDampening;

let serial; // variable to hold an instance of the serialport library
let portName = "COM3"; // fill in your serial port name here
let xPos=0;
let yPos=0;
let onOff=0;

function setup() {
  createCanvas(640, 360);
  serial = new p5.SerialPort(); // make a new instance of the serialport library
  serial.on("list", printList); // set a callback function for the serialport list event
  serial.on("connected", serverConnected); // callback for connecting to the server
  serial.on("open", portOpen); // callback for the port opening
  serial.on("data", serialEvent); // callback for when new data arrives
  serial.on("error", serialError); // callback for errors
  serial.on("close", portClose); // callback for the port closing

  serial.list(); // list the serial ports
  serial.open(portName); // open a serial port

  //initial setup
  noFill();
  position = createVector(width/2, 0);
  velocity = createVector(0,0);
  acceleration = createVector(0,0);
  gravity = createVector(0, 0.5*mass);
  wind = createVector(0,0);
  hDampening = map(mass,0,100,-1,1);
}

function draw() {
  background(255);

  wind.x = map(xPos, 0, width, -1, 1);


  applyForce(wind);
  applyForce(gravity);
  velocity.add(acceleration);
  velocity.mult(drag);
  position.add(velocity);
  acceleration.mult(0);
  fill(255);
  ellipse(position.x,position.y,mass,mass);


  if (position.y > height-mass/2 - 100) {
    if (velocity.y > 1) {
      serial.write(255);
    }

    if (position.y > height-mass/2 ) {
      velocity.y *= -0.9;
      position.y = height-mass/2;
    }
  }
}

function applyForce(force){
  // Newton's 2nd law: F = M * A
  // or A = F / M
  let f = p5.Vector.div(force, mass);
  acceleration.add(f);
}


// get the list of ports:
function printList(portList) {
  // portList is an array of serial port names
  for (let i = 0; i < portList.length; i++) {
    // Display the list the console:
    print(i + " " + portList[i]);
  }
}

function serverConnected() {
  print("connected to server.");
}

function portOpen() {
  print("the serial port opened.");
}

function serialEvent() {
  // read a string from the serial port
  // until you get carriage return and newline:
  let inString = serial.readLine();
  //xPos = map(inString, 0, 1023, 0, width);

  //check to see that there's actually a string there:
  if (inString.length > 0) {
    xPos = map(inString, 0, 1023, 0, width);
  }

  serial.write(onOff);
}

function serialError(err) {
  print("Something went wrong with the serial port. " + err);
}

function portClose() {
  print("The serial port closed.");
}
Arduino
void setup() {
  Serial.begin(9600);
  pinMode(5, OUTPUT);
  while (Serial.available() <= 0) {
    Serial.println("0,0"); // send a starting message
    delay(300);              // wait 1/3 second
  }
}

void loop() {
  while (Serial.available() > 0) {

   int inByte = Serial.read(); // takes data from p5JS about ball position

   int windValue = analogRead(A0);//Wind value from potentiometer

   analogWrite(5, inByte);//swtiches on LED when ball bounces


    Serial.print(windValue);
    Serial.println();
  }
}
My PSP consumed a large chunk of my childhood, specifically, a game called Tekken: Dark Resurrection. I want to recreate this game, except this time instead of entering commands through buttons and joysticks, like in the original, I want to use proximity and pressure sensors linked to Arduino and computer vision on p5.js. My game will be played with physical movements by the user, which is captured using sensors and camera. Specific movements will correspond to logical fighting moves (eg. punches, kicks, blocks).
Possible Challenges:
Computer being able to capture user movements
Computer being able to distinguish between user movements
In-game mechanics such as damage system and avatar animations
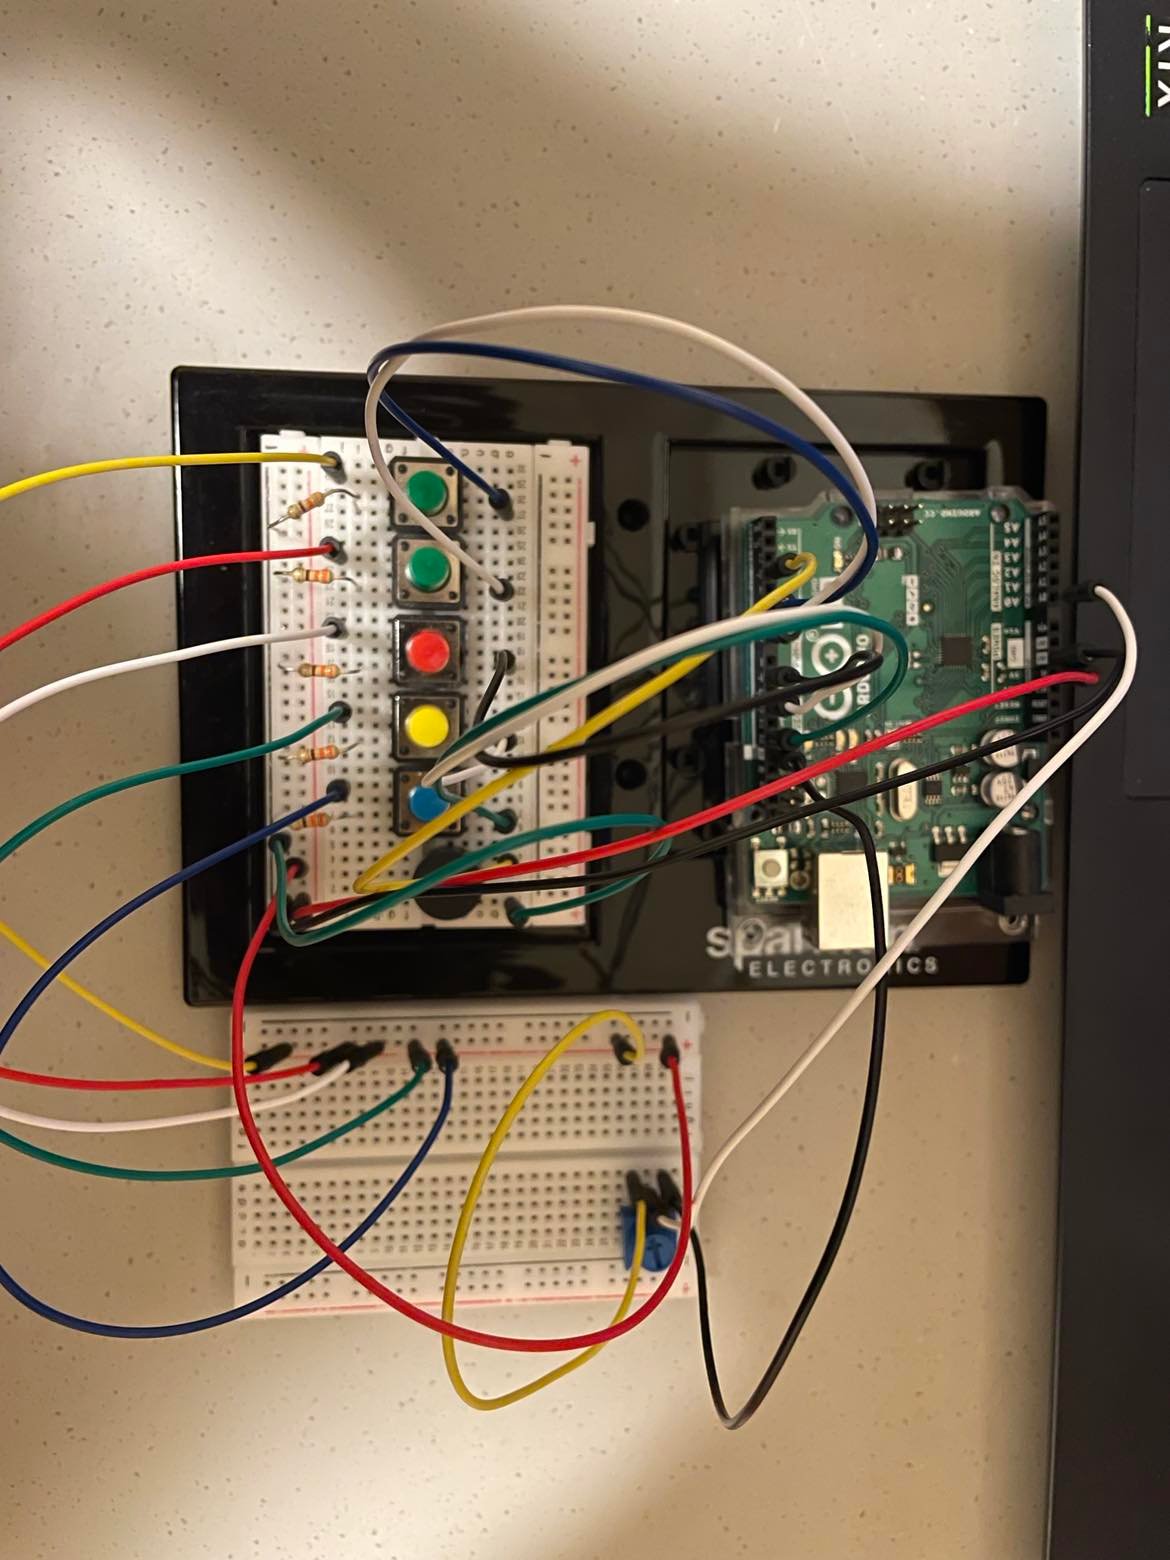
We aimed to build a pianoesque instrument, comprising of multiple push switches (as the digital inputs) to play different musical notes (C4, D4, E4, F4, G4). But given our breadboard’s size, we couldn’t attach too many switches for the wide array of notes, so we used a potentiometer (as the analog input) to further expand our range of pitches to play.
#include "pitches.h"

const int buzzerPin = 3;
const int button_C4 = 5;
const int button_D4 = 7;
const int button_E4 = 9;
const int button_F4 = 11;
const int button_G4 = 13;


void setup() {
  // put your setup code here, to run once:

  pinMode(buzzerPin, OUTPUT);
  pinMode(button_C4, INPUT);
  pinMode(button_D4, INPUT);
  pinMode(button_E4, INPUT);
  pinMode(button_F4, INPUT);
  pinMode(button_G4, INPUT);

}

void loop() {
  // put your main code here, to run repeatedly:

  int potValue = analogRead(A0);
  int mappedPotValue = map(potValue, 0, 1023, -200, 200);

  int buttonstate_C4 = digitalRead(button_C4);
  int buttonstate_D4 = digitalRead(button_D4);
  int buttonstate_E4 = digitalRead(button_E4);
  int buttonstate_F4 = digitalRead(button_F4);
  int buttonstate_G4 = digitalRead(button_G4);

  if(buttonstate_C4 == 1)
    {
      tone(buzzerPin, NOTE_C4+mappedPotValue, 50);
    }
    if(buttonstate_D4 == 1)
    {
      tone(buzzerPin, NOTE_D4+mappedPotValue, 50);
    }
    if(buttonstate_E4 == 1)
    {
      tone(buzzerPin, NOTE_E4+mappedPotValue, 50);
    }
    if(buttonstate_F4 == 1)
    {
      tone(buzzerPin, NOTE_F4+mappedPotValue, 50);
    }
    if(buttonstate_G4 == 1)
    {
      tone(buzzerPin, NOTE_G4+mappedPotValue, 50);
    }

}
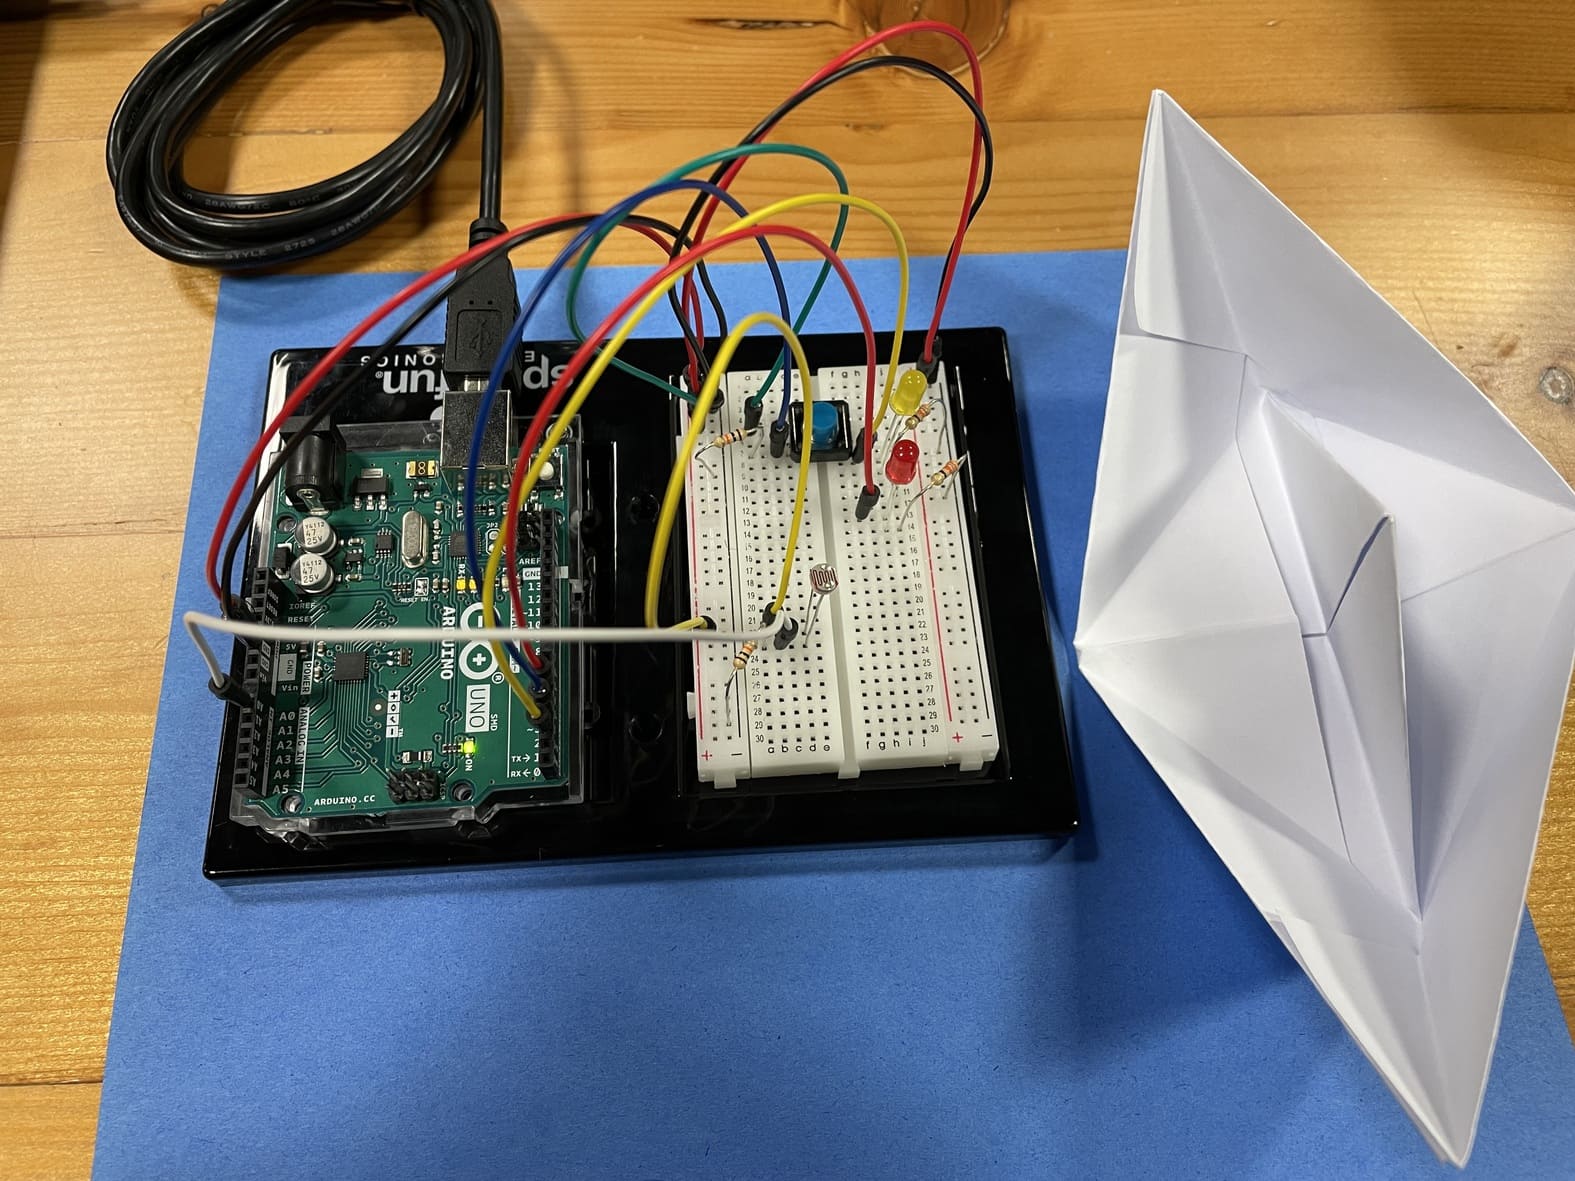
With this assignment I set out to buid a simplified lighthouse using two seperate LEDs.
The yellow LED is controlled by a switch (digital input). So this LED is either turned on or off, similar to how a lighthouse works at set times during the night.
The red LED is dependant on the intensity of light in the environment. It’s brightness is mapped to the resistance of the LDR that varies with light. Therefore, in absence of light, the LDR’s resistance increases, and the LED glows brighter. In real life, this would mean as the sun sets, the lighthouse would emit more light, hence being more visible to far off ships.
These two LED’s represent two plausable ways lighthouses function. The LDR value is read by the analogue input and the switch value is read by the digital inputs.
const int yLedPin = 2;
const int rLedPin = 7;
const int buttonPin = 3;
bool onOff = LOW;
byte prevButtonState = LOW;

void setup() {
  // put your setup code here, to run once:
  pinMode(yLedPin, OUTPUT);
  pinMode(rLedPin, OUTPUT);
  pinMode(buttonPin, INPUT);
  Serial.begin(9600);

}

void loop() {
  // put your main code here, to run repeatedly:
  byte buttonState  = digitalRead(buttonPin);
  int lightValue = analogRead(A0);
//  Serial.println(lightValue);
  int mappedLightValue = map(lightValue, 500, 900, 255, 0);

  int constrainedLightValue = constrain(mappedLightValue, 0, 255);
  analogWrite(5, constrainedLightValue);

  if (buttonState == HIGH && prevButtonState == LOW) {
    // change blinking to not blinking
    onOff = !onOff;
    digitalWrite(yLedPin, onOff);
  }
  prevButtonState = buttonState;

}
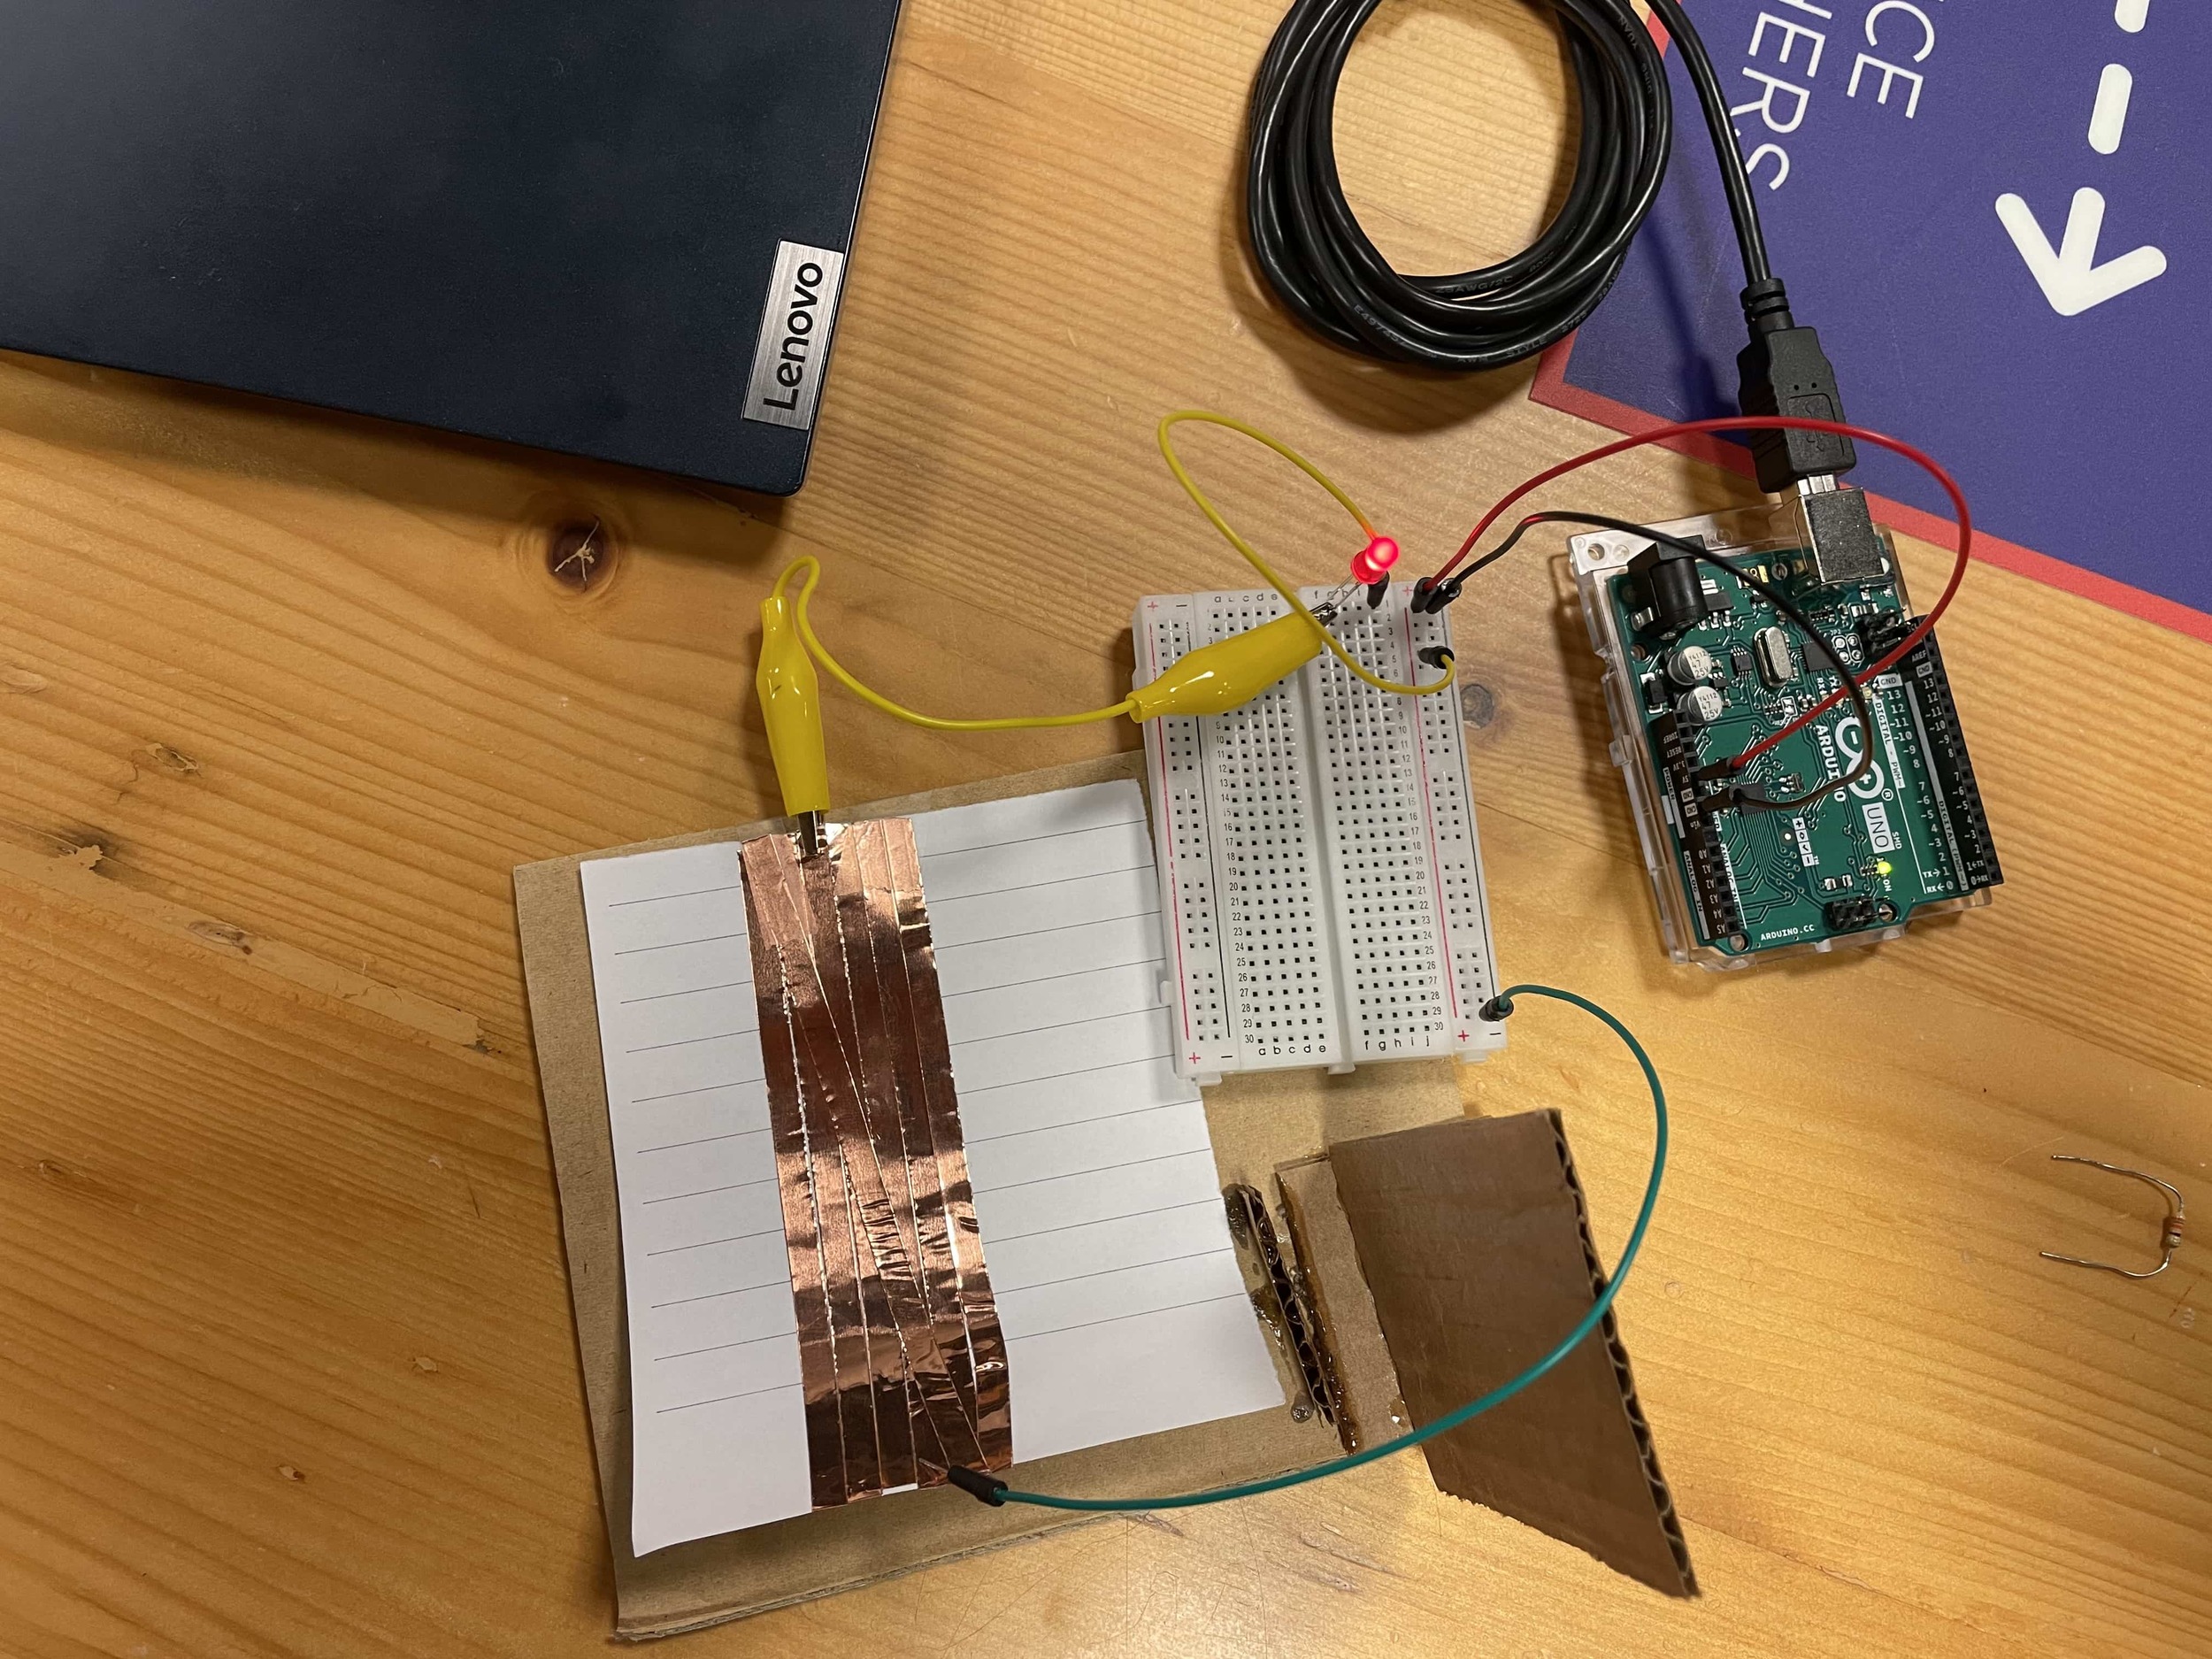
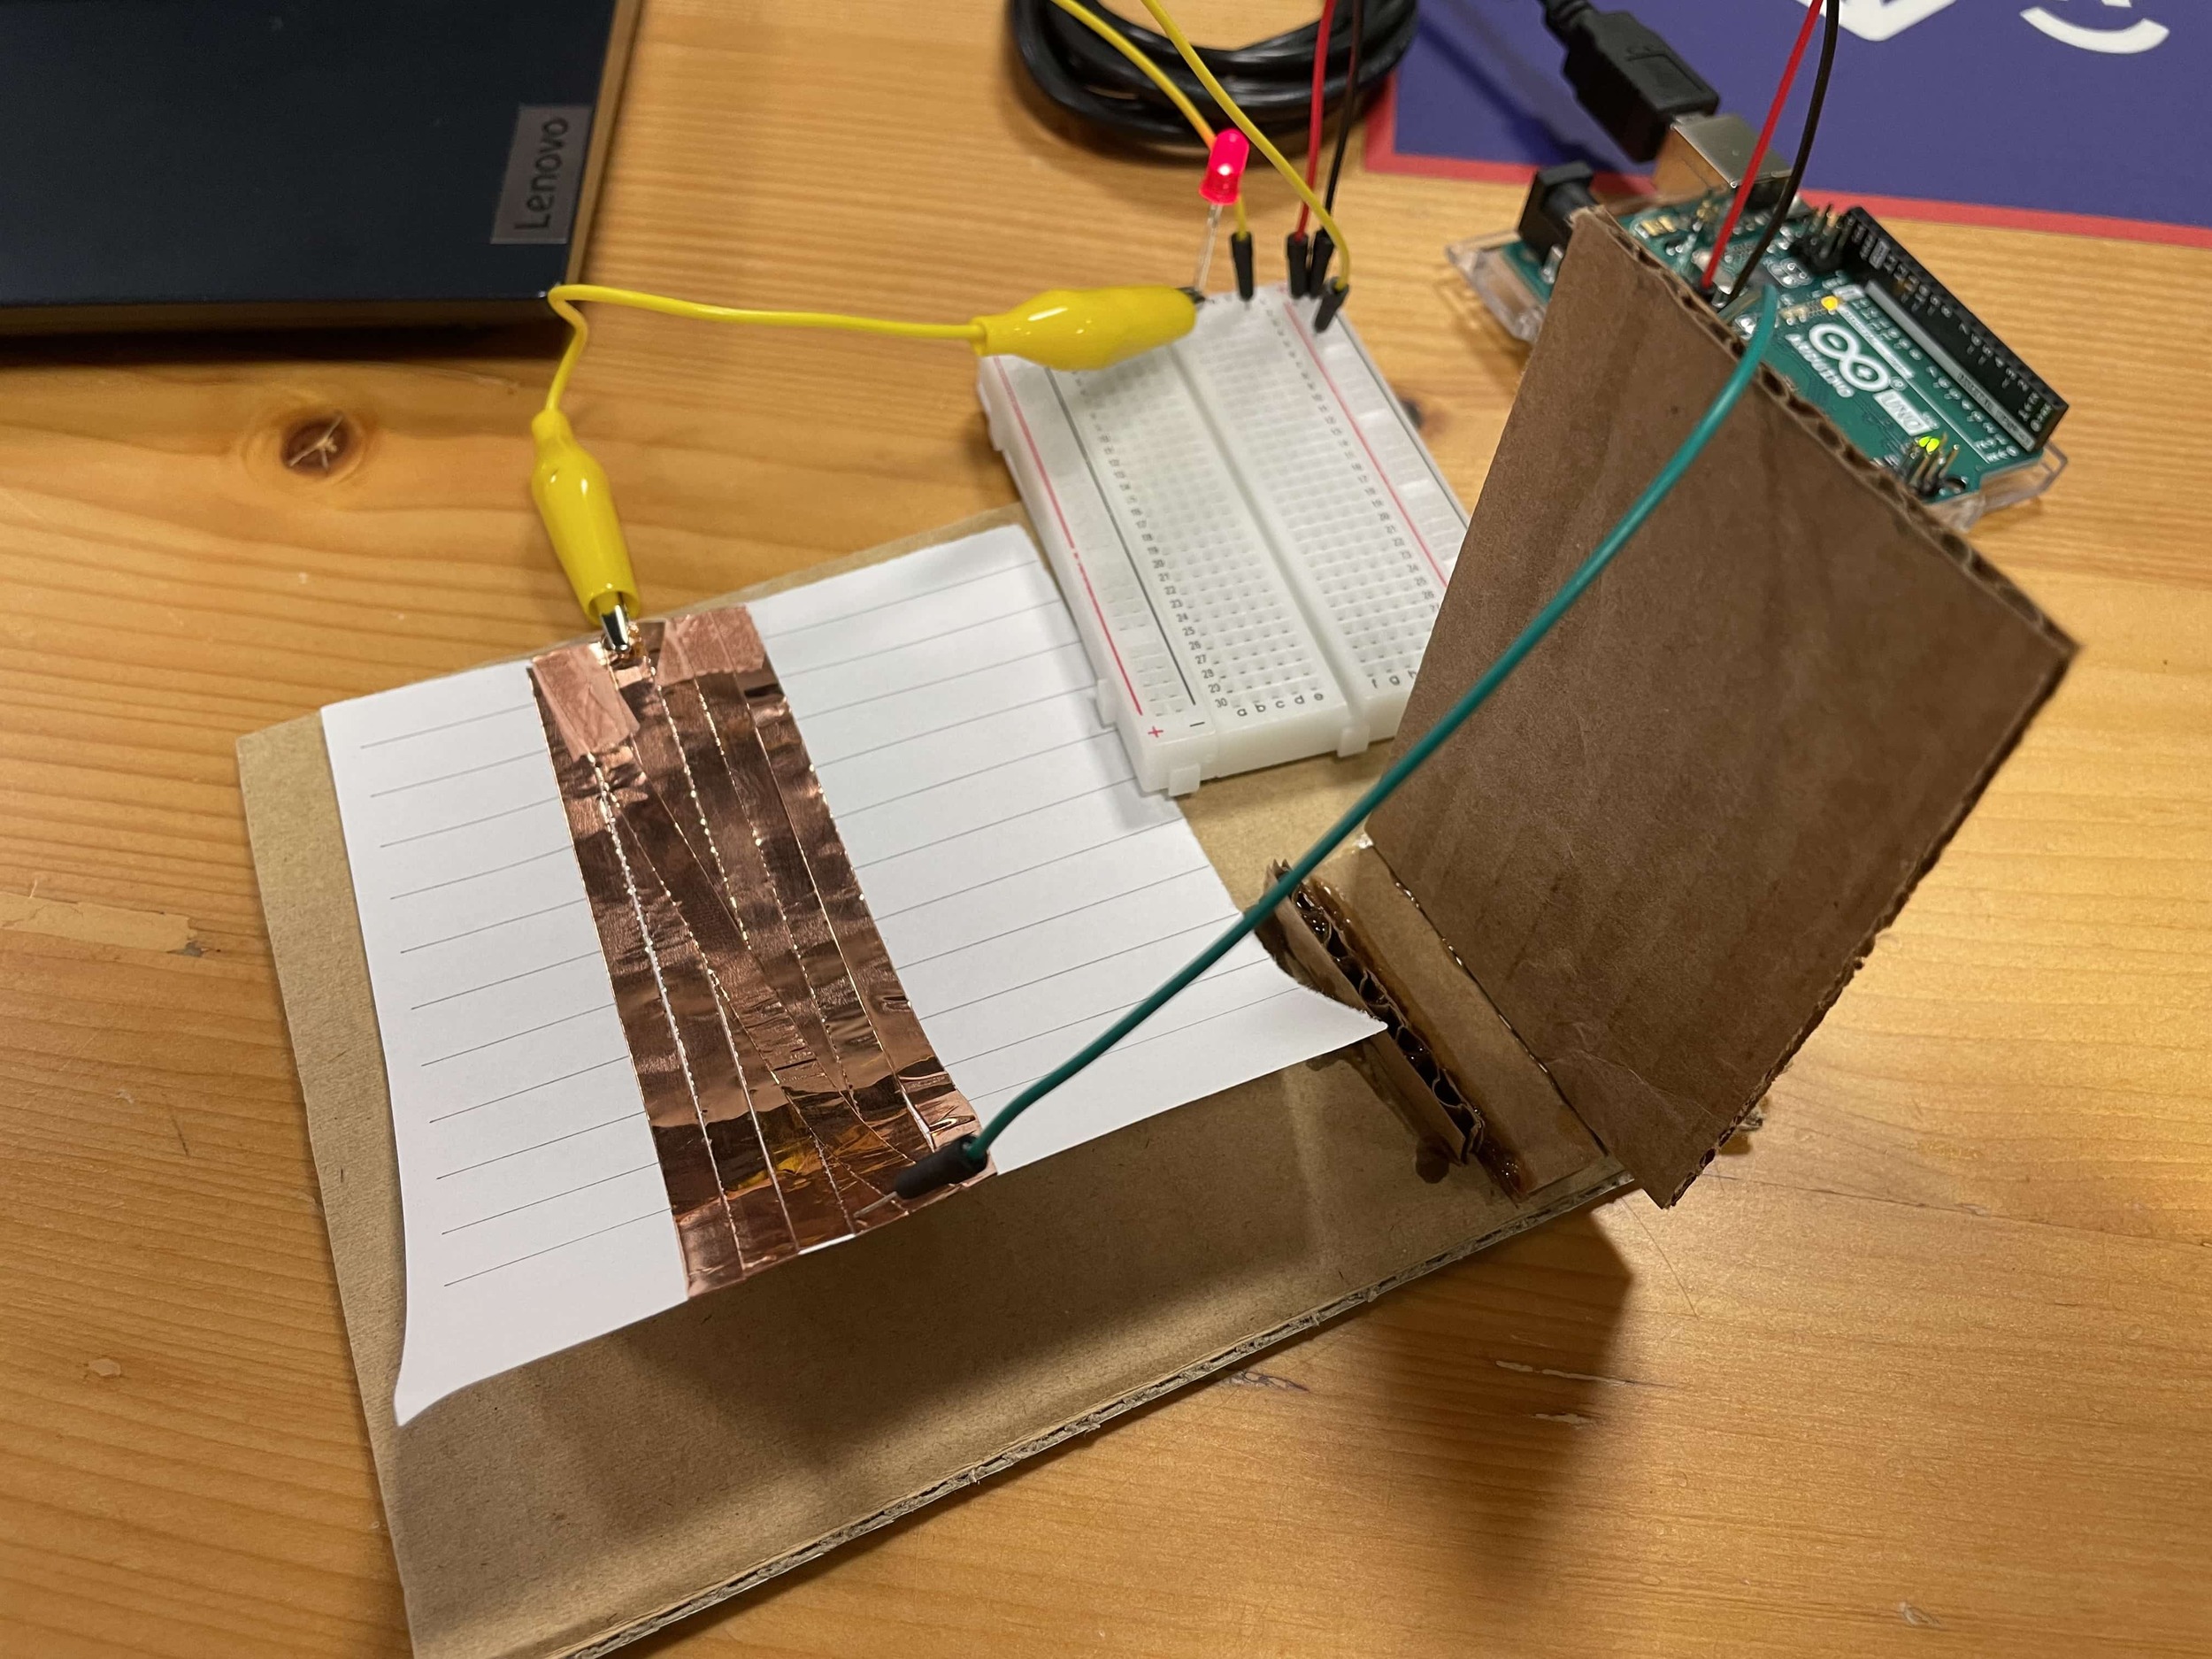
The circuit itself is very simplistic, in that only the components essential to the LED lighting up are present. For the switch I used a piece of paper and copper tape. I tightly stuck copper tape on the paper such that it would bend the paper. So as long as the paper stayed bent, it would remain in contact with the green jumper wire, thereby lighting up the LED. To turn off the LED, I can blow on the paper from above to straighten the paper, thereby disconnecting the circuit. The circuit does not have a resistor because when it was connected, the LED would not light up brightly, likely due to too high resistance in the circuit.
In elementary school I played a lot of Club Penguin. In the club penguin world, there was a mini game based on fishing, and I’d always play because it was the quickest way to receive in-game money. Unfortunately Club Penguin has shut down now, so I made my version of the game to fill the void. Welcome to Fishing Simulator!
Game Implementation
I started by creating the fish class, and scolpted my game around it. I wanted to make them as random as possible, so each fish is given its own spawning location and speed. And each have their own boundaries, which after reaching, they will return back to their spawn location to start their journey again, until the user has caught them. The more fish the user catches, the higher their score is. I set the cap at 15 fishes, but this can be easily changed by varying the for loop containing the instantiation in the setup function. To my dissapointment, there was a lack of fish sprites online, so a png had to suffice.
I chose backgrounds that I thought fit the theme of the game, and incorporated a lively outdoor-sy game music.
Next I made the fishing line class. It was simple as it only constituants are a line and an arc shape. This is coupled with the catchFish() function to complete foundational game mechanics. In this function splice() is used to delete the fish objects that had been caught, by coming in contact with the fishing hook. At first I coded the fishing line to move according to mouseX and mouseY, but this made the game too easy, so I only allowed user to control the fishing line’s vertical movement. This way, users’ need to assess timings as well.
Subsequently, I created the Boot class. This didn’t take long as it had similar movement properties to the Fish class. The only difference is that if the user catches a boot, the game is over. This is checked by the catchBoot() function.
With all this, the user is finally able to play the game with all the essential components incorporated. There are specific sound effects that play if the user catches any of the objects.
Finally, I integrated the start and restart screens and their corresponding buttons. With these, the user doesn’t have to rerun the code everytime he/she wants to play again.
In elementary school I played a lot of Club Penguin. In the club penguin world, there was a mini game based on fishing, and I’d always play it because it was the quickest way to receive in-game money. Due to the dissesemblement of the game, my aim is to recreate this game with my own twists. You can click the link below for a clip from the original game.
Implementation (thus far)
So far, I have preloaded some images to display the background and fishes in my game. These are regular pngs, but I hope to find appropriate sprites later to make the game less stiff. The fish class randomizes the starting and speed of a position of a fish. This way, each fish ‘spawned’ by the for-loop in the draw function has its own unique random attributes, thereby avoiding any patterns from forming.
Conclusion
I hope to incorporate several more types of objects to make the game more exciting/challenging, while also making it more interactive.