
For this week’s assignment, we had to complete 3 examples illustrating the use of Arduino and Processing together. Below are my codes for each of the tasks.
For my first 2 tasks, I partnered with Maaz, while for my third task, I partnered with Rock.
TASK 1:
Make something that uses only one sensor on Arduino and makes the ellipse in processing move on the horizontal axis, in the middle of the screen, and nothing on Arduino is controlled by Processing.
For this task, I used the potentiometer to control the horizontal position of the ball. The higher the value in the potentiometer, the closer the ball is towards the right end of the screen and vice versa. Since the ball position is variable and not just 0 and 1, this is an analog read from the potentiometer.
TASK 2:
Make something that controls the LED brightness from processing.
Here, I used the x position of the mouse on the screen to control the brightness of the LED. The extreme right position of the cursor means maximum (i.e. 255) brightness of the LEd and the extreme left means zero brightness. Since the position is variable, this is an analog write to the LED.
My Processing Code for the first 2 tasks is as follows:
import processing.serial.*;
Serial myPort;
int xPos=0;
int yPos=0;
boolean onOff=false;
boolean onOff2=false;

void setup() {
  size(960, 720);

  //keep the starting position of the ball in the middle of the screen
  xPos = width/2;
  yPos = height/2; //wont be using yPos for this task

  printArray(Serial.list());
  String portname=Serial.list()[3];
  println(portname);
  myPort = new Serial(this, portname, 9600);
  myPort.clear();
  myPort.bufferUntil('\n');
}

void draw() {
  background(255);
  ellipse(xPos,height/2,30,30); //for task 1
}

//this is a callback fn. - called whenever smthg comes in serial buffer
void serialEvent(Serial myPort) {
  String s=myPort.readStringUntil('\n');
  s=trim(s);
  if (s!=null) {
    println(s);
    int values[]=int(split(s, ','));
    if (values.length==2) {
      //for task 1
      //use the potentiometer readings to map the horizontal position off the ball on the screen
      xPos=(int)map(values[0], 0, 1023, 15, width-15); //eclipse position
      //yPos=(int)map(values[0], 0, 1023, 0, height); //when yPos == h
    }
  }

  //for task 2
  //control the led brightness using the mouseX position on screen.
  //extreme left = 0 brightness, extreme right = max (i.e. 255) brightness
  float ledBrightness = map(mouseX, 0, width, 0, 255);
  myPort.write(int(false)+","+int(ledBrightness)+"\n");
}
TASK 3:
Take the gravity wind example and make it so every time the ball bounces one led lights up and then turns off, and you can control the wind from one analog sensor.
My Processing Code for this task is as follows:
import processing.serial.*;
Serial myPort;
//int xPos=0;
//int yPos=0;
boolean onOff=false;
boolean onOff2=false;

//for gravity - task 3
PVector velocity;
PVector gravity;
PVector position;
PVector acceleration;
PVector wind;
float drag = 0.99;
float mass = 50;
float hDampening;


void setup() {
  size(960, 720);

  printArray(Serial.list());
  String portname=Serial.list()[3];
  println(portname);
  myPort = new Serial(this, portname, 9600);
  myPort.clear();
  myPort.bufferUntil('\n');

  //for gravity - task 3
  noFill();
  position = new PVector(width/2, 0);
  velocity = new PVector(0, 0);
  acceleration = new PVector(0, 0);
  gravity = new PVector(0, 0.5*mass);
  wind = new PVector(0, 0);
  hDampening=map(mass, 15, 80, .98, .96);
}

void draw() {
  background(255);

  velocity.x*=hDampening;

  applyForce(wind);
  applyForce(gravity);
  velocity.add(acceleration);
  velocity.mult(drag);
  position.add(velocity);
  acceleration.mult(0);
  ellipse(position.x, position.y, mass, mass);
  if (position.y > height-mass/2) {
    velocity.y *= -0.9;  // A little dampening when hitting the bottom
    position.y = height-mass/2;
    //if hits the ground, then light the bulb
    onOff=true;
  } else
    onOff=false;

  myPort.write(int(onOff)+","+int(false)+"\n");
}

//this is a callback fn. - called whenever smthg comes in serial buffer
void serialEvent(Serial myPort) {
  String s=myPort.readStringUntil('\n');
  s=trim(s);
  if (s!=null) {
    println(s);
    int values[]=int(split(s, ','));
    if (values.length==2) {
      //use the potentiometer readings to map the wind value between -5 to 5
      wind.x=map(values[0], 0, 1023, -5, 5); //controlling the wind using potentiometer
    }
  }
}

//============================================================================
//for gravity - task 3

void applyForce(PVector force) {
  // Newton's 2nd law: F = M * A
  // or A = F / M
  PVector f = PVector.div(force, mass);
  acceleration.add(f);
}
My working video of the task is as follows:
Arduino Code:
The following is the Arduino code for all 3 examples:
I did not make any changes to this.
int left = 0;
int right = 0;

void setup() {
  Serial.begin(9600); //serial 9600 mean 9600 bits per sec - rate/frequency of communication
  Serial.println("0,0"); //vvv imp line - this is settong up the handshake - someone needs to speak first
  pinMode(2, OUTPUT);
  pinMode(5, OUTPUT);
}

void loop() {
  while (Serial.available()) {
    right = Serial.parseInt();
    left = Serial.parseInt();
    if (Serial.read() == '\n') {
      digitalWrite(2, right);
      analogWrite(5, left);
      int sensor = analogRead(A0);
      delay(1);
      int sensor2 = analogRead(A1);
      delay(1);
      Serial.print(sensor);
      Serial.print(',');
      Serial.println(sensor2);
    }
  }
}
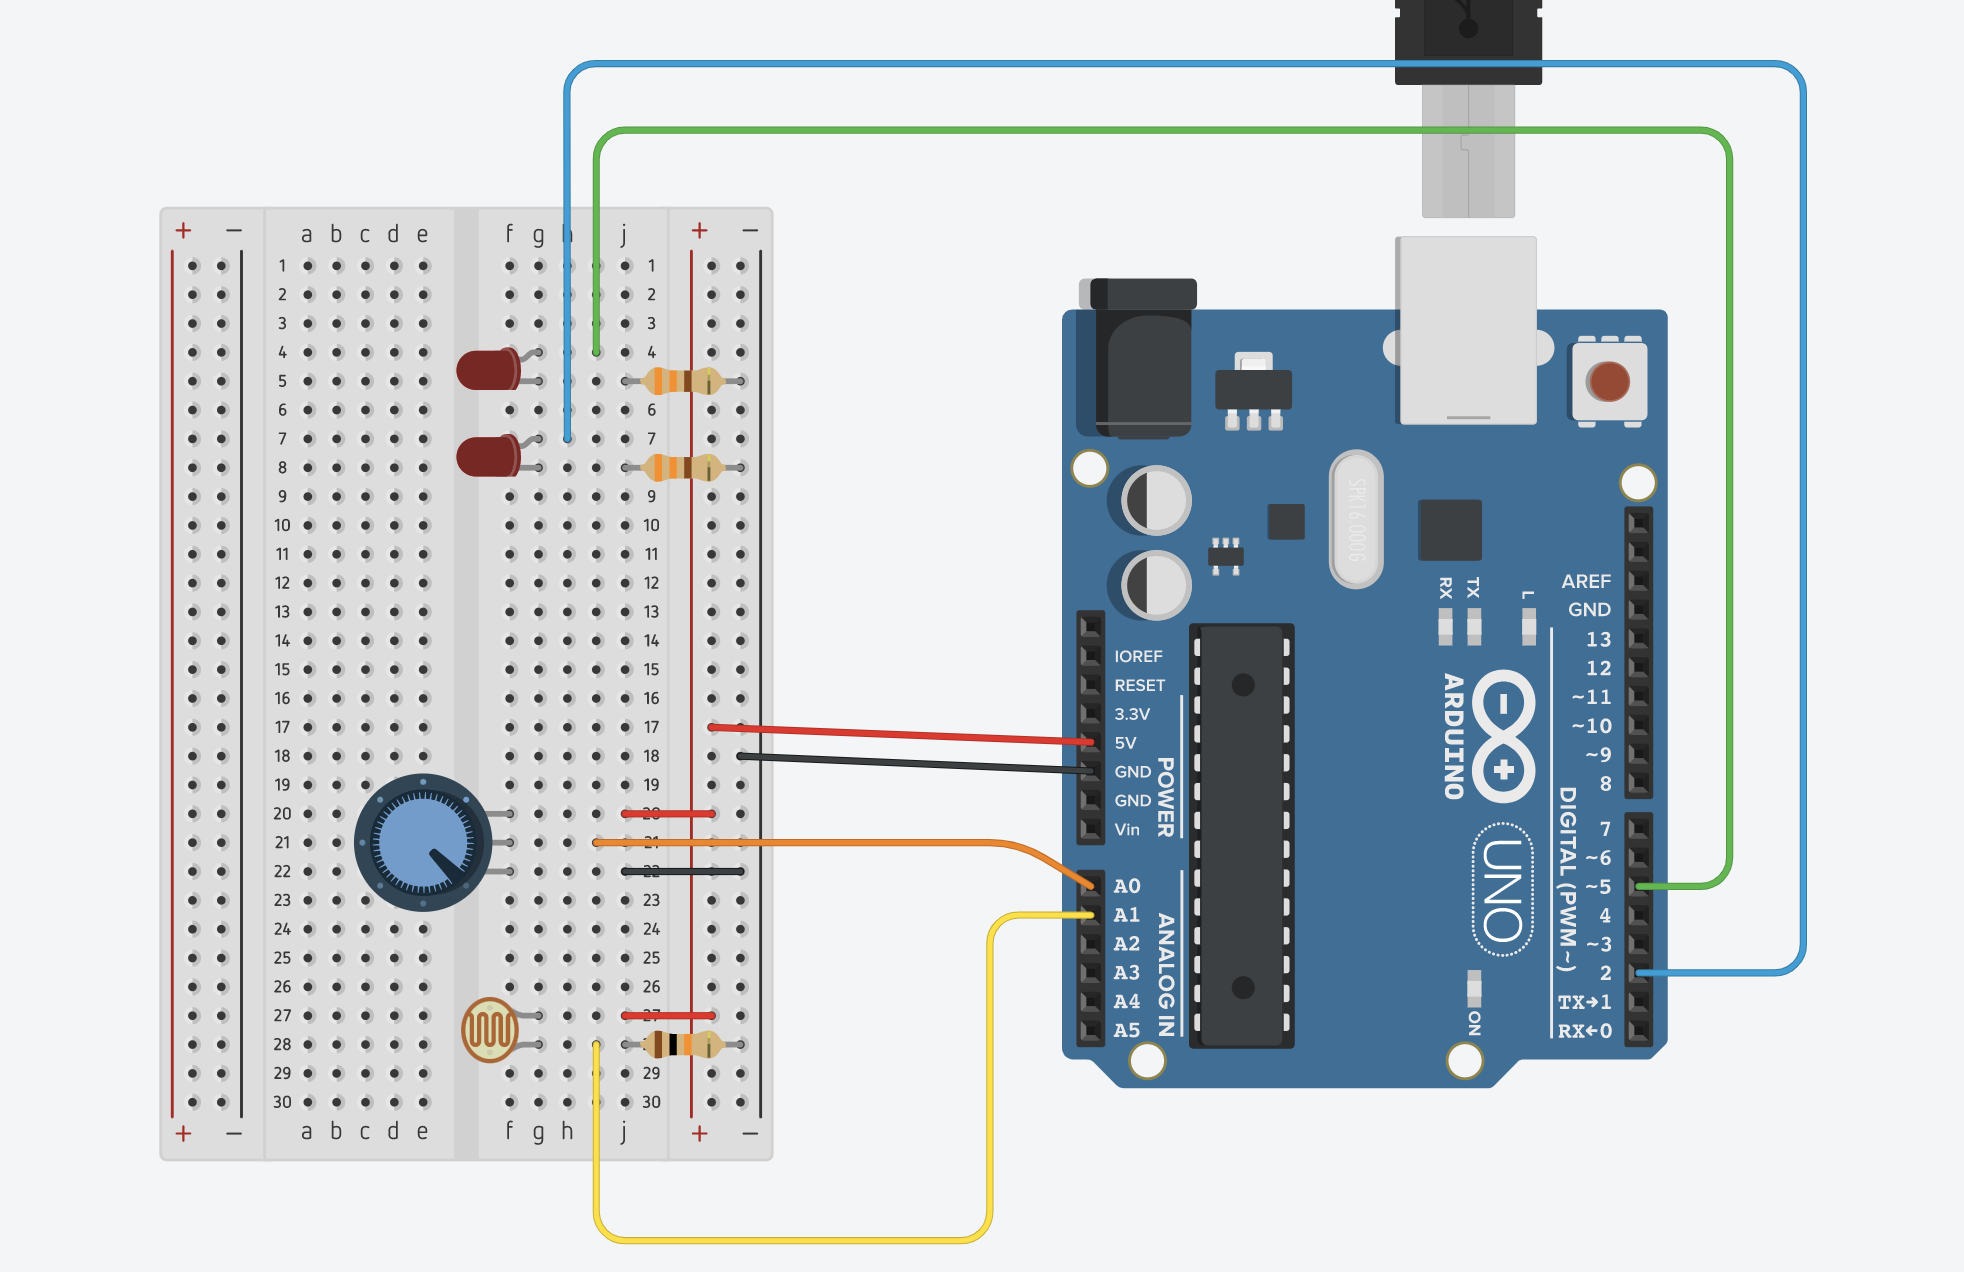
Circuit:
The circuit diagram for these examples can be found here.