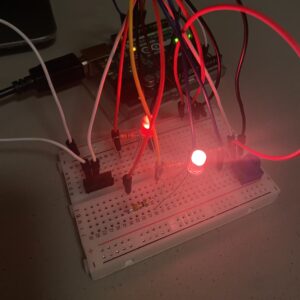
The challenge was to create something that blended analog and digital inputs to control a set of LEDs – one through an analog sensor and the other digitally.
The Concept:
I envisioned a vibrant desktop lamp that could cycle through a kaleidoscope of smoothly blending colours.
The Execution:
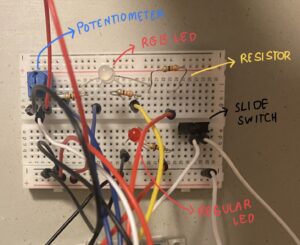
For the analog input, a potentiometer proved perfect – capable of outputting 1024 values just by twisting its knob. This enabled fluid color control.
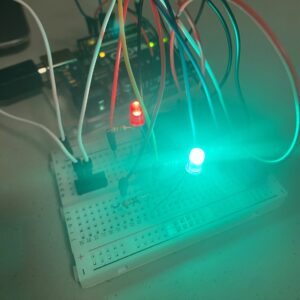
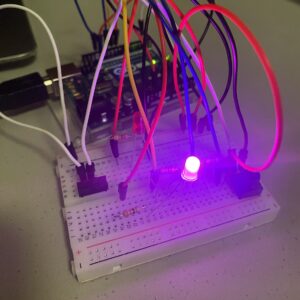
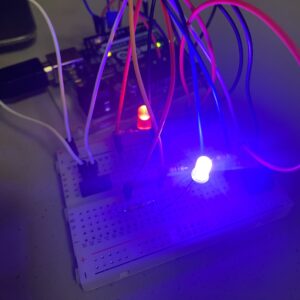
An RGB LED became the centerpiece light source. Its red, green, and blue elements could blend into any hue based on the potentiometer’s analog output levels. A regular red LED served as the digital indicator, powering on/off with the slide switch.
I wired the potentiometer to an Arduino analog input and the slide switch to a digital input pin. The RGB LED trio connected to three PWM analog outputs for mixable color output, while the red LED patched into a separate digital pin.
The Code:
The Arduino continuously read the potentiometer’s smooth analog value via analogRead(). I then mapped this range across the full RGB spectrum, setting the three LED output levels to precisely blend the corresponding hue on the RGB model. This proved to be slightly beyond my scope and I used the help of online resources to accomplish this
For the digital side, it just checked the slide switch state – HIGH powered the separate red LED, while LOW turned it off.
// Define pin connections
int potPin = A0;           // Potentiometer at analog pin A0
int redPin = 9, greenPin = 10, bluePin = 11; // RGB LED pins
int switchPin = 2;         // Digital pin for the toggle switch
int ledPin = 13;           // Pin for the additional standard LED

void setup() {
  pinMode(redPin, OUTPUT);
  pinMode(greenPin, OUTPUT);
  pinMode(bluePin, OUTPUT);
  pinMode(ledPin, OUTPUT);     // Set the additional LED pin as output
  pinMode(switchPin, INPUT_PULLUP); // Set the switch pin as input with pull-up
}

void loop() {
  int potValue = analogRead(potPin); // Read the potentiometer value
  int hueValue = map(potValue, 0, 1023, 240, 0); // Map pot value from blue to red hue values

  // Convert hue to RGB
  float r, g, b;
  hueToRGB(hueValue, r, g, b);

  // Write RGB values to LED pins
  analogWrite(redPin, r * 255);
  analogWrite(greenPin, g * 255);
  analogWrite(bluePin, b * 255);

  // Check the state of the switch
  if (digitalRead(switchPin) == LOW) {  // Switch is pressed (toggle switch connects to GND)
    digitalWrite(ledPin, HIGH);         // Turn on the additional LED
  } else {
    digitalWrite(ledPin, LOW);          // Turn off the additional LED
  }

  delay(10); // Short delay for stability
}

void hueToRGB(int hue, float &r, float &g, float &b) {
  int s = 1; // Saturation: 1 for full color
  int v = 1; // Value: 1 for max brightness
  float C = s * v;
  float X = C * (1 - fabs(fmod(hue / 60.0, 2) - 1));
  float m = v - C;
  float r1, g1, b1;

  if (hue >= 0 && hue < 60) {
    r1 = C, g1 = 0, b1 = X;  // Red to pinkish-red
  } else if (hue < 120) {
    r1 = X, g1 = 0, b1 = C;  // Pinkish-red to purple
  } else if (hue < 180) {
    r1 = 0, g1 = X, b1 = C;  // Purple to blue
  } else if (hue < 240) {
    r1 = 0, g1 = C, b1 = X;  // Lighter blue
  } else if (hue < 300) {
    r1 = X, g1 = C, b1 = 0;  // Skip greens
  } else {
    r1 = C, g1 = X, b1 = 0;  // Skip greens to yellow
  }
  r = (r1 + m);
  g = (g1 + m);
  b = (b1 + m);
}
Challenges:
My original vision was integrating this into a physical lamp with the RGB as the main light source. However, I struggled to find an easy way to run the component wires and extend the LEDs cleanly off the breadboard – a skill I’ll need to develop.
Future Improvements:
– Adding animation modes like pulsing, gradual color-cycling, and custom fading sequences between hues.
– Using light sensors to automatically adjust brightness based on ambient lighting.
– Exploring alternative RGB mapping patterns beyond the standard spectrum for unnatural, psychedelic hue blends.
– Integrating everything into a stylish 3D printed desktop lamp enclosure.

