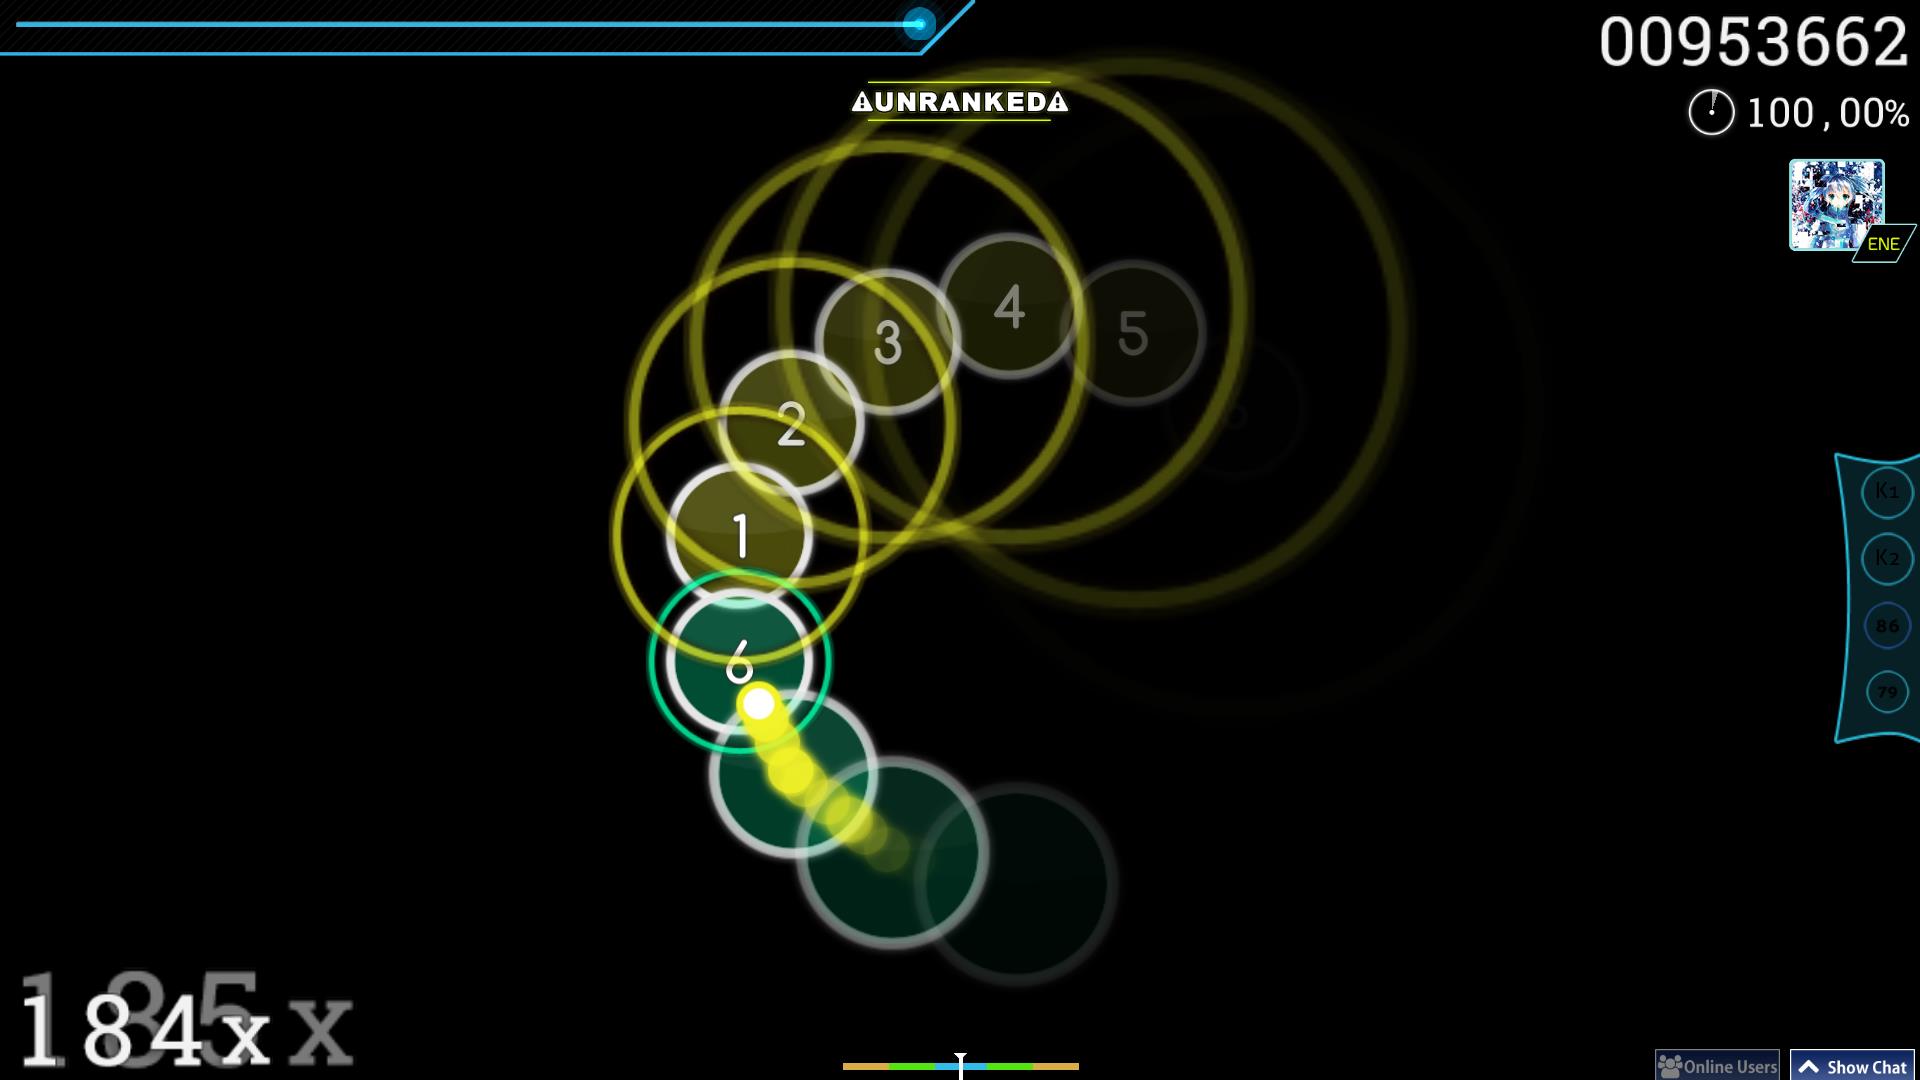
Assignment 1: Liz’s Self-Portrait

Concept:

As someone who is terrible at art and with zero experience with coding, this assignment scared me quite a lot. I wanted to keep it plain and simple while trying to keep it relatively accurate to what I look like. By using basic lines and shapes, I managed to unintentionally make a version of me that seems to have come straight out from Bob’s Burgers, which I found really funny. I’m not quite sure if I succeeded in the accuracy department, but I think it is good enough for my first time!

The Self-Portrait:


Highlight:

It took me a while to get used to the trial and error to create a self-portrait from basic 2D shapes, but it got better the more I practiced. However, creating the hair was an absolute nightmare with trying to rotate the arcs. The biggest highlight would have to be when I finally managed to get the hair looking somewhat decent, especially after adding some side bangs

//hair
fill(0)
arc(200,390,300,700,PI,0)
  //hair 2
fill(0)
arc(160,120,150,170)
arc(100,105,180,132,(11/6)*PI,PI/2,OPEN)

Otherwise, it would’ve looked like this egg…

Reflection:

Overall, I’m quite proud of myself for facing my coding fears and being able to create something like this in a short period of time. My brain refused to take in the information at first, but it got used to it eventually. I stuck with the simple plan I had due to time, but I would’ve loved to have been able to add my own personal touch to it and make it interactive. I was thinking of a little flashing camera or a phone on a gimbal. It would also have been cool to make the pupils both follow the cursor so that the eyeballs can move around while never looking at the same direction. Regardless, I’m still satisfied with how it turned out and I think it’s a cute first memory of my coding experience and result! It definitely wasn’t as bad as I thought it would be

Assignment 1 – Self Portrait

Concepts: 

For this assignment, my concept was a self portrait of me, wearing a NYU shirt, and a sunny and sandy background. I utilized basic shapes to construct the portrait, with the concept being me in NYUAD right now. I aimed to recreate my hairstyle as much as I could on a 2D space. Apart from the portrait of myself, I also drew the sun in the background, which I believe is an important feature of Abu Dhabi.

Portrait

Highlight

I implemented a feature where the nightsky, moon, and stars would show when you click down on the canvas. I used an if statement to detect whether a mouse button was being held down, which is detected with the function ‘mouseIsPressed’.

if (mouseIsPressed){
//nightsky
fill(40)
rect(0,0,400,250)
fill(190)
//moon
circle(0,0,250)
fill(240)
circle(30,24,30)
fill(230)
circle(16,81,15)
fill(215)
circle(48,83,20)
fill(242)
circle(87,19,15)
fill(250)
circle(70,50,30)
//stars
fill(255)
circle(294,25,2)
circle(187,42,2)
circle(361,52,2)
circle(218,9,2)
circle(276,115,2)
circle(279,70,2)
circle(355,85,2)
circle(133,91,2)
circle(215,85,2)

} 

Improvements 

For the drawing of the rays of the sun, I tediously drew the triangles one by one to achieve the way I wanted it to look. This was quite time consuming and wasn’t very efficient. In the future, I could utilize a loop to speed up this process.

Assignment 1 – Self-Portrait

I saw this assignment as an opportunity to get creative with p5.js and make something visually appealing using basic shapes, while also adding some elements of interactivity. I have had some experience with coding and I’m also really passionate about design, so overall, I really loved how this project made me think of new ideas and navigate the challenges that came up.

Main Idea

For this portrait, I wanted to create something that truly represents a part of me. As someone who absolutely loves books, I decided that a simple library setting (with a bookshelf) would perfectly capture this passion. Instead of going for a generic self-portrait, I focused on the details that define my personality, aiming to reflect my love for reading in both the visuals and interactivity of the piece.

Implementation

Creating the library scene involved several key steps, from drawing the bookshelves to the self-portrait itself. The books in the library are not just static; they come alive through interactivity, making the scene more engaging and fun. Every time you hover your mouse over a book, it bounces up and down, creating a playful effect. I’m particularly proud of the way the books bounce—implementing this took some effort, as it involved calculating the physics for a smooth jumping motion and resetting them back to their original positions. A fun surprise was discovering how, when you swipe the mouse across a row of books, it creates a wave effect, adding another layer of interaction.

Here’s a snippet of code that controls the bouncing of the books :))

// Drawing books with jumping effect
  for (let i = 0; i < books.length; i++) {
    let book = books[i];

    // Checking if the mouse is hovering over book
    if (
      mouseX > book.x &&
      mouseX < book.x + book.width &&
      mouseY > book.y &&
      mouseY < book.y + book.height &&
      !book.isJumping
    ) {
      book.isJumping = true; // book starts jumping when hovered
      book.velocity = -5; // initial jump velocity
    }

    // Handling jumping animation
    if (book.isJumping) {
      book.y += book.velocity; // updating y position based on velocity
      book.velocity += 0.4; // applying gravity effect

      // checking if the book has fallen back to its original position on the shelf
      if (book.y >= book.originalY) {
        book.y = book.originalY; // resetting position to the shelf
        book.isJumping = false; // stop jumping
        book.velocity = 0; // resetting velocity
      }
    }


Another feature I implemented is the colour change of the book held by the girl in the portrait. When you click on any book in the library, the book’s colour changes to match the one clicked, and I think this really adds to the interactivity of the scene and somehow just makes it seem more of a representation of my personality.

This is the code that controls the book changing colour:

function mousePressed() {
  // Checking if a book is clicked
  for (let i = 0; i < books.length; i++) {
    let book = books[i];
    if (
      mouseX > book.x &&
      mouseX < book.x + book.width &&
      mouseY > book.y &&
      mouseY < book.y + book.height
    ) {
      // Changing the girl's book color to the clicked book's color
      girlBookColor = book.color;
    }
  }
}


One of the most challenging parts of the drawing was the hair, which required understanding how the bezierVertex() function works. I spent time experimenting with the curves to get the right look, and I’m happy with how the hair flows in the final version. I also focused on the randomization of book sizes, spacing and colours to create a more realistic and dynamic library scene. The varied spacing between the books was particularly important because it prevented the scene from looking too uniform and added to the realistic clutter you’d expect in a real library.

Reflections and Possible Improvements

I’m proud of how the self-portrait captures a unique part of me through both the visuals and interactions. The bouncing books, the randomization of elements and the changing book colours all work together to create a portrait that isn’t just about how I look, but about what I love. The process was a great learning experience, especially in terms of coding the animations and achieving a realistic look using basic p5.js knowledge.

Possible improvements include adding more interactive features, such as having the girl’s expression change when clicking on different books or adding a subtle glow effect around the hovered book to enhance the visual feedback. Also, optimizing the code for smoother animations, especially when multiple books are interacting simultaneously, would enhance user-experience. Overall, I really enjoyed this project and look forward to exploring more of my creative potential throughout the course.

Assignment 1 | Self-Portrait (Lavish Lady)

My passion towards the art was born a long time ago and I couldn’t truly believe that I would be able to find an area, which would challenge my art skills as much as an art production using p5js. It allowed me to combine my artistic expertise and expand my knowledge of Javascript. This work was inspired by the contemporary art that I experimented a lot lately. I decided to bring in my artwork a wide pallette of colors symbolizing the diversity of human beings in terms of their character development. Combining it with nature that could be observed in the front, I wanted to depict the idea of close relationship between human and nature. Undoubtedly, we are a part of nature and it has a profound effect on our development and nurturing of essential.

I’m particularly proud of the code I wrote for the interactive eyes that follow the mouse movement and the effect of color changing lips. This adds an element of interactivity and brings the portrait to life. Here’s a snippet of the codes:

// Eye movement based on mouse position
  fill(mouseX % 255, mouseY % 255, 100, mouseY % 255); // Color changes based on mouse position
  let pupilOffsetX = constrain(map(mouseX, 0, width, -20, 10), -10, 10);
  let pupilOffsetY = constrain(map(mouseY, 0, height, -5, 5), -5, 8);
  ellipse(160 + pupilOffsetX, 280 + pupilOffsetY, 15, 15); // left pupil
  ellipse(230 + pupilOffsetX, 280 + pupilOffsetY, 15, 15); // right pupil
}
lipcol.r = random(111, 218);
  lipcol.g = random(72, 47);
  lipcol.b = random(209, 67);
  fill(lipcol.r, lipcol.g, lipcol.b);
  strokeWeight(1);
  stroke(lipcol.r, lipcol.g, lipcol.b);
  beginShape();


For future improvements, I’d like to:

-Enhance the interactivity by adding more elements that respond to mouse clicks or movements.

-Improve the smoothness of the animated features to make them more natural.

– Explore using different algorithms for more complex shapes and patterns, such as fractals or noise functions, to add more depth and texture to the portrait.

Working on this self-portrait allowed me to explore various aspects of my creativity through code. I learned a lot about using shapes, colors, and transformations to create a digital representation of myself. In the future, I would like to add more interactive elements, like changing colors or shapes based on user input, to make the sketch more dynamic. Additionally, I’d explore adding animations to give the portrait a lively, animated feel that captures my personality even more.


Reference to this genius guy from “The Coding Train”

Assignment 1- Self portrait.

Concept
A portrait of myself. I was inspired to create the portrait by the assignment and also to play around and learn how to use p5.js
Code
Coming up with the sketch was really fun and helpful in implementing what I learnt in class. It was a great way to interact with p5.js and know what I can do with it. I am proud of how I managed to incorporate what was taught in class particularly using the arc function to come up with the sketch.

Reflection
I believe that I still have room to improve the portrait. I had challenges making the hair and ears so learning how to make it more realistic would be really great. I would also like to make the portrait more lively by adding more things in the background and having more movements.

Assignment 1: Self Portrait (Orange Cat)

Concept

I love cats. I don’t have one but I would love to have one in the future. One of my favorite type of cats are orange cats; they’re silly and funny to me. Hence, I decided to create a silly orange cat with their tongue out making a silly face. The cat is also seen to be waving their paw as if to say hello!

Process

I started making the head using a circle and planned on using triangles for the ears, but soon found it difficult to make it look neat so I opted for a long rectangle pointing from one side of the circle to the other to act as ears. This way the ears are more symmetrical.

Highlight

I particularly liked how I made the mouth section where I used different sizes and orientations of ellipses and combining them with layering in mind to form the shape of the cat’s snout.

// mouth
fill('rgb(255,114,38)')
ellipse(200, 270, 15, 30)
fill('rgb(255,182,49)')
ellipse(190, 250, 35, 30)
ellipse(210, 250, 35, 30)
fill('#FF9700')
ellipse(200, 240, 20, 15)
Sketch

function setup() {
  createCanvas(400, 400);
}

function draw() {
  
  background('rgb(178,223,250)');
  
  // body
  fill('orange')
  rect(90, 260, 220, 400, 100)
  fill('rgb(255,182,49)')
  rect(115, 290, 170, 400, 100)
  fill('rgb(255,151,0)')
  
  // arm
  rect(115, 310, 50, 400, 100)
  fill('#FF9700')
  circle(140, 340, 55)
  fill('rgb(255,182,49)')
  circle(140, 340, 35)
  stroke('orange')
  circle(125, 339, 15)
  circle(133, 327, 15)
  circle(147, 327, 15)
  circle(155, 340, 15)
  
  // head
  noStroke()
  fill('orange')
  ellipse(200, 220, 200, 180)
  rect(100, 140, 200, 80)
  
  // streaks
  fill('#FF9700')
  rect(192.5, 130, 15, 50, 10)
  rect(170, 132, 15, 40, 10)
  rect(215, 132, 15, 40, 10)
  
  // ears
  fill('rgb(255,182,49)')
  ellipse(115, 170, 15, 50)
  ellipse(285, 170, 15, 50)
  
  // eyes
  fill('black')
  circle(155, 220, 25)
  circle(245, 220, 25)
  
  fill('white')
  circle(160, 215, 10)
  circle(250, 215, 10)
  
  // blush
  fill('rgb(255,116,44)')
  ellipse(125, 250, 50, 20)
  ellipse(275, 250, 50, 20)  
  
  // mouth
  fill('rgb(255,114,38)')
  ellipse(200, 270, 15, 30)
  fill('rgb(255,182,49)')
  ellipse(190, 250, 35, 30)
  ellipse(210, 250, 35, 30)
  fill('#FF9700')
  ellipse(200, 240, 20, 15)
  
}
Reflection

Though I did use a variety of shapes, my sketch is still very simple. So in the future, I’d like to incorporate more shapes and learn how to animate them as well to make it more interactive and lively; like maybe make the cat’s paw move!

Assignment 1: Aysha’s Self-Portrait

Concept:

For this assignment I use my knowledge of drawing basic shapes in p5*js to create a self-portrait. This portrait is a rough sketch of me, wearing my favorite hairstyle—a high ponytail. Since I’m still relatively new to coding, I chose to keep my approach simple by using basic shapes, lines, and curves to create this sketch. Understanding how the order of code affects the final drawing inspired me to stack shapes strategically, allowing me to capture minute details like the facial features in my portrait.

Highlight:

I’m particularly proud of the eyes in this sketch, as I invested a lot of effort into adding detailed elements that took some time to perfect. My biggest challenge was getting the curves right, especially when it came to the eyebrows and eyelids. Positioning them correctly was tricky, but using the mouseX and mouseY variables was incredibly helpful in determining their relative placement. However, achieving consistent curves across the sketch was the most time-consuming aspect of the entire process.

//eyes
fill(250);
ellipse(180,195,15,20);
ellipse(220,195,15,20);

noFill();
curve(175,230,167,190,194,190,200,230);
curve(180,240,206,190,235,190,220,220);
curve(200,170,167,200,194,200,200,150);
curve(200,155,206,200,235,200,200,170);

//eyebrows
curve(200,175,207,175,239,175,250,220);
curve(150,220,165,175,197,175,280,200);

Reflections:

When drawing the eyelids and eyebrows, I initially used the curve() function, but I later realized that combining noFill() with bezier() would have been a quicker and more efficient approach for creating curves. Additionally, I used the width and height variables to center the head on the canvas, which worked well. However, I believe that applying these variables more consistently throughout my sketch would make the portrait scalable for any canvas size in the future.

Assignment 1 | Self-Portrait

Concept

When I first thought about what kind of recognizable features I would like to emphasize in my work, I chose 3 of them: curly hair, earrings and background.

In this portrait, I decided to solely focus on collaboration between 2D shapes and colors to bring simplistic, yet realistic picture of me.

My first task lied in creating an interesting background for portrait that would resemble my personality in some way. Walking through library, I stumbled upon one journal that was only focused on photographs of ocean and waves. It reminded me of calmness and solitude that I do value myself, so I implemented gradient of water on background.


Furthermore, I was confused on how I could illustrate curly hair in p5, but then I decided to choose two colors and use unfilled circles patterns to show the curls.

Working on facial features, I decided to choose style similar to emoji drawings. I worked with opacity and arc’s to deliver also very calm mood of the face.

At the right bottom corner I decided to add a small signature of letter A, as it is very symbolic letter in my life.

Highlight of some code that I’m particularly proud of
//setting background
  //first row
  strokeWeight(15);
  stroke(91,184,229,50)
  fill(93, 170, 233)
  rect(0,300,100,100)
  fill(90, 177, 231)
  rect(100,300,100,100)
    fill(91, 184, 229)
  rect(200,300,100,100)
  fill(95, 190, 226)
  rect(300,300,100,100)
  //second row
  strokeWeight(15);
  stroke(110, 201, 220,50)
   fill(133, 211, 214)
  rect(0,200,100,100)
  fill(121, 206, 216)
  rect(100,200,100,100)
  fill(110, 201, 220)
  rect(200,200,100,100)
  fill(101, 196, 223)
  rect(300,200,100,100)
  //thrid row
  strokeWeight(15);
  stroke(157, 220, 210,50)
   fill(145, 216, 212)
  rect(0,100,100,100)
  fill(157, 220, 210)
  rect(100,100,100,100)
  fill(170, 224, 210)
  rect(200,100,100,100)
  fill(182, 228, 211)
  rect(300,100,100,100)
  //fourth row
  strokeWeight(15);
  stroke(218, 239, 221,50)
   fill(228, 243, 226)
  rect(0,0,100,100)
  fill(218, 239, 221)
  rect(100,0,100,100)
  fill(206, 235, 216)
  rect(200,0,100,100)
  fill(195, 232, 213)
  rect(300,0,100,100)

I am particularly proud of the background of the portrait, because it reveals additional detail I put in the work to deliver idea about my character.  I had intention in mind about creating a gradient using the tools we already learned on the lessons, so I experimented with colors, strokes, opacity, to create a kind of smooth picture that would resemble a gradient. And I think I could accomplish that.

Embedded sketch

Reflection and ideas for future work

In the future assignments, I would like to explore more efficient and realistic ways to portrait a gradient background and curly hair. In this work, major part of the code required manual instructions to create a specific illustration of curls and pattern in the background. I want to find out more efficient ways of how I could code these things. Moreover, I would further work on more specific and detail-oriented picture of the earrings, as it stays one of the key features in my portrait. I would tie shape of earrings to Kazakh national ornaments to show my identity. In addition, I didn’t have much chance to work with interactivity of my portrait in this concept, so next time I would definitely create more interactive background or interactive face features. As I progress in interactive media, I would also love to implement 3D shapes in my work.

Assignment 1: Self-Portrait

Sketch

Idea

I’m quite new to P5js so I started the project by drawing myself out.

The sketch is easy but I ended up giving up on the complicated version of my bang and chose to use an arc & a transparent triangle. I removed the stroke at the end because I like how an image is created just by these big chunks of color composing together. The blush, the piercing, and the top are all obvious characteristics of mine so I decided to include them apart from just coding my facial features out. The self portrait looks sad because I was sleepy when working on it.

I like photography a lot so I decided to use the background to show that.


Highlighted code

I used the variable & random code that we talked about in class to create the camera that appears at the beginning and the flashes. To make them obvious, I chose a plain green background. The camera’s movement is set using CameraX & CameraY global variables. I used CameraX = frameCount % width to make sure that they will reappear. The flashes appear using random. One thing that I might change in the future is to make the rectangles into a diamond shape and add white highlights so that they = look more like flashes. I might also add interactivity: users click on the camera to produce the flash.

//the flash
//make random camera flashes
frameRate(10);
let x = random(600);
let y = random(600);
fill('yellow');
rect(x,y,90,120);
fill('white');
//the camera
fill('rgb(224,216,216)');
rect(CameraX+4,CameraY-10,40,100,0)
fill('white');
rect(CameraX,CameraY,150,100,10);
fill('grey');
rect(CameraX,CameraY+20,150,60,5);
fill('rgb(175,165,165)');
circle(CameraX+80,CameraY+50,80);
fill('black');
circle(CameraX+80,CameraY+50,60);
fill('yellow');
circle(CameraX+90,CameraY+40,10);
CameraX = CameraX +1
CameraX = frameCount % width
CameraY = frameCount % width
noStroke();


Assignment #1: An Honest Self-Portrait.


Idea & Sketching.

As a newcomer to coding, this small project has been an important exercise in practicing what I have learned in class so far. I primarily focused on experimenting with basic shapes, still trying to find useful tools to add (at least) some interactivity to a static portrait.

First, I made a quick sketch in Figma of what I roughly aimed to create (see below). As a Film & New Media major, I couldn’t help but show my passion for filmmaking by incorporating a “Kodak” T-shirt (which I actually own and wear) paired with a green jacket made up of two symmetrical triangles.

My cartoon character shows no mercy to my real self: protruding ears, furrowed eyebrows, and a discontented smirk. Nevertheless, I’m still fine with that…

Highlights.

Having finished the layering of the character in p5.js, I felt that something was missing, and I had to soon realize that it was the absence of movement. Since it was my first time coding, I did a quick research to find different options for animating in JavaScript. The most suitable and easiest to comprehend for my case turned out to be the lerp() function.

I implemented the lerp() function to animate my character’s mouth by following a tutorial on p5.js.

if (mouseX > 150 && mouseX < 450 && mouseY > 150 && mouseY < 600) { // to check if the mouse reaches the body
  finalX = 300;  
  finalY = 400; 
} else {
  finalX = 280; 
  finalY = 410;  
}

initialX = lerp(initialX, finalX, 0.5);
initialY = lerp(initialY, finalY, 0.2);

I’m particularly proud of how I figured out the pace of the animation, specifically the “amt” parameter, which I set at 0.5 and 0.2. After experimenting with the function for a while, I decided to use different values for the “x” and “y” positions, so that the mouth movement would look more natural and eye-catching.

Reflection.

To summarize, I truly enjoyed working on this tiny project. I’m quite satisfied with my whatever cartoonish self and excited to dive deeper into the lerp() function as the course progresses to create more sophisticated animations and interactive projects. So far so good – JavaScript seems to be fun.

Embedded Sketch.

P.S. Place the mouse around the body so the mouth moves.