
For the final project, I have created a bubble-popping game that involves both P5.js and Arduino. The main concept is that the user will pop as many bubbles as possible using hand gestures in a playful virtual environment, leveraging hand-tracking technology for a seamless and immersive experience and enjoy real bubble along the way. Initially, the project was supposed to be just a bubble maker that tracked the user and shot bubble at him/her continuously. Unfortunately, due to technical difficulties, I could not implement that, and after consulting with the professor, I decided to make a game instead.
How it works:
The user comes in front of the camera and raises his/her left hand. If the camera detects left hand raised on the left side of the screen (the right side by mirroring), the bubble starts to generate in the middle portion of the screen, and a timer gets started. The timer is set to 2 minutes of maximum time. Then the user will pop the bubbles with the finger tips by making popping a bubble gesture. Users get points for popping the bubble based on the popped bubble’s size. And if the user want, he/she can quit the game by raising his/her hand. While the game is on and the user scores cross a milestone, a signal is sent to the Arduino to turn on the servo motor and a DC motor fan. Servo takes the bubble-making stick in front of the fan and generates bubbles. The servo and the fan will keep generating bubbles while the game is on. Initially, I had 400 points (400, 800, 1200, … ) as milestones. However, after user testing, I reduced it to 100. So, after every 100 points, you get bubbles. The reasoning behind this was that all the users were more into the actual bubble popping experience and all wanted to get more real bubbles while playing the game. A This gives the user a more immersive bubble-popping experience, as from time to time they can pop the real bubbles too. During the gameplay the user can press “H” on the keyboard for the instructions. The game also keeps track of high scores and has a 2 minutes timer.
User testing:
After user testing, I made few changes. I had 2 user tests. During my initial testing, I received feedback to make the real bubble generation a reward for popping the on screen bubbles, which currently implemented in the game. And during my second user test, the user told me to make it a bit easier to get real bubbles. I have reduced the milestone from 400 to 100 afterwards. Other than this, I received reviews from the Professor. One was to make the on-screen bubble bigger and more visible (opacity). The second was to incorporate visuals and instructions. Both have been implemented in the game.
Schematic:

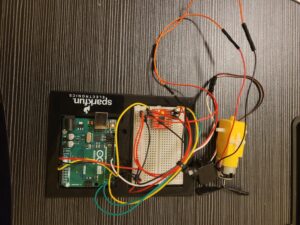
As the tinkercad did not have the SparkFun Motor Driver – Dual TB6612FNG (1A) used in the project, the schematic has been adjusted for L293D Motor Driver.
P5.js Code:
Serial communication is needed to run the game. The cover picture was made using DALL-E 2.
In this game, hand detection is accomplished using the ml5.handpose model. This model detects 21 hand keypoints representing different parts of the hand. Each keypoint provides an x, y, and z coordinate, but here, only the x and y coordinates are used. These keypoints are used to detect gestures and interact with the game objects (bubbles).
Gestures are detected based on the position of keypoints of all five fingers. Here’s how gestures to start and stop the game are handled:
const LEFT_FINGERS = [4, 8, 12, 16, 20]; // Indices of the left-hand finger tips
let play = 0; // 0 for paused, 1 for playing
let waveTimeout = null;
let waveCooldown = false;
let leftBoundary, rightBoundary;
let scaleX, scaleY;
let videoWidth = 640;
let videoHeight = 480;

function detectHandGesture() {
  if (hands.length > 0) {
    const fingerIndices = [4, 8, 12, 16, 20]; // Thumb, index, middle, ring, pinky tips
    let allInLeft = true;
    let allInRight = true;

    for (let index of fingerIndices) {
      let x = (videoWidth - hands[0].keypoints[index].x) * scaleX;
      if (x < leftBoundary) {
        allInRight = false;
      } else if (x > rightBoundary) {
        allInLeft = false;
      } else {
        allInLeft = false;
        allInRight = false;
      }
    }

    if (allInLeft && play === 0) {
      togglePlayState(1); // Start playing
    } else if (allInRight && play === 1) {
      togglePlayState(0); // Stop playing
    }
  }
}

function togglePlayState(newState) {
  play = newState;
  waveCooldown = true;

  if (play === 1) {
    startTime = millis(); // Start the timer when playing starts
  } else {
    updateHighScore(); // Update high score before resetting
    resetGame();
  }

  waveTimeout = setTimeout(() => {
    waveCooldown = false;
  }, 3000); // Add a 3-second cooldown to prevent repeated triggering
}
function drawBubbles() {
  let leftFingers = [];
  if (hands.length > 0) {
    let hand = hands[0];
    for (let index of LEFT_FINGERS) {
      let keypoint = hand.keypoints[index];
      leftFingers.push({
        x: (videoWidth - keypoint.x) * scaleX,
        y: keypoint.y * scaleY,
      });
    }
  }

  for (let i = 0; i < bubbles.length; i++) {
    let bubble = bubbles[i];
    fill(bubble.color[0], bubble.color[1], bubble.color[2], 100);
    noStroke();
    ellipse(bubble.x, bubble.y, bubble.size * 5, bubble.size * 5);

    bubble.x += bubble.speedX;
    bubble.y += bubble.speedY;
    bubble.x = constrain(bubble.x, leftBoundary, rightBoundary);

    // Check for collision with any of the left fingers and pop the bubble
    if (play === 1) {
      for (let finger of leftFingers) {
        if (dist(bubble.x, bubble.y, finger.x, finger.y) < bubble.size * 2.5) {
          bubbles.splice(i, 1);
          popped.play();
          score += floor(bubble.size / 2);
          i--;
          break;
        }
      }
    }
  }
}
The left-hand finger tips are used to pop bubbles.
#include <Servo.h>

Servo myservo1;
Servo myservo2;
Servo myservo3;

int pos = 45;
int play = 0;
int high = 25;
int low = 85;

const int ain1Pin = 3;
const int ain2Pin = 4;
const int pwmAPin = 5;


void setup() {
  myservo1.attach(8);
  myservo2.attach(9);
  myservo3.attach(10);

  pinMode(ain1Pin, OUTPUT);
  pinMode(ain2Pin, OUTPUT);
  pinMode(pwmAPin, OUTPUT);

  Serial.begin(9600);
  while (Serial.available() <= 0) {
    digitalWrite(LED_BUILTIN, HIGH);
    Serial.println("0,0");
    delay(200);
    digitalWrite(LED_BUILTIN, LOW);
    delay(50);
  }
}

void loop() {
  while (Serial.available()) {
    play = Serial.parseInt();
    if (play && Serial.read() == '\n') {
      myservo1.write(45);
      myservo2.write(45);
      moveServoSlowly(myservo3, low, high, 20);
      analogWrite(pwmAPin, 255);
      digitalWrite(ain1Pin, HIGH);
      digitalWrite(ain2Pin, LOW);
      delay(3000);
      analogWrite(pwmAPin, 0);
      moveServoSlowly(myservo3, high, low, 20);
      delay(2000);
    }
    Serial.println(1);
  }
}

void moveServoSlowly(Servo &servo, int startPos, int endPos, int stepDelay) {
  int step = startPos < endPos ? 1 : -1;
  for (int pos = startPos; pos != endPos; pos += step) {
    servo.write(pos);
    delay(stepDelay);
  }
  servo.write(endPos);
}
I initially had issues with my servo motor movement. It was moving too quickly to the positions and. So I used the moveServoSlowly function. The moveServoSlowly function controls the movement of a servo motor gradually from a starting position to an ending position. It takes four parameters: a reference to the Servo object, the starting and ending positions (in degrees), and a delay time that dictates the speed of movement. The function calculates the direction of movement using a step variable, which is set to either 1 or -1, depending on whether the starting position is less than the ending position. It then iterates through the range of positions, incrementing or decrementing by the step value, and uses servo.write to set the servo’s position. A delay specified by stepDelay between each position change ensures smooth and gradual movement. Finally, it ensures the servo reaches the exact ending position.