
Exercise 1
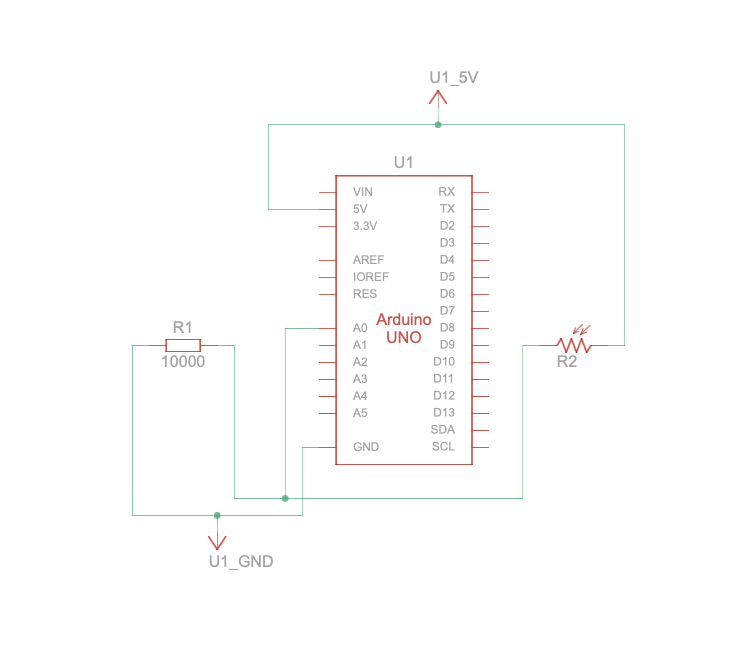
For this exercise, we used a photosensor to control the x position of an ellipse in p5. The more light the photosensor reads, the further right the ellipse’s position is.
Demo:
Codes:
p5 –
let circlePosition = 100;
function setup() {
  createCanvas(400, 400);
  textSize(18);
  fill(243,213,205);
  text("Press the space bar to connect port", width / 2, 60);
}
function draw() {
  background(176, 16, 50);
  textSize(18);
  fill(243,213,205);
  text("Press the space bar to connect port", 60, 60);
  ellipse(circlePosition, height / 2, 70, 70);
}
// Function to set up the serial connection
function keyPressed() {
  if (key == " ") {
    setUpSerial();
  }
}
// Function to read the data from serial port
function readSerial(data) {
  // Check if data received is not null
  if (data != null) {
    // Mapping the data to 0-400 and sets it as X position of the circle
    circlePosition = map(int(data), 0, 1023, 0, 400);
  }
}
Arduino –
void setup() {
  Serial.begin(9600); // Begin serial communication
}
void loop() {
  int sensor = analogRead(A0);
  delay(5);
  Serial.println(sensor);

}
Circuit:
Exercise 2
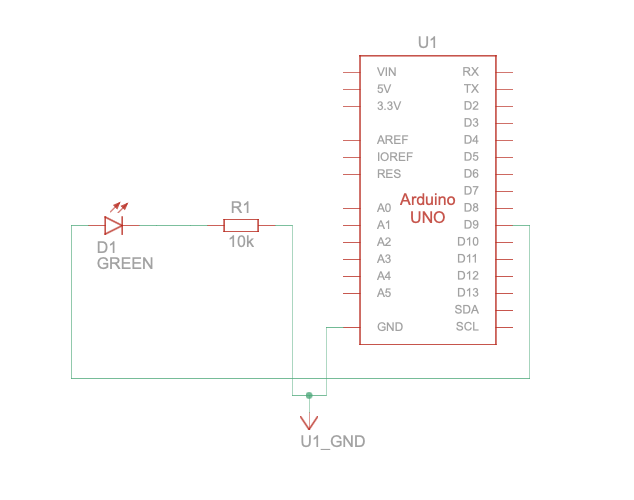
For this exercise, we created a gradient on p5 that goes from green to black along the y-axis. When the mouse is on the highest point of the canvas, meaning at the greenest point, the LED is the brightest. The further the mouse goes down towards the black, the darker it gets.
Demo:
Codes:
p5 –
function setup() {
  createCanvas(400, 400);
  textSize(20);
}

function draw() {
  // Gradient background from green to black
  setGradient(0, 0, width, height, color(0, 255, 0), color(0));


  if (!serialActive) {
    fill(255);
    text("Press space bar to select port", 60, 60);
  } else {
  }

  // Change brightness of LED based on mouse position
  let brightness = map(mouseY, 0, width, 255, 0);

  // Send the brightness value to Arduino
  if (serialActive) {
    let sendToArduino = brightness + "\n";
    writeSerial(sendToArduino);
  }
}

// Function to draw a gradient background
function setGradient(x, y, w, h, c1, c2) {
  noFill();
  for (let i = y; i <= y + h; i++) {
    let inter = map(i, y, y + h, 0, 1);
    let c = lerpColor(c1, c2, inter);
    stroke(c);
    line(x, i, x + w, i);
  }
}

// Function to begin serial connection
function keyPressed() {
  if (key == " ") {
    setUpSerial();
  }
}

function readSerial(data) {
  if (data != null) {
    serialActive = true;
  }
}
Arduino –
int ledPin = 9;
int brightness = 0;

void setup() {
  Serial.begin(9600);
  pinMode(LED_BUILTIN, OUTPUT);
  pinMode(ledPin, OUTPUT);
  digitalWrite(ledPin, LOW); // Starts with LED off
  while (!Serial) { // Wait for serial connection
    delay(500);
  }
  Serial.println("Arduino initialized");
}

void loop() {
  if (Serial.available() > 0) {
    brightness = Serial.parseInt(); // Read brightness value
    analogWrite(ledPin, brightness);
    Serial.read();
  }
  digitalWrite(LED_BUILTIN, LOW); // LED off when there is no data
}
Circuit:
Exercise 3
For this exercise, we established bidirectional communication between the Arduino and the p5 sketch, enabling real-time interaction between physical input (potentiometer) and visual output (LED indication) synchronized with the simulation on p5.
The Arduino code reads data from a potentiometer connected to analog pin and sends it to the p5.js sketch. It also receives position data from the p5.js sketch via serial communication and controls an LED connected to pin 9 accordingly. The setup() function initializes serial communication and sets pin modes for the LED, potentiometer, and built-in LED. It initiates a handshake with the p5.js sketch by sending a starting message until it receives data from the serial port.
Demo:
Codes:
p5 –
let velocity;
let gravity;
let position;
let acceleration;
let breeze;
let drag = 0.99;
let mass = 50;
let heightOfBall = 0;
function setup() {
  createCanvas(640, 360);

  noFill();
  position = createVector(width/2, 0);
  velocity = createVector(0,0);
  acceleration = createVector(0,0);
  gravity = createVector(0, 0.5*mass);
  breeze = createVector(0,0);
}
function draw() {
  background(215);
  fill(0);

  if (!serialActive) {
    text("Press space bar to connect Arduino", 50, 60);
  }
  else
  {

  applyForce(breeze);
  applyForce(gravity);
  velocity.add(acceleration);
  velocity.mult(drag);
  position.add(velocity);
  acceleration.mult(0);
  ellipse(position.x,position.y,mass,mass);

  if (position.y > height-mass/2) {
      velocity.y *= -0.9;

      position.y = height-mass/2;

    heightOfBall = 0;

    }
    else {
      heightOfBall = 1;
    }
  }
}
function applyForce(force){
  // Newton's 2nd law: F = M * A
  // or A = F / M
  let f = p5.Vector.div(force, mass);
  acceleration.add(f);
}
function keyPressed() {
  if (key == " ") {
    // important to have in order to start the serial connection!!
    setUpSerial();
  }
  else if (key=='b'){
    mass=random(15,80);
    position.y=-mass;
    velocity.mult(0);
  }
}
// this callback function
function readSerial(data) {
    ////////////////////////////////////
    //READ FROM ARDUINO HERE
    ////////////////////////////////////

     if (data != null) {
    // make sure there is actually a message

    let fromArduino = split(trim(data), ",");

       // if the right length, then proceed
    if (fromArduino.length == 1) {
//sensor value is the input from potentiometer
      let sensorVal = int(fromArduino[0]);

//potentiometer value ranges from 0 - 1023
//for values less than 400,wind blows to right
      if (sensorVal < 400){
        breeze.x=1
      }
//if value between 400 and 500, wind stops so ball stops
      else if(sensorVal >= 400 && sensorVal < 500){
        breeze.x = 0
      }
//if value greater than 500, wind blows to left
      else {
        breeze.x = -1
      }
          //////////////////////////////////
          //SEND TO ARDUINO HERE (handshake)
          //////////////////////////////////
    }
//height of ball sent to arduino to check if ball on floor or not
    let sendToArduino = heightOfBall  + "\n";
    writeSerial(sendToArduino);
  }
}
Arduino –
const int poten_pin = A5;
const int ledPin = 9;
void setup() {
 Serial.begin(9600); // Start serial communication at 9600 bps
 pinMode(LED_BUILTIN, OUTPUT);
 pinMode(ledPin, OUTPUT);
 pinMode(poten_pin, INPUT);
 // start the handshake
 while (Serial.available() <= 0) {
   digitalWrite(LED_BUILTIN, HIGH); // on/blink while waiting for serial data
   Serial.println("0,0"); // send a starting message
   delay(300);            // wait 1/3 second
   digitalWrite(LED_BUILTIN, LOW);
   delay(50);
 }
}
void loop()
{
 // wait for data from p5 before doing something
   while (Serial.available())
   {
     digitalWrite(LED_BUILTIN, HIGH);
     digitalWrite(ledPin, LOW);
//read the position of ball from p5
     int position = Serial.parseInt();

     if (Serial.read() == '\n') {
       // Read potentiometer value
     int sensorValue = analogRead(poten_pin);
     //send value to p5
     Serial.println(sensorValue);
     }
//if ball is touching the ground i.e. height is zero, turn LED on
     if (position == 0)
     {
       digitalWrite(ledPin, HIGH);
     }
     else{
       digitalWrite(ledPin, LOW);
     }
   }
     digitalWrite(LED_BUILTIN, LOW);
   }
Circuit:
