
Concept
While looking for ideas for the musical instrument, I came across something called HID (Human Interface Devices). These are devices that can be used to substitute for Devices that are used to interact with the computer, such as a keyboard or a mouse. Unfortunately , The Arduino UNO board that we use is not HID compatible. Why did we need this? because we wanted to do something unique and use something unconventional for the digital input part of the assignment. This is when we came across the MakeyMakey board by Sparkfun. Using this board, we can use anything with a weak conductivity as a button that send an input to the computer. We can then use the computer as an interface between Arduino and Makey Makey and use the output of Makey Makey as an input to the Arduino via the Serial.
Once we had this figured out, It opened great possibilities. For the purpose of this assignment, we decided to draw a piano on a piece of paper and use each part as a button ( so a sound plays whenever you touch the paper).
Technical Plan (Abstract overview)
For Arduino UNO
- Takes input from the serial , and reads it
- Converts the letter input to a corresponding frequency (taking digital input)
- Offsets the frequency by reading the value on the potentiometer (taking analog input)
- Uses tone function to play this frequency on the buzzer
For Makey Makey
- Takes input from the paper buttons and send a keystroke to the keyboard corresponding to what button is pressed.
- Presses enter automatically so that the keystroke is entered in the serial of the Arduino board.
Other Technicalities
- We need to make sure that the piano sounds good , for this we will use notes corresponding to an actual scale . The default scale we are using here is the C major Scale on the 4th Octave consisting of the notes C , D, E ,F , G, A and B .
- While drawing the piano , we need to make sure that the keys are separated and each key separately conducts electricity.
- Use alligator clips properly and make sure the connections work
- Since the Arduino board default firmware can only output 6 letters ( wasdfg), we need to configure it to replace some other outputs with letters. Here, we have reprogrammed it to output ‘h’ instead of the Up arrow and used ‘ ‘ (Blank space) as an input as well .
To use
- Connect both Arduino UNO and Makey Makey to the computer
- Upload Code on Makey Makey
- Open new Window of Arduino IDE and upload code on Arduino UNO
- Open the Serial monitor and click on it to place the computer cursor there.
- Start taking input from Makey Makey
Code
Code for the Arduino UNO board :
#include "pitches.h"
#include <Keyboard.h>

const int BUZZER_PIN = 8;          // Pin for the buzzer
const int potentiometerPin = A0;   // Pin for the potentiometer
const int duration = 200;          // Duration of the tone

unsigned long lastPotReadTime = 0; // Variable to store the last time potentiometer was read
int offset =0;

void setup() {
  Serial.begin(9600);
  pinMode(BUZZER_PIN, OUTPUT);
}

void loop() {
  // Read the potentiometer value only once every second
  unsigned long currentTime = millis();
  if (currentTime - lastPotReadTime >= 1000) {
    offset = analogRead(potentiometerPin) / 3; // Offset the frequency based on potentiometer reading
    lastPotReadTime = currentTime;

    // Print the potentiometer value
    Serial.println(offset);
  }

  // Check if there's any character available in the serial buffer
  if (Serial.available() > 0) {
    char receivedChar = Serial.read();
    int frequency = 0; // Frequency value for the tone

    // Map received character to frequency
    switch (receivedChar) {
      case 'w': frequency = NOTE_C5; break;
      case 'a': frequency = NOTE_D5; break;
      case 's': frequency = NOTE_E5; break;
      case 'd': frequency = NOTE_F5; break;
      case 'f': frequency = NOTE_G5; break;
      case 'g': frequency = NOTE_A5; break;
      case 'h': frequency = NOTE_C6; break;
      case ' ': frequency = NOTE_B5; break;
      default: break; // Do nothing if character is not recognized
    }

    if (frequency != 0) {
      tone(BUZZER_PIN, frequency + offset, duration); // Play the tone
      delay(duration); // Wait for the tone to complete
      noTone(BUZZER_PIN); // Stop the tone
    }
  }
}
//CCDCFE
//CCDCGF
// for happy Birthday first two lines
Relevant Code for the Makey Makey board
- To press enter (write newline) along with the character
void updateInputStates() {
  inputChanged = false;
  for (int i=0; i<NUM_INPUTS; i++) {
    inputs[i].prevPressed = inputs[i].pressed; // store previous pressed state (only used for mouse buttons)
    if (inputs[i].pressed) {
      if (inputs[i].bufferSum < releaseThreshold) {
        inputChanged = true;
        inputs[i].pressed = false;
        if (inputs[i].isKey) {
          Keyboard.release(inputs[i].keyCode);
        }
        if (inputs[i].isMouseMotion) {
          mouseHoldCount[i] = 0;  // input becomes released, reset mouse hold
        }
      }
      else if (inputs[i].isMouseMotion) {
        mouseHoldCount[i]++; // input remains pressed, increment mouse hold
      }
    }
    else if (!inputs[i].pressed) {
      if (inputs[i].bufferSum > pressThreshold) {  // input becomes pressed
        inputChanged = true;
        inputs[i].pressed = true;
        if (inputs[i].isKey) {
          Keyboard.press(inputs[i].keyCode);
          // Print the key code before pressing Enter
          Keyboard.write('\n');
        }
      }
    }
  }
#ifdef DEBUG3
  if (inputChanged) {
    Serial.println("change");
  }
#endif
}
2. To configure the outputs of makey makey
#include "Arduino.h"

/*
/////////////////////////////////////////////////////////////////////////
// KEY MAPPINGS: WHICH KEY MAPS TO WHICH PIN ON THE MAKEY MAKEY BOARD? //
/////////////////////////////////////////////////////////////////////////

  - edit the keyCodes array below to change the keys sent by the MaKey MaKey for each input
  - the comments tell you which input sends that key (for example, by default 'w' is sent by pin D5)
  - change the keys by replacing them. for example, you can replace 'w' with any other individual letter,
    number, or symbol on your keyboard
  - you can also use codes for other keys such as modifier and function keys (see the
    the list of additional key codes at the bottom of this file)

*/

int keyCodes[NUM_INPUTS] = {
  // top side of the makey makey board

  KEY_UP_ARROW,      // up arrow pad
  KEY_DOWN_ARROW,    // down arrow pad
  KEY_LEFT_ARROW,    // left arrow pad
  KEY_RIGHT_ARROW,   // right arrow pad
  ' ',               // space button pad
  MOUSE_LEFT,        // click button pad

  // female header on the back left side

  'w',                // pin D5
  'a',                // pin D4
  's',                // pin D3
  'd',                // pin D2
  'f',                // pin D1
  'g',                // pin D0aa

  // female header on the back right side

  'h',      // pin A5
  MOUSE_MOVE_DOWN,    // pin A4
  MOUSE_MOVE_LEFT,    // pin A3
  MOUSE_MOVE_RIGHT,   // pin A2
  MOUSE_LEFT,         // pin A1
  MOUSE_RIGHT         // pin A0
};

///////////////////////////
// NOISE CANCELLATION /////
///////////////////////////
#define SWITCH_THRESHOLD_OFFSET_PERC  5    // number between 1 and 49
                                           // larger value protects better against noise oscillations, but makes it harder to press and release
                                           // recommended values are between 2 and 20
                                           // default value is 5

#define SWITCH_THRESHOLD_CENTER_BIAS 55   // number between 1 and 99
                                          // larger value makes it easier to "release" keys, but harder to "press"
                                          // smaller value makes it easier to "press" keys, but harder to "release"
                                          // recommended values are between 30 and 70
                                          // 50 is "middle" 2.5 volt center
                                          // default value is 55
                                          // 100 = 5V (never use this high)
                                          // 0 = 0 V (never use this low


/////////////////////////
// MOUSE MOTION /////////
/////////////////////////
#define MOUSE_MOTION_UPDATE_INTERVAL  35   // how many loops to wait between
                                           // sending mouse motion updates

#define PIXELS_PER_MOUSE_STEP         4     // a larger number will make the mouse
                                           // move faster

#define MOUSE_RAMP_SCALE              150  // Scaling factor for mouse movement ramping
                                           // Lower = more sensitive mouse movement
                                           // Higher = slower ramping of speed
                                           // 0 = Ramping off

#define MOUSE_MAX_PIXELS              10   // Max pixels per step for mouse movement

/*

///////////////////////////
// ADDITIONAL KEY CODES ///
///////////////////////////

- you can use these codes in the keyCodes array above
- to get modifier keys, function keys, etc

KEY_LEFT_CTRL
KEY_LEFT_SHIFT
KEY_LEFT_ALT
KEY_LEFT_GUI
KEY_RIGHT_CTRL
KEY_RIGHT_SHIFT
KEY_RIGHT_ALT
KEY_RIGHT_GUI

KEY_BACKSPACE
KEY_TAB
KEY_RETURN
KEY_ESC
KEY_INSERT
KEY_DELETE
KEY_PAGE_UP
KEY_PAGE_DOWN
KEY_HOME
KEY_END
KEY_CAPS_LOCK

KEY_F1
KEY_F2
KEY_F3
KEY_F4
KEY_F5
KEY_F6
KEY_F7
KEY_F8
KEY_F9
KEY_F10
KEY_F11
KEY_F12

*/
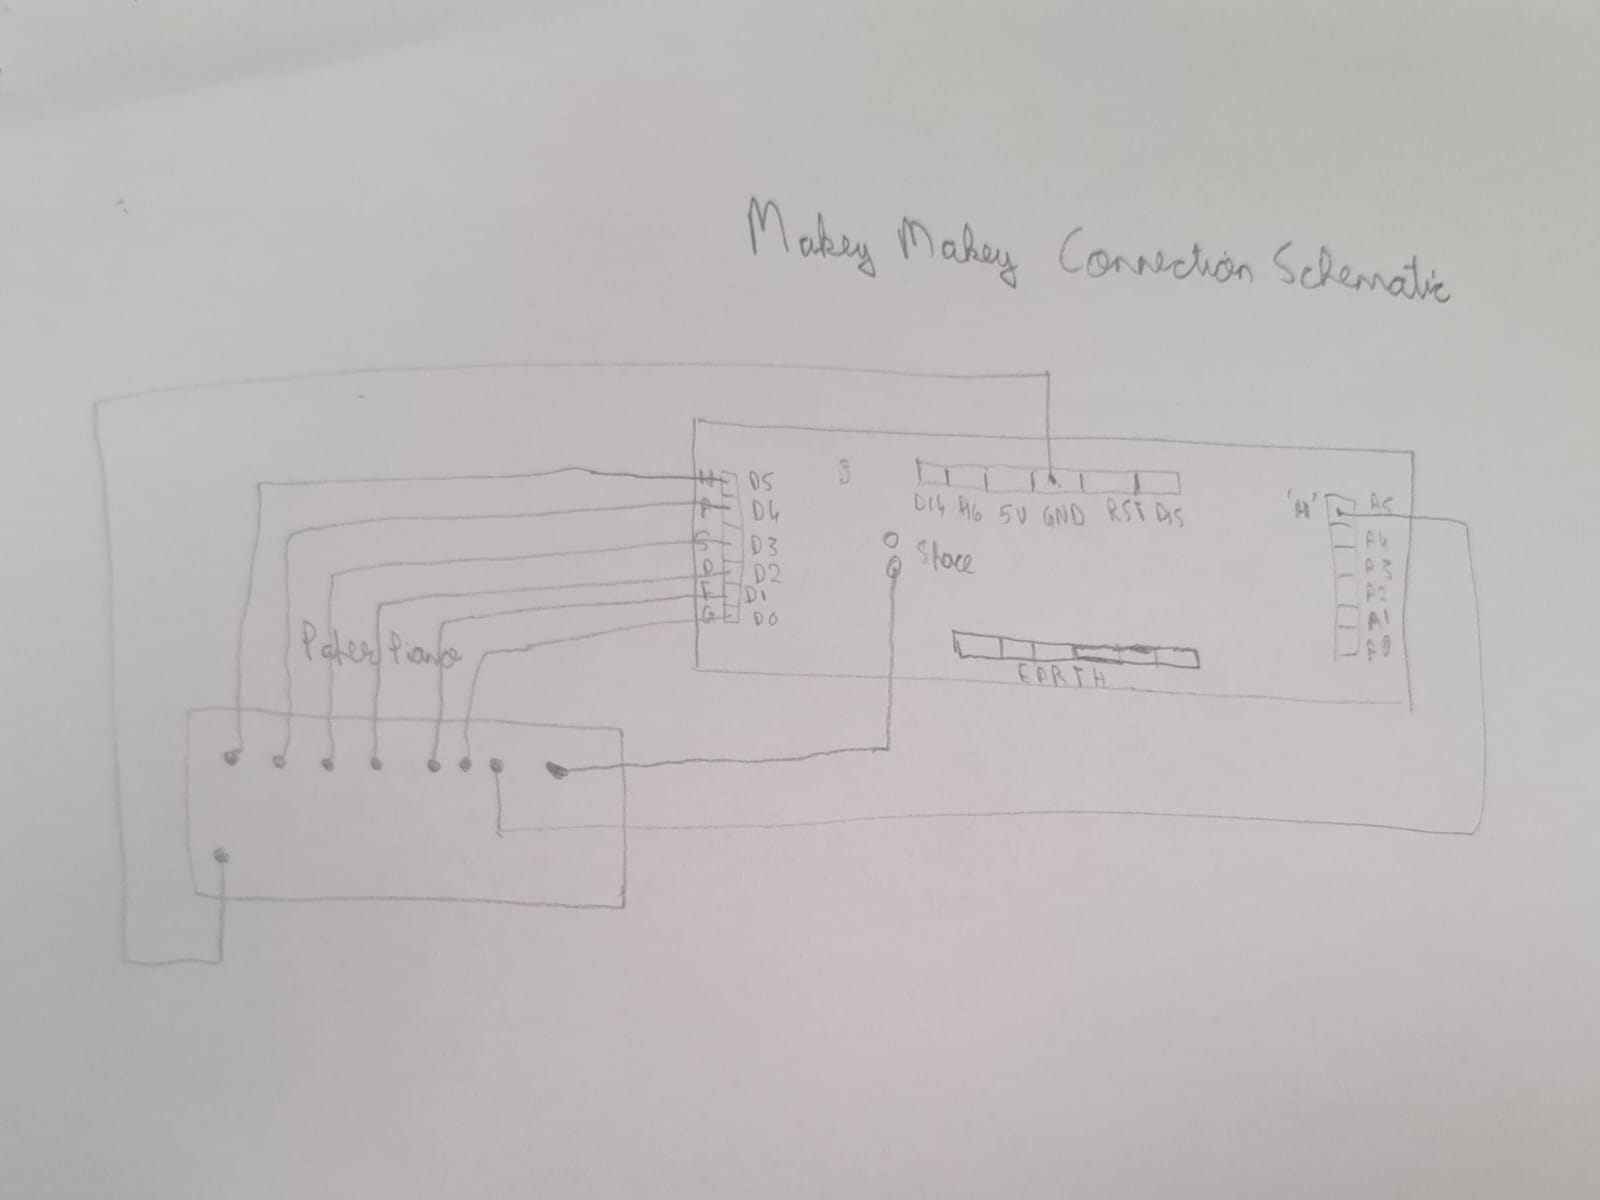
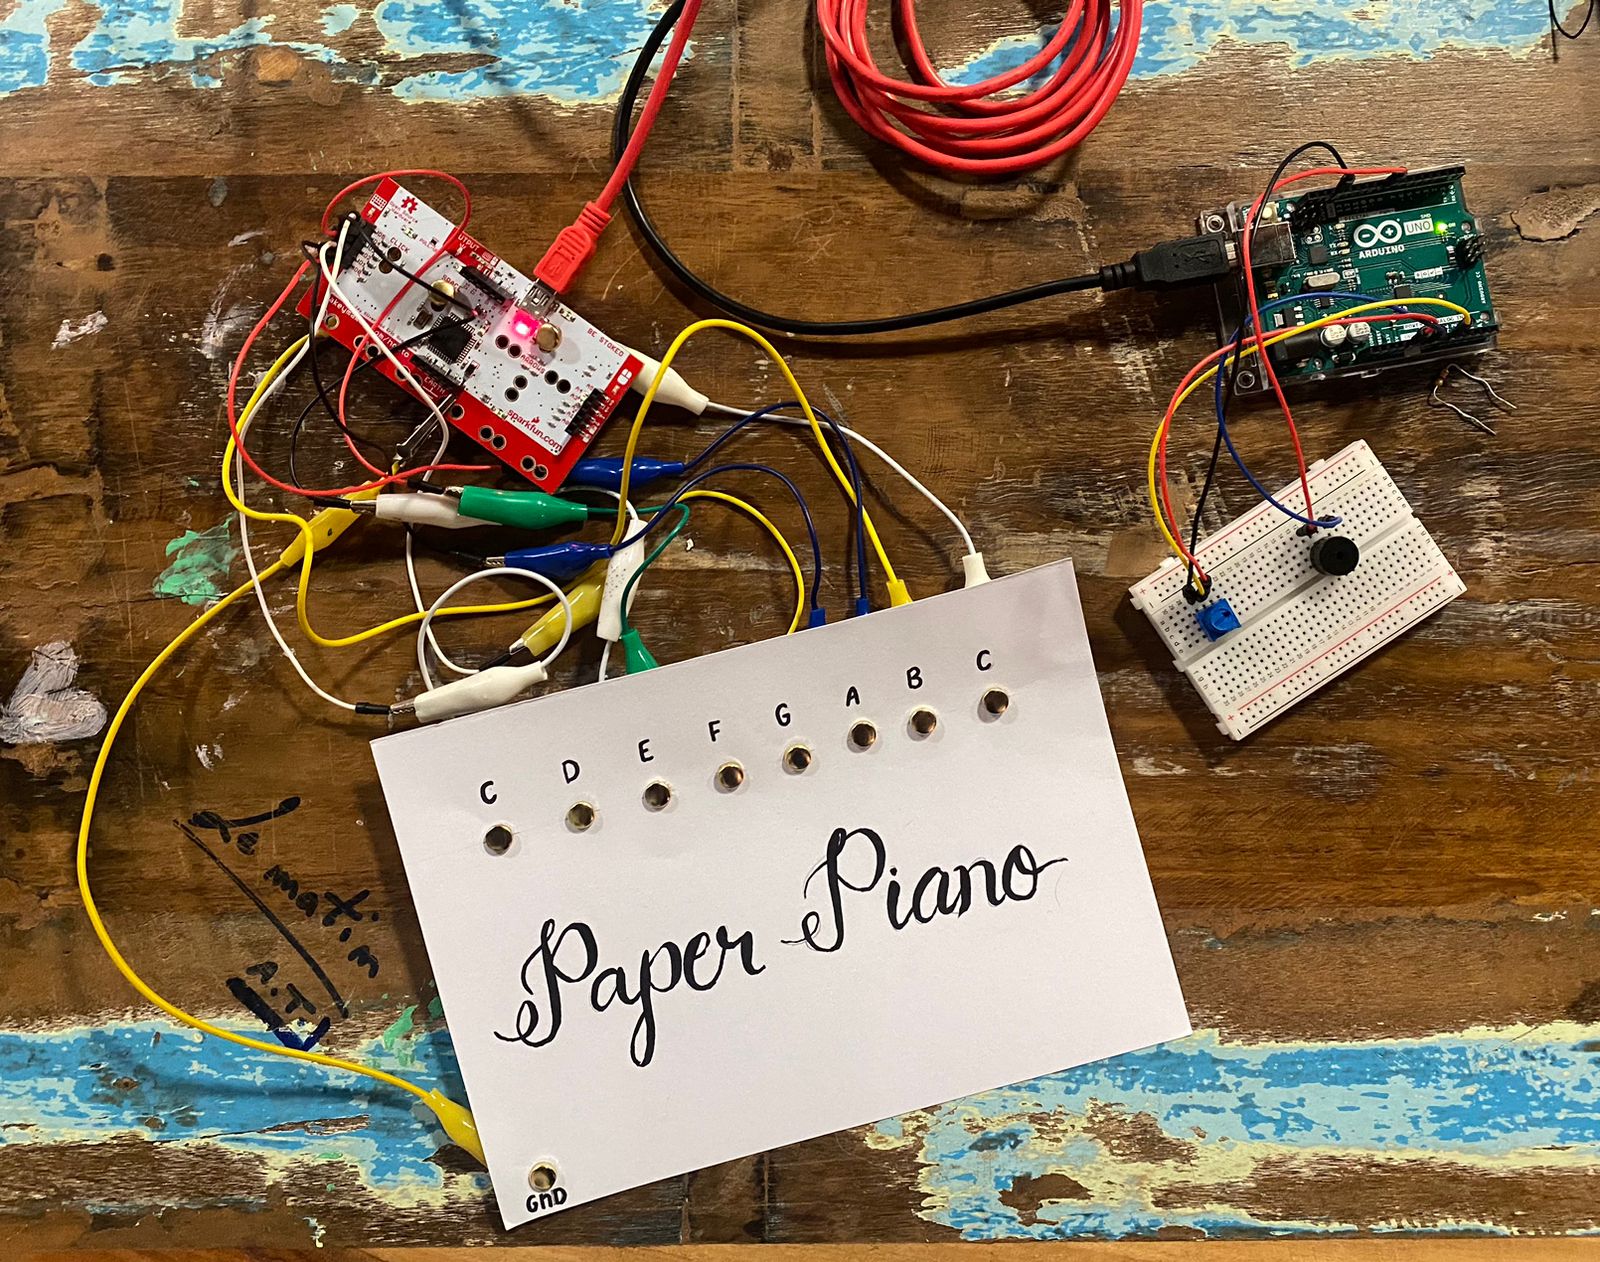
Connections and Schematics


Images and Video
Challenges
- Could not use a direct serial communication between Arduino and Makey Makey because the Makey Makey has only 2 digital output pins. The work around to this was using the PC as an interface.
- Had to find the right notes so that the piano would sound good , after a bit of experimentation , the 4th Octave of the C scale sounded very good so we decided to go with it.
- Had to find a correct value for the potentiometer offset, which we found through some experimentation.
- Had to find a way to enter the output of makey makey in the serial of Arduino UNO for communication . Used the Laptop keyboard as an interface for this.
- Had trouble using analogRead and Tone together. So,had to use the concept ofBlinkWithoutDelay using mills() function to take analogRead input only once every second.
Reflections and Further Improvements
This could be improved by :
- Adding more notes
- Better range
- Improving aesthetics
- It could be possible to ground without using one hand so that both hands are free.
- Since we are using tone(), we cannot press multiple keys at the same time .
Overall, The project turned out very well. Exploring using a different board also using Arduino to make a project that is interactable in a creative way was a great experience. This inspires us to explore further and discover new types of boards and sensors. We hope to use what we have learned in our final projects too .