
Concept
While brainstorming for this assignment, we decided that we would like to make a project that utilizes the photocell and the buttons. The photocell changes its resistance value depending on the light intensity. And this inspired us to explore interactions between light presence and absence. We came up with a cute project called the “Lullaby Box”, which plays nursery rhymes when the photocell is covered and a button is pressed. This project features yellow, red, and green buttons, each corresponding to different songs: ‘Mary Had a Little Lamb,’ ‘Twinkle Twinkle Little Star,’ and ‘Happy Birthday Song,’ respectively. The rationale for the songs playing only when the photocell is covered is tied to the project’s purpose: to soothe children to sleep in the dark.
Schematics and Diagram
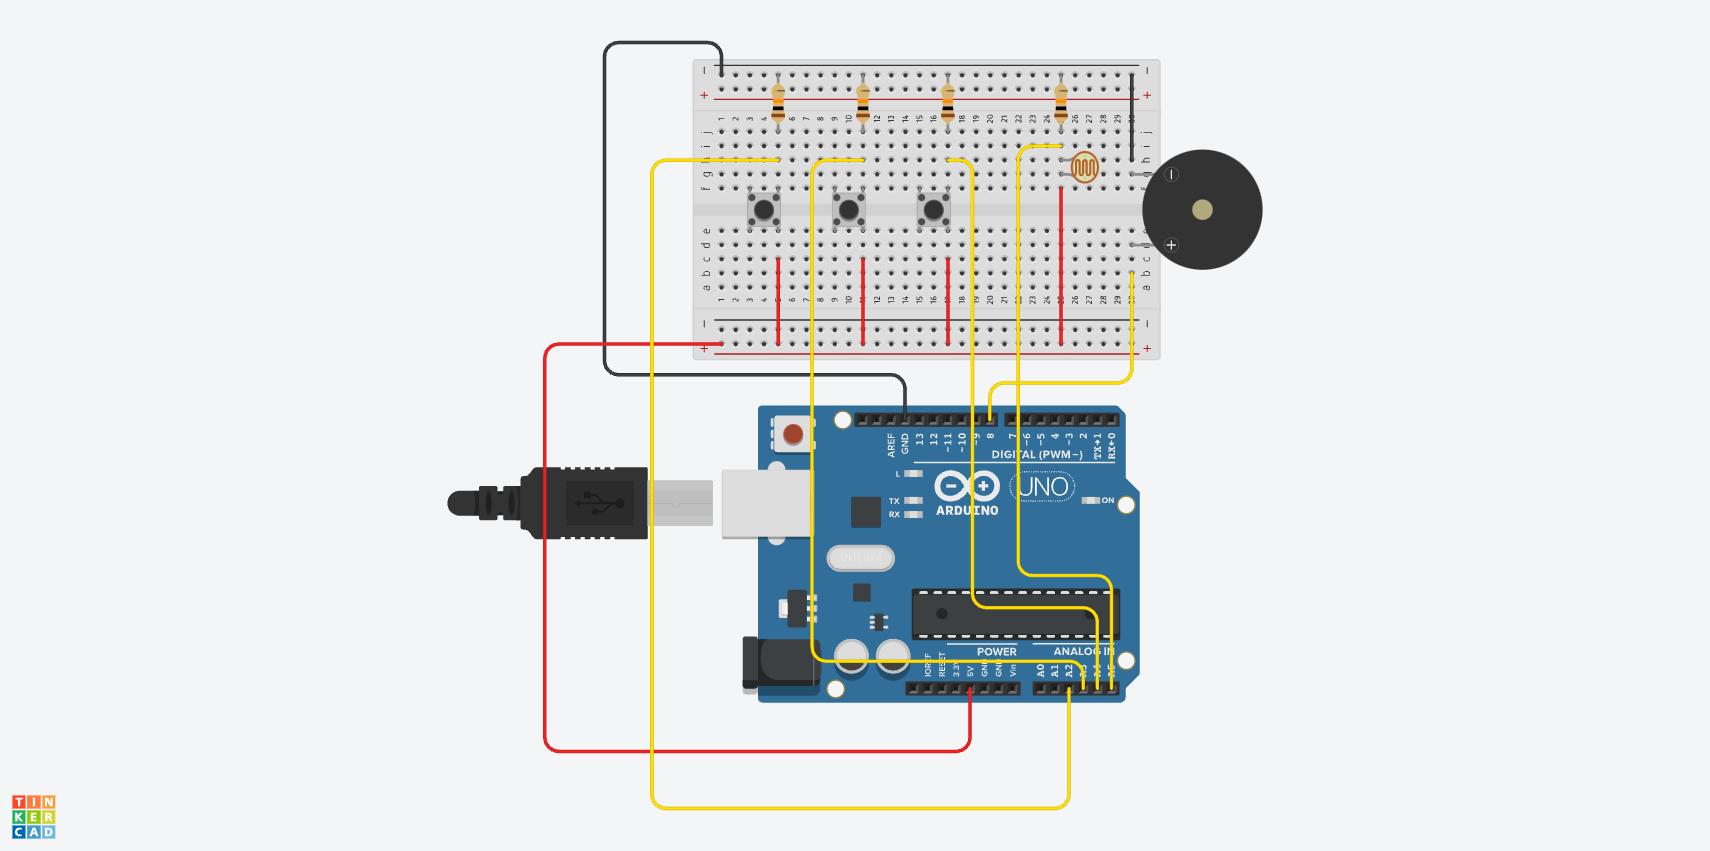
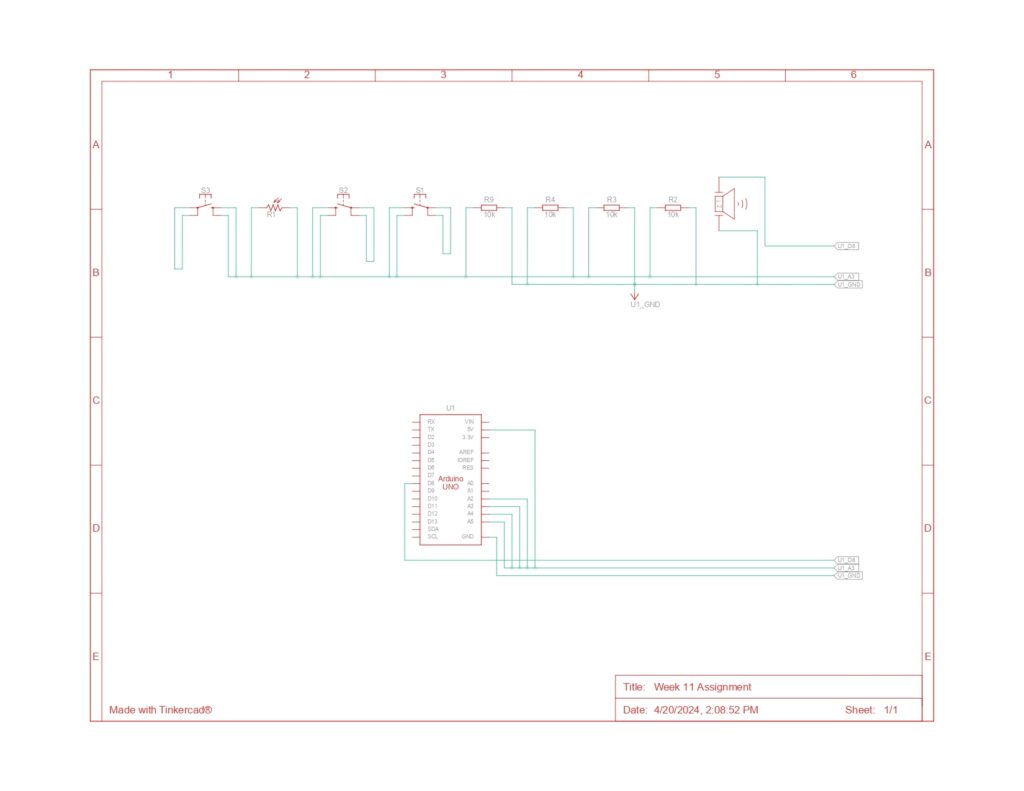
The circuit consists of three main parts: the light sensor, the Piezo Speaker, and the buttons. The light sensor is connected to port A5 for analog reading. It acts as a button in the circuit, allowing the song to play when the photocell is covered. The buttons are the main controller of this assignment. They are connected to ports A2, A3, and A4 for digital reading. The song will only play when the photocell is covered (its value is low) and the button is pressed. Each button is responsible for a different song that will be played by the Piezo Speaker (connected to port 8 for digital output).
Arduino Code
#include "pitches.h"
//mary had a little lamb
int melody1[] = {
  NOTE_E4, NOTE_D4, NOTE_C4, NOTE_D4, NOTE_E4, NOTE_E4, NOTE_E4, NOTE_D4, NOTE_D4, NOTE_D4,
  NOTE_E4, NOTE_G4, NOTE_G4, NOTE_E4, NOTE_D4, NOTE_C4, NOTE_D4, NOTE_E4, NOTE_E4, NOTE_E4,
  NOTE_E4, NOTE_D4, NOTE_D4, NOTE_E4, NOTE_D4, NOTE_C4
};
// twinkle twinkle little star
int melody2[]={
  NOTE_C4, NOTE_C4, NOTE_G4, NOTE_G4, NOTE_A4, NOTE_A4, NOTE_G4, NOTE_F4, NOTE_F4, NOTE_E4,
  NOTE_E4, NOTE_D4, NOTE_D4, NOTE_C4, NOTE_G4, NOTE_G4, NOTE_F4, NOTE_F4, NOTE_E4, NOTE_E4,
  NOTE_D4, NOTE_G4, NOTE_G4, NOTE_F4, NOTE_F4, NOTE_E4, NOTE_E4, NOTE_D4, NOTE_C4, NOTE_C4,
  NOTE_G4, NOTE_G4, NOTE_A4, NOTE_A4, NOTE_G4, NOTE_F4, NOTE_F4, NOTE_E4, NOTE_E4, NOTE_D4,
  NOTE_D4, NOTE_C4
};
// happy birthday
int melody3[] = {
  NOTE_G4, NOTE_G4, NOTE_A4, NOTE_G4, NOTE_C5, NOTE_B4,
  NOTE_G4, NOTE_G4, NOTE_A4, NOTE_G4, NOTE_D5, NOTE_C5,
  NOTE_G4, NOTE_G4, NOTE_G5, NOTE_E5, NOTE_C5, NOTE_B4, NOTE_A4,
  NOTE_F5, NOTE_F5, NOTE_E5, NOTE_C5, NOTE_D5, NOTE_C5
};


int noteDurations[] = {
  4, 4, 4, 4, 4, 4, 2, 4, 4, 2, 4, 4, 2, 4, 4, 4, 4, 4, 4, 4, 4, 4, 4, 4, 4, 1
};
int noteDurations2[] = {
  4,4,4,4,4,4,2,4,4,4,4,4,4,2,4,4,4,4,4,4,2,4,4,4,4,4,4,2,4,4,4,4,4,4,2,4,4,4,4,4,4,2
};

int noteDurations3[] = {
  8, 8, 4, 4, 4, 2,
  8, 8, 4, 4, 4, 2,
  8, 8, 4, 4, 4, 4, 4,
  8, 8, 4, 4, 4, 2
};


void setup() {
  Serial.begin(9600);
  pinMode(A4, INPUT); // yellow switch

}

void loop() {
  int sensorValue= analogRead(A5);
  int yellowButtonState = digitalRead(A4);
  int redButtonState = digitalRead(A3);
  int greenButtonState= digitalRead(A2);
  // Serial.println(sensorValue);
  if (sensorValue<=800){
  if (yellowButtonState == HIGH) {
    // Play the melody only if the button is pressed
    for (int thisNote = 0; thisNote < 26; thisNote++) {
      // Check the button state inside the loop
      yellowButtonState = digitalRead(A4);
      if (yellowButtonState == LOW) {
        noTone(8);
        break; // Exit the loop if the button is released
      }

      int noteDuration = 1000 / noteDurations[thisNote];
      tone(8, melody1[thisNote], noteDuration);
      int pauseBetweenNotes = noteDuration * 1.30;

      // Use non-blocking delay
      int startTime = millis();
      while (millis() - startTime < pauseBetweenNotes) {
        // Update the button state
        yellowButtonState = digitalRead(A4);
        if (yellowButtonState == LOW) {
          noTone(8);
          break; // Stop the tone if the button is released
        }
      }
      noTone(8); // Ensure the tone is stopped after the loop
    }
  }
  else if (redButtonState == HIGH) {
    // Play the melody only if the button is pressed
    for (int thisNote = 0; thisNote < 42; thisNote++) {
      // Check the button state inside the loop
      redButtonState = digitalRead(A3);
      if (redButtonState == LOW) {
        noTone(8);
        break; // Exit the loop if the button is released
      }

      int noteDuration = 1000 / noteDurations2[thisNote];
      tone(8, melody2[thisNote], noteDuration);
      int pauseBetweenNotes = noteDuration * 1.30;

      // Use non-blocking delay
      int startTime = millis();
      while (millis() - startTime < pauseBetweenNotes) {
        // Update the button state
        redButtonState = digitalRead(A3);
        if (redButtonState == LOW) {
          noTone(8);
          break; // Stop the tone if the button is released
        }
      }
      noTone(8); // Ensure the tone is stopped after the loop
    }
  }
    else if (greenButtonState == HIGH) {
    // Play the melody only if the button is pressed
    for (int thisNote = 0; thisNote < 25; thisNote++) {
      // Check the button state inside the loop
      greenButtonState = digitalRead(A2);
      if (greenButtonState == LOW) {
        noTone(8);
        break; // Exit the loop if the button is released
      }

      int noteDuration = 1000 / noteDurations3[thisNote];
      tone(8, melody3[thisNote], noteDuration);
      int pauseBetweenNotes = noteDuration * 1.30;

      int startTime = millis();
      while (millis() - startTime < pauseBetweenNotes) {
        // Update the button state
        greenButtonState = digitalRead(A2);
        if (greenButtonState == LOW) {
          noTone(8);
          break; // Stop the tone if the button is released
        }
      }
      noTone(8); // Ensure the tone is stopped after the loop
    }
  }
   else {
    noTone(8); // Ensure the tone is stopped if not in the loop
  }
}}
Firstly, we initialize the code with arrays of the melody we will play. There are 3 different songs: ‘Mary Had a Little Lamb,’ ‘Twinkle Twinkle Little Star,’ and ‘Happy Birthday Song’. Each song will have one array for the notes and another array for the note durations.
Next, we initialized all the input readings at A2, A3, A4, and A5 for the buttons and the photocell. To run the songs, we continuously check for the value of the photocell to allow the buttons to turn on the songs. If the photocell is covered (the value is low), the song will play according to the buttons. For each note that is about to play, the code will check for the state of the button whether it is pressed or not. If the button is not pressed, the song will stop playing immediately.
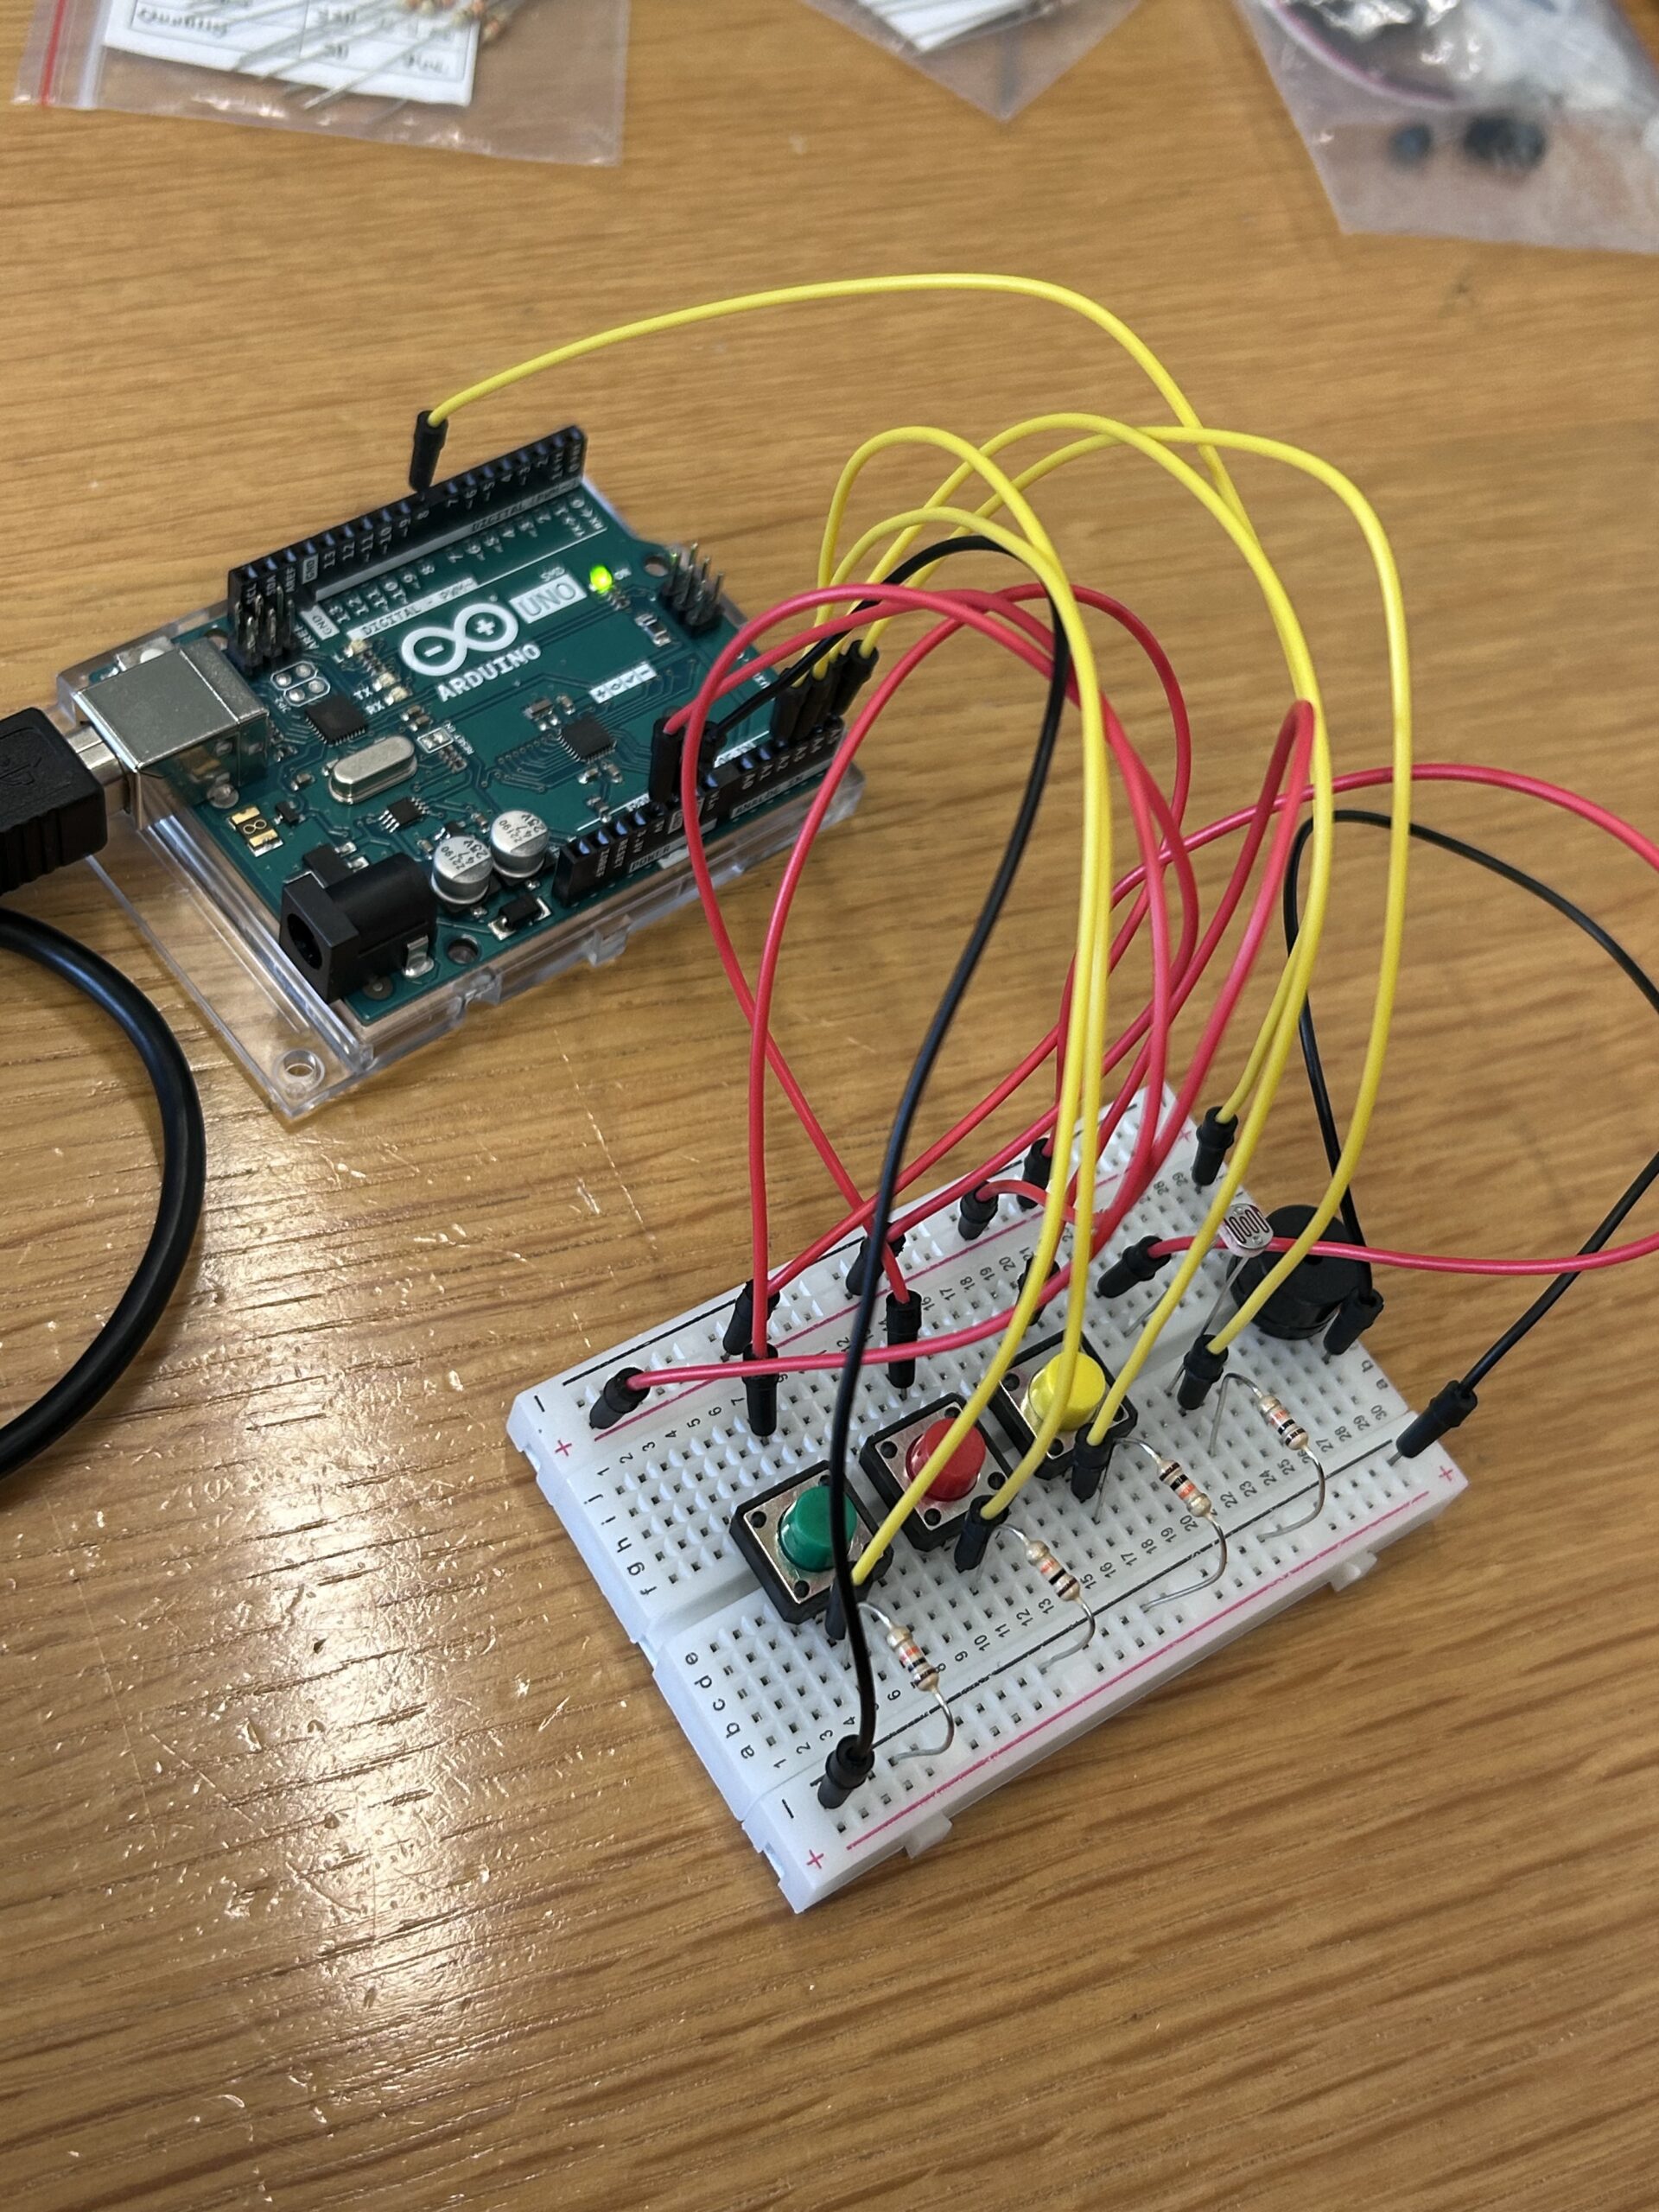
Built Circuit Based on the Diagram
Demonstration of the Final Outcome
Challenges and Reflection
We genuinely enjoyed tackling this assignment, despite its initial challenges. Creating the melodies was particularly tricky since neither of us is knowledgeable about musical composition and notes. Eventually, we grasped what was required and made progress.
A weird issue arose while we were constructing the circuits for this project. To determine the resistance value of the photocell, we attempted to use code and the serial monitor. However, we discovered that the photocell was malfunctioning. Initially, we suspected errors in our coding or circuit assembly. Despite repeatedly consulting past lecture slides, re-uploading the code, and rebuilding the circuit, we couldn’t pinpoint any mistakes. Then, quite mysteriously, the photocell began functioning correctly after another code upload. We still don’t understand the cause of this issue. Aside from this strange incident, we encountered no significant problems throughout the project
For improvement, we would like to add more button switches and songs for the variety of choices. In this way, the range of songs that the Lullaby box can offer would make this project more entertaining to play with during the nap time of children. Also, we think it would be nice if we could change the volume through the potentiometer. We think that this would enhance user control, allowing the sound level to be easily modified to suit the environment and preferences of the user.