Concept:
Imagine it’s the year 2100. They apparently discovered a robot from back in 2023 at the museum. They say it used to be the best at one point of time. Robots could just ‘talk’ back then, you know? And even that would be some inferior form of consciousness – simply mimicry. But oh wow, how it enchanted the people back then.
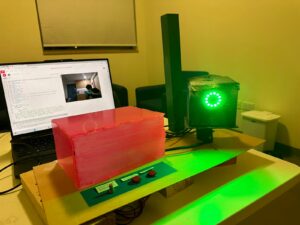
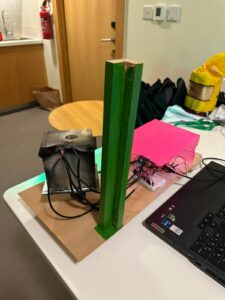
This is a project where the user can interact and communicate with a talking robot. In building this project I made extensive use of the ChatGPT API, for text generation and the p5.speech library for speech to text and text to speech. Additionally, I use the ml5.js library for person tracking that is done physically using a servo motor. Aesthetically, I was inspired by “Wall-E” to use the broken-down and creaky cardboard box aesthetic for my main moving robot head.
User Testing:
Implementation:
Interaction Design:
The user interacts with the robot by talking to it/moving around, patting the robot on its head, and turning a potentiometer/pressing a button. The robot tracks the user around making it seem conscious.
The talking aspect is simple, as in the robot listens to the user when the light is green, processes information when the indicator light is blue, and speaks when the indicator light is green – making it clear when the user can talk. The user can also press the “Click a photo” button and then ask a question to give the robot an image input too. Finally, the user can choose one of three possible moods for the robot – a default mode, a mode that gives the user more thoughtful answers, and a mode where the robot has an excited personality.
Arduino:
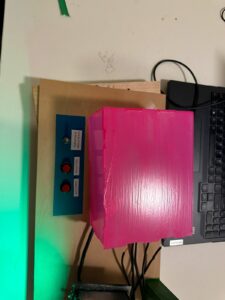
The Arduino controls the servo motor moving the robot head, the neopixels lights, the light sensor, the potentiometer and the two buttons. In terms of computations it computes what color the neopixels should be.
#include <Servo.h>
#include <Adafruit_NeoPixel.h>

// Pin where the NeoPixel is connected
#define PIN            11

// Number of NeoPixels in the strip
#define NUMPIXELS      12

// Create a NeoPixel object
Adafruit_NeoPixel strip = Adafruit_NeoPixel(NUMPIXELS, PIN, NEO_GRB + NEO_KHZ800);
Servo myservo;  // Create servo object
int pos = 90;   // Initial position
int neostate=0;
int onButton = 4;
int picButton = 7;
int potpin=A1;

void neo_decide(int neo){
  //starting
  if(neo==0)
  {
    setColorAndBrightness(strip.Color(100, 200, 50), 128); // 128 is approximately 50% of 255
    strip.show();
  }
  //listening
  else if(neo==1)
  {
    setColorAndBrightness(strip.Color(0, 255, 0), 128); // 128 is approximately 50% of 255
    strip.show();
  }
  //thinking
  else if(neo==2)
  {
    setColorAndBrightness(strip.Color(0, 128, 128), 128); // 128 is approximately 50% of 255
    strip.show();
  }
  //speaking
  else if(neo==3)
  {
    setColorAndBrightness(strip.Color(255, 0, 0), 128); // 128 is approximately 50% of 255
    strip.show();
  }
  //standby
  else
  {
    setColorAndBrightness(strip.Color(128, 0, 128), 128); // 128 is approximately 50% of 255
    strip.show();
  }
}

void setColorAndBrightness(uint32_t color, int brightness) {
  strip.setBrightness(brightness);
  for(int i = 0; i < strip.numPixels(); i++) {
    strip.setPixelColor(i, color);
    strip.show();
  }
}

void setup() {
  // Start serial communication so we can send data
  // over the USB connection to our p5js sketch
  myservo.attach(9);  // Attaches the servo on pin 9
  Serial.begin(9600);
  strip.begin();
  strip.show();
  pinMode(onButton, INPUT_PULLUP);
  pinMode(picButton, INPUT_PULLUP);
  // start the handshake
  while (Serial.available() <= 0) {
    digitalWrite(LED_BUILTIN, HIGH); // on/blink while waiting for serial data
    Serial.println("0"); // send a starting message
    delay(300);            // wait 1/3 second
    digitalWrite(LED_BUILTIN, LOW);
    delay(50);
  }
}

void loop() {
  // wait for data from p5 before doing something
  while (Serial.available()) {
    digitalWrite(LED_BUILTIN, HIGH); // led on while receiving data

    pos = Serial.parseInt();
    neostate = Serial.parseInt();
    neo_decide(neostate);
    if (Serial.read() == '\n') {
      myservo.write(pos);   // Move servo to position
      int lightstate=analogRead(A0);
      int onbuttonstate=digitalRead(onButton);
      int picbuttonstate=digitalRead(picButton);
      int potstate=analogRead(potpin);
      Serial.print(lightstate);
      Serial.print(',');
      Serial.print(potstate);
      Serial.print(',');
      Serial.print(onbuttonstate);
      Serial.print(',');
      Serial.println(picbuttonstate);
    }
  }
  digitalWrite(LED_BUILTIN, LOW);
}
P5.js
The p5.js code does most of the work for this project. Firstly, it handles the API calls to GPT3.5 Turbo and GPT-4-vision-preview models. When the user is talking to the robot normally, I send the API calls to the cheaper GPT3.5 turbo model, when the user wants to send an image input, I convert all the previously sent inputs into the format necessary for the GPT4-vision-preview model along with the image.
Second, I use the ml5.js library and the ‘cocossd’ object detection model to detect a human on the camera field of vision and draw a bounding box around it. Then we take the center of the bounding box and attempt to map the servo motor’s movement to this.
The text to speech and speech to text functionalities are done using the p5.Speech library. While doing this, we keep a track of what state we are in currently.
Lastly, we also keep track of whether the system is on right now, the light sensor’s values, and whether the click a photo button was pressed. The ‘on’ button, as the name suggests acts as a toggle for the system’s state, the light sensor starts a specific interaction when it’s value is below a threshold, and the photo button informs us about which API call to make.
Finally, we can also switch between the model’s different personalities by using the potentiometer and this is handled in the updateMood() function.
Communication between Arduino – P5
The Arduino communicates the button states, the potentiometer state, and the light sensor state to the p5.js program and receives inputs for the neopixel state, and the servo motor state.
Highlights:
For me the highlights of this project have to be designing the physical elements and handling the complex API call mechanics. Due to the fact that I use two different models that have different API input structures, the transformation between them was time-consuming to implement. Additionally, the p5.speech library that I use extensively is relatively unreliable and took a lot of attempts for me to use correctly.
Additionally, it was exciting to watch the different ways people interacted with the robot at the IM showcase. A large percent of people were interested in using the robot as a fashion guide assistant! I think overall, this was a really interesting demonstration of the potential of generative AI technology and I would love to build further using it!
Future Work:
There are several features I would love to add to this project in future iterations. Some of these include:
- Do a basic talking animation by moving the robot’s head up and down during the talking phase. Additionally, perhaps make the robot mobile so it can move about.
- Make the camera track the person in the front. This can be done by making the person wear a specific object – or some sophisticated ML trick.
- Have additional interactions and add parts to the robot such as more expressive ears etc.
- Use a more robust box and fit the arduino breadboard, camera, speaker etc. inside the robot head.
- Make the neopixels implementation more aesthetic by employing colored patterns and animations.


