
Concept:
My project concept is one I came to fall in love with. I always liked the idea of taking pictures and so being able to create an interactive environment, where I am able to solve a puzzle using a picture I just took, I think is very fun. This I think is a metaphor for just how challenging but fun this class was. The puzzle could represent some of the challenges I faced throughout the class and building the puzzle represents the way in which my skills developed over the course of the 14 weeks. At the end when you look at the finished puzzle and feel proud of yourself for solving, represents how happy and proud I am of myself, not only to have finished the class, but having done so with new skills and I guess a love for physical computing. I feel like a genius, which is exactly what my LCD screen says when I complete the puzzle.
Schematic and Modelling: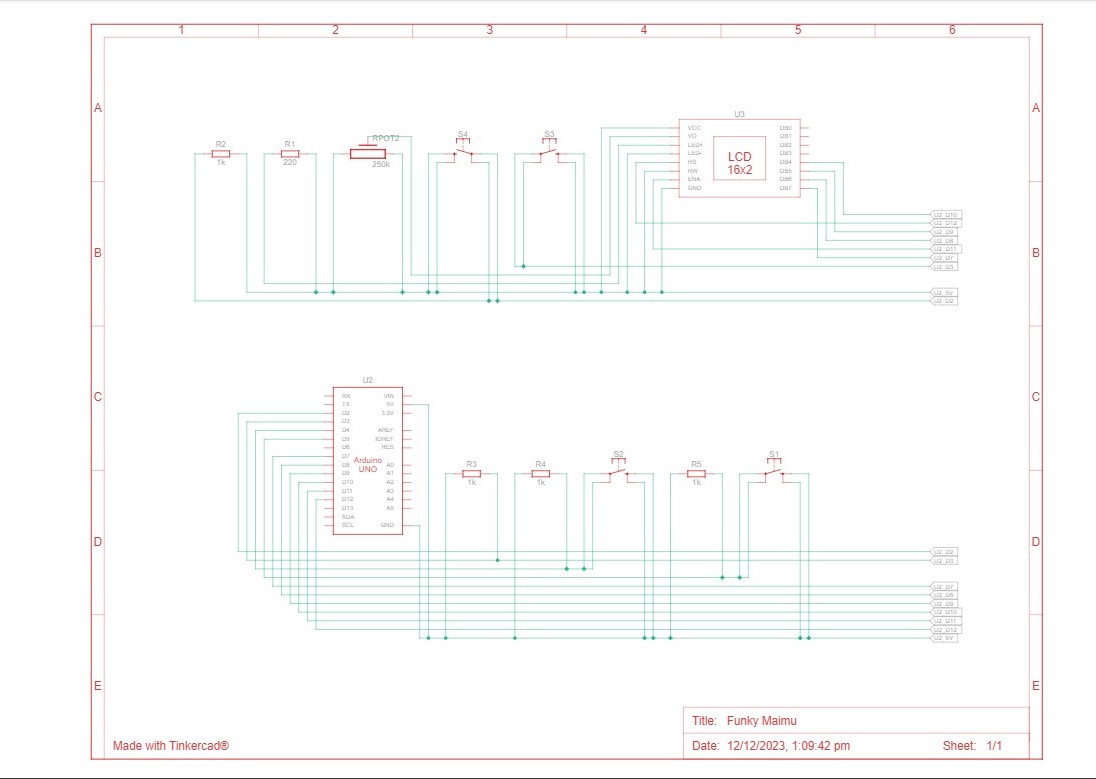
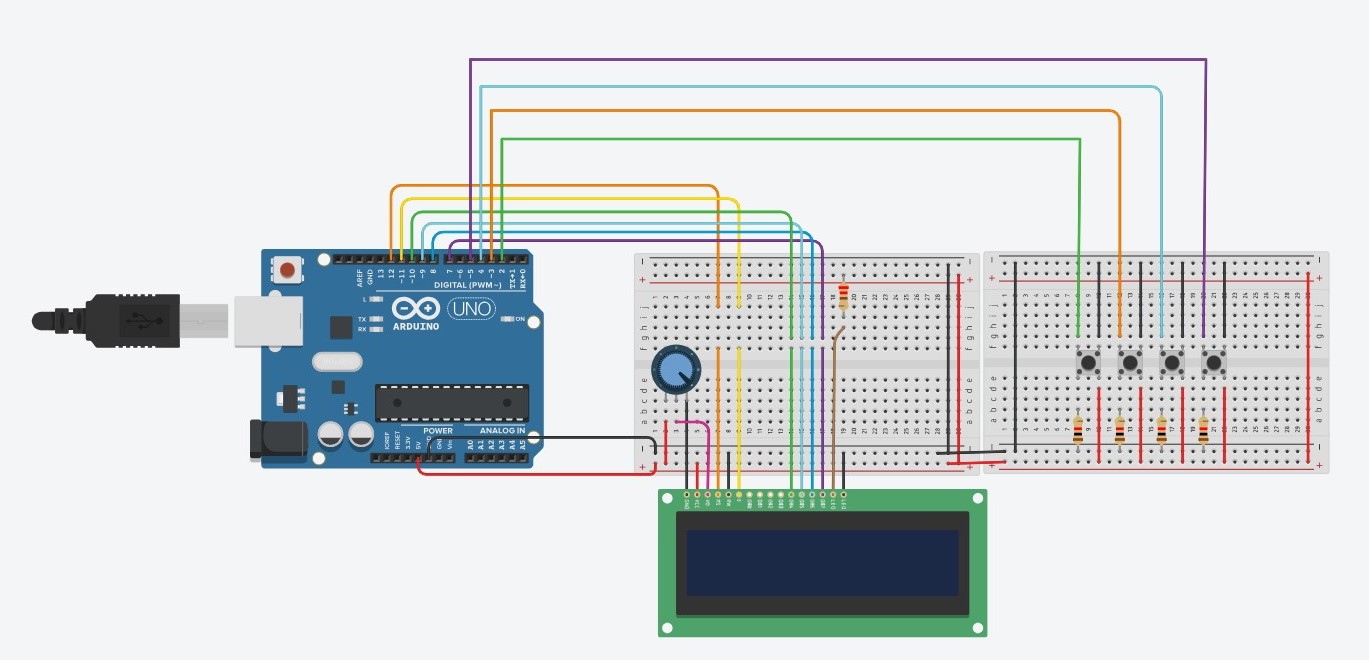
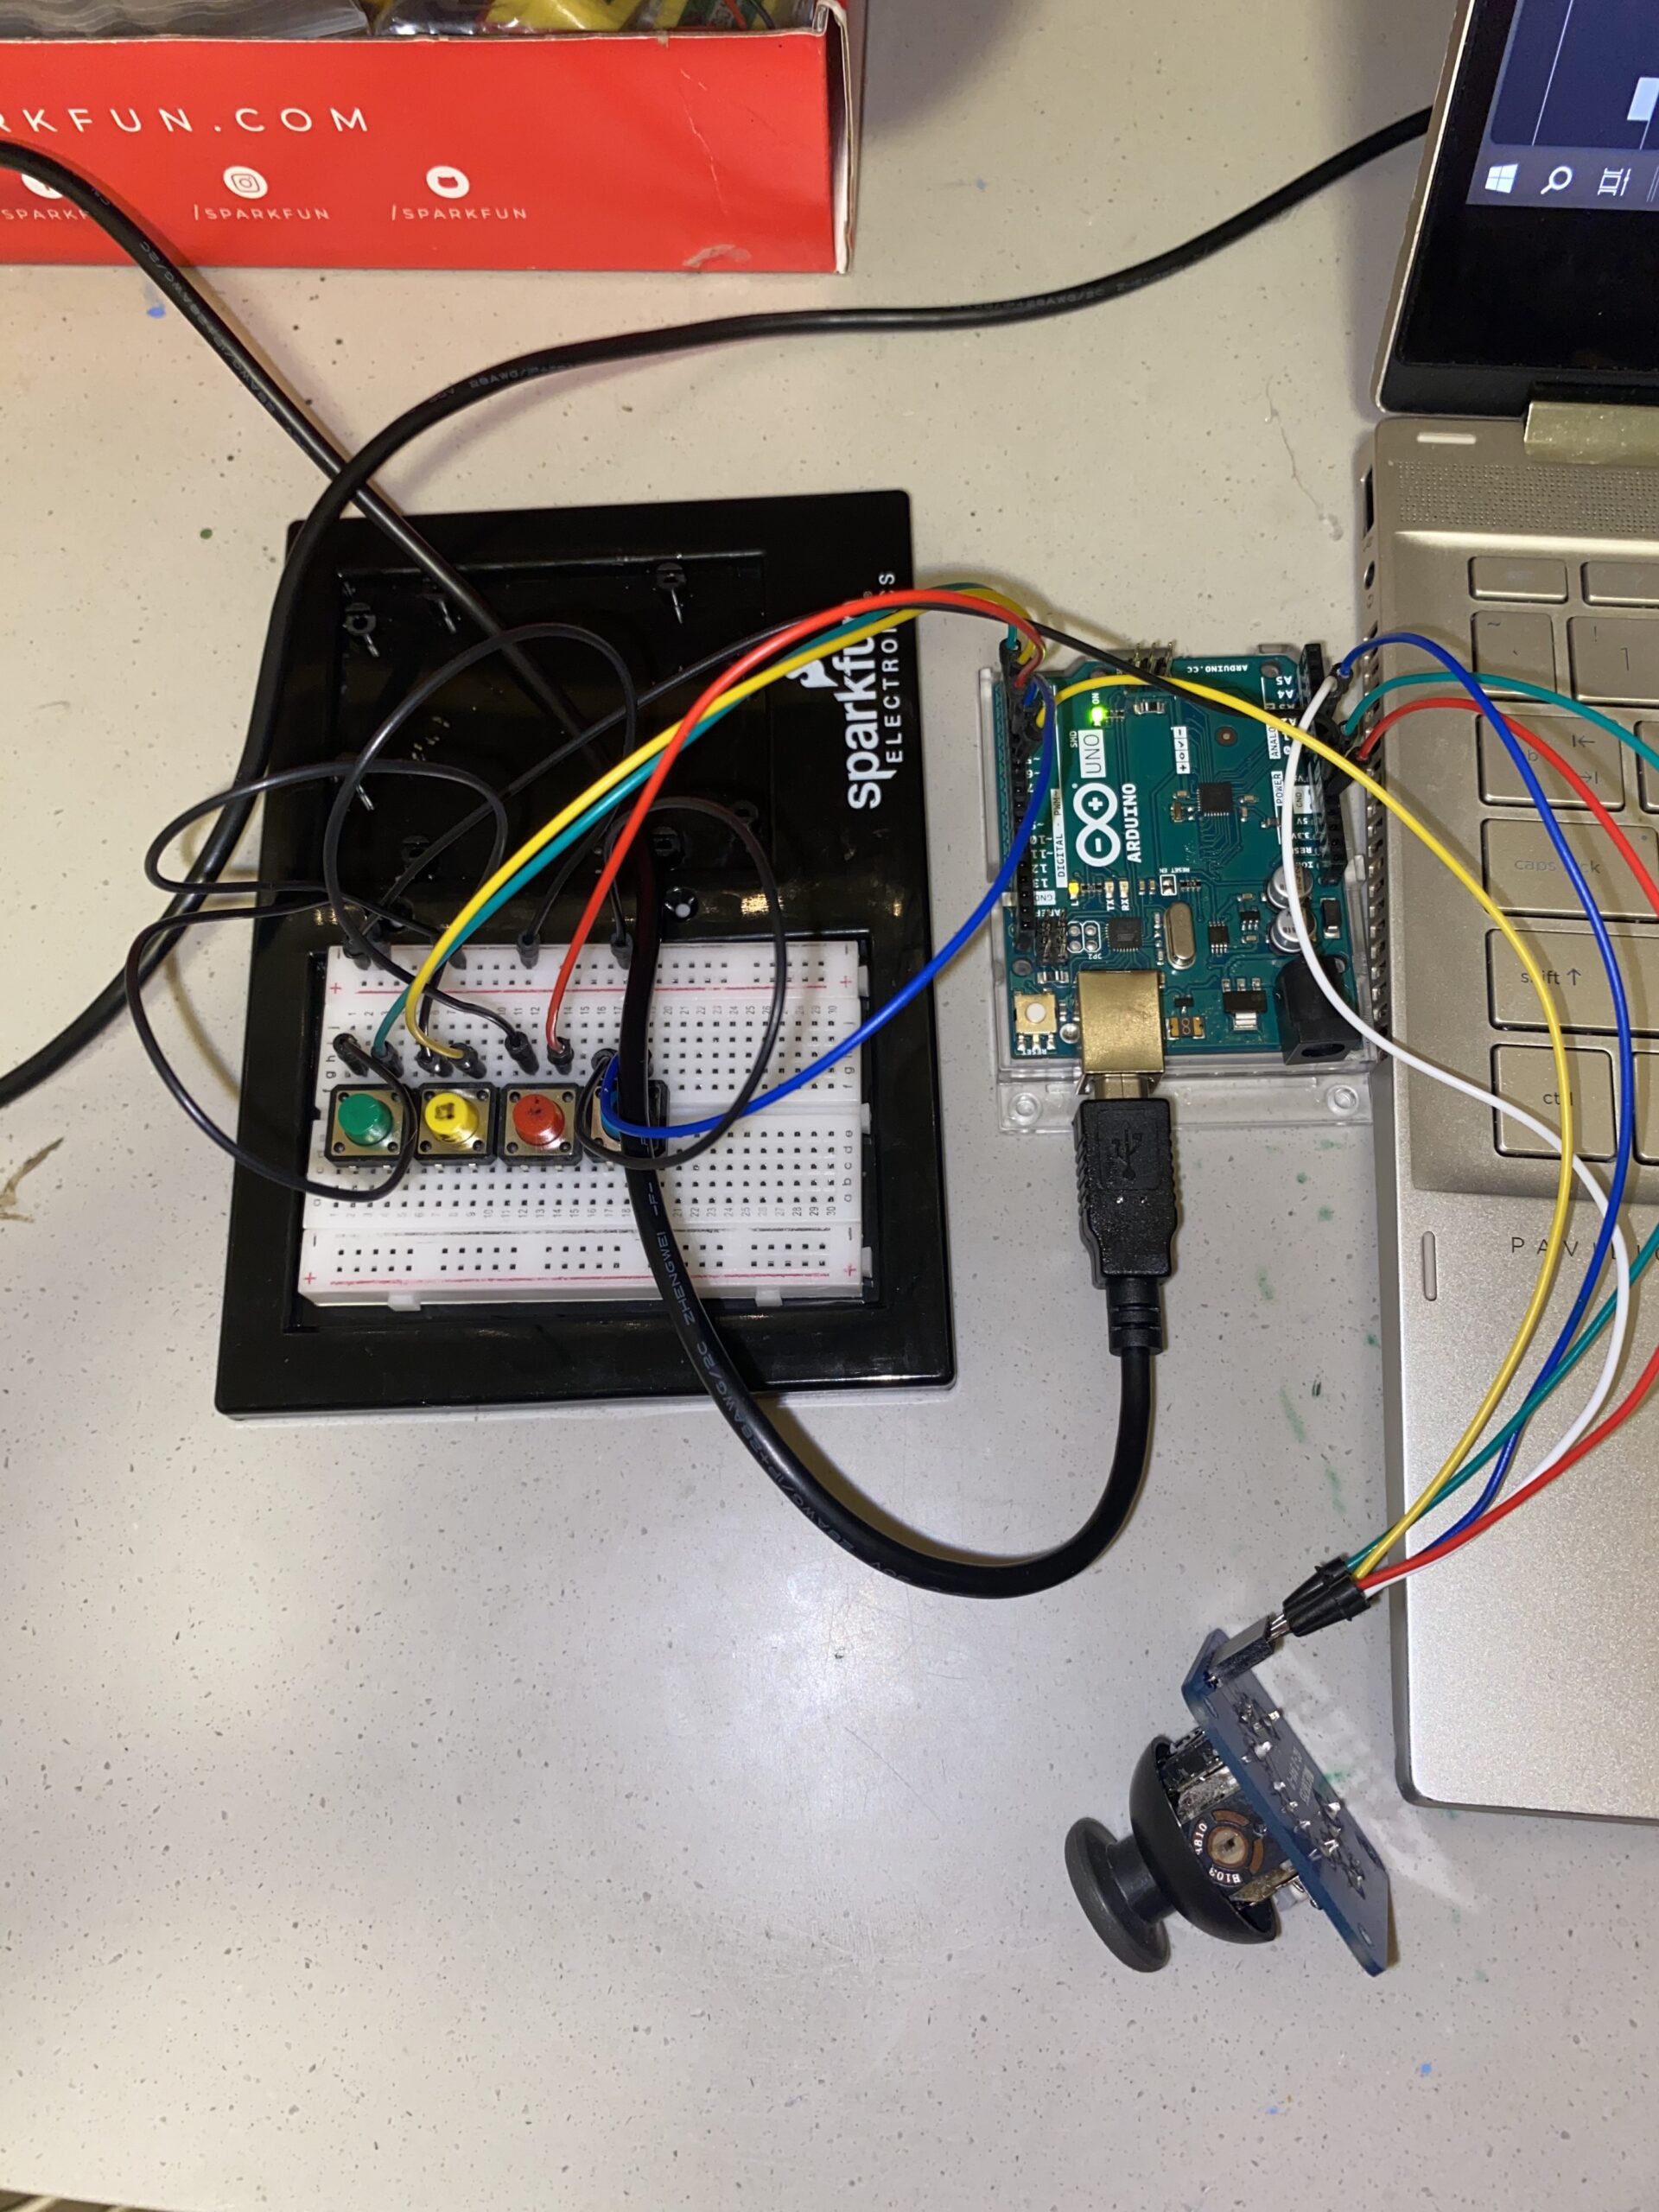
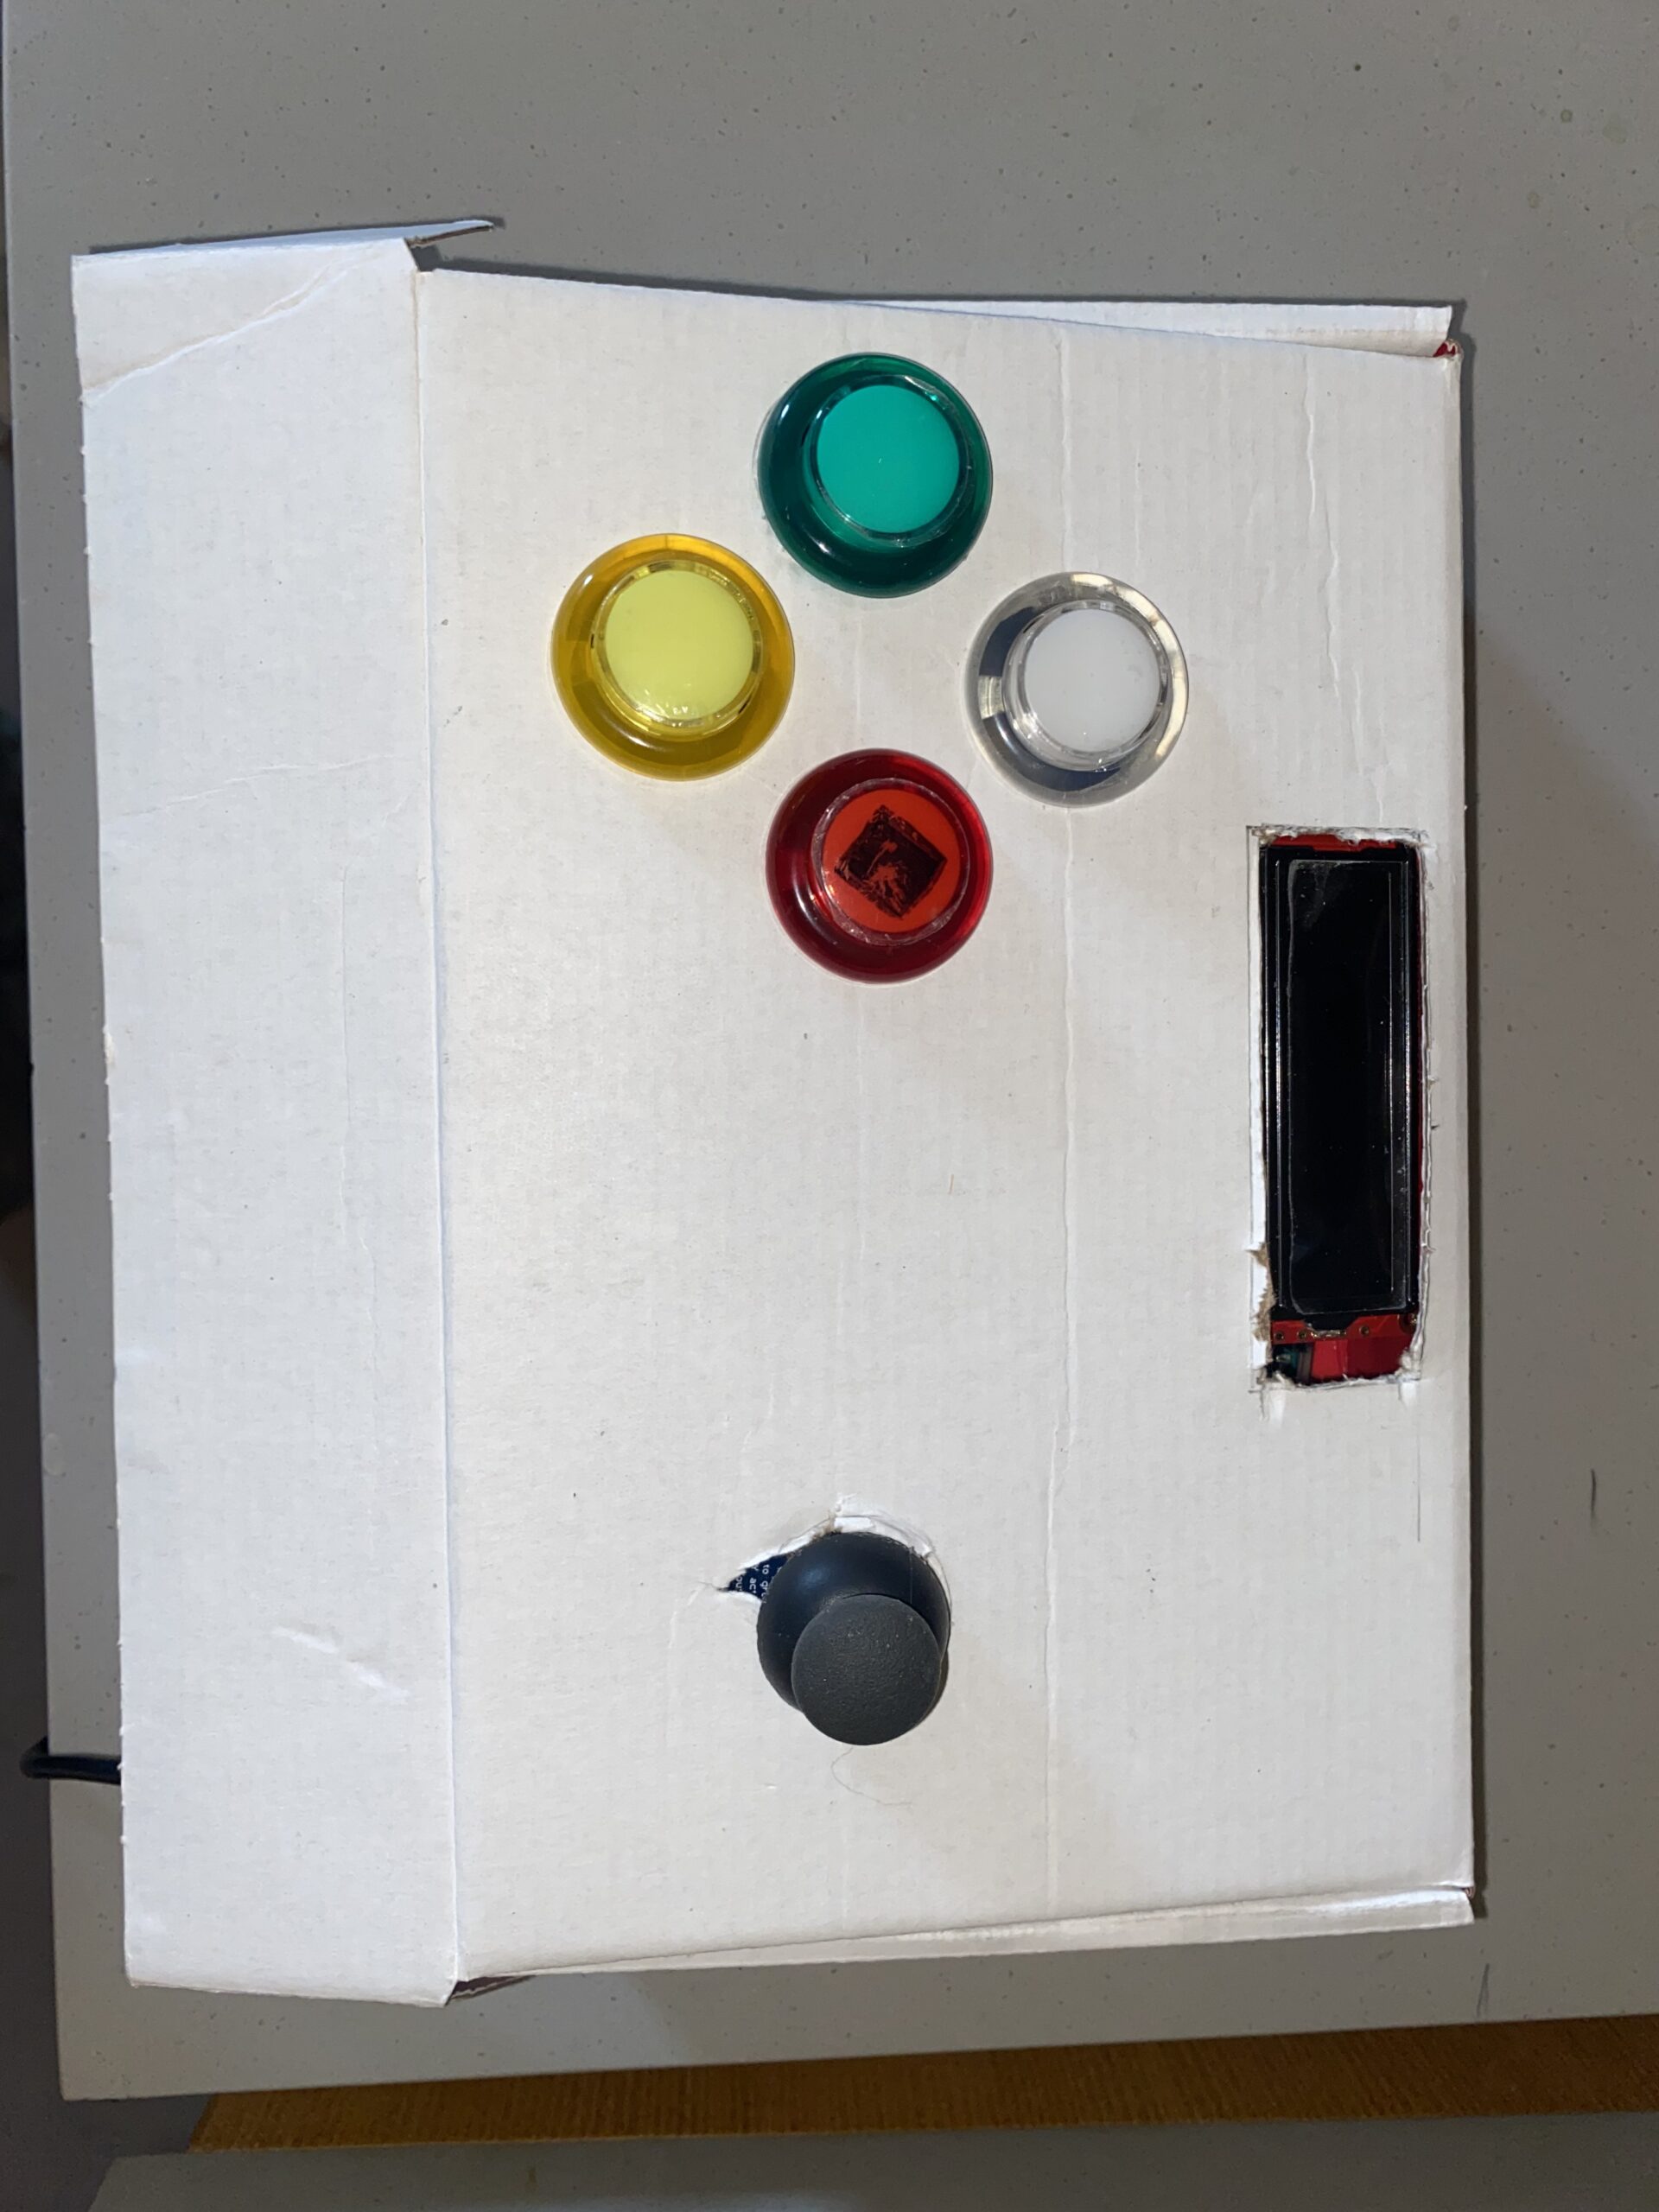
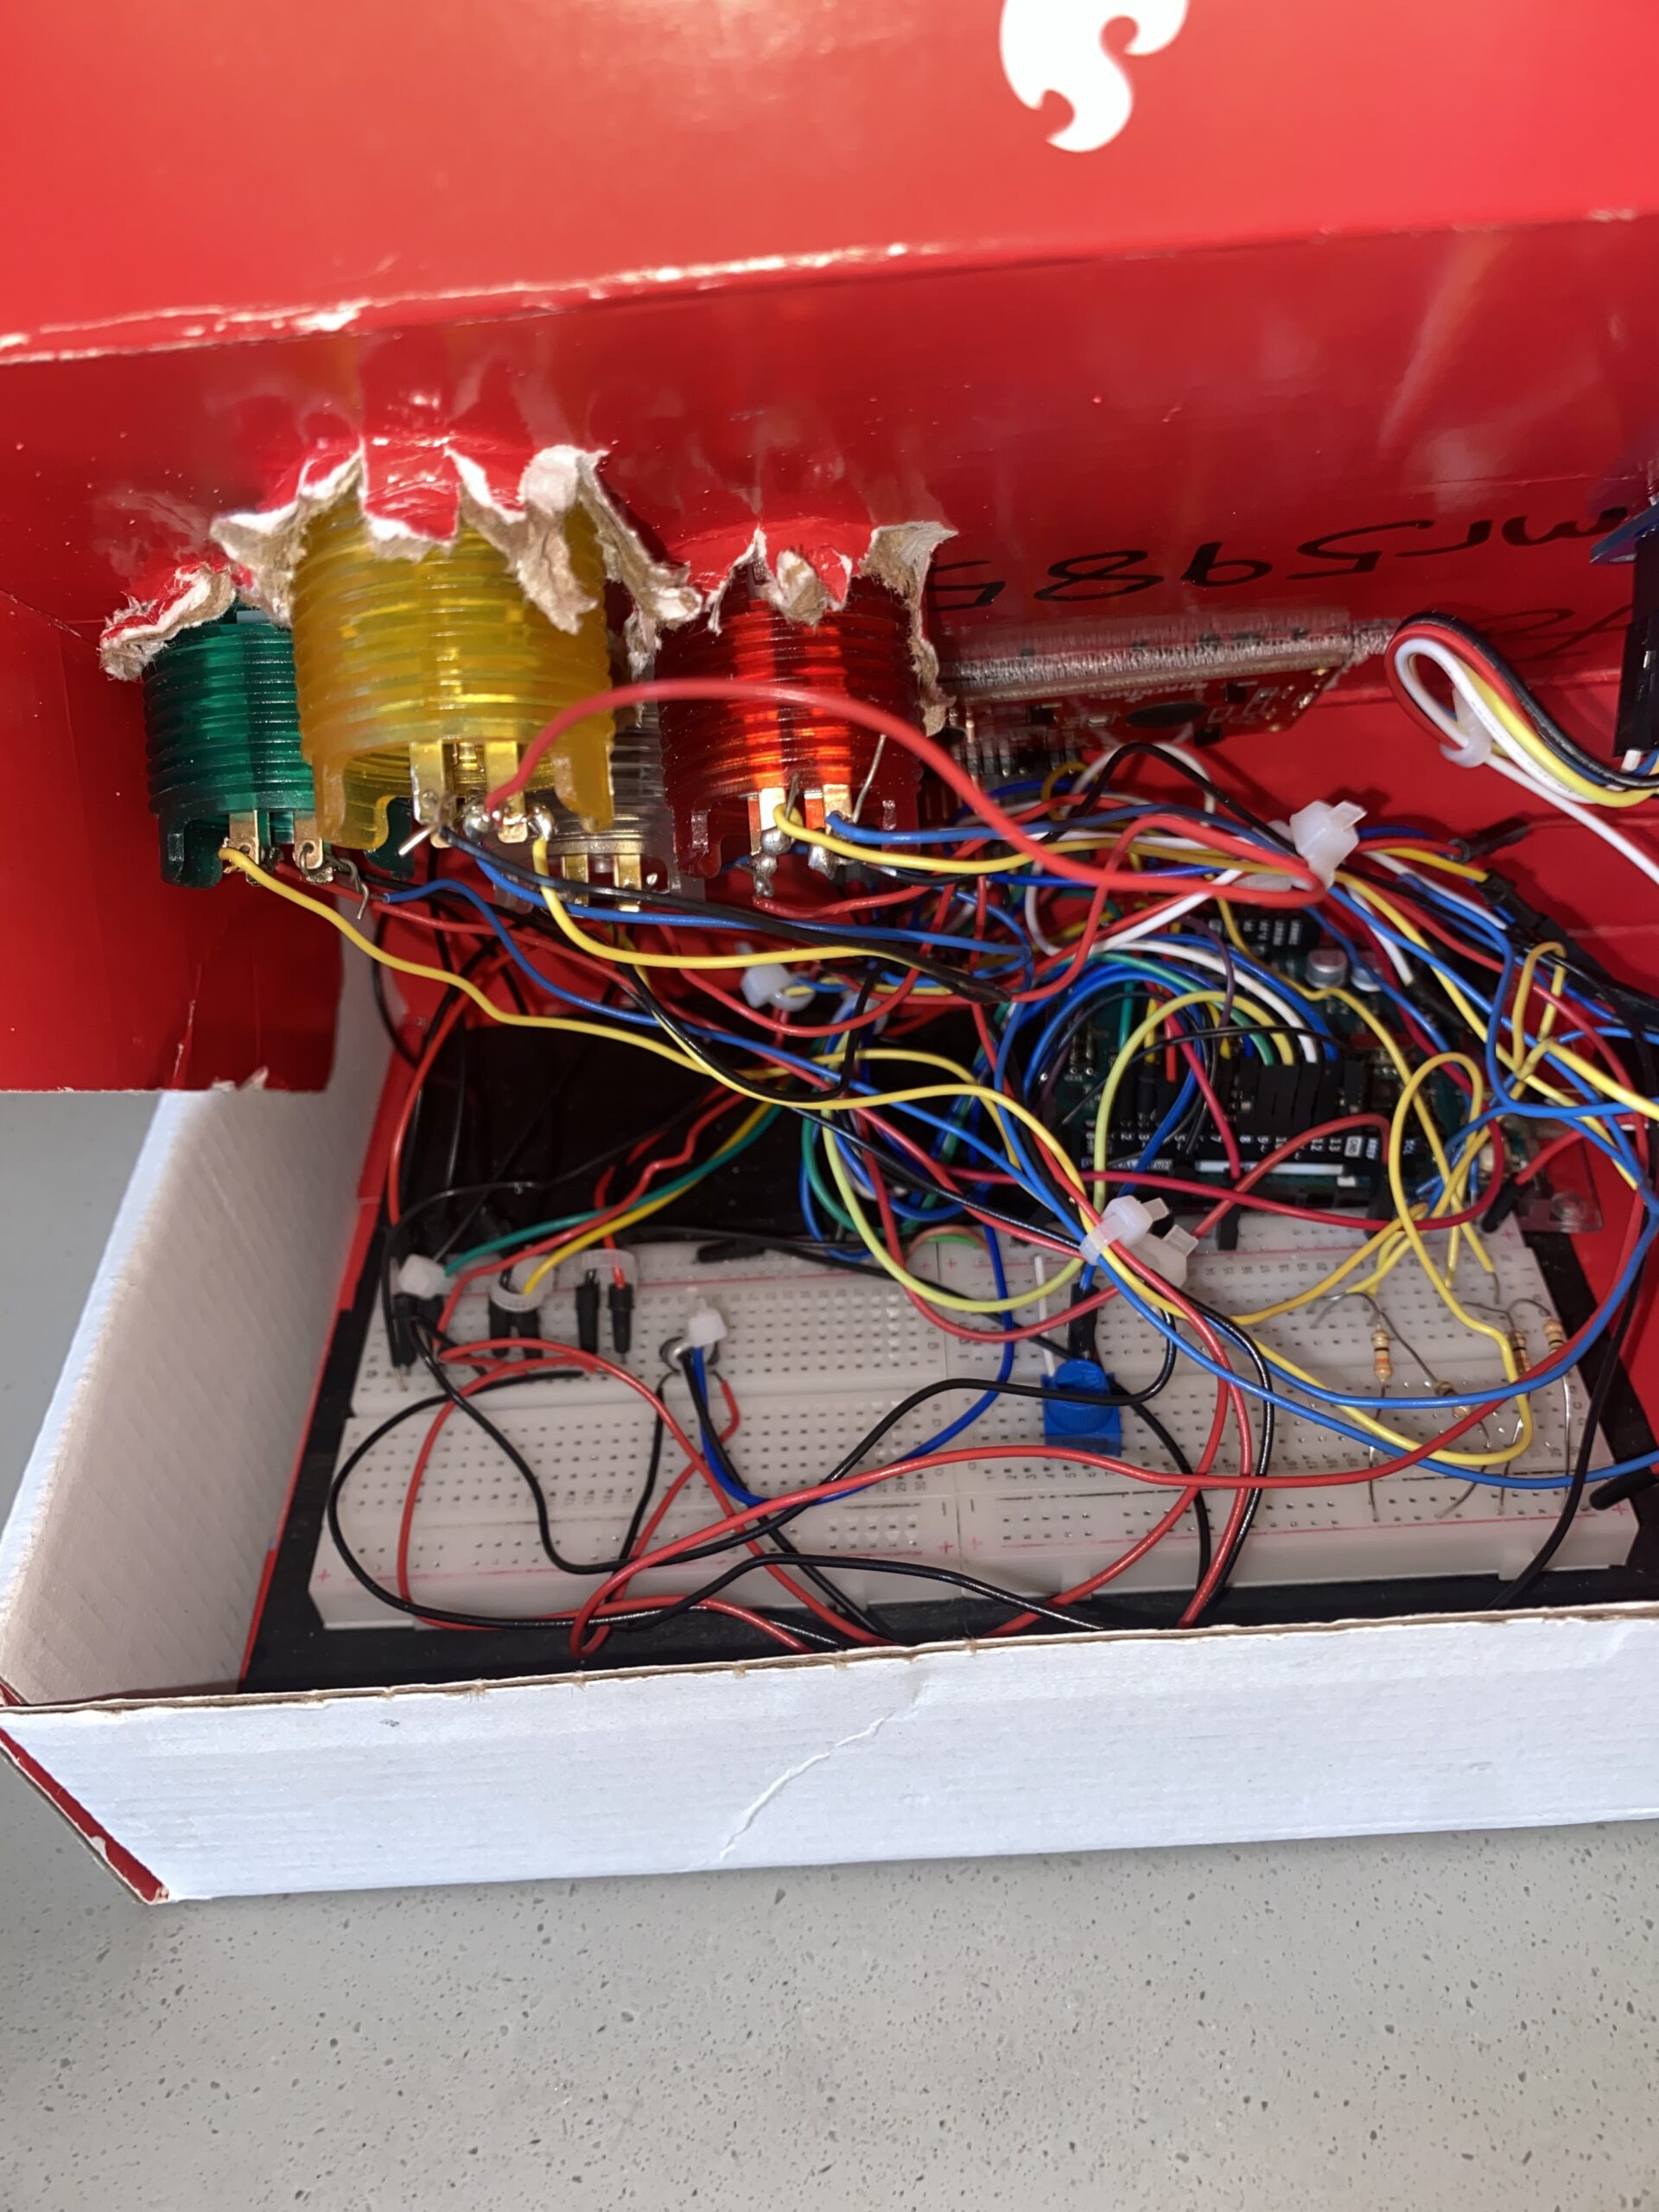
Images of project:
User Testing videos:
How does the implementation work?
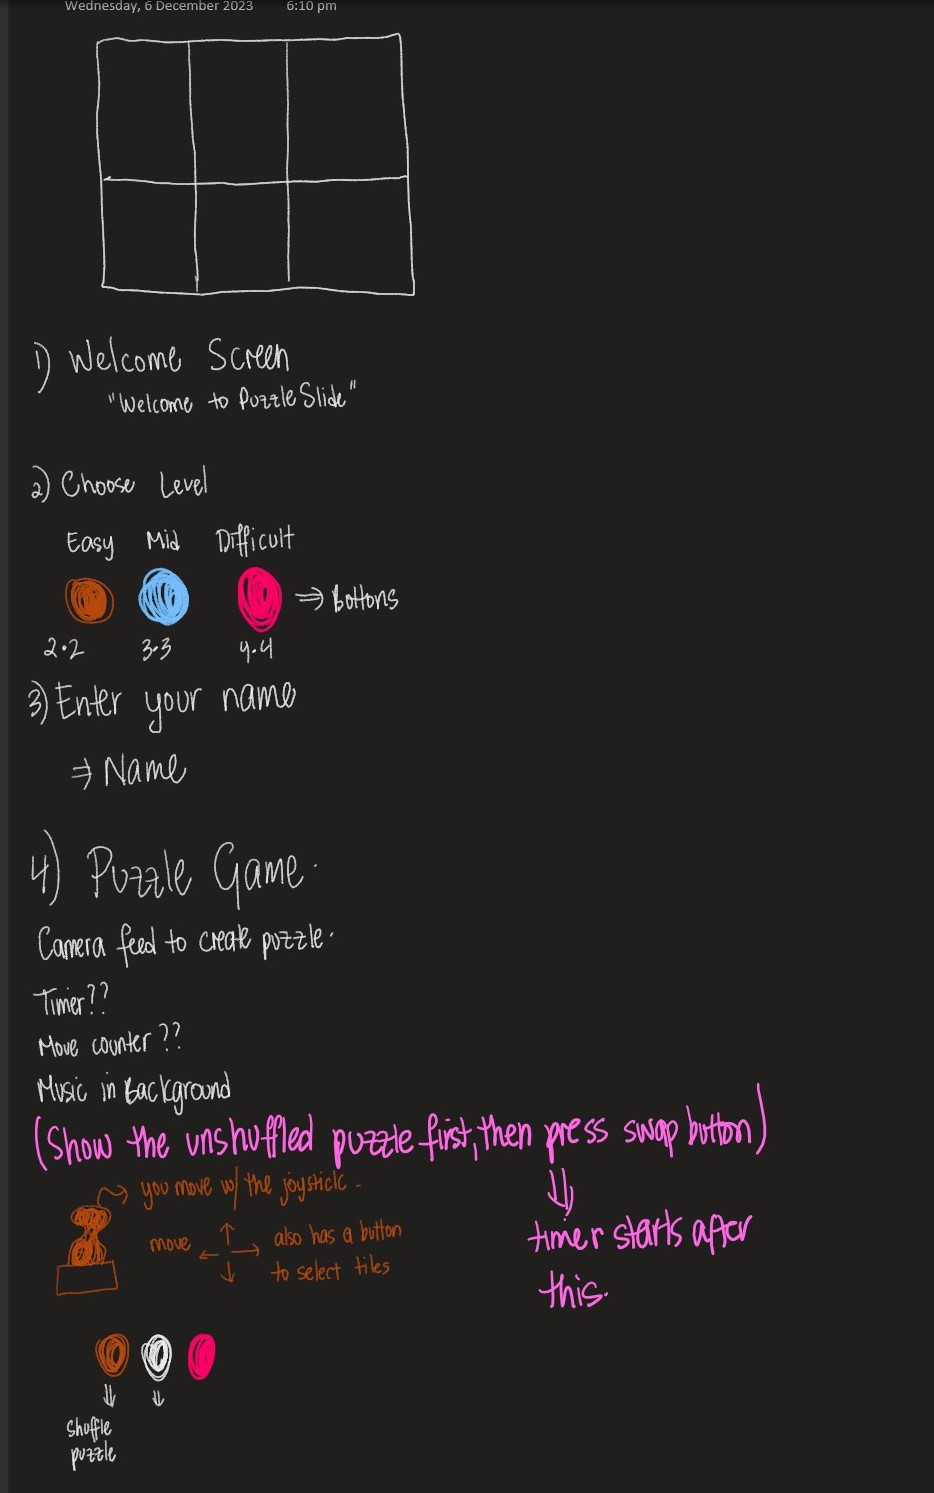
The project’s core idea is straightforward: manipulate the puzzle pieces using the joystick and follow on-screen instructions by pressing the buttons accordingly. The inspiration behind this setup actually came from the PS5 controller. I was dead set on incorporating a joystick into the design, and that sparked the whole concept.
Description of interaction design:
The design is meant to be user-friendly. I aimed for simplicity, assuming everyone knows the basics of a joystick. The on-screen instructions should guide players smoothly through the game. It’s a balance—simple enough for anyone to dive in yet not overly basic to bore them. That’s where the difficulty levels come in. I’ve got three, but I’ve only tested two myself, only managing to crack the first level. Give it a shot and see how far you can go!
Description of Arduino code + code snippets
The Arduino sketch I’ve got sets up a cool interface using buttons and a joystick to handle an LCD display and communicate using serial communication. First off, it gets things going by setting up pins for the buttons and joystick, along with initializing a LiquidCrystal display. The setup() function takes care of configuring serial communication, initializing pins, and prepping the LCD screen. The loop() function takes care of button presses and joystick moves. And when it detects these actions, it sends messages through serial communication. Each action—like a mouse click, difficulty level selection, joystick move, or even a command to snap a picture—is translated into a specific message. This sketch is a great listener too. It keeps an ear out for incoming messages through the serial port. When it gets specific ones like ‘TIMER:’, ‘MOVES:’, or ‘SOLVED’, it updates the LCD screen accordingly. So, you’ll see things like timer values ticking away, move counts racking up, and a sweet congratulatory message popping up when you crack that puzzle.
#include <LiquidCrystal.h>

const int XbuttonPin = 2;
const int SbuttonPin = 3;
const int TbuttonPin = 4;
const int CbuttonPin = 5;
const int joystickXPin = A0; // Analog pin for joystick X-axis
const int joystickYPin = A1; // Analog pin for joystick Y-axis
const int threshold = 50; // Threshold for joystick sensitivity
//bool isDifficulty = false;

LiquidCrystal lcd(6, 12, 11, 10, 9, 8);

void setup() {
  Serial.begin(9600);
  pinMode(XbuttonPin, INPUT_PULLUP);
  pinMode(SbuttonPin, INPUT_PULLUP);
  pinMode(TbuttonPin, INPUT_PULLUP);
  pinMode(CbuttonPin, INPUT_PULLUP);

  lcd.begin(16, 2);
  lcd.clear();
}

void loop() {
  if (digitalRead(XbuttonPin) == LOW) {
    Serial.println("MOUSE_CLICK");
    delay(1000); // Debounce delay
  }

  if (digitalRead(SbuttonPin) == LOW) {
    Serial.println('2');
    delay(100); // Debounce delay
  }

  if (digitalRead(TbuttonPin) == LOW) {
    Serial.println('1');
    delay(1000); // Debounce delay
  }

  if (digitalRead(CbuttonPin) == LOW) {
    Serial.println('3');
    delay(100); // Debounce delay
  }

  if (digitalRead(TbuttonPin) == LOW) {
    Serial.println('C');
    delay(100); // Debounce delay
  }

  int xVal = analogRead(joystickXPin); // Read X-axis value
  int yVal = analogRead(joystickYPin); // Read Y-axis value

  if (xVal < 512 - threshold) {
    Serial.println("LEFT");
    delay(500); // Debounce delay
  } else if (xVal > 512 + threshold) {
    Serial.println("RIGHT");
    delay(500); // Debounce delay
  }

  if (yVal < 512 - threshold) {
    Serial.println("DOWN");
    delay(500); // Debounce delay
  } else if (yVal > 512 + threshold) {
    Serial.println("UP");
    delay(500); // Debounce delay
  }
  if (Serial.available() > 0) {
    String message = Serial.readStringUntil('\n');

    if (message.startsWith("TIMER:")) {
      lcd.setCursor(0, 0);
      lcd.print(message.substring(6)); // Print the timer message
    } else if (message.startsWith("MOVES:")) {
      lcd.setCursor(0, 1);
      lcd.print("Moves: " + message.substring(6)); // Print the move counter message
    } else if (message == "SOLVED") {
      lcd.clear();
      lcd.setCursor(0, 0);
      lcd.print("You are a GENIUS!!!");
      delay(5000); // Display "Puzzle Solved!" for 2 seconds
      lcd.clear();
    }
  }
}
Description of p5.js code + code snippets + embedded sketch
My p5.js puzzle game lets you interact with images, customizable with varying difficulty levels. It progresses through welcome, instructions, and gameplay phases. The Puzzle class manages the game mechanics—moves, shuffling tiles, checking progress, and joystick input. The draw() function orchestrates screens, responding to commands from sources like Arduino. Background music sets the tone for welcome and instructions, fading during gameplay focus. The setup() function initializes the canvas, video feed, and initial puzzle grid, making it the core of this interactive experience.
function captureAndSetupPuzzle(video) {
  if (video) {
    source = video.get();
    source.loadPixels(); // Ensure pixels are loaded
 if (source.width > 0 && source.height > 0) {
    // Resize the source image to fit the canvas
    source.resize(width, height);
    video.hide();

    w = Math.floor(width / cols);
    h = Math.floor(height / rows);

    for (let i = 0; i < cols; i++) {
      for (let j = 0; j < rows; j++) {
        let x = i * w;
        let y = j * h;
        let img = source.get(x, y, w, h); // Get a portion of the image for each tile

        if (i === cols - 1 && j === rows - 1) {
          board.push(-1);
          puzzle.tiles.push(new Tile(-1, img));
        } else {
          let index = i + j * cols;
          board.push(index);
          puzzle.tiles.push(new Tile(index, img));
        }
      }
    }

    puzzle.board = board.slice();
    puzzle.simpleShuffle(puzzle.board);

    currentScreen = 'game';
    puzzle.startTimer();
  } else {
    console.error("Error loading the video source");
    }
  }
}
function joystick(puzzle, direction) {
  let xOffset = (width - puzzle.w * puzzle.cols) / 1.3;
  let yOffset = (height - puzzle.h * puzzle.rows) / 2.5;

  // Calculate the tile indices based on joystick direction
  let i = -1,
    j = -1;
  let blank = puzzle.findBlank();
  let blankCol = blank % puzzle.cols;
  let blankRow = Math.floor(blank / puzzle.rows);

  switch (direction) {
    case 'LEFT':
      i = blankCol + 1;
      j = blankRow;
      moveSound.play();
      break;

    case 'RIGHT':
      i = blankCol - 1;
      j = blankRow;
      moveSound.play();
      break;

    case 'UP':
      i = blankCol;
      j = blankRow + 1;
      moveSound.play();
      break;

    case 'DOWN':
      i = blankCol;
      j = blankRow - 1;
      moveSound.play();
      break;

    default:
      // Handle other cases or unknown commands
      break;
  }

  if (i >= 0 && i < puzzle.cols && j >= 0 && j < puzzle.rows) {
    puzzle.move(i, j, puzzle.board);
  }
  writeSerial("MOVES:" + puzzle.getMoves() + "\n");
 // puzzle.updateTimer(); // Update the timer
 // puzzle.displayTimer(); // Display the timer
}
Description of communication between Arduino and p5.js
In my project, the Arduino and p5.js are like buddies chatting through a USB connection using serial communication. The Arduino sends messages over to p5.js, which eagerly listens and understands what’s being said. Depending on these messages, p5.js swings into action—triggers different functions, or tweaks how the whole thing behaves. It’s like they’re choreographing a dance together! This connection allows the tangible aspects of my project—like button pushes or sensor readings from the Arduino—affect what happens on the digital playground of the p5.js sketch. It’s a smooth back-and-forth: the Arduino talks to p5.js, guiding its moves, while p5.js keeps the Arduino in the loop about how the game’s going—sending updates on moves made and puzzles solved. They’ve got this teamwork thing down, with the Arduino shaking things up in the digital world and p5.js keeping it informed about what’s happening in the game.
What are some aspects of the project that you’re particularly proud of?
One thing I’m really excited about is achieving two-way communication in my project. It was a bit of a hurdle because I’ve always been more comfortable with software like p5.js, which made tasks like controlling mouse clicks and key presses with Arduino a breeze. But the real challenge came when I needed to send information back from p5.js to the Arduino IDE. Figuring out how to establish that connection was a bit tricky, but once I got it working, it felt like a big win.
Another part that I’m super proud of is the capture process. Initially, I had the picture saved and then converted it into the grid. However, I realized this meant that everyone’s picture would end up stored on my laptop, and I wasn’t keen on that idea. So, I reworked the code to immediately convert the picture as soon as it’s taken. I love this feature because it ensures privacy by not saving anyone’s picture on my device, and it’s more immediate and seamless for the users.
Links to resources used.
SparkFun Inventor’s Kit Experiment Guide – v4.1 – SparkFun Learn
Coding Challenge 165: Slide Puzzle – YouTube
reference | createVideo() (p5js.org)
How to connect and use an Analog Joystick with an Arduino – Tutorial – YouTube
LED pattern with button control on Arduino | Arduino Tutorial – YouTube
Challenges:
One of the toughest parts I tackled was turning the picture into a grid and getting those tiles to shift around. The real challenge here wasn’t just making the picture the puzzle, but doing it on the spot—taking a photo and instantly turning it into a puzzle. It felt like a puzzle itself! For a while, I hit a roadblock. I could snap the picture, form the tiles, but they just wouldn’t budge. Turned out, they weren’t connecting to my puzzle class properly. It was like they were stuck in place. To fix this, I had to dive into the puzzle class and really fine-tune how the capturing worked. It was trial and error, a lot of experimenting. Then, I stumbled upon this function called video() in p5.js, and that was a game-changer. It helped me get things back on track and finally, my project started to click.
Future Work:
I’ve been thinking about how to take this project to the next level and turn it into more of a game. For me, this whole thing has been a way to relax and unwind, not really about competing. But I think adding a competitive element could make it way more interesting. I’ve been considering the idea of making it multiplayer, so that more than one player can get involved in the game. Imagine friends coming together, enjoying some puzzling challenges, and maybe even a bit of friendly competition. It could be a great way for them to hang out and have a good time. By making these changes, I believe it’ll become a fun escape for folks who enjoy puzzles or just want to kick back and have some light-hearted rivalry.
IM SHOWCASE!!!!