week 11- reading reflectiom – design meets disability

This book about the collaboration between the Eameses and their creation of leg splints for veterans is a profound exploration of how design transcends its conventional boundaries. What’s truly fascinating is their approach—they didn’t just aim for practicality in their design; they sought to blend functionality with aesthetic appeal.

What’s really interesting is how deeply they considered the human aspect. The Eameses didn’t limit their focus to the technicalities; they delved into the emotional and experiential dimensions of their design. They wanted these splints to not only serve their purpose but also uplift the users’ spirits, ensuring comfort and a sense of dignity.

Their emphasis on inclusive design is remarkable. They didn’t want these splints to be exclusive; they envisioned them as tools accessible to all, irrespective of abilities. It’s a profound statement about the importance of ensuring good design is available universally.

The core message resonating here is that design isn’t just about appearances; it’s about functionality and the impact it has on people’s lives. The Eameses’ venture with these leg splints is a testament to how empathetic design can significantly enhance lives and contribute to a more equitable and inclusive society.

Series Connection

overview:

In this assignment, I worked with Fady John to achieve the three exercises in class

Exercise 1:

p5 js

let left = 0;

function setup() {
  createCanvas(400, 400);
}

function draw() {
  background(220);
  fill("red");
  ellipse(left, 50, 50, 50);
}

function keyPressed() {
  if (key == " ") {
    // important to have in order to start the serial connection!!
    setUpSerial();
  }
}

function readSerial(data) {
  left = map(data, 0, 1023, 0, 400);
}

Arduino:

//// Arduino Code
/*

void setup() {
  // put your setup code here, to run once:
  Serial.begin(9600);

}

void loop() {
  // put your main code here, to run repeatedly:
  int sensor = analogRead(A0);
  delay(5);
  Serial.println(sensor);

}

*/

Exercise 2:

P5 js

let brightnessSlider;
let brightnessValue = 0;

function setup() {
  createCanvas(400, 200);

  // Create a brightness slider
  brightnessSlider = createSlider(0, 255, 128);
  brightnessSlider.position(width/2-50, height/2);
  brightnessSlider.style('width', '100px');
}

function draw() {
  background(255);

  // Get the brightness value from the slider
  brightnessValue = brightnessSlider.value();
}

function keyPressed() {
  if (key == " ") {
    // important to have in order to start the serial connection!!
    setUpSerial();
  }
}

function readSerial(data) {
  console.log(data);
    let dataToSend = brightnessValue + ", \n";
    writeSerial(dataToSend);  
}

Arduino:

///Arduino COde
/*

const int ledPin = 9;  // Digital output pin for the LED

void setup() {
  pinMode(ledPin, OUTPUT);

  // Start serial communication
  Serial.begin(9600);
}

void loop() {
  Serial.println("sensor");
  // Check if data is available from p5.js
  if (Serial.available() > 0) {
    // Read the brightness value from p5.js
    int brightness = Serial.parseInt();

    // Map the received value to the LED brightness range
    brightness = constrain(brightness, 0, 255);

    // Set the LED brightness
    analogWrite(ledPin, brightness);
  }
}

*/

Exercise 3:

P5 js

let velocity;
let gravity;
let position;
let acceleration;
let wind;
let drag = 0.99;
let mass = 50;
let led = 0;

function setup() {
  createCanvas(640, 360);
  noFill();
  position = createVector(width/2, 0);
  velocity = createVector(0,0);
  acceleration = createVector(0,0);
  gravity = createVector(0, 0.5*mass);
  wind = createVector(0,0);
}

function draw() {
  background(255);
  applyForce(wind);
  applyForce(gravity);
  velocity.add(acceleration);
  velocity.mult(drag);
  position.add(velocity);
  acceleration.mult(0);
  ellipse(position.x,position.y,mass,mass);
  if (position.y > height-mass/2) {
      velocity.y *= -0.9;  // A little dampening when hitting the bottom
      position.y = height-mass/2;
  }
  if(position.y == height-mass/2 && (velocity.y > 0.5 || velocity.y < -0.5)){ 
    led = 1;
  }else{
    led = 0;
  }
}

function applyForce(force){
  // Newton's 2nd law: F = M * A
  // or A = F / M
  let f = p5.Vector.div(force, mass);
  acceleration.add(f);
}

function keyPressed(){
  if (key == "n") {
    // important to have in order to start the serial connection!!
    setUpSerial();
  }
  if (key==' '){
    mass=random(15, 80);
    position.y=-mass;
    velocity.mult(0);
  }
}

function readSerial(data) {

  if (data != null) {
    // make sure there is actually a message
    // split the message
    wind.x = data;

    //////////////////////////////////
    //SEND TO ARDUINO HERE (handshake)
    //////////////////////////////////
    let sendToArduino = led + "\n";
    writeSerial(sendToArduino);
  }
}

Arduino:

///Arduino COde

/*

int ledPin = 9;

void setup() {
  // Start serial communication so we can send data
  // over the USB connection to our p5js sketch
  Serial.begin(9600);
  pinMode(ledPin, OUTPUT);
}

void loop() {
  int sensor = analogRead(A0);
  int wind = map(sensor, 0, 1023, -2, 2);
  Serial.println(wind);
  delay(10);
  if (Serial.available() > 0) {
    // Read the brightness value from p5.js
    int touch = Serial.parseInt();
    // Set the LED brightness
    digitalWrite(ledPin, touch);
  }
}
*/

BOUNCING BALL VIDEO

exercise3 week11

Week 11: Elora and Saiki Assignment

Assignment 1: Move Ball With Potentiometer

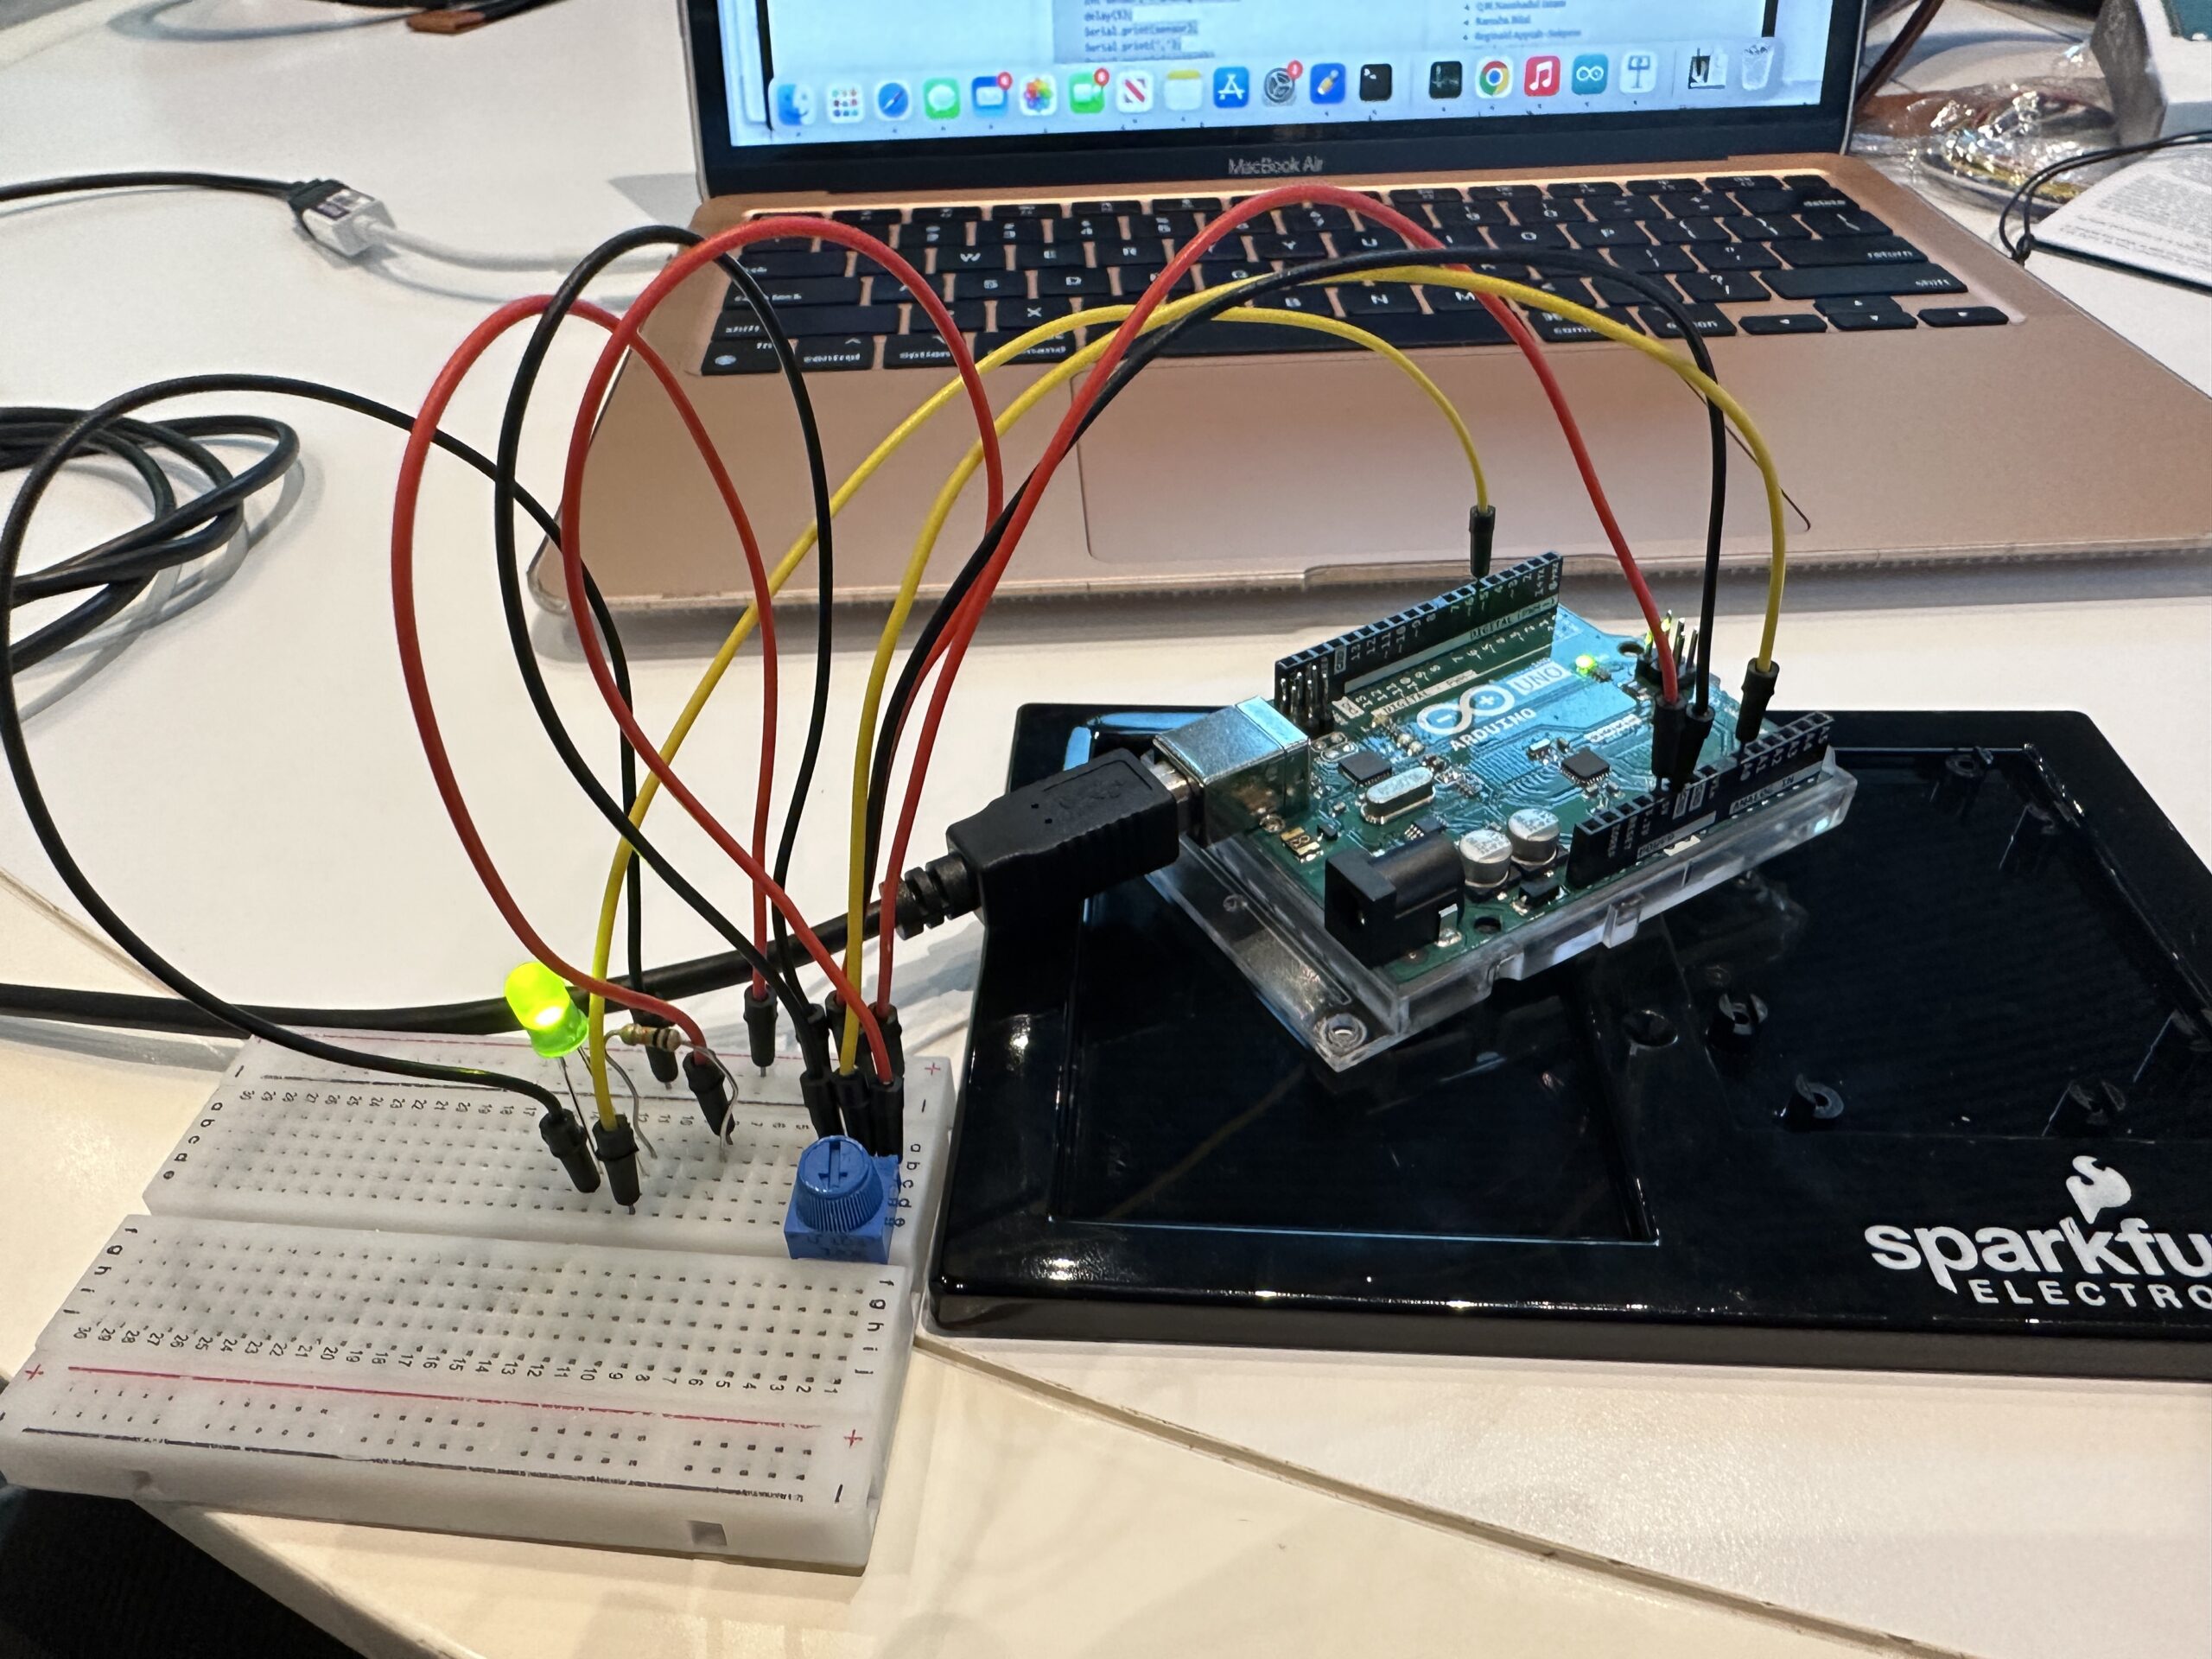
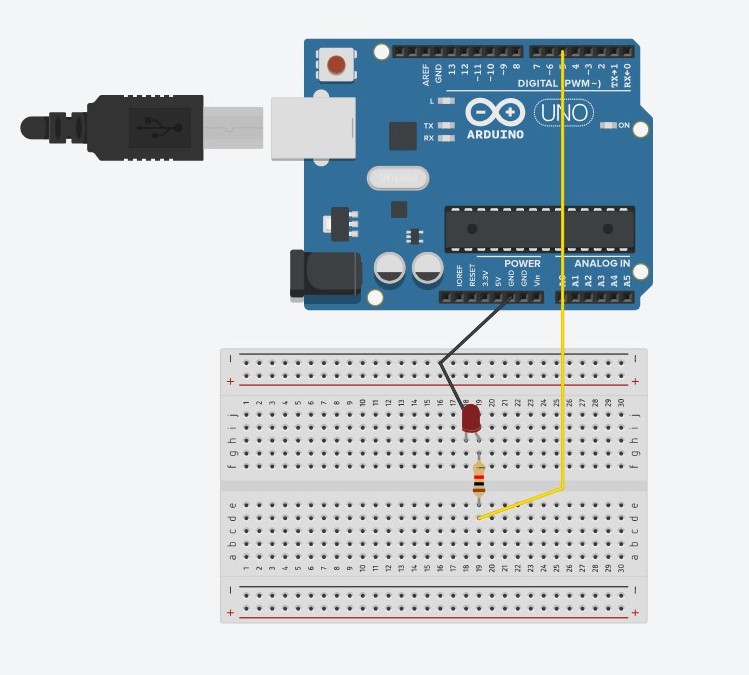
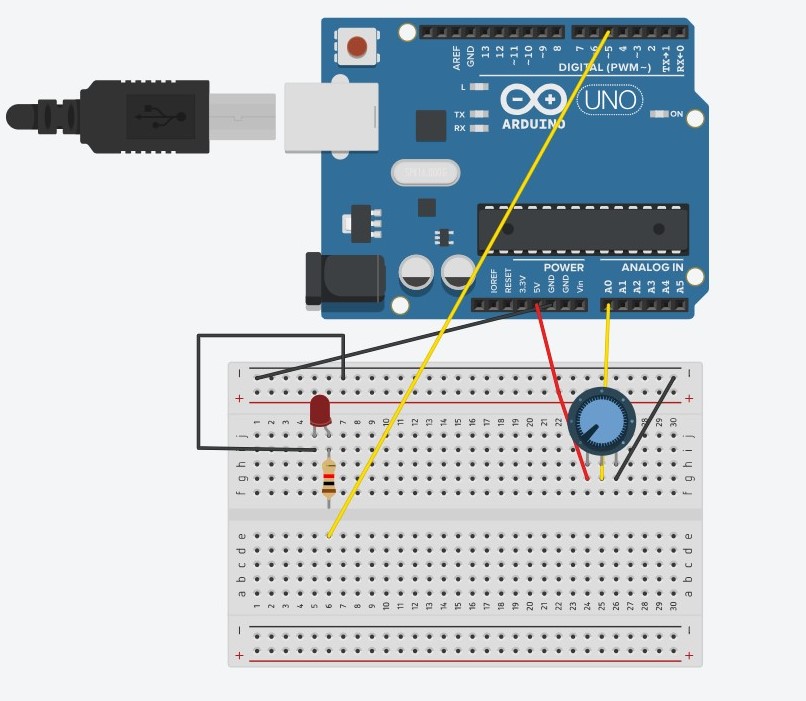
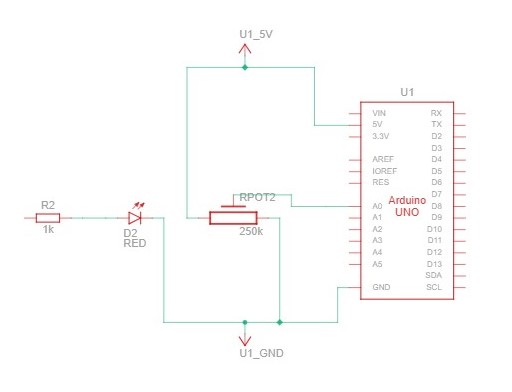
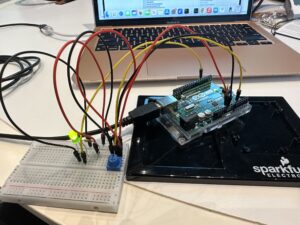
I attached a picture of our setup below:

I took the P5JS sketch we used in class and made a few changes, seen here. First, we created the ellipse. When writing the parameters, we made the x value alpha, because the sketch already set alpha as the value that is reading the Arduino board. In order to read Alpha, we had to make sure we mapped the potentiometer range to the range of the P5JS screen. So when you turn the potentiometer, the x value changes, making the ellipse move backwards and forwards. See the important code snippet below:

ellipse(map(alpha, 0, 1023, 0, width),height/2,60);

Assignment 2: Control LED Brightness From P5JS

We took the same P5JS sketch from the slides and altered it, seen here. Here are the changes we made:

let value = map(mouseX,0,width,0,255);
right = int(value);

We created a new variable called value and then mapped the width of the P5JS screen to the LED values, so that as you moved your mouse horizontally across the screen, the LED brightened and dimmed. We used pin 5 because it supports PWM. The LED connected to Pin 5 was the “right” one in the code we used in class, hence why used “right” above to connect the LED and the P5JS bit above. We also had to go into the Arduino code that we had used in class and changed a bit of that as well.

digitalWrite(leftLedPin, left);
analogWrite(rightLedPin,right);
// digitalWrite(rightLedPin, right);

As you can see, we commented out the digitalWrite regarding the right pin and replaced it with analogWrite so that the LED didn’t just turn on or off, but actually got dimmer and brighter on a spectrum.

Assignment 3: Make The LED Turn On When The Ball Bounces

Here is our video. Here is the link to our sketch.

We combined the Gravity Wind example from the slides with the other P5JS sketch from the slides and changed a few things, seen below:

ellipse(position.x,position.y,mass,mass);
  if (position.y > height-mass/2) {
      velocity.y *= -0.9;  // A little dampening when hitting the bottom
      position.y = height-mass/2;
    
    right = 1;
    }
  
  else {
    right = 0;
  }

We went to the part of the code where the ball hits the ground, and made it so that the Arduino read the LED as “right,” and the LED turned on (1) and off (0) depending on whether the ball was touching the ground or not.

On a side note, we also made sure that whenever you pressed n, that was how a new circle appeared. Because when we combined the two sketches, it had already been written that pressing the space bar makes the serial bar pop up.

if (key=='n'){
   mass=random(70,80);
   position.y=-mass;
   velocity.mult(0);

Assignment 4: Control Wind With Potentiometer

Last but not least, we made the ball move left and right with the potentiometer by adding this bit of code.

wind.x = map(alpha,0,1023,-1,1);

We mapped the values of the potentiometer onto the wind values already established in the code. So that when we turned the potentiometer right, the ball went right (1) and left (-1) when we turned the potentiometer left.

Week 11 Exercises

Exercise 1

function draw() {
  background(250, 200, 152);

  if (!serialActive) {
    print("Press Space Bar to select Serial Port", 20, 30);
  } else {
    print("Connected");

    // ellipse
    noStroke();
    fill(255, 0, 0);
    ellipse(map(rVal, 0, 1023, 0, width), height / 2, 100, 50);
  }
}

Link to the sketch: Sketch Exercise 1 

Exercise 2

function draw() {
  background(250, 200, 152);

  if (!serialActive) {
    print("Press Space Bar to select Serial Port");
  } else {
    print("Connected");
    
    brightness = Math.floor(map(rVal, 0, 1023, 0,255));
    right = Math.floor(brightness);
  }
}

The only change in Arduino code I made was using analogWrite instead of digitalWrite.

Link to the sketch: Sketch Exercise 2

Exercise 3

function draw() {
  
  background(250,200,152);
  
  if (!serialActive) {
    print("Press Space Bar to select Serial Port");
  } else {
    if (state == 1){
    
    applyForce(wind);
    applyForce(gravity);
    velocity.add(acceleration);
    velocity.mult(drag);
    position.add(velocity);
    acceleration.mult(0);
    ellipse(position.x,position.y,mass,mass);

    if (position.y > height-mass/2) {
      velocity.y *= -0.9;  // A little dampening when hitting the bottom
      position.y = height - mass/2;
    } 

    if (position.y >= height - mass/2 - 5) {
      left = 1;
    } else {
      left = 0;
    }

  wind.x = map(rVal, 0, 1023, -1, 1)
    }
  }
}

For this sketch, I used the state machine to allow the Arduino to load before the ball starts to fall. Otherwise, the LEDs wouldn’t work properly.

Link to the sketch: Sketch Exercise 3

Video demonstration: VIDEO

Khaleeqa’s Exercises (W/ Kwaaku)

EXERCISE 01: ARDUINO TO P5 COMMUNICATION

Make something that uses only one sensor on Arduino and makes the ellipse in p5 move on the horizontal axis, in the middle of the screen, and nothing on Arduino is controlled by p5.

SCHEMATIC AND MODELLING:

P5 CODE:

let circleX = 0;
function setup() {
  createCanvas(640, 480);
  textSize(18);
}

function draw() {
  background(255);
  stroke(0);
  
  fill("pink");
  circle(map(circleX,0, 1023, 0, width), height/2, 50);
  
  if (!serialActive) {
    text("Press Space Bar to select Serial Port", 20, 30);
  } else {
    text("Connected", 20, 30);
  }
  
}

function keyPressed() {
  if (key == " ") {
    // important to have in order to start the serial connection!!
    setUpSerial();
  }
}

// This function will be called by the web-serial library
// with each new *line* of data. The serial library reads
// the data until the newline and then gives it to us through
// this callback function
function readSerial(data) {
  ////////////////////////////////////
  //READ FROM ARDUINO HERE
  ////////////////////////////////////

  if (data != null) {
    circleX = int(trim(data));
    
  }
  print(circleX);
}

ARDUINO CODE: 

void setup() {
  // Start serial communication so we can send data
  // over the USB connection to our p5js sketch
  Serial.begin(9600);

  // We'll use the builtin LED as a status output.
  // We can't use the serial monitor since the serial connection is
  // used to communicate to p5js and only one application on the computer
  // can use a serial port at once.
  pinMode(LED_BUILTIN, OUTPUT);

}

void loop() {

  int sensor = analogRead(A0);
  delay(5);
  digitalWrite(LED_BUILTIN, HIGH);
  Serial.println(sensor);
    
  digitalWrite(LED_BUILTIN,LOW);
}

PROTOTYPE:

IMG_4402

EXERCISE 02: P5 TO ARDUINO COMMUNICATION

Make something that controls the LED brightness from p5.

SCHEMATIC AND MODELLING: 

P5 CODE:

let value = 0;

function setup() {
  createCanvas(640, 480);
  textSize(18);
}

function draw() {
  background(0);
  stroke(255);
  fill(255);
  
  if (!serialActive) {
    text("Press Space Bar to select Serial Port", 20, 30);
  } else {
    text("Connected", 20, 30);
  }
}

function keyPressed() {
  if (key == " ") {
    // important to have in order to start the serial connection!!
    setUpSerial();
  }
}

// This function will be called by the web-serial library
// with each new *line* of data. The serial library reads
// the data until the newline and then gives it to us through
// this callback function
function readSerial(data) {
  if (data != null) {
    //////////////////////////////////
  //SEND TO ARDUINO HERE (handshake)
  //////////////////////////////////
    value = int(map(mouseX, 0, width, 0, 255));
  let sendToArduino = value + "\n";
  writeSerial(sendToArduino);
  print(value);
    
    
  }

  
}

ARDUINO CODE: 

int ledPin = 5;

void setup() {
  // Start serial communication so we can send data
  // over the USB connection to our p5js sketch
  Serial.begin(9600);

  // We'll use the builtin LED as a status output.
  // We can't use the serial monitor since the serial connection is
  // used to communicate to p5js and only one application on the computer
  // can use a serial port at once.
  pinMode(LED_BUILTIN, OUTPUT);
  pinMode(ledPin, OUTPUT);

  digitalWrite(ledPin, HIGH);
  delay(1000);
  digitalWrite(ledPin, LOW);

  // start the handshake
  while (Serial.available() <= 0) {
    digitalWrite(LED_BUILTIN, HIGH); // on/blink while waiting for serial data
    Serial.println("0,0"); // send a starting message
    delay(300);            // wait 1/3 second
    digitalWrite(LED_BUILTIN, LOW);
    delay(50);
  }

}

void loop() {


  // wait for data from p5 before doing something
  while (Serial.available()) {
    Serial.println("0,0");
    digitalWrite(LED_BUILTIN, HIGH); // led on while receiving data

    int value = Serial.parseInt();

    if (Serial.read() == '\n') {
      analogWrite(ledPin, value);
    }
  }
  digitalWrite(LED_BUILTIN, LOW);
  

}

PROTOTYPE:

IMG_4403

EXERCISE 03: BI-DIRECTIONAL COMMUNICATION

Take the gravity wind example and make it so: every time the ball bounces one led lights up and then turns off, and you can control the wind from one analog sensor.

SCHEMATIC AND MODELLING: 

P5 CODE:

let velocity;
let gravity;
let position;
let acceleration;
let wind;
let value = 0;
let drag = 1;
let mass = 50;

function setup() {
  createCanvas(640, 360);
  noFill();
  position = createVector(width/2, 0);
  velocity = createVector(0,0);
  acceleration = createVector(0,0);
  gravity = createVector(0, 0.5*mass);
  wind = createVector(0,0);
}

function draw() {
  background(255);
  stroke(0);
  fill(0);
  if (!serialActive) {
    text("Press Space Bar to select Serial Port", 20, 30);
  } else {
    text("Connected", 20, 30);
    
    applyForce(wind);
    applyForce(gravity);
    velocity.add(acceleration);
    velocity.mult(drag);
    position.add(velocity);
    acceleration.mult(0);
    ellipse(position.x,position.y,mass,mass);
    
    if (position.y > height-mass/2) {
        velocity.y *= -0.9;  // A little dampening when hitting the bottom
        position.y = height-mass/2;
        value = 1;
      }
    else {
      value = 0;
    }
    
  }
  
  
}

function applyForce(force){
  // Newton's 2nd law: F = M * A
  // or A = F / M
  let f = p5.Vector.div(force, mass);
  acceleration.add(f);
}

function keyPressed(){

  if (key==UP_ARROW){
    mass=random(15,80);
    position.y=-mass;
    velocity.mult(0);
  }
  if (key == " ") {
    // important to have in order to start the serial connection!!
    setUpSerial();
  }
}


// This function will be called by the web-serial library
// with each new *line* of data. The serial library reads
// the data until the newline and then gives it to us through
// this callback function
function readSerial(data) {
  ////////////////////////////////////
  //READ FROM ARDUINO HERE
  ////////////////////////////////////

  if (data != null) {
    
    if (int(trim(data)) >= 511) {
      wind.x = 3;
    }
    else {
      wind.x = -3;
    }

    //////////////////////////////////
    //SEND TO ARDUINO HERE (handshake)
    //////////////////////////////////
    let sendToArduino = value + "\n";
    writeSerial(sendToArduino);
  }
}

ARDUINO CODE: 

int ledPin = 5;

void setup() {
  // Start serial communication so we can send data
  // over the USB connection to our p5js sketch
  Serial.begin(9600);

  // We'll use the builtin LED as a status output.
  // We can't use the serial monitor since the serial connection is
  // used to communicate to p5js and only one application on the computer
  // can use a serial port at once.
  pinMode(LED_BUILTIN, OUTPUT);
  pinMode(ledPin, OUTPUT);

  // start the handshake
  while (Serial.available() <= 0) {
    digitalWrite(LED_BUILTIN, HIGH); // on/blink while waiting for serial data
    Serial.println("0"); // send a starting message
    delay(300);            // wait 1/3 second
    digitalWrite(LED_BUILTIN, LOW);
    delay(50);
  }

}

void loop() {


  digitalWrite(LED_BUILTIN, LOW);

  // wait for data from p5 before doing something
  while (Serial.available()) {
    digitalWrite(LED_BUILTIN, HIGH); // led on while receiving data

    int value = Serial.parseInt();

    if (Serial.read() == '\n') {
      if (value == 1) {
        digitalWrite(ledPin, HIGH);
      }
      else {
        digitalWrite(ledPin, LOW);
      }
      
      int sensor = analogRead(A0);
      delay(5);
      Serial.println(sensor);
    }
  }
  digitalWrite(LED_BUILTIN, LOW);
  

}

PROTOTYPE:

IMG_4406

Project Proposal Idea

Concept

For my project, I’m working on a Human Following Robot – you know, something straight out of a sci-fi movie, and Wall-E definitely comes to mind. The whole idea is to create this robot buddy that can autonomously follow people around, kind of like a helpful sidekick. It hit me after watching Wall-E, and I thought, why not bring a touch of that magic into real life?

So, here’s the plan: I’ll be using sensors to catch someone’s presence and their moves. Think about it like a buddy who always walks by your side, adjusting its position as you go. No need for a remote or anything – it just picks up on your vibe and tags along. The key components here are these cool sensors – they’re like the robot’s eyes and ears, helping it figure out where you are and what you’re up to.

final project proposal

I was building the 3D printer for the lab and noticed how the extruder moves across the X and Y axes. There are two motors, each moving the extruder in one or the other axis. By working both motors together, the extruder can be moved to any X or Y position. This is where I got my final project idea from. I’m going to make a raised tray and fill it with sand, and place one metal ball bearing on the sand surface, like in this picture:

There’s going to be a magnet underneath the table, which attracts the ball, and by moving the magnet, I’ll be able to move the ball on the sand and draw patterns. The magnet is going to be moved across the X and Y axes using two motors, like in the 3D printer. There are a bunch of belts in the IM lab storage, just like the ones that are used in the 3D printer, and I’m hoping that I get to use those for my purposes. If not, I would probably have to order them myself.

This is where p5 comes in: the Arduino controls the motors, but the Arduino is controlled by user input from p5. Users can maybe use keyboard arrows to move a virtual ball on the canvas, and that motion will be replicated by the real ball. I haven’t really pinned down what the user interaction would look like: it could also be users painting with their finger on a touch screen, but the issue with that might be that users might just move their fingers faster than the motors are able to move the ball, so that wouldn’t work. One simple way to tackle this would be to just reduce the frame rate on p5, so that users can’t draw that fast, and the motors are able to keep up.

I would also want to program a “default” mode, so that when there’s no users, the ball draws nice, symmetric shapes on its own. That way, the project could be a nice, standalone art installation, but also interactive.

Week 11 – Reflection Assignment

The writer of Design Meets Disability delves into using design to make the needs of disabled people more fashionable. However, they fail to take into account that not every disabled person wants to make their disability their entire personality. While some of the designs he showed were stunning, they may be too “out there” for someone who doesn’t want to make a big deal of their disability. I know a couple of disabled people who would actually be uncomfortable with the idea that their disability would be used as a fashion statement. That being said, there is nothing wrong with making it a fashion statement for those who willingly choose to do so. I would also like to point out that the writer made it seem that the “normal” products for disabled people were not good enough. In reality, most people can’t afford to get designer prosthetics or hearing aids. They should not be made to feel like they’re getting the short end of the stick.

I particularly liked how the writer mentioned how hearing aid companies are trying to make their products more invisible by making them smaller and hidden. On the other hand, eyeglass companies are trying to make their products more out there to show off as a fashion statement. I never noticed this contrast before but it was quite interesting to realize. I think that perhaps because glasses are more commonly worn than hearing aids that they’re more widely accepted and people are more comfortable with wearing them publicly instead of keeping them hidden like hearing aids. Furthermore, the writer also delves into modern technologies that value simplicity and accessibility. I found this to be very different compared to his original view where he wanted disability products to be less simple and more fashion-forward. As someone who is into fashion, I would want nothing more than to make a statement unless it comes in the way of my comfort and accessibility. While some of the designs he showed were gorgeous, some like the hand prosthetic looked less functional and more just a fashion statement.

Coding Assignment – Week #11

Exercise 1:

To move the ellipse in the middle of the screen, I used the example from class with small changes. Here is the sketch:

The ellipse moving part:

let x = map(alpha, 0, 1023, 0, width);
  ellipse(x, height/2, 40, 40)
Exercise 2:

I wanted the brightness level of an LED to be matched with the falling of the ellipse on P5.js. The LED is the brightest when the ellipse is at the bottom of the canvas, thus making the LED brighter as the ellipse falls. Here is the sketch:

P5 code:

let y = 0;

function setup() {
  createCanvas(640, 240);
  textSize(18);
}

function draw() {
  
  background(0);

  // the other value controls the text's transparency value
  fill(255);
  ellipse(width/2, y, 40, 40);
  y+=1;
  
  if (y>height){
    y=0
  }

  if (!serialActive) {
    text("Press Space Bar to select Serial Port", 20, 30);
  } else {
    text("Connected", 20, 30);
    

    // Print the current values
    //text('rVal = ' + str(rVal), 20, 50);
    text('alpha = ' + str(alpha), 20, 70);

  }
  
  print(y)
  

}

function keyPressed() {
  if (key == " ") {
    // important to have in order to start the serial connection!!
    setUpSerial();
  }
}

// This function will be called by the web-serial library
// with each new *line* of data. The serial library reads
// the data until the newline and then gives it to us through
// this callback function
function readSerial(data) {
  ////////////////////////////////////
  //READ FROM ARDUINO HERE
  ////////////////////////////////////

  if (data != null) {
    // make sure there is actually a message
    // split the message
    let fromArduino = split(trim(data), ",");
    // if the right length, then proceed
    if (fromArduino.length == 2) {
      // only store values here
      // do everything with those values in the main draw loop
      
      // We take the string we get from Arduino and explicitly
      // convert it to a number by using int()
      // e.g. "103" becomes 103
      //rVal = int(fromArduino[0]);
      alpha = int(fromArduino[1]);
    }

    //////////////////////////////////
    //SEND TO ARDUINO HERE (handshake)
    //////////////////////////////////
    let sendToArduino = y + "\n";
    writeSerial(sendToArduino);
  }
}

Arduino code:

int ledPin = 11;  // LED connected to pin 11

void setup() {
  Serial.begin(9600);
  pinMode(ledPin, OUTPUT);

  // Blink the LED to indicate setup
  digitalWrite(ledPin, HIGH);
  delay(200);
  digitalWrite(ledPin, LOW);

  // Start the handshake
  while (!Serial.available()) {
    Serial.println("0");  // Send a starting message
    delay(300);
  }
}

void loop() {
  // Wait for data from p5.js before doing something
  while (Serial.available()) {
    int y = Serial.parseInt();
    if (Serial.read() == '\n') {
      // Map the y value to the LED brightness (0-255)
      int brightness = map(y, 0, 240, 0, 255);
      analogWrite(ledPin, brightness);

      // Print the received y value for debugging
      Serial.println(y);
    }
  }
}
Exercise 3:

I made the gravity weaker so that the LED blinking is more clearly visible.

P5 code:

let velocity;
let gravity;
let position;
let acceleration;
let wind;
let drag = 0.99;
let mass = 50;
let alpha = 0; // Initialize alpha

function setup() {
  createCanvas(640, 360);
  noFill();
  position = createVector(width / 2, 0);
  velocity = createVector(0, 0);
  acceleration = createVector(0, 0);
  gravity = createVector(0, 0.05 * mass);
  wind = createVector(0, 0);
}

function draw() {
  background(255);

  // Update wind based on alpha
  wind.x = alpha;

  applyForce(wind);
  applyForce(gravity);

  velocity.add(acceleration);
  velocity.mult(drag);
  position.add(velocity);
  acceleration.mult(0);

  ellipse(position.x, position.y, mass, mass);

  if (position.y > height - mass / 2) {
    velocity.y *= -0.9; // A little dampening when hitting the bottom
    position.y = height - mass / 2;
  }

  print(int(position.y), alpha);
}

function applyForce(force) {
  // Newton's 2nd law: F = M * A
  // or A = F / M
  let f = p5.Vector.div(force, mass);
  acceleration.add(f);
}

function readSerial(data) {
  if (data != null) {
    // make sure there is actually a message
    // split the message
    let fromArduino = split(trim(data), ",");
    // if the right length, then proceed
    if (fromArduino.length == 2) {
      // only store values here
      // do everything with those values in the main draw loop
      alpha = int(fromArduino[1]);
    }

    //////////////////////////////////
    // SEND TO ARDUINO HERE (handshake)
    //////////////////////////////////
    let sendToArduino = int(position.y) + "\n";
    writeSerial(sendToArduino);
  }
}

function keyPressed(){
  
  if (key == " ") {
    // important to have in order to start the serial connection!!
    setUpSerial();
  
}
}

Arduino code:

const int potPin = A0;  
const int ledPin = 13;  

int potValue;  
int ballPosition;  
bool isBouncing = false;  

void setup() {
  pinMode(ledPin, OUTPUT);
  Serial.begin(9600);  
}

void loop() {
  // Read the value from the potentiometer
  potValue = analogRead(potPin);

  // Map the potentiometer value to the range of wind force
  int mappedWind = map(potValue, 0, 1023, -1, 1);

  // Send the mapped wind force value to the computer through serial
  Serial.print("0,");
  Serial.println(mappedWind);

  // Read the ball's position from p5.js
  if (Serial.available() > 0) {
    ballPosition = Serial.parseInt();
  }

  // Check if the ball bounces
  if (ballBouncesCondition()) {
    if (!isBouncing) {
      // Turn on the LED when the ball starts bouncing
      digitalWrite(ledPin, HIGH);
      isBouncing = true;
    }
  } else {
    // Turn off the LED if the ball is not bouncing
    digitalWrite(ledPin, LOW);
    isBouncing = false;
  }

  
}

bool ballBouncesCondition() {
  return ballPosition >= 320;
}


Week 11 | Exercises

Exercise 1: make something that uses only one sensor  on Arduino and makes the ellipse in p5 move on the horizontal axis, in the middle of the screen, and nothing on arduino is controlled by p5

I used an Arduino potentiometer to change the horizontal position of the ellipse in the p5js sketch. The values read from the potentiometer are mapped to the x coordinates of the ellipse, moving it across the horizontal axis in the middle of the screen.

Video of implementation:

Code:

let left = 0;

function setup() {
  createCanvas(400, 400);
}

function draw() {
  background(220);
  fill("red");
  ellipse(left, 50, 50, 50);
}

function keyPressed() {
  if (key == " ") {
    // important to have in order to start the serial connection!!
    setUpSerial();
  }
}

function readSerial(data) {
  left = map(data, 0, 1023, 0, 400);
}

//// Arduino Code
/*

void setup() {
  // put your setup code here, to run once:
  Serial.begin(9600);

}

void loop() {
  // put your main code here, to run repeatedly:
  int sensor = analogRead(A0);
  delay(5);
  Serial.println(sensor);

}

*/


Exercise 2: make something that controls the LED brightness from p5

To control the led brightness through P5JS, I created a brightness slider similar to that in our smartphones. The value of the slider is sent to Arduino to be the value of the analog write of the led and change its brightness.

Video of implementation:

Code:

let brightnessSlider;
let brightnessValue = 0;

function setup() {
  createCanvas(400, 200);

  // Create a brightness slider
  brightnessSlider = createSlider(0, 255, 128);
  brightnessSlider.position(width/2-50, height/2);
  brightnessSlider.style('width', '100px');
}

function draw() {
  background(255);

  // Get the brightness value from the slider
  brightnessValue = brightnessSlider.value();
}

function keyPressed() {
  if (key == " ") {
    // important to have in order to start the serial connection!!
    setUpSerial();
  }
}

function readSerial(data) {
  console.log(data);
    let dataToSend = brightnessValue + ", \n";
    writeSerial(dataToSend);  
}

///Arduino COde
/*

const int ledPin = 9;  // Digital output pin for the LED

void setup() {
  pinMode(ledPin, OUTPUT);

  // Start serial communication
  Serial.begin(9600);
}

void loop() {
  Serial.println("sensor");
  // Check if data is available from p5.js
  if (Serial.available() > 0) {
    // Read the brightness value from p5.js
    int brightness = Serial.parseInt();

    // Map the received value to the LED brightness range
    brightness = constrain(brightness, 0, 255);

    // Set the LED brightness
    analogWrite(ledPin, brightness);
  }
}

*/

Exercise 3: take the gravity wind example and make it so every time the ball bounces one led lights up and then turns off, and you can control the wind from one analog sensor

When the ball touches the ground, the value of the variable Led changes accordingly (either 0 or 1) and then sent to the Arduino to toggle the led at pin 9. For the wind effect, I used a potentiometer where its values are mapped to values between -2 and 2, making a smooth wind effect moving the ball horizontally.

Video of implementation:

Code:

let velocity;
let gravity;
let position;
let acceleration;
let wind;
let drag = 0.99;
let mass = 50;
let led = 0;

function setup() {
  createCanvas(640, 360);
  noFill();
  position = createVector(width/2, 0);
  velocity = createVector(0,0);
  acceleration = createVector(0,0);
  gravity = createVector(0, 0.5*mass);
  wind = createVector(0,0);
}

function draw() {
  background(255);
  applyForce(wind);
  applyForce(gravity);
  velocity.add(acceleration);
  velocity.mult(drag);
  position.add(velocity);
  acceleration.mult(0);
  ellipse(position.x,position.y,mass,mass);
  if (position.y > height-mass/2) {
      velocity.y *= -0.9;  // A little dampening when hitting the bottom
      position.y = height-mass/2;
  }
  if(position.y == height-mass/2 && (velocity.y > 0.5 || velocity.y < -0.5)){ 
    led = 1;
  }else{
    led = 0;
  }
}

function applyForce(force){
  // Newton's 2nd law: F = M * A
  // or A = F / M
  let f = p5.Vector.div(force, mass);
  acceleration.add(f);
}

function keyPressed(){
  if (key == "n") {
    // important to have in order to start the serial connection!!
    setUpSerial();
  }
  if (key==' '){
    mass=random(15, 80);
    position.y=-mass;
    velocity.mult(0);
  }
}

function readSerial(data) {

  if (data != null) {
    // make sure there is actually a message
    // split the message
    wind.x = data;

    //////////////////////////////////
    //SEND TO ARDUINO HERE (handshake)
    //////////////////////////////////
    let sendToArduino = led + "\n";
    writeSerial(sendToArduino);
  }
}

///Arduino COde
/*

int ledPin = 9;

void setup() {
  // Start serial communication so we can send data
  // over the USB connection to our p5js sketch
  Serial.begin(9600);
  pinMode(ledPin, OUTPUT);
}

void loop() {
  int sensor = analogRead(A0);
  int wind = map(sensor, 0, 1023, -2, 2);
  Serial.println(wind);
  delay(10);
  if (Serial.available() > 0) {
    // Read the brightness value from p5.js
    int touch = Serial.parseInt();
    // Set the LED brightness
    digitalWrite(ledPin, touch);
  }
}
*/