week11.assignment – Serial Communication

Exercise One – Ellipse Movement with Sensor

In this exercise, I decided to use the light sensor to control the horizontal position of the ellipse in the center of the screen by mapping the serial values of the light sensor to the y position of the ellipse.

let yShift = 0;
let alpha = 255;


function setup() {
  createCanvas(640, 480);
  textSize(18);
}

function draw() {
  
  background(205);
  
  ellipseMode(CENTER);
  ellipse(width / 2 , height/2 + map(yShift, 0, 1023, -255, 255), 50, 100);

  // the other value controls the text's transparency value
  fill(255, 0, 255, map(alpha, 0, 1023, 0, 255));

  if (!serialActive) {
    text("Press Space Bar to select Serial Port", 20, 30);
  } else {
    text("Connected", 20, 30);
    

    // Print the current values
    text('yShift = ' + str(yShift), 20, 50);
    text('alpha = ' + str(alpha), 20, 70);

  }

function keyPressed() {
  if (key == " ") {
    // important to have in order to start the serial connection!!
    setUpSerial();
  }
}

// This function will be called by the web-serial library
// with each new *line* of data. The serial library reads
// the data until the newline and then gives it to us through
// this callback function
function readSerial(data) {
  ////////////////////////////////////
  //READ FROM ARDUINO HERE
  ////////////////////////////////////

  if (data != null) {
    // make sure there is actually a message
    // split the message
    let fromArduino = split(trim(data), ",");
    // if the right length, then proceed
    if (fromArduino.length == 2) {
      // only store values here
      // do everything with those values in the main draw loop
      
      // We take the string we get from Arduino and explicitly
      // convert it to a number by using int()
      // e.g. "103" becomes 103
      yShift = int(fromArduino[0]);
      alpha = int(fromArduino[1]);
    }

    //////////////////////////////////
    //SEND TO ARDUINO HERE (handshake)
    //////////////////////////////////
    let sendToArduino = "0,0" + "\n"; 
    // we dont need arduino to recieve anything so we can send empty         
    // information
    writeSerial(sendToArduino);
  }
}


Exercise Two – LED Brightness Control from Arduino

Yet again, I decided to repurpose the previous code and modify it so that now P5 would send data to the Arduino, but it doesn’t need any data from Arduino.

function setup() {
  createCanvas(640, 480);
  textSize(18);
}

function draw() {
  
  background(205);

  // the other value controls the text's transparency value
  fill(0)

  if (!serialActive) {
    text("Press Space Bar to select Serial Port", 20, 30);
  } else {
    text("Connected", 20, 30);

  }

  // when clicked, digital LED will turn on,
  // other analog write LED will have brightness corresponding to the height of the mouse when it is press. can be pressed and dragged for controlling brightness
  if (mouseIsPressed) {
      LEDbright = mouseY;
  } else {
    LEDbright = 0;
  }
}

function keyPressed() {
  if (key == " ") {
    // important to have in order to start the serial connection!!
    setUpSerial();
  }
}

function readSerial(data) {
  ////////////////////////////////////
  //READ FROM ARDUINO HERE
  ////////////////////////////////////

  if (data != null) {
    // dont need any data from arduino
    let fromArduino = 0;


    //////////////////////////////////
    //SEND TO ARDUINO HERE (handshake)
    //////////////////////////////////
    
    //send the posiiton of mouseY when clicked to control brightness
    let sendToArduino = LEDbright + "," + LEDbright + "\n";
    writeSerial(sendToArduino);
  }
}


Exercise Three – Gravity Wind Bounce

For this exercise, I had to modify the code of Aaron Sherwood’s sketch and allow for serial communication between the Arduino and the sketch. To control the blinking of the LED, I modified the if condition, which is active when the ball touches the ground, and added a variable to turn on an LED, the right one, that is. Additionally, I use the data from the Arduino potentiometer to control the wind. A video is linked below the code.

let velocity;
let gravity;
let position;
let acceleration;
let wind;
let drag = 0.99;
let mass = 50;
let ledState = 0; // control LED when ball bounce

function setup() {
  createCanvas(640, 360);
  noFill();
  position = createVector(width / 2, 0);
  velocity = createVector(0, 0);
  acceleration = createVector(0, 0);
  gravity = createVector(0, 0.5 * mass);
  wind = createVector(0, 0);
}

function draw() {
  background(255);
  if (!serialActive) {
    fill(0);
    text("Press the letter 'c' to select Serial Port", 20, 30);
  } else {
    text("Connected", 20, 30);
    applyForce(wind);
    applyForce(gravity);
    velocity.add(acceleration);
    velocity.mult(drag);
    position.add(velocity);
    acceleration.mult(0);
    ellipse(position.x, position.y, mass, mass);

    if (position.y > height - mass / 2) {
      velocity.y *= -0.9; // A little dampening
      position.y = height - mass / 2;
      ledState = 1;
    } else {
      ledState = 0;
    }
  }
}

function applyForce(force) {
  // Newton's 2nd law: F = M * A
  // or A = F / M
  let f = p5.Vector.div(force, mass);
  acceleration.add(f);
}

function keyPressed() {
  if (keyCode == LEFT_ARROW) {
    wind.x = -1;
  }
  if (keyCode == RIGHT_ARROW) {
    wind.x = 1;
  }
  if (key == " ") {
    mass = random(15, 80);
    position.y = -mass;
    velocity.mult(0);
  }
  if (key == "c") {
    setUpSerial();
  }
}

function readSerial(data) {
  ////////////////////////////////////
  //READ FROM ARDUINO HERE
  ////////////////////////////////////

  if (data != null) {
    // make sure there is actually a message
    // split the message
    let fromArduino = split(trim(data), ",");
    // if the right length, then proceed
    if (fromArduino.length == 2) {
      wind.x = map(int(fromArduino[1]), 0, 1023, -1, 1);
    }

    //////////////////////////////////
    //SEND TO ARDUINO HERE (handshake)
    //////////////////////////////////
    let sendToArduino = ledState + "," + "480" + "\n";
    writeSerial(sendToArduino);
  }
}

LED BOUNCE

Reflection

Overall, I believe that this was a great opportunity to understand how serial communication between the Arduino and P5JS works. Personally, I found these concepts quite understandable and was able to work through the exercises easily. One issue, however, that I did encounter was trying to make the LED light up when the ball bounced. Unfortunately, there is a slight delay in the Serial communication, and additionally, when the ball bounces the first few times, it bounces extremely fast, and thus, the LED blink is too fast to perceive with the human eye. Additionally, it can be seen that for the final few bounces, the blinking is also delayed.

Week 11 – Reading Reflection

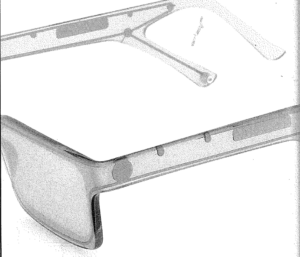
According to the World Health Organization, 1.3 billion people, or 16% of the population, have significant disabilities. With the invention of new technology, most of the disabilities can be treated, providing a person with a relatively normal lifestyle. However, there’s a stigma posed by society that makes it treat people with disabilities differently, which complicates the process of socialization for them. And design, along with fashion, can be a great force in transitioning people’s beliefs towards accepting and equalizing our society. While I was reading, I was curious to find out how glasses, being an attribute of people with sight problems, have become an essential object of fashion in recent decades.

I believe that there should be more investments in the field of biological and medical advances that would enable the group of people with disabilities to enjoy life and implement their intellectual abilities. Design should become the transitional power to understand and accept people with disabilities, but there’s still a long way to go until people with disabilities are treated equally in most of the world.

Final ideas


I am still not sure what to do for my final project I have three different ideas and I am not sure which one to pick.

Idea 1:

I am thinking of doing a PS4-like controller with a car race on the screen. It would have some audio effects and a trick to win or lose. I want to do it so that 2 people might be able to race at the same time. However, I am not sure how and if I will be able to do it. It seems like a cool idea but I am a little overwhelmed by how it will go. It can either work fine or go the other way around.

Idea 2:

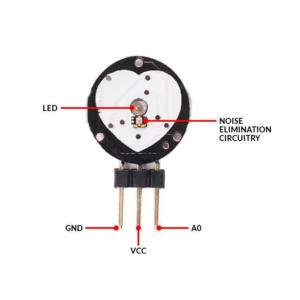
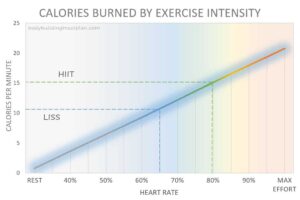
I am thinking of having a screen and a small area where people can run in place but seem as if they are running on a track. Maybe the speed of the person running is controlled by the heart rate. Then maybe I would do some research to see how many calories the person burned at a specific time their weight. It seems an interesting idea. However, it is also challenging and how I visualize it is that it is somehow immersive so that the person only focuses on the running and not what is going on around them.

Ideas 3:

A small physical car and a controller.  I might make a car that moves on a track using a controller similar to kids’ car toys. However, I am trying to think of a twist or a way to make It more engaging. I am not sure until now how to do so.

Week 11 – AakifR

1. Moving Ellipse Using Sensor:

(Arduino Code Remains same as given in class)

/* Week 11.2 bidi serial example
 * Originally by Aaron Sherwood
 * Modified by Mangtronix
 *
 * Add this library to Sketch files
 *  https://github.com/mangtronix/IntroductionToInteractiveMedia/blob/master/code/p5.web-serial.js files
 *
 * You must include this line in your index.html (in Sketch Files) to load the
 * web-serial library
 *
 *     <script src="p5.web-serial.js"></script>
 *
 * Arduino code:
 * https://github.com/mangtronix/IntroductionToInteractiveMedia/blob/master/code/Week11Serial.ino
 */

let rVal = 0;
let alpha = 255;
let left = 0; // True (1) if mouse is being clicked on left side of screen
let right = 0; // True (1) if mouse is being clicked on right side of screen

function setup() {
  createCanvas(640, 480);
  textSize(18);
}

function draw() {
  // one value from Arduino controls the background's red color
  background(map(rVal, 0, 1023, 0, 255), 255, 255);
  
  ellipse(rVal +25,height/2, 50,55); // makes an ellipse that moves with resistor

  // the other value controls the text's transparency value
  fill(255, 0, 255, map(alpha, 0, 1023, 0, 255));

  if (!serialActive) {
    text("Press Space Bar to select Serial Port", 20, 30);
  } else {
    text("Connected", 20, 30);
    

    // Print the current values
    text('rVal = ' + str(rVal), 20, 50);
    text('alpha = ' + str(alpha), 20, 70);

  }


  // click on one side of the screen, one LED will light up
  // click on the other side, the other LED will light up
  if (mouseIsPressed) {
    if (mouseX <= width / 2) {
      left = 1;
    } else {
      right = 1;
    }
  } else {
    left = right = 0;
  }
}

function keyPressed() {
  if (key == " ") {
    // important to have in order to start the serial connection!!
    setUpSerial();
  }
}

// This function will be called by the web-serial library
// with each new *line* of data. The serial library reads
// the data until the newline and then gives it to us through
// this callback function
function readSerial(data) {
  ////////////////////////////////////
  //READ FROM ARDUINO HERE
  ////////////////////////////////////

  if (data != null) {
    // make sure there is actually a message
    // split the message
    let fromArduino = split(trim(data), ",");
    // if the right length, then proceed
    if (fromArduino.length == 2) {
      // only store values here
      // do everything with those values in the main draw loop
      
      // We take the string we get from Arduino and explicitly
      // convert it to a number by using int()
      // e.g. "103" becomes 103
      rVal = int(fromArduino[0]);
      alpha = int(fromArduino[1]);
    }

    //////////////////////////////////
    //SEND TO ARDUINO HERE (handshake)
    //////////////////////////////////
    let sendToArduino = left + "," + right + "\n";
    writeSerial(sendToArduino);
  }
}

//Arduino Code
/*
// Week 11.2 Example of bidirectional serial communication

// Inputs:
// - A0 - sensor connected as voltage divider (e.g. potentiometer or light sensor)
// - A1 - sensor connected as voltage divider 
//
// Outputs:
// - 2 - LED
// - 5 - LED

int leftLedPin = 2;
int rightLedPin = 5;

void setup() {
  // Start serial communication so we can send data
  // over the USB connection to our p5js sketch
  Serial.begin(9600);

  // We'll use the builtin LED as a status output.
  // We can't use the serial monitor since the serial connection is
  // used to communicate to p5js and only one application on the computer
  // can use a serial port at once.
  pinMode(LED_BUILTIN, OUTPUT);

  // Outputs on these pins
  pinMode(leftLedPin, OUTPUT);
  pinMode(rightLedPin, OUTPUT);

  // Blink them so we can check the wiring
  digitalWrite(leftLedPin, HIGH);
  digitalWrite(rightLedPin, HIGH);
  delay(200);
  digitalWrite(leftLedPin, LOW);
  digitalWrite(rightLedPin, LOW);


  // start the handshake
  while (Serial.available() <= 0) {
    digitalWrite(LED_BUILTIN, HIGH); // on/blink while waiting for serial data
    Serial.println("0,0"); // send a starting message
    delay(300);            // wait 1/3 second
    digitalWrite(LED_BUILTIN, LOW);
    delay(50);
  }
}

void loop() {
  // wait for data from p5 before doing something
  while (Serial.available()) {
    digitalWrite(LED_BUILTIN, HIGH); // led on while receiving data

    int left = Serial.parseInt();
    int right = Serial.parseInt();
    if (Serial.read() == '\n') {
      digitalWrite(leftLedPin, left);
      digitalWrite(rightLedPin, right);
      int sensor = analogRead(A0);
      delay(5);
      int sensor2 = analogRead(A1);
      delay(5);
      Serial.print(sensor);
      Serial.print(',');
      Serial.println(sensor2);
    }
  }
  digitalWrite(LED_BUILTIN, LOW);
}
*/


2. LED Brightness Control:

/* Week 11.2 bidi serial example
 * Originally by Aaron Sherwood
 * Modified by Mangtronix
 *
 * Add this library to Sketch files
 *  https://github.com/mangtronix/IntroductionToInteractiveMedia/blob/master/code/p5.web-serial.js files
 *
 * You must include this line in your index.html (in Sketch Files) to load the
 * web-serial library
 *
 *     <script src="p5.web-serial.js"></script>
 *
 * Arduino code:
 * https://github.com/mangtronix/IntroductionToInteractiveMedia/blob/master/code/Week11Serial.ino
 */

let rVal = 0;
let alpha = 255;
let left = 0; // True (1) if mouse is being clicked on left side of screen
let right = 0; // True (1) if mouse is being clicked on right side of screen

function setup() {
  createCanvas(255, 255);
  textSize(18);
}

function draw() {
  // one value from Arduino controls the background's red color
  background(map(rVal, 0, 1023, 0, 255), 255, 255);


  // the other value controls the text's transparency value
  fill(255, 0, 255, map(alpha, 0, 1023, 0, 255));

  if (!serialActive) {
    text("Press Space Bar to select Serial Port", 20, 30);
  } else {
    text("Connected", 20, 30);
    

    // Print the current values
    text('rVal = ' + str(rVal), 20, 50);
    text('alpha = ' + str(alpha), 20, 70);

  }


  // click on one side of the screen, one LED will light up
  // click on the other side, the other LED will light up
  if (mouseIsPressed) {
    if (mouseX <= width / 2) {
      left = 1;
    } else {
      right = 1;
    }
  } else {
    left = right = 0;
  }
}

function keyPressed() {
  if (key == " ") {
    // important to have in order to start the serial connection!!
    setUpSerial();
  }
}

// This function will be called by the web-serial library
// with each new *line* of data. The serial library reads
// the data until the newline and then gives it to us through
// this callback function
function readSerial(data) {
  ////////////////////////////////////
  //READ FROM ARDUINO HERE
  ////////////////////////////////////

  if (data != null) {
    // make sure there is actually a message
    // split the message
    let fromArduino = split(trim(data), ",");
    // if the right length, then proceed
    if (fromArduino.length == 2) {
      // only store values here
      // do everything with those values in the main draw loop
      
      // We take the string we get from Arduino and explicitly
      // convert it to a number by using int()
      // e.g. "103" becomes 103
      rVal = int(fromArduino[0]);
      alpha = int(fromArduino[1]);
    }

    //////////////////////////////////
    //SEND TO ARDUINO HERE (handshake)
    //////////////////////////////////
    
    let sendToArduino = mouseX + "," + mouseY + "\n";
    writeSerial(sendToArduino);
  }
}
// Week 11.2 Example of bidirectional serial communication

// Inputs:
// - A0 - sensor connected as voltage divider (e.g. potentiometer or light sensor)
// - A1 - sensor connected as voltage divider 
//
// Outputs:
// - 2 - LED
// - 5 - LED

int leftLedPin = 3;
int rightLedPin = 5;

void setup() {
  // Start serial communication so we can send data
  // over the USB connection to our p5js sketch
  Serial.begin(9600);

  // We'll use the builtin LED as a status output.
  // We can't use the serial monitor since the serial connection is
  // used to communicate to p5js and only one application on the computer
  // can use a serial port at once.
  pinMode(LED_BUILTIN, OUTPUT);

  // Outputs on these pins
  pinMode(leftLedPin, OUTPUT);
  pinMode(rightLedPin, OUTPUT);

  // Blink them so we can check the wiring
  digitalWrite(leftLedPin, HIGH);
  digitalWrite(rightLedPin, HIGH);
  delay(200);
  digitalWrite(leftLedPin, LOW);
  digitalWrite(rightLedPin, LOW);


  // start the handshake
  while (Serial.available() <= 0) {
    digitalWrite(LED_BUILTIN, HIGH); // on/blink while waiting for serial data
    Serial.println("0,0"); // send a starting message
    delay(300);            // wait 1/3 second
    digitalWrite(LED_BUILTIN, LOW);
    delay(50);
  }
}

void loop() {
  // wait for data from p5 before doing something
  while (Serial.available()) {
    digitalWrite(LED_BUILTIN, HIGH); // led on while receiving data

    int xPos = Serial.parseInt();
    int yPos = Serial.parseInt();
    if (Serial.read() == '\n') {
      analogWrite(leftLedPin, xPos);
      analogWrite(rightLedPin, yPos);
      int sensor = analogRead(A0);
      delay(5);
      int sensor2 = analogRead(A1);
      delay(5);
      Serial.print(sensor);
      Serial.print(',');
      Serial.println(sensor2);
    }
  }
  digitalWrite(LED_BUILTIN, LOW);
}

3. Part third

/* Week 11.2 bidi serial example
 * Originally by Aaron Sherwood
 * Modified by Mangtronix
 */
let velocity;
let gravity;
let position;
let acceleration;
let wind;
let drag = 0.99;
let mass = 50;

let LED_STATE = 0;

function setup() {
  createCanvas(640, 360);
  background(125, 125, 125);
  position = createVector(width / 2, 0);
  velocity = createVector(0, 0);
  acceleration = createVector(0, 0);
  gravity = createVector(0, 0.5 * mass);
  wind = createVector(0, 0);
}

let connected = false;

function draw() {
  background(255);
  fill(255, 200, 0);
  if (!serialActive) {
    text("Press SPACE to select Serial Port", 20, 30);
  } else {
    text("Connected", 20, 30);
  }

  if (connected === true) {
    applyForce(wind);
    applyForce(gravity);
    velocity.add(acceleration);
    velocity.mult(drag);
    position.add(velocity);
    acceleration.mult(0);
    ellipse(position.x, position.y, mass, mass);
    if (position.y > height - mass / 2) {
      velocity.y *= -0.9; // A little dampening when hitting the bottom
      position.y = height - mass / 2;
      LED_STATE = 0;
    } else {
      LED_STATE = 1;
    }
  }
}

function applyForce(force) {
  // Newton's 2nd law: F = M * A
  // or A = F / M
  let f = p5.Vector.div(force, mass);
  acceleration.add(f);
}

function keyPressed() {
  if (key == " ") {
    mass = random(15, 80);
    position.y = -mass;
    velocity.mult(0);
    setUpSerial();
  }
 
}

// This function will be called by the web-serial library
// with each new *line* of data. The serial library reads
// the data until the newline and then gives it to us through
// this callback function

function readSerial(data) {
  ////////////////////////////////////
  //READ FROM ARDUINO HERE
  ////////////////////////////////////

  if (data != null) {
    let fromArduino = split(trim(data), ',');
    if (fromArduino[0] < 512) {
      wind.x = map(fromArduino[0], 200, 512, -2, 0);
    } else {
      wind.x = map(fromArduino[0], 513, 1023, 0, 1);
    }
    //////////////////////////////////
    //SEND TO ARDUINO HERE (handshake)
    //////////////////////////////////
    let sendToArduino = LED_STATE + "\n";
    writeSerial(sendToArduino);

    connected = true;
  }
}
int leftLedPin = 2;
int rightLedPin = 5;


void setup() {
 // Start serial communication so we can send data
 // over the USB connection to our p5js sketch
 Serial.begin(9600);


 // We'll use the builtin LED as a status output.
 // We can't use the serial monitor since the serial connection is
 // used to communicate to p5js and only one application on the computer
 // can use a serial port at once.
 pinMode(LED_BUILTIN, OUTPUT);


 // Outputs on these pins
 pinMode(leftLedPin, OUTPUT);
 pinMode(rightLedPin, OUTPUT);


 // Blink them so we can check the wiring
 digitalWrite(leftLedPin, HIGH);
 digitalWrite(rightLedPin, HIGH);
 delay(200);
 digitalWrite(leftLedPin, LOW);
 digitalWrite(rightLedPin, LOW);


 // start the handshake
  while (Serial.available() <= 0) {
    digitalWrite(LED_BUILTIN, HIGH);  // on/blink while waiting for serial data
    Serial.println("0,0");            // send a starting message
    delay(300);                       // wait 1/3 second
    digitalWrite(LED_BUILTIN, LOW);
    delay(50);
  }
}


void loop() {
 // wait for data from p5 before doing something
 while (Serial.available()) {
   digitalWrite(LED_BUILTIN, HIGH);  // led on while receiving data


   int LED_STATE = Serial.parseInt();
   //int right = Serial.parseInt();
   if (Serial.read() == '\n') {
     digitalWrite(rightLedPin, LED_STATE);
     int sensor2 = analogRead(A1);
     delay(5);
     Serial.print(sensor2);
     Serial.print(',');
     Serial.println('Y');
   }
 }
 digitalWrite(LED_BUILTIN, LOW);
}


Final Project Idea

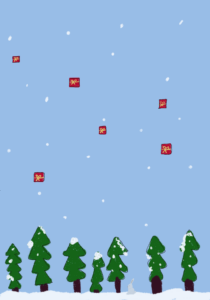
As a kid I used to love playing the game “winterbells” on my aunt’s PC. For my final project, i want to recreate that nostalgic experience with a twist.

Instead of the conventional keyboard controls, I want to introduce a hands-on approach. Players will have a physical bunny, a soft toy, that becomes the controller for the bunny’s movements on the screen. I will use an ultrasonic sensor to allow the bunny’s physical position to dictate the virtual bunny’s movements. There will also be a switch to allow the bunny to jump at the start of the game.

Given the project deadline aligns with the festive season, I want to infuse the game with a stronger Christmas theme. Here’s a sketch of what I’ve envisioned:

I also think it would be really fun if i could give players an incentive at the showcase: collect more than a certain amount of virtual gifts within the game to get a special Christmas gift at the showcase 🙂

Week 11 – Reading Response

I find it interesting how smooth was the transition of the perspective on the eyeglasses from the ‘sign of disability’ to a fashionable item. This idea became so popular because of the unique design and style of the eyeglasses that they are bought by people with no issue with eyesight just because they are fashionable, adding to the style and creating an overall image. Hence, eyeglasses became something that we don’t hide but rather emphasize in a stylish way, changing our view on disability as something we have to hide or be ashamed of. 

While reading the article, I started questioning whether the same approach can be applied to bigger items such as wheelchairs. Although for now there is not much to do for the design of the wheelchairs, their functionality is advancing day by day. However, it is not an absolute solution as not all the facilities in the urban and rural areas are made for wheelchairs. I feel like they consider themselves as people with disabilities mostly when there is a hardship in the movement in the city as not everything is made accessible. Therefore, I believe that not only the design of the items for accessibility should be improved, but also the things all around should be designed to be accessible. 

Although the transition for other items is not as fast as with the eyeglasses, I appreciate the work of designers in trying to make other disability items through the changes in the design of the items, raising awareness about their normality in the magazines, etc.

Design Meets Disability


I think the reading was interesting it communicated the importance of design to disabilities and how it opens a new possibility to re-invent these pieces as fashion and not only for medical purposes. I enjoyed the part about glasses because it reminded me of the times when I would go shopping with my mom and I always try many on before picking one that suits me. I can not imagine a time when glasses were not stylized. Similarly, I think there is a sense of struggle when comes to designing things for disability, I will argue that maybe because the person designing these pieces is not disabled himself/herself which would be a problem because the designer would not know what the people who he/she is designing for wants. I think part of the design process is to know the consumers well. Their opinion, their style, and what they want. However, the reading lacked that part. Especially when it comes to design Ear- Wear and different body limbs.

It is good to design products that are more inclusive and toward the disabled like clickable audio buttons, or products that have braille on them. Further, how do we design products that can compensate people who lack some limps? Do we incorporate different limps to our design too or do we make our products useable in different ways but with the same effect? I do not think that the radio example is that inclusive it might be to a degree but I think it could be more inclusive if the designers would allow users to control it with voice, or even control it with brail and then would also have a small screen that writes whatever is being displayed in the radio

Final Project Proposal

For my final project, I would really love to incorporate something with sound and color (very similar to my midterm). I think maybe a cool idea would be composing a short piece of music, that would generate some sort of light show using leds. I could assign different colors to the notes, so that when the piece plays, the leds (the translucent ones) will generate different colors for the piece.

WEEK 11 RESPONSE

For this week’s reading, the author discusses design in relation to disabilities. He specially talks about how the fashion industry has changed the perception of certain disabilities, purely based off of the design choices made to enhance the appearance of certain medical items. He used glasses as an example, stating that eyeglasses were once considered humiliating and undesirable, but that since the fashion industry/brands discovered a method to produce trendy and cool eyewear, glasses are now considered fashionable and stylish. This is a great example of positive framing (no pun intended) of a disability through its design, which not only offers a product for those with disabilities, but also allows indivsisuals with disabilities to seamlessly blend into society without feeling “different” from everyone else. What can become concerning about the fashion industry and its role in making certain medical items “fashionable” is its economic influence on these  products. These fashionable items become more expensive and leave those who actually need these items unable to afford them. This is extremely concerning and it begs the question of whether emphasizing aesthetic in the process of manufacturing these products is a good idea. Personally, I believe that the (aesthetic) design part of these items is extremely necessary because it not only allows people with disabilities to feel more at ease in society, but it also enables them to feel good about themselves. Of course, there must be a fair balance between usability and appearance, but looking good also makes you feel good.

Week 11 Final Concept Draft 1

Soundscapes in Light

Concept:

A dynamic light source that responds to the captured sound, adding a visual dimension to the auditory experience.

Soundscapes in Light is all about immersing users where the surrounding ambient sounds play the lead role in shaping a captivating visual atmosphere

I stumbled across this video I found which sort of matches the idea of what I want to display on p5.

Description:

I’m thinking of setting up a microphone to capture the audio vibes around. Different frequencies and amplitudes trigger variations in the light display for example if it’s a high-pitched sound the RGB LED nudges towards the blues or a deep bass note the RGB LED changes to reds.

Color Mapping: P5.js takes charge, translating the intensity and frequency of the captured sound into dynamic color schemes. Visuals come alive with vibrant colors and subtle gradients responding to every nuance of the audio, creating a visually harmonious representation.

Light Intensity: The volume and intensity of the sound guide the brightness and saturation of the RGB LED. A crescendo of sound could lead to a fully illuminated, vibrant display, while moments of silence might dim the lights, creating a tranquil ambiance.

Challenges:

Noise Interference:

  • The microphone may capture unintended ambient noise, leading to inaccurate or unwanted visual responses. Implementing effective noise reduction techniques is crucial to maintain the integrity of the sound-to-light transformation.
  • Color Mapping Aesthetics:
    • Determining the appropriate color mapping for different sound frequencies and amplitudes involves both artistic and technical considerations. Striking a balance between aesthetic appeal and meaningful representation is a challenge.