Week 12 – Final Project: Whac-A-Note

Concept:

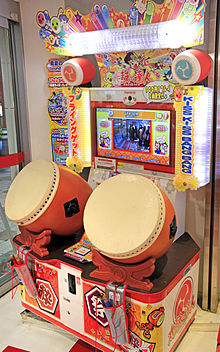
With the original foundation of the whac-a-mole system of arduino circuit being completed by a hammer whacking the mole, I added an extra element of music notes to make this a rhythm game. Users must hit the several moles (I am currently thinking of six) which will be spread in three different directions: left, right, and center. The interface will show a series of notes, each correlated to a specific mole and the user must hit the mole at a correct timing and order in order to score points. Missing the mole or hitting the incorrect mole will deduct points and if too many notes are missed, the user will lose the game.

Implementation:

-Arduino:

The arduino board will have an incomplete series of circuits that can be connected only when the hammer contacts the mole which will be made with some conductors and attached to wires. When the circuit is connected, an LED bulb will be lit and will send a signal to p5js some data that the mole was hit. It will also connect the buzzer which will then play a specific note correlated to the mole.

-P5js:

The p5js will show the interface of starting the game and the in-game node sequences. The node will be going across from one part of the screen to the other side, and when the node reaches a certain point in the screen, users must hit the correlating mole at that time in order to score points. I still haven’t figured the exact method of p5js loading this sequence of node. My current two possible ideas are either it is generated using some random function, or it would load a preloaded existing tune. During the actual implementation stage, I plan to try out both and see which is better to decide this.

Potential issues / Future work:

Like I mentioned before, I need to decide on the methodology of the loading of the sequence of nodes and part of this problem is feasibility. Since the core factor of a rhythm game is the music of it, I need to make sure that this is executed well during implementation. I also need to confirm that the serial communication between p5js and arduino can be done by completing a circuit via connecting wires. Other than that, I’m a bit worried about the physical layout of the whole project with long wires and several objects big and strong enough to withstand some whacking… But I am very excited to work on this project since I really love rhythm games and I also love some whacking.

Project Update

Final Project Update

Hassan, Majid & Aaron.


CONCEPT

Our project is to create a remote-controlled car that can be controlled using hand gestures, specifically by tracking the user’s hand position. We will achieve this by integrating a P5JS tracking system into the car, which will interpret the user’s hand gestures and translate them into commands that control the car’s movements.

IMPLEMENTATION

To implement this project, we will first build the remote-controlled car using an Arduino Uno board and other necessary components. We will then integrate the P5JS system, which will detect the user’s hand position and translate it into movement commands for the car. We have two options for detecting user’s hand position, either PoseNet or Teachable Machine. The camera tracking system will be programmed to interpret specific hand gestures, such as moving the hand forward or backward to move the car in those directions.

POTENTIAL CHALLENGES

One potential challenge we may face during the implementation is accurately interpreting the user’s hand gestures. The camera tracking system may require experimentation and programming adjustments to ensure that it interprets the user’s hand movements accurately. Also testing will be required to see if PoseNet performs better or Teachable Machine. Responsiveness will also be a factor as we would want the control to be fluid for the user. Additionally, ensuring the car responds correctly to the interpreted movement commands may also present a challenge, in terms of the physical construction of the cars and the variability of the motors.


Update

We were able able to come up with two car concept designs, but this was the best we decided to move ahead with. We believe we might need a motor driver, which we will connect to the Arduino Uno board to make controls possible.

1.

2.

3.

When we get the code to control the car right and time is on our side, we will update the car model to an acrylic body. We also plan to use a vacuum former to create a body for the car.

Box Ball Musician – Final Group Proposal

Group: Vladimir, Dariga

Project Idea

A rhythm game where you are given instructions on which notes to play from a song. You must use our physical controller to play these sounds. You must keep up the tempo and always play the correct notes. We plan to prepare one to three songs for the player, which they will be able to select. Also, we can add a ‘freestyle’ mode where the song is generated at every moment.

Arduino: We have a cardboard box with the top open. We also have a ball or other smooth object which we place inside the box. We intend to use 2 ultrasonic sensors to track the ball’s position inside the box. So, for this project, one ultrasonic sensor should track the X position and the other should track the Y position. We have tested the use of two ultrasonic sensors to get (X, Y) coordinates for future use and this works for our project purposes. The distances to the ball from 2 ultrasonic sensors will be sent to p5js which will use these distances to map to (X, Y) coordinates and then associate with the screen regions for the game.

This functionality of Arduino & p5js to map the coordinates has been already implemented and tested:

Arduino code

p5js sketch

p5js: The canvas is divided to include multiple coloured regions that will correspond to a particular sound. Placement of the physical ball within the particular region will trigger a sound to play. One way to define the regions is by a 3×3 grid:

1 2 3
4 5 6
7 8 9


Here, cell 5 could not play a sound, but the others would.

We haven’t decided yet on the particular sounds to play, with the preliminary idea for sounds to represent pre-defined notes.

On the screen, we also show the instructions (sequence of notes) the player has to play. We can also colour-code the notes to make them easier to remember. When the player misses enough notes they lose. Without missed notes, the player completes their music experience and may restart the game. We intend to use a physical speaker to play sounds, though we are open to using p5js as well.

We will work further on the music part of the game as we progress with the final project.

Final project proposal: Neuro-Jump

Background :                                                                                                                                      After we learnt about the future of design and having read the rant on the future of interaction design by bret vector. I started thinking deeper about the concept of interactivity and how we as the future generation of designers and technologists can design innovative and authentic interaction experiences that differ from the “glass screen”.

Solution:                                                                                                                                     Using a different interactive gadget that allows the user to immerse in a designed universe without using their fingers or hands!

Using electrodes would allow the detection of EMG signals of the muscle and that will make it possible to use “muscle flexes” as input that can be detected, transferred and used as main input in the final product..         Concept:                                                                                                                                     My idea is to create an interactive P5 video game that is based on a retro style game such as ( Racing games, Tetris or even flappy bird). I would like to use the Backyards brain product( Arduino+Shield+ Electrodes) and combine that with p5, where the video game/ virtual environment will be created. I might also develop another game that some how incorporate muscle flexes to commit some sort of action in the game/ virtual environment.

Arduino:                                                                                                                                            Other than the Arduino circuit, shield and the electrodes already provided. I would like to incorporate a buzzer and LEDs that will allow to add a visual and a sonic signals to the game making it more immersive and adding another layer to the game by including sound and light signals that depend on the either the strength or the length of the flex. The EMG detected signals will then be transferred by the Arduino to the p5 which will cause certain actions to happen in the game

P5:                                                                                                                                                        As I mentioned above the P5.js side of the project will probably be a game based on either a retro style game or another game that requires repetitive action such as flappy bird or bounce ball.

Issues:                                                                                                                                                   I would like to make the game very responsive so I need to check that the hardware and the P5.js game are both at tune so that the game does not lag when the EMG signal has not been detected.


Week 12 – Final Project Proposal Revision

Concept

I want to create an interactive game where the user will use the joystick to move the avatar and find the lost objects. The idea for this project came from this interactive web-based experience called The Healing Forest. Initially, I was thinking of creating a Fruit Ninja game as a group project because I wanted to make the user interact with the game using the camera  but then I figured out it would lack the physical computing part so I decided to settle on the idea of using a joystick. 

  • There will be a forest (or another setting) where the user will search for lost items by moving the avatar
  • The flashlight will illuminate the avatar’s path wherever it will go and other parts of the background will be dark

Arduino

Input:

  • Joystick will be used to control the movement of the avatar
  • Buttons
    • Will be used to switch between themes
    • Will be used to jump from obstacles such as stone, etc.

Output:

  • LEDs will be used to indicate a warning when obstacle is nearby

p5.js

Output:

  • p5.js will provide a gaming interface by displaying avatar, setting, etc. It will receive the x and y coordinates from the joystick and will parse them to the gaming screen to move the avatar accordingly. It will also send a signal to the Arduino when an obstacle is nearby to light up the warning LED.

Further Improvements

I want to add some stages before and after locating objects, but I’m still brainstorming on those. One of the ideas is to add another stage where the user would need to sort/place the found objects based on different attributes or some output could be displayed based on the items the user collects.

Final Project: Report #2 – Finalized Concept

Finalized Concept:

My finalized concept is to construct an Arduino Radar Sensor and make a game out of it! Essentially, I would have a bunch of random items all over the desk and it’s the user’s job to find the treasure in this pile of mess within a certain amount of time.

The only threat is, there is a radar constantly moving back and forth around a servo motor trying to detect the user. If the radar detects the user, and they are within firing range they would lose! However, if the user manages to find the correct piece of treasure before being noticed and within the time limit then they win! They would compete with each other to try and get the treasure at the fastest time possible!

Arduino:

For the Arduino, I was going to implement a Servo motor. I would make this motor move back and forth at a fixed speed and the angle at which the Servo motor rotates would be sent to p5js which would route to the visual representation of the radar.

Then I would mount the ultrasonic sensor onto the Servo motor. The distance that the user is from the sensor would be sent to p5js and translated in the range of the map and be drawn onto the radar. If the user is detected within some range then it would trigger the losing mechanism.

For the losing mechanism, I though I could incorporate a solenoid and it would essentially knock some mini model of a human, indicating they got shot and basically lost.

Additionally, I would add a pressure sensor on the table for the treasure. As the treasure rests on the table, it will apply pressure on the sensor, so when it’s picked up, the sensor has less weight so it implies the user picked it up and won! This would signal p5js to stop the radar and stop the timer and indicate that the user has won.

I was also thinking of adding a potentiometer to the circuit to try and challenge the user. This potentiometer would change the speed of the servo motor. So that way it maps the area even faster making it more challenging not to be noticed.

P5js:

For p5js, I wanted to simply create a visual for the radar, sort of like the image I posted last time:

So, as the Servo motor rotates, the line rotates around the circle as well. The ultrasonic sensor would produce some point on this radar to detect a person is there. If they are outside the range then it will not map.

Additionally, I wanted to also draw a timer somewhere so that the user can detect how much time they have left.

I also plan to add some music and some cool radar sound effects through p5js to keep the experience a little more fun and realistic.

Afterthoughts:

I may utilize the createCapture() function on p5js (camera) as that may be useful as a backup or to even double down on the scanning. Perhaps, I could use this to detect the user and use the ultra sonic sensor to detect how far they are. Maybe I could use the camera to communicate with Arduino to move the laser pointing or the nerf gun or whatever to point exactly at their body or something so it doesn’t get in their eye.


Final Project Progress 1

Concept

For my final project I want to utilize force sensors that are placed under placards to create a walking path. The path will be circular and walking a full circle will be enough to complete the experience. Basically, the person will be holding a tablet with headphones on while walking the path. The person will get to choose one of the 2 option from the computer in the middle: escape or commit. According to that what they will see image/video sequence will be decided and what is displayed on the screen will gain mess or clarity according to how much of the circular path the user finishes.

Goal

There are messages that will be displayed when the person returns to where they have started. For the person who chose to escape, the image and the song that they will be watching will be so strong and attention seeking that it will be truly interruption when the final screen comes by at the end, asking “Look around you, how did we end up here?”

Similarly, for the person who chose the commit sequence, there will be an ending message saying “Different stories but same circles. Where do you wanna go from here?”

Method

I will use nearly 5 force sensors, Arduino, p5js, a headphone, laptop and a tablet to make this experience.

Final Project Proposal: Mini Basketball Arcade Game

Concept

The goal of this Final Project is to create a physically interactive system that relies on a multimedia computer for some sort of processing or data analysis. My Final Project uses BOTH P5 AND Arduino to create a Mini Basketball Arcade Machine. The mini Basketball Arcade Machine will be a tabletop-sized arcade game that will allow users to play basketball by shooting miniature basketballs into a hoop. Whenever the ball successfully passes through the hoop, it makes contact with the flex sensor causing alterations in its readings. As soon as a modification is identified in the flex sensor’s values, the player is credited with certain amount of points. Failing to score does not result in any reduction in points. The game has a time limit, and when the time runs out, a buzzer sounds, signaling the end of the game. The player can then view their score and the highest score achieved, and they have the option of playing again. The machine will use Arduino to sense when the user shoots the basketball and p5.js to display the score and time on the scoreboard.

Arduino

The Arduino program will read the sensor input to determine when the ball has been shot and passed through the hoop. The circuit will consist of a flex sensor and a resistor, with the flex sensor connected to an analog input on the Arduino board. The Arduino program will read the analog input to determine the current value of the flex sensor, which will change whenever a basketball passes through the hoop and contacts the sensor.

The Arduino program will send this flex sensor value to the P5.js program for processing and display on the scoreboard. The P5.js program will receive this data from the Arduino program and use it to update the score based on the number of successful shots made by the player. In summary, the Arduino program for the mini basketball arcade machine will read the flex sensor value from the circuit, send this value to the P5.js program for processing and display, and keep track of the time limit of the game.

Additionally, I am planning to test photoresistor and infrared distance measurer as potential types of sensors for detecting when the basketball passes through the hoop. Based on my testing I would determine whether flex sensor is the most accurate and well-designed option.

P5.js

The P5.js program for the mini basketball arcade machine will be responsible for displaying the game interface, keeping track of the player’s score, and communicating with the Arduino program to receive data about the current state of the game. The P5.js program will display the scoreboard on the computer screen, showing the player’s current score and the time remaining in the game. It will also display the basketball hoop and the basketballs for the player to shoot.

When the player shoots a basketball and it passes through the hoop, the flex sensor in the circuit will detect the change in resistance, and the Arduino program will send this data to the P5.js program. The P5.js program will receive the data from the Arduino program and update the player’s score based on the successful shot.

Final Project – Feel Nature Elements

Concept

The concept behind my project is to create an experience rather than a game or a tool. Similarly to my midterm project, I want to use nature elements to create a slow, relaxing and enjoyable experience for the user. The experience will receive user input through the use of switches and potentiometers, and the output will be both on the screen (P5) and off it (Arduino, neopixels and a fan). The idea is that the user can choose to switch between 4 different elements to experience – water, fire, sun and flora. There will be 4 color coordinated switches which will display a different element on the screen for the user. Once the user chooses the element, they will be shown the simulation on screen (rain for water, fire, sun, and a tree with leaves falling for flora), and the corresponding colors will flash on the neopixels to create a more immersive feel. There will be a potentiometer for the user to change different magnitudes – amount of rain, the size of the fire, the number of rays/brightness of the sun, the amount of wind blowing the leaves. The changes will reflect on the colors and blinking/simulations on the neopixels. They will also affect the fan, with the wind and the rain controlling the speed of the fan.

Arduino

The arduino will have 4 buttons to choose between the elements. It will have a potentiometer to control magnitudes. It will also have neopixels and a fan which will help simulate the elements better for a more immersive feel.

It will send to P5 the values from the switches and the potentiometer.

It will use both of the above mentioned values to simulate the lights on the neopixels and the speed of the fan. There will be different light simulations for each element at different magnitudes.

P5

I will utilize arrays of objects to create things such as raindrops, fire particles, leaves and sun rays, in order to create the simulations.

The values of which element is currently on and at what magnitude will be pulled from the Arduino.


Week 12: Final Project Proposal Revision

Concept

In light of the complexity of my initial plan in making a canvas made of LEDs to let the user draw, I decided to simplify my Final project. The former idea required a lot of LEDs which can not all be supported simultaneously by the Arduino Uno. Thus, I am restricting to a small number of LEDs to bring my project to fruition.

I am planning on two things:

  1. Visual Memory: I will use a 4×4 LED grid to blink LEDs in some pattern. The user is then required to repeat the pattern onto the p5Js console in order to win. This game will increase in difficulty as the user clears the levels.
  2. Text Marquee: On the same 4×4 LED grid, I will create a test marquee which would show text that the user enters onto the p5Js console.

Implementation

Arduino

All the LEDs will be controlled by the Arduino, however, the behaviour of the Arduino will change between the two modes:

  1. For the memory game, the Arduino will generate random co-ordinates which correspond to the LED, and send them to p5Js. It will then wait for further command that instructs it to either repeat the pattern again, or create a new pattern. The difficulty level of the game can be changed with a button or a sensor hooked up to the Arduino.
  2. As for the text marquee, the Arduino will wait for the text the user types and converts it to an array of co-ordinates corresponding to the LED which should be lit up to display that text/letter.
P5Js

The p5Js will incorporate all the user interactivity:

  1. It will provide with a gaming interface for the memory game. It receives the co-ordinates of the LED which it will parse to its gaming screen to register if the user is correct or wrong. It will also send a signal to the Arduino to change the pattern or repeat the pattern
  2. For the text marquee, the p5Js is used as an input device for sending text to the Arduino to later be printed on the LEDs.