
In our very first week of Intro to IM, we covered the basic concepts of programming and got a peek into the creative potential of computation as we were shown famous and popular digital arts from around the world. We also learned about this wonderful platform p5js.org where creative coding can be done and executed right inside the browser! (powerful, right?)
For our very first assignment of Intro to IM, we were asked to construct a self-portrait using code on p5.js. We were demonstrated how to construct primitive shapes in class. What I found most useful on this platform was the in-site Reference page, which contained documentation of different built in functions and libraries (which I referenced to countless times during this assignment). This is the result of a weekend of experimentation and countless trials and errors:
I decided to start with the face first. Instead of going for an ellipse for the face, I googled to find out how to make custom shapes and stumbled upon the use of Bezier curves. This short video on YouTube intrigued me:
This video explained every question I had in mind about custom shapes. The only challenge now was determining the anchor points for the exact type of curve I wanted. For that I used Desmos Cubic Bezier Curve visualizer, and I plotted the points in reference to a 400 X 400 px canvas. Then I was able to use the Bezier function on p5.js. Here’s a demo of what that looked like:
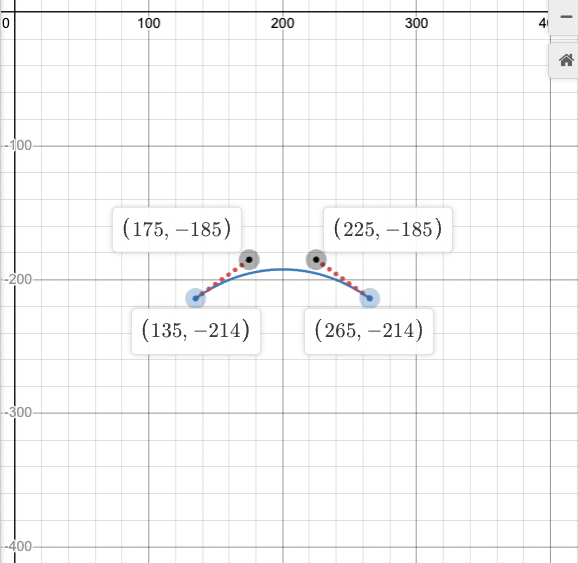
stroke(0, 0, 0);
  strokeWeight(18);
  noFill();
  bezier(130, 214, 175, 185, 225, 185, 270, 214);
Bezier functions seemed so powerful and fun, I got kind of hooked to it and it was hard to stop myself from using them at times. I also used beginShape() and endShape() to create closed bezier shapes, using guide from the above YouTube video. The face, the cap, the lips, and the ears were all created using closed Bezier forms. For all the colors, I used the RGB color chart from RapidTables.
I did, however, use plenty of primitive shapes. The glasses, for instance, were created using the built in ellipse() and line() functions. The nose was also easy to create using the triangle() function. For the syntax of these functions I took help from the Reference page. For the t-shirt, I created a closed polygon by calculating vertices from the center and using the vertex() function.
Now that I had a basic self portrait with a clear blue sky as background, I had this urge to add more to make the portrait interesting. Down I went again into my Googling rabbit-hole and discovered that I could use custom function and classes similar to Python! I have coded in Python before, so these concepts were known to me. I went to w3Schools JavaScript Tutorial and read the documentation for classes and functions in JavaScript (it was mostly similar to Python which helped). Using my newfound power, I went back to my p5.js code and created a simple function to make the left eye blink randomly. The function has a basic if statement and when executed, instead of the eyeball, I simply printed a line across the eye to make it look like the eyelid shut. Else, the function just printed an eyeball (an ellipse). But then I faced the challenge of how to show the motion. I googled a bit and learned about the frameRate() function from References and that was perfect to make idea work. Here’s the code snippet showing the custom eye(x,y) function:
// custom eye function

function eye(x, y) {
  fill(255, 255, 255);
  ellipse(x, y, 20, 20);

  //winking motion
  if (random(1000) > 20) {
    fill(0, 0, 0);
    ellipse(x, y, 7, 7);
  }
  else {
    stroke(0, 0, 0);
    line(x - 10, y, x + 10, y);
  }
}
Next, the background looked really empty. Back in my home country we have plenty of cloudy days which I love so I decided to put clouds using ellipses(). Then I realized I was already using the frameRate() function, so why not try moving the clouds as well. Thankfully, the frameRate() reference page had the exact example to moving an object across the screen. I only needed to increment the X or Y coordinate in one direction to make it seem they are moving. I decided using Javascript classes so I could easily produce multiple moving clouds since I was already familiar with classes in Python. I was able to create my own Cloud class with two methods– one for incrementing the X coordinates of the clouds so they seem to be moving, and one to display the created clouds. And voila! After some experimentation, I achieved my desired result. Here’s the code snippet of the Cloud class:
// Cloud JS Class

class Clouds {
  constructor(x, y) {
    this.x = x;
    this.y = y;
  }

  //method for horizontal cloud motion
  moveCloud() {
    this.x += 1;
    if (this.x > width) {
      this.x = 0;
    }
  }

  //method to show the cloud
  displayCloud() {
    noStroke();
    fill(255, 255, 255);
    ellipse(this.x, this.y, 70, 60);
    ellipse(this.x + 50, this.y + 10, 70, 40);
    ellipse(this.x - 50, this.y + 10, 80, 50);
  }
}
Now I had to put the finishing touches. I added a sun behind the clouds (because what’s better than a nice sunny day?), the letters Q and M of my name on the cap using ellipses and lines and finally for the t-shirt color I had to go with NYU’s trademark shade of violet (manifesting Violet Pride haha).
I called this portrait “Carefree” because this reflects my persona. Nothing makes me more happy than getting to relax on a nice green field on a breezy day with a clear blue sky and floating clouds, carefree and in peace.
Nice! Good work with the curves. The blink is a bit “twitchy” to me and doesn’t match the happy vibe of the piece. You could slow down the blink animation to last more frames and make it a longer transition to make it feel like a wink.