Idea 🦋
As planned, I wanted to incorporate my continuous butterfly theme. I had initially planned to make a butterfly catcher game however changed my concept/idea to butterfly generative art.
Process
p5.js
I began the process by working on the p5js code. I started with working on the butterfly using PI and then added in delta angle in order to add points and noise on the butterfly shape. I also added perlin noise to randomly generate smooth gradients and randomize the shape of the butterfly. I was able to animate the shape and make it look like the wings were flapping using sin and cos (I had to do some research and use online sources to help with this). Once this was sorted, I then played around with background, fill and stroke weight. I was able to remove the background, allowing the moving butterfly to leave behind an imprint which formed the design of a peony (the generate art aspect). I then played around with colors – I wanted to use a flex sensor to control changing colors of the art. Once all the p5js code and animating was sorted, which took the longest to do, I moved onto working on Arduino. Then I came back to the p5js code to insert code that allowed the color to change when the flex sensor was engaged.
p5js code
// Z's 🦋

//handshake
let rVal = 0;
let alpha = 255;
let left = 0;
let right = 0;

//adding a dimension
let yoff = 0;

function setup() {
  createCanvas(600, 600);
  createCanvas(windowWidth, windowHeight);
}

function draw() {
  translate(width / 2, height / 2);
    //rotate(PI / 2);

    stroke(255);
    fill(rVal, 162, 245);
    strokeWeight(1);

  //delta angle - each side of butterfly is PI
  //points
    let da = PI / 150;
  //noise value
    let dx = 0.04;

  //perlin noise
    let xoff = 0;

  //butterfly wings
    beginShape();
    for (let a = 0; a <= TWO_PI; a += da) {

      //using perlin noise to randomize the shape of butterfly
        let n = noise(xoff, yoff);
        let r = sin(2 * a) * map(n, 0, 1, 50, 300);

      //make it look like the wings are flapping
        let x = sin (frameCount*0.01) * r * cos (a);
        let y = r * sin(a);
        if (a < PI) {
            xoff += dx;
        } else {
            xoff -= dx;
        }
      //continous shape
        vertex(x, y);


    }
    endShape();

  //animating the butterfly
    yoff += 0.01;

  // if (!serialActive) {
  //   text("Press Space Bar to select Serial Port", 20, 30);
  // } else {
  //   text("Connected", 20, 30);
  // }

  print(rVal);
}

  function keyPressed() {
  if (key == " ") {
    // important to have in order to start the serial connection!!
    setUpSerial();
  }
}

function mousePressed() {
  if (mouseX > 0 && mouseX < windowWidth && mouseY > 0 && mouseY < windowHeight) {
    let fs = fullscreen();
    fullscreen(!fs);
  }
}

function windowResized() {
  resizeCanvas(windowWidth, windowHeight);
}

  function readSerial(data) {
  //READ FROM ARDUINO HERE

  if (data != null) {
    // make sure there is actually a message
    // split the message
    let fromArduino = split(trim(data), ",");
    // if the right length, then proceed
    if (fromArduino.length == 1) {
      // only store values here
      // do everything with those values in the main draw loop
      rVal = fromArduino[0];
      //alpha = fromArduino[1];
    }

    //SEND TO ARDUINO HERE (handshake)
    //////////////////////////////////
   // let sendToArduino = left + "," + right + "\n";
    writeSerial("\n");
  }
}
Arduino
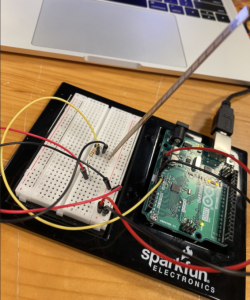
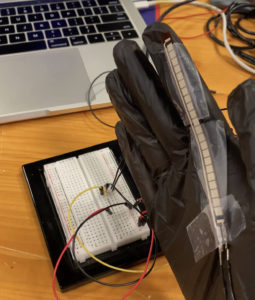
I started off wanting to use the ZX gesture sensor however was facing difficulty as it would often print random numbers, even when the wiring was done correctly. Then I tried using the distance sensor however the beam for that was limited, therefore I moved onto use a flex sensor. Once I settled on using a flex sensor, I wired up the board and had to test out the sensor to make sure it was printing values out well. I then soldered the flex sensors to wires so that they could be put into a glove. My idea was that when the hand would move (when glove is worn), the colors of the art (butterfly and peony design) would change according to the movement of the sensor. I taped the flex sensor to a glove and then put another glove on top to make it look more seamless and aesthetically appealing.


Arduino code
//Constants:
const int flexPin = A0; //pin A0 to read analog input

//Variables:
int value; //save analog value

void setup(){
  Serial.begin(9600);   //Begin serial communication
}

void loop(){
  value = analogRead(A0);         //Read and save analog value from potentiometer
  value = map(value, 180, 520, 0, 255);  //Map value 0-1023 to 0-255 (PWM)
  value = constrain(value, 0, 255);
  Serial.println(value);               //Print value

  // wait for data from p5 before doing something
  while (Serial.available()) {
    if (Serial.read() == '\n') {

    }
  }
}
Handshake
Then I had to put together both p5js and Arduino through handshake and to start serial connection. I struggled with this part for a bit and realized how essential it is to have all the key part of the handshake code.
Final Result
Overall I am happy with my final project. I am proud of how far I’ve come with coding, I started off the semester with no experience and am ending it having learnt a lot! I love how the project incorporates what I love – butterflies, flowers (peonies in particular) and uses my favorite colors (blue, purple and pink). In the future, I’d love to make more projects related to butterflies and potentially display them on a larger scale.
![]()
