I would have the pads laid on the floor and use longer wires to create a bigger space.
user testing:
THINGS TO WORK ON
User testing feedback
shorten the melody line
allow players to practice and familiarize the notes
Display ranking
Aesthetics and physical decorations
wooden box to contain the breadboard and Arduino Uno
square pieces to package the pads
//Processing codes

/*
 1. fix the melody
 2. display ranking
 3. aesthetics and physical decoration
 */

/*
 name: Chi-Ting Tsai
 assignment: final project
 date: 12/07/2021
 "Smash Your Memory"
 */

import processing.sound.*;
SoundFile demoMelody;
SoundFile recC;
SoundFile recD;
SoundFile recE;
SoundFile recG;
SoundFile recA;

int size = 200;
color frame = color(237, 168, 17);

int stage = 0;
int noteC = 1;
int noteD = 2;
int noteE = 3;
int noteG = 5;
int noteA = 6;
int[] correctMelody = {noteD, noteC, noteE, noteD, noteG, noteA, noteG, noteE, noteD, noteC};


void setup() {
  size (1024, 768);
  printArray(Serial.list());
  String portname=Serial.list()[3];
  println(portname);
  myPort = new Serial(this, portname, 9600);
  myPort.clear();
  myPort.bufferUntil('\n');
  demoMelody = new SoundFile (this, "/Users/chi-tingtsai/Downloads/10.wav");
  recC = new SoundFile (this, "/Users/chi-tingtsai/Downloads/C.wav");
  recD = new SoundFile (this, "/Users/chi-tingtsai/Downloads/D.wav");
  recE = new SoundFile (this, "/Users/chi-tingtsai/Downloads/E.wav");
  recG = new SoundFile (this, "/Users/chi-tingtsai/Downloads/G.wav");
  recA = new SoundFile (this, "/Users/chi-tingtsai/Downloads/A.wav");
}

void draw() {
  if (stage == 0) {
    ranking();
  } else if (stage == 1) {
    rules();
  } else if (stage == 2) {
    game();
  } else if (stage == 3) {
    lose();
  } else if (stage ==4) {
    win();
  }
}

//display ranking
void ranking() {
  background(color(99, 144, 130));
  PFont F = createFont("PatuaOne-Regular", 1);
  fill(255);
  textAlign(CENTER);

  //Game title
  textFont(F, 50);
  text("Smash Your Memory", width/2, height/2-50);
  //explain how to start
  textFont(F, 30);
  text("Smash Covid to Begin Game", width/2, height*3/4);

  //frame
  noStroke();
  rectMode(CENTER);
  fill(frame);
  rect(width/2, 10, width, 20);
  rect(width/2, height-10, width, 20);
  rect(10, height/2, 20, height);
  rect(width-10, height/2, 20, height);
}

void rules() {
  background(color(99, 144, 130));
  PFont F = createFont("PatuaOne-Regular", 1);
  fill(255);
  textAlign(CENTER);

  //explain how to play
  textFont(F, 50);
  text("RULES", width/2, height/4);
  textFont(F, 30);
  text("Listen to the pentatonic melody played after this scene.\n It's only going to play once!\n Smash the corresponding pads to recreate the melody!\nC: COVID\nD: Deadlines\nE: course Enrollment\nG: GPA\nA: Anxiety", width/2, height/2-120);
  textFont(F, 30);
  text("Smash course Enrollment to listen to the melody and begin!", width/2, height-110);

  //frame
  noStroke();
  rectMode(CENTER);
  fill(frame);
  rect(width/2, 10, width, 20);
  rect(width/2, height-10, width, 20);
  rect(10, height/2, 20, height);
  rect(width-10, height/2, 20, height);
}

import processing.serial.*;
Serial myPort;

int aSignal = 0;
int prevASignal = 3;
int val = 0;

void game() {
  //background
   background(color(99, 144, 130));
  fill(255);
  PFont F = createFont("PatuaOne-Regular", 1);
  textAlign(CENTER);

  textFont(F, 50);
  text("Listen Carefully and Recreate!", width/2, height/2-50);
}

void serialEvent(Serial myPort) {
  String s=myPort.readStringUntil('\n');
  s=trim(s);
  if (s!= null) {
    aSignal = parseInt(s);
    //println("signal from arduino: " + s);
    //scene transition
    if (stage == 0 && aSignal == noteC) {
      recC.play();
      stage = 1;
    }
    //if (stage == 1 && aSignal == noteD) {
    //  demoMelody.play();
    //}
    if (stage == 1 && aSignal == noteE) {
      stage = 2;
      demoMelody.play();
    }
    if ((stage == 3 || stage == 4) && aSignal == noteG) {
      recG.play();
      stage = 0;
    }

    //note playing and verification
    if (stage == 2 && prevASignal!= aSignal) {
      println("number stored in the array: " + aSignal);
      if (aSignal == noteC) {
        recC.play();
      } else if (aSignal == noteD) {
        recD.play();
      } else if (aSignal == noteE) {
        recE.play();
      } else if (aSignal == noteG) {
        recG.play();
      } else if (aSignal == noteA) {
        recA.play();
      }
      //verify note in array
      if (correctMelody[val] == aSignal) {
        //change circle color
        val++;
        prevASignal = aSignal;
        if (val == 10) {
          stage = 4;
        }
      } else {
        //change circle color
        delay(5000);
        stage = 3;
      }
    }
  }
  myPort.write('\n');
}

void lose() {
  background(color(99, 144, 130));
  PFont F = createFont("PatuaOne-Regular", 1);
  noStroke();
  fill(255);

  textFont(F, 80);
  text("Not the right note!", width/2, height/2);
  textFont(F, 50);
  text("Awwww... Smash GPA to see your ranking and restart.", width/2, height/2+50);
}

void win() {
  background(color(99, 144, 130));
  PFont F = createFont("PatuaOne-Regular", 1);
  noStroke();
  fill(255);

  textFont(F, 80);
  text("Congratulations! You have done it!", width/2, height/2);
  textFont(F, 50);
  text("Have you found your peace by smashing those that give off negative energy?", width/2, height/2-50);
  textFont(F, 30);
  text("Smash GPA to see your ranking", width/2, height/2+50);
}
//Arduino codes

//variable declaration
const int C = 1;
const int D = 2;
const int E = 3;
const int G = 5;
const int A = 6;
const int in_C = 2;
const int in_D = 3;
const int in_E = 4;
const int in_G = 5;
const int in_A = 6;
const int speaker_Pin = 8;
const int led_C = 9;
const int led_D = 10;
const int led_E = 11;
const int led_G = 12;
const int led_A = 13;

int switch_C, switch_D, switch_E, switch_G, switch_A = 0;

int smash = 0;

void setup() {
  // put your setup code here, to run once:
  pinMode(in_C, INPUT);
  pinMode(in_D, INPUT);
  pinMode(in_E, INPUT);
  pinMode(in_G, INPUT);
  pinMode(in_A, INPUT);
  pinMode(speaker_Pin, OUTPUT);
  pinMode(led_C, OUTPUT);
  pinMode(led_D, OUTPUT);
  pinMode(led_E, OUTPUT);
  pinMode(led_G, OUTPUT);
  pinMode(led_A, OUTPUT);

  Serial.begin(9600);
  Serial.println("0");
}

void loop() {
  // put your main code here, to run repeatedly:
  switch_C = digitalRead(in_C);
  switch_D = digitalRead(in_D);
  switch_E = digitalRead(in_E);
  switch_G = digitalRead(in_G);
  switch_A = digitalRead(in_A);

  while (Serial.available()) {
    if (Serial.read() == '\n') {
      //Note C
      if (switch_C == 1) {                //released, if the two aluminum foils touch
        digitalWrite(led_C, HIGH);        //turns on LED
        smash = C;
      }
      else if (switch_C && switch_D && switch_E && switch_G && switch_A == 0)
      { //released, if the two aluminum foils part
        digitalWrite (led_C, LOW);        //turns off LED
        smash = 0;
      };

      //Note D
      if (switch_D == 1) {                //released, if the two aluminum foils touch
        digitalWrite(led_D, HIGH);        //turns on LED
        smash = D;
      }
      else if (switch_C && switch_D && switch_E && switch_G && switch_A == 0)
      { //released, if the two aluminum foils part
        digitalWrite (led_D, LOW);        //turns off LED
        smash = 0;
      };

      //Note E
      if (switch_E == 1) {                //released, if the two aluminum foils touch
        digitalWrite(led_E, HIGH);        //turns on LED
        smash = E;
      }
      else if (switch_C && switch_D && switch_E && switch_G && switch_A == 0)
      { //released, if the two aluminum foils part
        digitalWrite (led_E, LOW);        //turns off LED
        smash = 0;
      };

      //Note G
      if (switch_G == 1) {                //released, if the two aluminum foils touch
        digitalWrite(led_G, HIGH);        //turns on LED
        smash = G;
      }
      else if (switch_C && switch_D && switch_E && switch_G && switch_A == 0)
      { //released, if the two aluminum foils part
        digitalWrite (led_G, LOW);        //turns off LED
        smash = 0;
      };

      //Note A
      if (switch_A == 1) {                //released, if the two aluminum foils touch
        digitalWrite(led_A, HIGH);        //turns on LED
        smash = A;
      }
      else if (switch_C && switch_D && switch_E && switch_G && switch_A == 0)
      { //released, if the two aluminum foils part
        digitalWrite (led_A, LOW);        //turns off LED
        smash = 0;
      }
      Serial.println(smash);
    }
  }
  //  Serial.print("smash: ");
  //  Serial.println(smash);
  //  Serial.print("C: ");
  //  Serial.println(switch_C);
  //  Serial.print("D: ");
  //  Serial.println(smash);
  //  Serial.print("E: ");
  //  Serial.println(smash);
  //  Serial.print("G: ");
  //  Serial.println(smash);
  //  Serial.print("A: ");
  //  Serial.println(smash);
}
For my project, I am building a mini-Tesla car that will feature both autopilot mode and manual mode. When the autopilot mode is enabled, the car will be able to move around and avoid all obstacles. Whereas for the manual mode, the user will be able to control the car through processing using the arrows/buttons.
Progress:
Autopilot mode:
Instead of the L298N motor driver shield, I am using the Adafruit motor shield (due to its unavailability) to control the wheels and add movement to the car. To use it correctly, I had to download a new library called “Adafruit Motor Shield V2 Library”, and a couple of other sub-libraries that come with it.
For that, I am using pulseIn() which starts the timing when the pin goes to HIGH then stops it when it goes to LOW. It works on pulses higher than 10 microseconds so I had to use a delay there.
// if both directions are free, choose right
    else if (rdist>=220 && ldist>=220){
      rb->setSpeed(80);
      lb->setSpeed(80);
      rf->setSpeed(80);
      lf->setSpeed(80);
      rb->run(BACKWARD);
      lb->run(FORWARD);
      rf->run(BACKWARD);
      lf->run(FORWARD);
      delay(400);
      rb->setSpeed(40);
      lb->setSpeed(40);
      rf->setSpeed(40);
      lf->setSpeed(40);
      rb->run(RELEASE);
      lb->run(RELEASE);
      rf->run(RELEASE);
      lf->run(RELEASE);
    }
If the right way is free, choose right:
// if right way is free, choose right
    else if (rdist>=ldist){
      rb->setSpeed(80);
      lb->setSpeed(80);
      rf->setSpeed(80);
      lf->setSpeed(80);
      rb->run(BACKWARD);
      lb->run(FORWARD);
      rf->run(BACKWARD);
      lf->run(FORWARD);
      delay(400);
      rb->setSpeed(40);
      lb->setSpeed(40);
      rf->setSpeed(40);
      lf->setSpeed(40);
      rb->run(RELEASE);
      lb->run(RELEASE);
      rf->run(RELEASE);
      lf->run(RELEASE);
    }
If the left way is free, choose left:
// if left way is free, choose left
    else if (rdist>=ldist){
      rb->setSpeed(80);
      lb->setSpeed(80);
      rf->setSpeed(80);
      lf->setSpeed(80);
      rb->run(FORWARD);
      lb->run(BACKWARD);
      rf->run(FORWARD);
      lf->run(BACKWARD);
      delay(400);
      rb->setSpeed(40);
      lb->setSpeed(40);
      rf->setSpeed(40);
      lf->setSpeed(40);
      rb->run(RELEASE);
      lb->run(RELEASE);
      rf->run(RELEASE);
      lf->run(RELEASE);
    }
Manual mode:
When enabled, the user can control the car through Processing using either the arrows or the screen buttons. When an action is specified, Processing sends the data to Arduino.
import processing.serial.*;
Serial myPort;
PImage img;

void setup() {
  size(960,720);
  printArray(Serial.list());
  String portname=Serial.list()[1];
  println(portname);
  myPort = new Serial(this,portname,9600);
  myPort.clear();
  myPort.bufferUntil('\n');
  img = loadImage("bg.png");
}

void draw() {
  background(#e9eaea);
  image(img, width*1/2-135, height/2-125,270,250);
  fill(#555555);
  textSize(30);
  text("Use the arrows to control the car.", width*1/2-200, height/2+ 145);
  text("Click on S to switch to stop the car.", width*1/2-210, height/2+ 195);
  text("Click on A to switch to autopilot mode.", width*1/2-225, height/2+ 245);
  if(keyPressed) {                                                                                            //if a key is pressed, do the following
    if (keyCode == UP){
      myPort.write(0+","+0+"\n");
    }
    else if (keyCode == DOWN){
      myPort.write(0+","+2+"\n");
    }
    else if (keyCode == RIGHT){
      myPort.write(0+","+1+"\n");
    }
    else if (keyCode == LEFT){
      myPort.write(0+","+3+"\n");
    }
    else if (key == 's'){
      myPort.write(0+","+4+"\n");
    }
    else if (key == 'a'){
      myPort.write(1+","+0+"\n");
    }
    else {
      myPort.write(4+","+9+"\n");
    }
  }
  else {
    myPort.write(4+","+9+"\n");
  }
}
One of the challenges I have faced was using the motor shield, as some of the parts were soldered (between the two right pads), which affected the address of the shield. So I had to either fix it through code or remove the soldering. One more issue was related to the VIN jumper because for some time there was no power in the shield, it might be because the 5v pad was also soldered.
According to my friend’s feedback, I think what I can improve is to make clearer instructions on the coin pusher. Since when I was making the physical setting, the coin pusher was pretty tricky.
I used the distance sensor to check if a coin has approached. But if the coin falls into the gap, the distance sensor would output an outlier, which could then lead to error. So I wrote “SWIPE a coin to START” before the game starts, hoping that people could just swipe — put the coin into the space and hold it for a second.
At first, my friend just tossed the coin into it, and the distance sensor didn’t capture that before the coin fell through it. Since she majors in IMA, she figured it out herself, but not everyone can understand how distance sensor works! So I decided to write specific instructions on the box about how to swipe a coin.
The other parts of the game was straightforward and understandable. As soon as my friend saw the claw/hand, she realized that it is a claw machine, so naturally she knew the way to play around it.
The last part was to show that there is possibility that you are lucky enough to grab a toy with an award. I set the probability to be quite low, so it took a long time before she could get the award. I had to change the code so that she could cheat on it.
PROGRESS:
int joyX = A0;
int joyY = A1;
int button = 4;
int button_state;
const int trigPin = 7;
const int echoPin = 6;
int duration = 0;
int dist = 0;
int prize=0;

int red = 10;
int yellow = 9;
int blue = 8;

int posX;
int posY;


void setup() {
  // put your setup code here, to run once:
  Serial.begin(9600);
  Serial.println("0,0,0,0");
  pinMode(A0, INPUT);
  pinMode(A1, INPUT);
  pinMode(button, OUTPUT);
  pinMode(trigPin , OUTPUT);
  pinMode(echoPin , INPUT);
  pinMode(red, OUTPUT);
  pinMode(yellow , OUTPUT);
  pinMode(blue , OUTPUT);
  pinMode(2,INPUT);
  digitalWrite(2,HIGH);
}

void loop() {
  // put your main code here, to run repeatedly:
//  int posX = analogRead(joyX);
//  int posY = analogRead(joyY);
//  Serial.println(posY);
//  Serial.println(posX);

  digitalWrite(red,prize);
  digitalWrite(trigPin, LOW);
  delayMicroseconds(2);
  digitalWrite(trigPin, HIGH);
  delayMicroseconds(2);
  digitalWrite(trigPin, LOW);

  duration = pulseIn(echoPin, HIGH);
  dist = duration/58.2;
//  Serial.println(dist);

  while (Serial.available()) {
    prize = Serial.parseInt();
    if (Serial.read() == '\n'){
       button_state = digitalRead(button);
       // move 0
       posX = analogRead(joyX);
       posY = analogRead(joyY);

       if (posX >= 550) {
          Serial.print(1);
       } else {
          Serial.print(0);
       }
       Serial.print(",");

       // move 1
       if (posX <= 360) {
          Serial.print(0);
       } else {
          Serial.print(0);
       }
       Serial.print(",");

       // grab 2
       if (button_state == 0) {
          Serial.print(0);
       } else {
          Serial.print(1);
       }
       Serial.print(",");

       // coin pusher 3
       if ( dist < 6 )
          {
            Serial.println(1);
          } else {
            Serial.println(0);
          }
        digitalWrite(red,prize);
        digitalWrite(yellow,prize);
        digitalWrite(blue,prize);
      }

     }

}
import fisica.*;
import processing.serial.*;
import processing.sound.*;
Serial myPort;
PImage claw;
PImage[][] claws;
PImage bird;
PImage[][] birds;
PImage bg;

boolean start = false;
boolean grab = false;
boolean get = false;
boolean drop = false;
boolean ret = false;
boolean prize = false;
boolean coin = false;
boolean right = false;
boolean left = false;

float speed;
float posX=20, posY=10;
FCircle[] bodies;

ArrayList<FBody> touching = new ArrayList<FBody>();
FCircle tip;
FBody prev_touch;

FWorld world;
int toy_num = 30;

SoundFile grab_sound;
SoundFile drop_sound;
SoundFile prize_sound;
SoundFile start_sound;

void setup() {
  size(750, 600);
  printArray(Serial.list());
  String portname=Serial.list()[1];
  println(portname);
  myPort = new Serial(this,portname,9600);
  myPort.clear();
  myPort.bufferUntil('\n');

  //
  bg = loadImage("bg.jpeg");
  bg.resize(750,600);
  generate_claw();
  Fisica.init(this);
  world = new FWorld();
  world.setEdges(0, 0, 750, 530, 255);
  generate_birds();

  tip = new FCircle(35);
  tip.setFill(0);
  tip.setStatic(true);
  tip.setDrawable(false);
  world.add(tip);

  grab_sound = new SoundFile(this, "pick_up.wav");
  drop_sound = new SoundFile(this, "drop.wav");
  prize_sound = new SoundFile(this, "prize.wav");
  start_sound = new SoundFile(this, "coin.wav");
}

void draw() {
  //println(mouseX,mouseY);

  background(bg);
  world.step();
  world.draw();

  // box
  fill(255, 200);
  noStroke();
  rect(603, 250, 200, 280);
  strokeWeight(3);
  stroke(0);
  line(603, 250, 605, 530);

  if (coin) {
    start_sound.play();
    coin = false;
  }

  if (start){
    initialize_claw();
  } else {
    fill(#A09B10);
    PFont f = createFont("Dialog-48", 40);
    textFont(f);
    text("SWIPE a coin to START", 145, 100);
    fill(#671235);
    text("SWIPE a coin to START", 140, 100);
  }
}

void initialize_claw() {
  if (posX >= width - 80) {
    posX = width-80;
  }

  if (posX <= 20) {
    posX = 20;
  }


  if (!grab) {
    if (ret) {
      if (posX > 20) {
        image(claws[0][0], posX, 10);
        posX -=3;
        if (prize) {
          fill(#901758);
          text("CONGRATULATIONS!!!", 150, 100);
        }
      } else {
        ret = false;
        world.remove(prev_touch);
        prize = false;
      }
    } else {
      image(claws[0][0], posX, 10);
      if (right) {
        posX += speed;
      }

      if (left) {
        posX -= speed;
      }
    }
  } else {
    if (posX >= 550 && !get) {
      grab = false;
      get = false;
      ret = true;
    } else {

    claw_down();
    if (posY<0) {
      posY+=3;
    }
    if (!drop) {
      FBody toy = world.getBody(posX+60, posY+80);
      if (get && posY < 20) {
        image(claws[6][0], posX, posY);
        if (posX <= 598) {
          posX += 3;
          toy.setPosition(posX+60, posY+80);
        } else {
          drop = true;
          drop_sound.play();
          toy.setStatic(false);
          grab = false;
          get = false;
          drop = false;
          ret = true;
        // prize
        int ram = (int)random(100);
        if (ram <= 1) {
          prize = true;
          prize_sound.play();
        }

         }
        }
      }
    }
  }

}

void claw_down() {
  FBody touch;
  tip.setPosition(posX+40, posY+90);
  if (posY < 500 && posY > 0) {
    touching = tip.getTouching();
    if (get) {
      image(claws[6][0], posX, posY);
      posY -= 3;
      if (touching.size()>0) {
        touch = touching.get(0);
        prev_touch = touch;

        touch.setStatic(true);
        touch.setPosition(posX+60, posY+80);
      }
    } else{
      image(claws[7][0], posX, posY);
      if (touching.size()>0) {
        get = true;
        grab_sound.play();
      } else {
        posY += 3;
        if (posY >= 500) {
          grab = false;
          get = false;
          ret = true;
        }
      }
    }
  }
}


void generate_claw() {
  claw = loadImage("claw.png");
  claws = new PImage[8][5];
  int w = claw.width / 5;
  int h = claw.height / 8;

  for (int y=0; y < 8; y++) {
    for (int x=0; x< 5; x++) {
      claws[y][x] = claw.get(x*w, y*h, w, h);
      claws[y][x].resize(100,120);
    }
  }
}

void generate_birds() {
  bodies = new FCircle[30];

  bird = loadImage("bird.png");
  birds = new PImage[2][3];
  int w1 = bird.width / 3;
  int h1 = bird.height / 2;

  for (int y=0; y < 2; y++) {
    for (int x=0; x< 3; x++) {
      birds[y][x] = bird.get(x*w1, y*h1, w1, h1);
      birds[y][x].resize(85, 85);
    }
  }

  for (int i=0; i<toy_num; i++) {
    int radius = 50;
    FCircle b = new FCircle(radius);
    b.setPosition(random(100, 500), height/2);
    b.setStroke(0);
    b.setStrokeWeight(2);
    b.setDensity(radius / 10);
    int random_x = int(random(0,2));
    int random_y = int(random(0,3));
    b.attachImage(birds[random_x][random_y]);
    world.add(b);
    bodies[i] = b;
  }

  FBox edge = new FBox(10, 300);
  edge.setPosition(600, 400);
  edge.setStatic(true);
  world.add(edge);
}


void mousePressed() {
  // if button pressed, reset
  world.clear();
  grab = false;
  ret = false;
  get = false;
  drop = false;
  start = false;

  bg = loadImage("bg.jpeg");
  bg.resize(750,600);
  generate_claw();
  Fisica.init(this);
  world = new FWorld();
  world.setEdges(0, 0, 750, 530, 255);
  generate_birds();

  tip = new FCircle(35);
  tip.setFill(0);
  tip.setStatic(true);
  tip.setDrawable(false);
  world.add(tip);

  initialize_claw();
}

void keyPressed() {
  // joystick

  //if (keyCode == ENTER) {
  //  speed = 0;
  //  grab = true;
  //}
  //else {
  //  speed = 8;
  //}
  speed = 8;

  if (keyCode == RIGHT) {
    posX += speed;
  }
  if (keyCode == LEFT) {
    posX -= speed;
  }


}


void serialEvent(Serial myPort){
  String s=myPort.readStringUntil('\n');
  s=trim(s);
  if (s!=null){
    println(s);
    int values[]=int(split(s,','));
    if (values.length>=1){
      if (values[3] == 1) {
        coin = true;
        start = true;
      }

      if (values[0] == 1 && start) {
        left = false;
        right = true;
      } else {
        right = false;
      }

      if (values[1] == 1 && start) {
        right = false;
        left = true;
      } else {
        left = false;
      }

      if (values[2] == 1 && start) {
        grab = true;
      }

    }
  }
  myPort.write(int(prize)+"\n");

}
Create a physically interactive system of your choice that relies on a multimedia computer for some sort of processing or data analysis. The Final should use BOTH Processing AND Arduino.Your focus should be on careful and timely sensing of the relevant actions of the person or people that you’re designing this for, and on clear, prompt, and effective responses. Any interactive system is going to involve systems of listening, thinking, and speaking from both parties. Whether it involves one cycle or many, the exchange should be engaging. You may work alone or in pairs.
Description of the game:
It is a space shooter game where there are spaceship has to protect itself from asteroids by either passing it by from a distance or by shooting it down. Each asteroid shot down is one point and to let the asteroid pass by is a negative point. As soon as your space ship crashes into an asteroid, the game is over and your final point are displayed on the screen.
Instead of a usual control as by a keyboard, this game is controlled by the movements of your hand. Using an ultrasonic sensor, the game using the distance between the the sensor and your hand, moves the spaceship along. A photo resistor is also installed in the glove, whose readings I have mapped from 0 to 10 and divided it in half, to help the with the shooting of the bullets by the player. Two led lights (red and blue) indicate if the shooting is taking place or no. Here’s a picture of the setup:
Here you can notice that the photo resistor is placed on the index finger to give the player a better control to the shooting. all they have to do is close their finger or the entire hand, whatever is comfortable to them.
USER TESTING:
Video:
Feedback:
” You should add an instructions panel at the start of the game for the glove usage” – I think that is a good idea and I will imply it next.
” You should add sound” – This too I will imply next.
“The glove is not the most flexible with different hand sizes, maybe you can use disposable gloves and attach the sensor each time. It will also be easy to wear.” – I am not sure about the disposable gloves because it will create too much unnecessary waste, but I do agree with different hand sizes. I will try getting Professor’s take on this.
Next steps:
I will implement the above given suggestions and also work on the serial communication part of the game. I believe this game can be more smooth than what it is right now.
CODE:
processing:
import processing.serial.*;
Serial myPort;

int yPos=0;

ArrayList<Star> stars = new ArrayList<Star>();
int frequency = 4; //frequency of star

Ship playerShip;

ArrayList<Asteroid> asteroids = new ArrayList<Asteroid>();
int asteroidFrequency = 60;

ArrayList<Bullet> bullets = new ArrayList<Bullet>();

int points;

EndScene end;

void setup() {
  printArray(Serial.list());
  String portname=Serial.list()[4];
  println(portname);
  myPort = new Serial(this, portname, 9600);
  myPort.clear();
  myPort.bufferUntil('\n');
  fullScreen();
  playerShip = new Ship();
  points = 0;
}

void draw() {


  if (end != null) {
    end.drawEndScene();
  } else {
    background(0);
    drawStar();

    drawAsteroid();
    fill(255, 0, 0);
    stroke(255);
    playerShip.drawShip(myPort);
    drawBullet();


    stroke(255);
    fill(255);
    textSize(30);
    text("Points: " + points, 50, 50);

    checkCollision();
  }
}

void drawBullet() {
  serialBullet(myPort);
  for (int i = 0; i<bullets.size(); i++) {
    bullets.get(i).drawBullet();
  }
}

void checkCollision() {
  for (int i = 0; i < asteroids.size(); i++) {
    Asteroid a = asteroids.get(i);
    if (a.checkCollision(playerShip) == true) {
      end = new EndScene();
    }
    for (int b = 0; b < bullets.size(); b++) {
      Bullet bullet = bullets.get(b);
      if (a.checkCollision(bullet) == true) {
        points++;

        asteroids.remove(a);
        bullets.remove(b);
      }
    }
  }
}


void drawAsteroid() {
  if (frameCount % asteroidFrequency == 0) {
    asteroids.add(new Asteroid(random(100, 250)));
  }
  for (int i = 0; i<asteroids.size(); i++) {
    Asteroid currentAsteroid = asteroids.get(i);
    currentAsteroid.drawAsteroid();
    if (currentAsteroid.y > height + currentAsteroid.size) {
      asteroids.remove(currentAsteroid);
      i--;
      points--;
    }
  }
}

void drawStar() {
  strokeWeight(1);
  stroke(255);
  if (frameCount % frequency == 0) {
    Star myStar = new Star();
    stars.add(myStar);
  }
  for (int i = 0; i<stars.size(); i++) {
    Star currentStar = stars.get(i);
    currentStar.drawStar();
  }
}

void serialBullet(Serial myPort) {
  String s=myPort.readStringUntil('\n');
  s=trim(s);
  if (s!=null) {
    println(s);
    int values[]=int(split(s, ','));
    if (values.length==2 && values[1] <= 5) {
      Bullet b = new Bullet(playerShip);
      bullets.add(b);
    }
  }
}

    void mousePressed() {
      if (end != null && end.mouseOverButton() == true) {
        resetGame();
      }
    }

    void resetGame() {
      stars.clear();
      bullets.clear();
      asteroids.clear();
      playerShip = new Ship();
      end = null;
      points = 0;
    }

class Asteroid {
  float size;
  float x;
  float y;
  int num;

  int speed_asteroid = 5; //speed of asteroid

  Asteroid(float size) {
    this.size = size;
    this.x = random(width);
    this.y = 0;
  }

  void drawAsteroid() {
    fill(150);
    stroke(150);
    ellipse(x, y, size, size);
    y+=speed_asteroid;
  }

  boolean checkCollision( Object crash) {
    if (crash instanceof Ship) {
      Ship playerShip = (Ship) crash;
      float tan_shoot =  10*tan(60);
      float distance_ship= dist(x, y, playerShip.xPos, playerShip.y-tan_shoot);
      if (distance_ship< size/2 +tan_shoot){ //tan_shoot+ 10) {
        //background(255, 0, 0);
        fill(255, 0, 0, 100);
        rect(0, 0, width, height);
        fill(255);

        return true;
      }
    } else if (crash instanceof Bullet) {
      Bullet bullet = (Bullet) crash;
      float distance_bullet = dist(x, y, bullet.x, bullet.y);
      //println(distance_bullet);
      if (distance_bullet <= size + bullet.size/2 ) {
        fill(0, 255, 0, 100);
        rect(0, 0, width, height);
        fill(255);

        return true;
      }
    }
    return false;

  }
}

class Bullet {
  float x;
  float y;
  float velocity_y;
  float size;

  Bullet(Ship playerShip) {
    this.x = playerShip.xPos;
    this.y = playerShip.y - 15;
    this.velocity_y = -10;
    this.size = 10;
  }

  void drawBullet() {
        fill(255);
        ellipse(x+100, y, size, size);
        y +=velocity_y;
      }
}

class EndScene {
  int button_x;
  int button_y;
  int button_width;
  int button_height;


  EndScene() {
    this.button_width = 300;
    this.button_height = 100;
    this.button_x = width/2 - this.button_width/2;
    this.button_y = height/2 - this.button_height/2;
  }

  void drawEndScene() {
    //Background
    fill(#FAE714);
    rect(0, 0, width, height);
    rect(button_x, button_y, button_width, button_height);

    //Game over text
    stroke(0);
    fill(0);
    textSize(150);
    textAlign(CENTER);
    text("GAME OVER!", width/2, height/4);

    //Restart Button
    fill(0);
    stroke(200);
    rect(button_x, button_y, button_width, button_height);
    fill(200);
    textSize(60);
    textAlign(CENTER);
    text("RETRY?", button_x+150, button_y+70);

    //Player Score
    stroke(0);
    fill(0);
    textSize(80);
    textAlign(CENTER);
    text("FINAL SCORE: " + points, width/2, height - height/4);
  }

  boolean mouseOverButton() {
    return (mouseX > button_x
      && mouseX < button_x + button_width
      && mouseY > button_y
      && mouseY < button_y + button_height);
  }
}

class Ship {
  PImage ship;
  float x;
  float y;
  float velocity_x;
  boolean leftPressed, rightPressed;
  int xPos=0;

  int speed = 6; //speed of ship

  Ship() {
    this.x = width/2;
    this.y = height - height/4;
    this.velocity_x = 0;
    ship = loadImage("spaceplane.png");
  }

  void drawShip(Serial myPort) {
    frameRate(60);
    String s=myPort.readStringUntil('\n');
    s=trim(s);
    if (s!=null) {
      println(s);
      int values[]=int(split(s, ','));
      if (values.length==2) {
        xPos=(int)map(values[0], 0, 30, 0, width);
        image(ship, xPos, y);
        ship.resize(200, 100);
      }
    }
  }
}

class Star {
  float x;
  float y;
  int velocity_star;

  Star() {
    this.x = random(width);
    this.y = 0;
    this.velocity_star = 10; //velocity of falling star
  }

  void drawStar() {
    y+=velocity_star;
    fill(#FCEB24);
    circle(x,y,5);
  }
}
Arduino:
int left = 0;
int right = 0;

const int echoPin = 2;  // attach pin D2 Arduino to pin Echo of HC-SR04
const int trigPin = 3; //attach pin D3 Arduino to pin Trig of HC-SR04
const int led_red = 9;
const int led_blue = 8;
const int photo = A0;


// defines variables
long duration; // variable for the duration of sound wave travel
int distance; // variable for the distance measurement

void setup() {
  Serial.begin(9600);
  Serial.println("0,0");
  pinMode(trigPin, OUTPUT); // Sets the trigPin as an OUTPUT
  pinMode (led_red, OUTPUT);
  pinMode(led_blue, OUTPUT);
  pinMode(echoPin, INPUT); // Sets the echoPin as an INPUT


}
void loop() {
  while (Serial.available()){
    right = Serial.parseInt();
    left = Serial.parseInt();
  }

  digitalWrite(trigPin, LOW);
  digitalWrite(trigPin, HIGH);
  digitalWrite(trigPin, LOW);

  duration = pulseIn(echoPin, HIGH);

  // Calculating the distance
  distance = duration * 0.034 / 2; // Speed of sound wave divided by 2 (going and coming)
  int constrained_distance = constrain(distance, 0, 30);

  int light = analogRead(photo);
  int mapped_light = map(light, 0, 1023, 0, 10);
  int constrained_light = constrain(light, 900, 1000);

  if (mapped_light <= 5) {
    digitalWrite(led_red, HIGH);
    digitalWrite(led_blue, LOW);
  } else {
    digitalWrite(led_red, LOW);
    digitalWrite(led_blue, HIGH);
  }
  Serial.print(constrained_distance);
  Serial.print(",");
  Serial.println(mapped_light);
  delayMicroseconds(100);
}
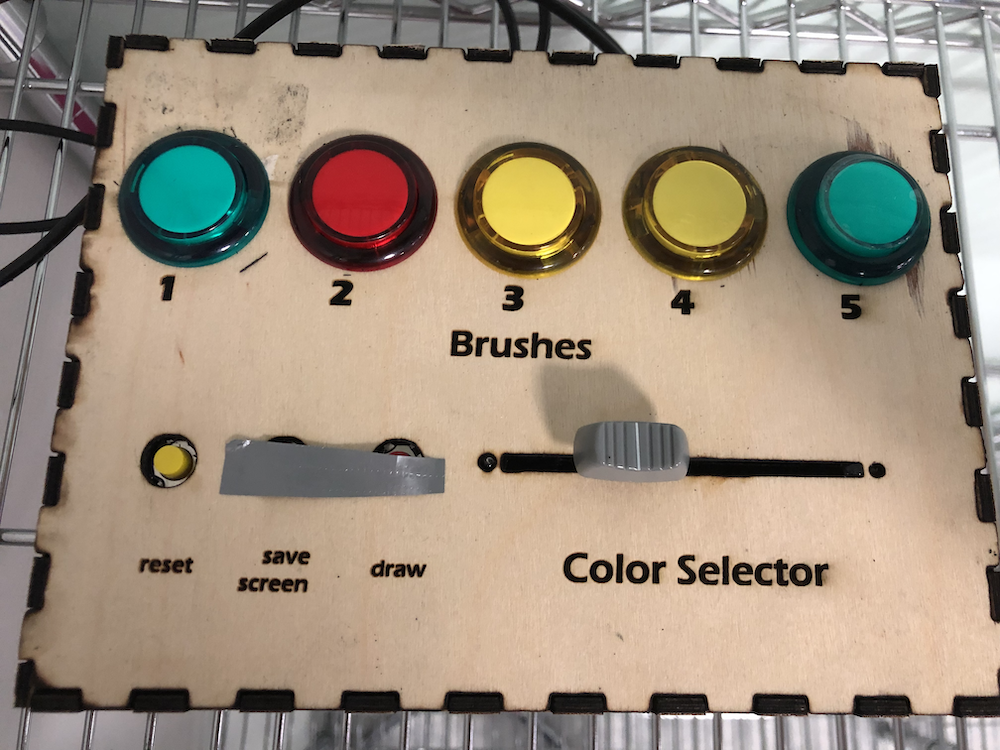
Basically, our idea was to imitate a sketchbook.The user gets to draw with their hands. There are 5 different generative art pieces, hence five different ‘brushes’ that the user can draw with.The user can choose which brush to use, by pushing the button corresponding to each brush connect to. arduino.We also decided to incorporate an element of allowing the user to choose the color they want to draw with using a color gradient on processing, that we connected to Arduino through a slide potentiometer. The user can reset the drawing, showing them a blank sketch so they. start the drawing again. We also, wanted to incorporate allowing the user to save the drawing they made to make it more personal to each individual, but we haven’t done that yet.
Process:
This is the order we chose to complete the project in:
First of all, we finalized the idea since we were not working together initially. We decided on everything we needed and the process we would complete the project in.
The brushes were complete (the 5 generative art pieces that play as the brushes)
started working on the fiducial QR code (which was a pain !) in order to allow the user to use their hands to draw on the sketch, we decided we will have a glove with the QR stuck to it and the user will wear the glove to draw, luckily we were able to get it to work. Simultaneously we were working on the arduino side of things, completing first the color gradient. The color gradient on processing is actually an image and the get(); function was used to get the color at the position of the rectangle that was also mapped and connected to arduino through the slide potentiometer.
Completed the the creation of the box using the laser cutter ! as well as finishing connecting the arcade buttons on arduino and creating code to connect it to processing, so that each button corresponds to a different brush.
We then finished assembling the box and creating the reset button (to return the sketch back to being blank again). We decided to create a box, so that the arduino doesn’t show as it is not very visually pleasing, and in order to ensure that nothing moves around as we are using a lot of wires that may move around.
We conducted user testing.
Difficulties:
First of all, the QR code was very difficult to get to work, but after so many days of trying to figure it out we were able to get it work. On the arduino side of things, there were so many connection on the arduino, and so much code that sometimes, they were glitches and loose wires which was very frustrating. But after several tests and removing the wires and re attaching them , we were able to get everything working well.
User Testing:
User #1:
User #2:
Feedback& next steps:
The feedback for both users was. generally the same:
The camera is flipped, hence when the user moves their hand to the left the drawing draws to the right. We are aware of that and it is our next step.
The QR code sometimes does not get picked up, so the drawing stops, this is because the user is holding the QR code as just a paper now, so. when they hold it wrong on bend it backwards the camera doesn’t pick it up. In order to fix that we will stick it on a glove that the user will wear, so the qr is always the right side up, and straight, hence it will be fixed to the camera will always pick it up.
Lastly, the users wanted us to incorporate adding the names of the brushes to the box so they know which brush corresponds to which button. However, we are a bit skeptical about doing so because we feel like we would be giving to much instruction on what the buttons do. We will take more opinions on this matter.
processing code:
import processing.video.*;
import jp.nyatla.nyar4psg.*;
import processing.serial.*;
import java.util.*;

int n=1, mode=1;
PVector mouseloc = new PVector(0, 0);
PVector p;

Capture cam;
MultiMarker nya;

Brush myBrush = new Brush(1, 2, mouseloc);


// serial stuff
Serial myPort;
int xPos=0;
int yPos;
boolean onOff=false;
boolean onOff2=false;
PImage myImage;
color pix;

int [] val = {0, 0, 0, 0, 0, 0, 0, 0};

void setup() {
  size(1280, 720, P3D);
  colorMode(RGB, 100);
  //fullScreen(P3D);

  printArray(Serial.list());
  String portname=Serial.list()[0];
  println(portname);
  myPort = new Serial(this, portname, 9600);
  myPort.clear();
  myPort.bufferUntil('\n');
  myImage  = loadImage("color.jpeg");

  printArray(Capture.list());
  cam=new Capture(this, 1280, 720);
  nya=new MultiMarker(this, width, height, "data/camera_para.dat", NyAR4PsgConfig.CONFIG_PSG);
  nya.addARMarker("data/patt.hiro", 40);//id=0
  cam.start();

  background(0);
  loadPixels();
}

int c=0;

void draw() {

  c++;
  if (cam.available() !=true) {
    return;
  }

  pushMatrix();
  cam.read();
  scale(-1, 1);
  //image(cam, -cam.width, 0);
  translate(width, 0);
  nya.detect(cam);
  nya.drawBackground(cam);
  popMatrix();


  if ((!nya.isExist(0))) {
    return;
  }
  p=nya.screen2ObjectCoordSystem(0, width/2, height/2);
  updatePixels();

  if (mode==1) {
    drawScreen();
  }
  // nya.endTransform();

  if (mode==2) {
    // save("pic"+String.valueOf(n++)+".tif");
    // delay(10);
    // takeScreenShot();
    // delay(10);
  }
}


void drawScreen() {
  //brush color picker
  imageMode(CENTER);
  fill(0);
  rectMode(CENTER);
  noStroke();
  rect(myImage.width/2, myImage.height/2, myImage.width, myImage.height*1.5);
  image(myImage, myImage.width/2, myImage.height/2, myImage.width, myImage.height);
  color pix = get(xPos, myImage.height/2);
  fill(pix);
  stroke(0);
  rect(xPos, myImage.height/2, 10, myImage.height*1.5);

  buttonPressed();
  myBrush.setCol(pix);

  mouseloc.x = p.x;
  mouseloc.y = p.x;
  myBrush.draww(mouseloc);
  loadPixels();
}

void buttonPressed() {
  if (val[0] == 1 ) {
    myBrush.setbrush(1);
  } else if (val[1] == 1 ) {
    myBrush.setbrush(2);
  } else if (val[2]==1 ) {
    myBrush.setbrush(3);
  } else if (val[3]==1 ) {
    myBrush.setbrush(4);
  } else if (val[4]==1 ) {
    myBrush.setbrush(5);
  }
  // reset
  else if (val[5]==1 ) {
    println("bla");
    background(0);
    loadPixels();
  }
}

void serialEvent(Serial myPort) {
  String s=myPort.readStringUntil('\n');
  s=trim(s);
  if (s!=null) {
    println(s);
    int values[]=int(split(s, ','));
    if (values.length==9) {
      xPos=(int)map(values[0], 89, 912, 0, myImage.width);

      //yPos=(int)map(values[1],0,1023,0, height);
      //yPos=height/2-230;
      //myBrush.setbrush(2);

      val[0] = (int)values[1];  // read it and store it in val[]
      val[1] = (int)values[2];
      val[2] = (int)values[3];
      val[3] = (int)values[4];
      val[4] = (int)values[5];
      val[5] = (int)values[6];//reset
      val[6] = (int)values[7];//draw
      val[7] = (int)values[8];//saveScreen
    }
    myPort.write(int(onOff)+","+int(onOff2)+"\n");
  }
}
class Brush {

  int brushN;

  float stepSize, linelength, diam;
  float angle;
  float x, y, tempX, tempY;
  color col;
  //
  int counter;
  PFont font;
  float fontSize;
  String letters;
  float  fontSizeMin;
  //

  //linemoduelw
  PShape lineModule;

  float [] numX={ -100, -70, 0, 70, 100, 70, 0, -70};
  float [] numY={ 0, 70, 100, 70, 0, -70, -100, -70};

  Brush(int defaultt, float step_size, PVector mouse) {
    // 1 blur
    // 2 random cylinder
    // 3 dynamic shapes
    // 4 text lines
    // 5 rotating lines
    brushN = defaultt;
    stepSize = step_size;
    angle = 270;
    x = mouseX;
    y = mouse.y;
    col = color(255);
    linelength = 100;
    diam = 2;
    fontSizeMin=200;

    fontSize=50;
    letters = "It isn't true that my mattress is made of cotton candy. It was the first time he had ever seen someone cook dinner on an elephant. Homesickness became contagious in the young campers' cabin. Every manager should be able to recite at least ten nursery rhymes backward.";
  }
  void setbrush(int brushn) {
    brushN=brushn;
  }
  void setSize(float size) {
    stepSize=size;
  }
  void setCol(int colorr) {
    col=colorr;
  }
  void setLineLength(float len) {
    linelength=len;
  }
  void setDiam(float diamm) {
    diam= diamm;
  }

  void setAngle(float ang) {
    angle=ang;
  }

  void draww(PVector mouse) {

    switch (brushN) {
    case 2:
      setLineLength(100);
      setSize(5);
      setDiam(2);
      blur(mouse);
      break;

    case 3:
      setLineLength(100);
      setSize(3);
      randomprisms(mouse);
      break;

    case 4:

      dynamicShapes(mouse);
      break;

    case 5:
      textlines(mouse);
      break;

    default :
      setLineLength(100);
      strokeWeight(1);
      rotatingLines(mouse);
      break;
    }
  }

  void helper_randomPrisms() {
    float angle = TWO_PI/8;
    float rad = 100 * random(0.5, 1);
    for (int i=0; i<8; i++) {
      numX[i]=cos(angle * i) * rad;
      numY[i]=sin(angle * i) * rad;
    }
  }

  void blur(PVector mouse) {
    float [] blurX ={ -stepSize, -stepSize, 0, stepSize, stepSize, stepSize, 0, -stepSize};
    float [] blurY ={         0, stepSize, stepSize, stepSize, 0, -stepSize, -stepSize, -stepSize};
    float d = dist(x, y, mouse.x, mouse.y);

    if (d > stepSize) {
      // gets the angle between the mouse and the location of the brush so that next point is drawn in the right intended location
      angle = (float)Math.atan2(mouse.y-y, mouse.x-x);

      tempX = x;
      tempY = y;

      nya.beginTransform(0);
      //
      //translate(x, y);
      rotate(angle);
      noStroke();
      fill(col, 40);

      //
      for (int i=0; i<500; i++) {
        int dir =  int(random(0, 7));
        rotate(random(5));
        println(blurX[dir]);
        tempX=blurX[dir]*random(1, 10);
        tempY=blurY[dir]*random(1, 10);
        circle(tempX, tempY, diam);
      }
      //
      nya.endTransform();

      x = mouse.x;
      y = mouse.y;
    }
  }

  void randomprisms(PVector mouse) {
    float d = dist(x, y, mouse.x, mouse.y);

    if (d>stepSize) {
      // gets the angle between the mouse and the location of the brush so that next point is drawn in the right intended location
      angle = (float)Math.atan2(mouse.y-y, mouse.x-x);
      for ( int i=0; i<8; i++) {
        numX[i]+=random(0-stepSize/2, stepSize/2);
        numY[i]+=random(0-stepSize/2, stepSize/2);
      }

      nya.beginTransform(0);
      //
      //translate(x, y);
      rotate(angle+random(-0.1, 0.1));
      stroke(col);
      strokeWeight(stepSize/4);
      rectMode(CENTER);
      noFill();
      rect(0, 0, linelength*random(0.95, 1)*d/100, linelength*random(0.95, 1)*d/100);

      nya.endTransform();

      x=x+(float)Math.cos((angle))*stepSize;
      y=y+(float)Math.sin((angle))*stepSize;
    }


    helper_randomPrisms();
  }

  void dynamicShapes(PVector mouse) {
    float d = dist(x, y, mouse.x, mouse.y);
    println("x: ",x,"y", y," mouse.x: ", mouse.x,"mouse.y: " ,mouse.y);
    if (d>stepSize) {
      //
      lineModule = createShape();
      stroke(col);
      strokeWeight(1);
      noFill();
      lineModule.beginShape();

      lineModule.vertex(100, 0); // first point

      lineModule.vertex(0, 100);// /
      lineModule.vertex(-100, 0);// \
      lineModule.vertex(0, -100);// /
      lineModule.vertex(100, 0);// \

      lineModule.endShape();
      // gets the angle between the mouse and the location of the brush so that next point is drawn in the right intended location
      angle = (float)Math.atan2(mouse.y-y, mouse.x-x);


      nya.beginTransform(0);
      //
      //translate(mouse.x, mouse.y);
      rotate((angle-PI));
      shape(lineModule, 0, 0, d, noise(1+frameCount*0.0001)*10);
      //
      nya.endTransform();


      x=x+(float)Math.cos((angle))*stepSize;
      y=y+(float)Math.sin((angle))*stepSize;
    }
  }

  void textlines(PVector mouse) {
    float d = dist(x, y, mouse.x, mouse.y);
    d= constrain(d, 60, 7000);
    if (d>stepSize) {
      // gets the angle between the mouse and the location of the brush so that next point is drawn in the right intended location
      angle = (float)Math.atan2(mouse.y-y, mouse.x-x);
      fontSize= fontSizeMin*60/d;
      font = createFont("Calibri", fontSize);

      textFont(font, fontSize);
      char newLetter = letters.charAt(counter);
      stepSize = textWidth(newLetter);
      fill(col);
      //stroke(col);


      nya.beginTransform(0);
      //
      //translate(x, y);

      rotate(angle);
      text(newLetter, 0, 0);
      //
      nya.endTransform();

      counter++;

      if (counter>letters.length()-1) counter=0;

      x = x + (float)Math.cos(angle)*stepSize;
      y = y + (float)Math.sin(angle)*stepSize;
    }
  }

  void rotatingLines(PVector mouse) {

    nya.beginTransform(0);
    strokeWeight(1);
    stroke(col);

    rotate(radians(angle));
    line(0, 0, linelength, 0);
    //
    nya.endTransform();

    angle +=5;

    linelength= int(noise(50+0.01*frameCount)*300);
  }
}
Arduino code:
int left = 0;
int right = 0;
int buttonOne = 9;
int buttonTwo = 10;
int buttonThree = 11;
int buttonFour = 12;
int buttonFive = 13;
int buttonSix = 3;//reset
int buttonSeven = 5;//Draw
int buttonEight = 4;//saveScreen


int val1 = 0;
int val2 = 0;
int val3 = 0;
int val4 = 0;
int val5 = 0;
int val6 = 0;
int val7 = 0;
int val8 = 0;

void setup() {
  pinMode(buttonOne, INPUT);
  pinMode(buttonTwo, INPUT);
  pinMode(buttonThree, INPUT);
  pinMode(buttonFour, INPUT);
  //   pinMode(buttonFive, INPUT);
  Serial.begin(9600);
  Serial.println("0,0");

}
void loop() {
  while (Serial.available()) {
    right = Serial.parseInt();
    left = Serial.parseInt();
    if (Serial.read() == '\n') {

      int sensor = analogRead(A0);
      delay(1);
      val1 = digitalRead(buttonOne);
      delay(1);

      val2 = digitalRead(buttonTwo);
      delay(1);

      val3 = digitalRead(buttonThree);
      delay(1);
      //
      val4 = digitalRead(buttonFour);
      delay(1);

      val5 = digitalRead(buttonFive);
      delay(1);

      val6 = digitalRead(buttonSix);
      delay(1);

      val7 = digitalRead(buttonSeven);
      delay(1);

      val8 = digitalRead(buttonEight);
      delay(1);


      Serial.print(sensor);
      Serial.print(',');
      Serial.print(val1);
      Serial.print(',');
      Serial.print(val2);
      Serial.print(',');
      Serial.print(val3);
      Serial.print(',');
      Serial.print(val4);
      Serial.print(',');
      Serial.print(val5);
      Serial.print(',');
      Serial.print(val6);//
      Serial.print(',');
      Serial.print(val7);//
      Serial.print(',');
      Serial.println(val8);
    }
  }


}
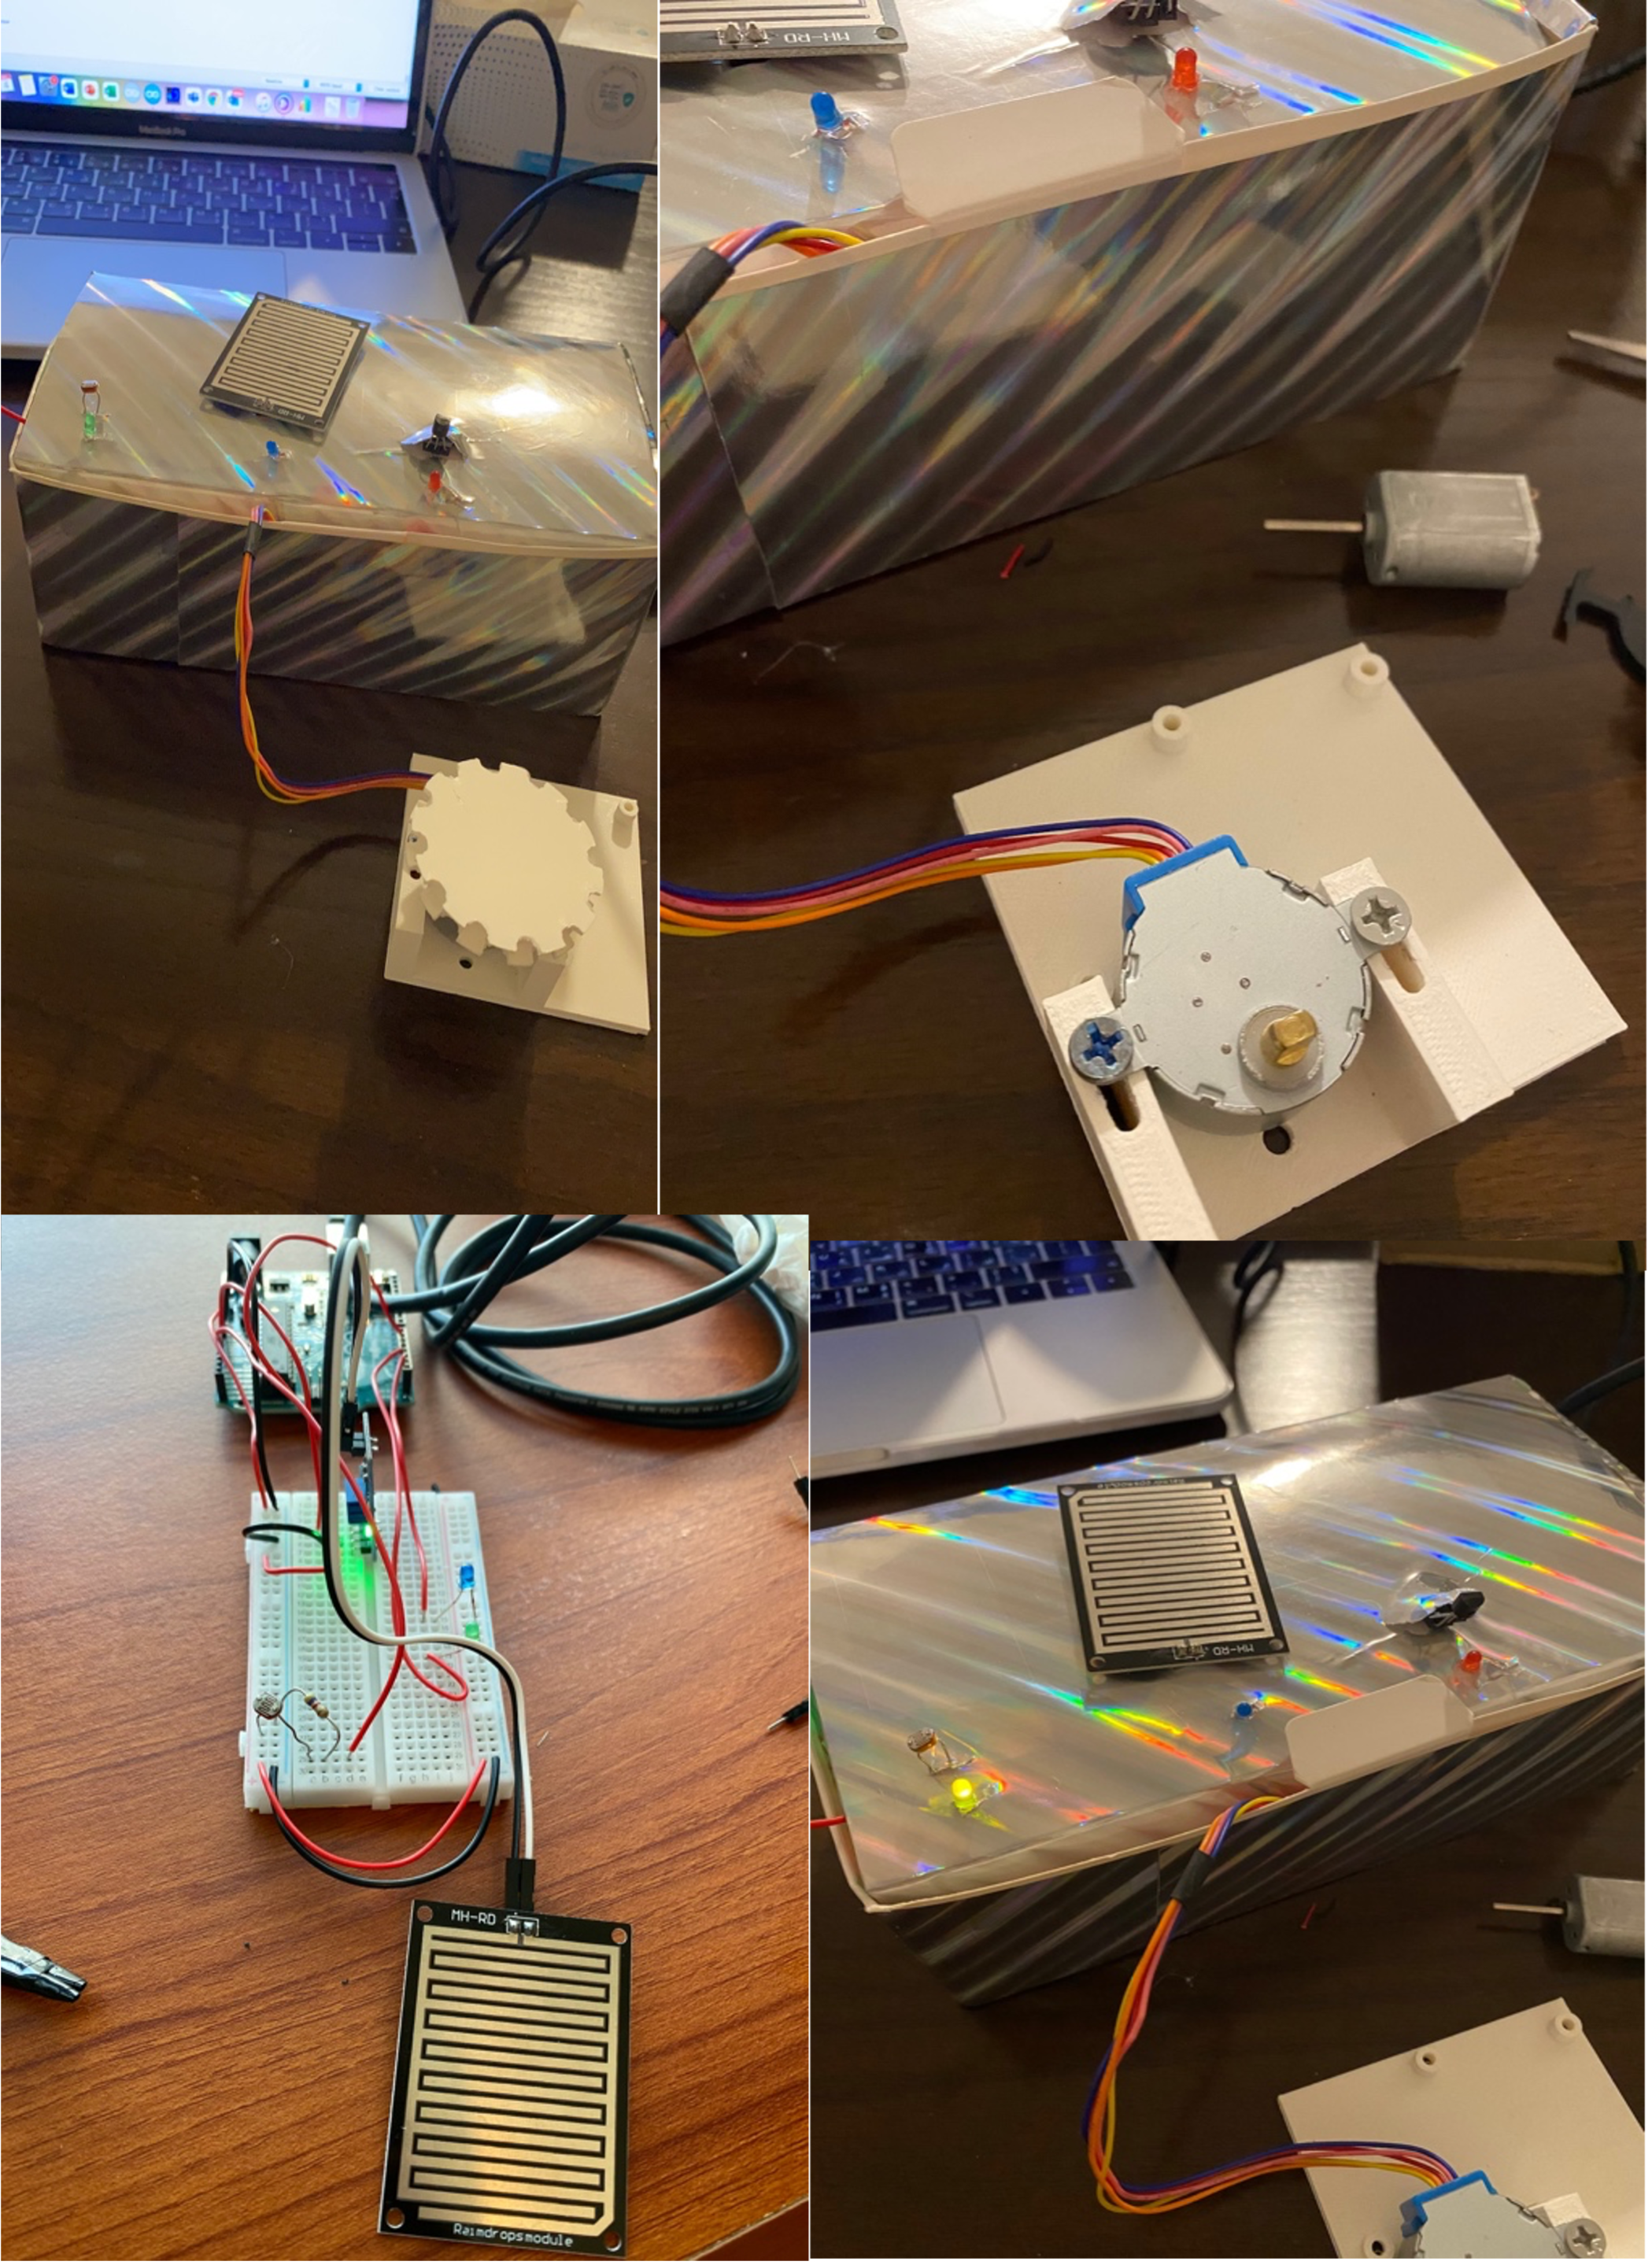
The project is a smart outdoor cover that we called the weather patio . It has the following different features. First, the system will detect if it’s raining, and if it is then it will close the rollable roof. Second, the system measures the temperature and if the temperature is very high, it will turn on a fan. Third, it detects if it’s night time and turns on the lights when it’s dark. Fourth, it displays all the values on a screen. Last, but not least, it allows for manual control from processing on a screen, so the roof , the fan and the light can be turned on manually using the screen controls.
SYSTEM I/O:
Input:

- Rain Sensor

- Temperature Sensor

- Light Sensor
Output:

-Servo or DC Motor

-Fan DC

-LED Strip with relay
DESCRIPTION OF EACH INPUT/OUTPUT ON ARDUINO & WHAT IT WILL SEND/RECEIVE FROM PROCESSING :
Input Arduino:
Rain sensor to detect if it’s raining
Temperature sensor to detect the ambient temperature.
Light sensor to detect the light in the area.
Output Arduino:
Motor (servo or DC) to close and open the roof top
Fan to cool down the temperature
LED strip or bulb to add light during the night
Basically, all the inputs will send the data to the processing in order to be visualized on the processing screen. That allows monitoring of the temperature, rain existence and light in the area. Thus, all the outputs of the Arduino will receive control from the processing , as the system we are building will be controlled manually using the screen of processing or automatically using the Arduino code.
DESCRIPTION OF PROCESSING & WHAT IT WILL SEND/RECEIVE TO ARDUINO:
Processing is used for two main reasons:
-   Monitor the values given by the temperature sensor and other sensors.

-   Allow for manual control of the outputs. As we will add buttons on the screen to be able to turn on/off the outputs when we need regardless of the value.
The manual control is needed as sometimes even it is not raining we might want to close the roof top. Or even turn on / off the fan regardless if it’s too hot, even turn on and off the light regardless of the time of the day.
PROCEDURE:
RAIN FALL SENSOR:
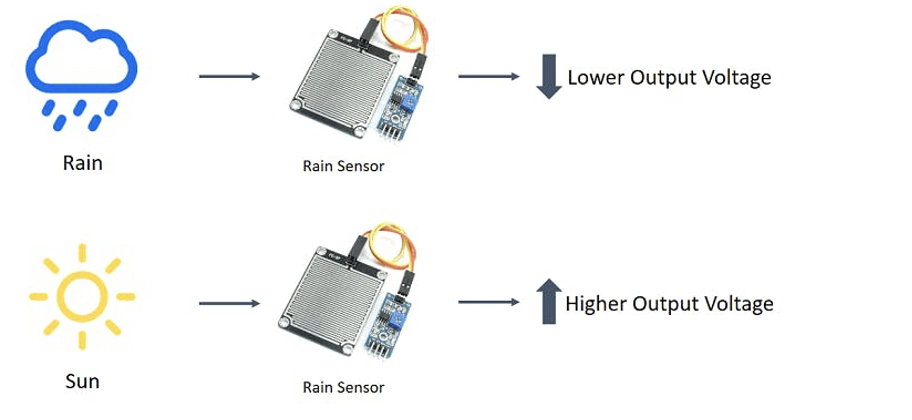
The rain sensor detects water that comes short circuiting the tape of the printed circuits.

The sensor acts as a variable resistance that will change status : the resistance increases when the sensor is wet and the resistance is lower when the sensor is dry.
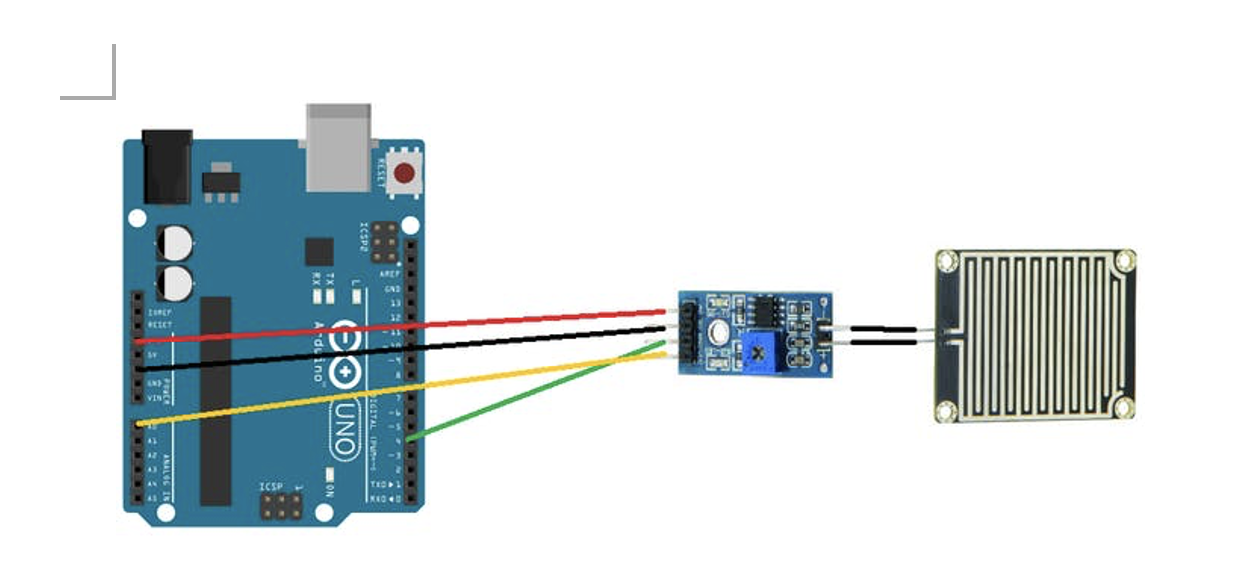
Connection:
Arduino –> Comparator
5V –> VCC
GND –> GND
DO –> D4
AO –> A0
Blueled ->pin 3
A blue LED is connected to show the presence of rain. If it’s raining, the blue LED will turn on, if it’s not raining the blue LED is off.
Code of Rain Sensor :
//RAINFALL SENSOR CODE
const int capteur_D = 4;
const int capteur_A = A0;
int blueled=2;
int val_analogique;
void setup()
{
  pinMode(capteur_D, INPUT);
  pinMode(capteur_A, INPUT);
  pinMode(blueled, OUTPUT);
  Serial.begin(9600);
}
void loop()
{
if(digitalRead(capteur_D) == LOW)
  {
    Serial.println("Digital value : wet");
    delay(10);
    digitalWrite(blueled,HIGH);
  }
else
  {
    Serial.println("Digital value : dry");
    delay(10);
    digitalWrite(blueled,LOW);
  }
val_analogique=analogRead(capteur_A);
 Serial.print("Analog value : ");
 Serial.println(val_analogique);
 Serial.println("");
  delay(1000);
}
LIGHT SENSOR:
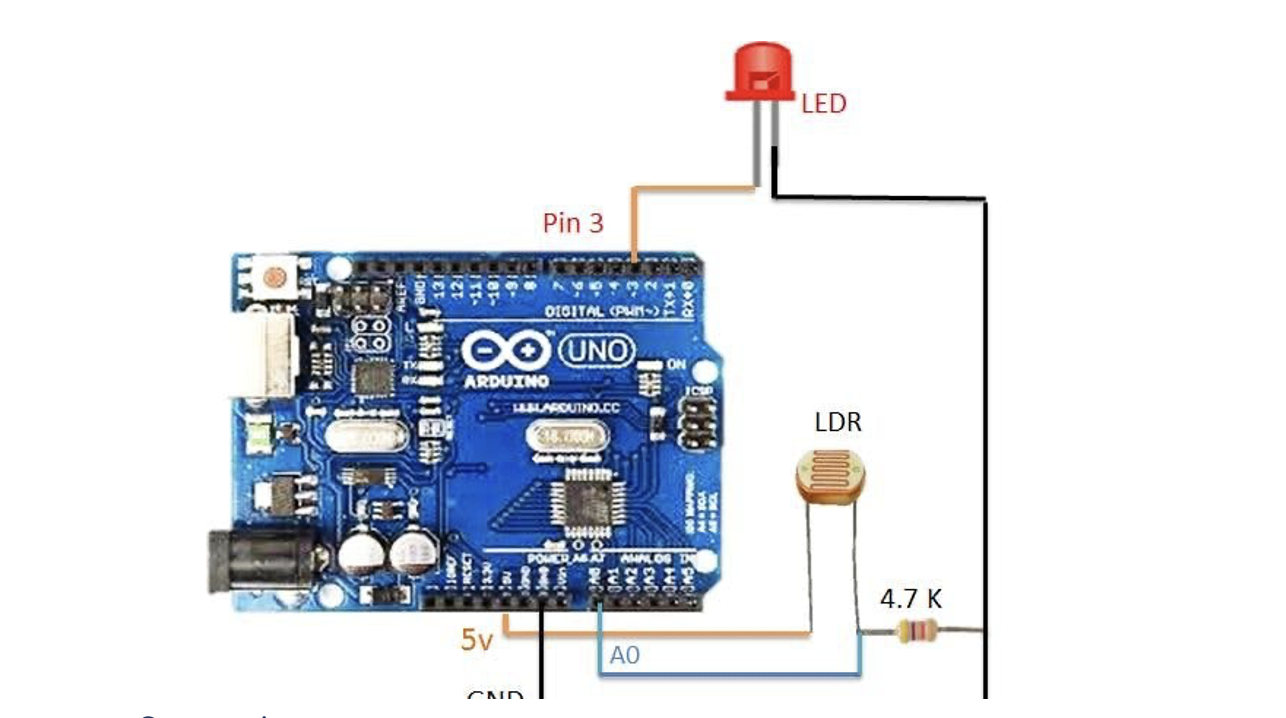
LDR light dependent resistor to have an automatic light turn on when it’s dark.
Connection
LDR: one side to 5V, other pin to analog pin A1 and to a 4.7K resistor connected to GND.

Output: LED on pin 3
Code with LDR:
const int capteur_D = 4;
const int capteur_A = A0;
int blueled=2;//for rain
int val_analogique;
int LDRsensorPin=A1;
int LDRsensorValue = 0;
int greenled = 3;//green light for ldr
void setup()
{
  pinMode(capteur_D, INPUT);
  pinMode(capteur_A, INPUT);
  pinMode(blueled, OUTPUT);
  pinMode(greenled, OUTPUT);
  Serial.begin(9600);
}

void loop()
{
if(digitalRead(capteur_D) == LOW)
  {
    Serial.println("Digital value : wet");
    delay(10);
    digitalWrite(blueled,HIGH);
  }
else
  {
    Serial.println("Digital value : dry");
    delay(10);
    digitalWrite(blueled,LOW);
  }
val_analogique=analogRead(capteur_A);
 Serial.print("Analog value : ");
 Serial.println(val_analogique);
 Serial.println("");
 LDRsensorValue = analogRead(LDRsensorPin);
 if(LDRsensorValue < 600)
 {
   Serial.println("LED light on");
   digitalWrite(greenled,HIGH);Serial.println(LDRsensorValue);
   //delay(1000);
 }
 else {digitalWrite(greenled,LOW);Serial.println(LDRsensorValue);}
  delay(1000);
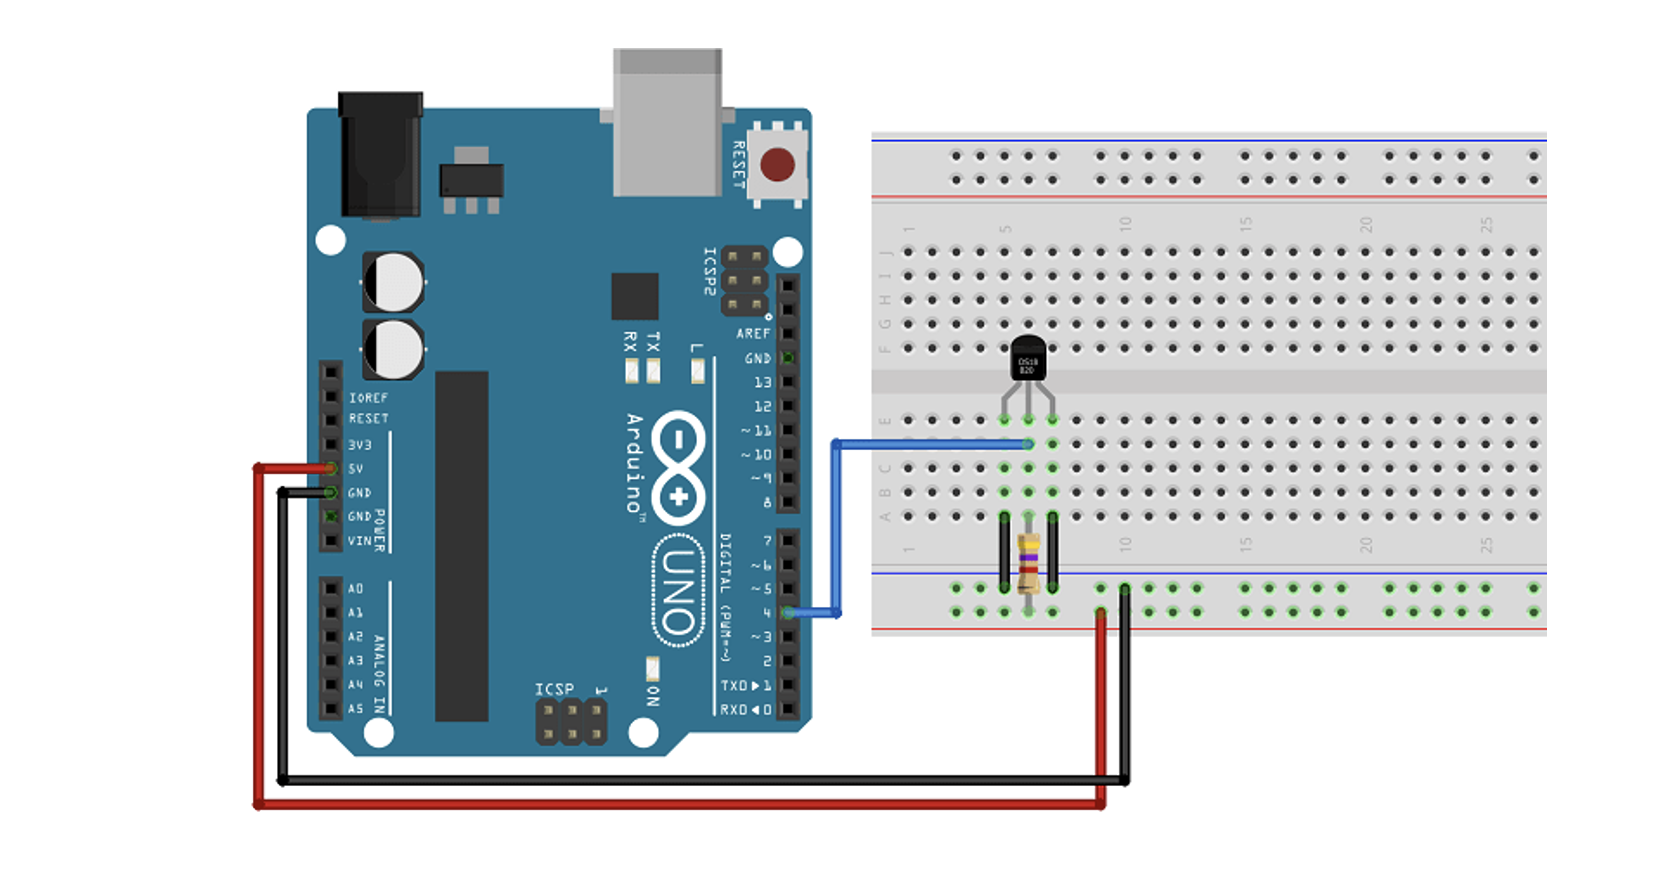
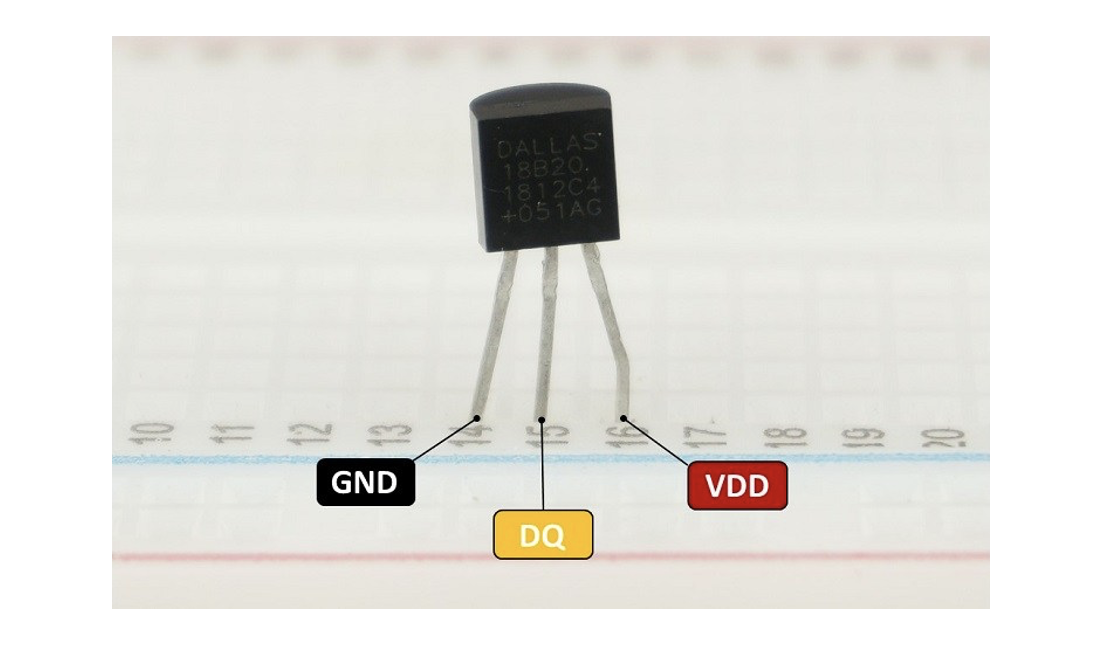
TEMPERATURE SENSOR & FAN:
We need a temperature sensor DS18B20 with a 4.7kohm resistor for input, as output we have a dc fan.

           If the temperature is high the fan will turn on.

           If the temperature is low the fan is off.
           Digital pin used is pin 5 for the temperature sensor

           Red led is to show if the temp above the limit.

           Redled is on pin 6
Code :
//code for temperature sensor


#include <OneWire.h>


#include <DallasTemperature.h>


#define ONE_WIRE_BUS temppin //pin in 4


OneWire oneWire(ONE_WIRE_BUS);


DallasTemperature sensors(&oneWire);


void setup()


{


  pinMode(redled, OUTPUT);


  Serial.begin(9600);


  //code for tempqrature


  sensors.begin();


}


void loop()


{


/********************************************************************/


//temperature sensor


sensors.requestTemperatures(); // Send the command to get temperature readings


Serial.println("Temperature is: ");


 celsius = sensors.getTempCByIndex(0);


Serial.print(celsius);


if(celsius>baselinetemp)digitalWrite(redled,HIGH);


else digitalWrite(redled,LOW);


}
STEPPER MOTOR :
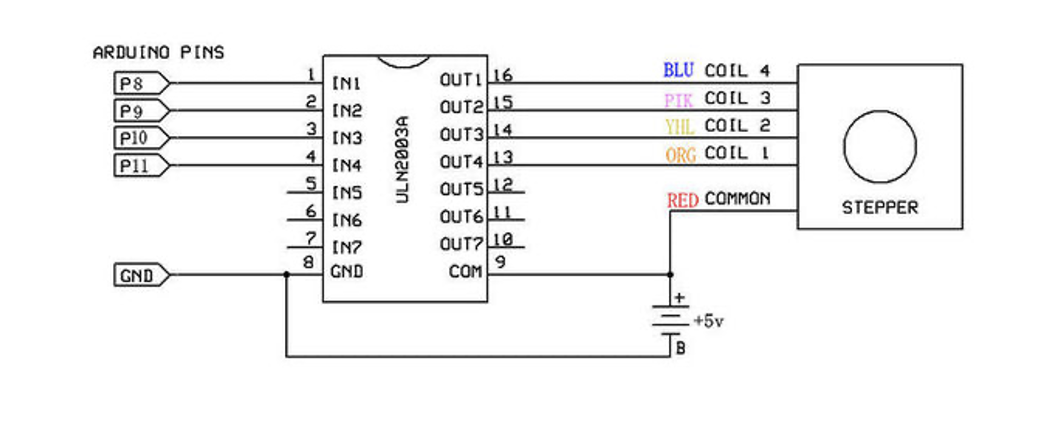
The stepper motor used is a 5 V motor with a Stepper Motor with Driver (28BYJ-48 5V DC).
A stepper motor, much like a DC motor has a rotating permanent magnet propelled by stationary electrical magnets, however the motion is divided into a number of steps around the rotation of the rotating magnet. It does so by having several teeth on the rotating magnet that line up with specific locations around the stationary charged magnets. When voltage is supplied to a specific magnet or specific sequence of magnets the motor will rotate, or step to that position and hold.

Stepper motors can spin like a regular DC motor, however they can also stop on a position like a servo motor.
Code is using the library Stepper.h :
#include <Stepper.h>
// Define number of steps per rotation:
const int stepsPerRevolution = 2048;
// Wiring:
// Pin 8 to IN1 on the ULN2003 driver
// Pin 9 to IN2 on the ULN2003 driver
// Pin 10 to IN3 on the ULN2003 driver
// Pin 11 to IN4 on the ULN2003 driver
// Create stepper object called 'myStepper', note the pin order:
Stepper myStepper = Stepper(stepsPerRevolution, 8, 10, 9, 11);
void setup() {
// Set the speed to 5 rpm:
myStepper.setSpeed(5);
// Begin Serial communication at a baud rate of 9600:
Serial.begin(9600);
}
void loop() {
// Step one revolution in one direction:
Serial.println("clockwise");
myStepper.step(stepsPerRevolution);
delay(500);
// Step one revolution in the other direction:
Serial.println("counterclockwise");
myStepper.step(-stepsPerRevolution);
delay(500);
}
Code Explanation:
The Stepper.h Arduino library is included in the first step of the project. On the website, you may learn more about this library.
// Include the Arduino Stepper.h library:
#include <Stepper.h>
Then we estimated how many steps it takes the motor to complete one rotation. We'll use the motor in full-step mode in this example. This translates to 2048 steps to complete a 360-degree rotation (see motor specifications above).
// Define number of steps per rotation:
const int stepsPerRevolution = 2048;
The next step is to build a new instance of the Stepper class, which represents a specific stepper motor that is attached to the Arduino. The function Stepper(steps, pin1, pin2, pin3, pin4) is used for this, where steps is the number of steps per revolution and pin1 through pin4 are the motor's pins. Set the pins in the following order to acquire the right step sequence: 8, 10,9,11.
// Create stepper object called 'myStepper', note the pin order:
Stepper myStepper = Stepper(stepsPerRevolution, 8, 10, 9, 11);
We labeled the stepper motor 'myStepper' in this example, but you could call it 'z motor' or 'liftmotor' instead. For example ,
Multiple stepper motor objects with distinct names and pins can be created. This makes it simple to control two or more stepper motors at once.

With the function, you may specify the speed in rpm in the setup by having
setSpeed(rpm).
At 5 V, a 28byj-48 stepper motor's maximum speed is around 10-15 rpm.
void setup() {
// Set the speed to 5 rpm:
myStepper.setSpeed(5);
// Begin Serial communication at a baud rate of 9600:
Serial.begin(9600);
}
We just call the step(steps) function in the loop part of code, which rotates the motor a certain number of steps at a speed defined by the function below
setSpeed(rpm)
Passing a negative value to this function causes the motor to spin in the opposite direction.
void loop() {
// Step one revolution in one direction:
Serial.println("clockwise");
myStepper.step(stepsPerRevolution);
delay(500);
// Step one revolution in the other direction:
Serial.println("counterclockwise");
myStepper.step(-stepsPerRevolution);
delay(500);
}
After having each sensor as input and component as outputs, we put everything together to assemble the project. For the processing code we based our code on the professors code :
In order to send multiple values from the Arduino to processing, we kept the handshake and we read the values until having the new line. The processing is to display values on the screen of the temperature, the rain status, and the light status. We created rectangles to present each input. The background color of the rectangles changes in accordance to the value. If the rain is present, the rectangle of rain changes to blue color and displays the sentence “it’s raining”. If the temperature is high or low we can see it as a graph with history of the previous 30 values. The temperature is displayed in Celsius and in Farhranayt. The LDR shows the light value so the rectangle changes color to yellow when it is dark which indicates that the light is turned on. In other words, processing was our way to visualize the data coming from the Arduino.
CONNECTION:
The stepper Motor is connected to the cover that should close when it rains. In order to have the motor control the cover we assumed the cover has a roller controller like the one found in normal curtains. So, we designed the controller that could be fitted into the stepper motor and to the cable of the roller curtain. Once the stepper motor turns clockwise, it will close the cover and if it turns anti clockwise it will open the cover
The reference to have the piece for the roller curtain is on this tutorial found below ...
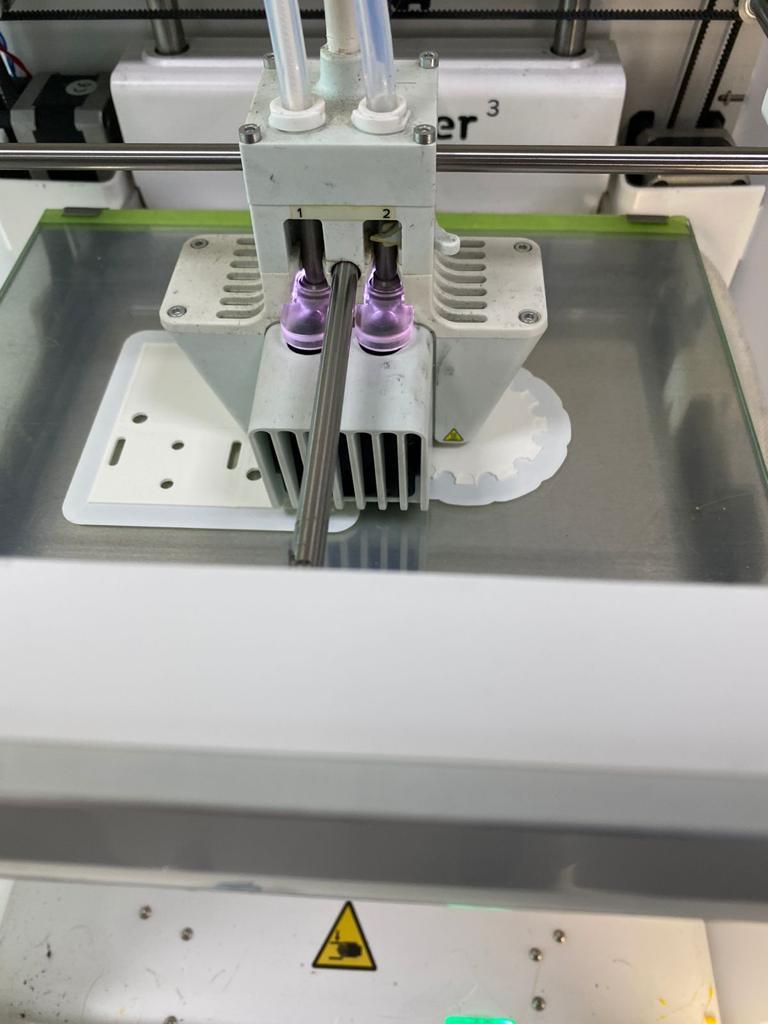
The 3D printer that we used to print the pieces we made
The journey of making our brainstorming session come into reality by putting the hardware of Arduino to processing connection.
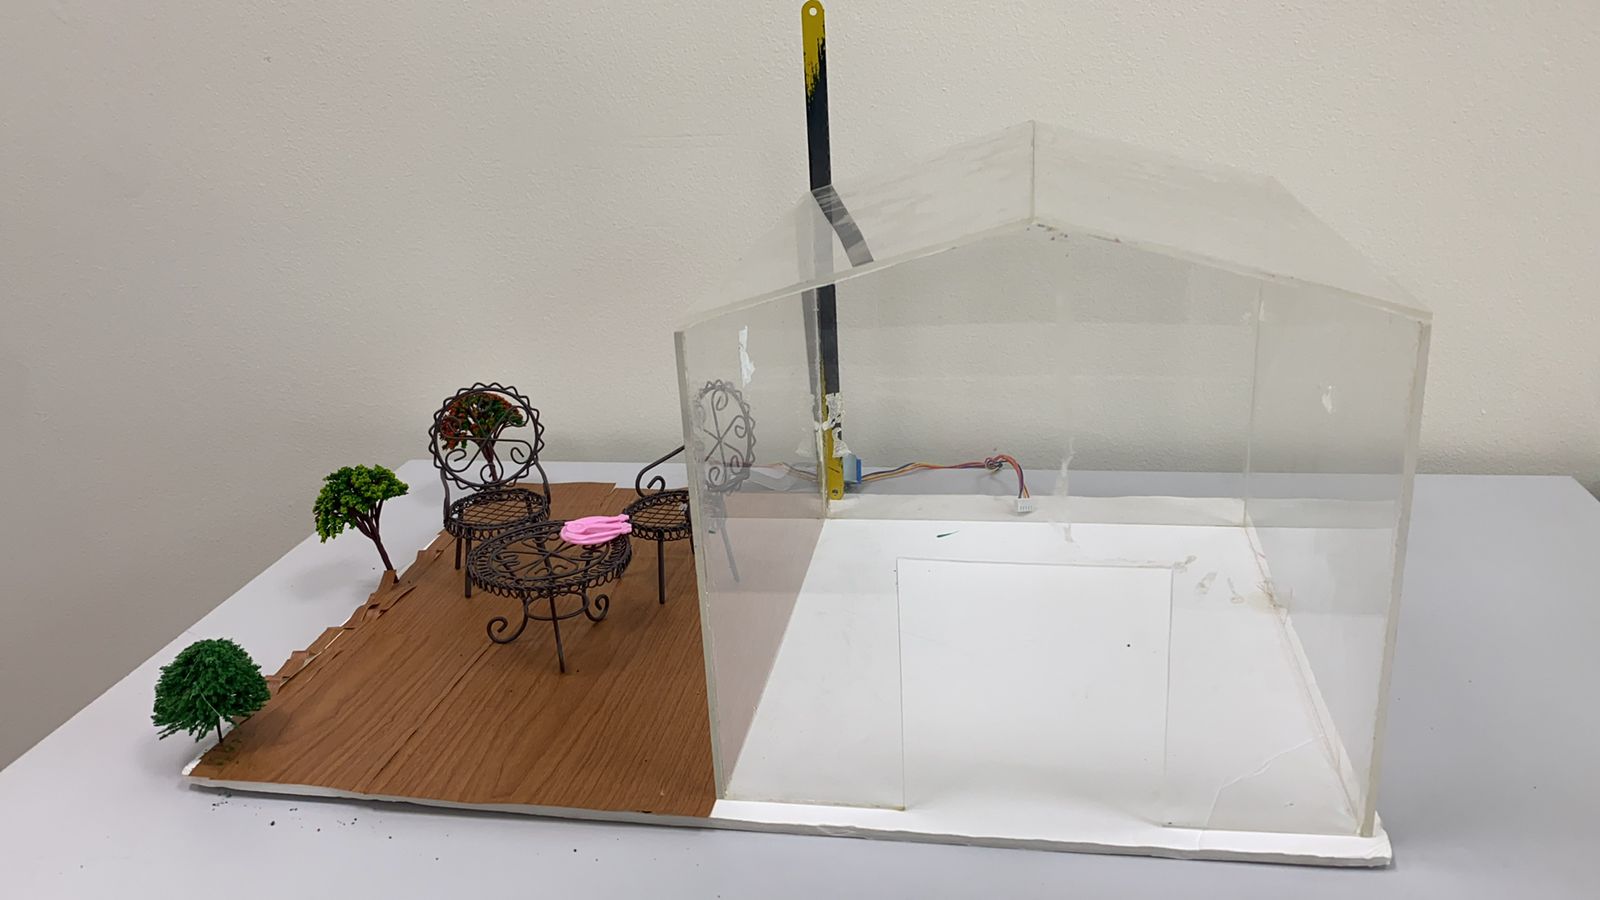
The doll sized house we are in the process of making to allow you a full experience
PROGRESS VIDEO :
USER TESTING VIDEO :
FEEDBACK FROM THE TESTER :
At first without explaining our project to him , he said he was not able to figure it out, like he cant make sense of what's being presented to him. However, after I gave the general instructions of what each shall do, and the whole project's concept, it made sense. He recommends us to create a brochure or a manual as a guidelines. Another thing he suggested is maybe connect our light sensor to an actual light bulb so it creates a more realistic experience or instead remove the other LEDs so only the light one has the impression of a light bulb as the others are technical. Last, but not least, his final comment was that cause our concept is based on an outdoor experience, it will be nice if after finishing our project we test it out in the daylight.
NEXT STEPS OF IMPROVING :
We would definitely try to either remove the other less or connect to a light bulb if it works with us, and other than that add the extra features that shall be there. For instance, we are still designing our doll size house and we still haven't done the temperature connection to the fan. Our main goal is to finish up with the actual features we shall have , and if we were able to finish all that, then we may consider either removing less or adding a light bulb as mentioned above.
PROCESSING FULL CODE:
//import Serial communication library
import processing.serial.*;
//init variables
Serial myPort;
int tempC;
int tempF;
int yDist;
int rainstatus;
int[] tempHistory = new int[100];
int ldrvalue;
void setup()
{
//set the size of the window
 size(800,600);
 printArray(Serial.list());
 String portname=Serial.list()[7];
 println(portname);

//init serial communication port
 myPort = new Serial(this, portname, 9600);
 myPort.clear();
 myPort.bufferUntil('\n');
//fill tempHistory with default temps
 for(int index = 0; index<100; index++)
 tempHistory[index] = 0;
}

void draw()
{
 //get the temp from the serial port
 //while (myPort.available() > 0)
 {

//refresh the background to clear old data
 background(123);
 //draw the temp rectangle
 colorMode(RGB, 160);  //use color mode sized for fading
 stroke (0);
 rect (49,120,22,162);
 //fade red and blue within the rectangle
 for (int colorIndex = 0; colorIndex <= 160; colorIndex++)
 {
 stroke(160 - colorIndex, 0, colorIndex);
 line(50, colorIndex + 120, 70, colorIndex + 120);
 }
//draw graph
 stroke(0);
 fill(255,255,255);
 //rect(90,180,100,100);
 rect(90,120,220,150);
 for (int index = 0; index<100; index++)
 {
 if(index == 99)
 tempHistory[index] = tempC;
 else
 tempHistory[index] = tempHistory[index + 1];
 point(90 + index, 280 - tempHistory[index]);
 }
//write reference values
 fill(0,0,0);
textAlign(RIGHT);
text("Temperature Value",180,80);
 text("210 F", 45, 130);
 text("32 F", 45, 287);
//draw triangle pointer
 yDist = int(260 - (160 * (tempC * 0.01)));
 stroke(0);
 triangle(75, yDist + 20, 85, yDist + 15, 85, yDist + 25);
//write the temp in C and F
 fill(0,0,0);
textAlign(LEFT);
 text(tempC + " C", 115, 137);
 tempF = ((tempC*9)/5) + 32;
 text(str(int(tempF)) + " F", 115, 165);

 text("Light Value",520,80);
 if(ldrvalue<400){
 fill(0,255,0);
 rect(475,120,220,150);
 fill(0,0,0);
 text("Light Value : "+ldrvalue + " .", 480,137);
 text("It's dark , light is turned ON. ", 480, 157);
 }
 else
 {fill(255,255,255);
 rect(475,120,220,150);
 fill(0,0,0);
 text("Light Value : "+ldrvalue + " .", 480, 137);
 text("It's day , light is turned OFF. ", 480, 157);}


  text("Rain Status",320,340);
 if(rainstatus==1){
   fill(0,0,255);
 rect(275,350,220,150);
 fill(0,0,0);
 text("It's Raining! The roof is closed." , 280,370);
 }
 else {fill(255,255,255);
 rect(275,350,220,150);
 fill(0,0,0);
 text("No rain ", 280,370);}

 }
}

void serialEvent(Serial myPort){

  String s=myPort.readStringUntil('\n');

  s=trim(s);

  if (s!=null){

    int values[]=int(split(s,','));

    if (values.length==3){

     // tempC=(int)map(values[0],0,1023,0, width);
tempC=values[0];
ldrvalue=values[1];
      rainstatus=values[2];

    }
      println(tempC,ldrvalue,rainstatus);

  myPort.write('0');

}

  }
ARDUINO FULL CODE :
const int capteur_D = 4;

const int capteur_A = A0;

int blueled=2;//for rain

int val_analogique;

int LDRsensorPin=A1;

int LDRsensorValue = 0;

int greenled = 3;//green light for ldr

int redled=6;

int temppin=5;

int baselinetemp=25;

int ldrvaluelimit=400;

int celsius=0;

bool closed=false;
int raining=0;
//code for stepper motor

#include <Stepper.h>

const int stepsPerRevolution = 2048;

Stepper myStepper(stepsPerRevolution, 8, 10,9, 11);


//code for temperature sensor

#include <OneWire.h>

#include <DallasTemperature.h>

#define ONE_WIRE_BUS temppin //pin in 4

OneWire oneWire(ONE_WIRE_BUS);

DallasTemperature sensors(&oneWire);


void setup()

{

  pinMode(capteur_D, INPUT);

  pinMode(capteur_A, INPUT);

  pinMode(blueled, OUTPUT);

  pinMode(greenled, OUTPUT);

  pinMode(redled, OUTPUT);


myStepper.setSpeed(10);


  Serial.begin(9600);

  //code for tempqrature

  sensors.begin();

//handshake

  Serial.println("0,0");

}


void loop()

{

  /********************************************************************/

  //rain sensor

if(digitalRead(capteur_D) == LOW)

  {

   // Serial.println("Digital value : wet");
   raining=1;
    delay(10);

    digitalWrite(blueled,HIGH);

    if(!closed){//Serial.println("close: turn counterclockwise");

    myStepper.step(stepsPerRevolution);

    delay(1000);

    closed=true;  }

  }

else

  {raining=0;
    //Serial.println("Digital value : dry");

    delay(10);

    digitalWrite(blueled,LOW);

   if(closed){

    //Serial.println("open: turn clockwise");

    myStepper.step(- stepsPerRevolution);

    delay(1000);

    closed=false;}

  }

val_analogique=analogRead(capteur_A);
 //Serial.println("Analog value for rain sensor : ");

//Serial.print(val_analogique);

// Serial.println("");

delay(500);

/********************************************************************/

//ldr sendor


 LDRsensorValue = analogRead(LDRsensorPin);

if(LDRsensorValue < ldrvaluelimit)

{

  /// Serial.println("LED light on");

   digitalWrite(greenled,HIGH);//Serial.print(LDRsensorValue);

   //delay(1000);

}

else {digitalWrite(greenled,LOW);//Serial.println("LED light off,LDR value:");Serial.print(LDRsensorValue);
}


/********************************************************************/

//temperature sensor

sensors.requestTemperatures(); // Send the command to get temperature readings

//Serial.println("Temperature is: ");

 celsius = sensors.getTempCByIndex(0);

if(celsius>baselinetemp)digitalWrite(redled,HIGH);

else digitalWrite(redled,LOW);


  delay(1000);

//processing code

Serial.print(celsius);
Serial.print(',');
Serial.print(LDRsensorValue);
Serial.print(',');
Serial.println(raining);
/*/
if(Serial.available()>0){
char state = Serial.read ( );    // Reading the data received and saving in the state variable

if(state == '1')             // If received data is '1', then turn on LED

{

digitalWrite (greenled, HIGH);

}

if (state == '0') {     // If received data is '0', then turn off led

digitalWrite (greenled, LOW);

}

}

delay(50);

 */

  }