
Introduction
Our task in this report is to create an unusual switch that doesn’t require the use of our hands. I will use the arduino prototyping board for the digital input and output for the interaction.
The hands-free switch is attached to a digital input pin on the Arduino, and then, with code, I took the input from that and turn on an led (digital output). The arduino digital I/O is a requirement for this exercise. That means I need a pull-down resistor with our hands-free switch in order for Aurdino to read the input.
As a hand free switch we used two options:
-option 1 : LDR light dependent resistor that turns the light on and off depending on the light in the room.
-option 2: Ultrasonic sensor that detects distance and turns the light off and on depending on an obstacle in front of the sensor.
Challenge Faced
As working on the Arduino board for the first time, the challenges I faced were understanding the pin diagram and how to define each pin.
After looking at the breakout pinout of the Arduino uno, I was able to identify which pins I will use for our input and output.
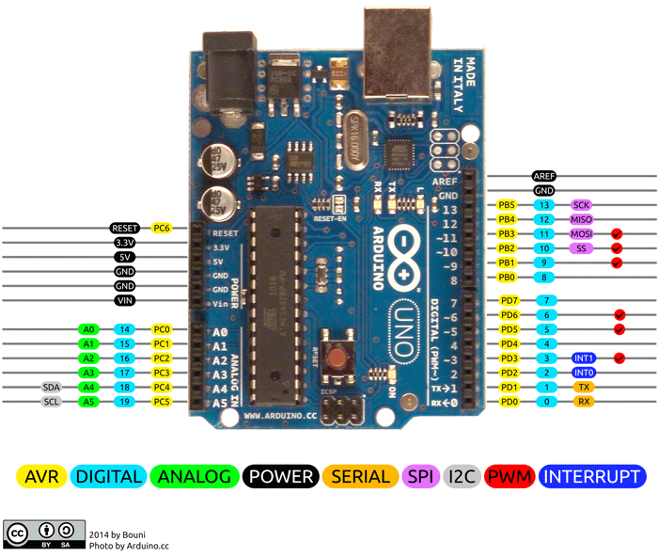
I decided to use the pins:
- 13 digital output for LED
- 6 input for LDR
- For ultrasonic sensor:
Procedure
First step was to identify the output and input.
As output we used the LED light, and we connected it using a pull up resistor as per the following circuit:
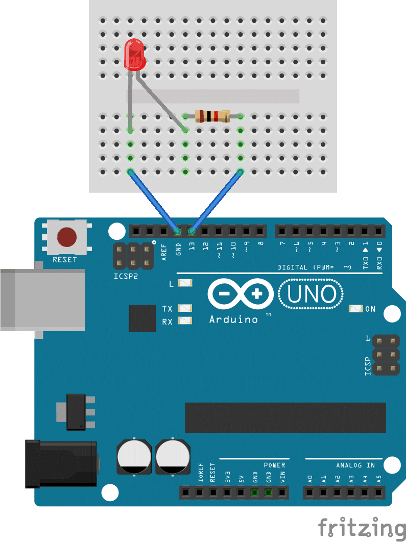
Code in the setup: pinMode(13, OUTPUT);
Code to turn on the led: digitalWrite(13, HIGH);
Code to turn off the led: digitalWrite(13, LOW);
Second step is to connect the switch:
Option 1 LDR:
We connected an LDR as the following circuit:

The pin of LDR went to analog pin on Arduino A5 through a pull down resistor.
If we cover the LDR the LED connected to pin 13will turn on.
The code used is:
Setup: Serial.begin(9600);
Loop: int ldrStatus = analogRead(ldrPin);
Option 2 : Ultrasonic sensor
Second option is using an ultrasonic sensor as the following:
We connected the ultrasonic sensor by the circuit:
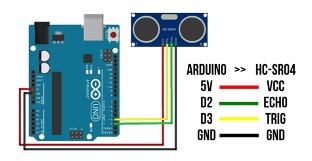
So when the distance is low the green light will be on. Green light is connected to pin 12 in the Arduino.
Demonstration :
Conclusion
As we completed this project we realized how diverse is the Arduino and how it could be used in many different application.
long duration;
int distance;
int echoPin=2 ;
int trigPin=3;

void setup() {

  Serial.begin(9600);
  pinMode(trigPin, OUTPUT);
  pinMode(echoPin, INPUT);
  pinMode(13, OUTPUT);
  pinMode(12, OUTPUT);
  pinMode(A0, INPUT);

}

void loop()
{
//LDR code
  int ldrStatus = analogRead(A0);
  Serial.println(A0);
  if (ldrStatus <= 300) digitalWrite(13, HIGH);
  else digitalWrite(13, LOW);

  //ultrasonic code
  digitalWrite(trigPin, LOW);
  delayMicroseconds(2);
  digitalWrite(trigPin, HIGH);
  delayMicroseconds(10);
  digitalWrite(trigPin, LOW);
  duration = pulseIn(echoPin, HIGH);
  distance = duration * 0.034 / 2;
  Serial.println("Distance: ");
  Serial.print(distance);
  if (distance <= 10) digitalWrite(12, HIGH);
  else digitalWrite(12, LOW);

}