Concept:
This consisted of creating a final project for the class that would combine both Arduino and Processing to create an Interactive game or application.
Idea:
My initial idea consisted of creating an application that would have two principal phases. The first phase would be an interactive free play piano where the user could explore and play the piano as they wish. This first phase would include features such as recording something and playing the record. The second phase would consist of a game where a piano would be shown and notes would be falling. The user would have to press (or play) the piano according to the falling notes. However, unfortunately, the first phase of the game took me a lot of time and effort that I was unable to work on the second phase. In the end, my project consisted of a music instrument application with additional features.
Process:
Initially, I worked on creating a basic platform for the piano. First I decided to solely focus on the processing part and therefore I started by creating a piano where keys from the keyboard represented the tiles from the piano. After, I focused on the design of the piano (basic design) implementing the shape functions in Processing.
Then one of the main components of my project was the sound files uploaded. I found files online and downloaded them. However, while doing my project, I realized the files needed to be edited to improve the sound and functionality of my instrument. Then I focused on learning about the minim library within Processing which helped me with making the sound files work.

After finishing with the files, I started working on the additional features. These features took me more time than I expected. The features I included were recording a note, stop recording, deleting notes from the record, adding notes to different parts of the record, and playing the record. The recording part was complicated because I wanted to implement a way to allow for various notes to be recorded in one part and played at the same time. I was able to do this by using a 2-D array where one dimension would represent the part being played and the other would represent the note being played. After implementing these various features, I focused on possible areas of improvement. One example was a self-updating array where an array would be resized onc
e the number of notes passed the capacity of the array.
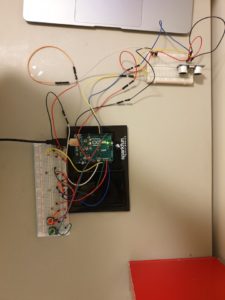
Then, I started focusing on connecting the Arduino and implementing the Arduino board. I used simple features from the Arduino but they certainly did add great ways to make the application interactive. The parts I used were the photocells, buttons, and the distance measuring device. I was just able to get a total of 4 photocells. These represented the tiles in the piano. Because I wanted to create a full piano and using only 4 notes did not help, I decided to use the distance measuring device. According to the distance measured, the piano would be changing location and therefore this would affect the notes being played by the tiles. Finally, the buttons were used to access the recording and playing part. One of the buttons recorded and stopped recording while the other played the recorded file. I could not add another button to represent the deleting part but this part can be performed with a keyboard key.
Finally, I focused on the design of the piano because I did not want to keep the application with basic rectangles and circles. I decided to draw and create all the designs including the tiles and backgrounds. This was done with several applications including Procreate, Affinity Designer, and Adobe Illustrator.
Challenges
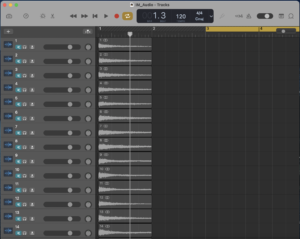
One of the main challenges encountered was in the sound files part. The files were really large in size and included parts that were not entirely necessary. Therefore I had to crop and edit some of the files because some of them were around a minute long. For notes on a piano, I did not need an entire minute. Since I wanted to shorten the file size and duration, I had to edit a total of 88 sound files in GarageBand. While doing the project I also realized that the beginning parts also needed to be edited. This was because, for the sound files, the actual sound did not start right away at the beginning of the file. This made several of my notes sound as if the application was lagging since the sound would be performed seconds after the tile was played.
Another challenge I encountered was with the part for the tiles. Since the piano consists of black and white tiles positioned differently across the piano. I had to create a way to recognize if a tile was black or white and according to this change the position of the tiles. This was challenging because although the piano tiles follow a pattern, the pattern is really complicated. For example, a pattern consists of 7 white tiles with 5 black tiles with black tiles separated as 2 and 3 tiles.
Finally, another main challenge I encountered was in the part where I had to connect the Arduino and Processing. I was not completely confident in using both together and therefore it took me some time to figure out some of the parts to connect this.
Areas of Improvement
There were several parts that I wanted to improve in my project. First, I want to possibly add new features to the free play piano. Some of the features in the piano are not functioning perfectly as I wanted although they are functioning. For example, for the selection of a specific part to add a note, this has to be selected AND deselected to be able to select another part. Also, I wanted to create a part where I could print or pop up a message for certain errors. For example, each “part” in the piano cannot contain more than 6 notes that are played at the same time. I wanted to print a message to represent this part when a user would try to record more than 6 notes in the same “part”. Another area of improvement was implementing the deleting button in the Arduino as mentioned in the Process part.
How the App works
- The first part includes the initial part where the user must press the start button to begin the application
- The 4 photocells represent 4 tiles in the piano. The keys to be played are represented by colored lines around the tile.
- The red button is used to Start Recording. Once it is pushed, it must be pushed again to stop recording.
- The Green button is used to play the record.
- The distance measuring device represents the position of the keys represented by the photocells. When this device is altered, the position will be changed on the screen accordingly.
- A user can select a specific part within a record to add a note in the part. To select another part, the user must deselect the previous part
- A user can delete several notes at the same time by selecting the notes and pressing the ‘l’ key on the keyboard.
- A user can also travel through the recording by using the ‘q’ and ‘w’ keys. The ‘q’ key is used to move the note part to the left while the ‘w’ key is used to move the key part to the right.
Conclusion
I was very proud to see my project completed because I dedicated a lot of time and effort to this. The code of the application resulted to be much longer and challenging than I expected. I really liked this project because I think it really represents my work. Starting from the ideas, the sound files, and the design, all components were created or edited by me. Although I could not implement my second idea, I really liked how the project turned out to be. I think it also includes an interactive part through the use of photocells and the distance measuring device. Overall, I really enjoyed working on this project and although it took me much more time and effort than I expected I think I was able to learn new skills and improve certain techniques within coding in general and applications such as Arduino and Processing.
Code Files:


Amazing job!