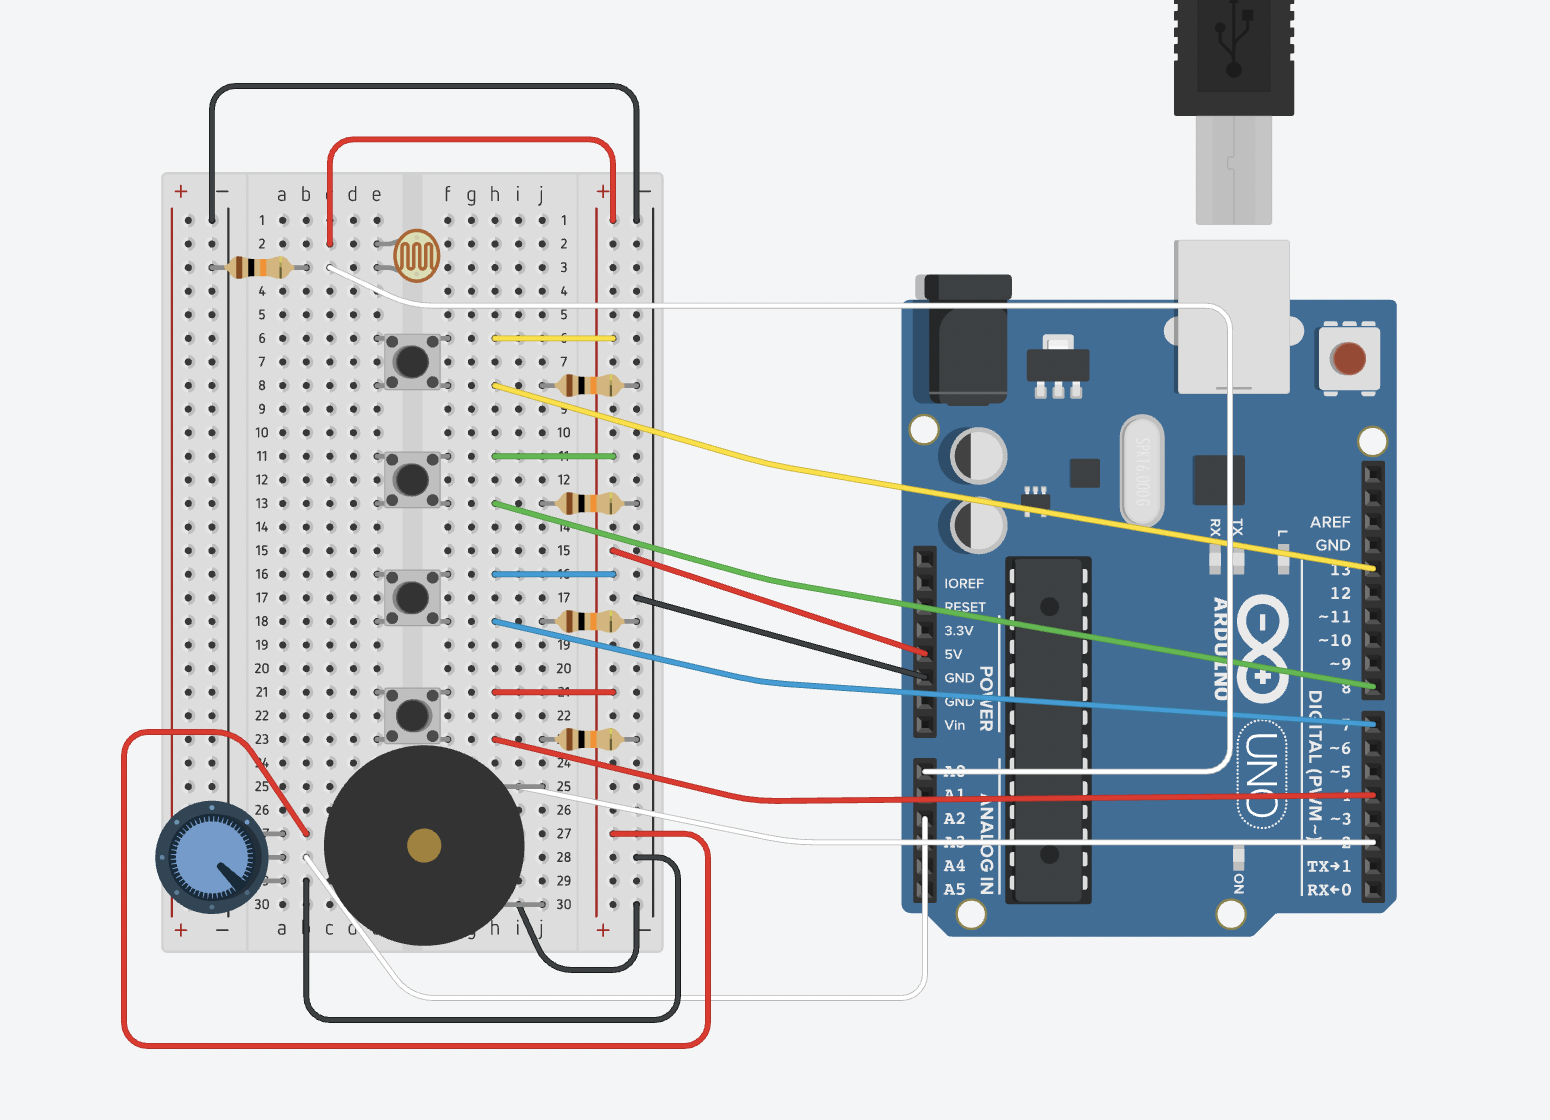
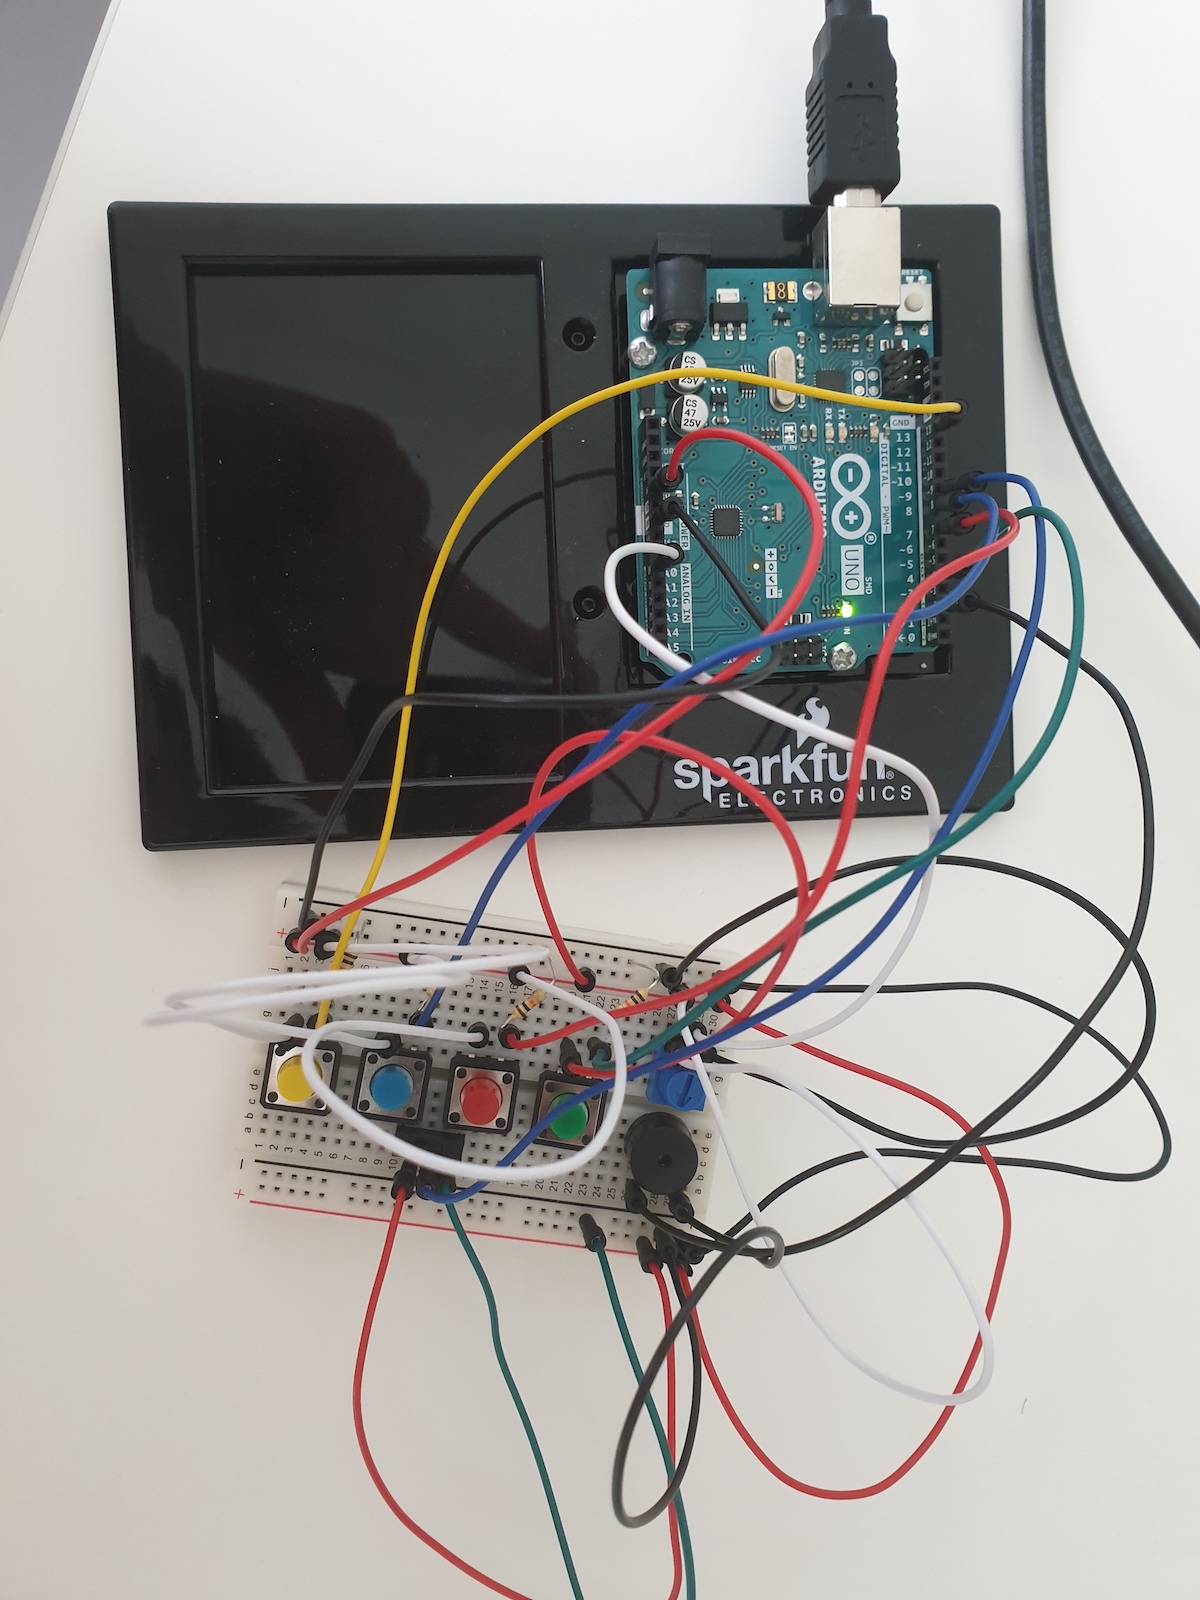
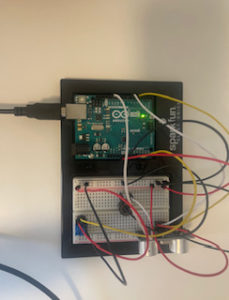
For this week’s assignment, I decided to a piano-like musical instrument. So, basically there are two ways of controlling it. First, without a photoresistor, buttons will play one music, but with a photoresistor, its frequency change to a high-pitched sound.
Buttons are digital input, while a photoresistor is an analog input. Sound is outputted from the buzzor.
VIDEO:
CODE:
int but1 = 3;
int but2 = 4;
int but3 = 5;
int but4 = 6;

int LDR=A1;
int buzzer = 13;
int sensorValue;
void setup()
{
  //let's declare the button pins as input
  pinMode(but1,INPUT);
  pinMode(but2,INPUT);
  pinMode(but3,INPUT);
  pinMode(but4,INPUT);

  //declare buzzer pin as output
  pinMode(buzzer,OUTPUT);
    Serial.begin(9600);


}

void loop()
{


  // read the value from buttons
  int b1 = digitalRead(but1);
  int b2 = digitalRead(but2);
  int b3 = digitalRead(but3);
  int b4 = digitalRead(but4);

 int sensorvalue= analogRead(LDR);
Serial.println(sensorvalue);
  if (sensorvalue<680){
  if( b1 == 1 ){
     tone(buzzer,300,100);
     delay(100);
     tone(buzzer,300,100);
     delay(100);
     tone(buzzer,300,100);
     delay(100);
     tone(buzzer,300,100);
  }
    if( b2 == 1 ){
     tone(buzzer,400,100);
      delay(100);
      tone(buzzer,400,100);
       delay(100);
       tone(buzzer,400,100);
        delay(100);

         delay(100);
  }
    if( b3 == 1 ){
     tone(buzzer,500,100);
  }
    if( b4 == 1 ){
     tone(buzzer,600,100);
  }
  }

   if (sensorvalue > 680){

  if( b1 == 1 ){
     tone(buzzer,700,100);
  }
    if( b2 == 1 ){
     tone(buzzer,800,100);
  }
    if( b3 == 1 ){
     tone(buzzer,900,100);
  }
    if( b4 == 1 ){
     tone(buzzer,1000,100);
  }
  }


  }
An instrument I’ve always admired is the theremin–it reminds me a bit of the smooth movement of the harp. Thus, for my practice this week, I decided to build a very mini version.
I wanted to try to use the ultrasonic sensor in our kits and wanted to be able to control at least one more variable such as volume or pitch. I decided to use the sensor for determining the note played and the potentiometer for controlling the volume.
I must admit I broke the rules of this assignment…I used serial communication between processing and arduino! In my defense, I broke the piezo buzzer and didn’t have a soldering station to fix it. Thus, my only way to test whether my instrument was working was to play using the output of my computer.
I used this tutorial to understand how the ultrasonic sensor worked and how to connect the four pins. One went to ground, one went to 5V, and the other two went to pins on my arduino (though one pin is input and the other is output). The code I used to find the distance of an object near the sensor seemed pretty standard between tutorials, but essentially a sound wave is emitted and then bounces back when it hits an object. We multiply by the speed of sound and then divide by 2 (so its just one way the wave travels).
From there, it was pretty straightforward. I read the value from the potentiometer and wrote the potentiometer value and sensor distance to the serial for Processing to read.
In Processing, I used an array of notes that mapped to the distance of the sensor. I used this documentation to learn more about creating a triangle wave. Essentially, all I did in Processing was read from the Serial and map the values and then play the triangle wave with the frequency depending on the sensor distance value and the amplitude (volume) depending on the potentiometer value.
I think it could be cool to experiment further by changing octaves and seeing if the photoresistor was more smooth than the ultrasonic sensor and adding LEDs that respond.
Here is my instrument!
Here is my Arduino code:
int trigger = 4;
int echo = 3;
int pot = A0;
int distance;
int duration;
int volume;
int c_notes[] = {35, 65, 131, 262, 523,1047, 2093, 4186};


void setup() {
  Serial.begin(9600);
  pinMode(trigger, OUTPUT);
  pinMode(echo, INPUT);
  pinMode(pot, OUTPUT);

}

void loop() {
   digitalWrite(trigger, LOW);
   delayMicroseconds(2);
  digitalWrite(trigger, HIGH);
  delayMicroseconds(10);
  digitalWrite(trigger, LOW);
  duration = pulseIn(echo, HIGH);
  volume = analogRead(pot);
  // Use 343 metres per second as speed of sound
  distance= duration*0.034/2;
  Serial.print(distance);
  Serial.print(",");
  Serial.print(volume);
  Serial.print("\n");

}
Here is my Processing code:
import processing.sound.*;
import processing.serial.*;
Serial myPort;
TriOsc triOsc;

//array of notes
int[] midiSequence = { 60, 61, 62, 63, 64, 65, 66, 67, 68, 69, 70, 71, 72, 73, 74, 75, 76, 77, 78, 79, 80, 81, 82, 83};

float amp;
int note = 0;

void setup() {
  size(640, 360);


  String portname=Serial.list()[2];
  println(portname);
  myPort = new Serial(this,portname,9600);
  myPort.clear();
  myPort.bufferUntil('\n');

  // Create triangle wave and start it
  triOsc = new TriOsc(this);


void draw() {
  //frequency, amplitude (volume)
    triOsc.play(midiToFreq(midiSequence[note]), amp);
  }


// This helper function calculates the respective frequency of a MIDI note
// taken from example 2 in processing documentation https://processing.org/tutorials/sound/
float midiToFreq(int note) {
  return (pow(2, ((note-69)/12.0))) * 440;
}


void serialEvent(Serial myPort){
  String s=myPort.readStringUntil('\n');
  s=trim(s);
  if (s!=null){
    int values[]=int(split(s,','));
    if (values.length==2){
      note=(int)map(values[0],-100,350,0, midiSequence.length);
      amp = map(values[1], 0, 1023, 0, 1);
    }
  }
}
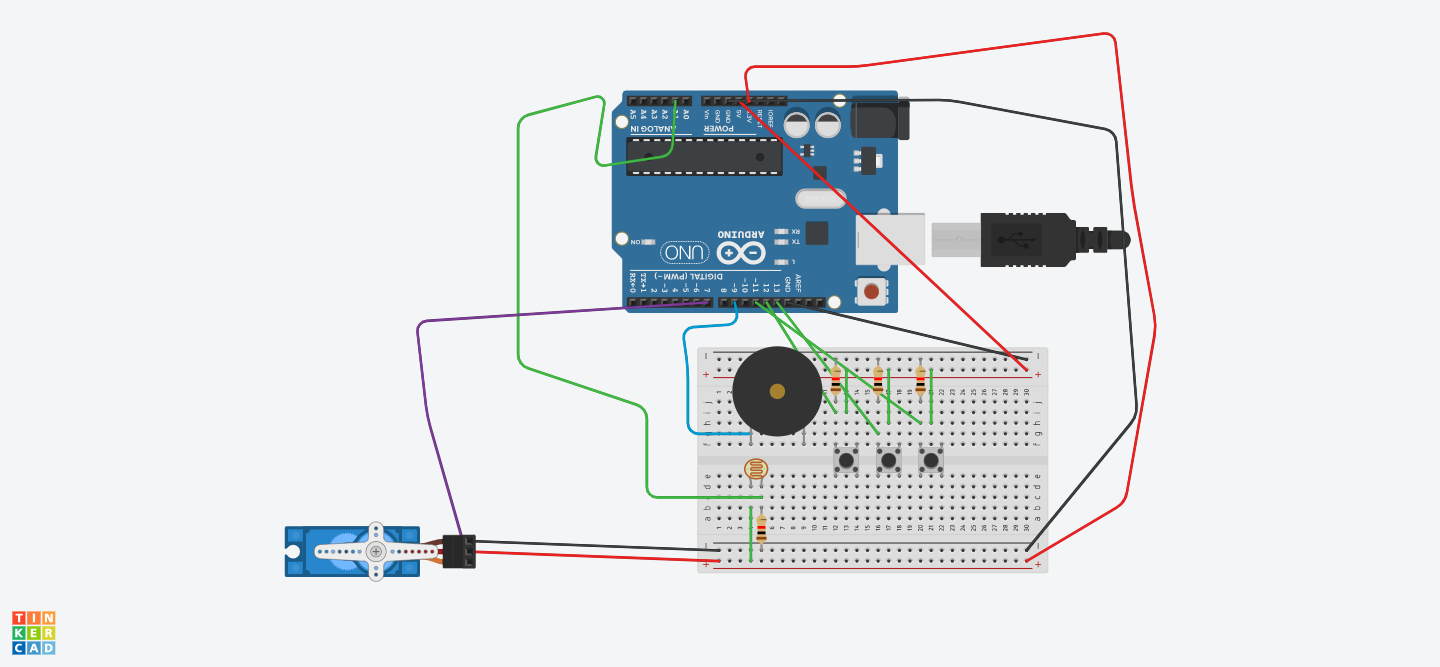
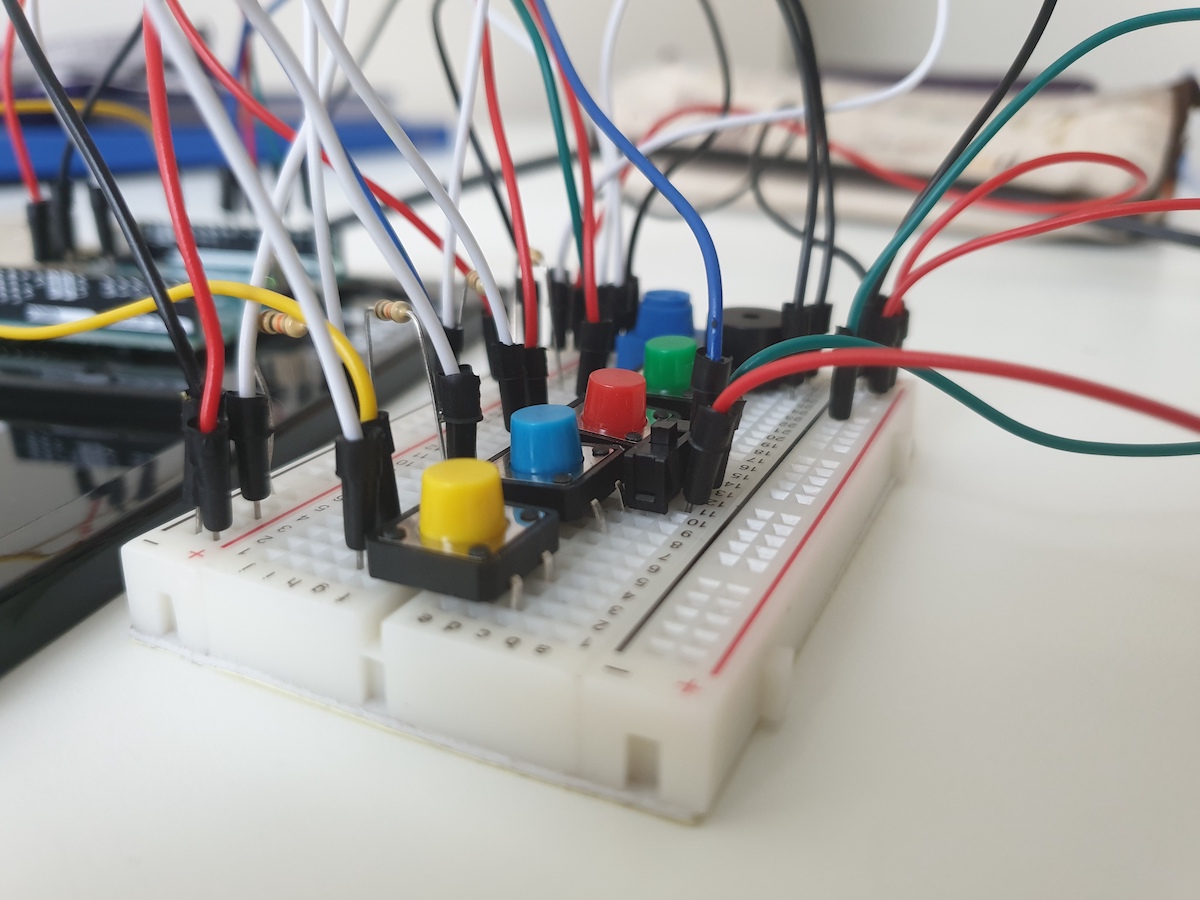
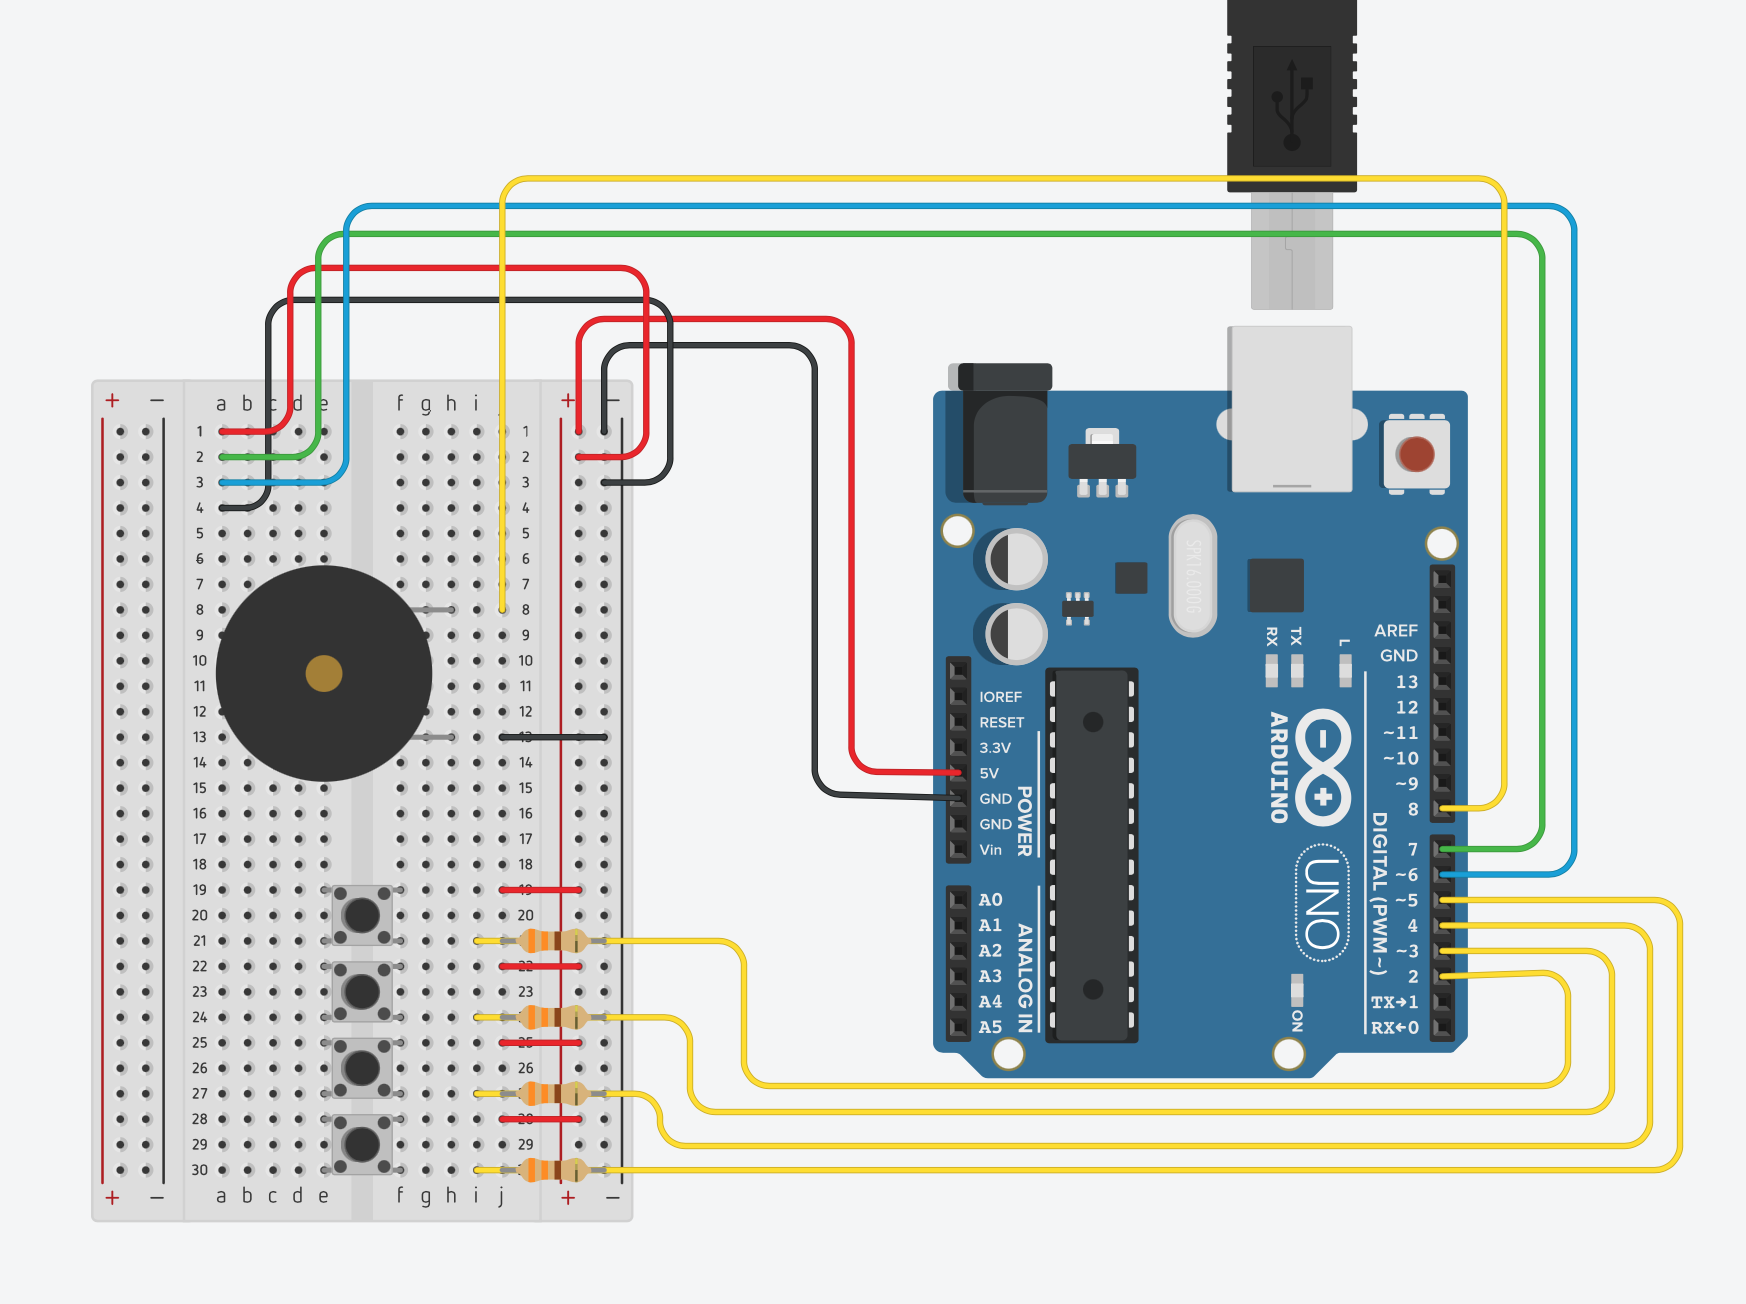
This week i tried to recreate music mix pult with the help of arduino. In the circuit there are 3 buttons, each corresponds to a certain sound, pressing them with different duration you can get different sounds. Also i included micro servo thing, which can be managed by photo resister.
To make micro servo “play” i combined it with the metal straw, at the same time i took a knife to hit them to get interesting and clear sound. As a stick is really heavy comparing to the servo i placed it the table side.
Code:
#include "pitches.h"
#include<Servo.h>
int but1 = 13;
int but2 = 12;
int but3 = 11;
int sound = 9;
Servo servo;
int i =0;
void setup() {
  pinMode(but1, INPUT);
  pinMode(but2, INPUT);
  pinMode(but3, INPUT);
    pinMode(led1, OUTPUT);
  pinMode(led2, OUTPUT);
  pinMode(sound, OUTPUT);

servo.attach(7);
   servo.write(180);
   Serial.begin(9600);
}

void loop() {
  int b1 = digitalRead(but1);
  int b2 = digitalRead(but2);
  int b3 = digitalRead(but3);
  int photoValue = analogRead(A1);
  int triggerInterval = map(photoValue, 0, 100, 0, 100);
 for ( i= 0; i<180; i++);{
   servo.write(i);
   delay(triggerInterval);
 }
  for ( i=180; i>=1; i--);{
   servo.write(i);
   delay(triggerInterval);
 }

  //Serial.println(triggerInterval);
if (b1 == 1){
tone (sound, NOTE_A3, 200);
    delay(100);
tone (sound, NOTE_A1, 100);
    delay(90);

tone (sound, NOTE_A3, 100);
    delay(80);

tone (sound, NOTE_A1, 100);
    delay(80);

}
if (b2 == 1){
   //digitalWrite(led2, HIGH);

tone (sound, NOTE_A3, 100);
    delay(100);
tone (sound, NOTE_A1, 100);
    delay(80);

tone (sound, NOTE_A3, 100);
    delay(100);

tone (sound, NOTE_A1, 500);
tone (sound, NOTE_A3, 500);
tone (sound, NOTE_A4, 500);
tone (sound, NOTE_A4, 500);

}

if (b3 == 1){
tone (sound, NOTE_A1, 500);
delay(80);
tone (sound, NOTE_A3, 500);
delay(80);

}
}
I have always loved to hear violins. I have never been a musician myself, neither do I know any basics of music (chords, strings, notes etc.) but violin has always fascinated me. So, for this assignment, I was very tempted to make a violin.
PROCESS and DIFFICULTIES
First of all, it was important to search about violins. What strings it has, how many of them (yes, I did not know violin has 4 strings!), how you play chords on it. Honestly, there was a lot of music terms that I didn’t understand, but hopefully, with the help of my friends, I got the technicalities correct in my Arduino-controlled-violin xD
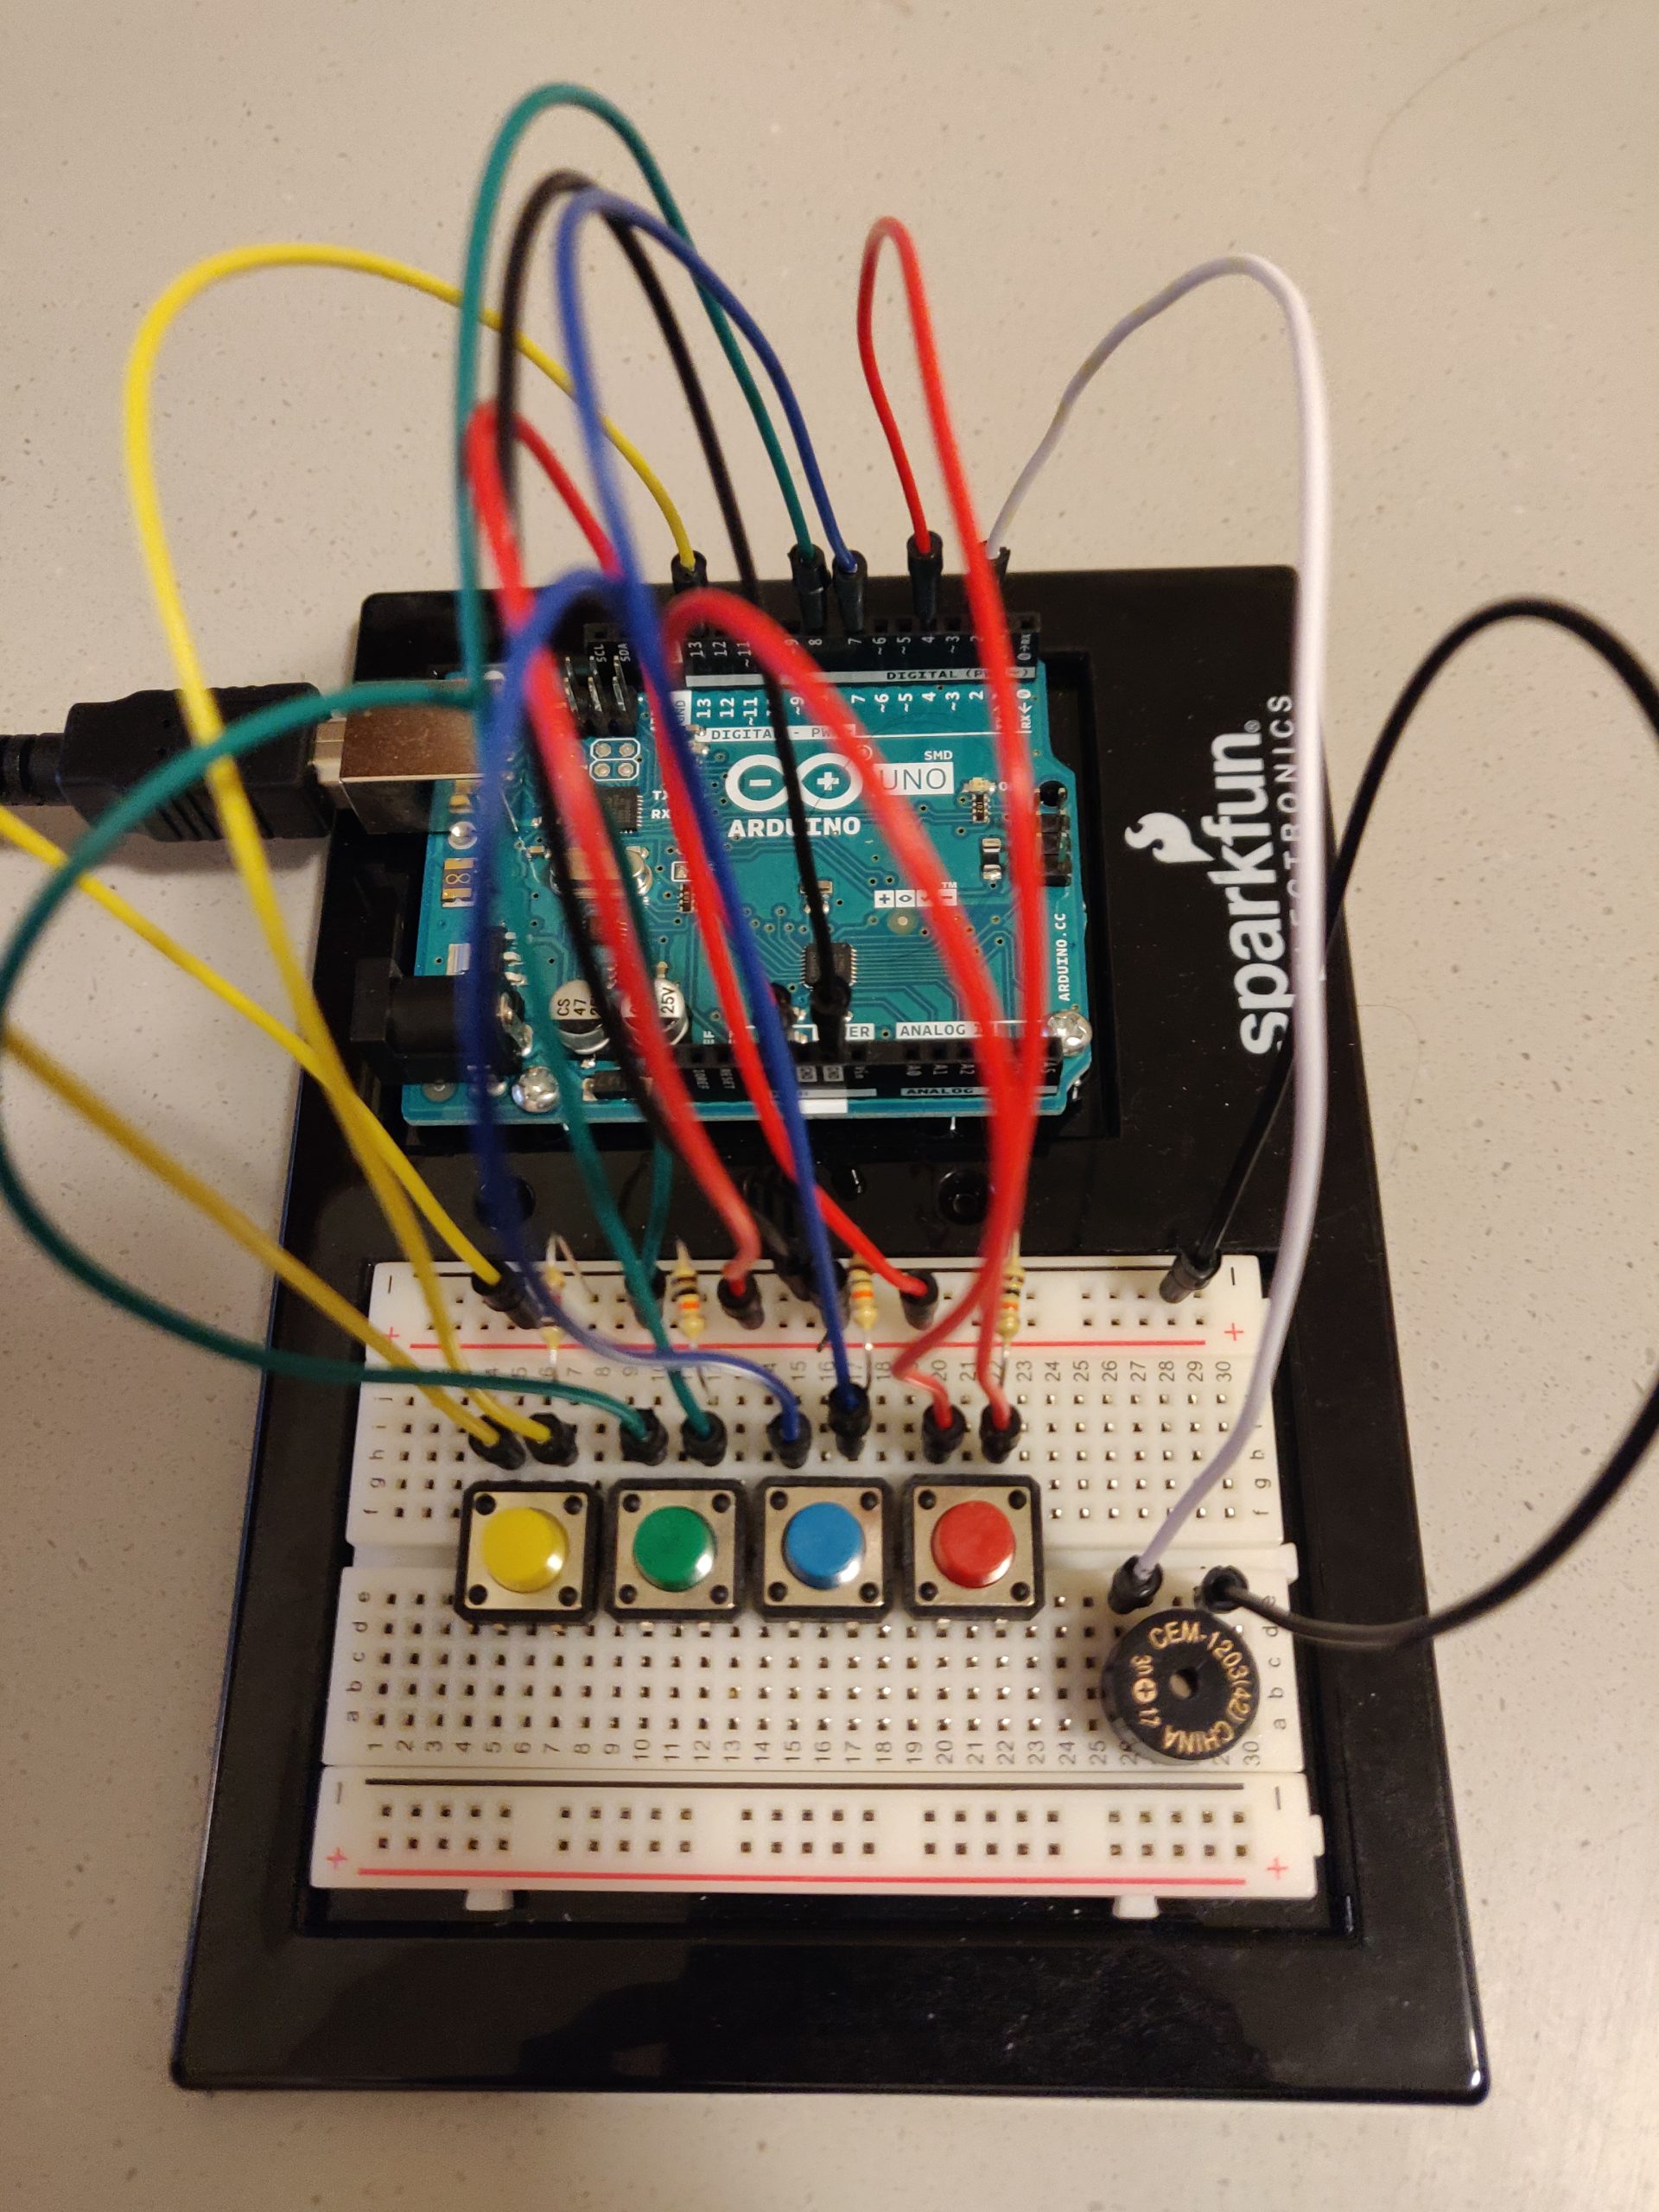
So, to replicate the 4 strings, I placed 4 buttons on my Arduino (see picture below).
If you press a button, it should play the open string note for that button. I problem I faced is here is that if I pressed a button, the sound would keep on continuing even when I released the button. To fix this, I used the noTone() function. I programmed it so that the tune stops playing when I release the button. However, this was not enough. I implemented the following code:
if (b1State == HIGH)
   tone(sPin, b1Note);
else if (prevB1State == HIGH and b1State == LOW)
   noTone(sPin);
A more difficult problem I faced was being able to play sounds from 2 button at a time. If I pressed 2 buttons simultaneously, the voice would become squeaky and annoying. I didn’t know what was happening. (See video below).
After searching on the net, I found that there is a frequency controller inside our buzzer, which can only play one frequency at a time. So, the buzzer can only play one tune at a time and not more. I found a fix for this, using multiple input wires and different resistors along with the alalogWrite() function instead of the tune() function. This would be able to write more than one frequency on the buzzer but this was more challenging to implement than it seemed. I didn’t have the correct resistors to put in. I tried various combinations of series and parallel resistors that could give me the desired Ohm value, but I wasn’t able to achieve it correctly to be able to implement my notes properly.
So, I decided I will restrict the user to one button at a time. I ensured that if another button is pressed while one was already pressed, the second button would not play the tune. Only when the first one is released, will the second one be played. I did this by altering the code in the following way:
if (b1State == HIGH && b2State == LOW && b3State == LOW && b4State == LOW)
   tone(sPin, b1Note);
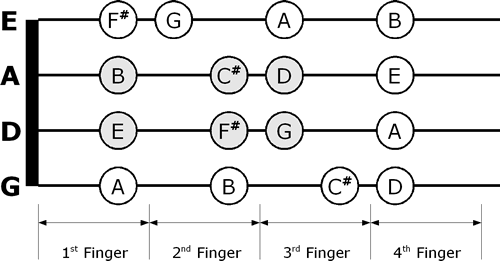
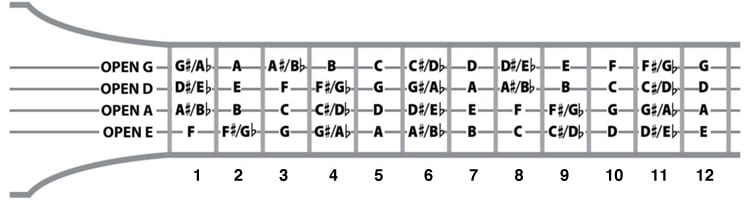
Next came playing different chords. The best way I thought of implementing this was to use a photocell which when tapped upon, would change the chord of my buttons. Each button would then signify the note played by first, second, third or fourth finger of that chord. I used the following picture as a reference to do so:
I am not sure my interpretation of t=it is necessarily correct, but being a person with no music background, I would say this is my version of the Violin hehe.
I added a little paper around my LDR to stabilize its readings. Otherwise, the threshold for touch would change depending upon my relative position to it and how much light I had been blocking.
For final touches, I decided to add a way to change the pitch/scale of the notes one was playing. So, I added a potentiometer for that. I wanted to keep a choice of 3 different scales – 3, 4, 5 (I hope they are called scales!) so I dived my potentiometer range into 3, and depending upon its value, the scale would change. One could further divide it to play all the scales if need be.
I also printed out the potentiometer readings, and chord choice so the user is aware of the chord and scale they are playing at. I f we keep the serial monitor open while playing the violin, it is a good indicator.
My final output looks like this:
I am very happy with what I made! Also, this project was much more exciting than usual because I learned and searched about music notes and tried to understand them for the first time ever! (It was hard to understand and I still don’t get it fully – I think not unless I start playing an instrument – but nevertheless, it was very fun 🙂 )
TINKER-CAD MODEL
CODE
The pitches.h file is the one Prof. Aaron shade with us in class. Below is the code I wrote (pitches.h file in another tab).
#include "pitches.h"

const int b1Pin = 13; //for the button pin - to play musical notes
const int b2Pin = 8; //for the button pin - to play musical notes
const int b3Pin = 7; //for the button pin - to play musical notes
const int b4Pin = 4; //for the button pin - to play musical notes
const int sPin = 2; //the speaker pin
const int ldrPin = A0; //the photo cell pin
const int potPin = A2; //potentiometer pin

bool b1State = false;
bool prevB1State = false;
bool b2State = false;
bool prevB2State = false;
bool b3State = false;
bool prevB3State = false;
bool b4State = false;
bool prevB4State = false;

int b1Note;
int b2Note;
int b3Note;
int b4Note;

int photoValue;
int prevPhotoValue;
int knobValue;
int chordChoice = 0; //0=E, 1=A, 2=D, 3=G

void setup() {
  pinMode(b1Pin, INPUT);
  pinMode(b2Pin, INPUT);
  pinMode(b3Pin, INPUT);
  pinMode(b4Pin, INPUT);
  pinMode(sPin, OUTPUT);
  pinMode(ldrPin, INPUT);
  pinMode(potPin, INPUT);

  Serial.begin(9600);

}

void loop() {

  b1State = digitalRead(b1Pin);
  b2State = digitalRead(b2Pin);
  b3State = digitalRead(b3Pin);
  b4State = digitalRead(b4Pin);

  photoValue = analogRead(ldrPin);
  knobValue = analogRead(potPin);
  //Serial.println(photoValue);

  if (photoValue < 150 && prevPhotoValue > 150)
    chordChoice = (chordChoice + 1) % 4; //i.e. change chord

  Serial.println((String)photoValue + " " + (String)chordChoice + " " + (String)knobValue);

  assignNotes();

  if (b1State == HIGH && b2State == LOW && b3State == LOW && b4State == LOW)
    tone(sPin, b1Note);
  else if (prevB1State == HIGH and b1State == LOW)
    //this is so that this happens only once when when button is released and not all the time
    noTone(sPin);
  if (b2State == HIGH && b1State == LOW && b3State == LOW && b4State == LOW)
    tone(sPin, b2Note);
  else if (prevB2State == HIGH and b2State == LOW)
    noTone(sPin);
  if (b3State == HIGH && b2State == LOW && b1State == LOW && b4State == LOW)
    tone(sPin, b3Note);
  else if (prevB3State == HIGH and b3State == LOW)
    noTone(sPin);
  if (b4State == HIGH && b2State == LOW && b3State == LOW && b1State == LOW)
    tone(sPin, b4Note);
  else if (prevB4State == HIGH and b4State == LOW)
    noTone(sPin);

  prevB1State = b1State;
  prevB2State = b2State;
  prevB3State = b3State;
  prevB4State = b4State;
  prevPhotoValue = photoValue;
}

void assignNotes()
{
  if (knobValue <= 341) //play on the 3rd scale
  {
    switch (chordChoice)
    {
      case 0:
        b1Note = NOTE_FS3;
        b2Note = NOTE_G3;
        b3Note = NOTE_A3;
        b4Note = NOTE_B3;
        break;
      case 1:
        b1Note = NOTE_B3;
        b2Note = NOTE_CS3;
        b3Note = NOTE_D3;
        b4Note = NOTE_E3;
        break;
      case 2:
        b1Note = NOTE_E3;
        b2Note = NOTE_FS3;
        b3Note = NOTE_G3;
        b4Note = NOTE_A3;
        break;
      case 3:
        b1Note = NOTE_A3;
        b2Note = NOTE_B3;
        b3Note = NOTE_CS3;
        b4Note = NOTE_D3;
        break;
    }
  }
  else if (knobValue > 341 && knobValue <= 682) //play on the 4rd scale
  {
    switch (chordChoice)
    {
      case 0:
        b1Note = NOTE_FS4;
        b2Note = NOTE_G4;
        b3Note = NOTE_A4;
        b4Note = NOTE_B4;
        break;
      case 1:
        b1Note = NOTE_B4;
        b2Note = NOTE_CS4;
        b3Note = NOTE_D4;
        b4Note = NOTE_E4;
        break;
      case 2:
        b1Note = NOTE_E4;
        b2Note = NOTE_FS4;
        b3Note = NOTE_G4;
        b4Note = NOTE_A4;
        break;
      case 3:
        b1Note = NOTE_A4;
        b2Note = NOTE_B4;
        b3Note = NOTE_CS4;
        b4Note = NOTE_D4;
        break;
    }
  }
  else //play on the 5nd scale
  {
    switch (chordChoice)
    {
      case 0:
        b1Note = NOTE_FS5;
        b2Note = NOTE_G5;
        b3Note = NOTE_A5;
        b4Note = NOTE_B5;
        break;
      case 1:
        b1Note = NOTE_B5;
        b2Note = NOTE_CS5;
        b3Note = NOTE_D5;
        b4Note = NOTE_E5;
        break;
      case 2:
        b1Note = NOTE_E5;
        b2Note = NOTE_FS5;
        b3Note = NOTE_G5;
        b4Note = NOTE_A5;
        break;
      case 3:
        b1Note = NOTE_A5;
        b2Note = NOTE_B5;
        b3Note = NOTE_CS5;
        b4Note = NOTE_D5;
        break;
    }
  }
}
This week we worked with the sound on Arduino, and I played around and tried to create a “musical instrument.” To mention before looking at my work: I have (had) zero knowledge of musical theory, and I had a hard time checking whether notes that play are the right ones. Also, I didn’t know how tempo works.
Let’s look at my “instrument”!
It consists of 4 buttons, buzzer, photoresistor, and servo. Initially, there were three buttons, but I added the yellow one so “twinkle twinkle little star” can play. I spent too much time figuring out how to make these arrays work not to include them. However, I still haven’t figured out how to use it without “delay” and gave up.
The other three buttons are responsible for one note each, namely C4, F4, and G4. Simultaneously, by blocking the light from the photoresistor (this example was cool), the servo moves accordingly. I tried to make it sound louder by placing it on my RedBull can.
This project consisted of creating a musical instrument using Arduino
Idea:
My initial idea was to create a piano with various features. I was thinking of using four buttons to resemble the piano keyboard, using the photoresistor to control the volume, use a knob to “travel through the keyboard” or change the keys played in the button, and using the bell curve technique when playing the buttons. However, I realized I had no method of controlling the volume emitted, and therefore I could not implement the photoresistor and the bell curve technique I had in mind. After careful thought, I decided to implement the buttons for the keyboard, the knob to change the keys, and a recorder that registers what has been played.
Challenges:
The first challenge I encountered was with the buttons themselves. I had to try for more than an hour to make the buttons work. However, I later realized that the real problem was in the physical Arduino instead of the code. Another problem I faced was with the recording part. I could manage to record the notes being played but the problem was that the notes were recorded 5-6 times each. I could solve this problem by allowing each button to play only once at a time. The problem was fixed but with the cost of not being able to play the same note more than one time in a row.
Process
For this project, first I started working with the physical Arduino. I connected all the buttons and the speaker. Then I started coding and attempted at creating and producing sounds through the speaker whenever a button was pressed. The speaker was making only two sounds and was making them continuously so I worked on solving this problem. I realized the problem was with the physical Arduino so I had to solve this problem first. Then I implemented the knob to play different parts of the piano. I stored the notes in a 2D array where there were 22 columns representing multiple parts of the piano and controlled by the knob, and 4 rows controlled each by a button. After this was working I tried to use a switch to power on or power off the piano. It worked and then I tried to use the recording part. This was accomplished by storing the notes played into a single array and then playing this array when the switch is changed to “off”.
I had to spend a lot of time on this project and when I first started I did not have in mind the part of recording what is played. Overall I was very proud of the outcome of this project. I did not expect it to result in this. Specifically, the recording idea was the part that I liked the most. This project made me learn to always keep in mind the importance of the physical Arduino and always double-check if everything is connected well.
This week, we were supposed to make a musical instrument which would involve both, a digital and an analog sensor.
For the most part, I faced a bad creative block. I knew I didn’t want anything extremely complicated, but I wanted it to be cool and fun to work with.
Hence, I first created something which wasn’t fully a musical instrument, but it helped me get a good idea about working with sounds in Arduino. I created an “instrument” consisting of a switch (digital sensor) and a photo resistor (analog sensor). The main idea here was to let changes in the button state and in the input generated by the photo resistor to play the intro song of Game of Thrones (9 out of 10 people who listened to it said it was close to the real intro song, so I’m hoping it’s not very disappointing).
I’ll be very honest, the GoT thing hit me before I did any research about it. Luckily, Google helped me find the notes which could be used to produce the song, and boom, a lot of my work was done. I coded the Arduino in a way where I stored all of the notes in an array (in order) and whenever the button was pressed or light was flashed (for the photo resistor), the next note of the song would be played. This allowed me to play the entire song in one go using ninety-five notes, where each note was played by either pressing the button or flashing light. The song could also be played any number of times. The video is attached below.
However, this wasn’t my best work and I knew I could do more. I wasn’t entirely satisfied with it because although I had used a digital and an analog sensor to create sound and make an “instrument”, I coded it in a way where any button press/flashing of light would only play the next note in a sequence which was already coded. Although playing the GoT intro song using the Arduino was something I found very cool, I felt the user didn’t have the liberty to play whatever note they wanted to as they usually do in a normal instrument.
So, I modified my work in the following way: I kept the photo resistor but instead of having one button, I now had 3. The combination of buttons and the photo resistor allowed me to implement the 7 most basic notes; Do, Re, Mi, Fa, Sol, La, Ti. I implemented them in the following manner.
Pressing the first button (red) without light plays Do.
Pressing the second button (yellow) without light plays Re.
Pressing the third button (blue) without light plays Mi.
Flashing the light/turning it on plays Fa.
Pressing the red button with the light on plays Sol.
Pressing the yellow button with the light on plays La.
Pressing the blue button with the light on plays Ti.
This implementation allowed me to have an instrument which could play the 7 fundamental notes using 7 different combinations of the buttons and photo resistor. The use of relevant conditional statements allowed me to achieve this behaviour.
The video below shows me using the instrument by working with the buttons and flashing lights while singing “D0-Re-Mi: The Sound of Music (1965)”; a song which was taught to us in elementary school. I am sorry for my horrible voice but years later, I was really vibing with the song.
The code for both, the GoT intro song and the main instrument can be found below.
#define NOTE_B0  31
#define NOTE_C1  33
#define NOTE_CS1 35
#define NOTE_D1  37
#define NOTE_DS1 39
#define NOTE_E1  41
#define NOTE_F1  44
#define NOTE_FS1 46
#define NOTE_G1  49
#define NOTE_GS1 52
#define NOTE_A1  55
#define NOTE_AS1 58
#define NOTE_B1  62
#define NOTE_C2  65
#define NOTE_CS2 69
#define NOTE_D2  73
#define NOTE_DS2 78
#define NOTE_E2  82
#define NOTE_F2  87
#define NOTE_FS2 93
#define NOTE_G2  98
#define NOTE_GS2 104
#define NOTE_A2  110
#define NOTE_AS2 117
#define NOTE_B2  123
#define NOTE_C3  131
#define NOTE_CS3 139
#define NOTE_D3  147
#define NOTE_DS3 156
#define NOTE_E3  165
#define NOTE_F3  175
#define NOTE_FS3 185
#define NOTE_G3  196
#define NOTE_GS3 208
#define NOTE_A3  220
#define NOTE_AS3 233
#define NOTE_B3  247
#define NOTE_C4  262
#define NOTE_CS4 277
#define NOTE_D4  294
#define NOTE_DS4 311
#define NOTE_E4  330
#define NOTE_F4  349
#define NOTE_FS4 370
#define NOTE_G4  392
#define NOTE_GS4 415
#define NOTE_A4  440
#define NOTE_AS4 466
#define NOTE_B4  494
#define NOTE_C5  523
#define NOTE_CS5 554
#define NOTE_D5  587
#define NOTE_DS5 622
#define NOTE_E5  659
#define NOTE_F5  698
#define NOTE_FS5 740
#define NOTE_G5  784
#define NOTE_GS5 831
#define NOTE_A5  880
#define NOTE_AS5 932
#define NOTE_B5  988
#define NOTE_C6  1047
#define NOTE_CS6 1109
#define NOTE_D6  1175
#define NOTE_DS6 1245
#define NOTE_E6  1319
#define NOTE_F6  1397
#define NOTE_FS6 1480
#define NOTE_G6  1568
#define NOTE_GS6 1661
#define NOTE_A6  1760
#define NOTE_AS6 1865
#define NOTE_B6  1976
#define NOTE_C7  2093
#define NOTE_CS7 2217
#define NOTE_D7  2349
#define NOTE_DS7 2489
#define NOTE_E7  2637
#define NOTE_F7  2794
#define NOTE_FS7 2960
#define NOTE_G7  3136
#define NOTE_GS7 3322
#define NOTE_A7  3520
#define NOTE_AS7 3729
#define NOTE_B7  3951
#define NOTE_C8  4186
#define NOTE_CS8 4435
#define NOTE_D8  4699
#define NOTE_DS8 4978


// code for GoT intro song is below (commented)


//int sensorPin = 2;
//int speakerPin = 4;
//int photoPin = A0;
//
//// setting the current and previous states for the button and (values) for the photoresistor
//boolean buttonState = LOW;
//boolean previousButtonState = LOW;
//
//int photoValue;
//int previousPhotoValue = 0;
//
//int i = 0;
//
//int notes[95] = {NOTE_G4, NOTE_C4, NOTE_DS4, NOTE_F4, NOTE_G4, NOTE_C4, NOTE_DS4, NOTE_F4, NOTE_G4, NOTE_C4, NOTE_DS4, NOTE_F4, NOTE_G4, NOTE_C4, NOTE_DS4, NOTE_F4, NOTE_G4, NOTE_C4, NOTE_E4,
//                 NOTE_F4, NOTE_G4, NOTE_C4, NOTE_E4, NOTE_F4, NOTE_G4, NOTE_C4, NOTE_E4, NOTE_F4, NOTE_G4, NOTE_C4, NOTE_E4, NOTE_F4, NOTE_G4, NOTE_C4, NOTE_DS4, NOTE_F4, NOTE_D4, NOTE_G3,
//                 NOTE_AS3, NOTE_C4, NOTE_D4, NOTE_G3, NOTE_AS3, NOTE_C4, NOTE_D4, NOTE_G3, NOTE_AS3, NOTE_C4, NOTE_D4, NOTE_G3, NOTE_AS3, NOTE_C4, NOTE_D4, NOTE_F4, NOTE_AS3, NOTE_DS4,
//                 NOTE_D4, NOTE_F4, NOTE_AS3, NOTE_DS4, NOTE_D4, NOTE_C4, NOTE_GS3, NOTE_AS3, NOTE_C4, NOTE_F3, NOTE_GS3, NOTE_AS3, NOTE_C4, NOTE_F3, NOTE_GS3, NOTE_AS3, NOTE_C4, NOTE_F3,
//                 NOTE_G4, NOTE_C4, NOTE_DS4, NOTE_F4, NOTE_G4, NOTE_C4, NOTE_DS4, NOTE_F4, NOTE_D4, NOTE_G3, NOTE_AS3, NOTE_C4, NOTE_D4, NOTE_G3, NOTE_AS3, NOTE_C4, NOTE_D4, NOTE_G3, NOTE_AS3,
//                 NOTE_C4, NOTE_D4};
//
//void setup()
//  {
//    pinMode(speakerPin,OUTPUT);
//    pinMode(sensorPin,INPUT);
//    Serial.begin(9600);
//  }
//
//void loop(){
//    buttonState = digitalRead(sensorPin);
//    photoValue = analogRead(photoPin);
//    if(buttonState == HIGH && previousButtonState == LOW)
//    {
//       // the %95 allows us to play notes all over again
//       tone(speakerPin, notes[i%95], 250);
//       i++;
//    }
//    previousButtonState = buttonState;
//
//    if (photoValue >= 400 && previousPhotoValue < 400) {
//      tone(speakerPin, notes[i%95], 250);
//      // i++ allows us to move to the next note in the array
//      i++;
//    }
//    previousPhotoValue = photoValue;
//
//   Serial.println(photoValue);
//  }


// code for main instrument is below


// assigning the pin for each component to a variable
int button1Pin = 7;
int button2Pin = 2;
int button3Pin = 8;
int photoPin = A0;
int speakerPin = 4;

// setting the current and previous state variables for all 3 buttons and the photoresistor value
boolean button1state = LOW;
boolean button1previousState = LOW;
boolean button2state = LOW;
boolean button2previousState = LOW;
boolean button3state = LOW;
boolean button3previousState = LOW;

int photoValue;
int previousPhotoValue = 0;

// creating an array called notes which stores the notes Do,Re,Mi,Fa,Sol,La,TI
int notes[7] = {NOTE_C4, NOTE_D4, NOTE_E4, NOTE_F4, NOTE_G4, NOTE_A4, NOTE_B4};


void setup() {
  // assigning the pin modes to the components
  pinMode(button1Pin, INPUT);
  pinMode(button2Pin, INPUT);
  pinMode(button3Pin, INPUT);
  pinMode(speakerPin, OUTPUT);
  Serial.begin(9600);
}

void loop() {
  // reading in a digital manner the state of the button and in an analog manner the input generated by the photoresistor
  button1state = digitalRead(button1Pin);
  button2state = digitalRead(button2Pin);
  button3state = digitalRead(button3Pin);
  photoValue = analogRead(photoPin);

  // specifying conditional statements for different combinations of components to play different notes
  if (button1state == HIGH && button1previousState == LOW && button2state == LOW && button3state == LOW && photoValue < 400){
    tone(speakerPin, notes[0], 250);
  }

  if (button2state == HIGH && button2previousState == LOW && button1state == LOW && button3state == LOW && photoValue < 400){
    tone(speakerPin, notes[1], 250);
  }

  if (button3state == HIGH && button3previousState == LOW && button1state == LOW && button2state == LOW && photoValue < 400){
    tone(speakerPin, notes[2], 250);
  }

  if (button3state == LOW && button2state == LOW && button1state == LOW && photoValue >= 400 && previousPhotoValue < 400){
    tone(speakerPin, notes[3], 250);
  }

  if (button1state == HIGH && button1previousState == LOW && button2state == LOW && button3state == LOW && photoValue >= 400){
    tone(speakerPin, notes[4], 250);
  }

  if (button2state == HIGH && button2previousState == LOW && button1state == LOW && button3state == LOW && photoValue >= 400){
    tone(speakerPin, notes[5], 250);
  }

  if (button3state == HIGH && button3previousState == LOW && button1state == LOW && button2state == LOW && photoValue >= 400){
    tone(speakerPin, notes[6], 250);
  }

  button1previousState = button1state;
  button2previousState = button2state;
  button3previousState = button3state;
  previousPhotoValue = photoValue;
}
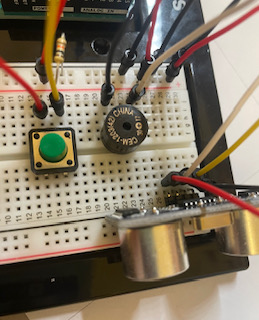
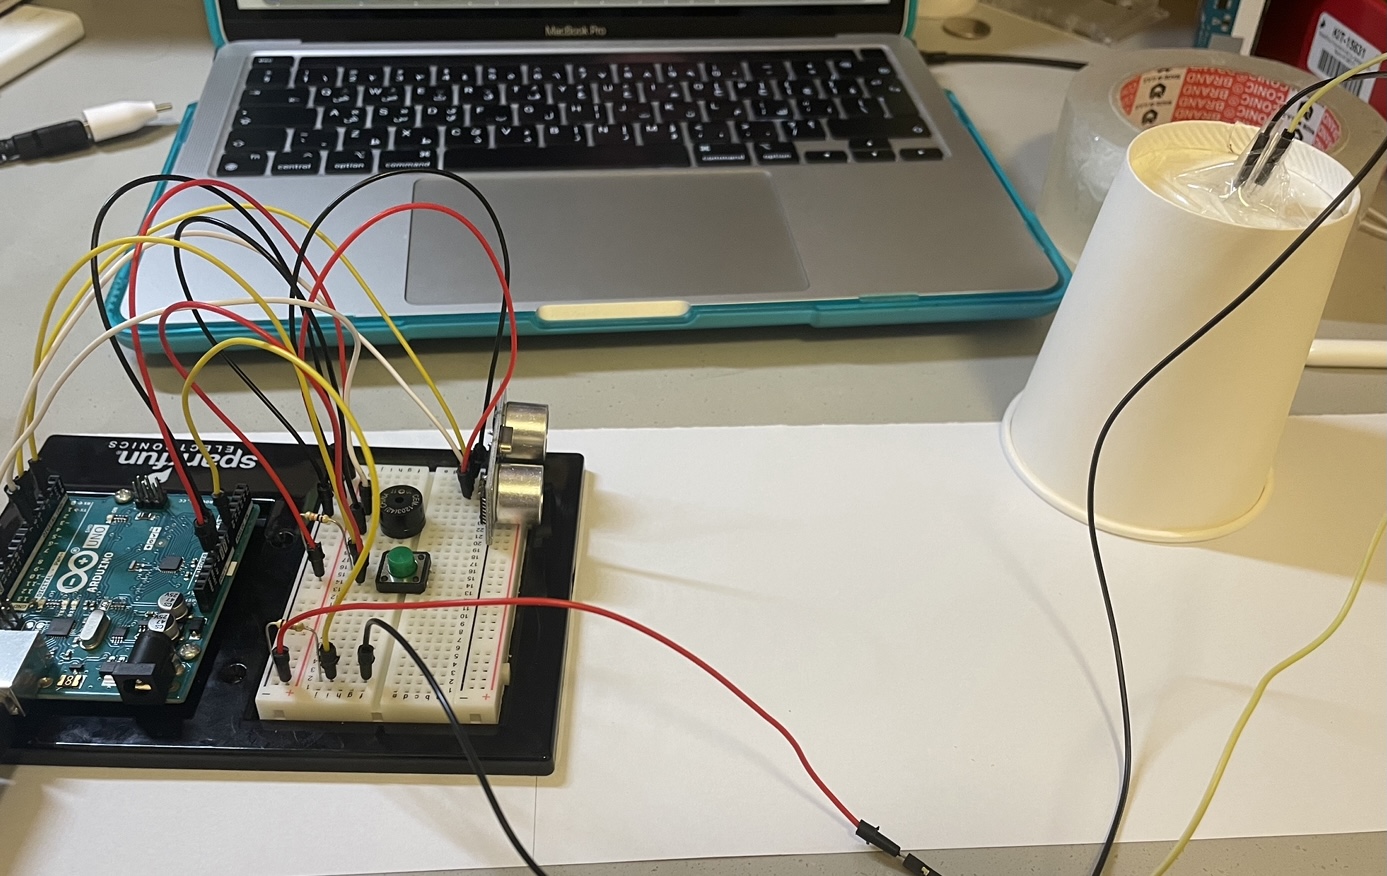
This is an instrument (don’t ask me the name) in which the user can play by utilizing a straight object and locating it at a certain position to play a note. The user can also distort that sound by turning the cup if so they wish.
Idea:
I actually got the inspiration from the clarinet. I wanted something that would be able to play in between the ranges of notes. However, at the end I think that I tried to simulate a piano more. I wanted to use the ultrasonic sensor to play the main notes and then have something similar to a pedal to change them. Now it is more of a distorter than a pedal, but the idea is there.
This is how the project looks like from the player’s perspective.
Process
I started by adding an ultrasonic sensor and a speaker to the circuit. (Please ignore the capacitor, it was there for class). I learned how to send and receive waves with the sensor in order to calculate distance. Afterwards, I made an array of sounds (middle C section) and mapped the distance to the number of notes in the array in order to assign a specific note to each distance. I then tested it out with my hand.
The sensor did not gave perfect values so there was a need to clean the information that it was getting. Even then there were still values that were off and I found it better to use a straight surface rather than my hand to make the sounds.
It was very difficult to control when a sound would change only with that so I added a button so that the instrument plays only when the button is pressed.
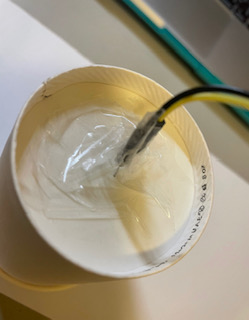
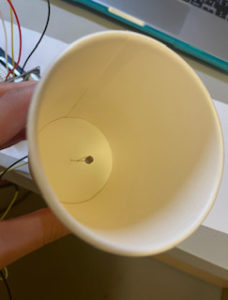
I thought that it would be interesting if the user could modify the pitch of the note by using some sort of additional feature and after much pondering, I decided to use the photosensor. To have better control of the amount of light received I choose to put the photosensor inside a cup. It was a very weird thing to do, specially with all the tape and I had to use female jumper wires for this.
Then I put it all together: the code for the ultrasonic sensor and that for the distortion (photosensor). This part was by far the hardest because merging them messed up some of the sounds and I had to find a way to make the notes sound normal when the photosensor is in the rest position. It took a lot of experimentation and debugging to get this part right. I still think there are better ways of doing what I did, but it works.
This is how it looked at the end:
For a better user experience, I decided to add the location of each of the notes as can be seen in the first image of this post.
Challenges:
SO MANY. This was a very stressful process because one moment something was working and the next everything was crashing.
Figuring out what to do for the project in the first place.
My ultrasonic sensor throws random values most of the time, even when I refined the noise there still were some values that were off, but 7amdullah it didn’t interfere with the program that much for playing. I also used a straight surface rather than my hand to play from the distance sensor side which helped regulate the values.
Been able to play a melody without the program crashing
The button sometimes continued to read pressed even though it wasn’t (specially after a couple minutes of running the program).
Combining the distortion effect of the photosensor with the actual note been played from the distance.
Just figuring out how to do things in general. (So many ideas, so few good ones ;-; cries in Arduino)
I am very bad with tape and keeping the photosensor in contact with the wire.
I had other problems (as you will noticed from all the prints in my code) but I am so glad that it now works that I don’t want to remember the trauma.
Not my most aesthetic project: There are wires everywhere!
Circuit
*Note: in this image the ultrasonic sensor is inverted because I could’t flip its image. Furthermore, there is not cup for the photosensor since TinkerCad doesn’t have that feature
Final Result
Code
# include "pitches.h"

int echoPin = 5;                //pin of the echo of the distance sensor: receives the wave
int trigPin = 6;                //pin of the trigger of the distance sensor: sends the wave
long duration;                  //duration of sending and receiving the wave
long distance;                  //distance calculate by the sensor

int buttonPin = 2;              //pin of the button

const int numReadings = 10;     //number of readings to get the average

int readings[numReadings];      // the readings from the analog input
int readIndex = 0;              // the index of the current reading
int total = 0;                  // the running total
int average = 0;                // the average
int noteFreq = 0;               // the final frequency used to play the note

int photocensorPin = A0;        //pin of the photosensor
float photoValue;               //value received from the photosensor

void setup() {

  pinMode(echoPin, INPUT);
  pinMode(trigPin, OUTPUT);

  pinMode(buttonPin, INPUT);

  pinMode(photocensorPin, INPUT);


  //int notes[8] = {NOTE_C4,NOTE_D4,NOTE_E4,NOTE_F4,NOTE_G4, NOTE_A4, NOTE_B4, NOTE_C5};

  //int sound = 0;
  //tone(11, notes[sound]);

  // you have to round this
  // it allows you to access the
  //you go up one note to change to a Sharp/bemol
  // (pow(2,(noteNumber-69.)/12.)*440)

  // initialize all the readings to 0
  for (int thisReading = 0; thisReading < numReadings; thisReading++) {
    readings[thisReading] = 0;
  }

  Serial.begin(9600);
}

void loop() {

  //PROGRAMMING THE ULTRASONIC SENSOR---------------------------------------------------------

  //send the wave and receive it
  digitalWrite(trigPin, LOW);
  delayMicroseconds(2);
  digitalWrite(trigPin, HIGH);
  delayMicroseconds(10);
  digitalWrite(trigPin, LOW);

  //collect the data of the duration of the pulse
  duration = pulseIn(echoPin, HIGH);

  //convert the duration to distance
  //0.340 is the speed (centimeters per microseconds)
  distance = (duration / 2) * .0340;
  //Serial.println(distance);

  //GETTING VALUES FROM THE PHOTOSENSOR-------------------------------------------------------

  photoValue = analogRead(photocensorPin);
  //Serial.println(photoValue);

  int distortion = map(photoValue, 300, 800, 0, 50);

  //int noteNumber = map(photoValue, 0, 1023, 0, 120);
  //int note = (pow(2, (noteNumber - 69.) / 12.) * 440);
  // tone(11, note);


  //UPLOAD NOTES-----------------------------------------------------------------------------
  //make an array with the note pitches
  int notes[8] = {NOTE_C4, NOTE_D4, NOTE_E4, NOTE_F4, NOTE_G4, NOTE_A4, NOTE_B4, NOTE_C5};

  //if the parst ten values are some note and it doesn't change, then leave that note
  //if the note changes for more than 3 than change the note

  //CHECK BUTTON STATE-----------------------------------------------------------------------
  bool currButtonState = digitalRead(buttonPin);
  //Serial.println(currButtonState);

  //PLAY INSTRUMENT--------------------------------------------------------------------------

  // if button is not pressed and distance is not within range, don't play anything
  if (distance < 0 && distance > 20 && !currButtonState)
  {
    noTone(11);
  }
  //play the note
  else
  {
    //this variable changed the distance to a value for the array
    int sound = map(distance, 0, 20, 0, 8);
    //Serial.println("Distance");
    //Serial.println(distance);
    //Serial.println("Sound");
    //Serial.println(sound);

    total = total - readings[readIndex];

    // read from the sensor:
    readings[readIndex] = sound;

    // add the reading to the total:
    total = total + readings[readIndex];

    // advance to the next position in the array:
    readIndex = readIndex + 1;

    // if we're at the end of the array...
    if (readIndex >= numReadings) {
      // ...wrap around to the beginning:
      readIndex = 0;
    }

    // calculate the average:
    average = total / numReadings;

    //Serial.print(sound);
    //Serial.print(" ");
    //Serial.println(average);

    //Serial.println(distortion);

    //Change NOTE FREQUENCY

    //if there it distortion
    if (distortion > 0, distortion < 50)
    {
      //add the distotion to the note
      noteFreq = notes[average] + distortion;
    }
    else
    {
      //just have the note without distortion
      noteFreq = notes[average];
    }

    //if button is pressed
    if (currButtonState)
    {
      //play the note
      tone(11, noteFreq, 100);
    }
    //tone(11, notes[average], 100);
    //Serial.println(average);
  }
}
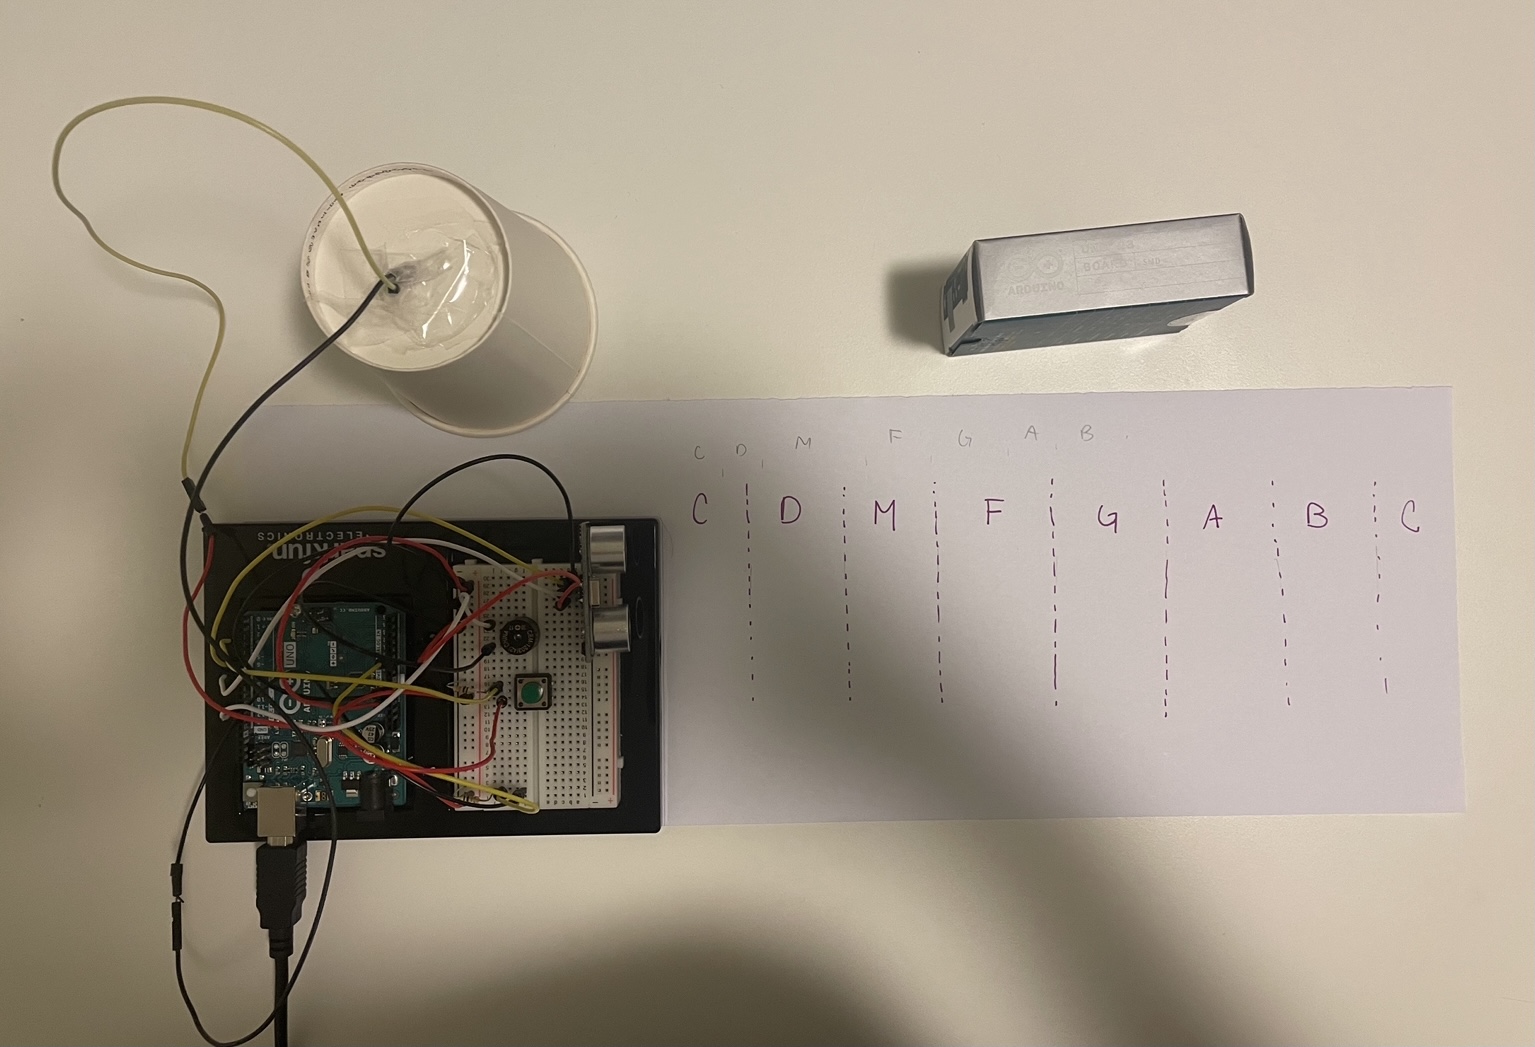
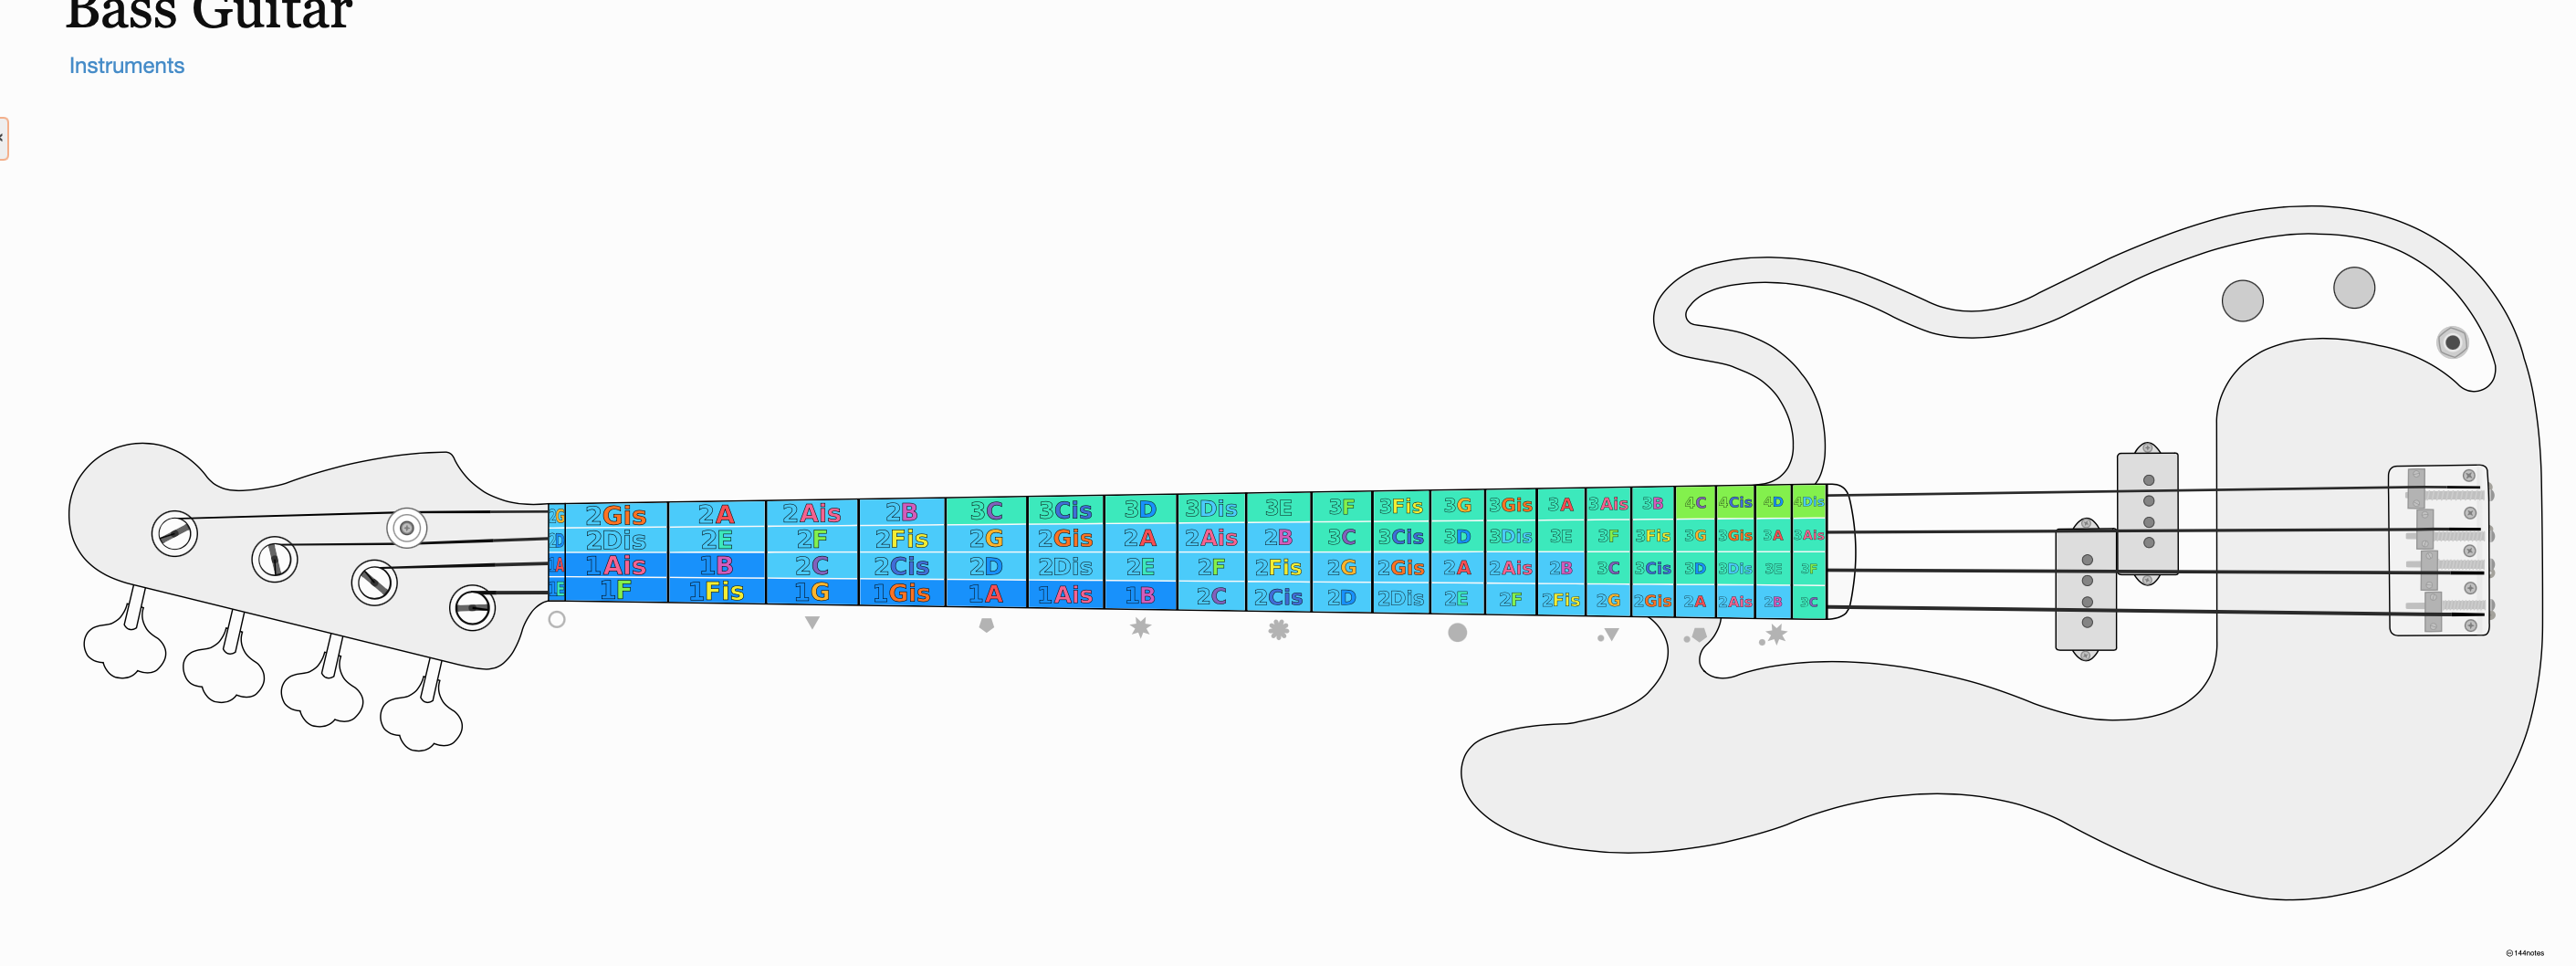
This week we had to make a musical instrument with at least one analog and one digital input. At first I wanted to try and make a guitar or piano as I am more familiar with them and can play them in a limited sense. Looking at the supplies in our kits I realized a full on instrument with the limited sensors and space we had would be hard. I ended up implementing a sort of 4 string bass that could play a full range of notes that one would find on a standard 4 string bass.
Result:
To play my Arduino bass, you use the distance finder to set the fret where you would be placing your finger. You then can press one of the buttons at a time to represent plucking a string on the bass.
Attached is the note layout that I modeled
You can imagine that the Arduino is at the base of the bass and so moving your hand further away from the distance sensor would be like moving your hand further up the neck.
Playing:
While I intended for the musician to move their hand closer and further to change frets, I found that the distance measurement was less consistent this way and as a result harder to control. Instead I ended up placing a flat box and moving the Arduino relative to that. I also placed marks on the table for the first few frets that I would need to play a basic C scale.
Here are the results
Wiring
(As TinkerCAD’s distance sensor is a three pin version while we used four pins I just placed the wires where the sensor would go in the top left of the board)
Code:
#include "pitches.h"

//Pins
const int string1Pin = 2; //E string
const int string2Pin = 3; //A string
const int string3Pin = 4; //D string
const int string4Pin = 5; //G string
const int echoPin = 6; // Echo Pin of Ultrasonic Sensor
const int pingPin = 7; // Trigger Pin of Ultrasonic Sensor
const int buzzerPin = 8;

bool stringOne = false;
bool stringTwo = false;
bool stringThree = false;
bool stringFour = false;

//20 fret (21 when including open strings) 4 string bass tuned to equal temperment tuning and standard pitch
int fourStringBass[21][4] = {
  {NOTE_E1, NOTE_A1, NOTE_D2, NOTE_G2},
  {NOTE_F1, NOTE_AS1, NOTE_DS2, NOTE_GS2},
  {NOTE_FS1, NOTE_B1, NOTE_E2, NOTE_A2},
  {NOTE_G1, NOTE_C2, NOTE_F2, NOTE_AS2},
  {NOTE_GS1, NOTE_CS2, NOTE_FS2, NOTE_B2},
  {NOTE_A1, NOTE_D2, NOTE_G2, NOTE_C3},
  {NOTE_AS1, NOTE_DS2, NOTE_GS2, NOTE_CS3},
  {NOTE_B1, NOTE_E2, NOTE_A2, NOTE_D3},
  {NOTE_C2, NOTE_F2, NOTE_AS2, NOTE_DS3},
  {NOTE_CS2, NOTE_FS2, NOTE_B2, NOTE_E3},
  {NOTE_D2, NOTE_G2, NOTE_C3, NOTE_F3},
  {NOTE_DS2, NOTE_GS2, NOTE_CS3, NOTE_FS3},
  {NOTE_E2, NOTE_A2, NOTE_D3, NOTE_G3},
  {NOTE_F2, NOTE_AS2, NOTE_DS3, NOTE_GS3},
  {NOTE_FS2, NOTE_B2, NOTE_E3, NOTE_A3},
  {NOTE_G2, NOTE_C3, NOTE_F3, NOTE_AS3},
  {NOTE_GS2, NOTE_CS3, NOTE_FS3, NOTE_B4},
  {NOTE_A2, NOTE_D3, NOTE_G3, NOTE_C4},
  {NOTE_AS2, NOTE_DS3, NOTE_GS3, NOTE_CS4},
  {NOTE_B2, NOTE_E3, NOTE_A3, NOTE_D4},
  {NOTE_C3, NOTE_F3, NOTE_AS3, NOTE_DS4},
};

int fret = 0;
int string = -1; //-1 means no string, 0 is E string, 1 is A string, 2 is D string, 3 is G string

//Datastructure used to determine which button to play to the buzzer, if two are pressed play last pushed one

void setup() {
  Serial.begin(9600);
  // put your setup code here, to run once:
  pinMode(string1Pin, INPUT);
  pinMode(string2Pin, INPUT);
  pinMode(string3Pin, INPUT);
  pinMode(string4Pin, INPUT);
  pinMode(pingPin, OUTPUT);
  pinMode(echoPin, INPUT);
}

void loop() {
  //=============================Deal with buttons and play sound=============================
  //Get button values, check to see if they were pushed and are now unpushed or vice versa
  int newStringOne = digitalRead(string1Pin);
  int newStringTwo = digitalRead(string2Pin);
  int newStringThree = digitalRead(string3Pin);
  int newStringFour = digitalRead(string4Pin);

  //Check if the buttons being pressed
  if(newStringOne && !stringOne){
    string = 0;
    stringOne = true;
  }
  if(newStringTwo && !stringTwo){
    string = 1;
    stringTwo = true;
  }
  if(newStringThree && !stringThree){
    string = 2;
    stringThree = true;
  }
  if(newStringFour && !stringFour){
    string = 3;
    stringFour = true;
  }

  //Check if button being unpressed
  if(!newStringOne && stringOne){
    string = -1;
    stringOne = false;
    noTone(buzzerPin);
  }
  if(!newStringTwo && stringTwo){
    string = -1;
    stringTwo = false;
    noTone(buzzerPin);
  }
  if(!newStringThree && stringThree){
    string = -1;
    stringThree = false;
    noTone(buzzerPin);
  }
  if(!newStringFour && stringFour){
    string = -1;
    stringFour = false;
    noTone(buzzerPin);
  }


  //===============Get distance of hand from ultrasonic sensor, usable range is 5-30 cm accuratley=====================
  long duration;
  int cm;
  digitalWrite(pingPin, LOW); //Send a ping out with sensor
  delayMicroseconds(2);
  digitalWrite(pingPin, HIGH);
  delayMicroseconds(10);
  digitalWrite(pingPin, LOW); //Ping sent
  duration = pulseIn(echoPin, HIGH);  //Wait for return on echo Pin
  cm = duration / 29 / 2; //Convert to cm

  //If value is too large or small just set it at 35 or 5
  if (cm > 35) {
    cm = 35;
  }
  else if (cm < 5) {
    cm = 5;
  }

  //Map the value 35-5 to 0-20 for frets
  fret = (int)map(cm, 35, 5, 0, 20);
  //=================Play Sound======================
  Serial.print("Fret: ");
  Serial.print(fret);
  Serial.print(", String:");
  Serial.println(string);
  if(string != -1){
    tone(buzzerPin, fourStringBass[fret][string]);
  }
}
While thinking about this assignment, I wanted to make something tangible that would actually feel like musical instrument and act like one too. Initially, I gravitated towards trying to make a sort of MIDI player because I wanted to press a button that would play a beat and another one to layer the first beat with another beat (sort of like the Groovepad App) but after many failed attempts I realized that it was quite hard to create a harmony using the buzzer and so eventually I had to abandon the idea. However, I kept up with the spirit and then thought of mimicking an electric bass guitar using the Arduino and I feel I was somewhat able to do it but not completely because of certain difficulties which I will be explaining later on.
🤩 Implementation
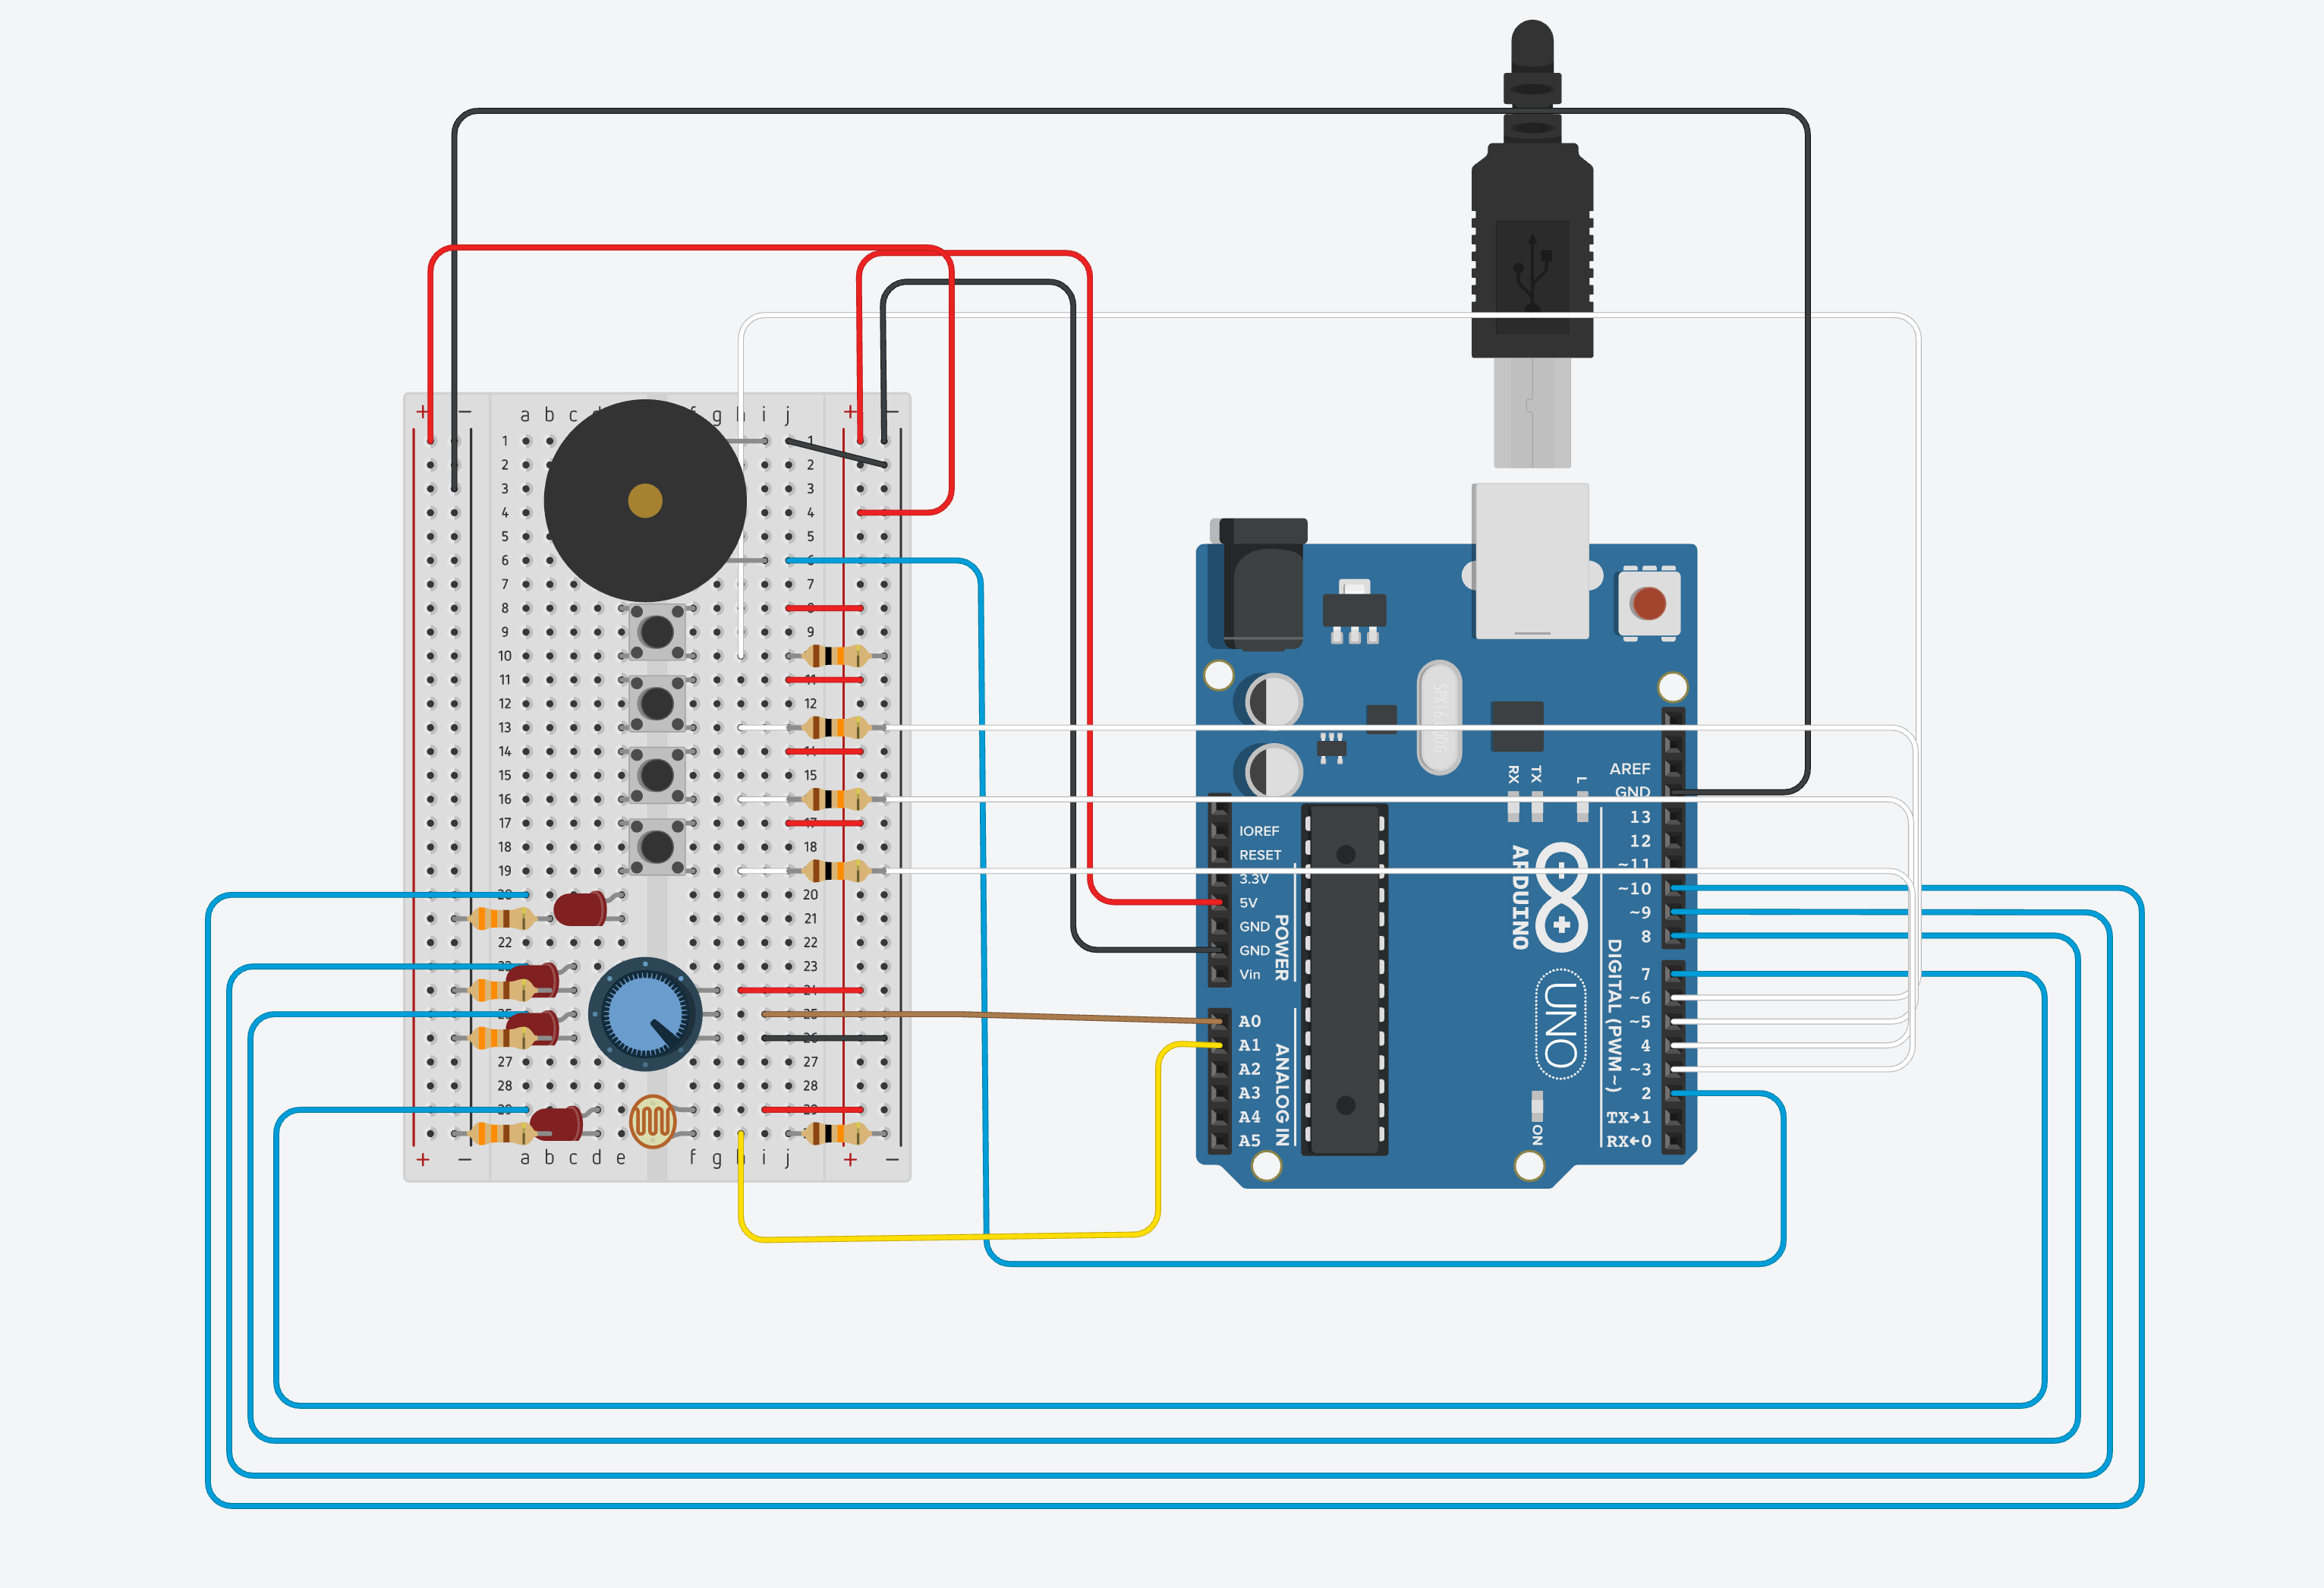
So the way I saw it, the electric bass seemed to be the most convenient instrument to implement through the Arduino as all it consists of is 4 strings and 12 sections along with the sound of just playing the strings. Obviously, mimicking the strumming patterns of the bass would be unfeasible or too time taking for this assignment but at least I could mimic the act of playing the individual notes. And I did so by first storing the notes in a 2D array based on how they are arranged in a bass guitar (see image below) and then having the four buttons mimic the four strings and using the potentiometer as a tool to change between sections. For added ease, I also added LED lights that would turn on when you are in a particular section so that you could get the experience of playing notes on a bass. Basically I replace the act of putting your finger on the string with pressing a button and then choosing a note by moving your finger along the string with choosing a note by turning a potentiometer.
Bass Notes
This was the circuitry involved to implement this assignment
As you can see there are four LEDs involved with the one connected to the 7th Pin signifying that this is the open string being played on the bass. The LED connected to 8th pin is for strings from 1-4 and the one connected to the 9th Pin is for strings from 5-8. The last LED is for strings from 9-12. Initially I wanted to have a separate LED for each string but this was not possible due to the small size of the board.
There are four buttons connected that operate as the strings
A potentiometer to change between notes within a string.
A buzzer that emits sound.
A photo-resistor (of which I will talk in the difficulties section).
The code:
#include "pitches.h"

const int NO_PINS = 4;
const int NO_BUTTONS = 4;
const int STRINGS = 4;
const int SECTIONS = 13;
const int BUZZER_PIN = 2;

int notes[STRINGS][SECTIONS] = {NOTE_E5, NOTE_F5, NOTE_FS5, NOTE_G5, NOTE_GS5, NOTE_A5, NOTE_AS5, NOTE_B5, NOTE_C6, NOTE_CS6, NOTE_D6, NOTE_DS6, NOTE_E6,
                          NOTE_A4, NOTE_AS4, NOTE_B4, NOTE_C4, NOTE_CS4, NOTE_D4, NOTE_DS4, NOTE_E4, NOTE_F4, NOTE_FS4, NOTE_G4, NOTE_GS4, NOTE_A4,
                            NOTE_D3, NOTE_DS3, NOTE_E3, NOTE_F3, NOTE_FS3, NOTE_G3, NOTE_GS3, NOTE_A3, NOTE_AS3, NOTE_B3, NOTE_C3, NOTE_CS3, NOTE_D3,
                          NOTE_G2, NOTE_GS2, NOTE_A2, NOTE_AS2, NOTE_B2, NOTE_C2, NOTE_CS2, NOTE_D2, NOTE_DS2, NOTE_E2, NOTE_F2, NOTE_FS2, NOTE_G2 };   // THE NOTES AS ON THE BASS

int whichNote = 9;
int buttonPins[NO_BUTTONS] = {3,4,5,6};
int ledPins[NO_PINS] = {7,8,9,10};
int ledSwitches[NO_PINS];
int currentButtonState[NO_BUTTONS];
int previousButtonState[NO_BUTTONS];
int whichString;

void setup() {
  Serial.begin(9600);

  for(int i = 0; i< NO_PINS; i++)
  {
  pinMode(ledPins[i], OUTPUT);   //SETTING OUTPUT PINS
  }

  for(int i = 0; i< NO_BUTTONS; i++)
  {
  pinMode(buttonPins[i], INPUT);  //SETTING INPUT PINS
  }

  for(int i = 0; i< NO_BUTTONS; i++)
  {
  previousButtonState[i] = 0;  //SETTING ALL PREVIOUS BUTTONS TO OFF
  }


void loop() {


  int knobValue = analogRead(A0);
  int whichSection = map(knobValue, 0, 1023, 0, 12);
 // SECTION SPECIFIC LIGHTING OF LEDs
  if(whichSection == 0){
    ledSwitches[0] = 1;
    ledSwitches[1] = 0;
    ledSwitches[2] = 0;
    ledSwitches[3] = 0;
  }
  if(whichSection > 0 && whichSection < 5){
    ledSwitches[0] = 0;
    ledSwitches[1] = 1;
    ledSwitches[2] = 0;
    ledSwitches[3] = 0;
  }
  if(whichSection > 4 && whichSection < 9){
    ledSwitches[0] = 0;
    ledSwitches[1] = 0;
    ledSwitches[2] = 1;
    ledSwitches[3] = 0;
  }
  if(whichSection > 8 && whichSection < 13){
    ledSwitches[0] = 0;
    ledSwitches[1] = 0;
    ledSwitches[2] = 0;
    ledSwitches[3] = 1;
  }

  for (int i =0; i<NO_PINS; i++)
  {
    digitalWrite(ledPins[i],ledSwitches[i]);
  }


// SWITICHING THE BUTTON ON OR OFF TO OBTAIN THE STRING

  for(int i = 0; i< NO_BUTTONS; i++)
  {
  currentButtonState[i] = digitalRead(buttonPins[i]);
  Serial.println(currentButtonState[i]);
    if (currentButtonState[i] == 1 && previousButtonState[i] == 0){
      whichString = i;
//    tone(BUZZER_PIN, notes[whichString][whichSection], 400);      OPTION 2
//    delay(1);
  }
  previousButtonState[i] = currentButtonState[i];
  }


  int volumeValue = analogRead(A1);    //ATTEMPT AT MANIPULATING VOLUME
  int pwm = map(volumeValue, 54, 970, 0, 125);

  unsigned long currentTime = millis();


    tone(BUZZER_PIN, notes[whichString][whichSection], 50);
    delay(1);    //                                                 OPTION 1
    //analogWrite(11,pwm);
 // }

}
🧐 Process
While coding this project, I was confused on two design choices available to me. In the first one, the notes would be continuous and would not stop but just change. In the second one, the notes could only be heard if the button was pressed. In the end I could not make up by mind and so decided to showcase both of them instead 🙂
👀 Demo
This is the youtube video where I go in depth about the project (sorry for the length!).
😅 Difficulties and what’s next
At first, along with the whole bass guitar idea, I had also decided to add a feature in which you could control the volume of the tone being played out and after seeing a bunch of YouTube videos on it, I thought I would give it a shot. However, even after multiple events I was not able to implement it. I had thought of using the photo-resistor for this but either the wires would come along the way or the lights were not easy to manoeuvre, something or the other would not let the whole thing happen smoothly.
Another big issue was the smoothening of the tone heard, as is evident from the video, when I try the first method, the 8bit tune can get really annoying after sometime and so I would want to figure out how I can eliminate that, whenever I work on this project again.
🥳 But overall, it was quite fun and learned a lot about the tone reference and understood the concepts of the buttons, LED, potentiometer and even the electricity flowing in the circuit, much better!