Week 10: Arduino meets Processing

💡Idea

For this exercise, I wanted to play with colors (yes, I like them a lot) and use different sensory input to change the color of different elements in my Processing sketch. Just exploring different color combinations would make me happy already but I also wanted to add a simple goal to this game which is to manipulate the Arduino sensors in such a way that all objects have the same color so merge in one color blob.

✍🏼Process

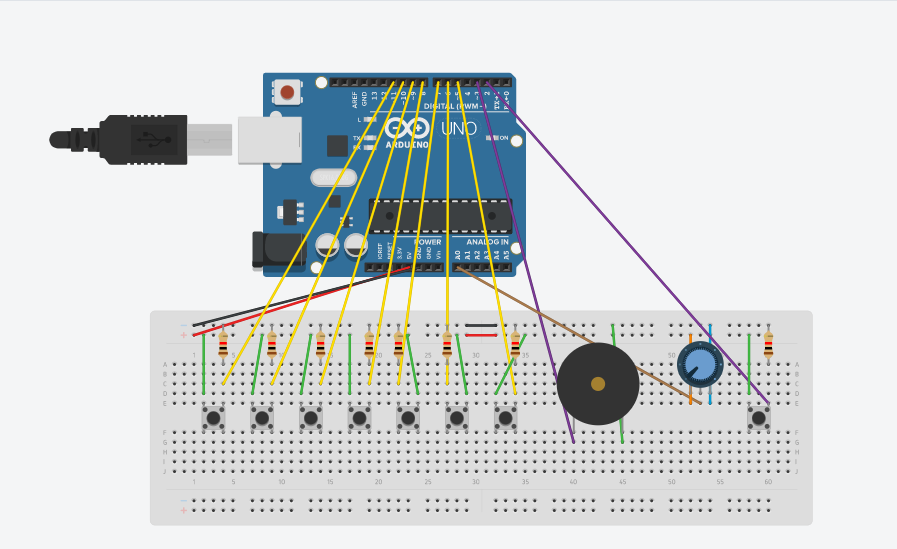
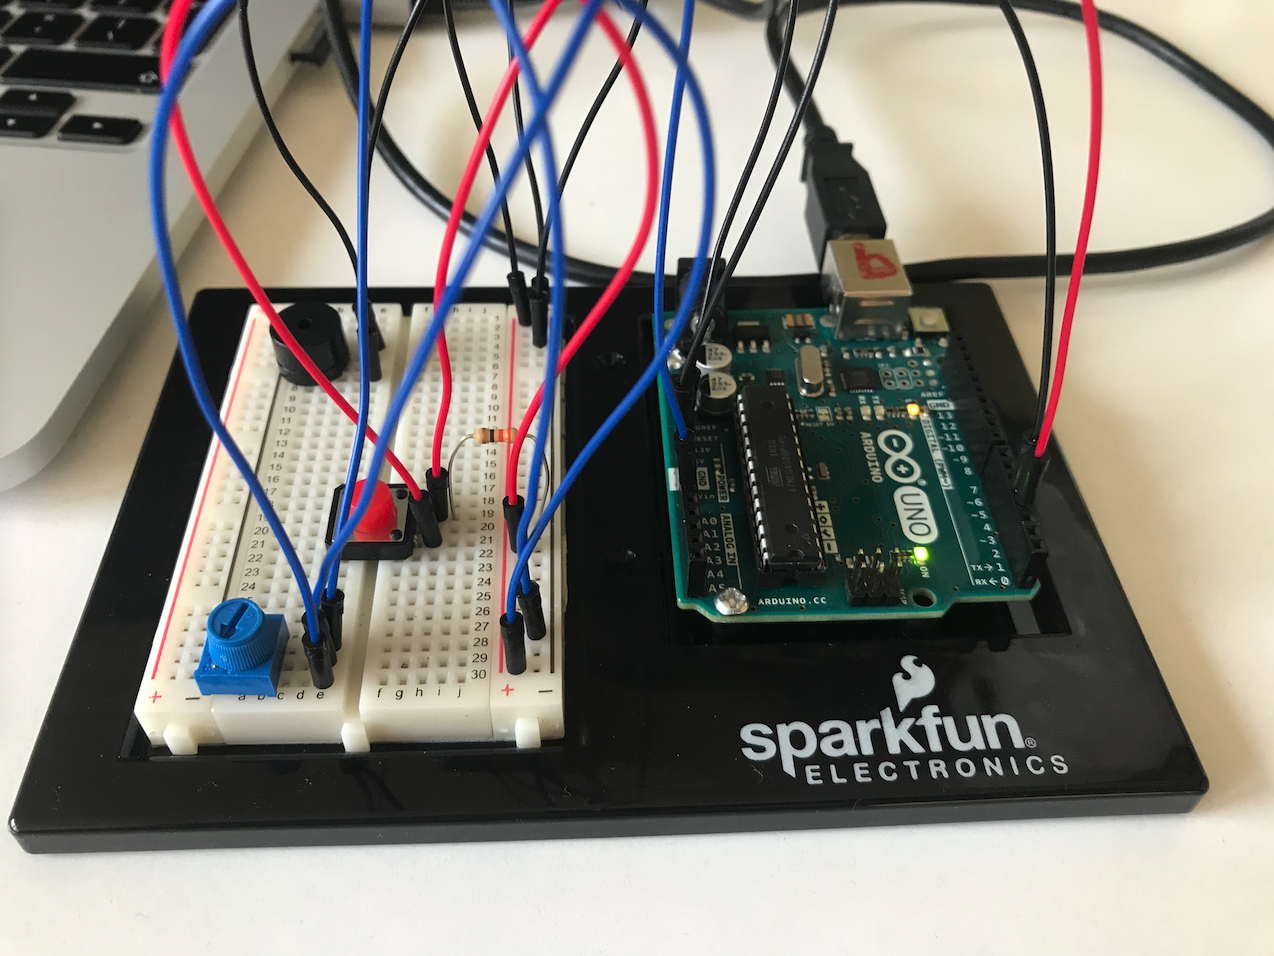
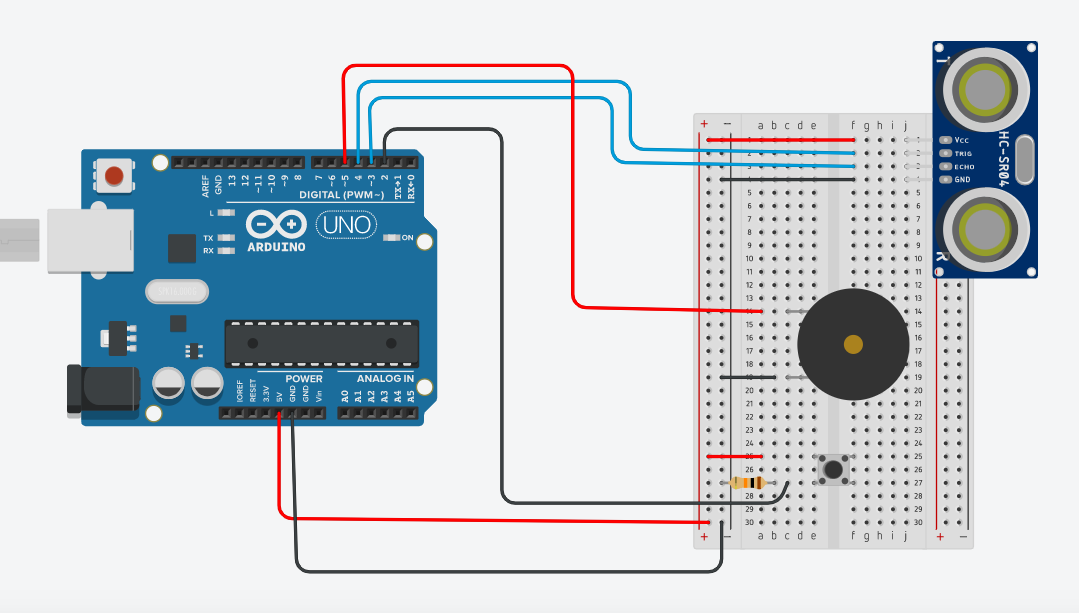
I built upon the “05_receiveInArduino” examples that we looked at in class. The potentiometer would be one way of input for color manipulation and I wanted to add the Distance Sensor of our kit for another source of input. For this, I looked up how to use it in the little booklet that came with the kit and also on the Arduino website and used their code. In my Processing sketch, I defined the colors of my elements (two lines of text, ellipse, stroke of ellipse, background) in such a way that they would at some position of the potentiometer all have the same color. Aaron helped me understand the mapping of the distance sensor but I did not yet figure out who to correctly map that input and use it in the Processing sketch for my intention so for now. I will look at this again. The LED was also intended to blink up when the game is solved but for that I would need the distance sensor input so now it is is simply on for 50% of the potentiometer range, and off for the other half. For now, enjoy a very easy to solve version of my game idea 🙂

🎭Outcome

const int trigPin = 11;           //connects to the trigger pin on the distance sensor
const int echoPin = 12;           //connects to the echo pin on the distance sensor

const int redPin = 3;             //pin to control the red LED inside the RGB LED
const int greenPin = 5;           //pin to control the green LED inside the RGB LED
const int bluePin = 6;            //pin to control the blue LED inside the RGB LED

float sensor2 = 0;               //stores the distance measured by the distance sensor

void setup() {
  // put your setup code here, to run once:
  Serial.begin(9600);
  Serial.println("0,0");
  pinMode(2,OUTPUT);

  //code for Distance Sensor taken from Arduino
  pinMode(trigPin, OUTPUT);   //the trigger pin will output pulses of electricity
  pinMode(echoPin, INPUT);    //the echo pin will measure the duration of pulses coming back from the distance sensor
}

void loop() {
  sensor2 = getDistance();   //variable to store the distance measured by the sensor
  sensor2 = map(sensor2, 0, 800, 0, 255);

  if(Serial.available()>0){
    int inByte=Serial.read();
    digitalWrite(2,inByte);
    int sensor = analogRead(A0);
    delay(1);
    int sensor2 = analogRead(A1);
    delay(50);
    Serial.print(sensor);
    Serial.print(',');
    Serial.println(sensor2);
  }
}

//code for Distance Sensor taken from Arduino
//------------------FUNCTIONS-------------------------------

//RETURNS THE DISTANCE MEASURED BY THE HC-SR04 DISTANCE SENSOR
float getDistance()
{
  float echoTime;                   //variable to store the time it takes for a ping to bounce off an object
  float calculatedDistance;         //variable to store the distance calculated from the echo time

  //send out an ultrasonic pulse that's 10ms long
  digitalWrite(trigPin, HIGH);
  delayMicroseconds(10);
  digitalWrite(trigPin, LOW);

  echoTime = pulseIn(echoPin, HIGH);      //use the pulsein command to see how long it takes for the
                                          //pulse to bounce back to the sensor

  calculatedDistance = echoTime / 148.0;  //calculate the distance of the object that reflected the pulse (half the bounce time multiplied by the speed of sound)

  return calculatedDistance;              //send back the distance that was calculated
}


/* Processing Code

import processing.serial.*;
Serial myPort;
int xPos=0;
int yPos=0;
boolean onOff=false;

void setup() {
  size(255, 720);
  printArray(Serial.list());
  String portname=Serial.list()[5]; //add my port here
  println(portname);
  myPort = new Serial(this, portname, 9600);
  myPort.clear();
  myPort.bufferUntil('\n');
}

void draw() {
  background(xPos, 0, 255);
  strokeWeight(10);
  stroke(0, xPos, 255); //eventually: this uses input from sensor2
  fill(255, 0, xPos);
  ellipse(xPos, height/2, 50, 50);
  //instruction text
  textSize(32);
  text("Align the colors", 5, 30);
  fill(0, xPos, 255);
  textSize(17);
  text("& make everything disappear", 6, 60);
  fill(0, xPos*2, 255);

  if (xPos >= 126) //eventually: xPos == yPos
    onOff=true;
  else
    onOff=false;
}

void serialEvent(Serial myPort) {
  String s=myPort.readStringUntil('\n');
  s=trim(s);
  if (s!=null) {
    int values[]=int(split(s, ','));
    if (values.length==2) {
      xPos=(int)map(values[0], 0, 1023, 0, width);
      //yPos=(int)map(values[1],0,1023,0, height);
      yPos=(int)map(values[0], 0, 1023, 0, height);
    }
  }
  myPort.write(int(onOff));
}

 */


Arduino + Processing Game

I had a really fun time exploring the serial communication between Arduino and Processing this week! My project was inspired by the R, G, B color mapping on Arduino buttons, and without further ado, let me explain what I did.

💡 idea

I wanted to figure out a way, in which I could use my Arduino as a joystick for the Processing game. I started off with some LEDs and a potentiometer, but then decided that I would like to try something different than what we did in class last Wednesday. After that, I wired three buttons on the breadboard, and the colors of the buttons immediately reminded me of the (R, G, B) color mapping. I decided to create a movement game and use my buttons as a joystick for moving whatever I have in my Processing console.

When a player starts the Processing sketch, they will see a rectangle on the console, and whenever each button is pressed, the rectangle changes color and moves to a particular side of the screen. The player’s score increments if the rectangle “hits” the side of the screen.

🛠 process

One of the main challenges while implementing this game was to figure out a way to transfer multiple serial communication bits into Processing. At first, I thought I would create an array of bits that occur while pressing the buttons. However, as I was exploring this idea it seemed like I was overcomplicating it, and then I just tried sending a different type of serial message each time a different button is pressed. For example, if the red button is pressed, I send “1”; if the blue one is pressed, I send “2”, and so on.

After reading this serial communication from my Processing, I created a boolean variable to track which button is pressed. For each boolean variable, I then created corresponding code lines to run throughout the game to move the rectangle. When the rectangle reaches the end of the screen, it reappears on the console, and the game continues until they eventually get tired of playing 😅. Right now, there is no way to stop or restart the game without closing the program, but it could be something to think about as a next step.

🎲 demo

Arduino code:

int buttonR = 2;
int buttonB = 4;
int buttonG = 7;
int prevRState = 0;
int prevGState = 0;
int prevBState = 0;

void setup() {
  // put your setup code here, to run once:
  pinMode(buttonR, INPUT);
  pinMode(buttonG, INPUT);
  pinMode(buttonB, INPUT);
  
  Serial.begin(9600);
}

void loop() {
    // getting digital communication from buttons
    int buttonRState = digitalRead(buttonR);
    int buttonGState = digitalRead(buttonG);
    int buttonBState = digitalRead(buttonB);
    
    // read if the buttons are pressed
    int valueR = digitalRead(buttonR);
    int valueG = digitalRead(buttonG);
    int valueB = digitalRead(buttonB);
    
    // output for debugging
    Serial.print(valueR);
    Serial.print(valueG);
    Serial.print(valueB);

    if (buttonRState == 1 && prevRState == LOW){
      // send values if buttons are pressed
      Serial.write(valueR);
    }

    if (buttonGState == 1 && prevGState == LOW){
      // send values if buttons are pressed
      Serial.write(valueG+1);
    }

    if (buttonBState == 1 && prevBState == LOW){
      // send values if buttons are pressed
      Serial.write(valueB+2);
    }
    
    // track button states
    prevRState = buttonRState;
    prevGState = buttonGState;
    prevBState = buttonBState;
}

Processing code:

import processing.serial.*; // importing from library
Serial port; // creating a serial port object

int numBtns = 3;  // number of buttons
int locX, locY;  // position of each rectangle
int rectW, rectH; // width and height of each rectangle
int value = 0; // passed value
boolean isRed, isGreen, isBlue = false; // keep track of colors
int numCollide; // keep track of collisions

void setup(){
  size(500, 500);
  rectMode(CENTER);
  locX = 250;
  locY = 250;
  rectW = 100;
  rectH = 100;
  numCollide = 0;
  //printArray(Serial.list()); // debugging
  port = new Serial(this, Serial.list()[1], 9600); // initializing the port
}

void draw(){
  background(255);
  
  // initializing the game
  rect(locX, locY, rectW, rectH);
  displayScore();
  
  // green mode
  if (isGreen == true){
    rect(8, 250, rectW-80, height);
    locX-=5;
  }
  
  // red mode
  if (isRed == true){
    rect(490, 250, rectW-80, height);
    locX+=5;
  }
  
  // blue mode
  if (isBlue == true){
    rect(250, 10, width, rectH-80);
    locY-=5;
  }
  
  // start again
  reStart();
}

void serialEvent(Serial port){
  // reading from the port
  value = port.read();
  // change to red
  if (value == 1){
    fill(255, 0, 0);
    isRed = true;
    isBlue = false;
    isGreen = false;
  }
  /// change to green
  if (value == 2){
    fill(0, 255, 0);
    isRed = false;
    isBlue = false;
    isGreen = true;
  }
  // change to blue
  if (value == 3){
    fill(0, 0, 255);
    isRed = false;
    isBlue = true;
    isGreen = false;
  }
}

// restart each time the rectangle is caught
void reStart(){
  if (locX==-rectW || locY == -rectH || locX == width+rectW){
    numCollide++;
    locX = 250;
    locY = 250;
  }
}

// display the instructions and the score
void displayScore(){
  textAlign(CENTER);
  push();
    textSize(16);
    fill(0);
    text("Press any arduino button to start!", width/2, height-100);
  pop();
  push();
    textSize(32);
    fill(0);
    text("Score: " + numCollide, width/2, height-50);
  pop();
}


Week 9: Musical Instrument of “BEETHOVEN”

Being named Beethoven, I had to live up to my name somehow, so I decided to create a (very) mini piano.

What I had in mind was a button that acts as a switch, a potentiometer that affects the frequency of the notes, and seven buttons to be clicked as the basic fundamental notes (C4, D4, E4, F4, G4, A4, B4). So this is how I imagined my circuit to look like and it actually ended up being the same exact thing.

Interestingly, for this assignment, I faced challenges only in code and not in wiring at all. So I just kept changing my strategy of coding in order to suit what I was building.

So in my first trial, I used if conditions to play the notes according to the corresponding button. I made the potentiometer be like some kind of volume changer. When I tested the potentiometer only, it changed the volume from 0 to 255 perfectly and worked well using analogWrite().

I would write analogWrite(piezo, pwm) , where pwm is the mapped value of knobValue from 0 to 125.

When I used the buttons only and the function tone(), they worked perfectly fine and the switch worked too.

I would write tone(piezo, notes[i], 100).

But when I merged the two in code, it was weird. The switch button almost did not work, the buttons wouldn’t work if the switch was off, but the buzzer still produced some background noise all the time. In addition, the potentiometer would only turn on the keys after a certain point, and turn them before that, there was no spectrum but rather as if it was a switch. The circuit would only be silenced if the potentiometer was at 0 and while one of the keys was held.

In my second attempt, I tried to separate analogWrite() and tone() because I realized the two cannot work simultaneously on the same output device. So instead of changing volume I changed the frequency by keeping the range 0 to 1023 mapped into 0 to 100 and multiplying some of the keys by the mapped value (specifically the last button) and adding the value to the rest as you change the potentiometer.

But then I just felt like multiplying the frequencies by any number just produces an 8-bit very annoying sound, and adding the same number to them makes it actually hard to differentiate between them because they are all already not equal and have increasing values which differ by around 32 Hz. So I decided to dismiss the idea of changing the volume using the potentiometer like in trial 1 and stick to changing frequency like trial 2. I decided to make the mapping in range 0 to 32 (unlike trial 2) because that’s the average difference between them, and then I would add pwm to the first, 2*pwm to the second, 3*pwm to the third, … and so on, to keep the difference between them constant. I also chose a relatively low number so the tones could still be identifiable and fit in an instrument that can be bearable. I have to point out that the piezo that I have produces low quality sounds in any case so the videos might be a bit noisy.

The piano turned out to be not very enjoyable to be honest, but with more trials and better equipment, it could be improved and shaped into a more realistic one.

The code I used for this assignment:

#include "pitches.h"

int button = 2;                 //button pin

int key1 = 5;
int key2 = 6;
int key3 = 7;
int key4 = 8;
int key5 = 9;
int key6 = 10;
int key7 = 11;

int notes[7] = {NOTE_C4, NOTE_D4, NOTE_E4, NOTE_F4, NOTE_G4, NOTE_A4, NOTE_B4}; //standard notes

int piezo = 3;

bool prevButtonState = LOW;     //initializing button to be unpressed

bool gameOn = false;
 
int knob = A0;                  //pin of potentiometer
 
void setup() {
 
  pinMode(button, INPUT);         //button initialized as input
  
  pinMode(key1, INPUT);         //button initialized as input
  pinMode(key2, INPUT);         //button initialized as input
  pinMode(key3, INPUT);         //button initialized as input
  pinMode(key4, INPUT);         //button initialized as input
  pinMode(key5, INPUT);         //button initialized as input
  pinMode(key6, INPUT);         //button initialized as input
  pinMode(key7, INPUT);         //button initialized as input, these are the piano keys

  pinMode(piezo, OUTPUT);     //buzzer is output
  
  Serial.begin(9600);
}
 
void loop() {
  int buttonState = digitalRead(button);              //storing reading from button
  Serial.println(buttonState);
 
  if (buttonState == HIGH && prevButtonState == LOW) {      //if button is clicked change the piano states to their opposites
    gameOn = !gameOn;
    }
 
  if (gameOn == true) {           //if the piano were previously off then were turned on by button
      int knobValue = analogRead(knob);                   //store reading from photocell
      
      int button1 = digitalRead(key1);
      int button2 = digitalRead(key2);
      int button3 = digitalRead(key3);
      int button4 = digitalRead(key4);
      int button5 = digitalRead(key5);
      int button6 = digitalRead(key6);
      int button7 = digitalRead(key7);                    //read current values from buttons/keys

      byte pwm = map(knobValue, 0, 1023, 0, 32);          //mapping analog values into range of average difference between the standard notes
      Serial.println(knobValue);
      
      if (button1 == HIGH) {              //if button is pressed
        tone(piezo, notes[0] + pwm, 100);  //add to the standard frequency the corresponding value from potentiometer
      }

      if (button2 == HIGH) {
        tone(piezo, notes[1] + 2*pwm, 100);           //add twice the value from potentiometer to frequency
      }

      if (button3 == HIGH) {
        tone(piezo, notes[2] + 3*pwm, 100);           //add 3 times the values from potentiometer to frequency
      }

      if (button4 == HIGH) {
        tone(piezo, notes[3] + 4*pwm, 100);          //add 4 times the values from potentiometer to frequency
      }

      if (button5 == HIGH) {
        tone(piezo, notes[4] + 5*pwm, 100);         // add 5 times the values from potentiometer to frequency
      }

      if (button6 == HIGH) {
        tone(piezo, notes[5] + 6*pwm, 100);          //add 6 times the values from potentiometer to frequency
      }

      if (button7 == HIGH) {
        tone(piezo, notes[6] + 7*pwm, 100);          //add 7 times the values from potentiometer to frequency
      }

      if (button1 == LOW && button2 == LOW && button3 == LOW && button4 == LOW && button5 == LOW && button6 == LOW && button7 == LOW){
        analogWrite(piezo, 255);                    //if none of the buttons is pressed then make buzzer make no noise
      }

      
      delay(10);
    }
    
  else {
     analogWrite(piezo, 255);                       //if the switch is off turn buzzer off
    }
 
  prevButtonState = buttonState;                    //update prevButtonState in each loop
}


City of Stars ONLY player

For this week’s instrument assignment, I originally planned to make something similar to Ons and David’s project, where I use the ultrasonic proximity sensor to make a “keyboard” where I can play notes and music. However, as I saw their projects in class, I thought I might change mine up a little bit to avoid having similar projects.

First, my original idea was to have a digital input button that triggered sound whenever it was pressed. The sound played will be decided by the distance sensed by the ultrasonic proximity sensor. The distances correlated with an octave of notes.

A problem that I noticed with this approach, however, was that the music I played was usually chopped up. The interface required me to constantly remember where I have to put the “distance blocker”, and the sound of pressing the button interfered with the song every time I pressed it.

Due to these concerns, I decided that I want my project to just play ONE song, and the distance measurements won’t correlate to notes in order, but the order of the notes in the song. This way, as the “distance blocker” moves further, the song just progresses by itself, and the player could continue to hold down the button.

Tweaks

As I re-designed my project, one obvious problem that would arise is the length of the interface. The song I want to play is City of stars. To code all of the song into arduino, while correlating with distance is problematic. I can’t reduce the space given to each note because of sensitivity issues, where it’d be too hard for the player to control the distance. However, giving each note enough distance would also make the interface too long, and the player wouldn’t be able to reach the end of it.

The solution I came up with is to integrate a knob. The entire rotation of the knob is separated into three parts. When the knob is in the first part, the interface is programmed to play part 1 of the song. Similarly, the second part of the knob programs the interface to play part 2, and the same for part 3. This way I could (sort of) dynamically change the interface when I’m done with a part of the song.

Full code:

#include "pitches.h"

int trig = 7;
int echo = 6;
int piezo = 12;
int button = 2;
int buttonState = 0;

//part 1
int notes[11] = {G3, A3, AS3, D4, E4, F4, D4, E4, C4, D4, A3};
//part 2
int notes2[11] = {A3, AS3, D4, C4, D4, A3, A4, G4, D4, E4, C4};
//part 3
int notes3[11] = {C4, D4, A4, G4, F4, D4, 0, 0, 0, 0, 0};

void setup() {
  Serial.begin (9600);
  pinMode(trig, OUTPUT);
  pinMode(echo, INPUT);
  pinMode(button, INPUT);
}

void loop() {
  int time;
  int distance;

  digitalWrite(trig, HIGH);
  delay(0.01);
  digitalWrite(trig, LOW);
    
  time = pulseIn(echo, HIGH);
    
  //speed of sound = 343 m/s = 0.0343 cm/µs
  // distance = time * speed
  // "taken from David thank you David"
  distance = time * 0.0343 / 2;
//  Serial.print(distance);
//  Serial.println(" cm");

  int knobValue = analogRead(A0);
  Serial.println(knobValue);
  
  int note = map(distance, 2, 40, 0, 11);
  int note2 = map(distance, 2, 40, 0, 11);
  int note3 = map(distance, 2, 40, 0, 11);
  buttonState = digitalRead(button);
  
  if (buttonState == true){
    if (knobValue <= 1023 && knobValue >= 682){
      tone(piezo, notes[note]);
    }
    else if (knobValue < 682 && knobValue >= 341){
      tone(piezo, notes2[note2]);
    }
    else if (knobValue>=0 && knobValue < 341){
      tone(piezo, notes3[note3]);
    }
  }
  else if (buttonState == false){
    noTone(piezo);
  }
}

Arduino Layout

Demonstration

I’m gonna find them all :D

Seven nations army is a classic and that should never be questioned. It is also very repetitive which is helpful if you’re trying to make your Arduino board play it.

For this weeks assignment I created a knob steered Seven Nations Army player, where the users can go through the notes of the tune and play it themselves. I also introduced the breaks, where in-between the notes there are 0 notes, which emit no sounds. By doing that I gained manual control over the length of each note played. I also used a RED EMERGENCY BUTTON for when the speaker was getting to nerve wrecking. When the button is pressed no sounds is emitted 🙂

#include "pitches.h"

#define speaker 4
#define btn 3
#define knob 2

int whichNote = 0;
int knobValue;
int lastNote = 14;

int notes[15] = {0, NOTE_E2, 0, NOTE_E2, 0, NOTE_G2, 0, NOTE_E2, 0, NOTE_D2, 0, NOTE_C2, 0, NOTE_B1, 0};

void setup() {
  pinMode (btn, INPUT);
  Serial.begin (9600);
}

void loop() {
  if (digitalRead(btn) == LOW) {
    whichNote = map(analogRead(A0), 0, 1023, 0, 14);
    tone(4, notes[whichNote], 1000);
  }

  if (whichNote == lastNote) {
    int i, k, t;
    int n = sizeof(notes) / sizeof(notes[0]);
    for (i = 0; i < n / 2; i++) {
      t = notes[i];
      notes[i] = notes[n - i - 1];
      notes[n - i - 1] = t;
    }
    if (lastNote == 0) {
      lastNote = 14;
    }
    else {
      lastNote = 0;
    }
  }
}


Keyboard/Theremin – Distance Measuring Sensor

introduction

When we were still working with processing, I made a keyboard simulator for one of my assignments. However, it wasn’t very practical. It was controlled with the arrow keys and space bar, meaning it took some time to travel between notes. So, for this week’s assignment, I decided to redo it with Arduino and a distance measuring sensor. A note will play based on the distance of an object/your hand from the sensor.

The sensor resulted in some noise, so I marked the exact spot where each note would sound decent, using lines on some papers, as shown here:

circuit And functionality

This is how the wiring goes:

As mentioned, I used a distance measuring sensor to (obviously) measure the distance of some object from the sensor. The range of the distance is limited (using constrain and map).
I also used a button. This is used to activate the sound when pressed. This is useful to control the length of a note since the note stops playing when the button is not pressed.
Finally, there is a buzzer which produces the sounds. It is only triggered when the button is pressed and when the object is within the distance range. It plays a specific note based on the distance from the sensor.

difficulties

The wiring for this assignment was quite straightforward. My main struggle this week was with the code. Even though it is brief, it took me a lot of time, trial, and error to figure out how to:

        • initialize the sensor
        • try to eliminate the noise as much as possible with the distance.

Even though I tried my best to eliminate the noise, I wasn’t able to fully do that, that’s why I marked the spot where the note would play clearly with a line for each note.

Code

#include "pitches.h"

int button = 2;
int sensorEcho = 3;
int sensorTrig = 4;
int buzzer = 5;
long distance;
long duration;
int buttonState;

int notes[8] = {NOTE_C4, NOTE_D4, NOTE_E4, NOTE_F4, NOTE_G4, NOTE_A4, NOTE_B4, NOTE_C5};

void setup() {
  // put your setup code here, to run once:
  
  Serial.begin(9600);
  pinMode(sensorEcho,INPUT);
  pinMode(sensorTrig,OUTPUT);
  pinMode(button, INPUT);
  pinMode(buzzer, OUTPUT);
  
}

void loop() {
  // put your main code here, to run repeatedly:
  buttonState = digitalRead(button);
  
  //initializing the distance measuring sensor
  digitalWrite(sensorTrig,HIGH);
  delayMicroseconds(1000);
  digitalWrite(sensorTrig, LOW);
  duration=pulseIn(sensorEcho, HIGH); 
  distance =constrain((duration/2)/29.1 ,4,81); //getting the distance value
  delay(10);
   
////  Serial.println(temp);
//
//  Serial.print(duration);
//  Serial.print(" , ");
//  Serial.println(distance);

  //if the button is not pressed or you are outside of the distance range
  if (buttonState == LOW || distance < 3 || distance > 80) 
  {
    noTone(buzzer); //the buzzer will not play anything
  }
  //if the button is pressed and you are within the distance range
  else if (buttonState == HIGH) 
  {
    int note = map(distance, 4, 81, 0, 8); //determine which note to play based on the distance
    tone(buzzer, notes[note]); //play the note
  }
}

//pitches.h
/*************************************************

 * Public Constants

 *************************************************/


#define NOTE_B0  31
#define NOTE_C1  33
#define NOTE_CS1 35
#define NOTE_D1  37
#define NOTE_DS1 39
#define NOTE_E1  41
#define NOTE_F1  44
#define NOTE_FS1 46
#define NOTE_G1  49
#define NOTE_GS1 52
#define NOTE_A1  55
#define NOTE_AS1 58
#define NOTE_B1  62
#define NOTE_C2  65
#define NOTE_CS2 69
#define NOTE_D2  73
#define NOTE_DS2 78
#define NOTE_E2  82
#define NOTE_F2  87
#define NOTE_FS2 93
#define NOTE_G2  98
#define NOTE_GS2 104
#define NOTE_A2  110
#define NOTE_AS2 117
#define NOTE_B2  123
#define NOTE_C3  131
#define NOTE_CS3 139
#define NOTE_D3  147
#define NOTE_DS3 156
#define NOTE_E3  165
#define NOTE_F3  175
#define NOTE_FS3 185
#define NOTE_G3  196
#define NOTE_GS3 208
#define NOTE_A3  220
#define NOTE_AS3 233
#define NOTE_B3  247
#define NOTE_C4  262
#define NOTE_CS4 277
#define NOTE_D4  294
#define NOTE_DS4 311
#define NOTE_E4  330
#define NOTE_F4  349
#define NOTE_FS4 370
#define NOTE_G4  392
#define NOTE_GS4 415
#define NOTE_A4  440
#define NOTE_AS4 466
#define NOTE_B4  494
#define NOTE_C5  523
#define NOTE_CS5 554
#define NOTE_D5  587
#define NOTE_DS5 622
#define NOTE_E5  659
#define NOTE_F5  698
#define NOTE_FS5 740
#define NOTE_G5  784
#define NOTE_GS5 831
#define NOTE_A5  880
#define NOTE_AS5 932
#define NOTE_B5  988
#define NOTE_C6  1047
#define NOTE_CS6 1109
#define NOTE_D6  1175
#define NOTE_DS6 1245
#define NOTE_E6  1319
#define NOTE_F6  1397
#define NOTE_FS6 1480
#define NOTE_G6  1568
#define NOTE_GS6 1661
#define NOTE_A6  1760
#define NOTE_AS6 1865
#define NOTE_B6  1976
#define NOTE_C7  2093
#define NOTE_CS7 2217
#define NOTE_D7  2349
#define NOTE_DS7 2489
#define NOTE_E7  2637
#define NOTE_F7  2794
#define NOTE_FS7 2960
#define NOTE_G7  3136
#define NOTE_GS7 3322
#define NOTE_A7  3520
#define NOTE_AS7 3729
#define NOTE_B7  3951
#define NOTE_C8  4186
#define NOTE_CS8 4435
#define NOTE_D8  4699
#define NOTE_DS8 4978

final outcome

This is the final outcome.
In the end, I tried (TRIED) to demonstrate how this works by playing a small snippet of a song. However, I’m pretty sure the song is only clear to me because I already know what it is (haha), let me know if you can tell what song it is.


Musical instrument with an ultrasonic distance sensor

This week’s assignment was my favorite arduino task thus far. I think it’s because the final outcome seems more reusable for other creative tasks. I used an ultrasonic distance sensor, a push button, and a piezo buzzer to emulate the interactive artwork Aaron once introduced to us in the beginning of the course (tried to find the artwork to show what I was inspired by but was never successful…).

The way it works is very simple. The push button initiates the sound, so only when the button is pressed down, you will be able to hear the notes. You can variate the distance between your hand (or any surface) and the ultrasonic distance sensor to create 3 different notes – middle C (~10 cm), middle D (~15 cm), and middle E (~20 cm). The hand should not move away from the sensor for more than 20 cm for the sound to be activated. Once these conditions are met, the buzzer will emit sound that is corresponding to the notes described above.

While making this instrument, it was important to note the formula for distance that sound travels. This was crucial for me to determine the distance range for each note. Another thing I had to be aware is the fact that echo pin takes in the number for total distance of the sound travel. In other words, I had to be aware that this number represented the round-trip of the sound against the surface and that it had to be halved to obtain the actual distance between the sensor and the object.

Without further ado, here is the video of my working instrument. Please bear in mind that I changed the note after making this video and the notes are now slightly lower and more accurate (Do, Re, Mi).

#define NOTE_C4  262
#define NOTE_D4  294
#define NOTE_E4  330

int trig = 13;
int echo = 12;
int piezo = 11;
int buttonPin = 3;
int buttonState = 0;

void setup() {
    Serial.begin (9600);
    pinMode(trig, OUTPUT);
    pinMode(echo, INPUT);
    pinMode(buttonPin, INPUT);
}

void loop() {
    int time;
    int distance;
    
    digitalWrite(trig, HIGH);
    delay(0.01);
    digitalWrite(trig, LOW);
    
    time = pulseIn(echo, HIGH);
    
    //speed of sound = 343 m/s = 0.0343 cm/µs
    // distance = time * speed
    distance = time * 0.0343 / 2; // sound wave travels forward and bounces backward.

    Serial.print(distance);
    Serial.println(" cm");

    buttonState = digitalRead(buttonPin);

    if( buttonState == HIGH ) {
      if (distance > 20 || distance < 0){
        noTone(piezo);
        }
      else if (distance < 10){
        tone(piezo, NOTE_C4);
        }
      else if (distance < 15){
        tone(piezo, NOTE_D4);
        }
      else{
        tone(piezo, NOTE_E4);  
        }
    }
    else {
      noTone(piezo);
    }
    delay(100);
}


Week 9: Creating an Instrument

As a singer, one of the things I struggle with is finding nice harmonies, as I am really new at that. That’s what inspired me to create an instrument where you can pick a note, and fine the Soprano, Alto, Tenor, and Bass notes for it.

I decided to go for a range of notes that was close to my vocal range, so I went for 15 notes, from D3 to A5. I set up 4 buttons, one resembling each note, soprano being the original melody. The goal was to use the Potentiometer to pick a note, listen to it with the red button (soprano), and then find the 4 part harmony with the other buttons. In the end I should be able to press all four, and hear the harmony.

I mapped the analogue to match the notes I wanted to use, and each button just jumped a few notes from the original, to be a harmony. I only went through a few hours of debugging and creating this, but when I finished I encountered an obstacle i didn’t know how to fix. My sound was very muffled. When I would only have 1 button in use in the code, the sound would be fine. When I tried the code one button at a time, each button worked perfectly. But when I put it together, the sound sounded muffled, laggy, and muddy. The notes also didn’t come outright. At first I realised i had the resistor in the wrong place in some buttons, so when I fixed that it helped, but the issue didnt seem to go away anymore. Im not sure if this is an issue with the button being so small, or not.

#include "pitches.h"
int knob = A0;
int soprano = 11;
int alto = 10;
int tenor = 9;
int bass = 8;

int notes [15] = {NOTE_D3 , NOTE_E3 , NOTE_F3 , NOTE_G3 , NOTE_A4 , NOTE_B4 , NOTE_C4 , NOTE_D4 , NOTE_E4 , NOTE_F4 , NOTE_G4 , NOTE_A5};
//int whichNote = 0;

void setup() {
  pinMode(soprano, INPUT);
  pinMode(alto, INPUT);
  pinMode(tenor, INPUT);
  pinMode(bass, INPUT);
  Serial.begin(9600);
  // put your setup code here, to run once:
}

void loop() {

// put your main code here, to run repeatedly:
int knobValue = analogRead(knob);
int sopranoState = digitalRead(soprano);
int altoState = digitalRead(alto);
int tenorState = digitalRead(tenor);
int bassState = digitalRead(bass);
Serial.println (sopranoState);

//mapping the potentiometer values from 0 - 800 for easy reference
int mappedValue =  map(knobValue, 0, 1023, 0, 15);
//
if (sopranoState == HIGH) {
  tone(4, notes[mappedValue]);
  } else {
    tone(4, 0);
  }
if (altoState == HIGH) {
  tone(4, notes[(mappedValue -2 )]);
  } else {
    tone(4, 0);
  }
if (tenorState == HIGH) {
  tone(4, notes[(mappedValue- 6)]);
  } else {
    tone(4, 0);
  }
if (bassState == HIGH) {
  tone(4, notes[(mappedValue- 8)]);
  } else {
    tone(4, 0);
  }
}


Each one on its own:

All together:

Week 9: Happy Birthday?

Intro + Initial Attempts

This week’s assignment was quite challenging! I tried many things and had to change up details in my idea a lot to get it to work. I was really inspired by the Sound Wall example from Peter Vogel and wanted to incorporate that in the assignment so I can play around with both the photoresistor and the servo motor. Initially, I coded my servo to automatically keep sweeping from left to right, over the photoresistor. I had a small piece of paper taped on my servo arm to cast a shadow over the photoresistor.

 The goal was to have a song playing, and then whenever the arm is over the photoresistor, the song switches to a lower octave to simulate a darker sound. The issue I had here is that the code for sweeping the servo arm relied on the delay(), and I think that interfered with triggering the buzzer in a regular manner.


//sweep code from Arduino Reference//
  for (pos = 0; pos <= 180; pos += 1) { // goes from 0 degrees to 180 degrees
    // in steps of 1 degree
    servo.write(pos);              // tell servo to go to position in variable 'pos'
    //delay(40);                       // waits 40ms for the servo to reach the position
  }
  for (pos = 180; pos >= 0; pos -= 1) { // goes from 180 degrees to 0 degrees
    servo.write(pos);              // tell servo to go to position in variable 'pos'
    //delay(40);                       // waits 40ms for the servo to reach the position
}

So, I decided to move the servo arm in an analog matter using the potentiometer and was presented with a second issue. I struggled with having the music playing all the time simultaneously with moving the servo, so I couldn’t have it switch between songs like I had imagined. I’m still a bit confused about how the movement of the servo interferes with the buzzer functions and how to navigate that and want to look into that.

Final Idea

So, I decided to make an “instrument” that plays Happy Birthday when the photoresistor reads a high value of intensity, and then when the knob is turned and the servo arm casts a shadow over the photoresistor the song stops. Then, when the photoresistor detects light again, it starts the song from the beginning.

Here’s my set-up, I used the eraser to elevate my servo!


Here’s a demo:

As you can see, my buzzer is lagging which presented another issue that I’m confused about. The durations of the notes are accurate, and I used the concept of the rate that we covered in class which makes me question if moving a servo and playing the buzzer at the same time causes this.


For the digital input, I used a switch. If the switch is flipped, it moves the servo arm to cover the photoresistor and doesn’t allow the user to move the arm, turning the music off and locking the device.

Overall, brainstorming adding a lot of interacting elements was a lot of fun for me! I would love to find a way to make my initial idea (where the pitches lower in response to shadow) work, though.

Here’s my circuit diagram and code:


#include "pitches.h"
#include <Servo.h>

Servo servo;
//defining photoresistor pin
int photoResistor = A1;
//potentiometer
int potenKnob = A0;
//buzzer pin
int buzzerLoc = 4;
//switch pin
int switchPin = 6;


//array for birthday song notes
int notes[25] = {NOTE_C5, NOTE_C5, NOTE_D5, NOTE_C5, NOTE_F5, NOTE_E5, NOTE_C5, NOTE_C5, NOTE_D5, NOTE_C5, NOTE_G5, NOTE_F5, NOTE_C5, NOTE_C5, NOTE_C6, NOTE_A5, NOTE_F5, NOTE_E5, NOTE_D5, NOTE_AS5, NOTE_AS5, NOTE_A5, NOTE_F5, NOTE_G5, NOTE_F5};
//array for the duration of each note
int durations[25] = {8, 8, 4, 4, 4, 2, 8, 8, 4, 4, 4, 2, 8, 8, 4, 4, 4, 4, 4, 8, 8, 4, 4, 4, 2};

//variable to keep track of which note in the song is playing
int whichNote = 0;


void setup() {
  servo.attach(2);
  Serial.begin(9600);
  pinMode(switchPin, INPUT);

}

void loop() {
  //variable to read the switch state
  int switchState = digitalRead(switchPin);

  //variable that reads from the photoresistor
  int prVal = analogRead(photoResistor);
  //variable to check previous photoresistor value
  int prevPrVal;
  //reading the potentiometer location
  int knobValue = analogRead(potenKnob);
  //mapping to 180 cause it's being used to move the servo
  int mappedKnobValue = map(knobValue, 0, 1023, 0, 180);

  //moving the servo
  servo.write(mappedKnobValue);

  //rate at which the music is meant to play, settled 600 after trial and error
  int rate = 600 / durations[whichNote];


  //condition that checks if servo arm is above photoresistor
  if (prVal >= 800) {
  //condition that checks if the photoresistor was previously covered, so the song starts over when the arm moves, rather than resuming from the middle
    if (prevPrVal < 800) {
      whichNote = 0; //back to beginning
    }

    if (millis() % rate == 0) { //condition to move through each note
      tone(buzzerLoc, notes[whichNote], rate); //plays the note by referring to the note from the array
      whichNote = (whichNote + 1) % 25; //to loop through the song
      delay(1);

    }


  }
  //condition that checks digital input from switch,
  if (switchState == HIGH) { //if the switch is flipped, the instrument is "locked" and no one can play the song by moving the potentiometer knob
    servo.writeMicroseconds(2100); //writing a value to the servo to move it digitally
  }
  prevPrVal  = prVal; //setting the current photoresistor reading to the previous variable, to check next time


}