
For this week’s project, I had the choice of making a physical input or output, given that I just needed to use the serial monitor to connect between Arduino and Processing. So I decided to make an LED controller that would switch on if you press the button for each one, and would turn off if you pressed an “off” button.
Overall it was not bad, but I had a few mistakes especially since I was using a new library and I had to get used to the syntax. Also, when I created the functions for each of the buttons, I didn’t know the names had to match but that was silly of me, since the functions wouldn’t work obviously if the names didn’t match. Finally, it was interesting to see that when Processing uses the “COM4” port that my Arduino is linked to, I cannot open the Serial Monitor in Arduino since it says that my Serial Port is busy (probably used in Processing).
The program is simple: it uses characters transferred within the Serial Monitor to communicate between the hardware and the software. The functions in Processing write on the port the characters that match with the buttons, then the Arduino reads those characters and if they match with each LED color (code in Arduino) the corresponding lights will turn on.
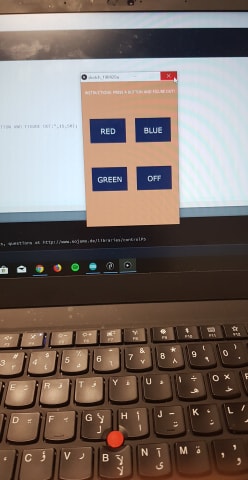
Below is the code, the pictures, and a video of me testing it out!
Arduino:
void setup(){
  pinMode(8,OUTPUT);
  pinMode(9,OUTPUT);
  pinMode(10,OUTPUT);

  Serial.begin(9600);
}

void loop(){

   if(Serial.available()){
    char val = Serial.read();

    if(val == 'r'){
      digitalWrite(8,HIGH);
    }
    if(val == 'b'){
      digitalWrite(9,HIGH);
    }
    if(val == 'g'){
      digitalWrite(10,HIGH);
    }
    if(val == 'f'){
      digitalWrite(8,LOW);
      digitalWrite(9,LOW);
      digitalWrite(10,LOW);
    }
    }
   }
Processing:
import controlP5.*;
import processing.serial.*;

Serial port;
ControlP5 a;
PFont b;
void setup(){
  size(400,600);

  printArray(Serial.list()); //print available ports
  port = new Serial(this,"COM4",9600); //connection time!
  a = new ControlP5(this);
  b = createFont("Verdana",30);//bigger font to put for the buttons


  //buttons:
  a.addButton("red") //name
    .setPosition(30,150) //position
    .setSize(150,100) //size
    .setFont(b) //font
    ;
  a.addButton("blue")
    .setPosition(220,150)
    .setSize(150,100)
    .setFont(b)
    ;
  a.addButton("green")
    .setPosition(30,350)
    .setSize(150,100)
    .setFont(b)
    ;
  a.addButton("off")
    .setPosition(220,350)
    .setSize(150,100)
    .setFont(b)
    ;
}

void draw(){
  background(227,154,118);
  textSize(15);
  text("INSTRUCTIONS: PRESS A BUTTON AND FIGURE OUT!",15,50);


}

void red(){
  port.write('r');
}
void blue(){
  port.write('b');
}
void green(){
  port.write('g');
}
void off(){
  port.write('f'); //press f in chat
}
Images:
 The LEDs:
Video: