
- peter vogel https://vimeo.com/19780802
- field: jacks performance: https://vimeo.com/149364292
- giant instrument: https://vimeo.com/95706212
- nyc subway: https://www.youtube.com/watch?v=QjwxE_kI5wA
- interface example: https://www.youtube.com/watch?v=5B-0zGBwMx4
- me robospiel: https://vimeo.com/50586230
- servo drum machine: https://www.youtube.com/watch?v=EXgQfelajZc
- servo harp: https://www.youtube.com/watch?v=CtvZJb9VMkE
- block example: https://www.youtube.com/watch?v=0HobOt06gOI
- chordocentric: http://loisliow.netii.net/project2.html
Category: Spring 2021
Serial Communication
int left = 0;
int right = 0;

void setup() {
  Serial.begin(9600);
  Serial.println("0,0");
  pinMode(2, OUTPUT);
  pinMode(5, OUTPUT);
}

void loop() {
  while (Serial.available()) {
    right = Serial.parseInt();
    left = Serial.parseInt();
    if (Serial.read() == '\n') {
      digitalWrite(2, right);
      digitalWrite(5, left);
      int sensor = analogRead(A0);
      delay(1);
      int sensor2 = analogRead(A1);
      delay(1);
      Serial.print(sensor);
      Serial.print(',');
      Serial.println(sensor2);
    }
  }
}

/*

import processing.serial.*;
Serial myPort;
int xPos=0;
int yPos=0;
boolean onOff=false;
boolean onOff2=false;

void setup(){
  size(960,720);
  printArray(Serial.list());
  String portname=Serial.list()[1];
  println(portname);
  myPort = new Serial(this,portname,9600);
  myPort.clear();
  myPort.bufferUntil('\n');
}

void draw(){
  background(255);
  ellipse(xPos,yPos,30,30);
  if (mousePressed){
    if(mouseX<=width/2)
      onOff2=true;
    else
      onOff=true;
  }else{
    onOff=onOff2=false;
  }
}

void serialEvent(Serial myPort){
  String s=myPort.readStringUntil('\n');
  s=trim(s);
  if (s!=null){
    println(s);
    int values[]=int(split(s,','));
    if (values.length==2){
      xPos=(int)map(values[0],0,1023,0, width);
      yPos=(int)map(values[1],0,1023,0, height);
    }
  }
  myPort.write(int(onOff)+","+int(onOff2)+"\n");
}

 */
All serial examples: https://github.com/aaronsherwood/introduction_interactive_media/tree/master/arduinoExamples/serialExamples
-
make something that uses only one sensor on arduino and makes the ellipse in processing move on the horizontal axis, in the middle of the screen, and nothing on arduino is controlled by processing
-
make something that controls the LED brightness from processing
-
take the gravity wind example below and make it so every time the ball bounces one led lights up and then turns off, and you can control the wind from one analog sensor
PVector velocity;
PVector gravity;
PVector position;
PVector acceleration;
PVector wind;
float drag = 0.99;
float mass = 50;
float hDampening;

void setup() {
  size(640,360);
  noFill();
  position = new PVector(width/2, 0);
  velocity = new PVector(0,0);
  acceleration = new PVector(0,0);
  gravity = new PVector(0, 0.5*mass);
  wind = new PVector(0,0);
  hDampening=map(mass,15,80,.98,.96);
}

void draw() {
  background(255);
  if (!keyPressed){
    wind.x=0;
    velocity.x*=hDampening;
  }
  applyForce(wind);
  applyForce(gravity);
  velocity.add(acceleration);
  velocity.mult(drag);
  position.add(velocity);
  acceleration.mult(0);
  ellipse(position.x,position.y,mass,mass);
  if (position.y > height-mass/2) {
      velocity.y *= -0.9;  // A little dampening when hitting the bottom
      position.y = height-mass/2;
    }
}

void applyForce(PVector force){
  // Newton's 2nd law: F = M * A
  // or A = F / M
  PVector f = PVector.div(force, mass);
  acceleration.add(f);
}

void keyPressed(){
  if (keyCode==LEFT){
    wind.x=-1;
  }
  if (keyCode==RIGHT){
    wind.x=1;
  }
  if (key==' '){
    mass=random(15,80);
    position.y=-mass;
    velocity.mult(0);
  }
}
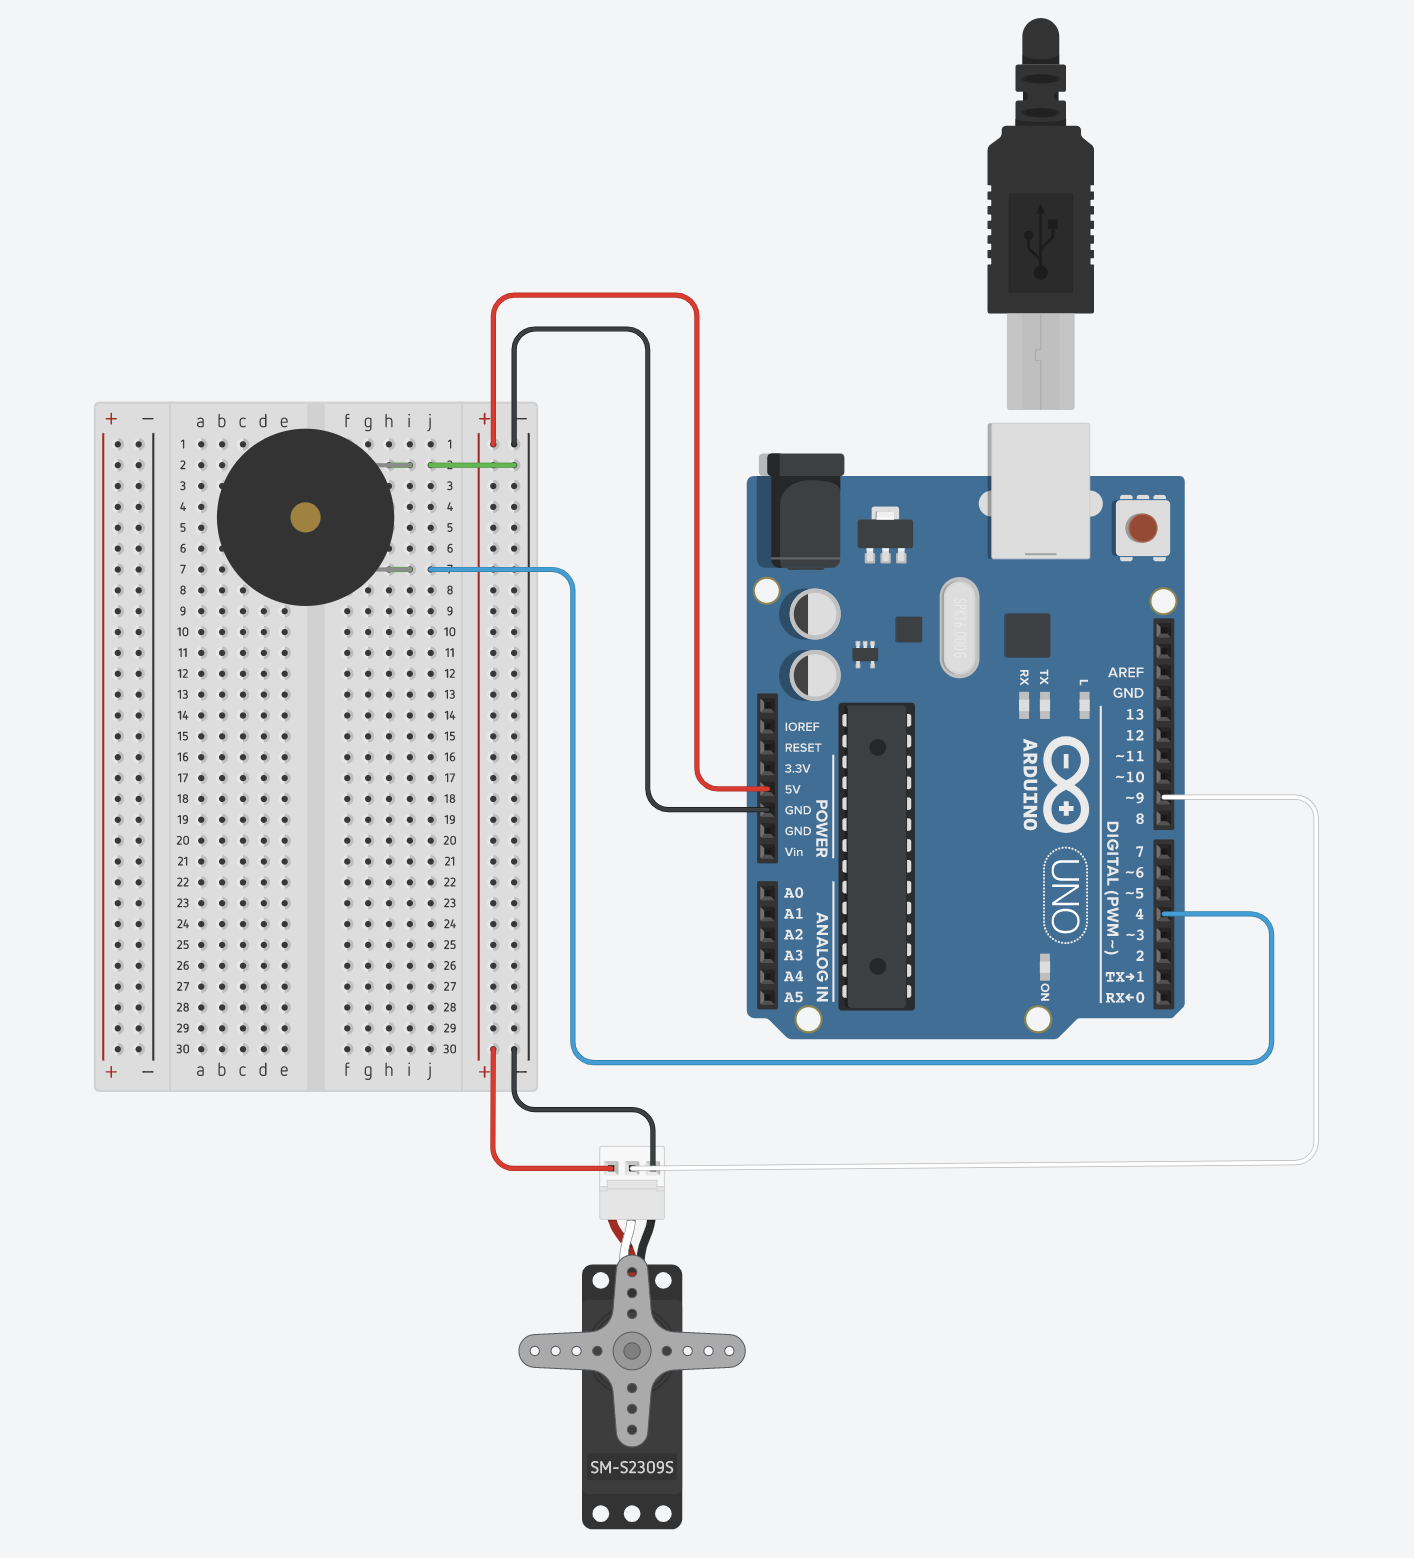
Servo and Tone
pitches.h:
/*************************************************

 * Public Constants

 *************************************************/

#define NOTE_B0  31
#define NOTE_C1  33
#define NOTE_CS1 35
#define NOTE_D1  37
#define NOTE_DS1 39
#define NOTE_E1  41
#define NOTE_F1  44
#define NOTE_FS1 46
#define NOTE_G1  49
#define NOTE_GS1 52
#define NOTE_A1  55
#define NOTE_AS1 58
#define NOTE_B1  62
#define NOTE_C2  65
#define NOTE_CS2 69
#define NOTE_D2  73
#define NOTE_DS2 78
#define NOTE_E2  82
#define NOTE_F2  87
#define NOTE_FS2 93
#define NOTE_G2  98
#define NOTE_GS2 104
#define NOTE_A2  110
#define NOTE_AS2 117
#define NOTE_B2  123
#define NOTE_C3  131
#define NOTE_CS3 139
#define NOTE_D3  147
#define NOTE_DS3 156
#define NOTE_E3  165
#define NOTE_F3  175
#define NOTE_FS3 185
#define NOTE_G3  196
#define NOTE_GS3 208
#define NOTE_A3  220
#define NOTE_AS3 233
#define NOTE_B3  247
#define NOTE_C4  262
#define NOTE_CS4 277
#define NOTE_D4  294
#define NOTE_DS4 311
#define NOTE_E4  330
#define NOTE_F4  349
#define NOTE_FS4 370
#define NOTE_G4  392
#define NOTE_GS4 415
#define NOTE_A4  440
#define NOTE_AS4 466
#define NOTE_B4  494
#define NOTE_C5  523
#define NOTE_CS5 554
#define NOTE_D5  587
#define NOTE_DS5 622
#define NOTE_E5  659
#define NOTE_F5  698
#define NOTE_FS5 740
#define NOTE_G5  784
#define NOTE_GS5 831
#define NOTE_A5  880
#define NOTE_AS5 932
#define NOTE_B5  988
#define NOTE_C6  1047
#define NOTE_CS6 1109
#define NOTE_D6  1175
#define NOTE_DS6 1245
#define NOTE_E6  1319
#define NOTE_F6  1397
#define NOTE_FS6 1480
#define NOTE_G6  1568
#define NOTE_GS6 1661
#define NOTE_A6  1760
#define NOTE_AS6 1865
#define NOTE_B6  1976
#define NOTE_C7  2093
#define NOTE_CS7 2217
#define NOTE_D7  2349
#define NOTE_DS7 2489
#define NOTE_E7  2637
#define NOTE_F7  2794
#define NOTE_FS7 2960
#define NOTE_G7  3136
#define NOTE_GS7 3322
#define NOTE_A7  3520
#define NOTE_AS7 3729
#define NOTE_B7  3951
#define NOTE_C8  4186
#define NOTE_CS8 4435
#define NOTE_D8  4699
#define NOTE_DS8 4978
#include <Servo.h>
#include "pitches.h"

Servo servo;
int servoPos = 100;
int whichNote = 0;
int notes[10] = {NOTE_C4, NOTE_D4, NOTE_E4, NOTE_F4, NOTE_G4, NOTE_A4, NOTE_B4, NOTE_C5, NOTE_D5, NOTE_E5};
int durations[10];

void setup() {
  servo.attach(9);
  pinMode(3, OUTPUT);
  Serial.begin(9600);

  // set the durations with a random coinflip
  for (int i = 0; i < 10; i++) {
    int coinFlip = random(2);
    if (coinFlip == 0)
      durations[i] = 8;
    else
      durations[i] = 4;
  }
}

void loop() {
  int val = analogRead(A0);

  // the rate is 1 second divided by the duration of the note
  int rate = 1000 / durations[whichNote];

  // get the current time
  unsigned long currentTime = millis();

  // trigger a note
  if (currentTime % rate == 0  ) {
    tone(4, notes[whichNote], random(100, 400));
    whichNote = random(10);
    delay(1);
  }

  // do the servo at half speed
  if (currentTime % (rate * 2) == 0  ) {
    servoPos = 50;
    servo.write(servoPos);
  }

  // else if not triggereing the servo, then every 10 milliseconds move the servo arm back a little bit
  // can't do it every frame as that is too fast for the servo
  else if (currentTime % 10 == 0) {
    servoPos -= 1;
    servo.write(servoPos);
  }
}
- Timer0 – used for millis(), micros(), delay() and PWM on pins 5 & 6
- Timer1 – used for Servos, the WaveHC library and PWM on pins 9 & 10
- Timer2 – used by Tone and PWM on pins 3 & 11
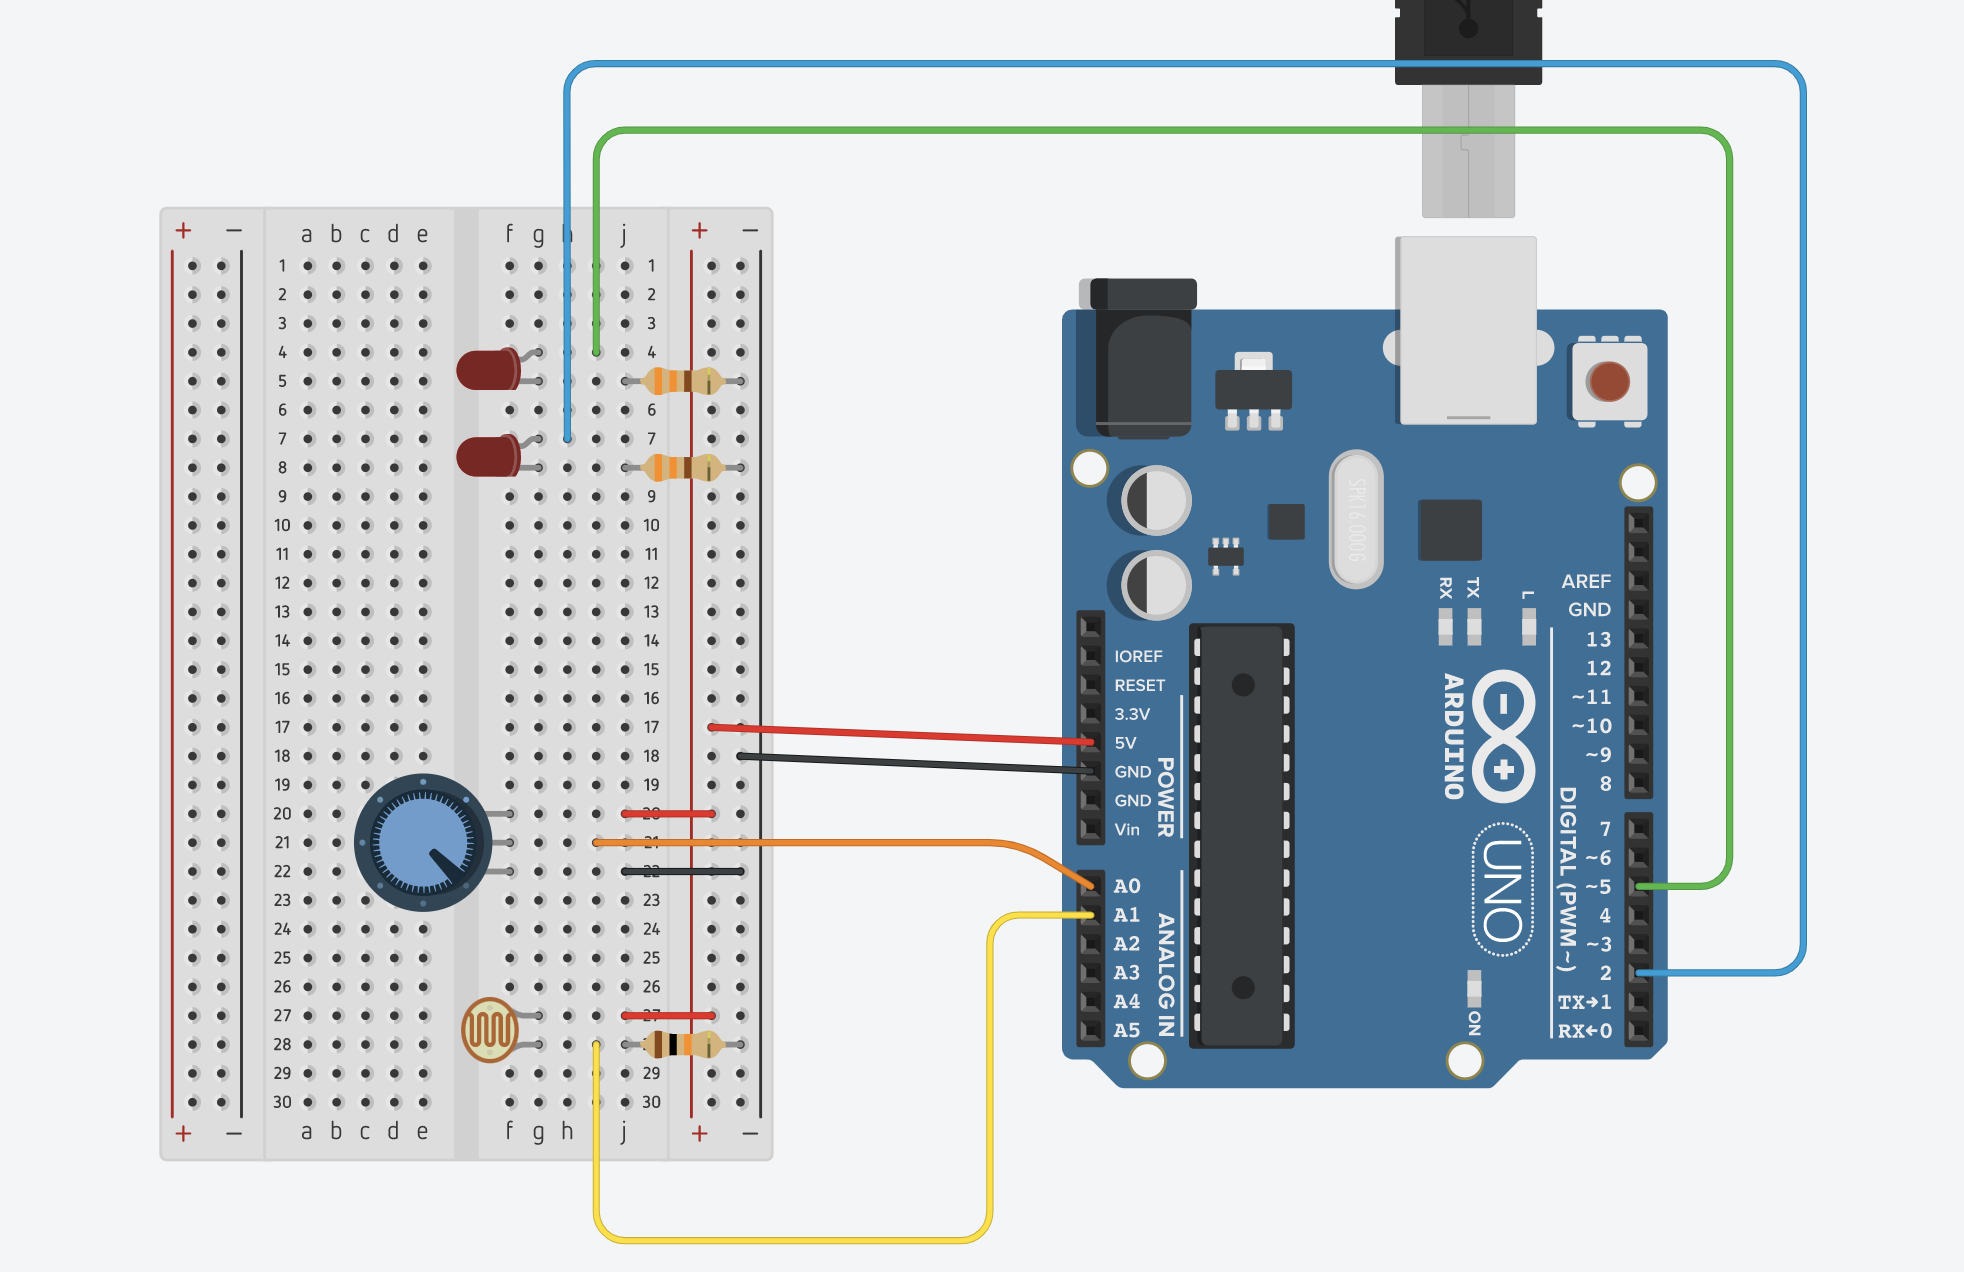
Analog Input & Output
Potentiometer:
Inside a potentiometer:

Photoresistor:
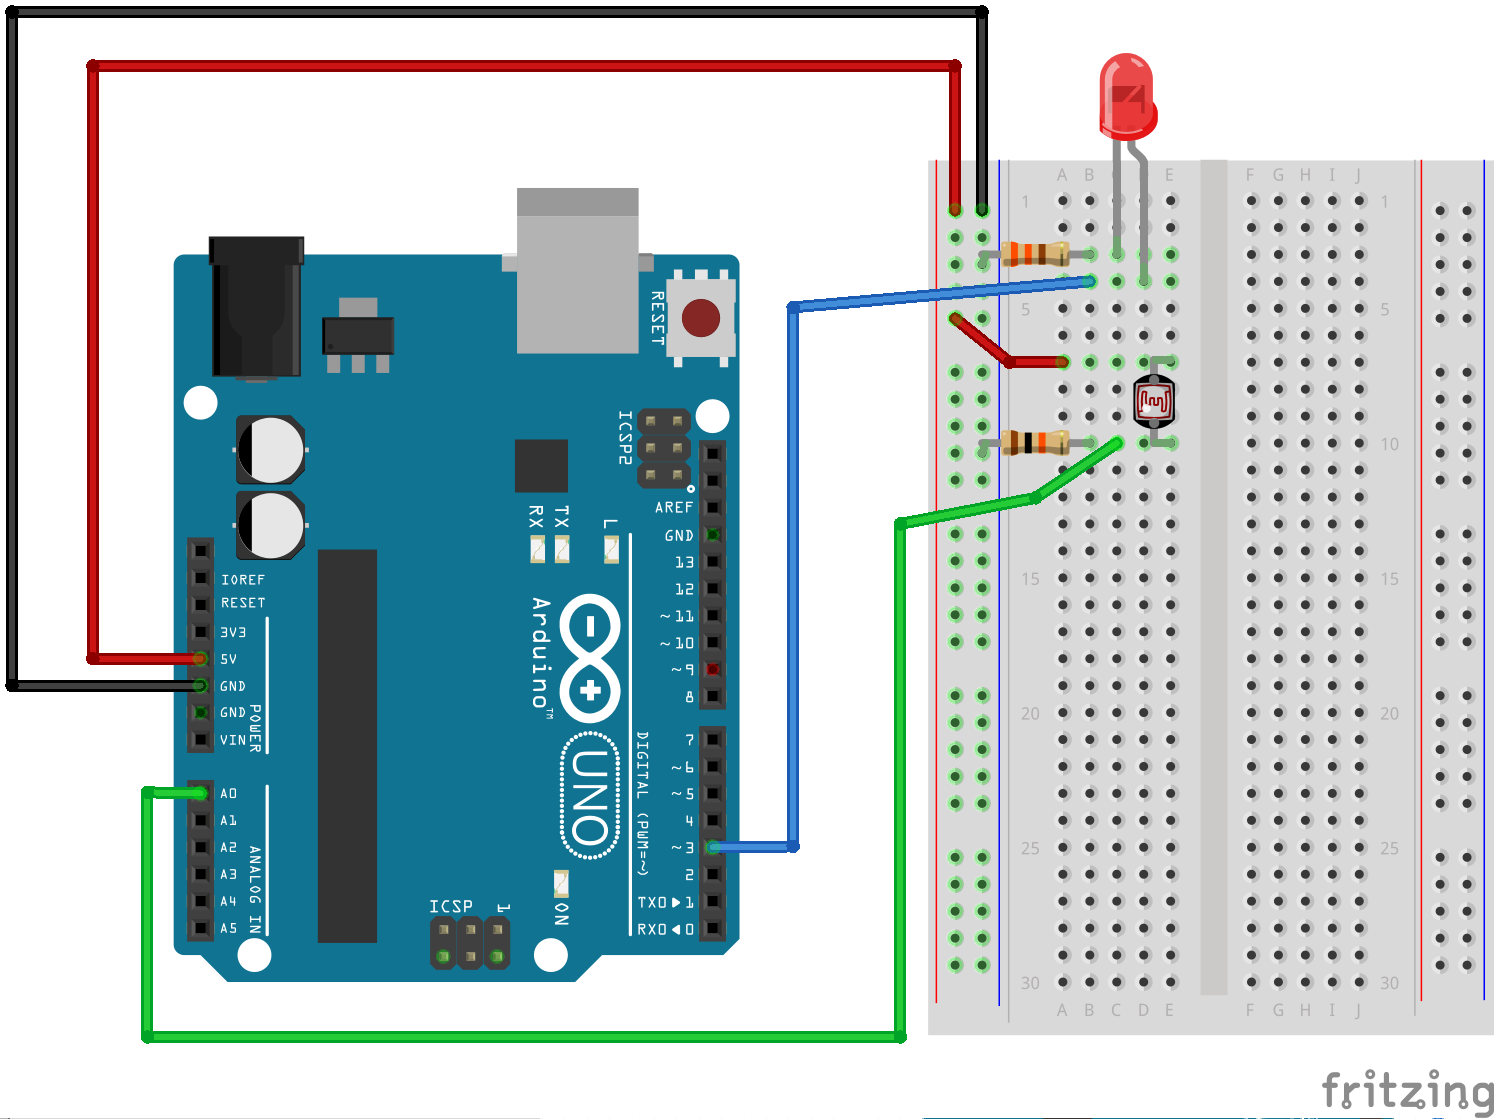
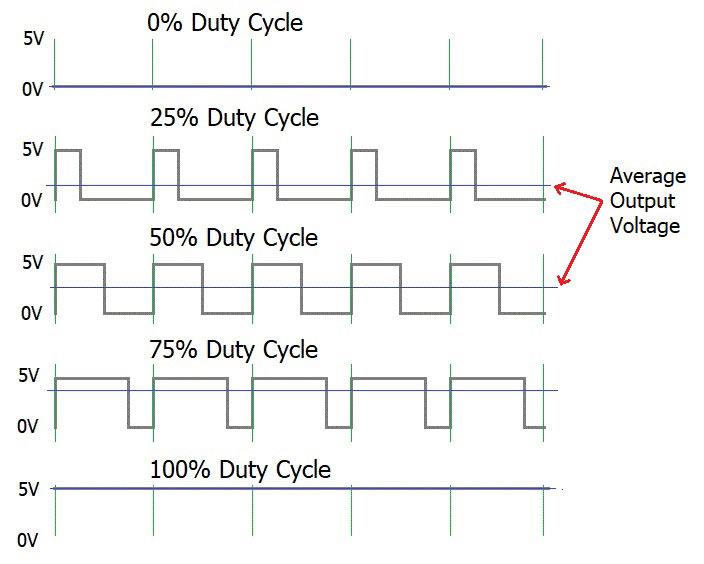
Pulse Width Modulation:
const int ledPin = 2;
bool ledState = LOW;

// a really longer number with no + or - sign
unsigned long toggleTime = 0;
int triggerInterval = 500;

void setup() {
  pinMode(ledPin, OUTPUT);
  Serial.begin(9600);
}

void loop() {
  // read the analog input
  int knobValue = analogRead(A0);
  // map that input to a range appropriate for our use
  // in this case, we take the range of the photocell and map it to millis between 10 & 500
  // this is the blink interval for the LED
  triggerInterval = map(knobValue, 190, 860, 10, 500);

  // print out the original value and the mapped value on the same line
  Serial.print(knobValue);
  Serial.print(" ");
  Serial.println(triggerInterval);

  // if the current time (millis) is more than the exact time when we are supposed to toggle
  if (millis() > toggleTime) {
    // flip the LED to the opposite of what it was
    ledState = !ledState;
    // set the next time the LED should toggle
    // to the current time + whatever the blink interval amount of time is
    toggleTime = millis() + triggerInterval;
  }

  // turn the LED on or off based on the ledState vaviable
  digitalWrite(ledPin, ledState);
}
Arduino First Steps!
Electricity slides from class
Basic Circuits:

Series
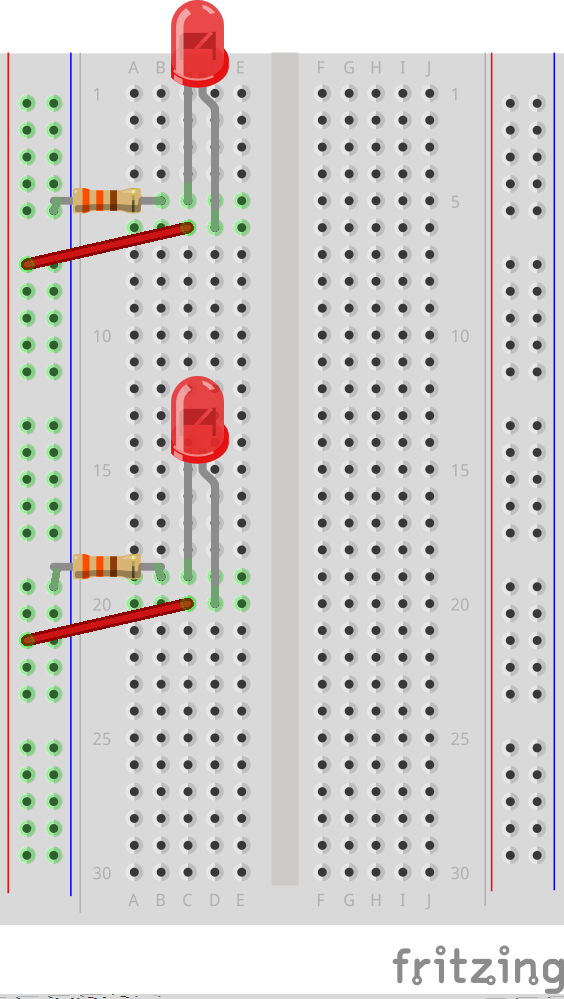
Parallel
Button
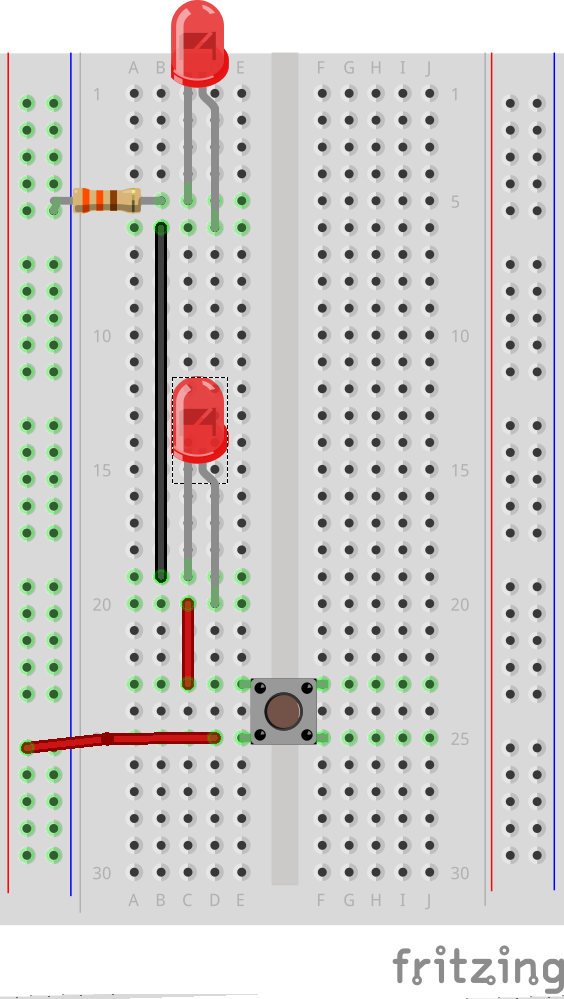
Series with Button
Parallel with Button
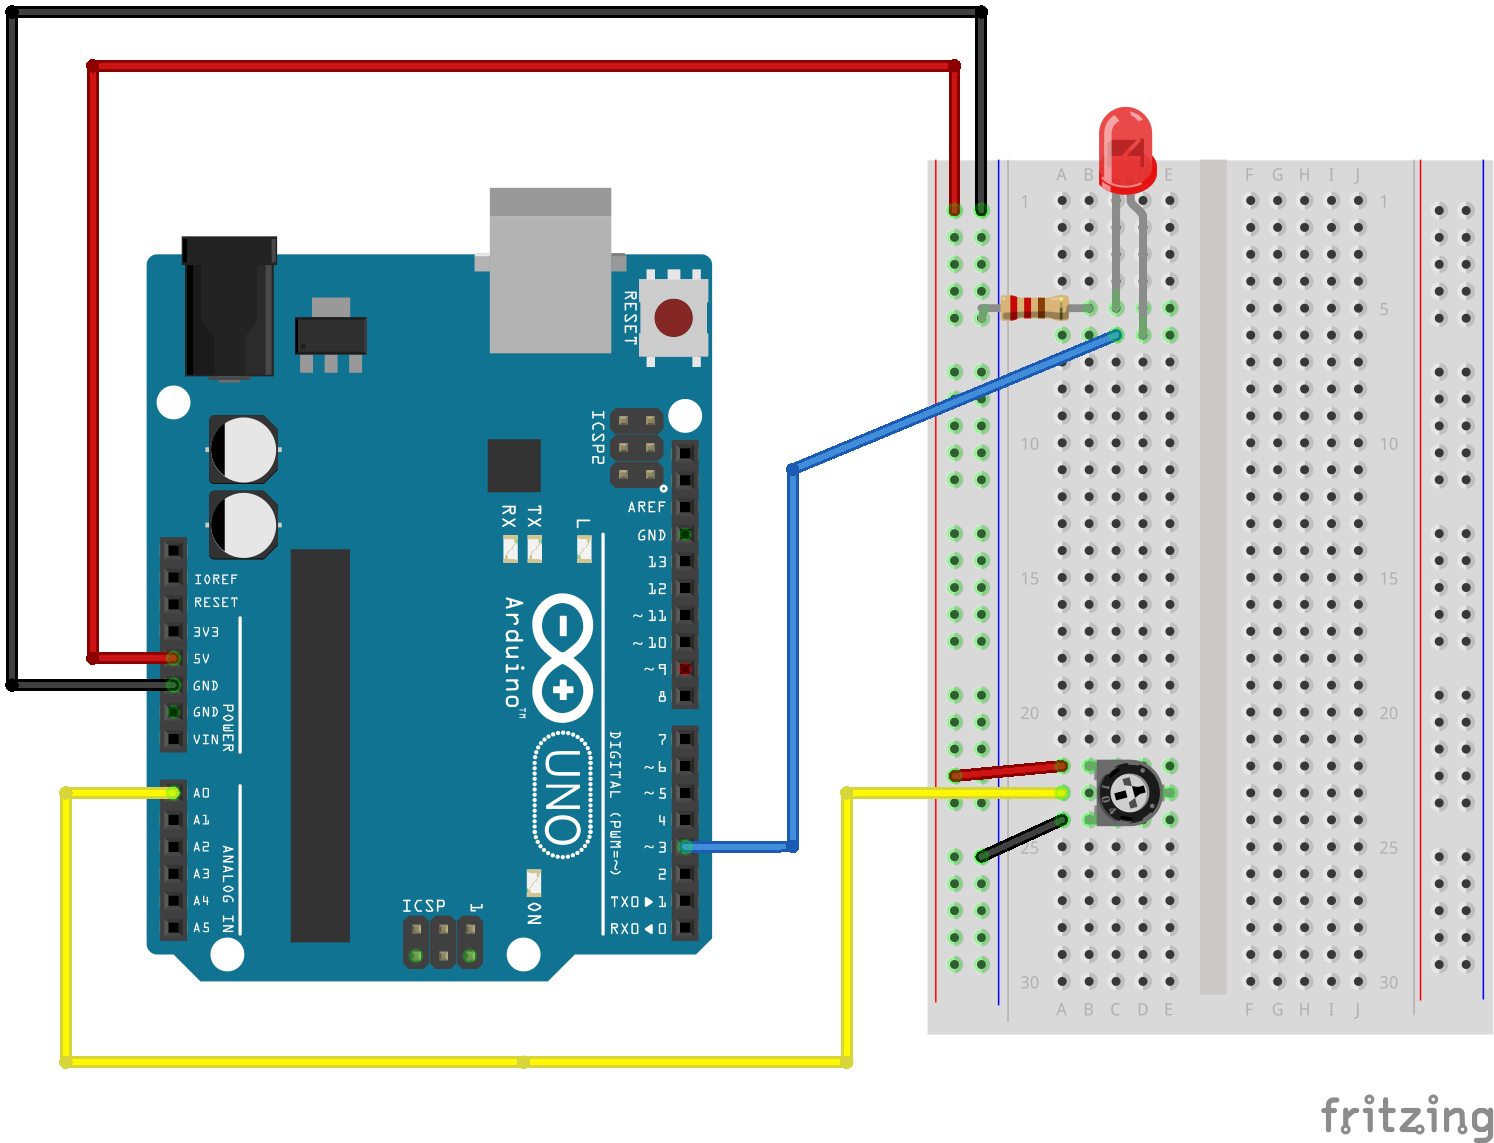
Digital Read and Write:
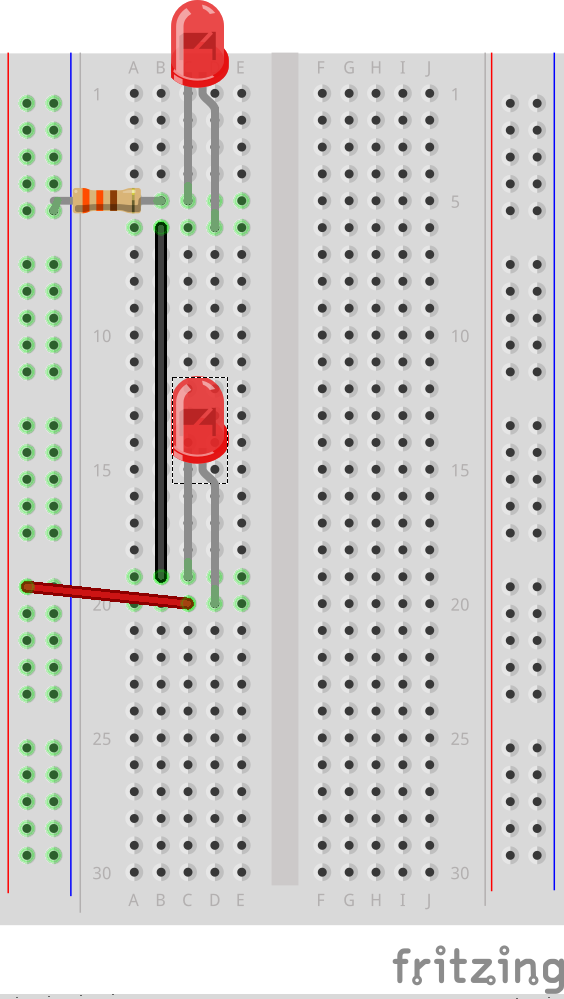
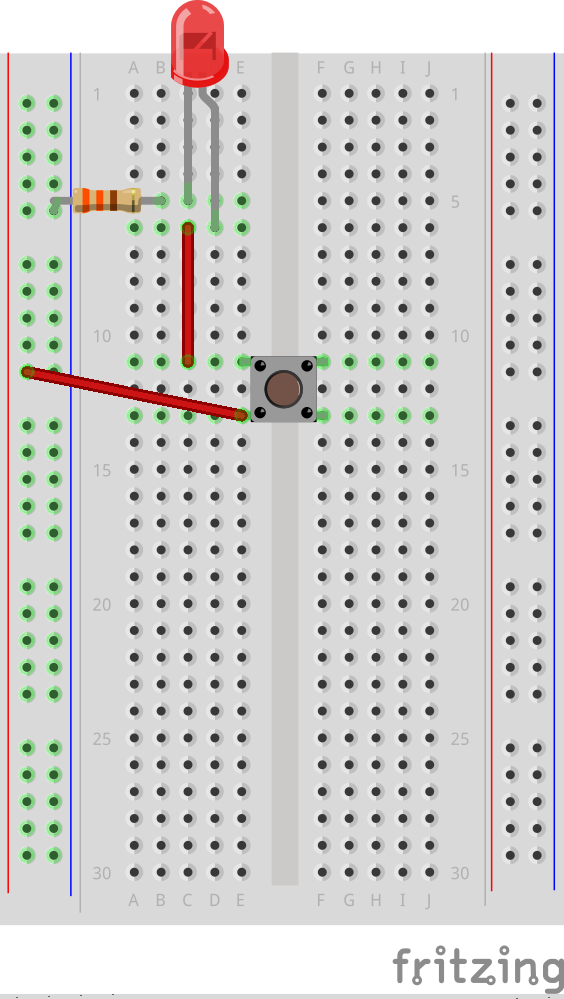
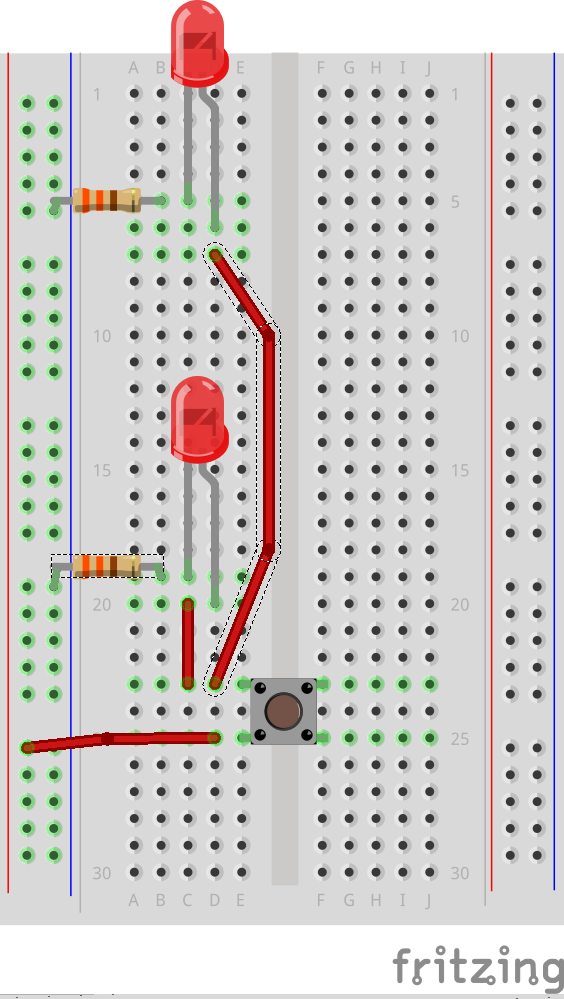
Digital Read a button on pin 2 and digital write an LED on pin 3:

Remember to include a 330 ohm resistor for the LED and a 10k ohm pull down resistor to ground for the button.
int buttonPin = 2;
int ledPin = 3;
int ledState = LOW;
int prevButtonState = LOW;

void setup() {
  // set pin modes
  pinMode(ledPin, OUTPUT);
  pinMode(buttonPin, INPUT);
  // needed in order to start serial communication
  Serial.begin(9600);
}

// PSUEDO CODE:
// check if button is currently pressed
// if button is pressed then check to see if it was pressed during the last frame too
// (we need to remember our button state)
// if button is bressed and previous button is not pressed then flip our LED state

 void loop() {
  // check to see what state our button is in, and store that information
  int currentButtonState = digitalRead(buttonPin);

  // if the button is currently being prssed down, AND during the last frame is wasn't pressed down
  if (currentButtonState == HIGH && prevButtonState == LOW) {
      // flip the LED state
      if (ledState == HIGH){
        ledState = LOW;
      } else if (ledState == LOW){
        ledState = HIGH;
      }
  }
  // if you want to print out the LED state
//  Serial.println(ledState);

  // set our LED to turn on and off according to our variable that we flip above
  digitalWrite(ledPin, ledState);

  //we need to remember the state of our button for the next time through LOOP
  prevButtonState = currentButtonState;
}
Polar to Cartesian Coordinates

sine(theta) = y/r → y = r * sine(theta)
cosine(theta) = x/r → x = r * cosine(theta)
More info: https://natureofcode.com/book/chapter-3-oscillation/#35-polar-vs-cartesian-coordinates
Dataviz/Typography references from class
IDEA & DESIGN :
My idea for my final project was to create the game “WHAC-A-MOLE” using Arduino as a controlling system for the game. But because I wanted my game to be unique I thought I’d change the theme and change the game to “WHAC-A-VAMP” so whacking vampires instead (which if you ask me is way cooler). I chose a vampire because (not sure if I mentioned it in my first assignment or not, but I made a “vampire themed self-portrait??”)

Yes, she’s supposed to be a vampire. What do you mean she doesn’t look like one?
Anyways, so users whack my vampire self-portrait. Now that I think about it my idea is kind of problematic-
IDEA (but seriously):
For the game itself, I re-drew my self-portrait:
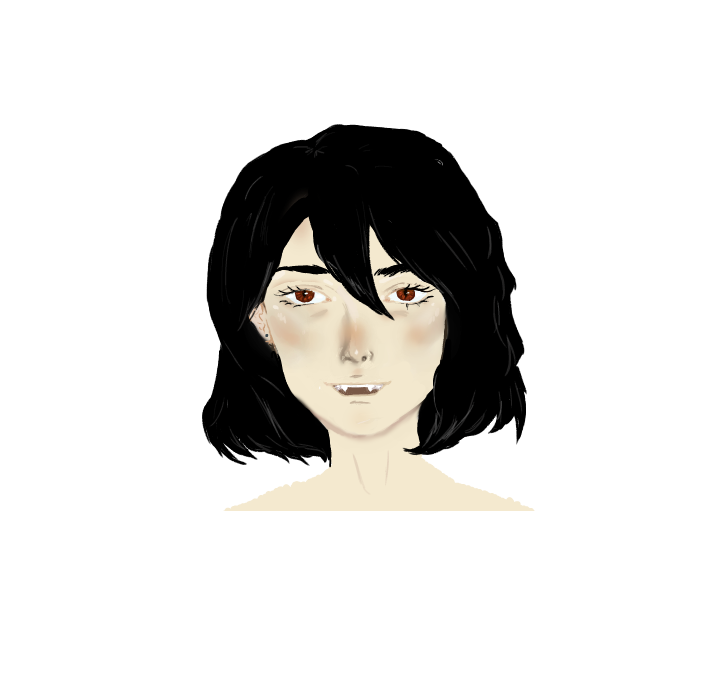
I was hoping I’d finish it completely to put the finished piece in the main menu but my program quit and only the sketch was saved. Basically, all my painting efforts have gone to waste and thankfully I screenshotted the face at least to include it in my game. This is what’s been saved ;-;

I use the same code for the stars in my dancing planets project in the background because I really liked it and I did not want a boring plain background.
APPLICATION AND CHALLENGES:
My game took much more time than anticipated. Whenever I tried to solve a problem a new problem arises. My highest streak of coding for this assignment was 10 hours straight! (not my highest streak for coding btw) But, it was definitely very exhausting. My main problems were the following:
- Wiring problems (honestly I’m embarrassed that I faced them)
I did not know that I was not inserting my buttons correctly on the breadboard! The buttons were always loose, but I just thought it was how they were designed. So, when I run my program, I would think I pressed the button but it is just loose, thus I’d think it is a logical problem. I only fixed this problem after the professor pointed it out lol.
- Logical problems
I faced problems because there would be loophole in my code that I could not see. For that, I needed a fresh pair of eyes to have a look at it and point out how to fix them.
My first problem was that when I would click to begin the game, the screen would go back and forth from menuScreen to gameScreen. I solved that by using boolean variables instead of using integer variables.
final int MENUSCREEN = 0;
final int GAMESCREEN = 1;
final int AGAINSCREEN = 2;
int screenState;
those were the previous variables and switching to boolean fixed it
- Problems regarding functions I’m not familiar with
This problem occurred with the serialEvent function. Because I was not aware of how to use it properly, I used it like it is a normal function. And so, I would call it whenever I would call the drawGame function and that interrupted the button values from Arduino. The fix was to not call it, it would read the Arduino information whenever it receives it.
DEMONSTRATION:
My code is in this zip file
submitted at 12:09 am (please don’t consider this to be late)
Final Project: A Work Accompaniment
In summary, my final project was a series of failed experiments.
My original goal was to use the p5.speech library to create something for Zoom classes. The user would be alerted every few minutes if they ended up falling asleep on their pillow using a capacitative touch sensor. I also hoped to record the transcript of the meeting/class in session and play some sort of alarm if the user’s name was said, urging them to get up.
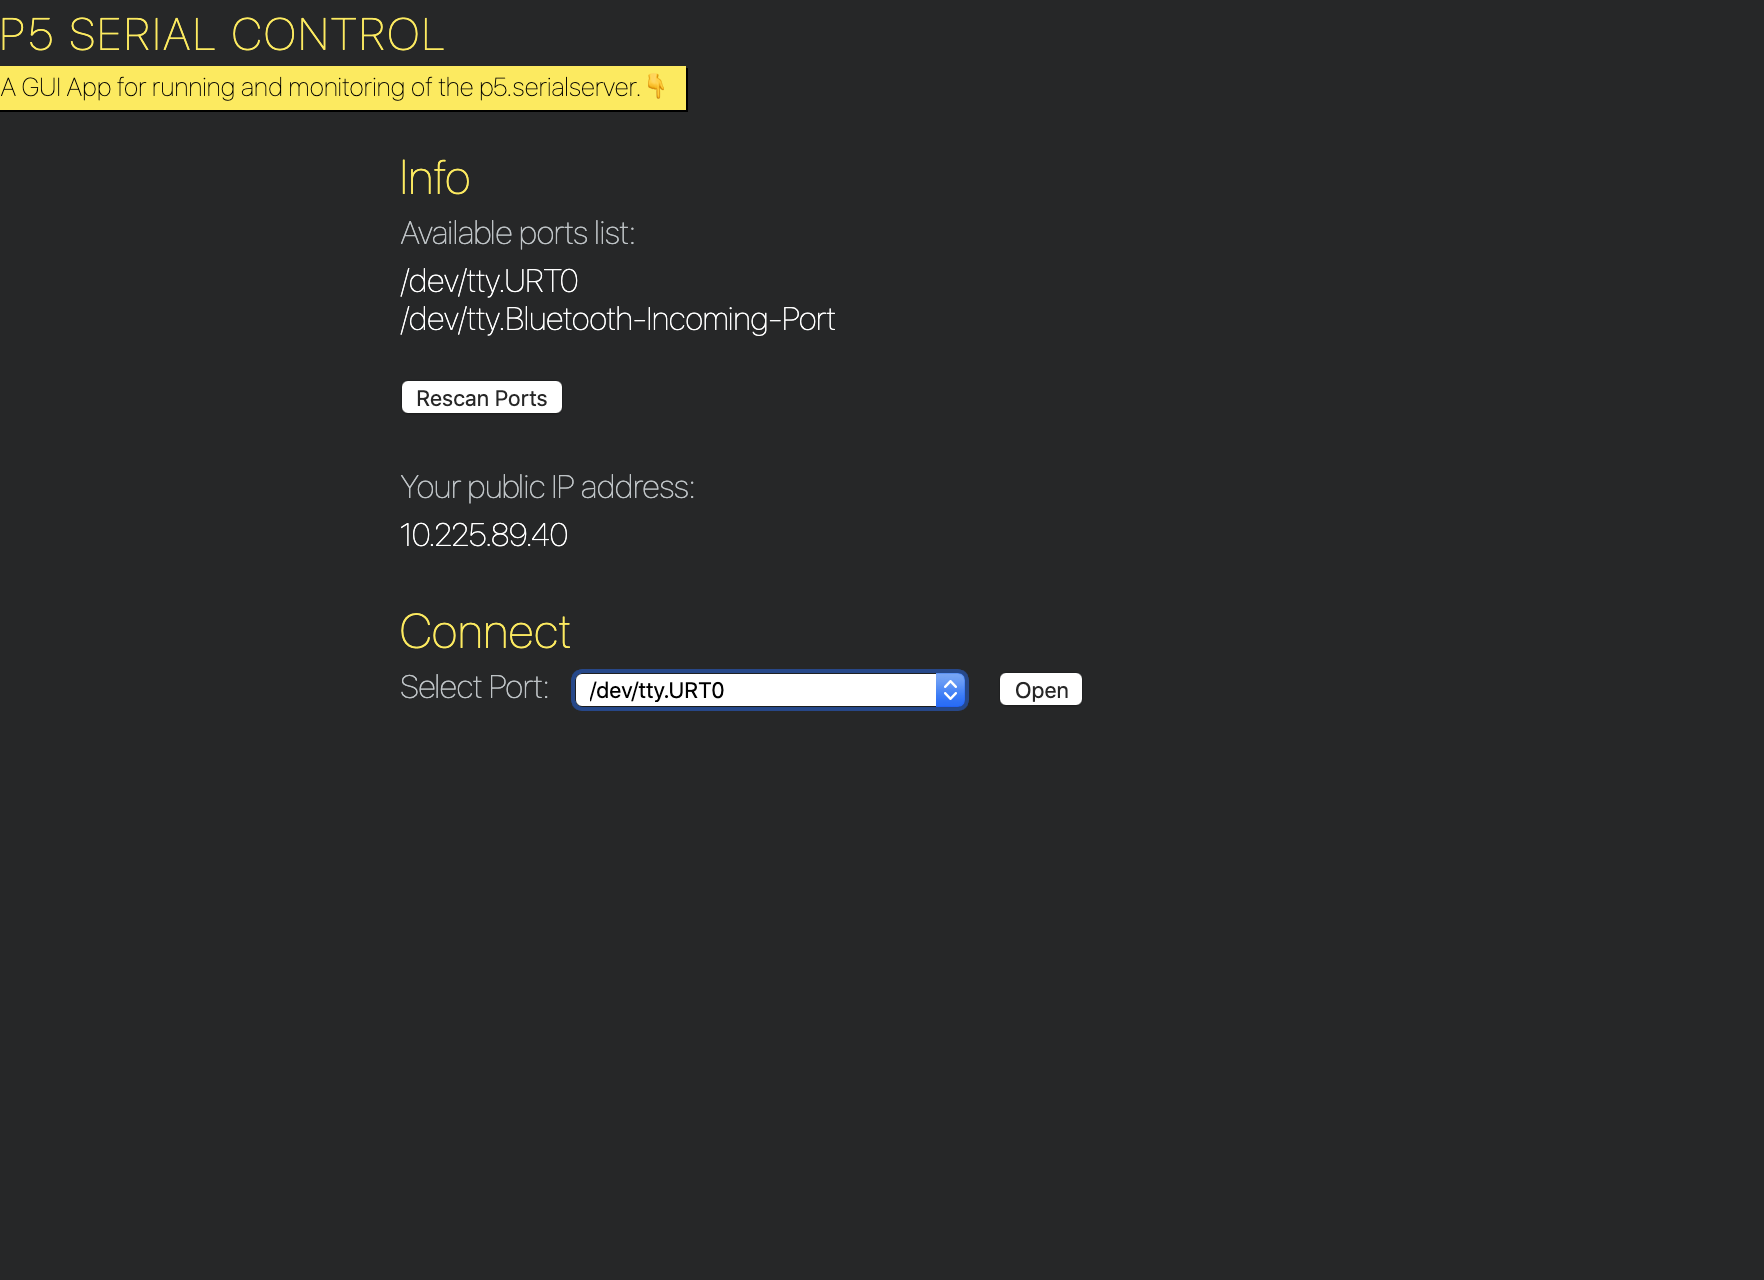
I ended up playing around with this idea, using the p5.serialcontrol program to communicate between p5.js and Arduino. While it is cool that this exists, it was a bit clunky in terms of workflow in terms of connecting ports, etc. Additionally, I wasn’t fully comfortable using the p5.speech library to record transcripts. Other than the technical problem of pipes breaking, I didn’t think it was okay to record the transcripts due to user privacy. Additionally, the speech recognition was a bit better than expected but probably still only a 65% recognition of the names of friends I tried, so I thought it would still make microaggressions in its failure to understand certain friends’ names, etc.
Thus, I needed to repivot my idea. I really wanted to keep the capacitative touch element of the project because this was something I had never been exposed to. I decided to maintain the original spirit of the project as well…something that could help me personally. I have lots of low energy periods due to insomnia and perpetual migraines, but I still have to do my best to complete my work. However, amidst the low energy, I need to make sure I don’t completely fall asleep. It’s not very predictable so setting an alarm ahead of time is not something I would know to do. Thus, I thought the capacitative touch sensor could be useful to see if I do end up falling asleep–having a sensor in my pillow could detect this and set into motion a way to wake me up.
From there I imagined having a combination of vibrations and sound to wake me up. I originally considered using an LED to show whether the sensor was working, but thought bright lights and migraines aren’t the greatest of combinations. In our class check-in, Aaron suggested using motors to create the vibrations.
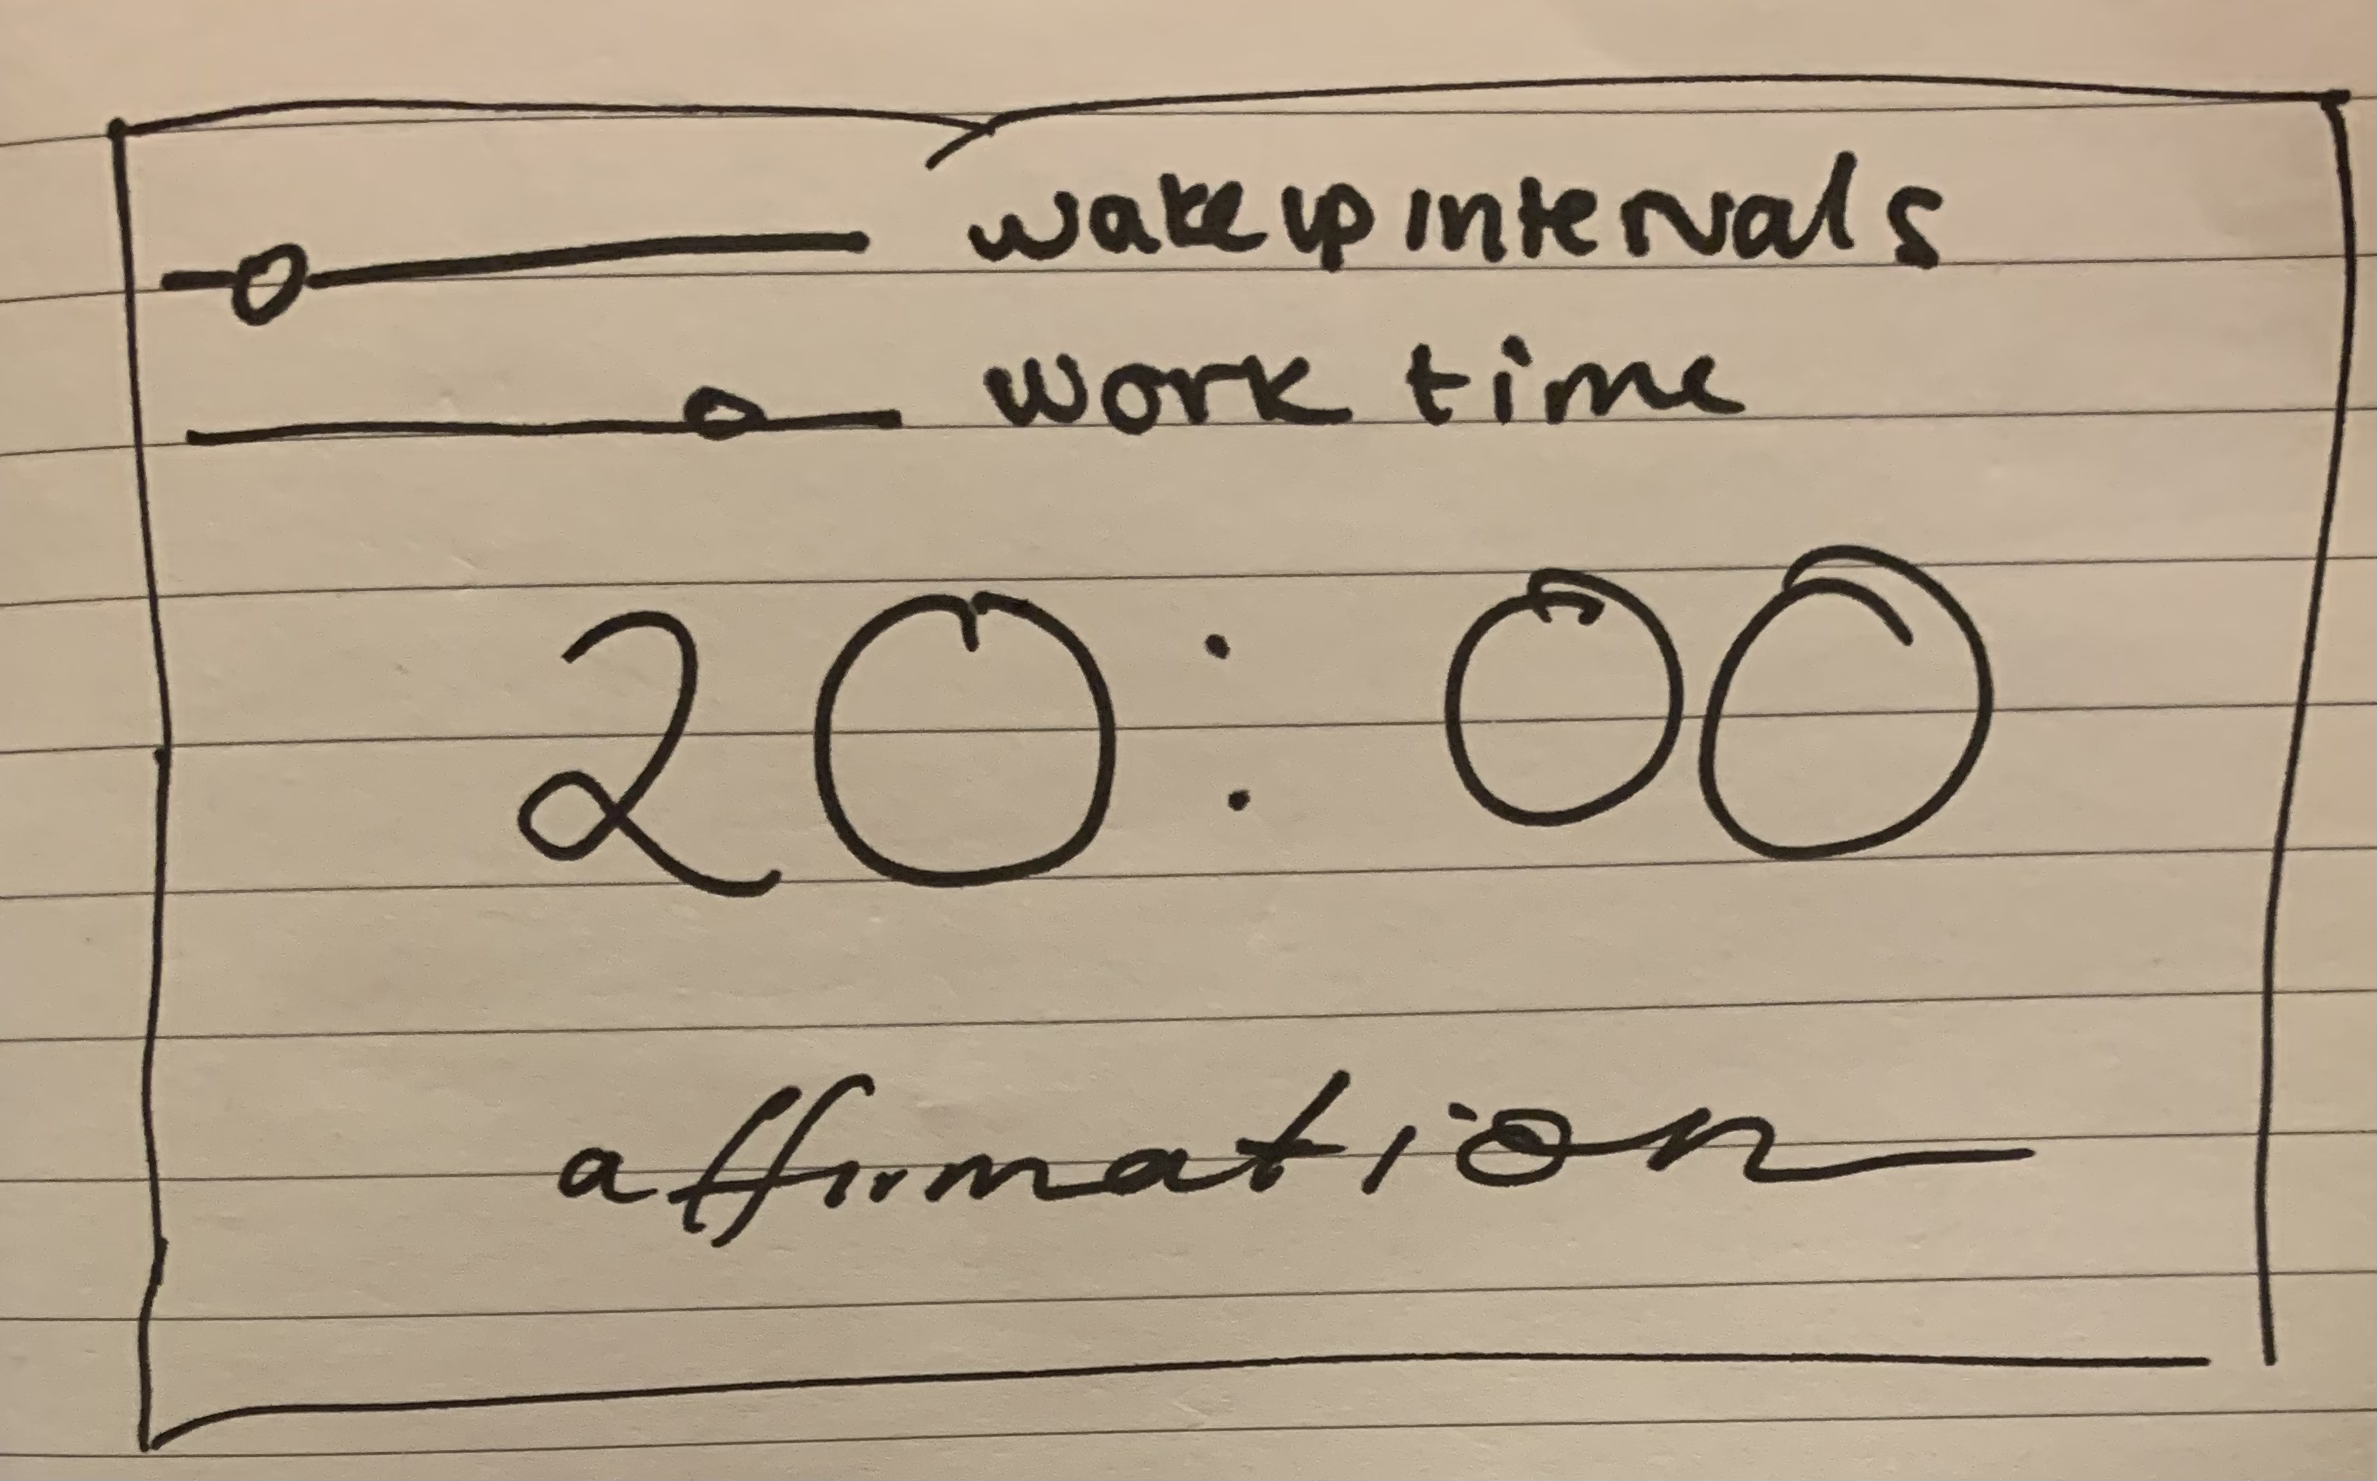
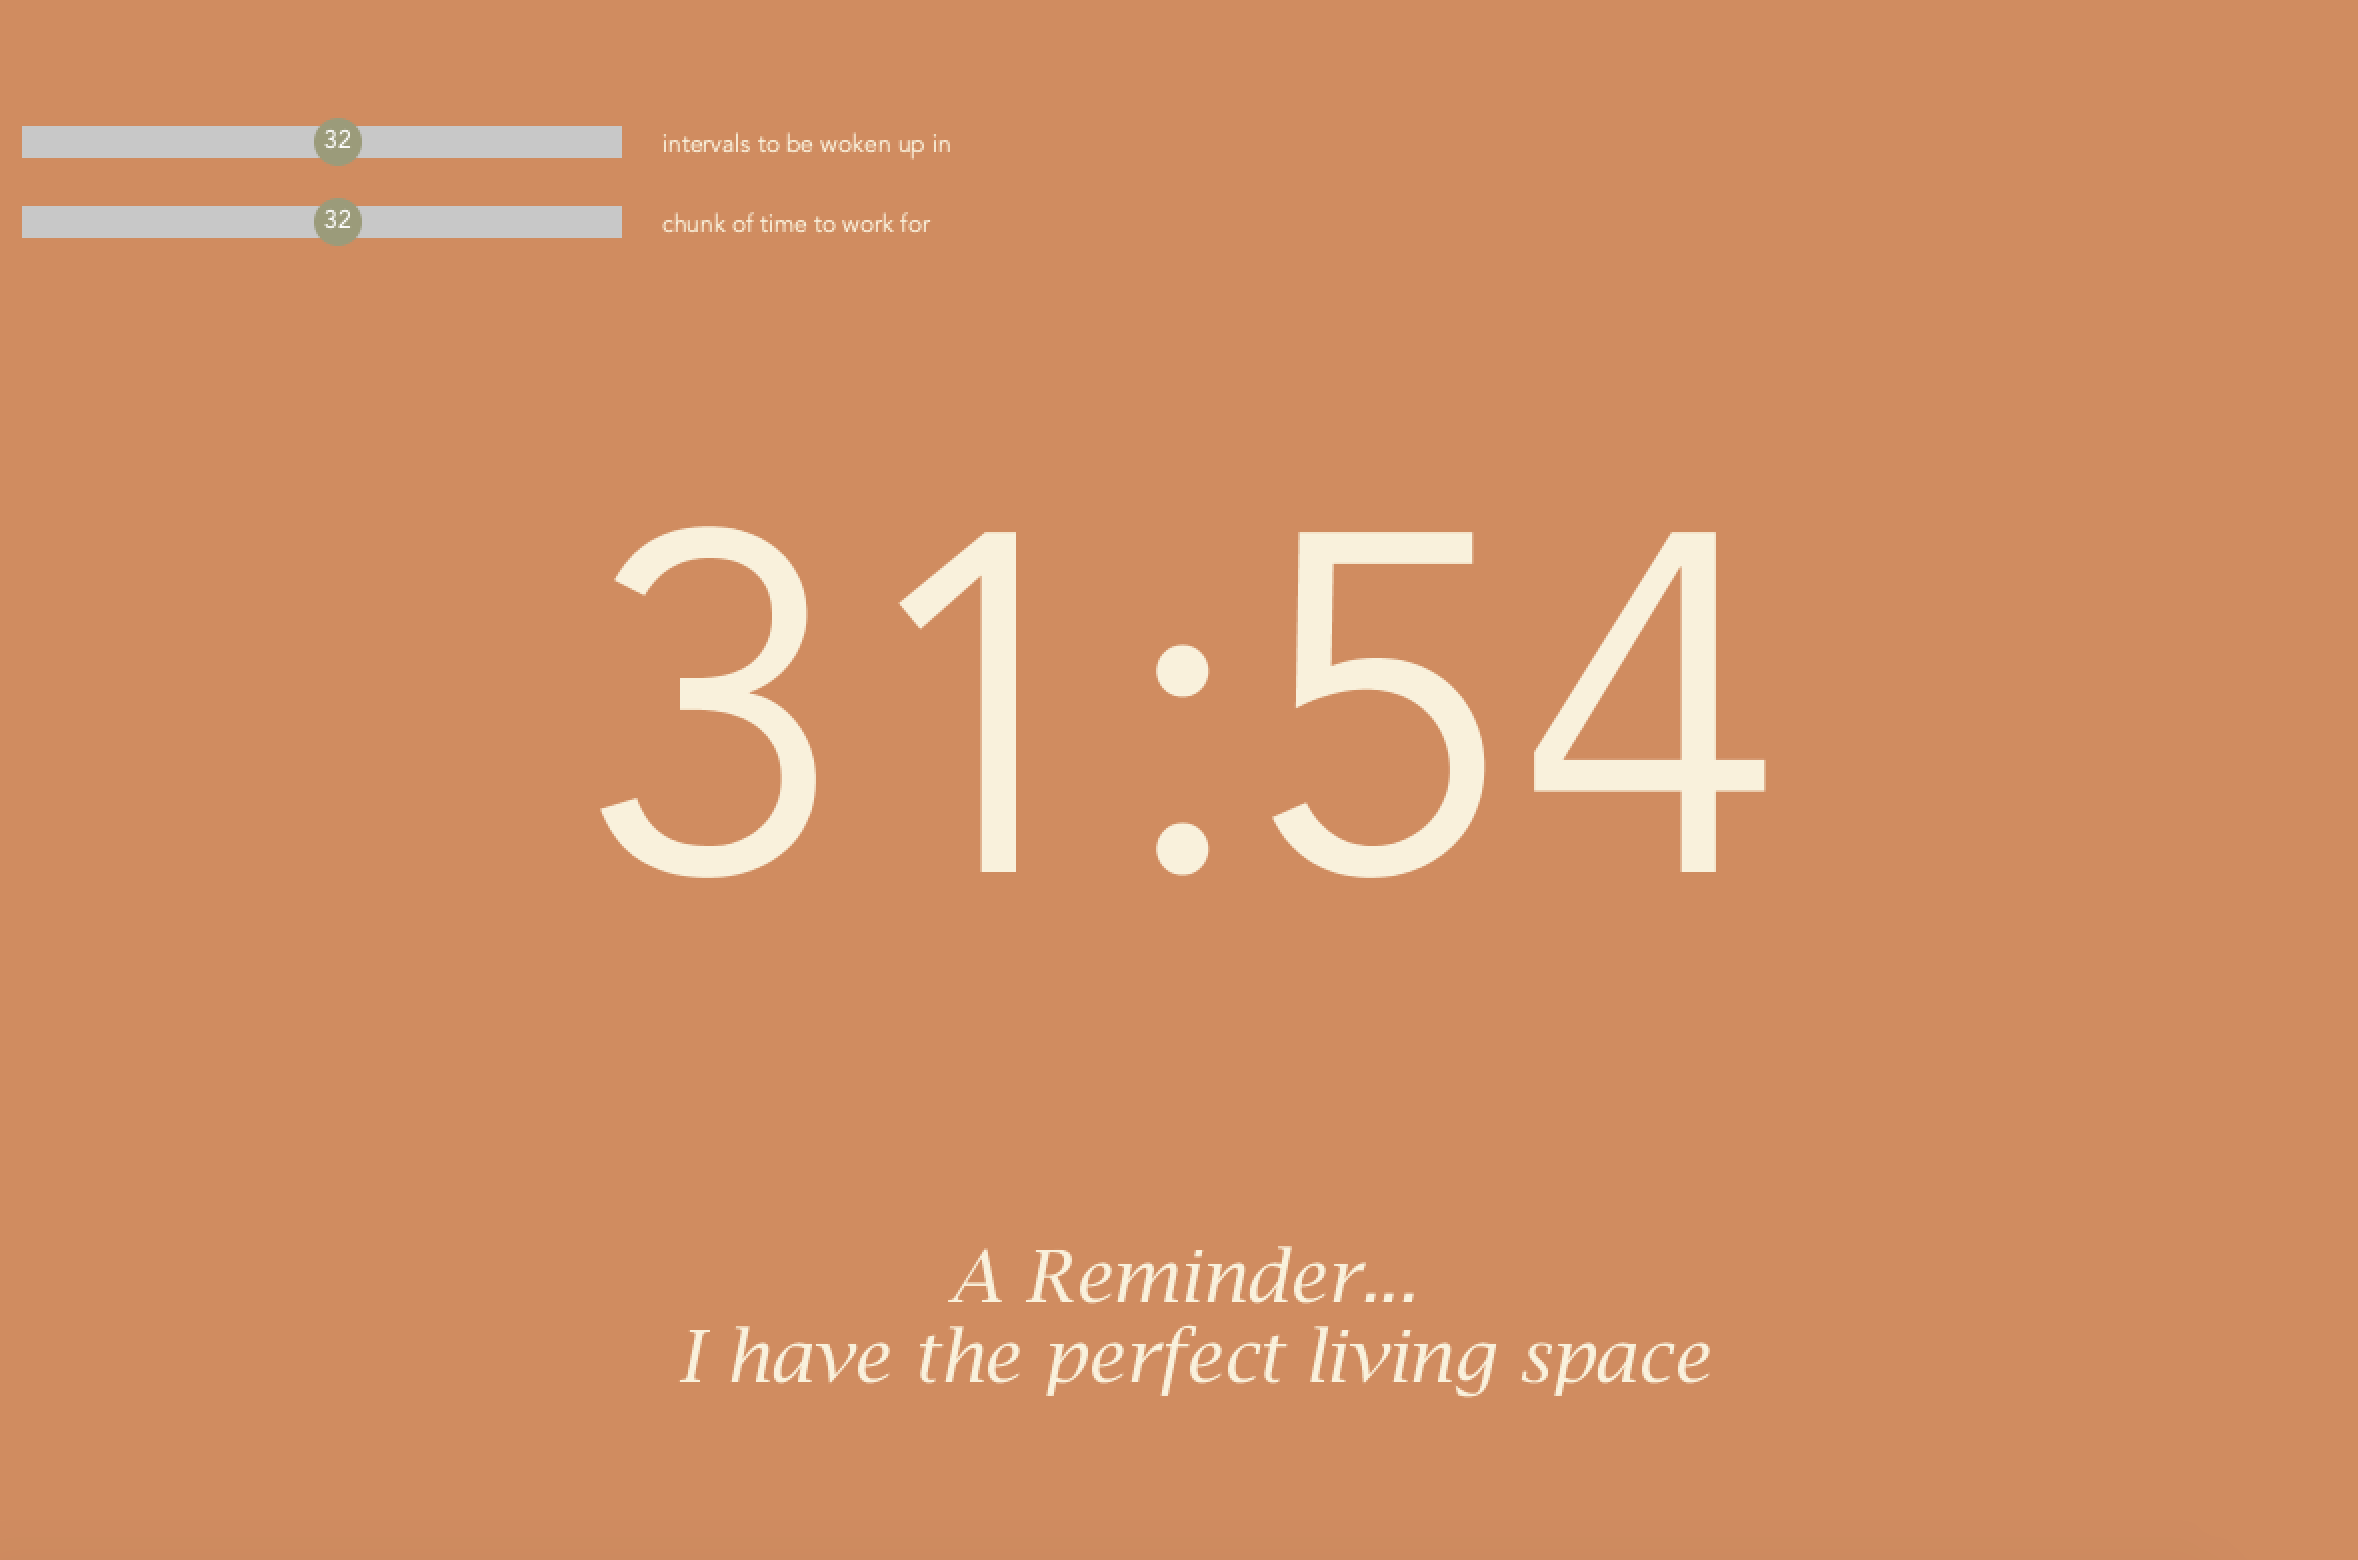
I was also trying to brainstorm what the Processing program could look like. Having structured work time and making sure I take breaks is important to make sure I don’t get too fatigued. Thus, I thought it could be interesting to make my own version of the Pomodoro method. Additionally, doing work tends to bring out a lot of negative thought patterns, so I wanted to integrate some positive energy into the program. I found this affirmation API that I could pull a random message from.
Creating the scrollbars was a bit manual, but I had help from the Scrollbar Processing documentation example. I modified it to make more simple and more to the aesthetic of the program and used a map function instead of calculating the ratio of the slider’s position to the slider’s width. I also added text to know what the current value of the slider is.
I designed a color palette using Coolors and tested it for accessibility for various visual abilities using their tool.
Creating the stopwatch display was a bit tricky because I wanted the new time to appear any time the scrollbar was moved. I ended up creating a helper function to calculate the new timer value. This would be used in the calculateTime function. Another issue I had was displaying the time in a way easy for the reader to understand. For instance, simply using the numerical value of minutes and seconds wouldn’t work for the 60 second mark (the user would expect to see 00 instead of 60) and for the second ticks less than 10 (the user would expect to see :01 instead of :1). I ended up just using an if statement to check for these edge cases, but I’m sure there is a smarter way to do this.
The final aspect of the front page of the program was the affirmations. Using the http.requests library was pretty straightforward, but the response was not in a form conducive for using JSON. I ended up just creating a substring of what was returned to include only the actual message part.
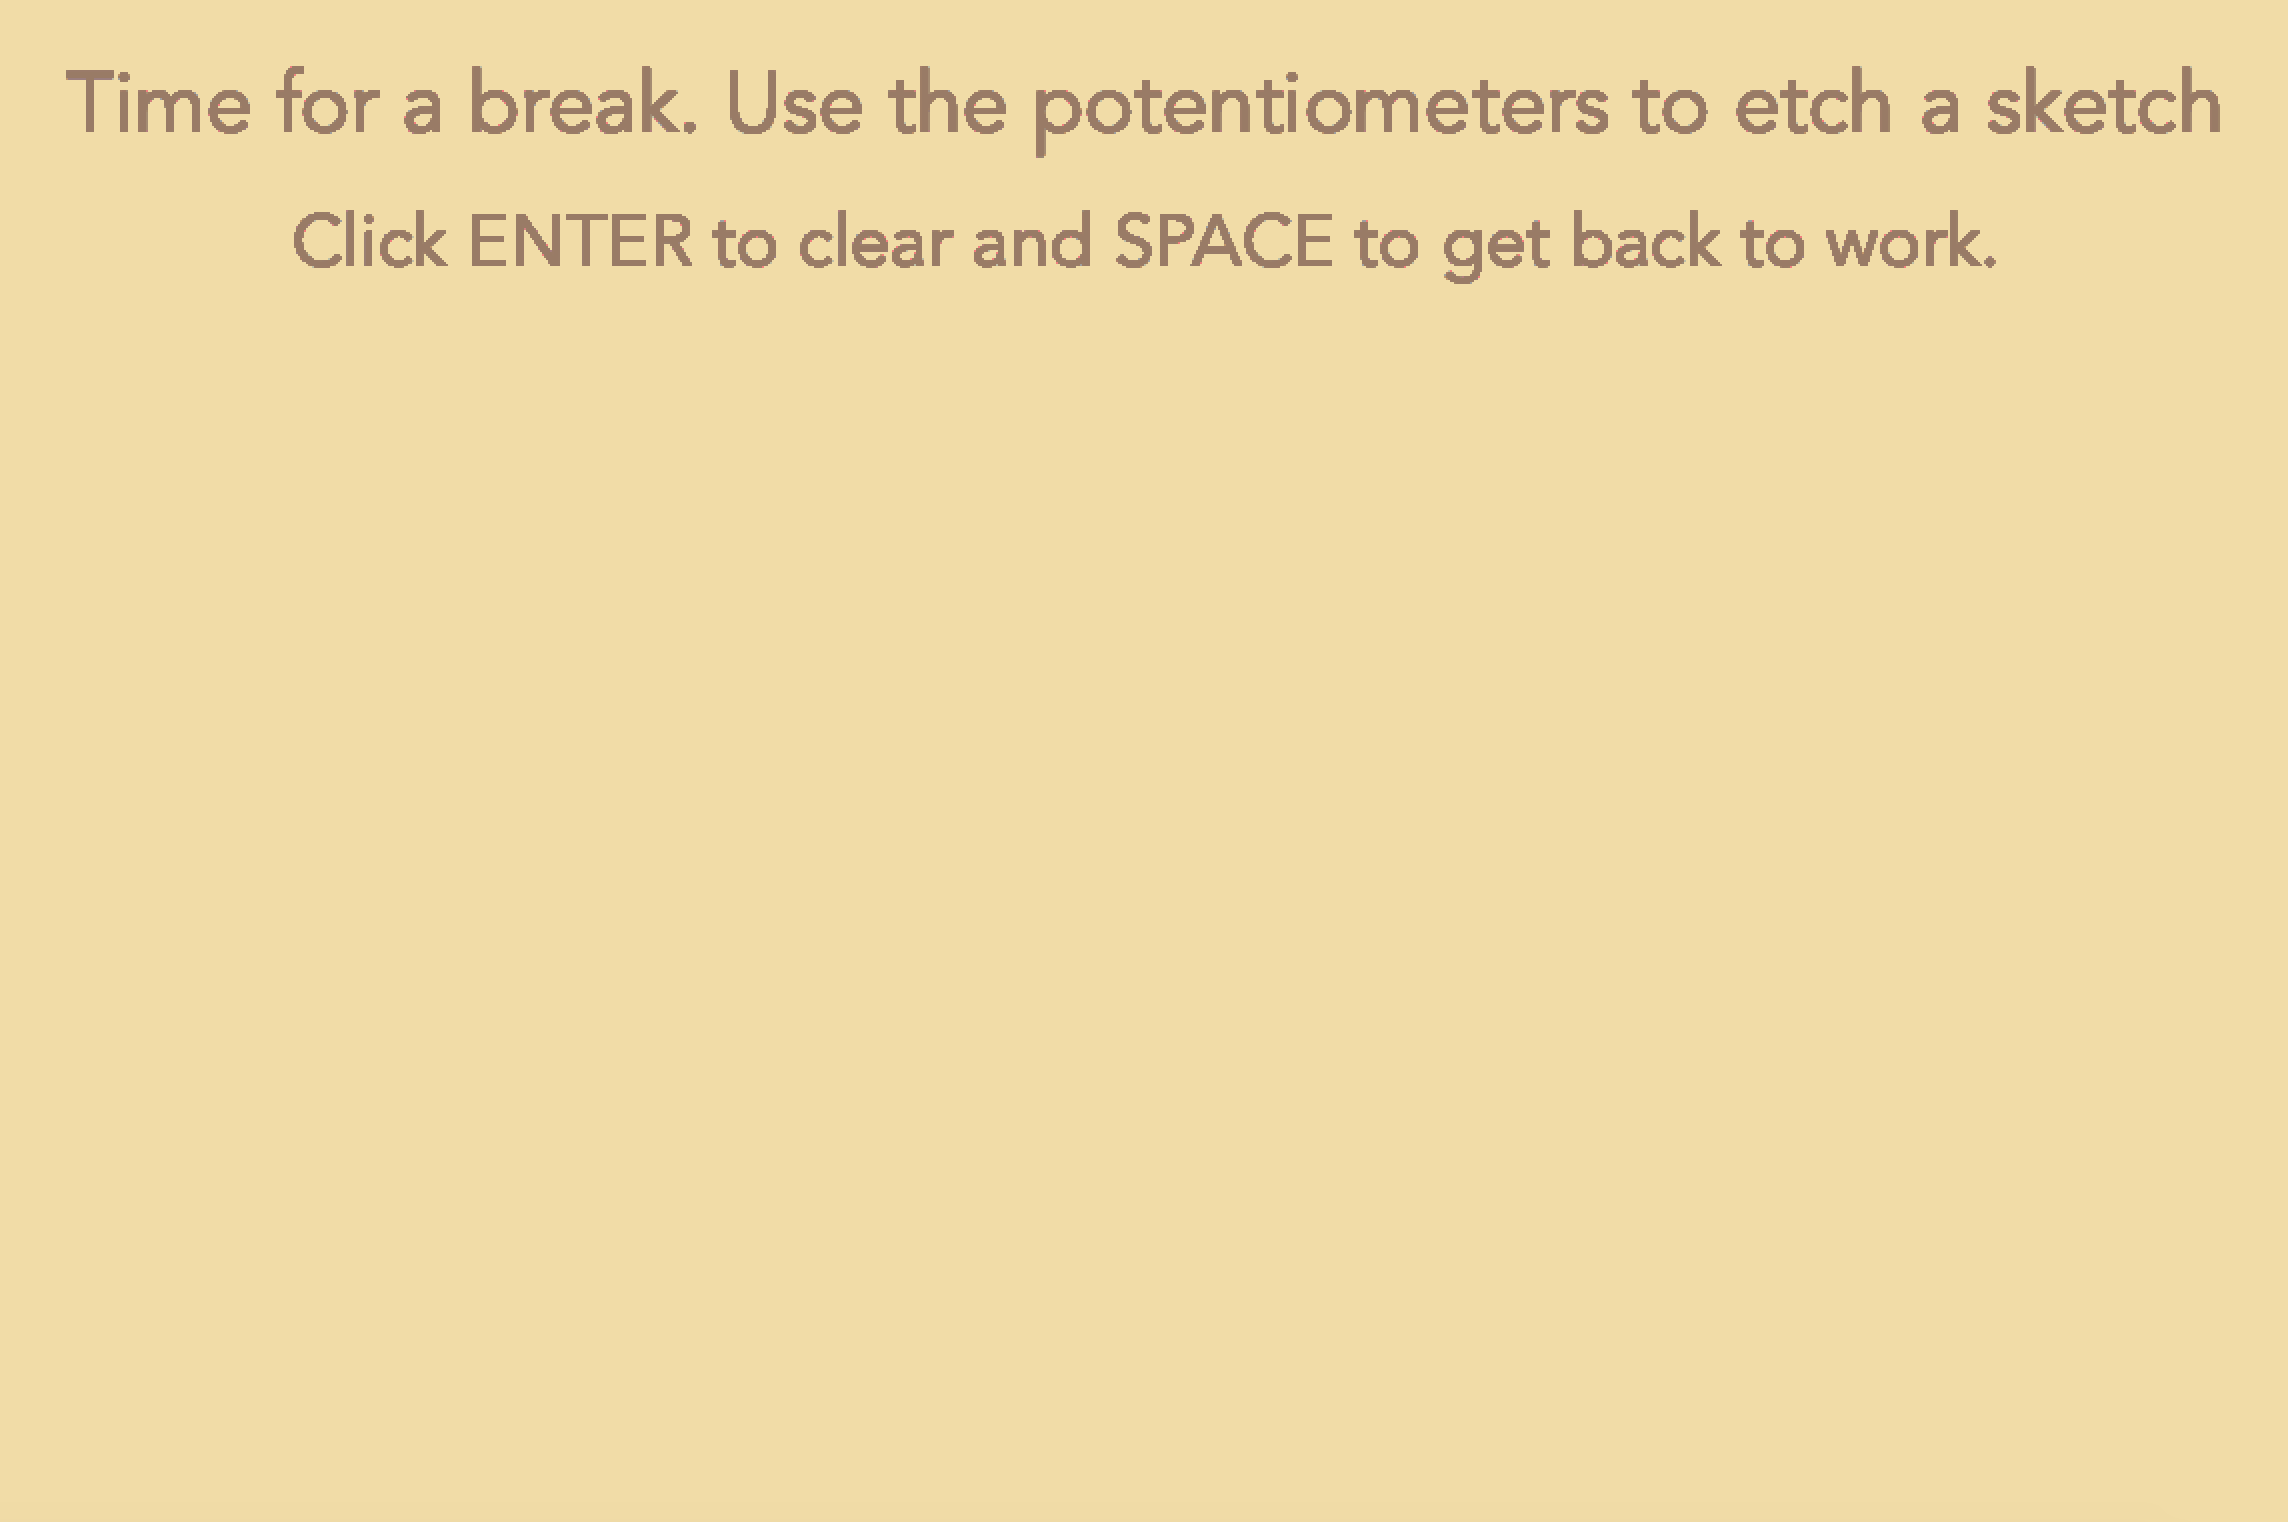
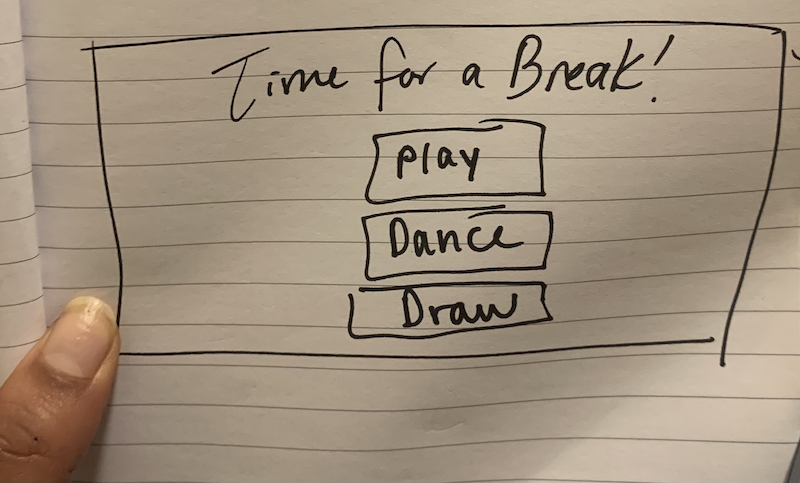
I also wanted to include another element of interaction with the Arduino. Thus, I thought I could create something for the break period of the program that involved using a hardware component. I considered doing a dance break–playing music with dancing LEDs, but had done something similar for one of the weekly projects and wanted to learn something new. I also thought it could be interesting to do a small mini game using the buttons on Arduino as controls, but I’m a bit tired of making games in all honesty. Thus, I decided to do something involving drawing. From the moment we starting working with potentiometers, they reminded me of the little knobs on those toys Etch-a-Sketch–I decided to build a mini Etch-a-sketch for the break part of the program!
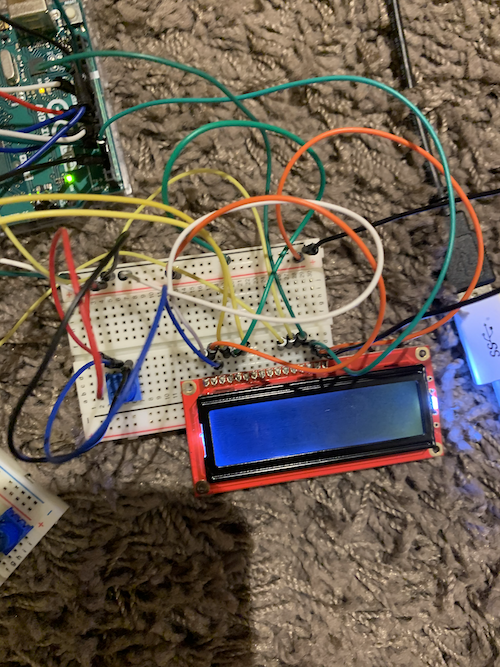
In terms of my hardware, I used the capacitative touch sensor. I was inspired by the Love You Pillow project on the Arduino Hub to use foil for the sensor. I had to experiment a bit with finding the right threshold, but overall, it worked pretty smoothly and consistently. I used the motor shield to connect two motors to create the vibrations…the code and wiring was heavily remixed from the class we spent on motors. I also used a piezo buzzer and two potentiometers.
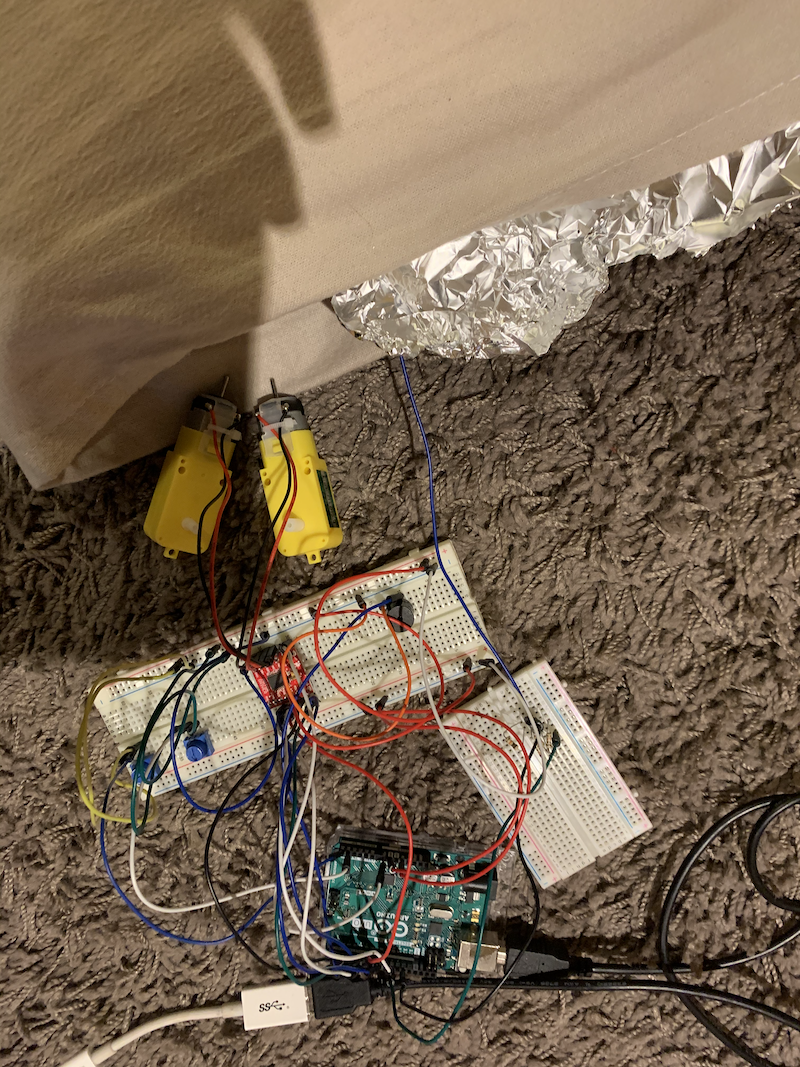
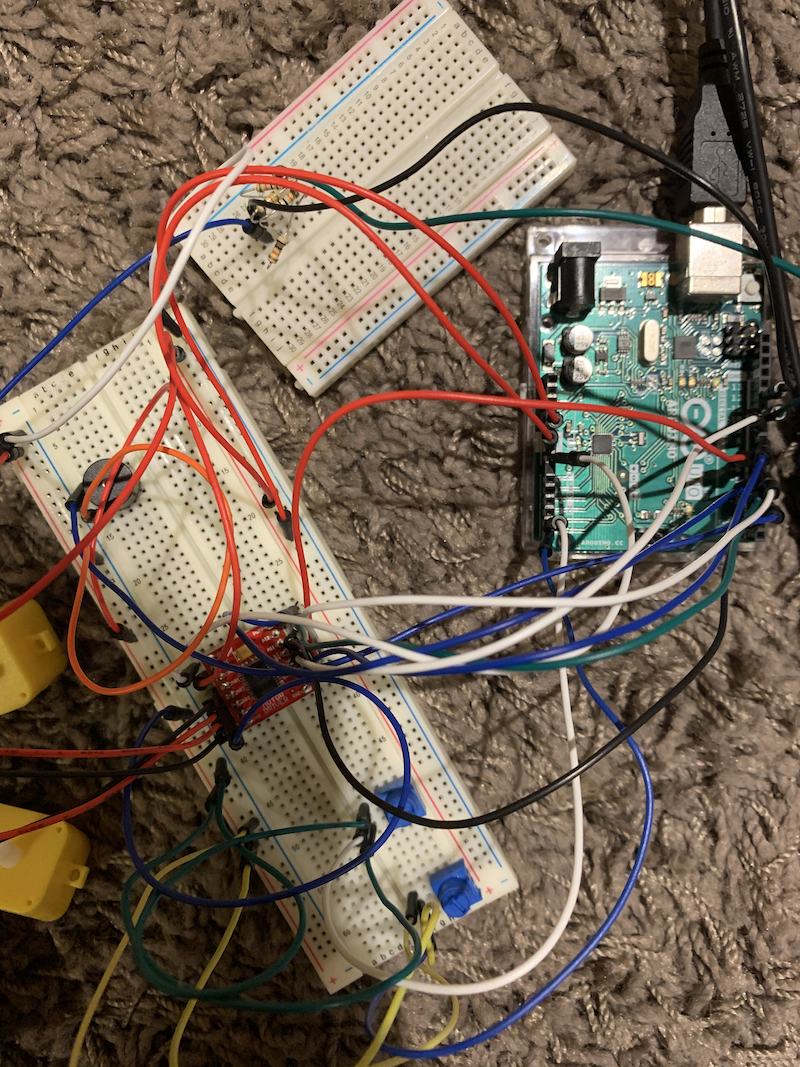
I also experimented a bit with the LED display–I was thinking of randomly sending messages like “Hydrate” and “Stretch,” but I ran out of pins to include it in the final setup, already using some of the analog pins as digital pins.
Overall, I’m not very content with the project. I know I’m capable of better work, but for where I’m at in terms of energy, I think I did my best. There’s definitely a lot of room for improvement. It could be cool to include the LCD Display with user choice of messages on the Processing screen (hydrate, eye break, stretch, breathe deeply). It could be cool to have more options for what to do on the break. I realize I don’t really like drawing with the etch a sketch, so it could be more useful to explore other potential activities like making a mini piano or game, etc. I think the user interface of the etch a sketch could be made more interesting by having more user input in choosing a color etc.
Here’s a walkthrough of my project:
CODE:
Arduino:
#include <CapacitiveSensor.h>
#include <SparkFun_TB6612.h>
//#include <LiquidCrystal.h>

#define AIN1 2
#define BIN1 7
#define AIN2 4
#define BIN2 8
#define PWMA 5
#define PWMB 6
#define STBY 9


//LiquidCrystal lcd(19, 18, 17, 16,11, 3);
// these constants are used to allow you to make your motor configuration
// line up with function names like forward.  Value can be 1 or -1
//from motor library example code
const int offsetA = 1;
const int offsetB = 1;
int duration = 2000;
Motor motor1 = Motor(AIN1, AIN2, PWMA, offsetA, STBY);
Motor motor2 = Motor(BIN1, BIN2, PWMB, offsetB, STBY);
//pressed boolean indicates whether the pillow sensor senses touch
int pressed = 0;
long timer;
//threshold for pillow sensor; if greater than threshold, there is touch
int threshold = 30;
//timeLength variable from first scrollbar in Processing program
int timeLength;

CapacitiveSensor   cs_4_2 = CapacitiveSensor(10,12);        //12 is sensor pin
//count indicates what level of intensity to be woken up
int count = 0;
int piezoPin = 3;

int pot1 = A4;
int pot2 = A5;

void setup()
{
   cs_4_2.set_CS_AutocaL_Millis(0xFFFFFFFF);     //from capacitive sensor library
   Serial.begin(9600);
   Serial.println(0,0);

//   lcd.begin(16, 2);                 //tell the lcd library that we are using a display that is 16 characters wide and 2 characters high
//  lcd.clear();                      //clear the display
}

void loop()  {
 while (Serial.available()) {
  //read from Processing
  timeLength = Serial.parseInt();
  //turns into minutes, change this value if you want the interval in seconds
  timeLength *= 60000;

   if (Serial.read() == '\n') {
    //sends potentiometer values to processing
  int val1 = analogRead(pot1);
  Serial.print(val1);
  Serial.print(",");
  int val2 = analogRead(pot2);

  Serial.println(val2);
   }
  }

//   lcd.setCursor(0, 1);
//  lcd.print(timeLength);
//
    long start = millis();
    long cap =  cs_4_2.capacitiveSensor(30);
    //if the sensor value is greater than the threshold and has not yet been activated
    //starts sensor and level count
    if (cap > threshold && pressed != 1){
      pressed = 1;
      timer = millis();
      count = 0;

    } else if (cap > threshold && pressed == 1) {
      pressed = 1;
      //if sensor value is less than threshold, turn pressed off
    } else if (cap < threshold && pressed == 1) {
      pressed = 0;
    }
  if (pressed == 1) {
//   lcd.setCursor(0, 0);
//  lcd.print("sensor on");
//  lcd.setCursor(0, 1);
//  lcd.print(timeLength);

//after every X minutes
  if (millis() - timer >= timeLength) {
    timer = millis();
   level(count);
   count += 1;
  }
  }
}
//function creates intensity of response to wake up depending on level
void level(int count) {
  switch(count){
  case 0:
    vibrate(0);
    break;
  case 1:
    vibrate(1);
    break;
  case 2:
    vibrate(2);
    break;
  case 3:
    vibrate(2);
    tone(piezoPin, 200, duration);
    break;
  default:
    vibrate(3);
    tone(piezoPin, 500, duration);
    break;
  }
}
//vibrate function to determine speed based on level
void vibrate(int level) {
  int sp = 0;
  if (level == 0) {
    sp = 75;
  } else if (level == 1) {
    sp = 120;
  } else if (level == 2) {
    sp = 180;
  } else {

    sp = 255;
  }
  //moves the motors
  motor1.drive(sp,duration);
  motor2.drive(sp,duration);
  //stops motors
  motor1.brake();
  motor2.brake();
}
Processing:
import http.requests.*;
import processing.serial.*;

Serial myPort;

Scrollbar bar1;
Scrollbar bar2;

int first = 0;
int second = 0;
float lastX = 0;
float lastY = 0;
//Button play;
//Button dance;
//Button draw;

int seconds;
int minutes;

int timer;
int startTime;

PFont lucida;
PFont avenir;
int state = 0;
String response;
void setup() {
    size(1200, 800);
    lucida = createFont("Lucida Bright Italic", 36);
    avenir = createFont("Avenir", 12);
    textAlign(CENTER);
    background(#D08C60);
    //requests affirmation from api
    GetRequest affirm = new GetRequest("https://dulce-affirmations-api.herokuapp.com/affirmation");
    affirm.send();
    response = affirm.getContent();
    //finds string of affirmation
    response = response.substring(12, response.length() - 3);

    //Scrollbar(x, y, width, height, min val, max val)
    bar1 = new Scrollbar(20, height/10, 300, 16, 1, 60);
    bar2 = new Scrollbar(20, height/10 + 40, 300, 16, 1, 60);
    //finds initial time of scrollbars
    adjustTime();

     //play = new Button("PLAY", width/2 - 150, height/3, 300, 80, 2);
     //dance = new Button("DANCE", width/2 - 150, height/3 + 120, 300, 80, 3);
     //draw = new Button("DRAW", width/2 - 150, height/3 + 240, 300, 80, 4);

     //sets up serial communication
     String portname=Serial.list()[2];
      myPort = new Serial(this,portname,9600);
      myPort.clear();
      myPort.bufferUntil('\n');
      delay(1000);

}

void draw(){
//if home screen
  if (state == 0) {
    background(#D08C60);
    //scrollbars - draw and update if user input
    bar1.update();
    bar2.update();
    bar1.display();
    bar2.display();
    fill(#F9F1DC);
    //displays affirmation
    textFont(lucida);
      text("A Reminder...", width/2, height - 140);
      text(response, width/2, height - 100);
    textAlign(LEFT);
    textFont(avenir);
    text("intervals to be woken up in", 340, height/10 + 5);
    text("chunk of time to work for", 340, height/10 + 45);
    //calculates and displays time
    calculateTime();
  //} else if (state == 1) {
  //    background(#F1DCA7);
  //    textFont(avenir);
  //    textSize(72);
  //    fill(#997B66);
  //    text("Time for a break!", width/2, height/8);
  //    play.display();
  //    dance.display();
  //    draw.display();
  //    play.update();
  //    dance.update();
  //    draw.update();
  } else if (state == 2) {
    //drawing screen game
      textFont(avenir);
      textSize(42);
      fill(#997B66);
      text("Time for a break. Use the potentiometers to etch a sketch", width/2, height/8);
      textSize(36);
      text("Click ENTER to clear and SPACE to get back to work.", width/2, height/8 + 65);
      //maps potentiometer value to some coordinate on the screen
      float x = map(first, 0, 1023, 0, width);
      float y = map(second, 0, 1023, height/4, height);
      //finds random color for the line
      stroke(random(0,255), random(0,255), random(0,255));
      //idea for saving last coordinate from this project: http://graysonearle.com/edu/physcom/etch-a-sketch-arduino-processing/
      line(x, y, lastX, lastY);
      lastX = x;
      lastY = y;
  }
}
//scrollbar class for user input on first screen
class Scrollbar {
  //slider width and height
  int sw;
  int sh;
  float xpos;
  float ypos;
  //the slider position (ellipse)
  float slider_pos;
  float newpos;
  float sliderMin;
  float sliderMax;
  boolean mouseOnTop;
  boolean moved;
  boolean posChanged;
  //min and max values of slider
  int sValMin;
  int sValMax;

  Scrollbar(float x, float y, int w, int h, int minVal, int maxVal) {
    sw = w;
    sh = h;
    xpos = x;
    ypos = y - sh/2;
    slider_pos = xpos + sw/2 + sh/2;
    newpos = slider_pos;
    sliderMin = xpos;
    sliderMax = xpos + sw;
    sValMin = minVal;
    sValMax = maxVal;
    posChanged = false;
  }

  void update() {
    //if user mouseX, mouseY is on top of the scrollbar
    if (overEvent()) {
      mouseOnTop = true;
    } else {
      mouseOnTop = false;
    }
    //if mouse held and on top, then the scrollbar is being moved
    if (mousePressed && mouseOnTop) {
      moved = true;
    }

    if (!mousePressed) {
      moved = false;
    }
    //keep within the range of the slider
    //code remixed from https://processing.org/examples/scrollbar.html
    if (moved) {
      newpos = constrain(mouseX - sh/2, sliderMin, sliderMax);
    }
    //if slider value has changed
    if (abs(newpos - slider_pos) > 1) {
      slider_pos += (newpos -slider_pos);
      adjustTime();
    }
  }

  float constrain(float val, float smin, float smax) {
    return min(max(val, smin), smax);
  }
  boolean overEvent() {
    if (mouseX > xpos && mouseX < xpos + sw && mouseY > ypos && mouseY < ypos + sh) {
      return true;
    } else {
      return false;
    }
  }
  //creates the scrollbar
  void display() {
    noStroke();
    fill(200);
    rect(xpos, ypos, sw,sh);
    fill(#9B9B7A);
    //ellipse is the slider part of the bar
    ellipse(slider_pos, ypos + sh/2, 1.5 *sh, 1.5*sh);
    fill(255);
   textAlign(CENTER);
    textFont(avenir);
    //label of the actual value
    text(getVal(), slider_pos, ypos + sh/1.5);
  }

  int getVal() {
    float mapVal = map(slider_pos, xpos, xpos + sw, sValMin, sValMax);
    return int(mapVal);
  }

}
//get value from scrollbar and create a new start time
void adjustTime() {
  timer = bar2.getVal();
  startTime = millis();
}

void calculateTime() {
  seconds = 60 - ((millis() - startTime)/1000) % 60;
  minutes = timer - 1 - ((millis() - startTime) / 60000);
  //displays time in middle of screen
  textFont(avenir);
  textSize(240);
  textAlign(CENTER, BOTTOM);
  if (seconds == 60) {
    text(minutes + 1 + ":00", width/2, 2*height /3);
  } else if (seconds < 10) {
  text(minutes + ":0" + seconds, width/2, 2*height /3);
  } else {
    text(minutes + ":" + seconds, width/2, 2*height /3);
  }
  //when timer runs out, move to next screen
  if (seconds == 60 && minutes <= 0) {
    state = 2;
    background(#F1DCA7);
  }
}
//class Button {
//  String msg;
//  int xpos;
//  int ypos;
//  int w;
//  int h;
//  int cntl;

//  Button(String words, int x, int y, int w_, int h_, int st) {
//    msg = words;
//    xpos = x;
//    ypos = y;
//    w = w_;
//    h = h_;
//    cntl = st;
//  }

//  void display() {
//    noStroke();
//    if (mouseX > xpos && mouseX < xpos + w && mouseY > ypos && mouseY < ypos + h) {
//      fill(#7A6352);
//    } else {
//      fill(#997B66);
//    }
//    rect(xpos, ypos, w, h);
//    textAlign(CENTER, CENTER);
//    fill(#F1DCA7);
//    text(msg, xpos + w/2, ypos + h/3);
//  }

//  void update() {
//    //if button is clicked
//    if (mousePressed && mouseX > xpos && mouseX < xpos + w && mouseY > ypos && mouseY < ypos + h) {
//      state = cntl;
//      background(#F1DCA7);
//    }
//  }
//}

void keyPressed() {
  if (state == 2) {
    //returns to home screen if SPACE is clicked
    if (key == ' ') {
      state = 0;
    }
    //refreshes background if ENTER clicked to allow for new drawing
    else if (key == ENTER) {
    background(#F1DCA7);
    }
  }
}
void serialEvent(Serial myPort){
 String s=myPort.readStringUntil('\n');
 println(s);
  s=trim(s);
  if (s!=null){
    //gets value of potentiometer
    int values[]=int(split(s,','));
    first = values[0];
    second = values[1];
  }
  //writes to arduino the scrollbar value
  myPort.write(bar1.getVal() + "\n");
}
FINAL PROJECT[mirror booth]
THE IDEA
The final project turned out to be an artistic expression in its true form, developing chaotically and very unexpectedly. The essence of this project is to reflect over your own reflection, viewer by interacting with my project gets to see the distorted, trippy yet witty images of the face. This goes to display that we live in a world where the grimace that you put on may not be the true reflection of one’s identity or perhaps personaity.
Since it’s an arts installation, giving any instruction would ruin the mystery that the project holds. Any uniform shapes or identically consistent styles would ruin the whole aesthetics as the exhibition of mirrors projects and celebrates the diversity and the will to think outside the box. Not only it challenges the audience to render many untrivial ideas, but also immerses the audience into the galaxy of unknown and unseen.
While doing the project, I got inspired by many things, but what had finally set my thoughts on the project was the combination of psychic TV shows where psychic would force her patients to believe in something that they are not, and also the many apps like Photo Booth, Snapchat or even Instagram that has filters that alter the way one sees itself.
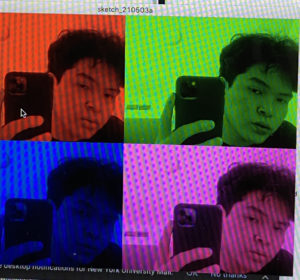
The main trick is in simplicity. The processing code consists of several stages of realities: starting from distortion, to alienation, to taking a visit to an upside world only to see thriple and frouple of you at the final stage. During this emerging and magical process, the spiral hypnosis adds up to the whole surrealistic moment that was intended to be recreated. The sonic unearthy sound of the motor contributes to making the experience more sensual and industrial.
MIRRORS

THE PROCESSING CODE
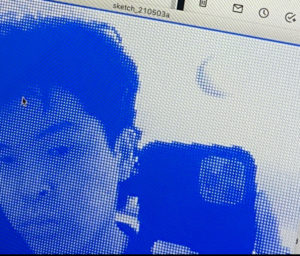
import processing.video.*;
import processing.serial.*;
Serial myPort;
int switcher = 0;
int cellSize = 5;
int duration = 155;
// Number of columns and rows in our system
int cols, rows;
Capture video;
void setup(){
  size(640,480);
  frameRate(20);
  cols = width / cellSize;
  rows = height / cellSize;
  colorMode(RGB, 255, 255, 255, 100);
  printArray(Serial.list());
  String portname=Serial.list()[1];
  println(portname);
  myPort = new Serial(this, portname, 9600);
  myPort.clear();
  myPort.bufferUntil('\n');
  video = new Capture(this, width, height);
  video.start();
  background(0);
}
void draw(){
  tint(256,256,256);
  background(0);
  if (video.available()){
    video.read();
    video.loadPixels();
  }
  if(switcher==0){
    for (int i = 0; i < cols; i++) {
      // Begin loop for rows
      for (int j = 0; j < rows; j++) {

        // Where are we, pixel-wise?
        int x = i*cellSize;
        int y = j*cellSize;
        int loc = (video.width - x - 1) + y*video.width; // Reversing x to mirror the image

        float r = red(video.pixels[loc]);
        float g = green(video.pixels[loc]);
        float b = blue(video.pixels[loc]);
        // Make a new color with an alpha component

        color c = color(r, g, b, 75); //make smth out of the last number using potentiometer

        // Code for drawing a single rect
        // Using translate in order for rotation to work properly
        pushMatrix();
        translate(x+cellSize/2, y+cellSize/2);
        // Rotation formula based on brightness
        rotate((2 * PI * brightness(c) / 255.0));
        rectMode(CENTER);
        fill(c);
        noStroke();
        // Rects are larger than the cell for some overlap


        ellipse(0, 0, 5, 50);

        popMatrix();
      }
    }
    //image(video,0,0);
  }
  else if(switcher == 1){
        background(0,0,255);

        for (int i = 0; i < cols;i++) {
      // Begin loop for rows
      for (int j = 0; j < rows;j++) {

        // Where are we, pixel-wise?
        int x = i * cellSize;
        int y = j * cellSize;
        int loc = (video.width - x - 1) + y*video.width; // Reversing x to mirror the image

        // Each rect is colored white with a size determined by brightness
        color c = video.pixels[loc];
        float sz = (brightness(c) / 255.0) * cellSize;
        rectMode(CENTER);
        fill(255);
        noStroke();
        rect(x + cellSize, y + cellSize, sz, sz);
      }
    }
    //scale(-1,1);
    //image(video,-width,0);
  }
  else if(switcher == 2){

    scale(-1,-1);
    image(video,-width,-height);
  }
  else if(switcher == 3){
  tint(256, 0, 0);
  image(video, 0, 0, width/2, height/2);
  tint(0, 256, 0);
  image(video, width/2, 0, width/2, height/2);
  tint(0, 0, 256);
  image(video, 0, height/2, width/2, height/2);
  tint(256, 0, 256);
  image(video, width/2, height/2, width/2, height/2);
}
  else{
    println("Switcher = 0 again");
    switcher = 0;
  }
}
void mousePressed(){
  switcher++;
}
void serialEvent(Serial myPort) {
  String s=myPort.readStringUntil('\n'); //open port, read
  s=trim(s);
  myPort.write(duration + "\n");
}
ARDUINO CODE
#include <SparkFun_TB6612.h>

#define AIN1 2
#define BIN1 7
#define AIN2 4
#define BIN2 8
#define PWMA 5
#define PWMB 6
#define STBY 9
int duration = 0;

const int offsetA = 1;
const int offsetB = 1;

Motor motor1 = Motor(AIN1, AIN2, PWMA, offsetA, STBY);

void setup() {

  Serial.begin (9600);
  Serial.println("0");

}

void loop() {


  while (Serial.available()) {

  duration = Serial.parseInt();
      if (Serial.read() == '\n') {
      motor1.drive(duration,1000);
      }
  }

}
THE DISPLAY
THE PROJECT