Newer Mac Video Capture

Instructions summarized from here: http://wiki.iad.zhdk.ch/CV/904626177/Video+Library+2.0

Due to security features on newer Macs, Processing’s video capture examples can’t be opened on those machines (Catalina and >). Follow these steps to be able to use video capture (the first two only need to happen once):

  1.  Install the latest release of  the video library in Processing from here: https://github.com/processing/processing-video/releases
  2. In the terminal app, copy and paste the following to remove Processing from quarantine: `cd ~/Documents/Processing/libraries/video; xattr -r -d com.apple.quarantine *`
  3. You HAVE TO OPEN PROCESSING FROM THE COMMAND LINE now whenever you want to use the video camera: `/Applications/Processing.app/Contents/MacOS/Processing`

Capacitive Touch


const int touchPin = 2;

void setup() {
  Serial.begin(9600);
  pinMode(3, OUTPUT);
}

void loop() {
  int capacitance = readCapacitivePin(touchPin);
  Serial.println(capacitance);
  if (capacitance > 3)
    digitalWrite(3, HIGH);
  else
    digitalWrite(3, LOW);
}


// readCapacitivePin
//  Input: Arduino pin number
//  Output: A number, from 0 to 17 expressing
//  how much capacitance is on the pin
//  When you touch the pin, or whatever you have
//  attached to it, the number will get higher
#include "pins_arduino.h" // Arduino pre-1.0 needs this
uint8_t readCapacitivePin(int pinToMeasure) {
  // Variables used to translate from Arduino to AVR pin naming
  volatile uint8_t* port;
  volatile uint8_t* ddr;
  volatile uint8_t* pin;
  // Here we translate the input pin number from
  //  Arduino pin number to the AVR PORT, PIN, DDR,
  //  and which bit of those registers we care about.
  byte bitmask;
  port = portOutputRegister(digitalPinToPort(pinToMeasure));
  ddr = portModeRegister(digitalPinToPort(pinToMeasure));
  bitmask = digitalPinToBitMask(pinToMeasure);
  pin = portInputRegister(digitalPinToPort(pinToMeasure));
  // Discharge the pin first by setting it low and output
  *port &= ~(bitmask);
  *ddr  |= bitmask;
  delay(1);
  uint8_t SREG_old = SREG; //back up the AVR Status Register
  // Prevent the timer IRQ from disturbing our measurement
  noInterrupts();
  // Make the pin an input with the internal pull-up on
  *ddr &= ~(bitmask);
  *port |= bitmask;

  // Now see how long the pin to get pulled up. This manual unrolling of the loop
  // decreases the number of hardware cycles between each read of the pin,
  // thus increasing sensitivity.
  uint8_t cycles = 17;
  if (*pin & bitmask) {
    cycles =  0;
  }
  else if (*pin & bitmask) {
    cycles =  1;
  }
  else if (*pin & bitmask) {
    cycles =  2;
  }
  else if (*pin & bitmask) {
    cycles =  3;
  }
  else if (*pin & bitmask) {
    cycles =  4;
  }
  else if (*pin & bitmask) {
    cycles =  5;
  }
  else if (*pin & bitmask) {
    cycles =  6;
  }
  else if (*pin & bitmask) {
    cycles =  7;
  }
  else if (*pin & bitmask) {
    cycles =  8;
  }
  else if (*pin & bitmask) {
    cycles =  9;
  }
  else if (*pin & bitmask) {
    cycles = 10;
  }
  else if (*pin & bitmask) {
    cycles = 11;
  }
  else if (*pin & bitmask) {
    cycles = 12;
  }
  else if (*pin & bitmask) {
    cycles = 13;
  }
  else if (*pin & bitmask) {
    cycles = 14;
  }
  else if (*pin & bitmask) {
    cycles = 15;
  }
  else if (*pin & bitmask) {
    cycles = 16;
  }

  // End of timing-critical section; turn interrupts back on if they were on before, or leave them off if they were off before
  SREG = SREG_old;

  // Discharge the pin again by setting it low and output
  //  It's important to leave the pins low if you want to
  //  be able to touch more than 1 sensor at a time - if
  //  the sensor is left pulled high, when you touch
  //  two sensors, your body will transfer the charge between
  //  sensors.
  *port &= ~(bitmask);
  *ddr  |= bitmask;

  return cycles;
}

Arduino LCD Screen

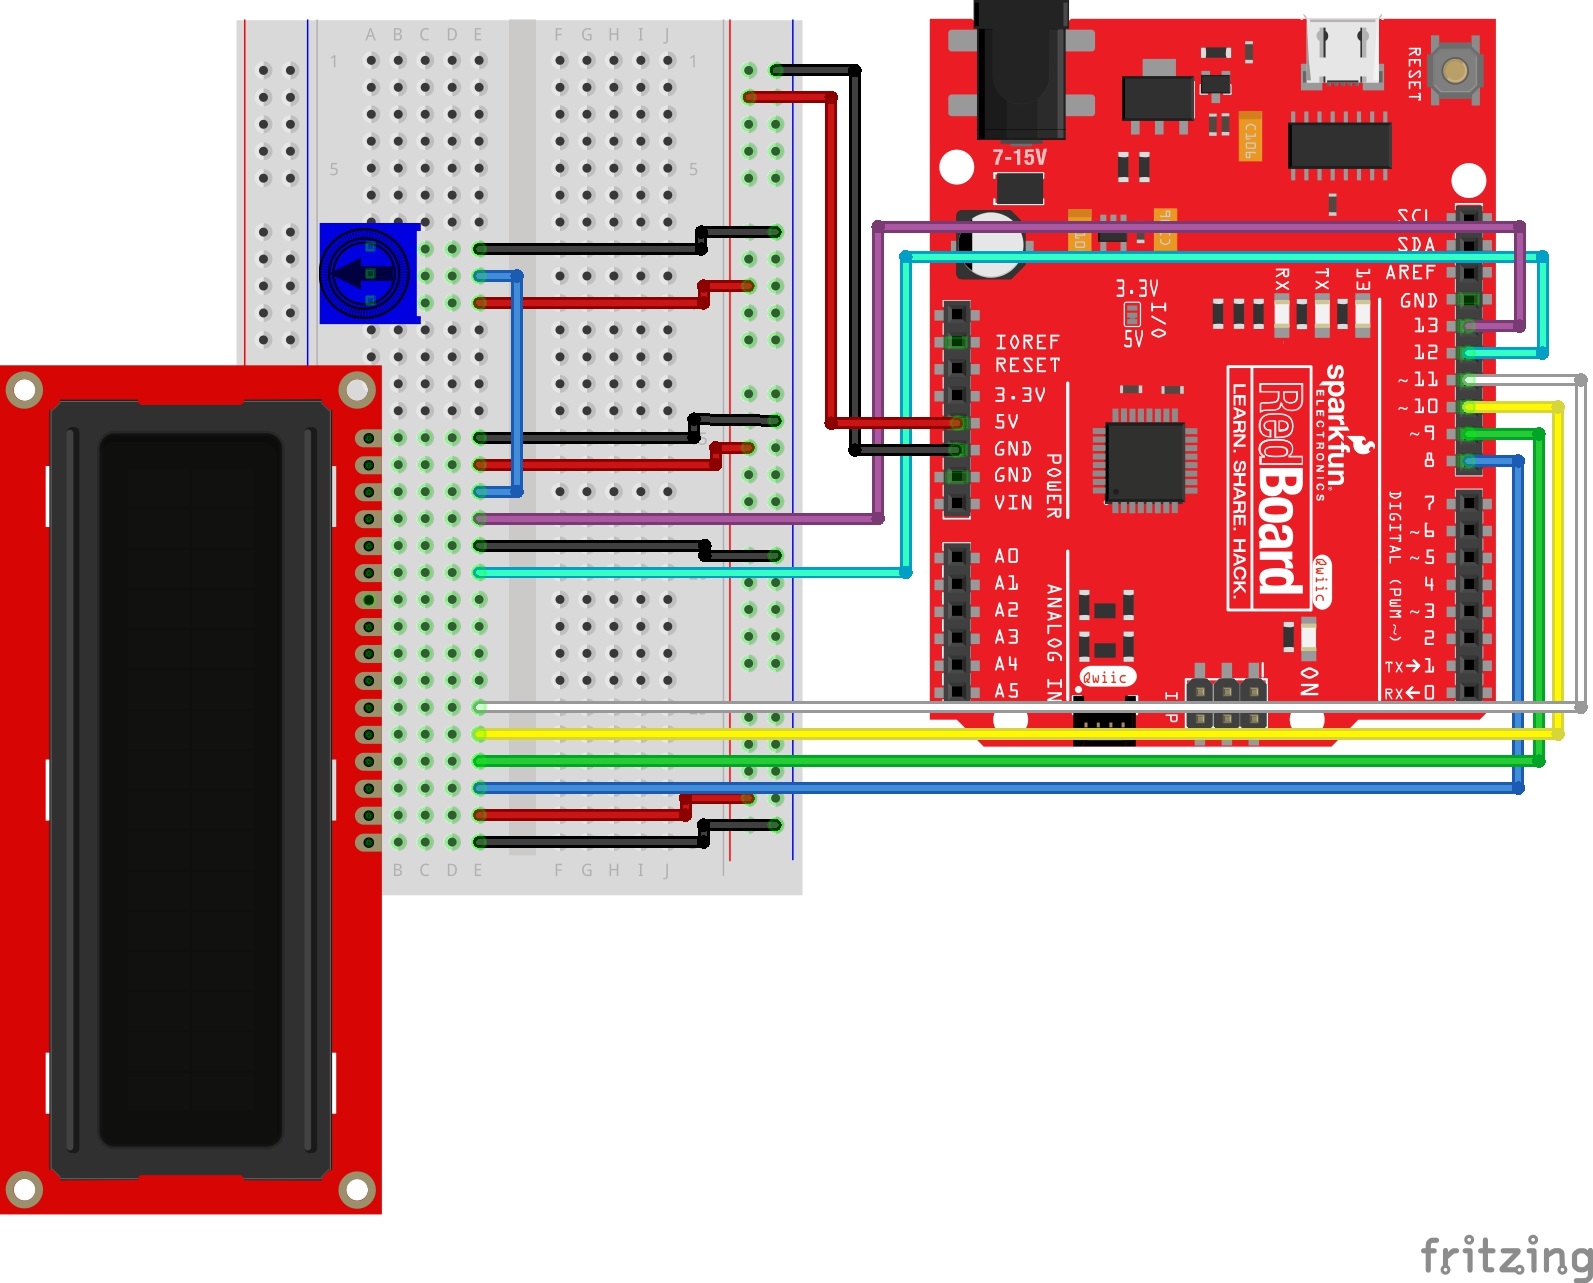
This is from the Sparkfun tutorials online found here. More code examples available here.

/*
  SparkFun Inventor’s Kit
  Circuit 4A-HelloWorld

  The LCD will display the words "Hello World" and show how many seconds have passed since
  the RedBoard was last reset.

  This sketch was written by SparkFun Electronics, with lots of help from the Arduino community.
  This code is completely free for any use.

  View circuit diagram and instructions at: https://learn.sparkfun.com/tutorials/sparkfun-inventors-kit-experiment-guide---v41
  Download drawings and code at: https://github.com/sparkfun/SIK-Guide-Code
*/

#include <LiquidCrystal.h>          //the liquid crystal library contains commands for printing to the display

LiquidCrystal lcd(13, 12, 11, 10, 9, 8);   // tell the RedBoard what pins are connected to the display

void setup() {

  lcd.begin(16, 2);                 //tell the lcd library that we are using a display that is 16 characters wide and 2 characters high
  lcd.clear();                      //clear the display
}

void loop() {

  lcd.setCursor(0, 0);              //set the cursor to the 0,0 position (top left corner)
  lcd.print("Hello, world!");       //print hello, world! starting at that position

  lcd.setCursor(0, 1);              //move the cursor to the first space of the bottom row
  lcd.print(millis() / 1000);       //print the number of seconds that have passed since the last reset
}

LED Bell Curve

// higher number is slower
int speed = 20;

// change spread to make the bell curve wiser or narrower
float spread = 0.12;

// set the postion to start outside of 0 to 1 so the first LED is dark
float bellCurveCenter = -spread;

float ledPos[3] = {.25, .5, .75};
int ledIndex[3] = {5, 10, 11};

void setup()
{
  for (int i=0; i<3; i++){
    pinMode(ledIndex[i], OUTPUT);
  }
}

void loop()
{
  // this is the juicy part
  for (int i=0; i< 3; i++) {
    // finding the distance of each LED from the center of our bell curve
    float distance = abs(ledPos[i]-bellCurveCenter);
    // this is the formula for the bell curve, multiply by 255 to put in the proper range for brightness
    float brightness = exp(-0.5*pow(distance/spread, 2.))*255;
    analogWrite(ledIndex[i],brightness);

  }
  
  // move the center
  // you could adjust the speed with a potentiometer
  if (millis()%speed==0)
    bellCurveCenter += .01;

  // start it over when it reaches the end
  // reset based on the spread so that it fades all the way out before resetting
  if (bellCurveCenter>1+spread) {
    bellCurveCenter = -spread;
  }
}


Week 5 Class – Pixels

Images to download

Sketches used:

class SimpleMover {
  float x, y, homeX, homeY;
  float xSpeed, ySpeed;
  float diam;
  boolean seek;
  char letter;

  SimpleMover(float _x, float _y, float _diam ) {
    homeX = x = _x;
    homeY = y = _y;
    xSpeed = ySpeed = 0;
    diam = _diam;
    seek = true;
  }

  void update() {
    x += xSpeed;
    y += ySpeed;
    xSpeed *= .95;
    ySpeed *= .95;
  }

  void display() {
    ellipse(x, y, diam, diam);
  }

  void seekHome() {
    if (seek) {
      float dirX = homeX-x;
      float dirY = homeY-y;
      dirX*=.005;
      dirY*=.005;
      xSpeed+=dirX;
      ySpeed+=dirY;
    }
  }

  void checkEdges() {
    if (y>height) {
      y=0;
    }
    if (y<0) {
      y=height;
    }
    if (x>width) {
      x=0;
    }
    if (x<0) {
      x=width;
    }
  }
}


In Class Exercises

Start with which ever is easiest, go deep or try as many as you can get through. Post at least one finished one on the blog (with images/video/code/etc.)

  • Take an image and make an artistic collage with sections of that image using get()
  • Access the pixels of an image and for a particular color change that pixel with a pixel from another image (green screen effect)
  • Take an image and draw it with rectangles with the proper colors
    • Make those rects explode along the Z-axis based on the brightness of each pixel ( you need to set P3D in the size statement at the beginning of the sketch, i.e. size(512,512,P3D) )
    • Make it interactive with the mouse, the further you move the mouse in one direction the more it explodes, or goes back to it’s original position
  • Take an image and draw it with rectangles or circles with the proper colors
    • Using a class/object from before (like the letters sketches), or some other generative movement algorithm, make the shapes move around on screen in various ways and then return to their  home positions when you press a key