Båige – Horse Race!
User testing is in a separate blog post. Here is the video of my final project-> FINAL PROJECT VIDEO
My Concept: The project is an interactive game about the horse race, one of the traditional games in Kazakh culture. As horse riding was a part of our nomadic lifestyle, we have a lot of games connected with horse riding. One of these games is called Båige as the name of this game, where the equestrians compete with each other while riding the horses and that might include overcoming some obstacles. I wanted to incorporate that into my game: the user is an equestrian, riding the horse and avoiding obstacles in the form of snakes while collecting the stars that add up extra points to the score. As the game progresses, the snakes move faster, making the game harder for the user.
The implementation of the idea: To implement the idea four main buttons were used, which are responsible for each of the lines in the racing game. When the button is pressed, the horse moves to the corresponding line. To make the experience of racing, the obstacles and the awards are added to the game, so the user should avoid the former and collect the latter, adding up to the score.
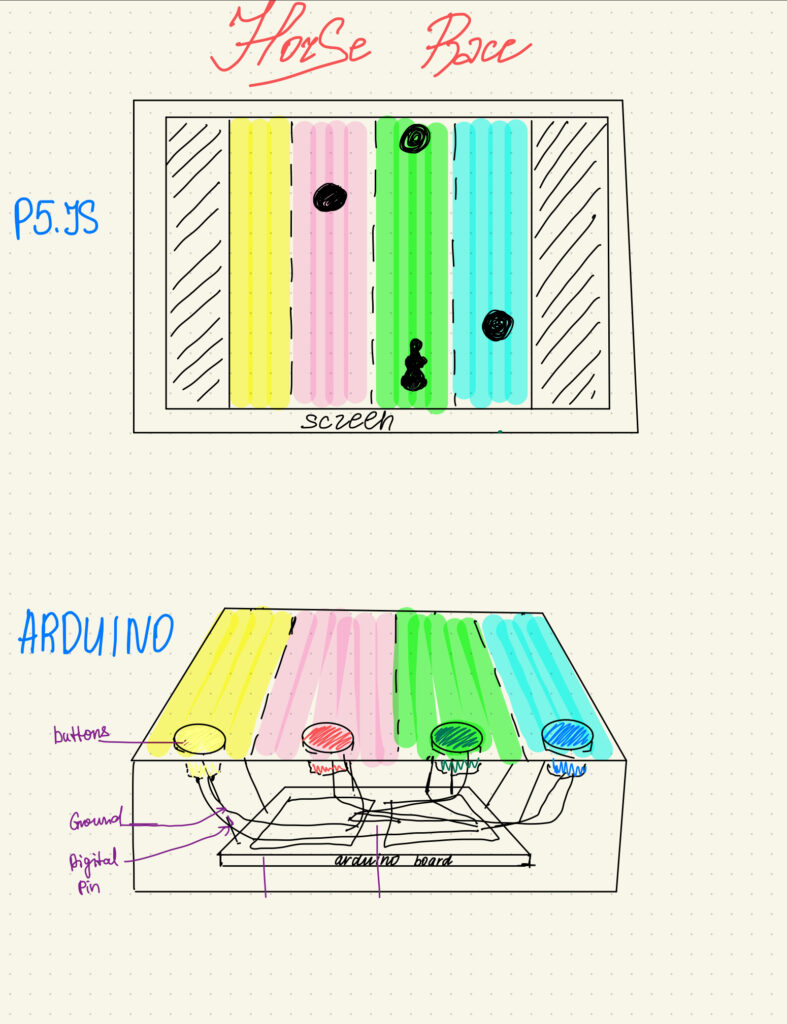
Description of interaction design: The user interacts with the game by pressing the physical buttons on the box, each of which is responsible for the corresponding line as shown in Fig 1. For instance, when the user presses the red button on Arduino, the equestrian on the p5.js moves to the red line. Hence, when the obstacles appear in the way of the user, the user will try to press the buttons of the lines with no obstacles. More obstacles are avoided, and more score is given to the user. Furthermore, the stars appear on the p5.js and by pressing the buttons of the lines with the stars, the user will be able to collect these stars and add extra points to the score. When the user collides with the snakes, the game is over and the score collected by the user shows up.
 Fig. 1. P5.js and Arduino set up sketch
Description of Arduino code: The Arduino code declares the buttons as digital inputs with internal pull-up resistors. It checks if the buttons are pressed and sends the corresponding number through serial if they are pressed. For instance, if the white button is pressed, the number 1 is sent to the serial communication. The delay was added, so when the button is pressed once, only one number is printed and sent.
Link to full Arduino sketch:
// Intro To IM - Fall 2023
// Michael Ang
// Final Project - Baige- Horse Race!
// Diana Alibekova

// assigning pins to the buttons and declaring them as constant int, so their values will not be accidentally altered
const int greenbutton = 2;
const int yellowbutton = 3;
const int redbutton = 4;
const int whitebutton = 5;
const int startbutton = 6;

void setup() {
  //activating the serial communication
  Serial.begin(9600);
  //declaring the buttons as digital inputs with internal pull up resistors (the external resistors are not used)
  pinMode(greenbutton, INPUT_PULLUP);
  pinMode(yellowbutton, INPUT_PULLUP);
  pinMode(redbutton, INPUT_PULLUP);
  pinMode(whitebutton, INPUT_PULLUP);
  pinMode(startbutton, INPUT_PULLUP);
}

void loop() {
  // checking if the buttons are pressed and sending the corresponding number through serial if they are pressed
  if (digitalRead(whitebutton) == LOW) {
    Serial.println(1);
    // delay is needed because it pauses the program for a half a second, so only one press of the button is registered.
    delay(500);
  } else if (digitalRead(redbutton) == LOW) {
    Serial.println(2);
    delay(500);
  } else if (digitalRead(yellowbutton) == LOW) {
    Serial.println(3);
    delay(500);
  }
  else if (digitalRead(greenbutton) == LOW) {
    Serial.println(4);
    delay(500);
  }
  else if (digitalRead(startbutton) == LOW) {
    Serial.println(0);
    delay(500);
  }
}
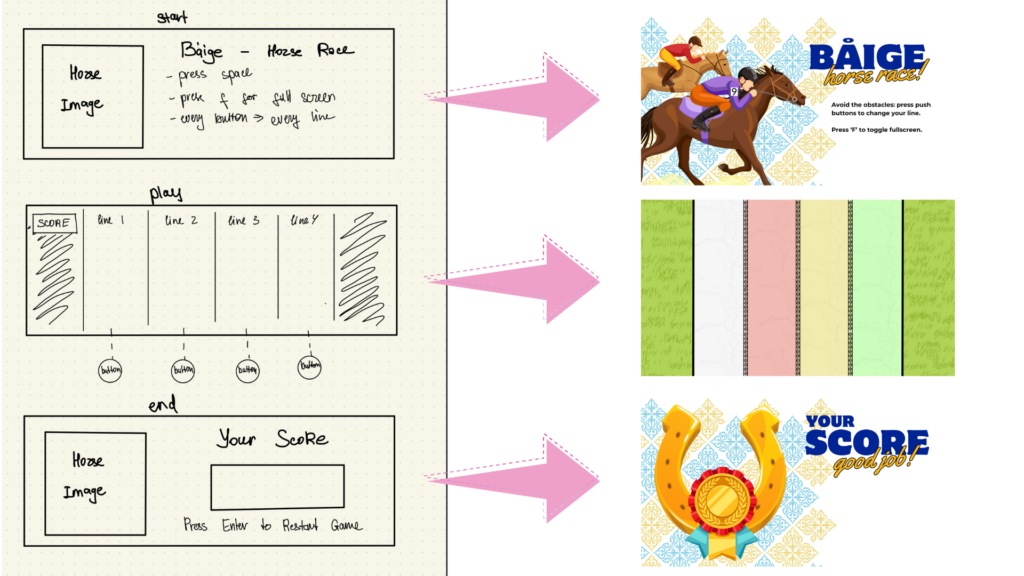
Description of p5.js code: The images and sounds are preloaded before the setup runs. The game has three states: start with instructions given, play with the game playing, and end with the score obtained as shown in Fig. 2. In the instructions, the image with the instructions is shown and the serial communication is set by pressing the space key button and choosing the serial port. By pressing the start button on Arduino, the number ‘0’ is sent to the p5.js, which is interpreted as the transition between the states. So, the game transitions to the game-playing state. In this state, the background image of the racing lines is displayed with the moving obstacles, bonus stars as well and the horse of the user. In the beginning, the horse is in the initial position given unless the number is sent to the p5.js by pressing one of the four buttons on Arduino. When the button is pressed, the number is sent to p5.js and the horse moves by x coordinate accordingly. Moreover, there are the moving obstacles, which appear randomly in the x coordinates of windowWidth * (3 / 12), windowWidth * (5 / 12), windowWidth * (7 / 12), windowWidth * (9 / 12) and move by y coordinate and increase the speed. Initially, these obstacles were identified as the circles as well as the horse, so the minimum distance between them was calculated as the obstacle.radius + (circleRadius / 2). The collision was identified when the distance between the obstacle radius and the circle (horse) radius was smaller than the minimum distance. When they collide, the game ends by freezing the image or sleeping for a second and then transiting to the end state. A similar approach was taken with the bonus stars, but the collision with them added extra points to the score. The score was calculated by every obstacle passing through the window, so the y coordinate of the obstacle circle is greater than the window height. In the end state, the end image is displayed with the score.
The code I am proud with: I am particularly proud with the code of calculating the distance between the obstacles and the circle (horse) to determine the collision.
// for loop accessing each obstacle in the array and calcilating the distance between the horse and obstacle as well as minimum distance for collision to occur
 for (let i = 0; i < obstacles.length; i++) {
  let obstacle = obstacles[i];
  let distance = dist(circleX, windowHeight * (2 / 3), obstacle.x, obstacle.y);
    let minDistance = obstacle.radius + (circleRadius / 2);

// if the horse collides with the obstacles, then the game is over, transitting to end game state and playing the winning sound
  if (distance < minDistance) {
    wonGame = false;
    // transitting to end game state
    gameState = 'end';
    level_win.play();
// if the horse doesn't collide with the obstacles, for each of the obstacles passed through the window height, the score is incremented.
  } else if (obstacle.y > windowHeight && !obstacle.passed) {
      obstacle.passed = true;
      score++;
    }
}
Embedded p5.js code:
Description of communication between Arduino and p5.js: there are five buttons on Arduino. Every time the button is pressed, the corresponding number is written down, which is sent to p5.js. For every one of these numbers, there are the x coordinates of the horse. Hence, the horse moves by x coordinate depending on the number taken. For instance, when the red button is pressed, the number 4 is sent to p5.js, meaning that the horse should move to the windowWidth*(3/12).
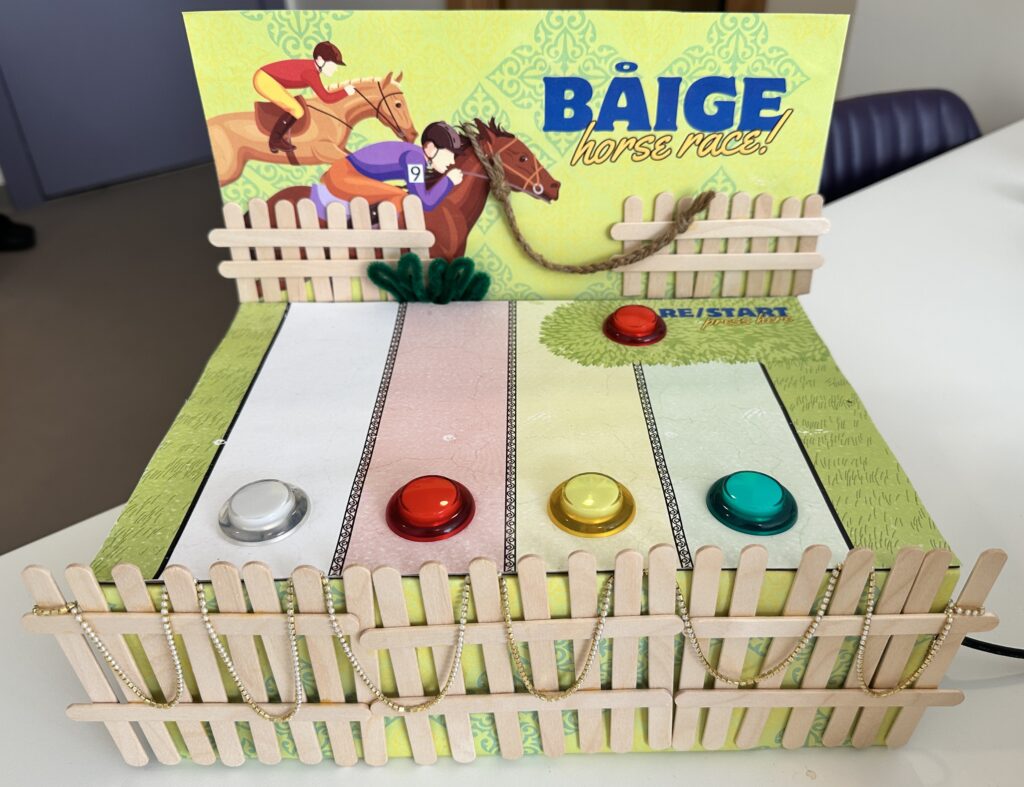
The aspects of the project I am proud of: Overall, I am very proud of the final product because I see the development of creative coding skills from absolute zero to something that can be presented in the IM Show. Specifically, I am proud of being able to correctly create the serial communication between Arduino and p5.js, so the Arduino sends the number every time the button is pressed and that number is rightly interpreted by p5.js and moves the horse by x coordinate. Moreover, as this is my very first dynamic game project, I am proud of being able to code the moving obstacles and awards as well as the collision between them. When the horse collides with an obstacle, the game is over, while when it collides with the award, bonus points are given to the score. Last but not least, I am very proud of the physical decoration I made shown in Fig. 3. because overall the project looks aesthetically pleasing and engaging.
The areas of improvement: There are some improvements to the project that I would like to add in the future. For instance, it would be great if the score of the users could be saved and created the list of users with the highest score in the game. This would create a sense of competition with others, making the game more interesting. Furthermore, there are minor details that would enhance the experience of playing the game such as whenever the collision with the snake happens, the image of the horse and snake changes as if the snake was biting the horse or something similar. I had that idea but I couldn’t find the image which would satisfy that. Hence, I think in the future, I might draw the images of the snake and horse and import them. Additionally, the moving trees and houses on the sides would be a great addition, enhancing the experience that the horse is moving. Moreover, as an improvement for the game, it would be great if two or more people could play the game together and compete with each other. In this case, the game would look like a horse race.
Resources used:
- The website used for images and design: https://www.canva.com/
- The horse image: top-view-of-people-set-isolated-on-a-white-background-men-riding-a-horse-a-motorcycle-a.jpg
- The sounds were taken from the website: https://pixabay.com/sound-effects/
- The sleep function was based on the code on the website: https://stackoverflow.com/questions/67221313/how-to-wait-in-p5-js
- The game states code followed the class example: https://editor.p5js.org/mangtronix/sketches/lwALEq10U
- The serial communication code followed the class example: https://editor.p5js.org/mangtronix/sketches/s67XC0zT4


