
Exercise 1:
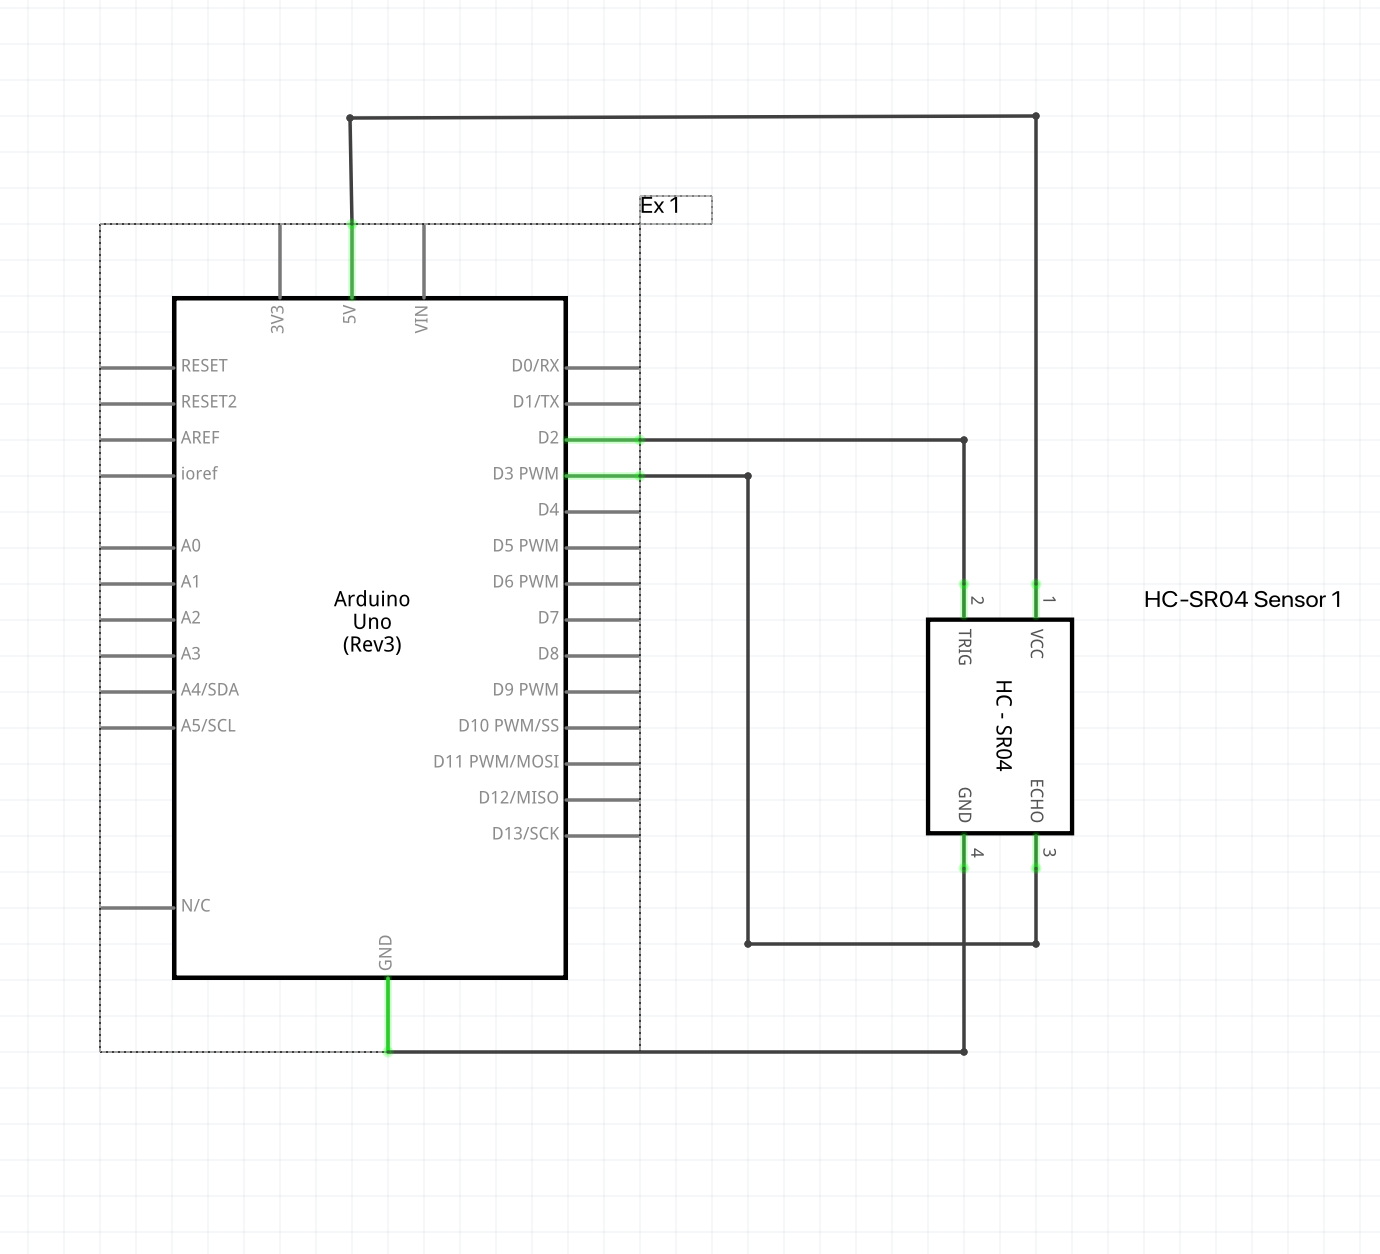
During the exercise, we had to use an Arduino with an analog sensor to manipulate a feature in P5js based on the readings. We opted for an ultrasonic sensor to achieve this, where the data obtained was utilized to shift an ellipse along its horizontal axis in P5js.
CODE FOR P5JS
//declare variables for the dimensions and coordiantes of ellipse
let ellipseXcord;
let ellipseYcord;
let ellipseRadius;

function setup()
{
  createCanvas(500, 500); //create canvas
  background(100);
  textDisplay();
  //set the initial ellipse to be in the centre
  ellipseXcord = width/2;
  ellipseYcord = height/2;
  ellipseRadius = height/10;
}

//displays this text in the starting
function textDisplay()
{
  text("PRESS ANY KEY TO START SERIAL PORT", width/2 - 109, height/2 - 5);
}

function draw()
{
  background(220);
  if (serialActive) //if the serial is active
  {
    ellipse(ellipseXcord, ellipseYcord, ellipseRadius, ellipseRadius); //then keep changing the coordinates of ellipse bases on ellipseXcord
  }
  else //if the serial is not active
  {
    textDisplay(); //then display the text with instructions
  }
}

function readSerial(data) //call back function
{
  if (data != null) //if the data received is not null
    {
      ellipseXcord = map(data, 300, 1500, ellipseRadius, width - ellipseRadius); //map the value of the data and then update the variable
      //do it with ellipse radius because dont want half the circle off the screen
    }
}

function keyPressed() //if any key is pressed, then set up serial
{
  setUpSerial();
}
CODE FOR ARDUINO
const int pingPin = 2; //Trigger Pin of Ultrasonic Sensor
const int echoPin = 3; //Echo Pin of Ultrasonic Sensor
long distance = 0; //will contain the distance of the object

void setup() {
  //Start serial communication at 9600 baud
  Serial.begin(9600);

  //Set the ultrasonic sensor pins as output and input respectively
  pinMode(pingPin, OUTPUT);
  pinMode(echoPin, INPUT);
}

void loop() {
  //Send a short low pulse
  digitalWrite(pingPin, LOW);
  delay(2); //delay to avoid complications
  digitalWrite(pingPin, HIGH); //sends a high pulse for 10 microseconds
  delay(10);
  digitalWrite(pingPin, LOW); //turn off the ping pin
  distance = pulseIn(echoPin, HIGH); //Measure the duration of the ultrasonic pulse and calculate the distance
  Serial.println(distance); //print it in the serial (P5js)
}
EXERCISE 2
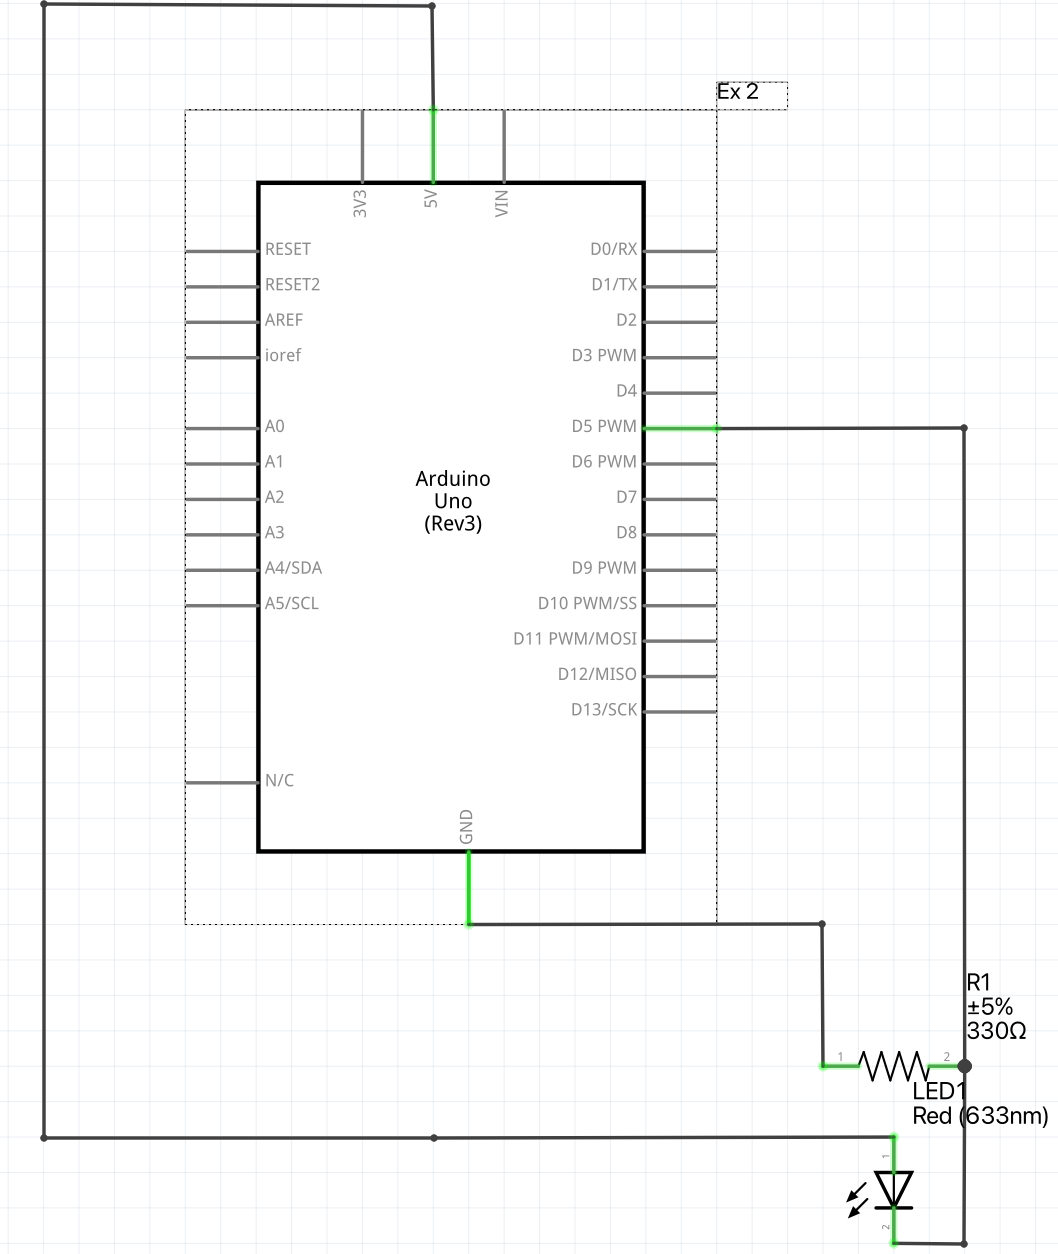
In this particular exercise, the primary objective was to control the LEDs on an Arduino board through P5js code. We utilized the left and right arrow keys, which functioned as input devices to alter the dimness of the bulb. The code starts off with the LED at its maximum brightness but as the right arrow key is pressed, the brightness keeps decreasing. When the left arrow key is pressed, the brightness starts increasing again.
CODE FOR P5JS
let dimnessCounter = 0; //this will control the brightness and dimness of the LED

function setup()
{
  createCanvas(400, 400);  //create canvas
}


function textDisplay() //display text in the starting
{
  text("PRESS SPACE TO START SERIAL PORT", width/2 - 109, height/2 - 5);
}

function draw()
{

  background(100);  //grey background

  if (serialActive) //if serial is active
  {
    text("CONNECTED!", width/2 - 27, height/2 - 5); //tell the user that it is connected
    text("PRESS RIGHT ARROW TO LOWER BRIGHTNESS!", width/2 - 130, height/2 + 15); //give instructions on how to control brightness
  }
  else
  {
    textDisplay(); //display instructions on how to start serial is not active
  }
}


function keyPressed() //built in function
{
  if (key == " ") //if space is pressed then
  {
    setUpSerial(); //setup the serial
  }
  else if (keyCode == LEFT_ARROW) //if left arrow pressed
  {
    if (dimnessCounter != 0) //check if brightness is not already at the lowest
    {
      dimnessCounter = dimnessCounter - 50; //if not then decrease by 50
    }
  }
  else if (keyCode == RIGHT_ARROW) //for the right key
  {
    if (dimnessCounter != 250) //check if dimness not at the maximum
    {
      dimnessCounter = dimnessCounter + 50; //increase dimness by 50
    }
  }

}

//callback function
function readSerial(data)
{
    let sendToArduino = dimnessCounter + "\n"; //add the next line to dimness counter
    writeSerial(sendToArduino); //write serial and send to arduino
}
CODE FOR ARDUINO
//declare variables
const int LED_PIN = 5;
int dimness = 0; //contains the dimness fothe LED

void setup()
{
  Serial.begin(9600); // Start serial communication at 9600 baud

  pinMode(LED_PIN, OUTPUT); //declare pin to be output

  while (Serial.available() <= 0)
  {
    Serial.println("CONNECTION ESTABLISHED"); // send a starting message
  }
}
void loop()
{
  //wait for p5 to do something
    while (Serial.available()) //when serial is available
    {
      dimness = Serial.parseInt(); //parse the dimness from the serial to the variable
      Serial.println(dimness); //checking purposes

      if (Serial.read() == '\n') //since the "\n" would be present in the serial, read that and
      {
        analogWrite(LED_PIN, dimness); //write it to the LED
      }
    }
}
EXERCISE 3
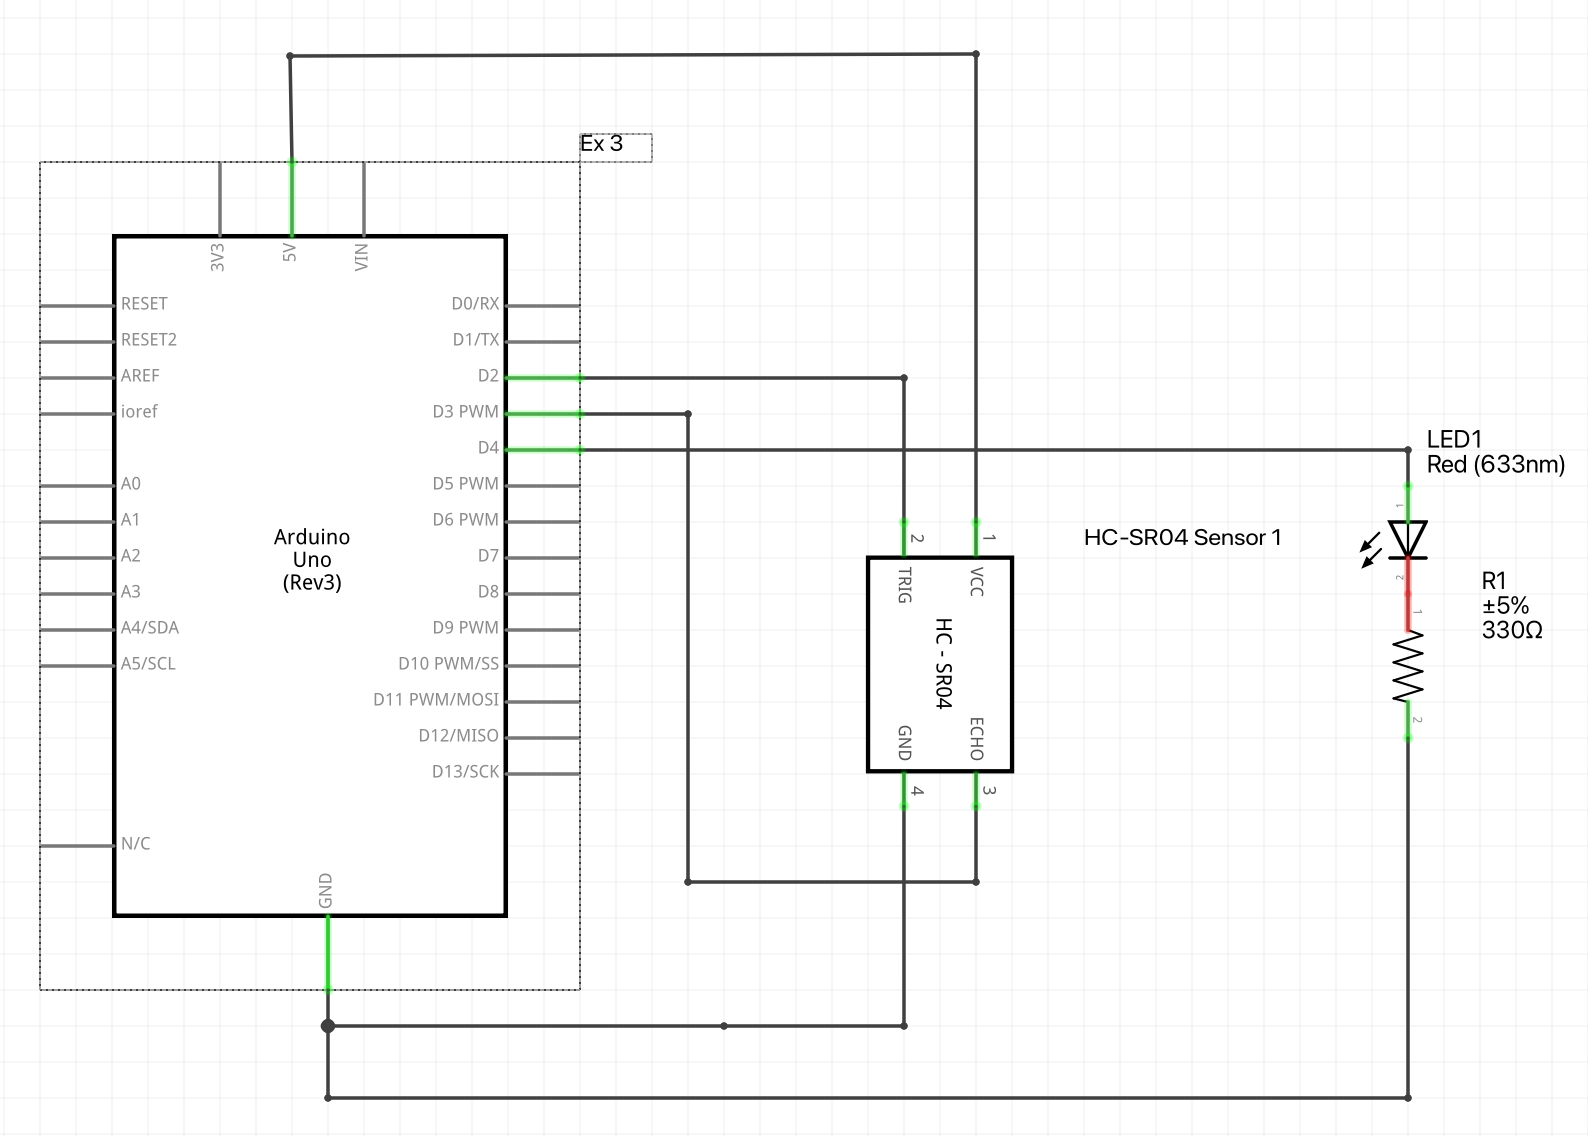
In this exercise, we were tasked with creating an interactive p5js program that simulates a bouncing ball, which changes direction based on a variable called ‘wind.’ The ball bounces on the floor and we needed to detect when it hit the floor, so we could turn an LED on. For the second part of this exercise, we used an analog sensor (ultrasonic sensor) to control the wind variable. We set a default value in which the ball would stay in the middle of the screen. When the object is moved to the right from the center, the ball would move to the right, and when moved to the left, the ball would move to the left.
CODE FOR P5JS
//declare variables
let velocity;
let gravity;
let position;
let acceleration;
let wind;
let drag = 0.99;
let mass = 50;
let LEDvalue = 1401;
let goRight = 0;
let goLeft = 0;
let first

function setup() {
  createCanvas(1000, 360); //create canvas
  noFill();
  position = createVector(width/2, 0);
  velocity = createVector(0,0);
  acceleration = createVector(0,0);
  gravity = createVector(0, 0.5*mass);
  wind = createVector(0,0);
}

function textDisplay()
{
  text("PRESS SPACE TO START SERIAL PORT", width/2 - 109, height/2 - 5); //display the appropriate text in the start
}

function draw() {
  background(255);
  if (serialActive) //if the serial is active
  {
    applyForce(wind);
    applyForce(gravity);
    velocity.add(acceleration);
    velocity.mult(drag);
    position.add(velocity);
    acceleration.mult(0);
    ellipse(position.x,position.y,mass,mass);
    if (position.y > height-mass/2)  //if the ball touches the bottom
    {
      velocity.y *= -0.9;  // A little dampening when hitting the bottom
      position.y = height-mass/2;
      LEDvalue = 1401; //take LED value to be 1401 because we dont want the value (1) to be lurking in the serial and then affecting the wind values

    }
    else
    {
      LEDvalue = 1400; //when the LED is off
    }

  }
  else
  {
    fill(0);
    textDisplay();
  }
}

function applyForce(force){
  // Newton's 2nd law: F = M * A
  // or A = F / M
  let f = p5.Vector.div(force, mass);
  acceleration.add(f);
}

function keyPressed(){
  if (key==' '){ //if space is pressed, then serial is set up
    setUpSerial();
  }

  if (keyCode == DOWN_ARROW) //if down arrow is pressed
  {
    //mass etc is changed
    mass=random(15,80);
    position.y=-mass;
    velocity.mult(0);
  }
}

function readSerial(data) //call back function
{
  let sendToArduino = LEDvalue + "\n"; //sends value of LED to arduino with \n added
  writeSerial(sendToArduino); //write to arduino


  if (data != null) //if the data is not null and something is received
  {
    console.log(data);
    if (data > 1450) //if the distance is greater than 1450, then
    {
      wind.x = 1; //the ball/wind goes right
    }
    else if (data < 1350) //if the distance is less than 1350
    {
      wind.x = -1; //the ball/wind goes left
    }
  }
}
CODE FOR ARDUINO
//declare variables
const int LED_PIN = 4;
int LEDvalue = 0; //will contain whether or not the LED should be on or off
int distance = 0; //will contain the distance by ultrasonic sensor
const int pingPin = 2; //Trigger Pin of Ultrasonic Sensor
const int echoPin = 3; //Echo Pin of Ultrasonic Sensor

void setup()
{
  Serial.begin(9600); // Start serial communication at 9600 baud

  pinMode(LED_PIN, OUTPUT); //pin mode is output

  //Set the ultrasonic sensor pins as output and input respectively
  pinMode(pingPin, OUTPUT);
  pinMode(echoPin, INPUT);

  while (Serial.available() <= 0)
  {
    Serial.println(1400); //connection establishment. 1400 so that the wind values do not change
  }
}

void loop()
{
  //wait for p5js
    while (Serial.available())
    {
      sensorReading(); //reads data from the sensor

      LEDvalue = Serial.parseInt(); //parsing from the serial written data from p5js

      if (LEDvalue == 1400) //if the LED value is 1400
      {
        digitalWrite(LED_PIN, LOW); //then turn off the LED
      }
      else if (LEDvalue == 1401) //if the LED value is 1401
      {
        digitalWrite(LED_PIN, HIGH); //then turn on the LED
      }
    }
}

//Function to read the ultrasonic sensor and measure distance
void sensorReading()
{
  //Send a short low pulse
  digitalWrite(pingPin, LOW);
  delay(2); //delay to avoid complications
  digitalWrite(pingPin, HIGH); //sends a high pulse for 10 microseconds
  delay(10);
  digitalWrite(pingPin, LOW); //turn off the ping pin
  distance = pulseIn(echoPin, HIGH); //Measure the duration of the ultrasonic pulse and calculate the distance
  Serial.println(distance); //print the serial from distance
}
VIDEO