Exercise 1
Extending the potentiometer example demoed in class, we created a smiley ball that bounces horizontally across the screen whose velocity was dependent on the value of the potentiometer. Inside our Arduino code, we write the value of the potentiometer as serial output to the p5.js sketch:
void loop() {
// put your main code here, to run repeatedly:
 int potentiomenter = analogRead(A0);
 int mappedPot = map(potentiomenter, 0, 1023, 0, 255);
 Serial.write(mappedPot);
delay(100);
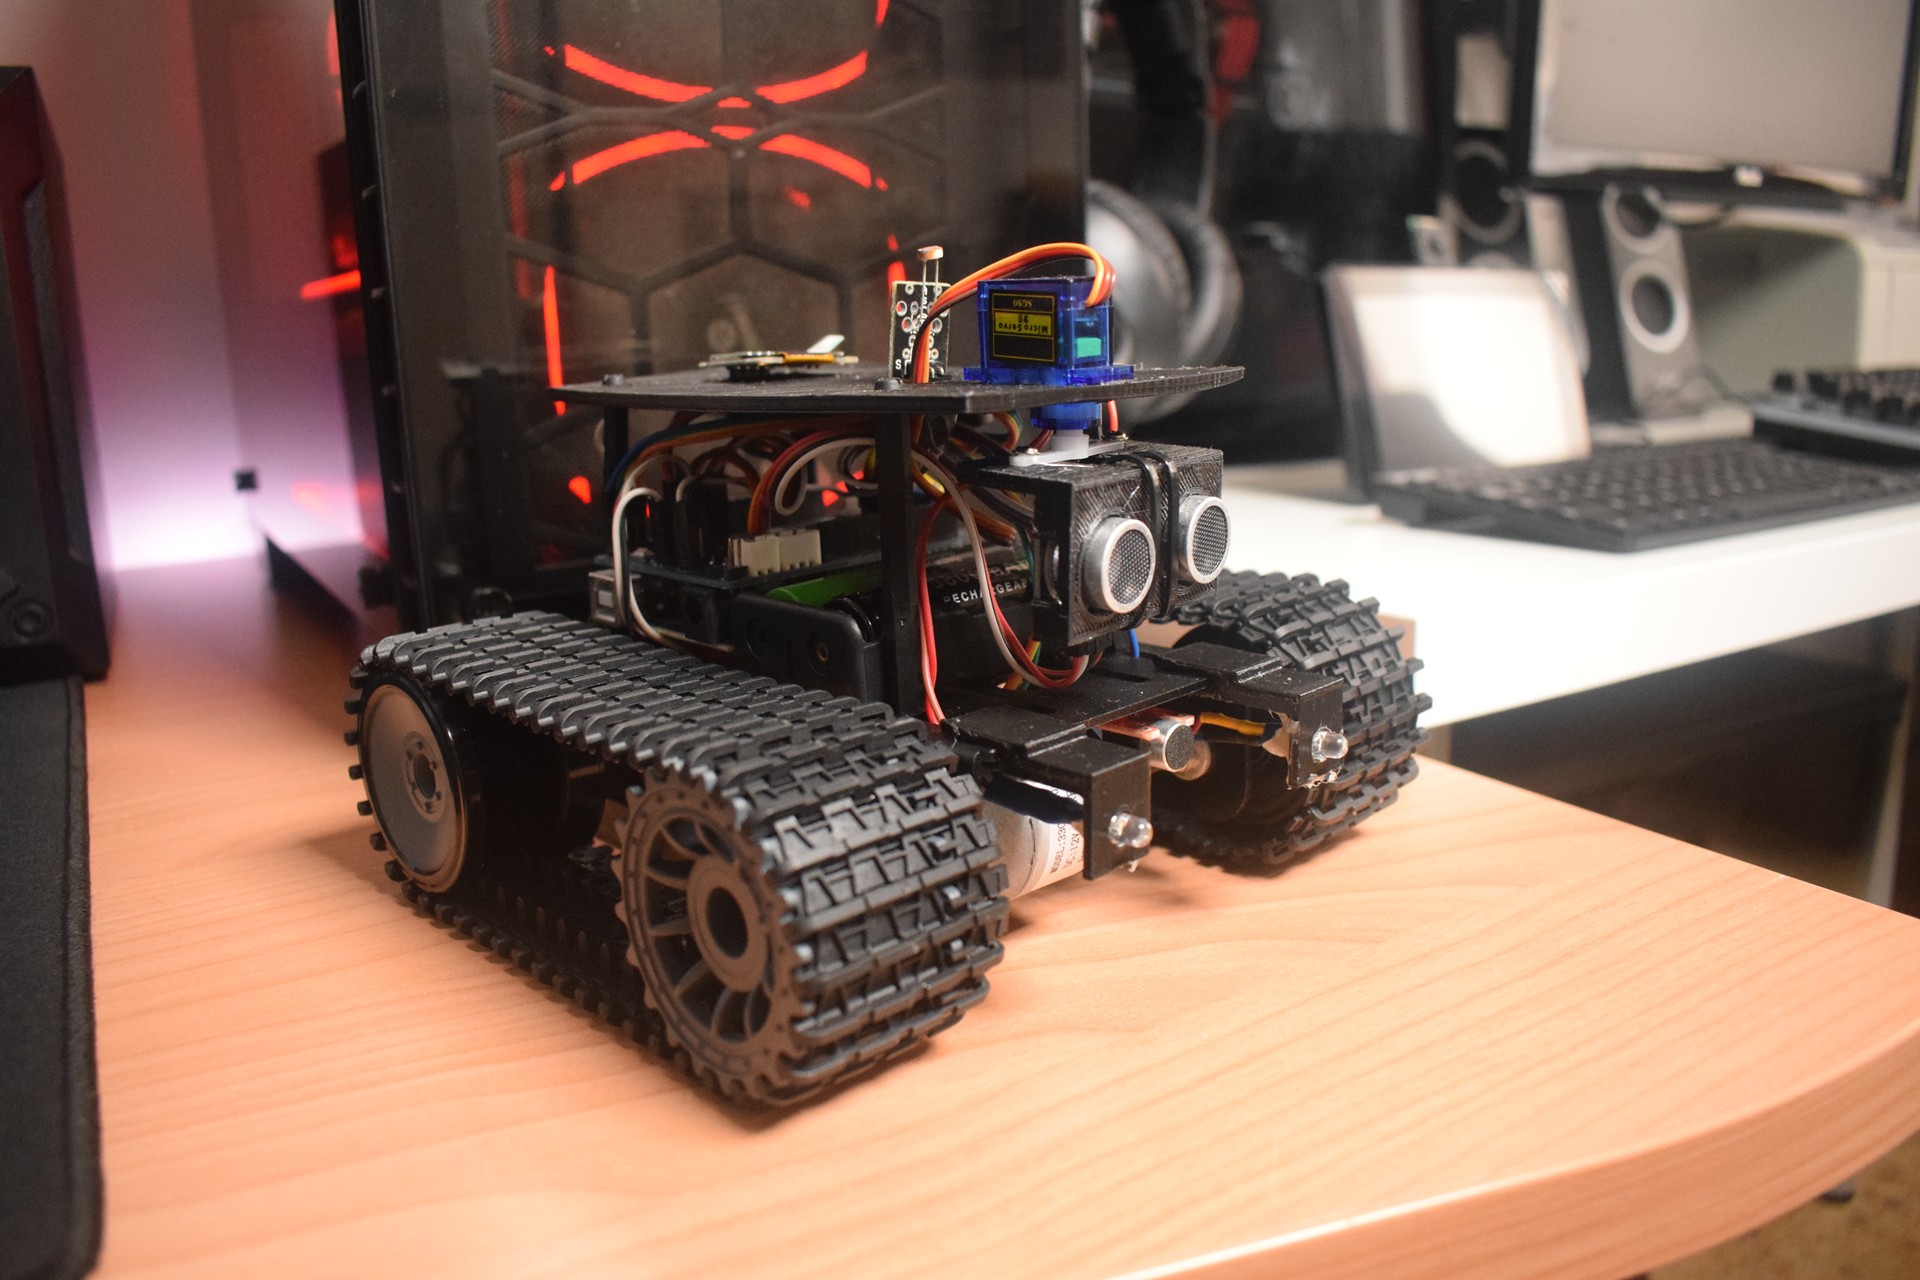
The corresponding breadboard is shown below:
[image]
Inside our p5.js sketch, we created our smiley ball by making a simple Circle class with an x and y position and a move() method. The move method() doesn’t change the ball’s y position, as it remains constant along the horizontal axis height/2, but it does update the x position, which is calculated using the variable inData – the value of the potentiometer read from Arduino. A snipped of the code is shown below:
class Circle {
constructor(x, y, d) {
this.x = x;
this.y = y;
this.d = d;
}
move() {
if (this.x<=50) {x = 1;}
else if (this.x>=550) {x =-1;}


let y;


if (inData==undefined) {
y=0;
} else {
y = inData;
}


this.x+=(y/20)*x;
}
Finally, a demo of the final product is shown below:
Exercise 2
We thought that the first exercise was rather bland in terms of visuals, so for this exercise we wanted our p5.js sketch to be more interesting. We made the connection of a sun rising and falling to the brightness of an LED, hence our sketch shows a sun against a mountain landscape that can “rise” and “fall” by pushing the up and down arrow keys. As the sun “rises”, the sky changes to a bright magenta color, and when the sun “falls”, the sky deepens to a dark blue color. We achieved this by having the sun’s y position (also built from the Circle class of Exercise 1) determined the rgb values of the background, as demonstrated in the following code:
function draw() {
background(300-c.y, 100-c.y, 100+c.y);
c.display();
c.move();


var rightBrightness = map(c.y, height, 0, 0, 255);

outData = rightBrightness; // setup the serial output
serial.write(outData); // write to serial for Arduino to pickup
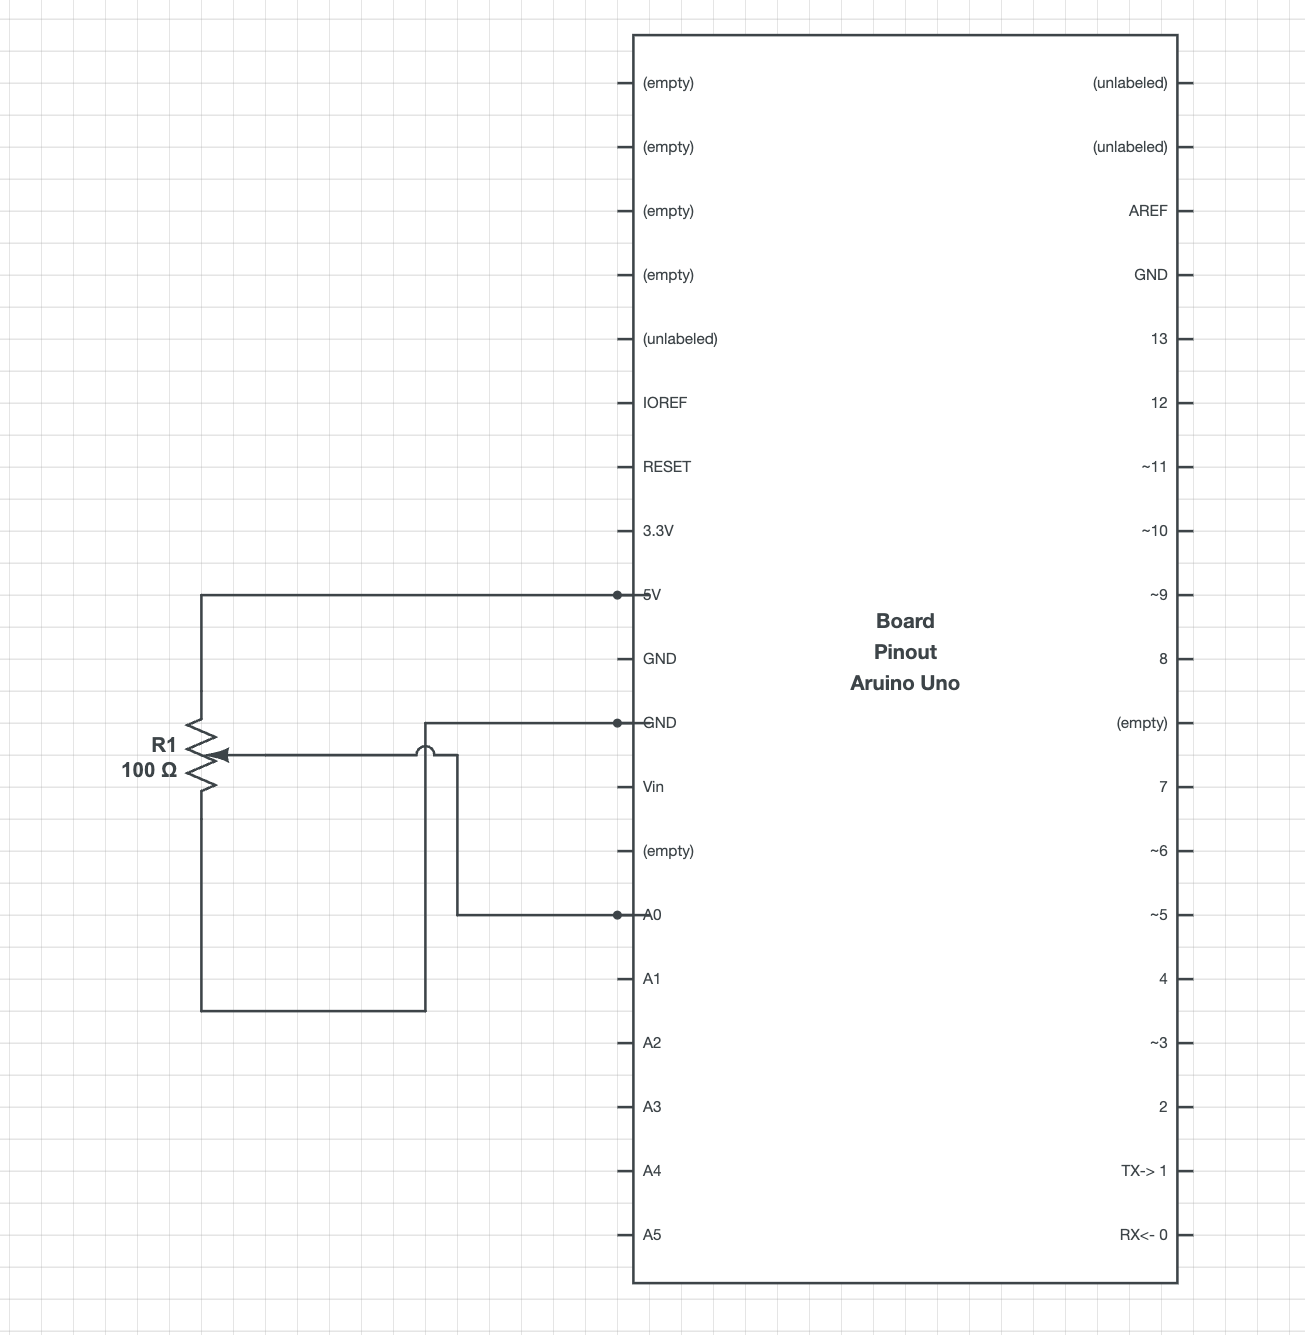
This seamless gradient effect then corresponds to the brightness of an LED on our Arduino board.
[image]
The sun’s y position is stored as outData, which is then sent to Arduino. Inside our Arduino code, we map the incoming value to a scale of 0 to 255 and use that value to analog write the LED brightness. A snippet of this code is shown below:
void loop() {
if (Serial.available() > 0) { // see if there's incoming serial data
incomingByte = Serial.read(); // read it
led2brightness = map(incomingByte, 0, 255, 0, 255); // map the input value to the brightness for second LED
} else { }
analogWrite(ledPin, led2brightness); // write the brightness to the led pin 2


}
Finally, a demo of the finished product is shown below:
Exercise 3
For the final exercise, we had to use bidirectional serial communication, which basically involved controlling a p5js sketch with an Arduino and tweaking the p5js sketch to affect the arduino. On the arduino, we used a distance sensor to affect the change of wind in p5js to make the ball move. Depending on the ball’s velocity, we programmed the p5js sketch so that an LED will turn on each time the ball bounces.
if (pos.y > height-mass/2) {
    velocity.y *= -0.9;  // A little dampening when hitting the bottom
    pos.y = height-mass/2;
    bounces+=1;
    outData = "H";
    serial.write(outData);
    console.log(outData);
  }
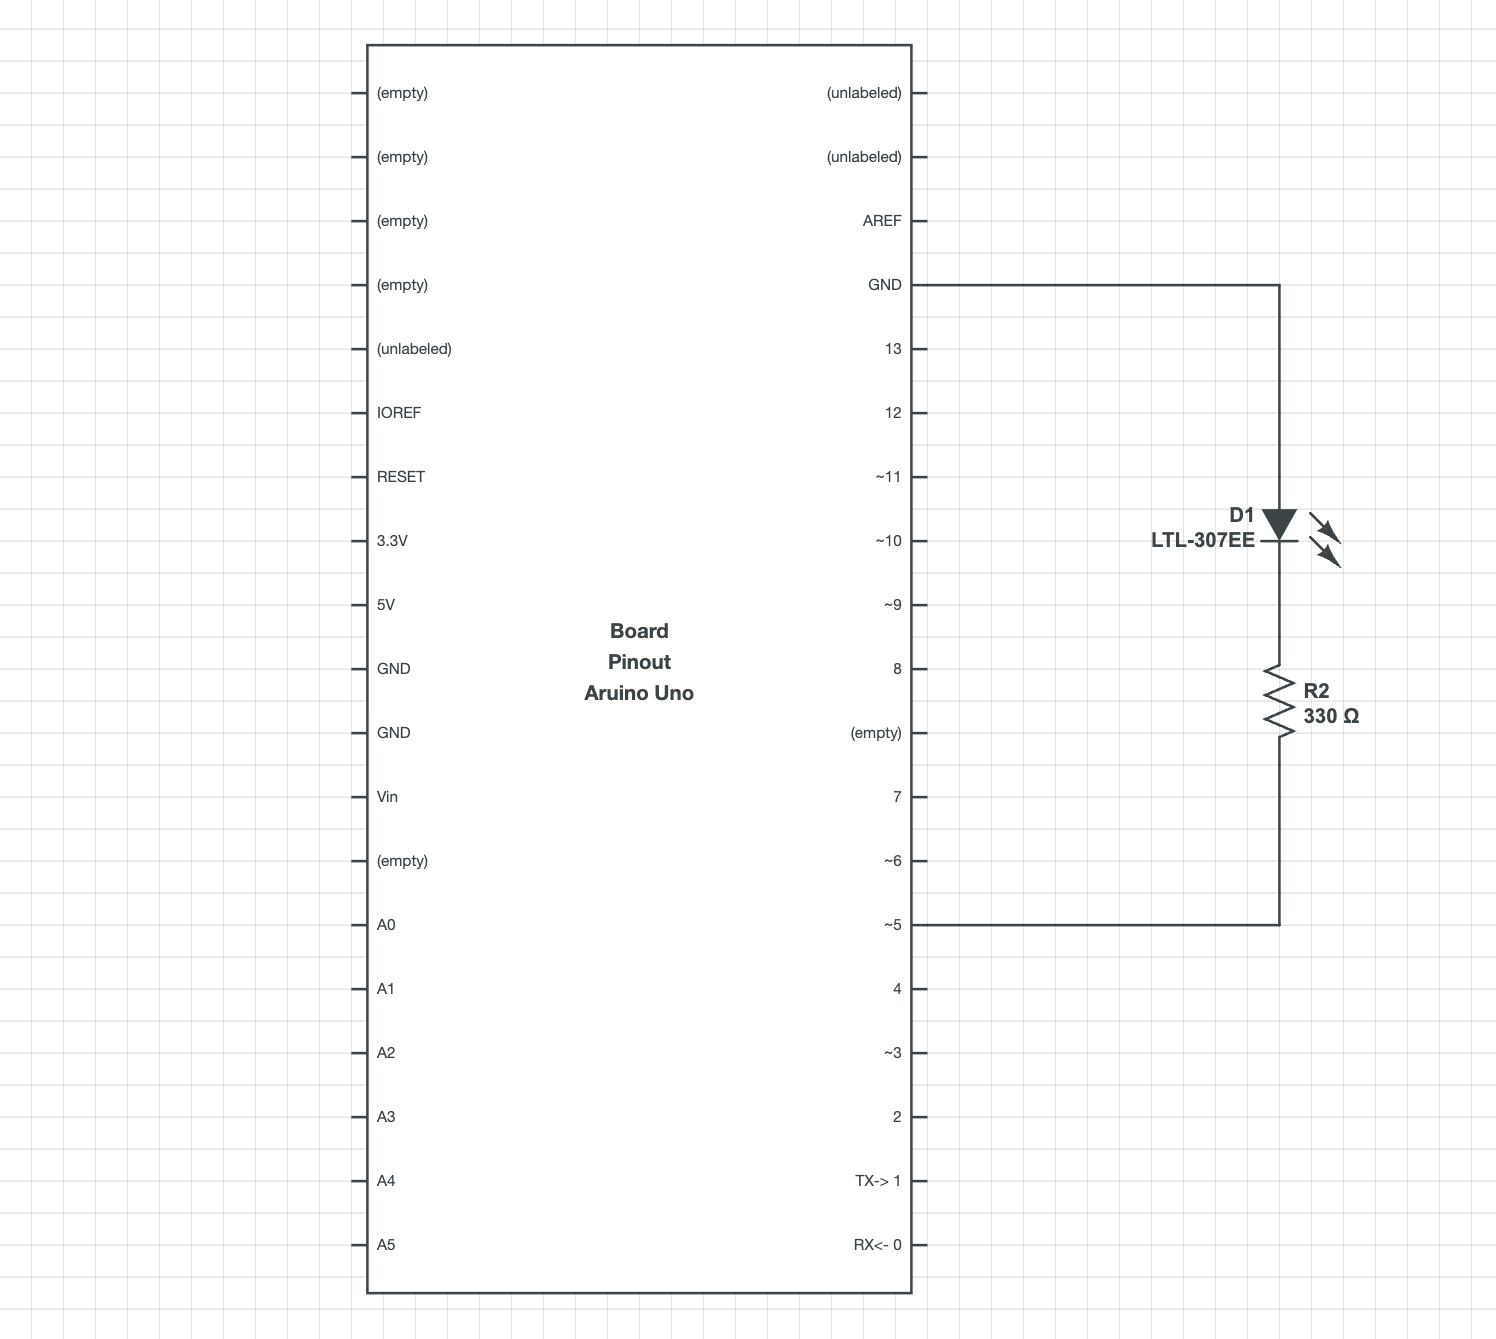
The corresponding breadboard is shown below:
[image]
Every time the ball strikes the platform, which occurs with the increment of the bounce counter, the program inside the p5js sketch sends “H” signals to the arduino. The Arduino then receives the H signals and activates the LED. The duration and distance variables in our Arduino code return the sound wave travel time in microseconds and the distance is the duration divided by two, respectively. The distance is next transmitted to the p5js sketch, which receives it as “indata” in p5js. A portion of the code is displayed below:
void loop() {
  if (Serial.available() > 0) { // see if there's incoming serial data
    incomingByte = Serial.read(); // read it
    //Serial.println(incomingByte);
    if (incomingByte == 'H') {    // if it's a capital H (ASCII 72),
      digitalWrite(LED, HIGH); // turn on the LED
      delay(100);
      digitalWrite(LED, LOW);
    }
  }
  //Clears the trigPin condition
  digitalWrite(trigPin, LOW);
  delayMicroseconds(2);
  // Sets the trigPin HIGH (ACTIVE) for 10 microseconds
  digitalWrite(trigPin, HIGH);
  delayMicroseconds(10);
  digitalWrite(trigPin, LOW);
  // Reads the echoPin, returns the sound wave travel time in microseconds
  duration = pulseIn(echoPin, HIGH);
  // Calculating the distance
  distance = duration * 0.034 / 2; // Speed of sound wave divided by 2 (go and back)
  // Displays the distance on the Serial Monitor
  Serial.write(distance);
  //delay(1);
}
Finally, a demo of the final product is shown below:
(The images and videos of this post were lost with one of our colleagues phone that got damaged in water and never recovered.)
Pauline, Fuad, and Phoebe